| Esp | Eng |
|---|---|
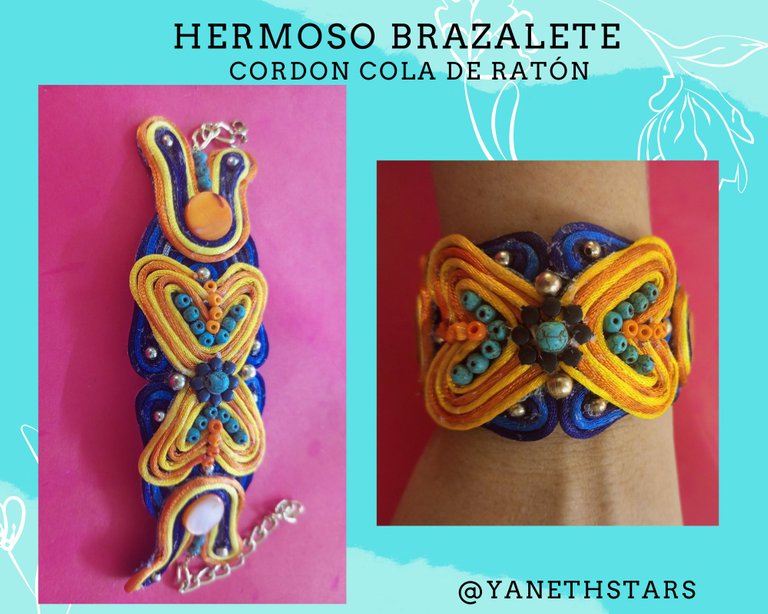
| Mi propuesta para hoy es esté Lindo brazalete de cordón cola de ratón. Es un diseño hecho con el material cordón cola de ratón que es un material muy versátil y económico, pero en mí opinión cuando se usa en este tipo de trabajo, es un poco complicado ya que el proceso de pegado con silicón es algo engorroso y hay que tener extremo cuidado para que quede el trabajo limpio y prolijo. A continuación les presento la lista de materiales que utilicé y el procedimiento. Espero que les guste y disfruten mi post. | My proposal for today is this Cute mouse tail cord bracelet. It is a design made with mouse tail cord material which is a very versatile and economical material, but in my opinion when used in this type of work, it is a bit complicated because the process of gluing with silicone is somewhat cumbersome and you have to be extremely careful so that the work is clean and neat. Here is the list of materials I used and the procedure. I hope you like it and enjoy my post. |

| Materiales : | Materials: |
|---|---|
| Cordón cola de ratón diferentes colores: azul oscuro, azul claro, gris, anaranjado, amarillo claro, y un amarillo un poco más intenso, balines color plata de diferentes tamaño, canutillos azul turquesa, canutillos anaranjados, tachas negras, dos piezas redondas planas anaranjadas, alambre de bisutería, cadenas 2 piezas de 5 cm aproximados de largo, 1 argolla, 1 trancadero, silicón liquido, tela de jeans, 1 creyón para marcar las piezas en la tela de jeans, papel blanco, pinzas de bisutería, tijera. | Mouse tail cord in different colors: dark blue, light blue, gray, orange, light yellow, and a slightly more intense yellow, silver colored balls of different sizes, turquoise blue beads, orange beads, black studs, two flat orange round pieces, costume jewelry wire, chains, 2 pieces of approximately 5 cm long, 1 ring, 1 ring, 1 locking ring, liquid silicone, jeans fabric, 1 crayon to mark the pieces on the jeans fabric, white paper, costume jewelry tweezers, scissors. |

| Instrucciones: | Instructions: |
|---|
| Paso 1 | Step 1 |
|---|---|
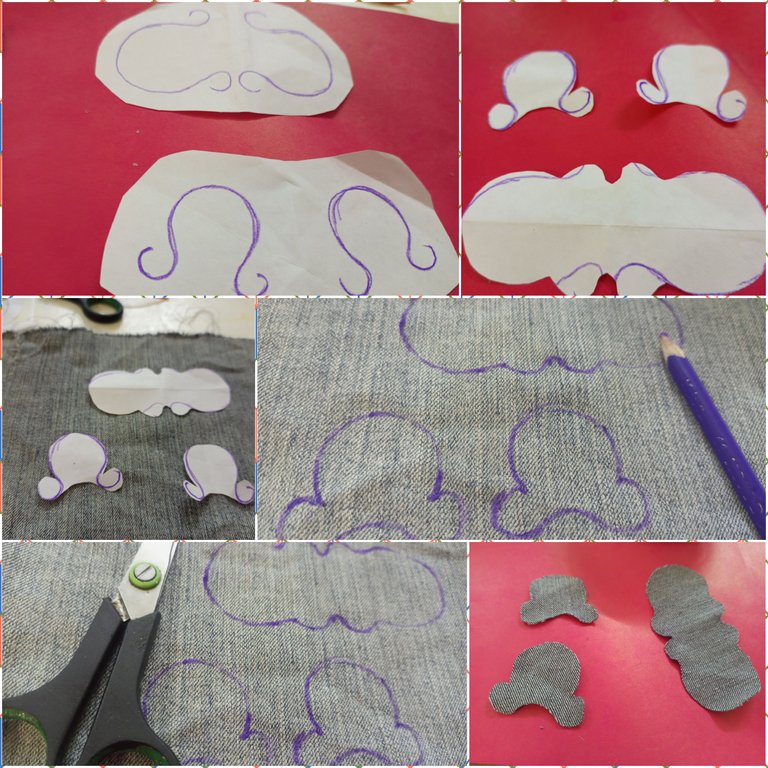
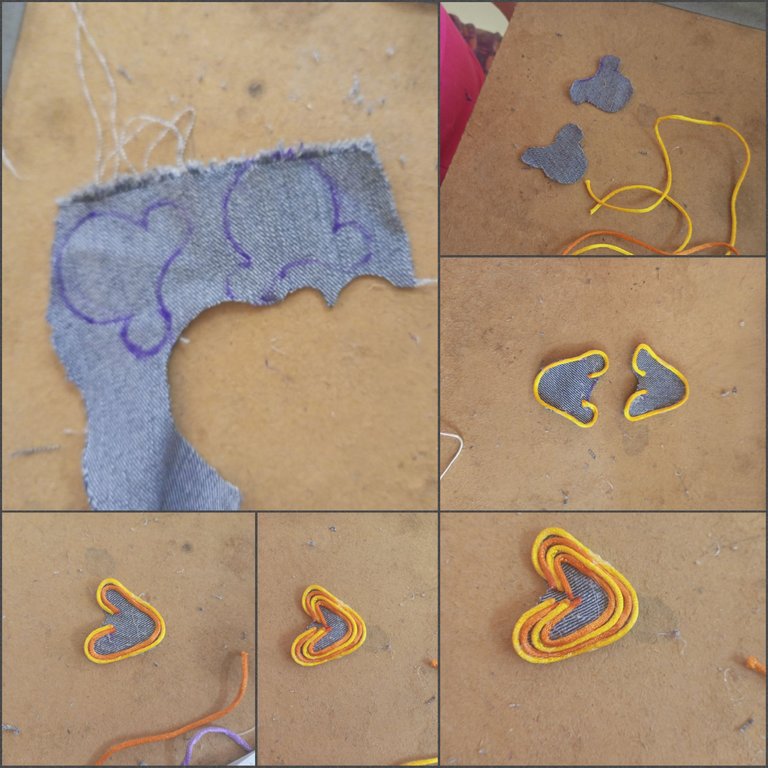
| Pinte en una hoja blanca las piezas que hare para tener una idea del diseño que quiero hacer. Recorte con tijeras, luego transferi a la tela remarcando con un color oscuro, y luego recorte las piezas que usaré. 1 pieza central y dos laterales. | I painted on a white sheet the pieces I will make to get an idea of the design I want to do. Cut out with scissors, then transfer to the fabric, highlighting with a dark color, and then cut out the pieces I will use. 1 center piece and two side pieces. |
| Paso 2 | Step 2 |
|---|---|
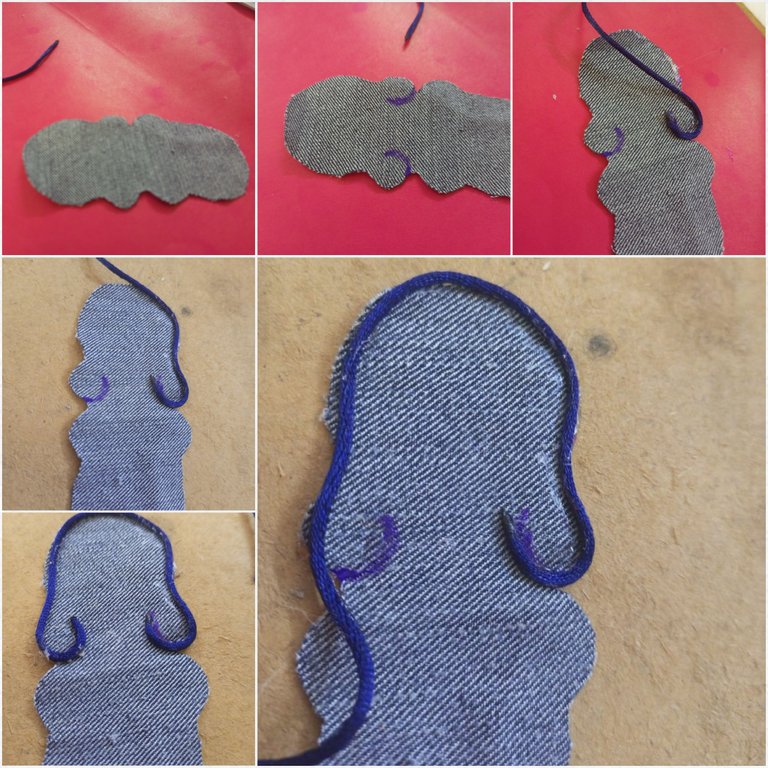
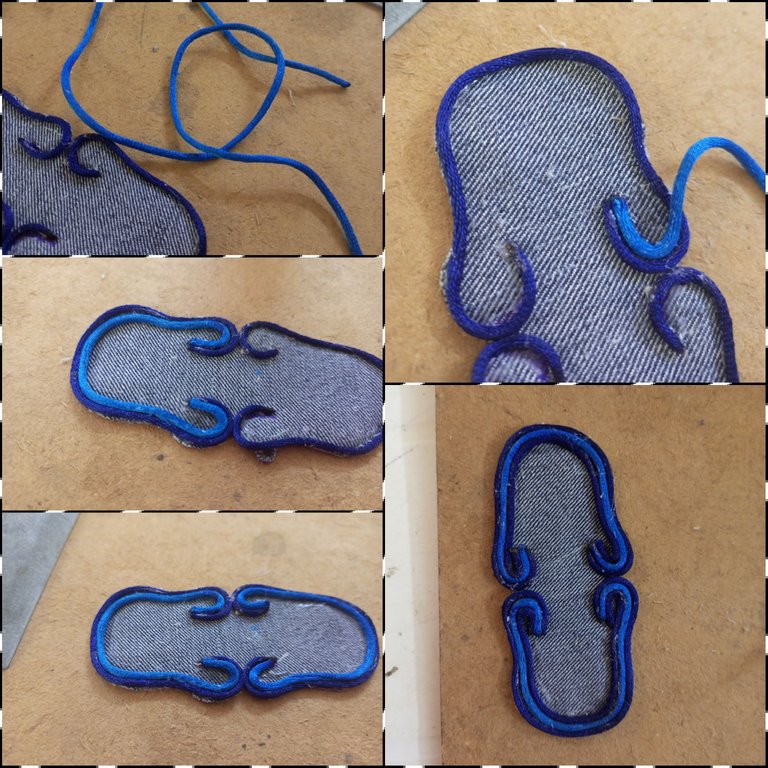
| Comenzaré pegando en la orilla en los lados de la pieza central el cordón azul, queme con un yesquero la punta del cordón. | I will start by gluing the blue cord on the sides of the center piece, burn the tip of the cord with tinder. |
| Paso 3 | Step 3 | |
|---|---|---|
| Pegué el cordón azul en los dos lados de la pieza central. | I glued the blue cord on both sides of the center piece. | I glued the blue cord on both sides of the center piece. |
| Paso 4 | Step 4 |
|---|---|
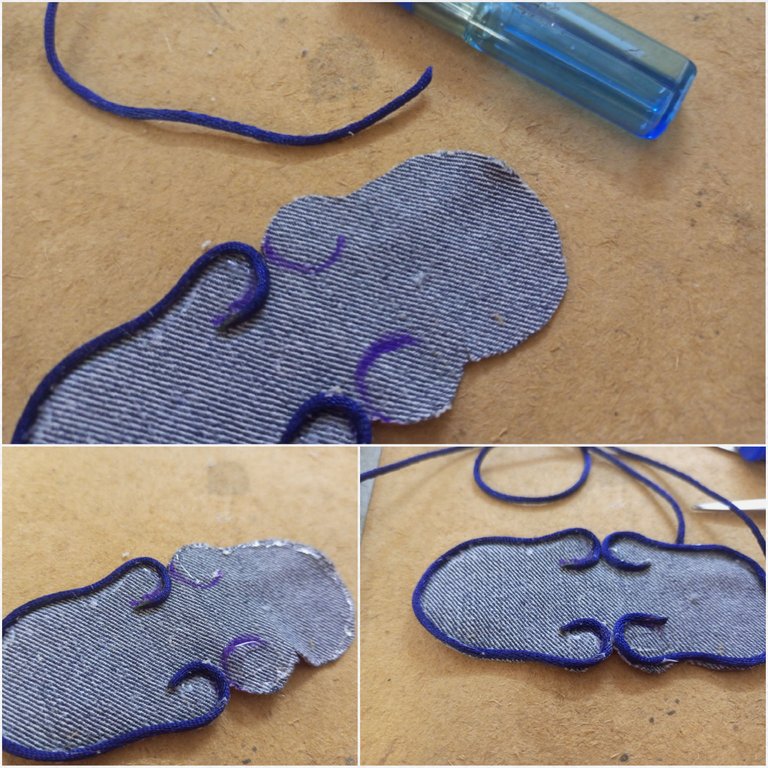
| Pegué el cordón azul claro para continuar con el diseño, observemos la foto. | I glued the light blue cord to continue with the design, let's look at the picture. |
| Paso 5 | Step 5 |
|---|---|
| Luego con el color gris. | Then with the gray color. |

| Paso 6 | Step 6 |
|---|---|
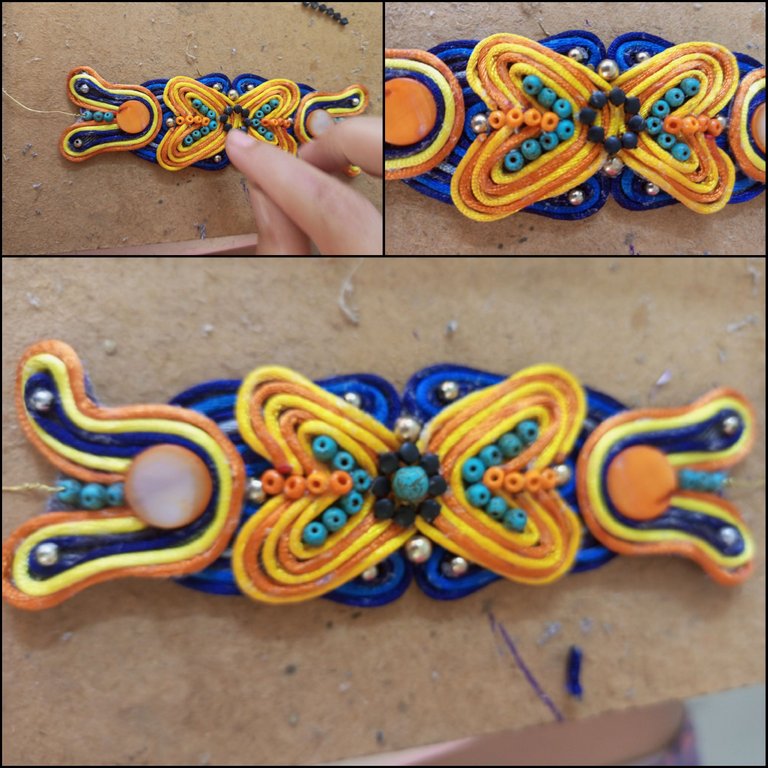
| Intercalando los colores azul claro y oscuro, hasta rellenar la pieza central. | Interspersing the light and dark blue colors, until the central piece is filled. |
| Paso 7 | Step 7 |
|---|---|
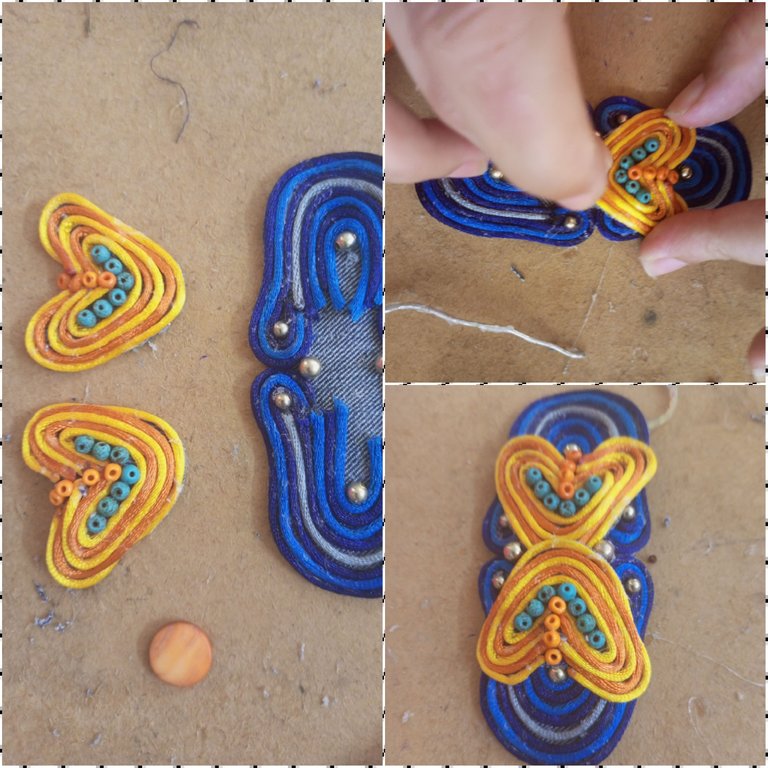
| Pegué balines color plata en los puntos y terminaciones. Observemos la foto. | I glued silver colored pellets in the points and terminations. Let's look at the photo. |
| Paso 8 | Step 8 |
|---|---|
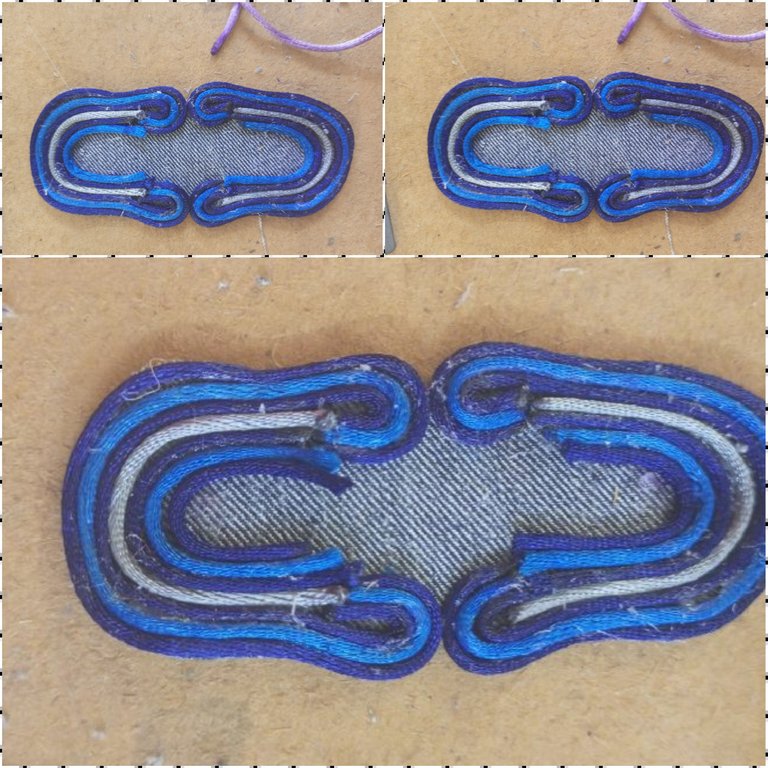
| Corte las otras dos piezas que irán en el centro de la pulsera. Estas dos piezas son del mismo tamaño y forma que la de los laterales. | Cut the other two pieces that will go in the center of the bracelet. These two pieces are the same size and shape as the side pieces. |
| Paso 9 | Step 9 |
|---|---|
| Estas piezas usaré los cordones en la gama de colores amarillos y naranja, fui pegando con silicón en toda la orilla hasta cubrir parte de las piezas. También les pegue canutillos azul turquesa y naranja. | These pieces I will use the cords in the yellow and orange color range, I glued them with silicone all around the edge until I covered part of the pieces. I also glued turquoise blue and orange beads to them. |

| Paso 10 | Step 10 |
|---|---|
| Pegué las piezas sobre la pieza principal con abundante silicón. | I glued the pieces on the main piece with abundant silicone. |
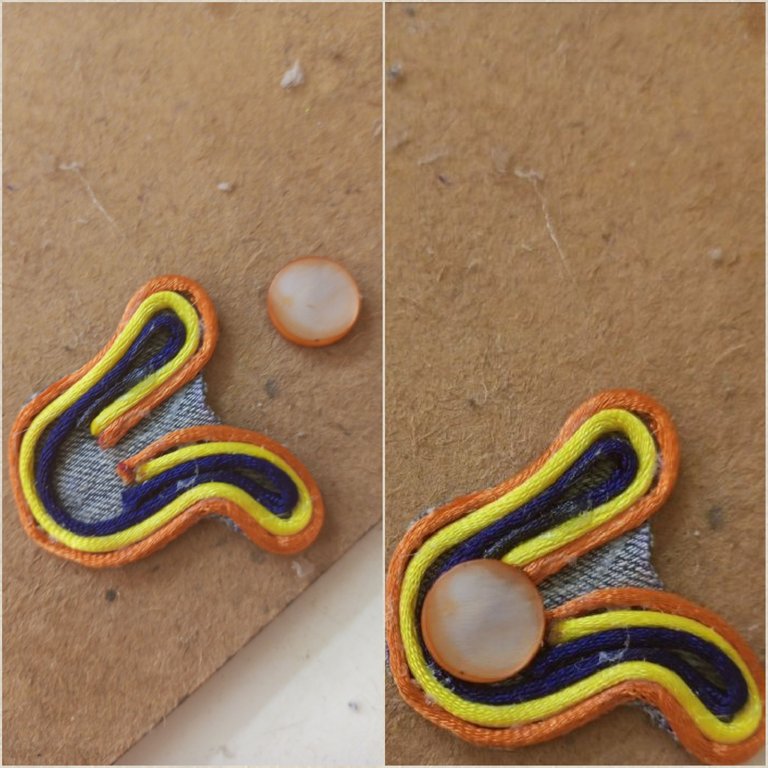
| Paso 11 | Step 11 |
|---|---|
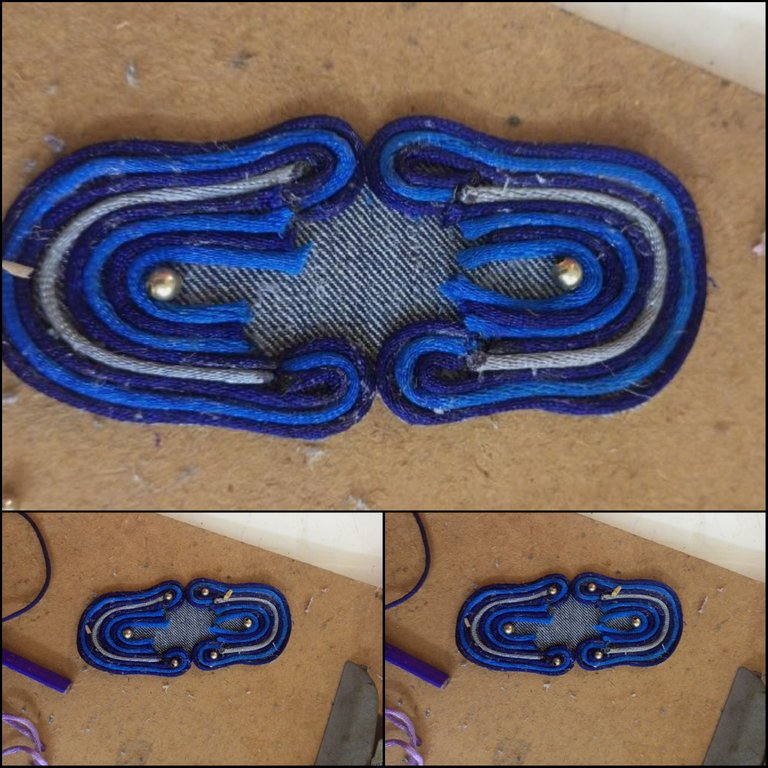
| Para los laterales use el cordón amarillo y anaranjado, y para contrastar y realzar use el azul oscuro, pegando con silicón liquido el cordón a la pieza. | For the sides I used yellow and orange cord, and for contrast and enhancement I used dark blue, gluing the cord to the piece with liquid silicone. |
| Paso 12 | Step 12 |
|---|---|
| Y pegue las piezas redondas planas para tapar las terminaciones de los cordones. | And glue the flat round pieces to cover the ends of the cords. |
| Paso 13 | Step 13 |
|---|---|
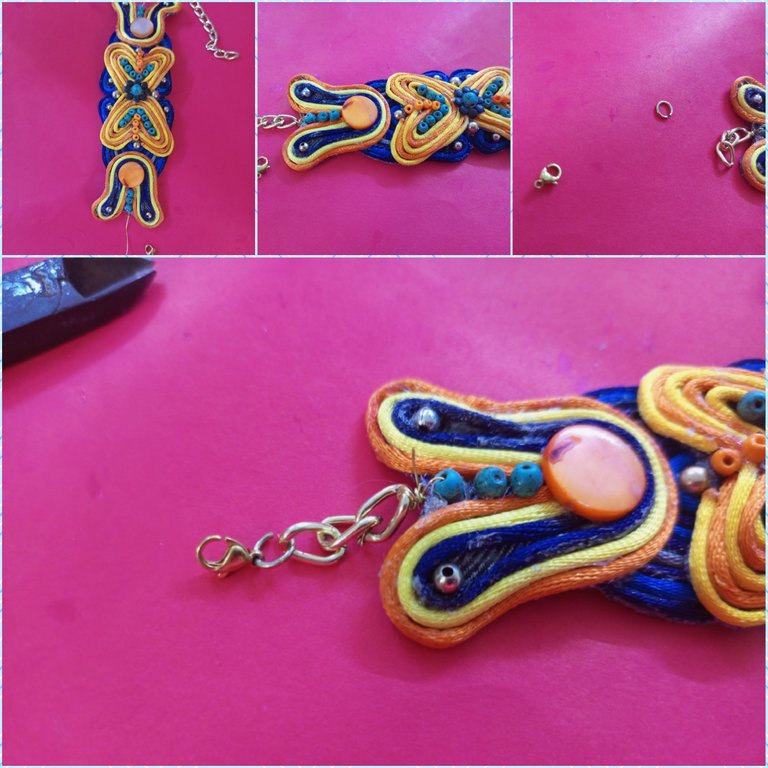
| Para completar y combinar el diseño coloqué canutillos azul turquesa y balines pequeños. E introduje en el último canutillo azul un alambre de bisutería para colocar las cadenas del brazalete. | To complete and combine the design I placed turquoise blue beads and small balls. And I inserted in the last blue bead a costume jewelry wire to place the chains of the bracelet. |
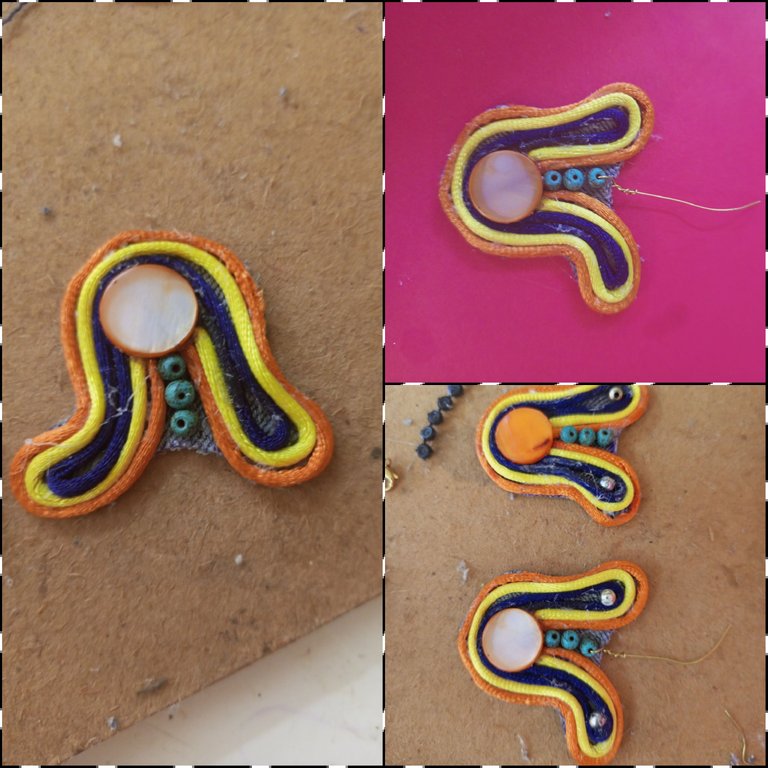
| Paso 14 | Step 14 |
|---|---|
| Pegué los laterales a la pieza principal. Observemos la foto. | I glued the sides to the main piece. Let's look at the photo. |
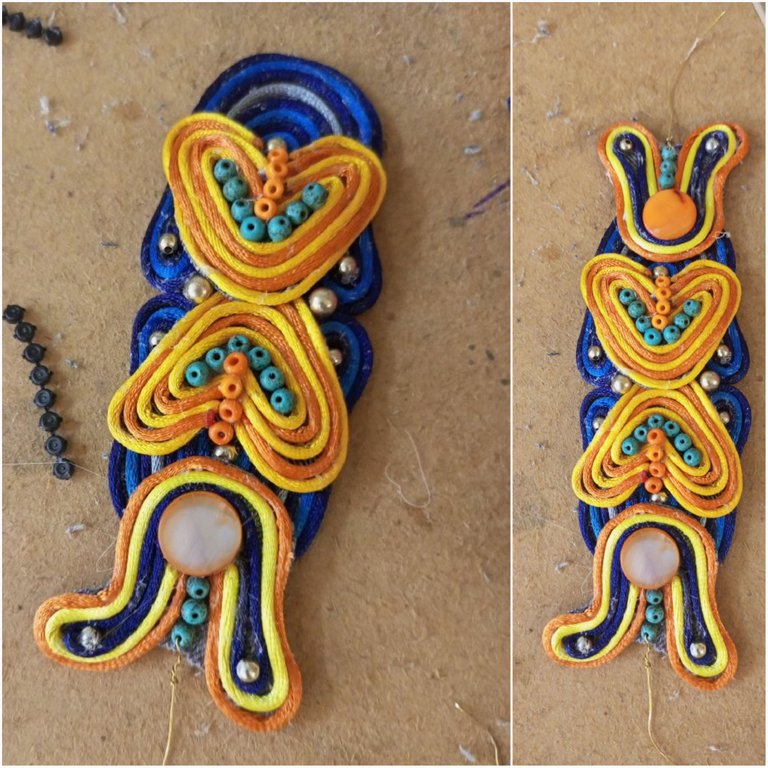
| Paso 15 | Step 15 |
|---|---|
| Coloqué unas tachas negras en forma redonda en el centro de la pulsera y una piedra azul turquesa para realzar el brazalete. | I placed black round studs in the center of the bracelet and a turquoise blue stone to enhance the bracelet. |
| Paso 16 | Step 16 |
|---|---|
| Coloqué las cadenas y el trancadero anudándolas con el alambre de bisutería que introduje. | I placed the chains and the locking device, knotting them with the bijouterie wire that I inserted. |
| Despedida | Farewell |
|---|---|
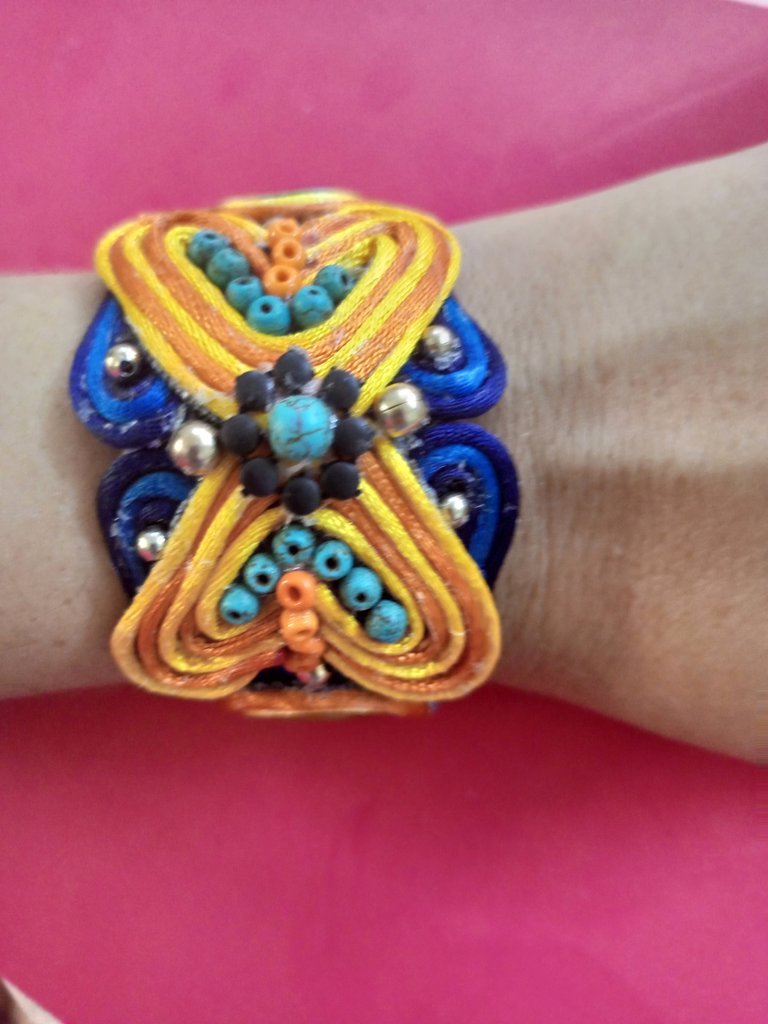
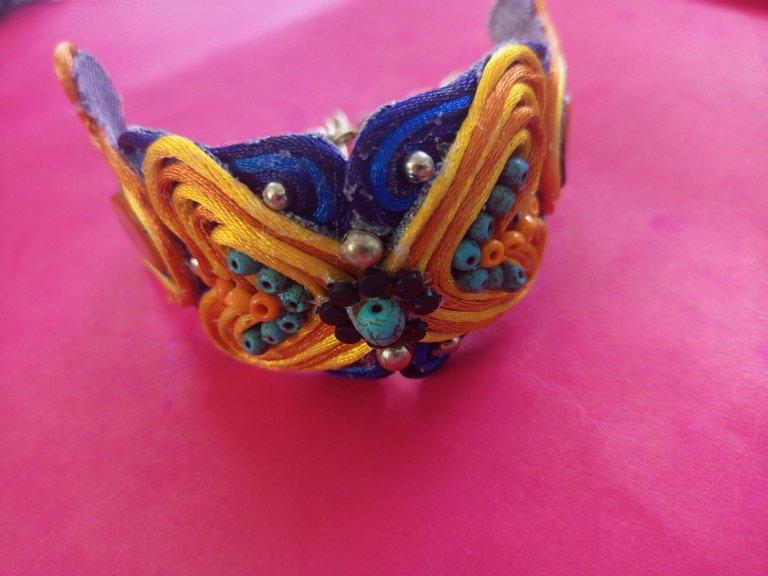
| Y está es mi propuesta de hoy Hermoso y elegante brazalete. Espero que les guste y disfruten de este post. | And this is my proposal for today Beautiful and elegant bracelet. I hope you like it and enjoy this post. |
| Créditos | Credits |
|---|---|
| Traductor: www.DeepL.com/Translator (free version).Las fotos fueron tomadas con mi Celular Tecno Sport 7T. Foto de portada editada con Canva.Banner editado con Canva. . | Translator: www.DeepL.com/Translator (free version).The photos were taken with my Tecno Sport 7T cell phone. Cover photo edited with Canva.Banner edited with Canva. |
The rewards earned on this comment will go directly to the people( @dayadam ) sharing the post on Twitter as long as they are registered with @poshtoken. Sign up at https://hiveposh.com.
Interesante trabajo, muy creativo el diseño, me parece qe está bien bonito✨
Hola, me alegra que te guste. Gracias por visitar mi post. Saludos
Thank you for sharing this post on HIVE!
Your content got selected by our fellow curator jasonmunapasee & you just received a little thank you upvote from us for your great work! Your post will be featured in one of our recurring compilations which are aiming to offer you a stage to widen your audience within the DIY scene of Hive. Stay creative & HIVE ON!
Please vote for our hive witness <3
Gracias curator jasonmunapasee.
@yanethstars muy colorido y hermoso trabajo, muy llamativo , gracias por compartir tu creación, Saludos 😊
Gracias amiga, valoro mucho tu comentario y apoyo a mi post. Saludos.
Un trabajo muy original y llamativo, nos encanta como lo creaste y el resultado obtenido, este brazalete te quedo espectacular 👌, un paso a paso completo genial trabajo 👏
Gracias amigo. Aprecio mucho su cometario.
Que bello @yanethstars, es muy parecido a la técnica del Soutache! Te recomiendo utilizar pinzas, así no llenas los hilos de pega por la parte superior y la pieza te quedará con un mejor acabado...
Hola amiga. Gracias por comentar y por la recomendación. Saludos.
Me encanta el trabajo que haces, creativo, llamativo, colorido e imponente.💕
Felicidades amiga @yanethstars. Mil éxitos para ti...✨
!PIZZA
Hola amiga @dayadam, gracias por tu apoyo a mi post. Me alegra mucho que te guste.
I gifted $PIZZA slices here:
@dayadam(2/5) tipped @yanethstars (x1)
Learn more at https://hive.pizza!
Me dio mucha curiosidad saber cómo creaste ese diseño por eso accedí al post, muy interesante el proceso de elaboración, gracias por compartir.