| Esp | Eng |
|---|---|
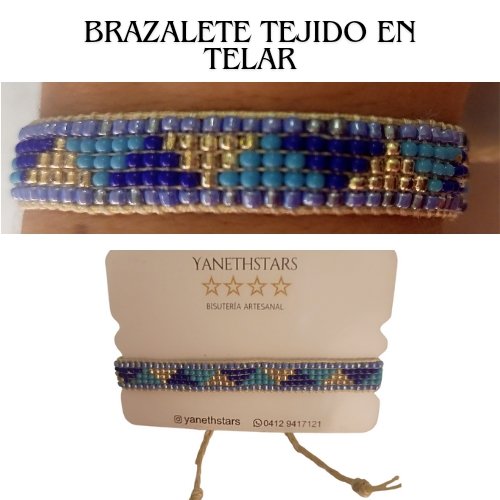
| Hola queridos amigos de está linda y creativa comunidad, hoy traigo éste LINDO BRAZALETE TEJIDO EN TELAR. Es un lindo y elegante brazalete hecho en telar. A continuación les comparto el paso a paso y la lista de materiales. Espero disfruten mi post tanto como yo. | Hello dear friends of this beautiful and creative community, today I bring you this NICE BRAZALET WOVEN IN FABRIC. This is a nice and elegant bracelet made in loom. Below I share with you the step by step and the list of materials. I hope you enjoy my post as much as I do. |
| Materiales: | Materials: |
|---|---|
| Hilo para mostacillas beige, hilo chino beige, aguja mostacillera, mostacillas: azul claro, azul marino, azul claro metalizado, plateadas, telar, tijeras, yesquero. | Beige beading thread, beige Chinese thread, beige beading needle, beads: light blue, navy blue, metallic light blue, silver, loom, scissors, tinder. |

| Instrucciones: | Instructions: |
|---|
| Paso 1 | Step 1 |
|---|---|
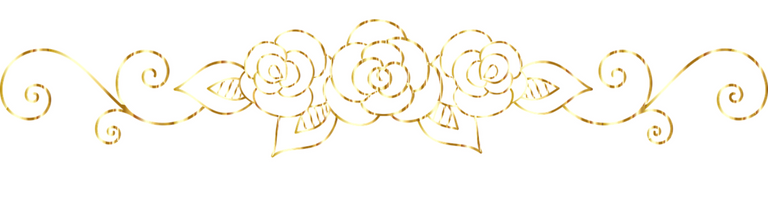
| El primer paso es montar en el telar los hilos para hacer la estructura del brazalete y comenzar a tejer, cortarnos 1 metro de hilo chino beige, lo colocamos en los dos el telar, guardando 5 espacios de las mostacillas del telar, esto es con la intención de dar mayor fuerza y mejor estetica y presencia a nuestro brazalete. | The first step is to mount on the loom the threads to make the structure of the bracelet and begin to weave, cut 1 meter of beige Chinese thread, we place it in the two loom, keeping 5 spaces of the loom beads, this is with the intention of giving greater strength and better aesthetics and presence to our bracelet. |

| Paso 2 | Step 2 |
|---|---|
| El brazalete que haremos es de 5 filas, por lo que montaremos en nuestro telar 4 filas de hilo para mostacillas, para eso utilizaremos aproximado 3 metros de hilo. Observemos como se ve el hilo montado en el telar. | The bracelet that we will make is of 5 rows, so we will mount in our loom 4 rows of thread for beads, for that we will use approximately 3 meters of thread. Let's see how the thread looks mounted on the loom. |
| Paso 3 | Step 3 |
|---|---|
| El siguiente paso es enhebrar 2 metros de hilo para mostacillas en la aguja. Para trabajar más cómodo y no se enrede el hilo podemos enhebrar solo 1 metro, y cuando se agote el hilo, lo que debemos hacer es entre meter el hilo en las mostacillas hacia atrás, cortar y quemar el excedente de hilo y comenzar a tejer con el hilo nuevo en dos o tres líneas atrás, primero entre metiendo el hilo en las mostacillas de atras. | The next step is to thread 2 meters of bead thread on the needle. To work more comfortable and not tangle the thread we can thread only 1 meter, and when the thread runs out, what we must do is between putting the thread in the beads backwards, cut and burn the excess thread and begin to weave with the new thread in two or three lines back, first between putting the thread in the beads backwards. |

| Paso 4 | Step 4 |
|---|---|
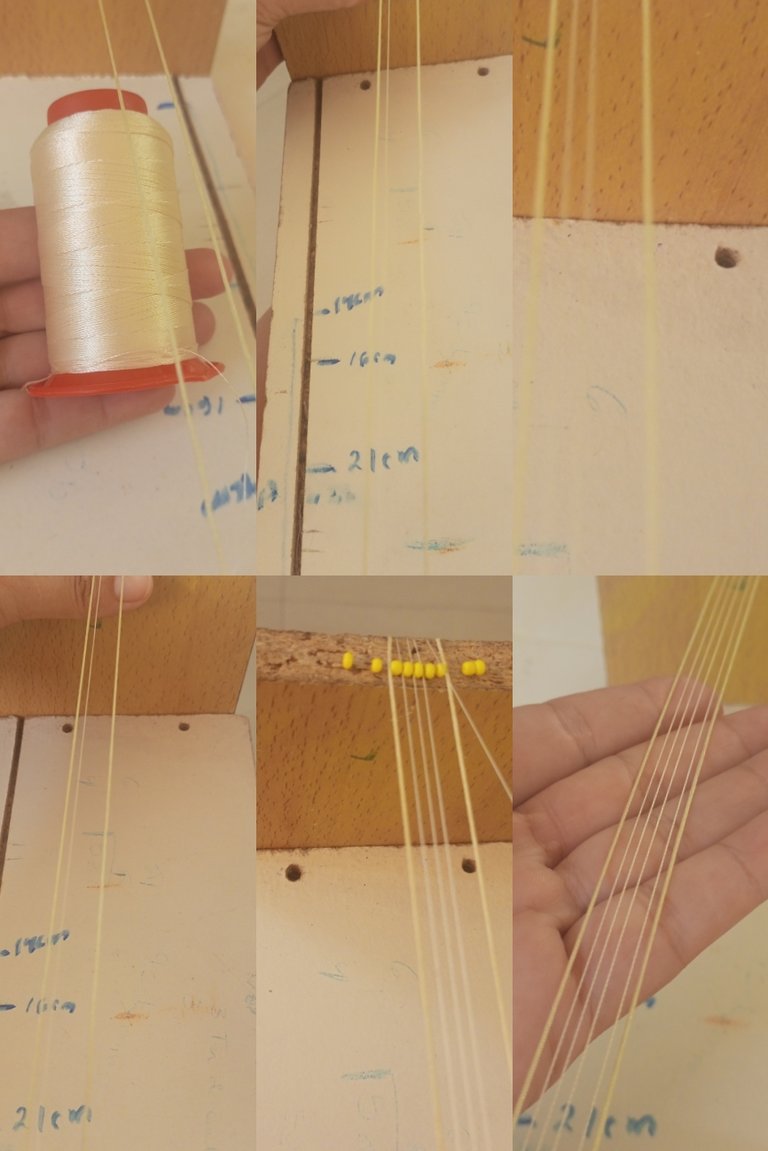
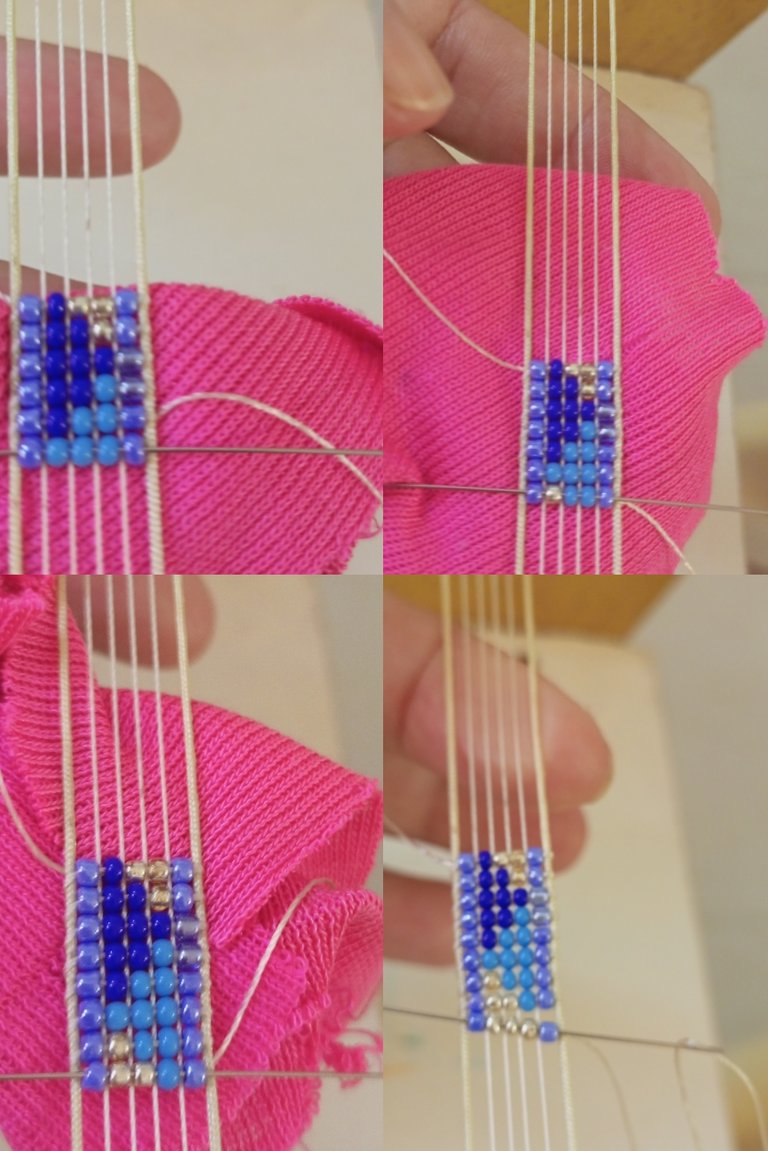
| Comenzaremos a tejer, en la aguja introducimos las mostacillas en el orden que observamos en la foto. Colocamos la aguja con las mostacillas por debajo de los hilos del telar, sacamos la aguja y aseguramos que cada mostacilla quedé acomodada en cada espacio, y volvemos a meter la aguja por las mostacillas por arriba, cuidando tomar también los hilos del telar. Debemos ser cuidadosos en estos pasos, y lograr que todos los hilos queden pisado con el hilo, de lo contrario las mostacillas quedarán sueltas. | We will begin to weave, in the needle we introduce the beads in the needle in the order that we observe in the photo. We place the needle with the beads under the loom threads, we take out the needle and make sure that each bead is placed in each space, and we put the needle back through the beads from above, taking care to also take the loom threads. We must be careful in these steps, and make sure that all the threads are stepped with the thread, otherwise the beads will be loose. |

| Paso 5 | Step 5 |
|---|---|
| En la imagen anterior observamos la primera línea, seguimos en las imagenes siguiente construyendo con la misma técnica las otras lineas del diseño, que son triangulos de diferentes colores en la gama de colores: azules y plateados. Observamos el primer cuadro en color azul marino y las lineas de los lados en color azul bebé metalizado. | In the previous image we observe the first line, we continue in the following images building with the same technique the other lines of the design, which are triangles of different colors in the range of colors: blue and silver. We observe the first square in navy blue and the lines of the sides in metallic baby blue. |
| Paso 6 | Step 6 |
|---|---|
| En la siguiente imagen vemos el siguiente triángulo invertido en color azul cielo. | In the following image we can see the following inverted triangle in sky blue color. |
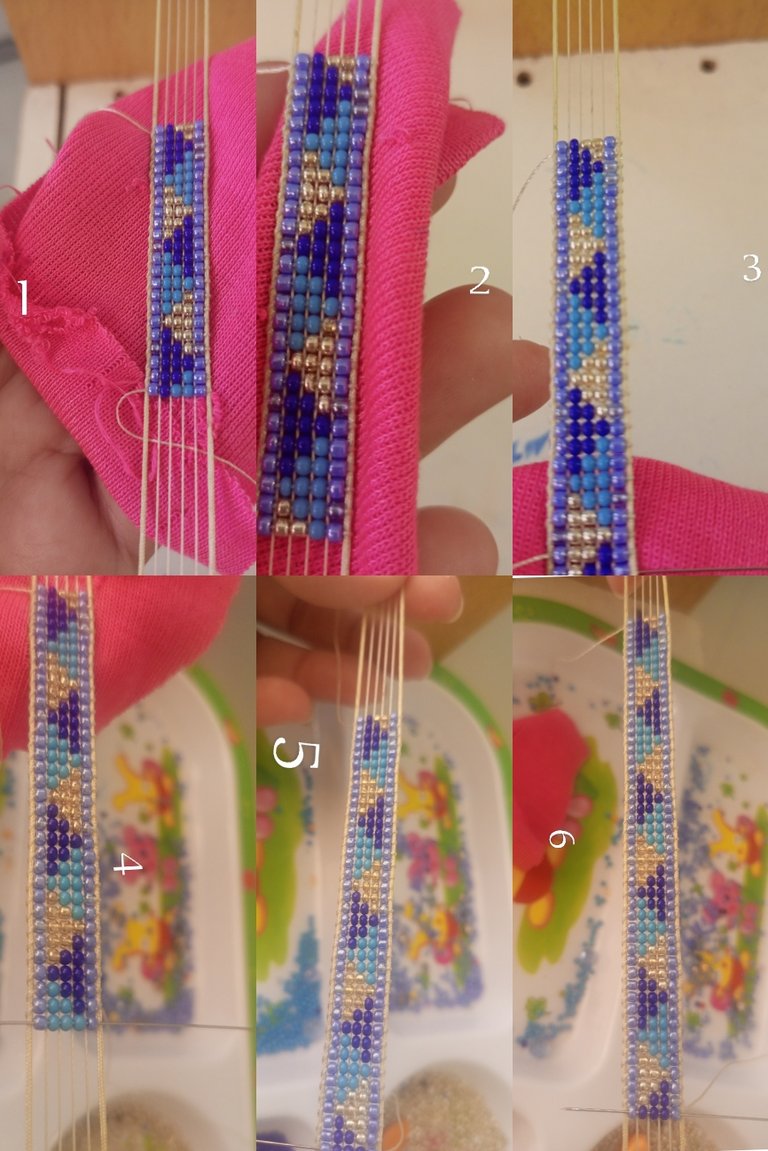
| Paso 7 | Step 7 |
|---|---|
| En la siguiente imagen observamos el tercer triángulo en color plateado, con esto culminamos el patrón, ya que es un triángulo en color azul marino, otro en color azul cielo y el otro en plateado para comenzar a volver a repetir. Recordando que se invierten la posición de los triángulos. | In the following image we observe the third triangle in silver color, with this we finish the pattern, since it is a triangle in navy blue color, another one in sky blue color and the other one in silver color to start repeating again. Remembering that the position of the triangles is inverted. |

| Paso 8 | Step 8 |
|---|---|
| En las siguientes imagenes observamos el segundo esquema de tres triangulos, ya llevamos 6 triángulos. | In the following images we observe the second scheme of three triangles, we already have 6 triangles. |

| Paso 9 | Step 9 |
|---|---|
| En las imágenes observamos el proceso del desarrollo del brazalete, hasta el triángulo número 15. | The images show the development process of the bracelet, up to triangle number 15. |
| Paso 10 | Step 10 |
|---|---|
| El brazalete es de 20 triangulos. | The bracelet is made of 20 triangles. |
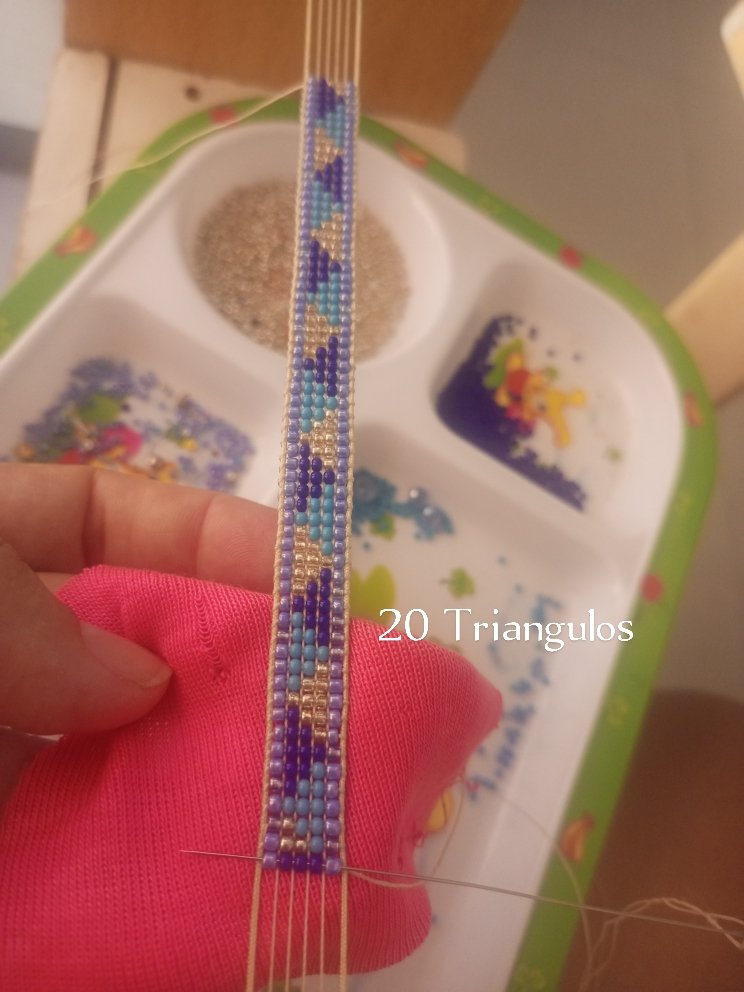
| Paso 11 | Step 11 |
|---|---|
| Hice las terminaciones reduciendo de 2 mostacillas en cada línea, y como es de pocas lineas, es una de tres mostacillas y luego una. | I made the terminations reducing of 2 beads in each line, and as it is of few lines, it is one of three beads and then one of three beads. |

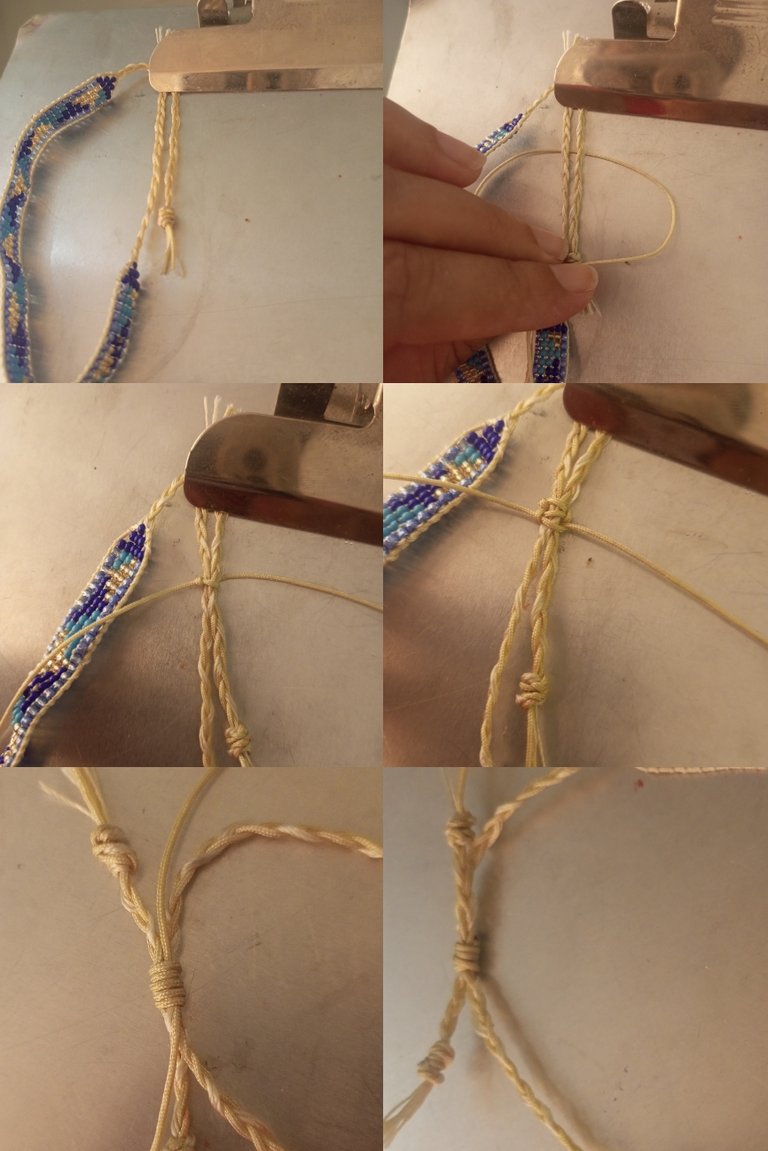
| Paso 12 | Step 12 |
|---|---|
| En este paso baje de un lado del telar los hilos del brazalete, para que no se tensen los hilos y no se deforme el brazalete, el hilo excedente lo devolví hacia atras entretejiendo en las mostacillas de atras, corté y queme el hilo excedente. Teji los hilos en una trenza de tres. Repetí el proceso del otro lado. | In this step I lowered the threads of the bracelet from one side of the loom, so that the threads are not stretched and the bracelet is not deformed, the excess thread I returned it backwards weaving in the back beads, I cut and burned the excess thread. I wove the threads in a braid of three. I repeated the process on the other side. |


| Paso 13 | Step 13 |
|---|---|
| Lista la manilla del brazalete ahora haremos el trancadero, que será en nudos planos en macramé. | The bracelet's handle is ready, now we will make the bracelet's handle with flat macramé knots. |
| Despedida | Farewell |
|---|---|
| Y está es mi propuesta del día de hoy LINDO BRAZALETE TEJIDO EN TELAR. Un post hecho con amor, espero les guste y disfruten mi post. | And this is my proposal for today NICE BRACELET WOVEN IN LOOM. A post made with love, I hope you like it and enjoy my post. |


| Créditos | Credits |
|---|---|
| Traductor: www.DeepL.com/Translator (free version).Las fotos fueron tomadas con mi Celular Tecno Sport 7T. Foto de portada editada con Canva y PhotoRoom Banner editado con Canva. Patron: https://images.app.goo.gl/nDWEaoLxKGnokedKA. | Translator: www.DeepL.com/Translator (free version).The photos were taken with my Tecno Sport 7T cell phone. Cover photo edited with Canva y PhotoRoom. Banner edited with Canva. Patron: https://images.app.goo.gl/nDWEaoLxKGnokedKA |
A delicate and complex job with an excellent result. I love the bracelet, the design is very elegant and practical to combine with almost any outfit.
Thank you, I am very pleased that it was to your liking. And I appreciate your support for my work. Best regards 🤗
A beautiful bracelet, we love the design you have brought, how beautiful the colors and the contrast they give. Good job 👍
Thank you. I am glad that my work is to your liking. And grateful for the support.
Que lindo trabajo amiga, se ve súper bien 😉
Gracias amiga, agradezco el apoyo a mi trabajo. Saludos 🤗