
| Esp | Eng |
|---|---|
| Hola amigos de nuestra laboriosa y creativa comunidad, agradecida de Dios por este espacio donde podemos compartir nuestro trabajo. En está oportunidad traigo para ustedes este LINDO COLLAR AJUSTABLE. Les cuento que hace unos días una amiga me presenta dos pedazos de cordones en cuerina, uno media 70 cm y el otro 30 cm, y me pide le haga un collar, sinceramente hice varios intentos para ver que podia hacer con ese material, pero no eran lo suficientemente largos para hacer un collar, pero realmente complacerla y que se sintiera felíz. Después de tanto medir e intertar varias opciones, se me ocurrió hacer un collar ajustable, que es un collar práctico, muy fácil y rápido de hacer, su elaboración no presenta mayores obstáculos, y su dueña lo puede usar de varias maneras, corto o un poco más largo. A continuación les comparto el paso a paso y la lista de materiales. | Hello friends of our industrious and creative community, grateful to God for this space where we can share our work. In this opportunity I bring for you this NICE ADJUSTABLE NECKLACE. I tell you that a few days ago a friend presented me with two pieces of leather cords, one is 70 cm and the other 30 cm, and asked me to make her a necklace, sincerely I made several attempts to see what I could do with that material, but they were not long enough to make a necklace, but really please her and make her feel happy. After so much measuring and trying several options, I came up with the idea of making an adjustable necklace, which is a practical necklace, very easy and quick to make, its elaboration presents no major obstacles, and its owner can wear it in several ways, short or a little longer. Here is the step by step and the materials list. |
| Materiales: | Materials: |
|---|---|
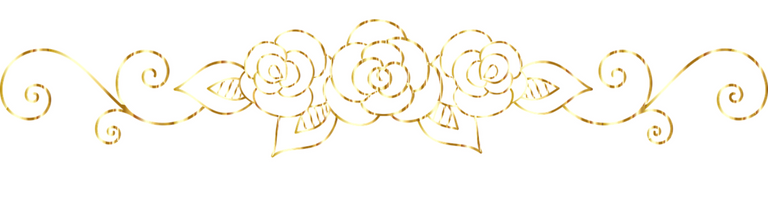
| Cordón de cuero negro 1 metro , 6 piedras con orificios grandes, yesquero, 1 carpeta con gancho, tijeras. | Black leather cord 1 meter, 6 stones with large holes, tinderbox, 1 folder with hook. |
| Instrucciones: | Instructions: |
|---|
| Paso 1 | Step 1 |
|---|---|
| El primer paso es cortar el cordón de 70 cm y doblarlo a la mitad. Los 30 cm lo reservaremos para usarlo cuando corresponda. En el medio haremos un nudo y sujetaremos con el gancho de una carpeta para que se mantenga firme, mientras trabajamos. | The first step is to cut the 70 cm cord and fold it in half. The 30 cm will be reserved for use when appropriate. In the middle we will tie a knot and fasten it with the hook of a folder to keep it firm while we work. |

| Paso 2 | Step 2 |
|---|---|
| Del cordón sobrante cortaremos 20 cm de cordon. | From the excess cord we will cut 20 cm of cord. |

| Paso 3 | Step 3 |
|---|---|
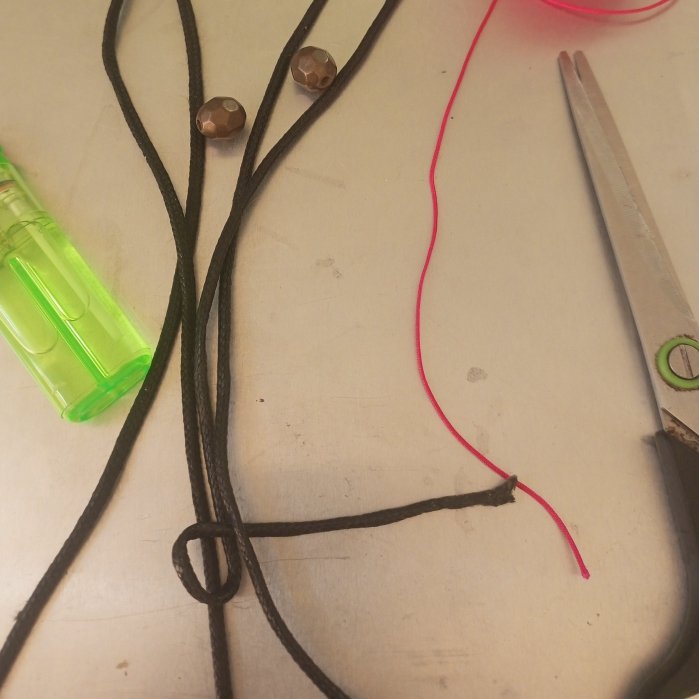
| Colocaremos esté hilo de 20 centímetros debajo de los dos hilos que están sujetos con la carpeta. | We will place this 20 centimeter thread under the two threads that are fastened with the binder. |

| Paso 4 | Step 4 |
|---|---|
| Trabajaremos con un nudo inicial en macrame, un solo punto. | We will work with an initial knot in macrame, a single stitch. |

| Paso 5 | Step 5 |
|---|---|
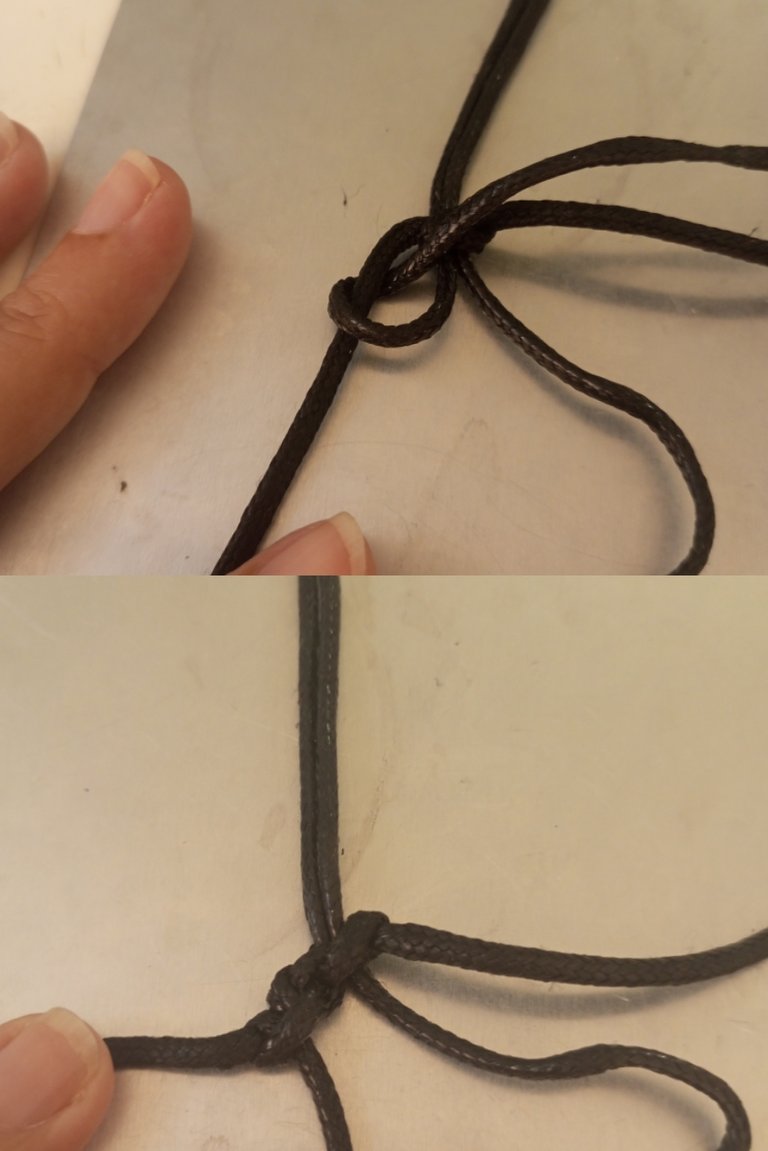
| Realizaremos 2 nudos macrame planos de un solo lado. En la foto observamos los dos nudos. | We will make 2 flat macrame knots on one side only. In the photo you can see the two knots. |
| Paso 6 | Step 6 |
|---|---|
| Haremos en el otro hilo dos nudos planos iguales de un solo lado. | We will make two equal one-sided flat knots on the other thread. |
| Paso 7 | Step 7 |
|---|---|
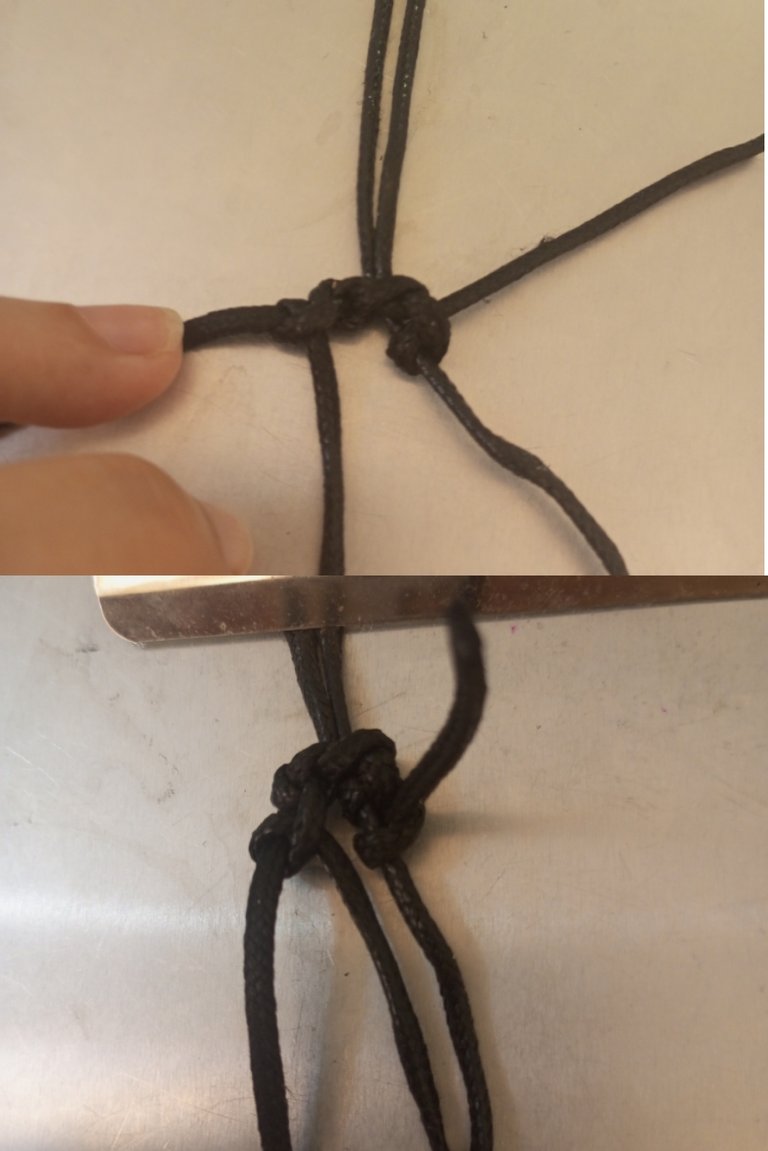
| Nos queda los dos nudos excedentes de cada lado, con esos nudos haré un nudo plano en el medio, , y el centro nos quedé de adorno central del collar. Quemamos con el yesquero las puntas excedentes, le damos forma o acomodamos un poco los nudos para que quede más estético y bonito. | We are left with the two excess knots on each side, with these knots I will make a flat knot in the middle, and the center will remain as a central ornament of the necklace. We burn with the tinder the excess ends, we shape or arrange the knots a little to make it more aesthetic and beautiful. |

| Paso 8 | Step 8 |
|---|---|
| Trabajaremos con las dos puntas de abajo, debemos introducir abalorios, piedras o hacer nudos para que no se salgan los cordones y se deshaga el nudo principal. Yo introduje unas piedras doradas, una en cada cordón y quemé las puntas con el yesquero, como el cordon es grueso no es necesario hacer nudo con solo quemar y presionar un poco sellamos para que no se salga. | We will work with the two bottom ends, we must introduce beads, stones or make knots so that the cords do not come off and undo the main knot. I introduced some golden stones, one in each cord and burned the ends with the tinder, as the cord is thick it is not necessary to make a knot just burn and press a little to seal the knot so it does not come out. |


| Paso 9 | Step 9 |
|---|---|
| Trabajaremos con los cordones largos del collar. Este collar es muy sencillo pero elegante, para agregar un poco más de personalidad y belleza, introduje en cada lado una piedra igual a las de abajo, pero hice primero un nudo sencillo para que no se rueden hacía abajo. | We will work with the long strands of the necklace. This necklace is very simple but elegant, to add a little more personality and beauty, I inserted on each side a stone just like the ones below, but I made a simple knot first so that they do not roll down. |

| Paso 10 | Step 10 |
|---|---|
| En el siguiente paso cerré el collar con un nudo corredizo, para eso utilicé un cordón de 15 cm de largo, el nudo que hice fue un nudo franciscano de 3 vueltas, quemé con un yesquero las puntas y sellé muy bien. | In the next step I closed the necklace with a slip knot, for that I used a 15 cm long cord, the knot I made was a Franciscan knot of 3 turns, I burned the ends with a tinder and sealed very well. |

| Paso 11 | Step 11 |
|---|---|
| Introduje en las puntas 1 piedra en cada lado igualmente quemé con el yesquero y sellé para que no se salgan las piedras. | I inserted 1 stone on each side into the points, burned them with the tinder and sealed them so that the stones would not come out. |

| Despedida | Farewell |
|---|---|
| Y está es mi propuesta del día de hoy LINDO COLLAR AJUSTABLE. Un post hecho con amor, espero les guste y disfruten mi post. | And this is my proposal for today CUTE ADJUSTABLE NECKLACE. A post made with love, I hope you like it and enjoy my post. |


| Créditos | Credits |
|---|---|
| Traductor: www.DeepL.com/Translator (free version).Las fotos fueron tomadas con mi Celular Tecno Sport 7T. Foto de portada editada con Canva y PhotoRoom Banner editado con Canva. Patron: https://images.app.goo.gl/nDWEaoLxKGnokedKA. | Translator: www.DeepL.com/Translator (free version).The photos were taken with my Tecno Sport 7T cell phone. Cover photo edited with Canva y PhotoRoom. Banner edited with Canva. Patron: https://images.app.goo.gl/nDWEaoLxKGnokedKA |
Muy lindo el modelo de collar, gracias por compartir este tutorial 😉 que tengas un excelente día!
Gracias a ti amiga por visitar mi post. Igual que tengas excelente día. Saludos 🤗
You can query your personal balance by
!DIYSTATSThank you for your support of my post.
Me encanto este diseño que nos traes, muy creativo, elegante, con colores y materiales que van conmigo a la perfección. Gracias por regalarnos tu paso a paso. Saludos bella...
!DIY
Gracias @dayadam por visitar mi post. Si sencillo y fácil para hacer con cualquier material.
Hola , muy bonito, elegante y sencillo tu collar
Gracias amiga. 🤗