![]()
| Esp | Eng |
|---|---|
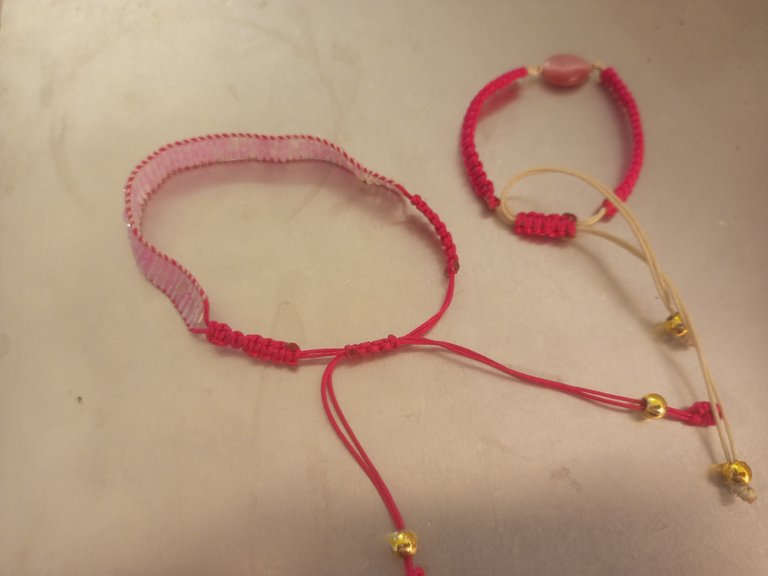
| Hola a todos amigos creativos de está linda comunidad de Jewelry, hoy traigo está hermosa y elegante propuestaLINDO SET DE BRAZALETES. Esté estilo de brazalete es muy lindo y coqueto, una pieza que podemos usarlos juntos o separados, también uno de los más comerciales ya que a mis clientes les encanta y me lo piden muchisimo. A continuación nuestra lista de materiales. | Hello to all creative friends of this beautiful Jewelry community, today I bring you this beautiful and elegant proposalNICE SET OF BRACELETS. This style of bracelet is very cute and flirty, a piece that can be used together or separately, also one of the most commercial since my customers love it and ask me a lot. Here is our list of materials. |
| Materiales: | Materials: |
|---|---|
| Telar, hilo chino beige y fucsia, hilo para mostacilla en color beige, canutillos rosados, 4 balines medida mediana,1 conector (yo use una piedra) alambre para bisuterías,tijeras, yesquero, pinzas y tenazas. | Loom, beige and fuchsia Chinese thread, beige beads, pink beads, 4 medium-sized balls, 1 connector (I used a stone), jewelry wire, scissors, tinder, tweezers and pliers.. |

| Instrucciones: | Instructions: |
|---|
| Paso 1 | Step 1 |
|---|---|
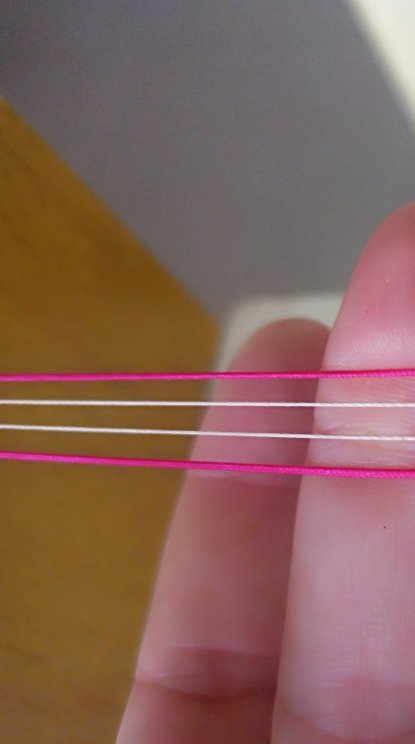
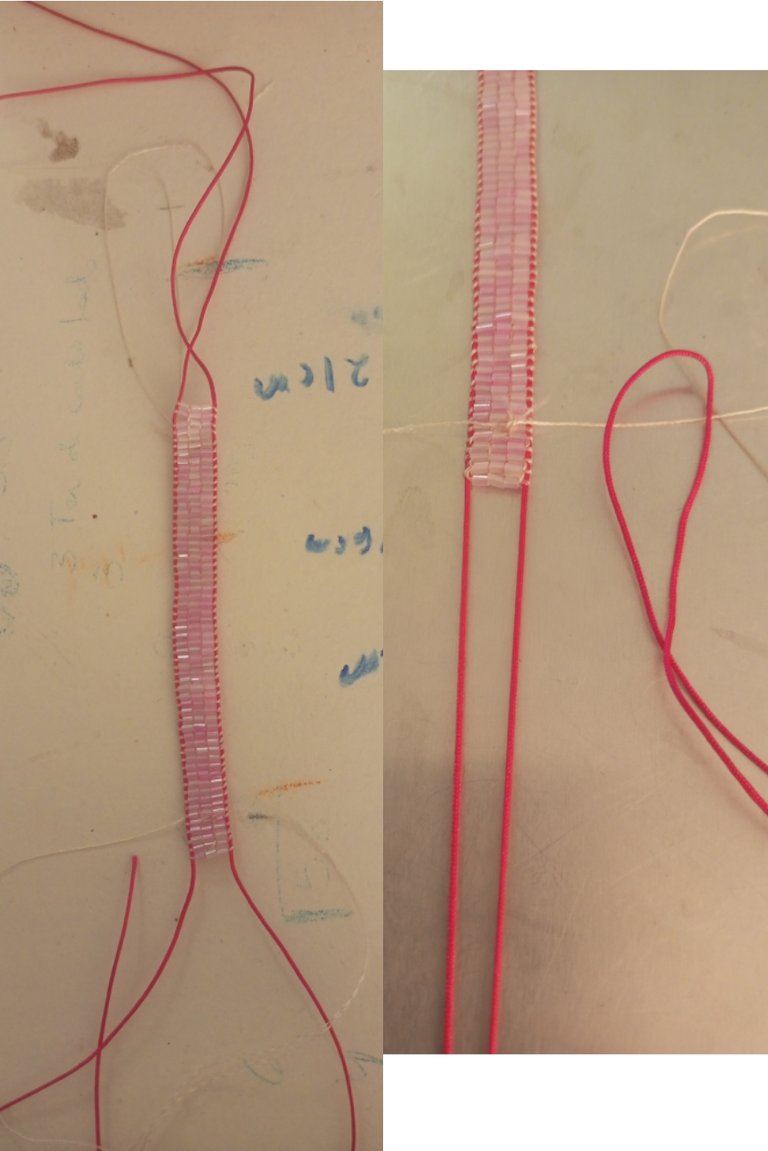
| Lo primero que haremos es montar los hilos en el telar para realizar la estructura de la primera pulsera. La haremos de 4 filas. Los hilos laterales los coloqué en color fucsia y en hilo chino para que aporte más firmeza a nuestra pulsera, ya que esté hilo es más grueso que el hilo para mostacillas. Las otras dos filas las coloqué en hilo para mostacilla en color beige. | The first thing we will do is to mount the threads on the loom to make the structure of the first bracelet. We will make it in 4 rows. The lateral threads I placed them in fuchsia color and in Chinese thread to give more firmness to our bracelet, since this thread is thicker than the thread for beads. The other two rows I placed them in beige mustard thread. |
| Paso 2 | Step 2 |
|---|---|
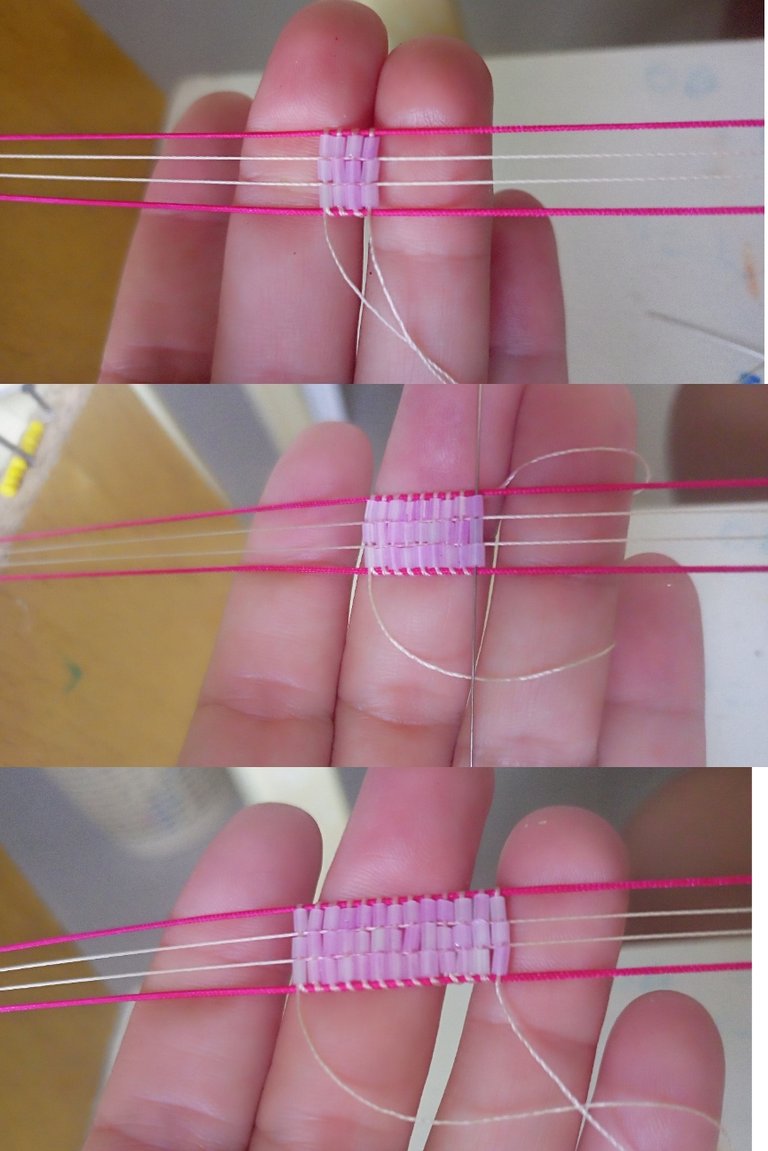
| Enhebre 2 metros de hilos en las mostacillas y comencé a tejer con los canutillos, introduzco 4 canutillos en la aguja, y luego los canutillos hasta el final del hilo, pongo los canutillos por debajo de los hilos del telar, e introduzco la aguja nuevamente por los canutillos, cuidando que los hilos del telar queden por debajo del hilo. Este paso es importante cuidarlo para que no queden canutillos sueltos, esto deformaría nuestra pulsera. | I thread 2 meters of threads in the beads and start weaving with the beads, I introduce 4 beads in the needle, and I weave the beads until the end of the thread, I put the beads under the loom threads, and I introduce the needle again through the beads, taking care that the loom threads are under the thread. It is important to take care of this step so that there are no loose beads, this would deform our bracelet. |
| Paso 3 | Step 3 |
|---|---|
| En la siguiente foto observamos el desarrollo del tejido de la pulsera. | In the following photo we can see the development of the bracelet weaving. |
| Paso 4 | Step 4 |
|---|---|
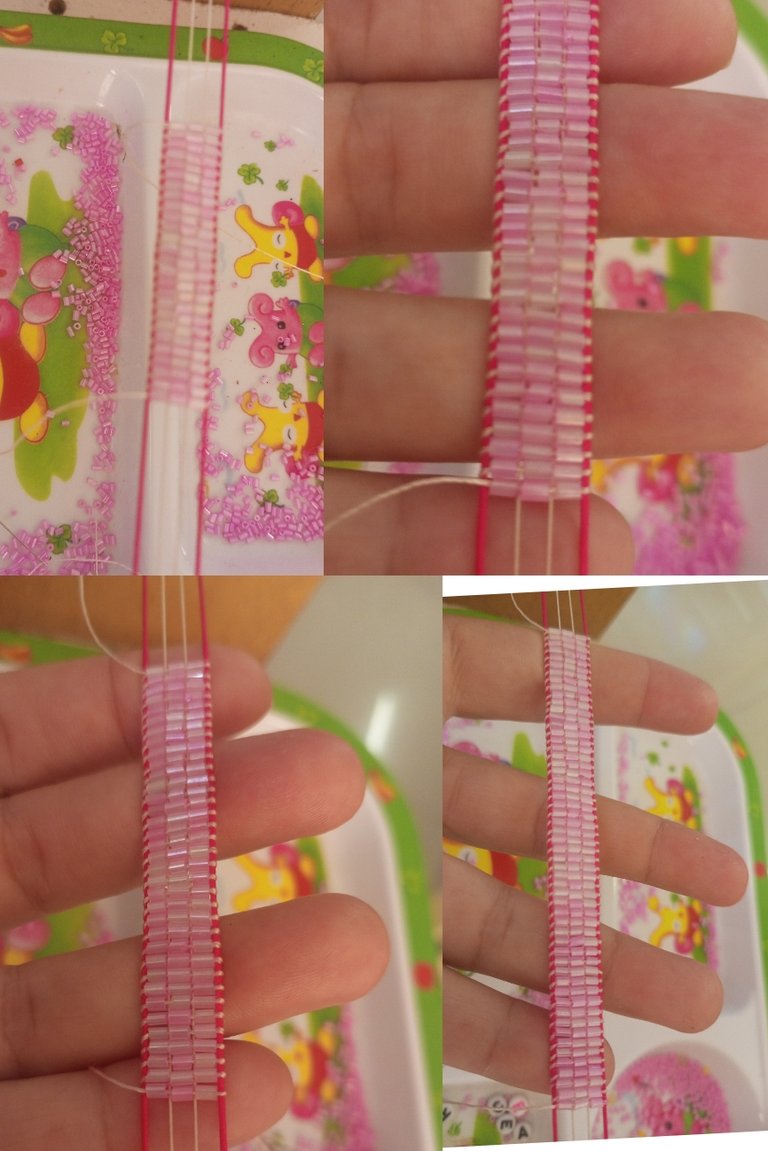
| Tejí 55 columnas, aproximadamente 15 cm. | I knit 55 columns, approximately 15 cm. |

| Paso 5 | Step 5 |
|---|---|
| Bajé la pulsera del telar cortando los hilos. Las terminaciones las hice recta. Y la manilla la haré en nudos macramé, para eso corté 2 hilos chinos en color fucsia de 30 cm cada uno | I lowered the bracelet from the loom by cutting the threads. I made the ends straight. And I will make the handle in macramé knots, for that I cut 2 Chinese threads in fuchsia color of 30 cm each.. |
| Paso 6 | Step 6 |
|---|---|
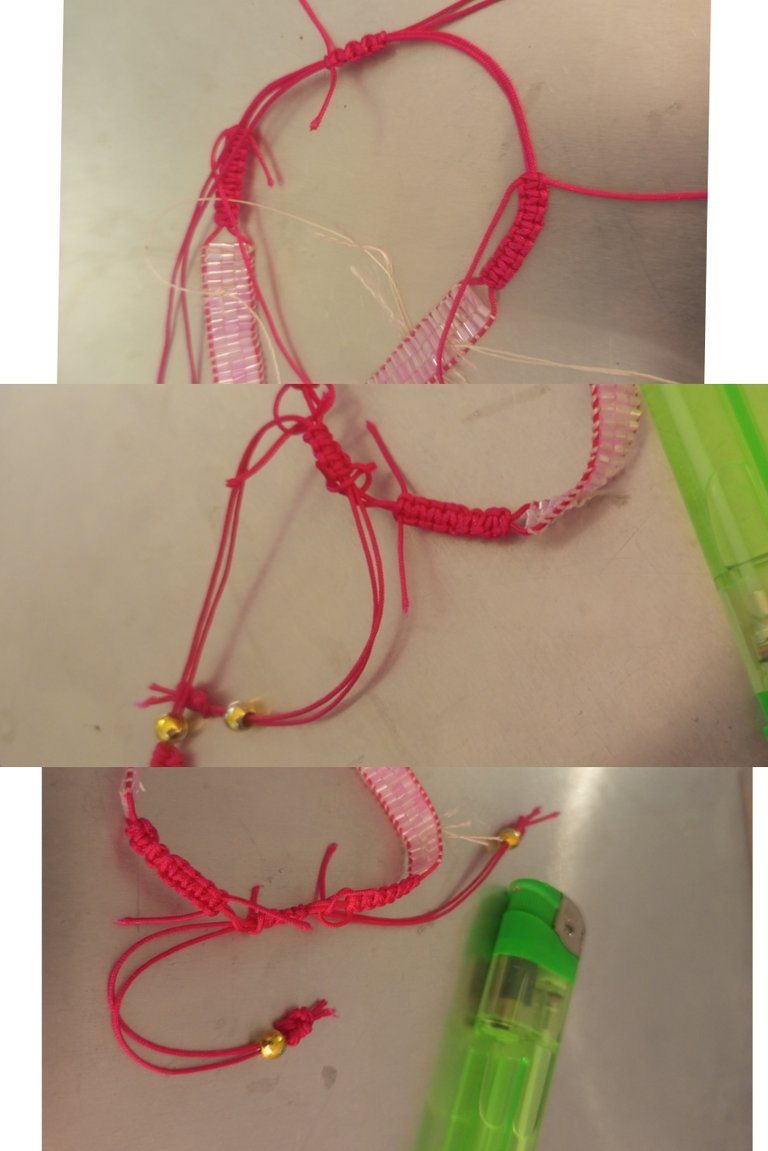
| Realicé 20 nudos planos. Y repetí el procedimiento del otro lado. | I made 20 flat knots. And repeated the procedure on the other side. |


| Paso 7 | Step 7 |
|---|---|
| Corté un hilo chino fucsia de 15 cm. Con una carpeta con gancho presione y uni los cuatro hilos de la manilla, y la cerre haciendo 10 nudos planos. | I cut a 15 cm fuchsia Chinese thread. With a hook binder I pressed and joined the four threads of the handle, and closed it by making 10 flat knots. |

| Paso 8 | Step 8 |
|---|---|
| Introduje balines en los hilos de cada lado, corté y quemé el hilo excedente. | I inserted pellets into the threads on each side, cut and burned the excess thread. |
| Paso 9 | Step 9 |
|---|---|
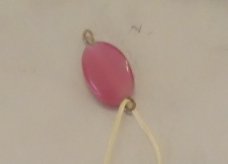
| Para la siguiente pulsera necesitamos un conector, sino tenemos uno podemos hacerlo. El que yo uso en esta pulsera lo hice, con un poco de alambre lo introduje en el orificio de la piedra e hice dos ojales ayudando con una pinza. | For the next bracelet we need a connector, if we don't have one we can make it. The one I use in this bracelet I made it, with a little wire I introduced it in the hole of the stone and made two eyelets with the help of a plier.. |
| Paso 10 | Step 10 |
|---|---|
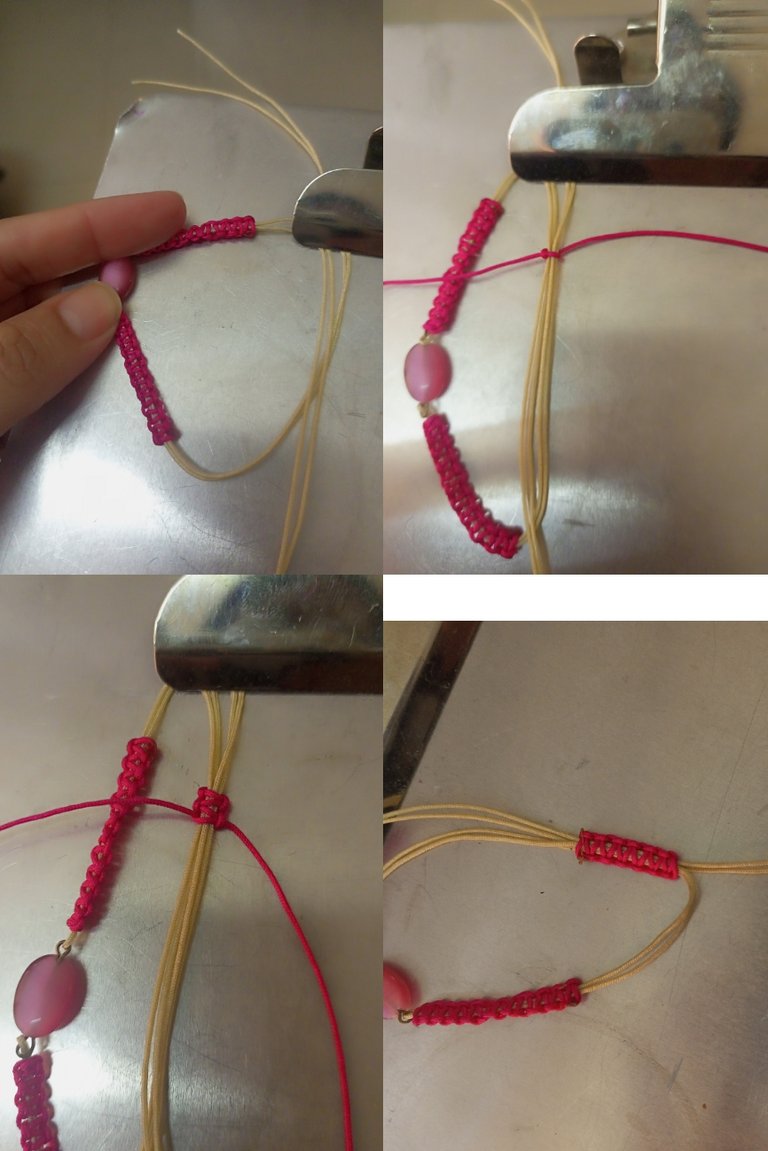
| Corté un hilo chino en color beige de 15 cm aproximado, introduje en el ojal del conector. Sujeté con el gancho de una carpeta. | I cut a Chinese thread in beige color of approximately 15 cm, I inserted it in the eyelet of the connector. I fastened with the hook of a folder. |

| Paso 11 | Step 11 |
|---|---|
| Corté 50 cm de hilo fucsia y comencé a tejer nudos planos macramé aproximado 30 nudos. Repetí todo el proceso en el otro lado de la manilla. | I cut 50 cm of fuchsia thread and started weaving in flat macramé knots, approximately 30 knots. I repeated the whole process on the other side of the handle. |

| Paso 12 | Step 12 |
|---|---|
| Sujeté los 4 hilos de la manilla con una carpeta con gancho. Corté 15 cm aproximado de hilo fucsia y tejí 10 nudos planos macramé que me servirán de trancadero. Corté y quemé el hilo excedente. | I fastened the 4 threads of the handle with a hook binder. I cut approximately 15 cm of fuchsia thread and wove 10 flat macramé knots that will serve as a handle. I cut and burned the excess thread. |
| Paso 13 | Step 13 |
|---|---|
| Introduje balines en cada lado e hice un nudo franciscano, corté y quemé el excedente del hilo. | I inserted pellets on each side and tied a Franciscan knot, cut and burned the excess thread. |


| Despedida | Farewell |
|---|---|
| Y está es mi propuesta del día de hoy LINDO SET DE BRAZALETES. Un post hecho con amor, espero les guste y disfruten mi post. | And this is my proposal for today NICE SET OF BRACELETS. A post made with love, I hope you like it and enjoy my post. |


| Créditos | Credits |
|---|---|
| Traductor: www.DeepL.com/Translator (free version).Las fotos fueron tomadas con mi Celular Tecno Sport 7T. Foto de portada editada con Canva y PhotoRoom Banner editado con Canva. Patron: https://images.app.goo.gl/nDWEaoLxKGnokedKA. | Translator: www.DeepL.com/Translator (free version).The photos were taken with my Tecno Sport 7T cell phone. Cover photo edited with Canva y PhotoRoom. Banner edited with Canva. Patron: https://images.app.goo.gl/nDWEaoLxKGnokedKA |
Hermosa combinación, nos encanta ver este reportaje de brazaletes tan originales.
Gracias a ustedes hermosa comunidad, por apoyar e incentivar a los creadores. Agradecida y feliz día.
@stevenson7 gracias por apoyar mi trabajo. Saludos 🤗
De nada 🫂
Amiga se ven muy lindos, hiciste excelente trabajo 😊
Hola amiga. Gracias ☺️
Hola muy bonita la pulsera rosa me encantó