
| Esp | Eng |
|---|---|
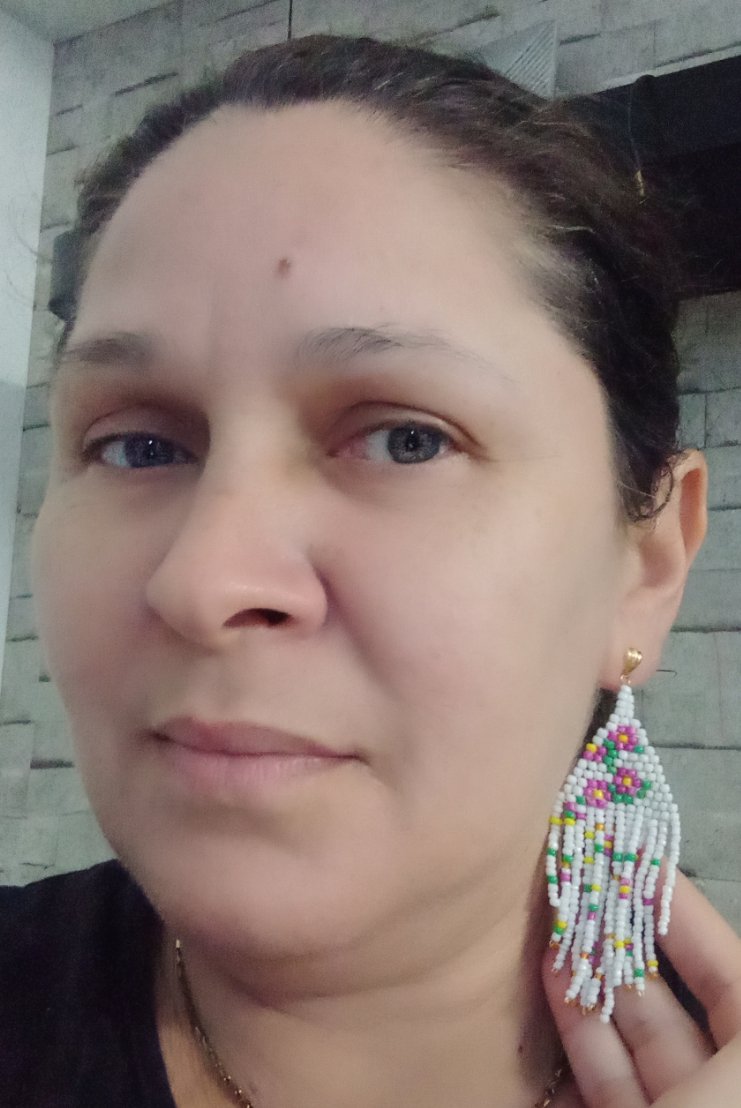
| Hola amigos de nuestra linda y creativa comunidad, yo sigo creando con uno de mis materiales favoritos LA MOSTACILLA para mi ella es la reina, ya que ofrece colores infinitos, así que sólo con un poco de creatividad e imaginación podemos hacer cosas linda, y en está oportunidad hice éstos LINDOS ARETES CASCADA EN MOSTACILLA. Realizados en PUNTADA LADRILLO una de mis técnicas preferida para trabajar mostacillas ya que me relajan y la uso como terapia desestresante, esté trabajo es fácil con un poco de práctica podemos hacerlo perfectamente, estos lindos aretes son ideales para la playa o para un lindo vestido veraniego. A continuación les comparto el paso a paso y la lista de materiales. Espero disfrúten mi post tanto como yo. | Hello friends of our beautiful and creative community, I continue creating with one of my favorite materials MOSTACILE for me she is the queen, as it offers infinite colors, so only with a little creativity and imagination we can make beautiful things, and this time I made these NICE WATERFALL MOSTACILE ARETES. Made in CASTIC BRICK Stitch one of my favorite techniques to work beads because it relaxes me and I use it as a de-stressing therapy, this work is easy with a little practice we can do it perfectly, these pretty earrings are ideal for the beach or for a nice summer dress. Below I share with you the step by step and the list of materials. I hope you enjoy my post as much as I do. |
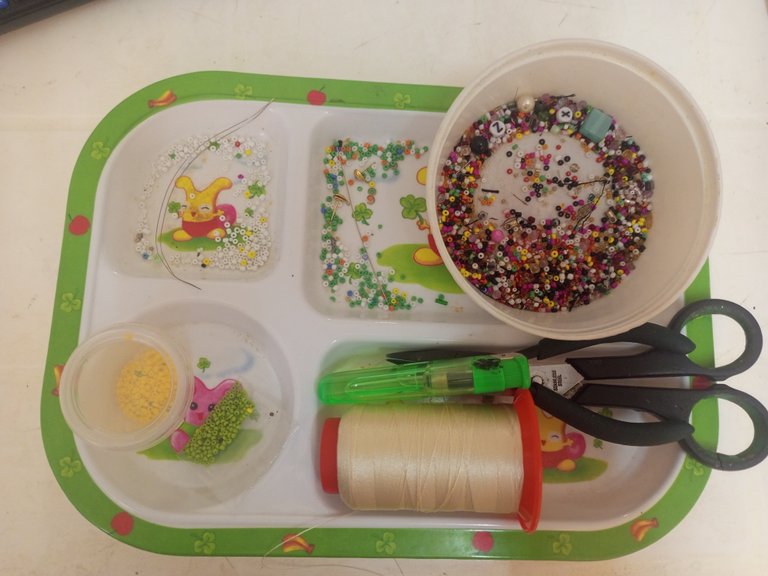
| Materiales: | Ma 12terials: |
|---|---|
| Hilo para mostacillas beige, mostacillas: blanca, verde, amarilla, fucsias, 2 aretes, 2 argollas, tijeras, yesquero, aguja mostacillera, pinza de bisutería. | Beige beading thread, beige beads, white, green, yellow and fuchsia beads, 2 earrings, 2 earrings rings, scissors, tinder, beading needle, jewelry tweezers, jewelry clip. |
| Instrucciones: | Instructions: |
|---|
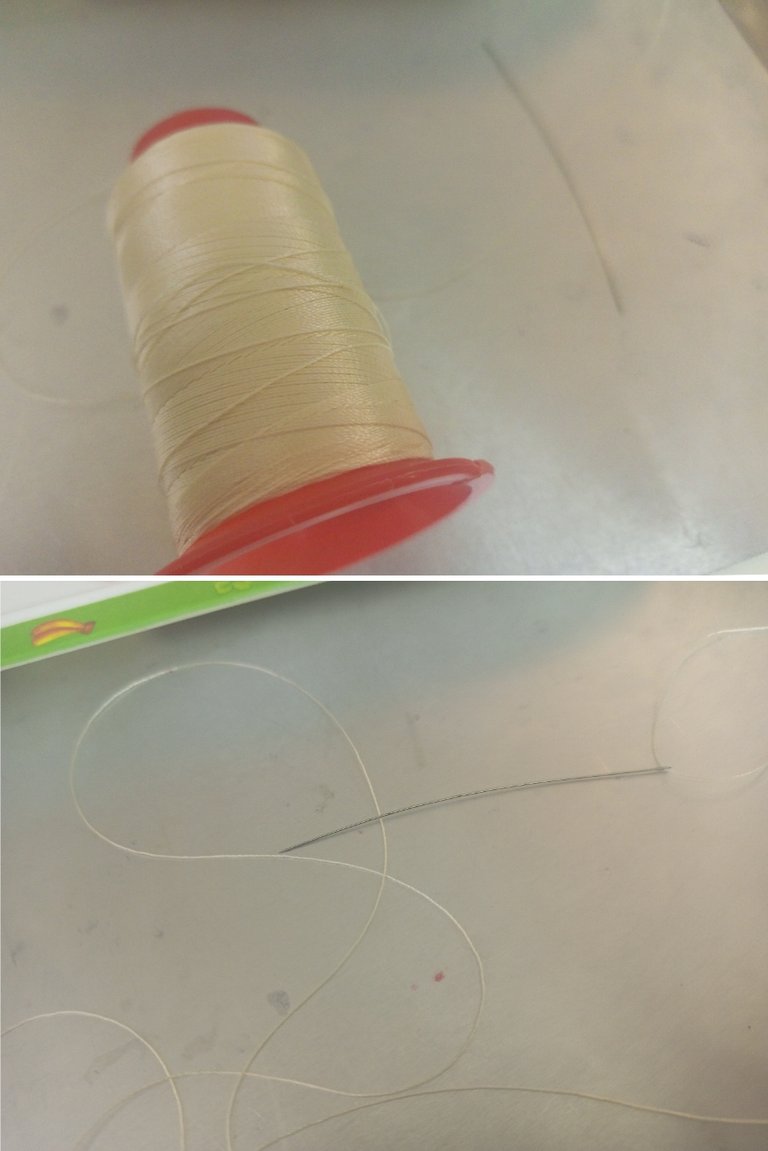
| Paso 1 | Step 1 |
|---|---|
| Corté 2 metros de hilo mostacillero para trabajar cómodamente y sin temor a quedarnos sin hilo, y lo enhebramos en la aguja mostacillera. | I cut 2 meters of mustard thread to work comfortably and without fear of running out of thread, and threaded it on the mustard needle. |
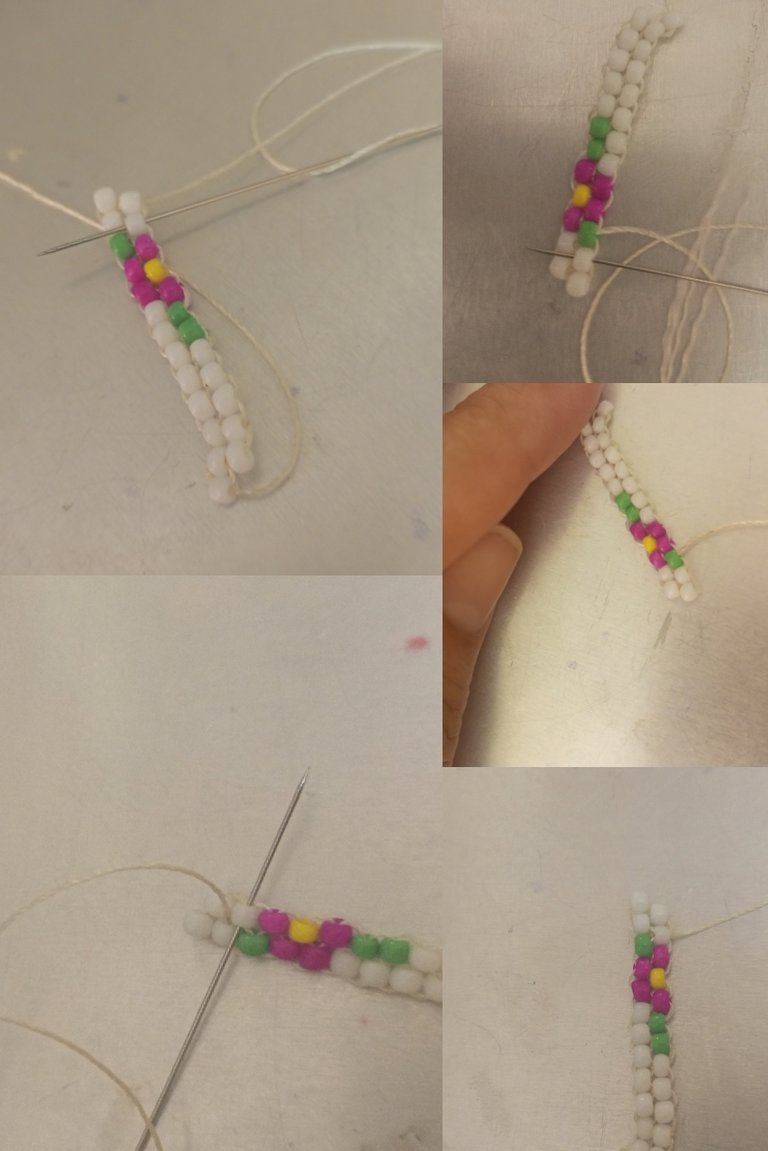
| Paso 2 | Step 2 |
|---|---|
| Para hacer el primer arete haremos una cadeneta de mostacillas que será nuestra base o columna para construir nuestro arete. Comenzaremos introduciendo 13 mostacillas, el orden de los colores los podemos observar en la foto. Hice una cadena introduciendo en la segunda mostacilla de arriba hacia abajo, y nos quedará unidas las dos primeras mostacilas, seguiremos luego de una mostacilla siempre introduciendo la aguja hacia abajo, hasta culminar la cadena. | To make the first earring we will make a chain of beads that will be our base or column to build our earring. We will begin by introducing 13 beads, the order of the colors can be seen in the photo. I made a chain introducing the second bead from top to bottom, and we will join the first two beads, we will continue after one bead always introducing the needle downwards, until we finish the chain. |

| Paso 3 | Step 3 |
|---|---|
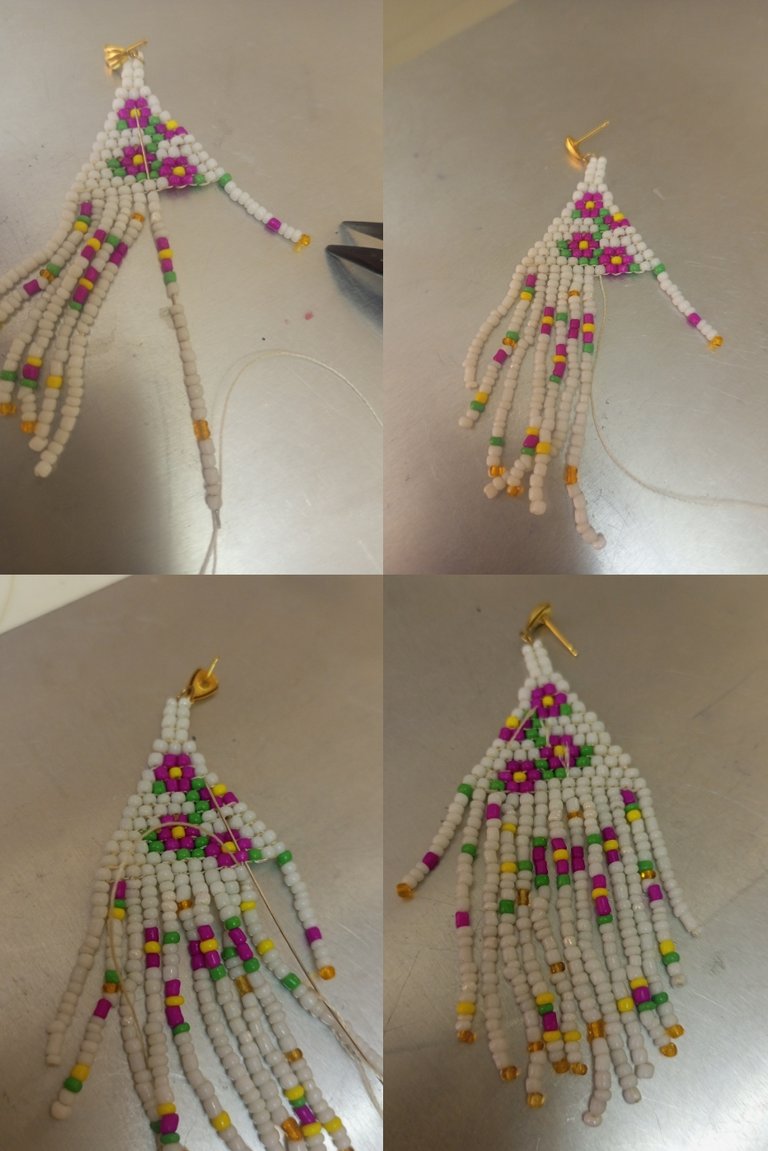
| Construiremos la parte superior del arete, introducimos la aguja en la mostacilla de abajo y la sacamos en la segunda mostacilla, en éste tipo de puntada podemos hacer ampliaciones y reducciones. Pero en estos aretes sólo haremos reducciones para construir la parte superior del arete. Siempre reduciendo de un espacio tanto al inicio y al final. ¿Como hacemos la reducción?, bajamos por las mostacillas de abajo y salimos hacia arriba ubicando en la mostacilla que queremos comenzar a construir. | We will construct the upper part of the earring, we introduce the needle in the bottom stitch and take it out in the second stitch, in this type of stitch we can make enlargements and reductions. But in these earrings we will only make reductions to build the upper part of the earring. Always reducing from a space at the beginning and at the end, how do we make the reduction, we go down through the lower beads and go upwards placing it on the bead that we want to start building. |

| Paso 4 | Step 4 |
|---|---|
| Una vez ubicados en la segunda mostacilla, tomamos dos mostacillas en la aguja, este es otro tips para construir una nueva hilera se comienza siempre con dos mostacillas, después continuamos construyendo de a una. Introducimos la aguja en el primer puente de hilo que conseguimos y salimos por arriba de esa misma mostacilla, acomodamos que quede bien posicionada, y asi sucesivamente seguimos hasta completar la hilera. | Once located in the second bead, we take two beads on the needle, this is another tip to build a new row always starts with two beads, then we continue building one by one. We introduce the needle in the first bridge of thread that we get and we go out on top of that same bead, we arrange that it is well positioned, and so on we continue until completing the row. |

| Paso 5 | Step 5 |
|---|---|
| En la primera imagen de este paso observamos la reduccion, ya que todas las hilera la iniciamos en reduccion. Continúe construyendo la tercera columna. | In the first image of this step we can see the reduction, since all the rows start in reduction. Continue building the third column. |

| Paso 6 | Step 6 |
|---|---|
| En las siguientes imagenes vemos las hileras que faltan para la parte superior, estan la octava, novena y décima que son 3 mostacillas. | In the following images we see the missing rows for the upper part, there are the eighth, ninth and tenth which are 3 beads. |


| Paso 7 | Step 7 |
|---|---|
| Construí 3 hileras de dos mostacillas. | I built 3 rows of 2 beads. |

| Paso 8 | Step 8 |
|---|---|
| Para montar la arolla y el arete nod ayudaremos con unas pinzas, luego introducimos una mostacilla blanca, la argolla y otra mostacilla, introducimos la aguja hacia abajo cuidando quedé bien sujeto y llevamos la aguja hacia abajo por el costado del arete hasta salir a la primera mostacilla de la primera columna. | To assemble the ring and the earring we will use tweezers, then we introduce a white bead, the ring and another bead, we introduce the needle downwards taking care to hold it well and we take the needle down the side of the earring until it comes out to the first bead of the first column. |


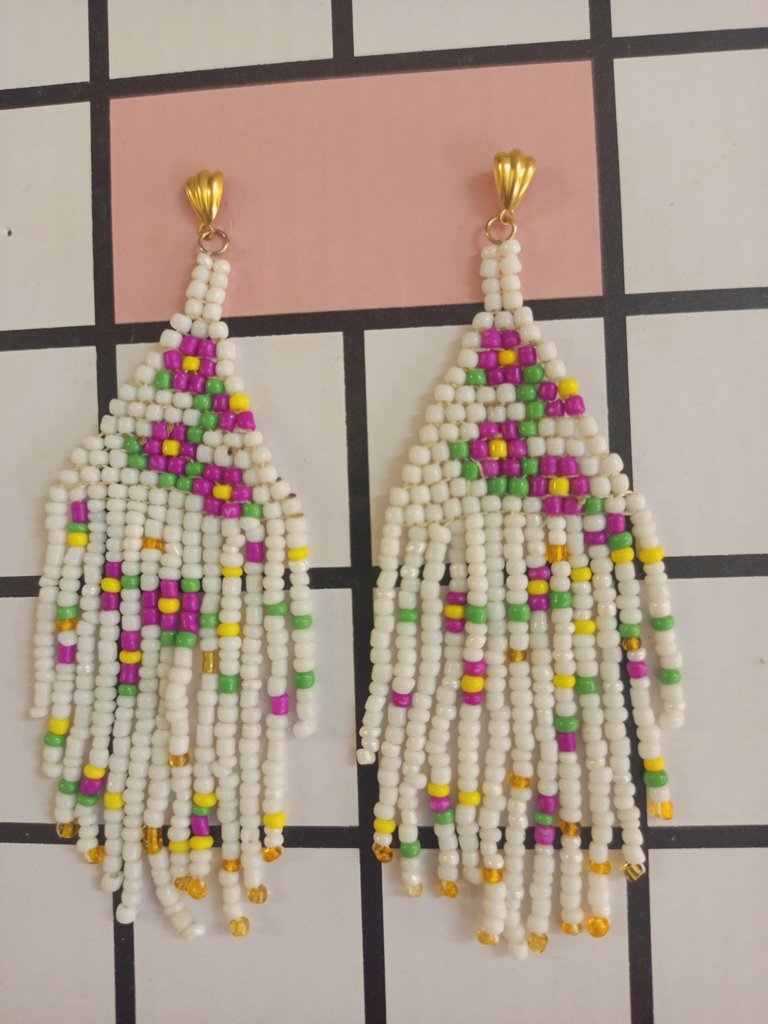
| Paso 9 | Step 9 |
|---|---|
| Para hacer los flecos o cascadas introducimos las mostacillas en la aguja y la devolvemos por las aguja saltando la última mostacilla que servirá de obstaculo para que no se suelten las mostacillas, introducimos la aguja por la mostacilla de donde sale el hilo y lo introducimos en la mostacillas de al lado hacia abajo. | To make the bangs or cascades we introduce the beads in the needle and we return it through the needle jumping the last bead that will serve as an obstacle so that the beads do not come loose, we introduce the needle through the bead from where the thread comes out and we introduce it in the beads of the side downwards. |

| Paso 10 | Step 10 |
|---|---|
| Repetiremos el procedimiento hasta completar todo el arete. | Repeat the procedure until the entire earring is completed. |

| Paso 11 | Step 11 |
|---|---|
| Llevamos el hilo que excede hacía arriba introduciendola entre las mostacillas, cortamos y quemamos con el yesquero el hilo excedente. | Bring the excess thread upwards, tuck it between the beads, cut and burn the excess thread with the tinder. |

| Paso 12 | Step 12 |
|---|---|
| Repetimos el proceso en el segundo arete. | Repeat the process on the second earring. |
| Despedida | Farewell |
|---|---|
| Y está es mi propuesta del día de hoy LINDOS ARETES CASCADA EN MOSTACILLA. Un post hecho con amor, espero les guste y disfruten mi post. | And this is my proposal for today BEAUTIFUL CASCADE EARRINGS IN MUSTARD CLAY. A post made with love, I hope you like it and enjoy my post. |

| Créditos | Credits |
|---|---|
| Traductor: www.DeepL.com/Translator (free version).Las fotos fueron tomadas con mi Celular Tecno Sport 7T. Foto de portada editada con Canva y PhotoRoom Banner editado con Canva. Patron: https://images.app.goo.gl/nDWEaoLxKGnokedKA. | Translator: www.DeepL.com/Translator (free version).The photos were taken with my Tecno Sport 7T cell phone. Cover photo edited with Canva y PhotoRoom. Banner edited with Canva. Patron: https://images.app.goo.gl/nDWEaoLxKGnokedKA |
Wow que hermosos amiga te han quedado
Gracias amiga 😊. Saludos 🤗
Hermoso resultado amiga 😊👍🏽
Gracias amiga. Agradezco tu comentario, saludos 🤗
@yanethstars Hermosa cascada floral,me encanta el diseño, se ven espectaculares, Saludos 🤗
Hola amiga, gracias. Saludos 🤗
Excelente paso a paso, nos encanta ver este tipo de zarcillos son hermosos y originales con cada detalle que se puede hacer con las mostacillas, buen trabajo 👏
Gracias, me alegra que mi trabajo sea de su agrado. Agradezco el apoyo, saludos 🤗
Que hermoso estos aretes con mostacilla se va creando el dibujo , todo un arte , muy lindo 👍🏽👍🏽
Si amiga, con la mostacilla podemos hacer cosas maravillosas. Saludos 🤗
Hermosos, bellos quedaron esos aretes en cascadas ... Me encantan.
Hola amiga, gracias.
Que bonitos aretes amiga!