Para nadie es un secreto mi pasion por los accesorios de bisutería, hace mucho tiempo queria realizar una pulsera al estilo miyuki, pero habia un impedimento, era que no tenia Telar, se me hacia muy difícil realizarla, pero hace unos dias me dieron un idea para realizar dicho instrumento que era muy necesario para mi.
Con materiales que tenia en casa puse en práctica esa gran idea, les quiero mostrar el paso a paso ulizado para crear esta herramienta de bisutería, pero antes conozcamos los materiales utilizados.
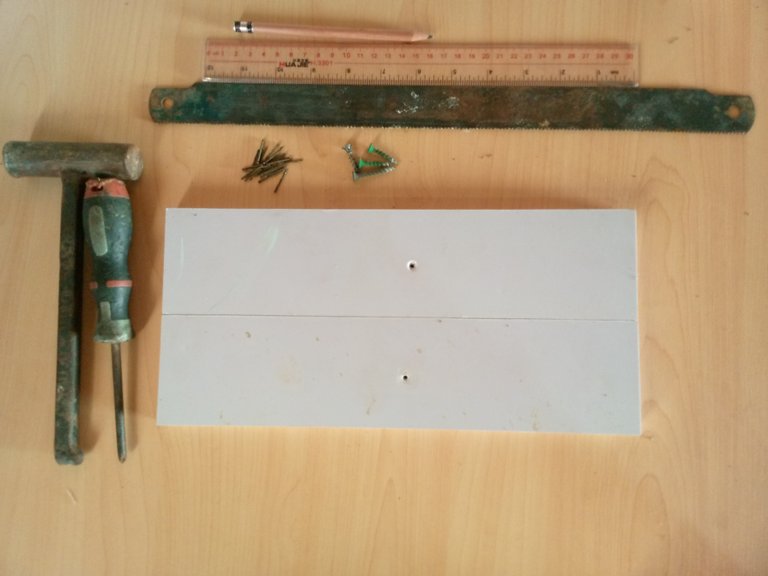
Materiales
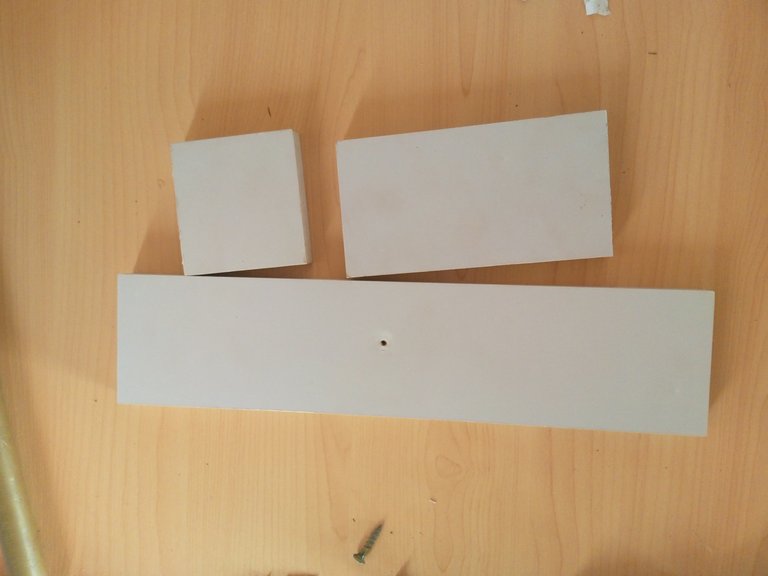
- 2 maderas de 7.5cm de Ancho por 17cm de largo
- Hoja de Serrucho
- Regla de Medir
- Lapiz
- Clavos de pared
- 4 Tornillos tira fondo
- Destornillador de estría
- Martillo
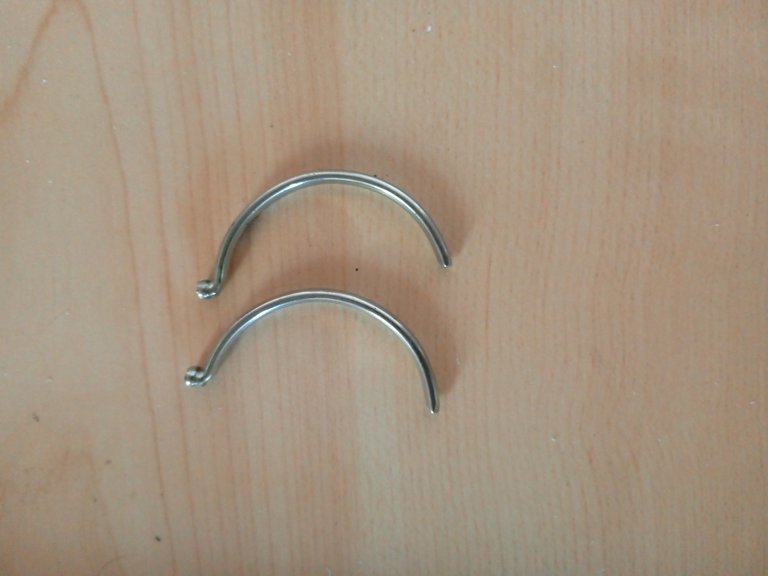
- 2 Ganchos
Ahora conocernos el Paso a Paso utilizado para la realización de esta herramienta de trabajo.
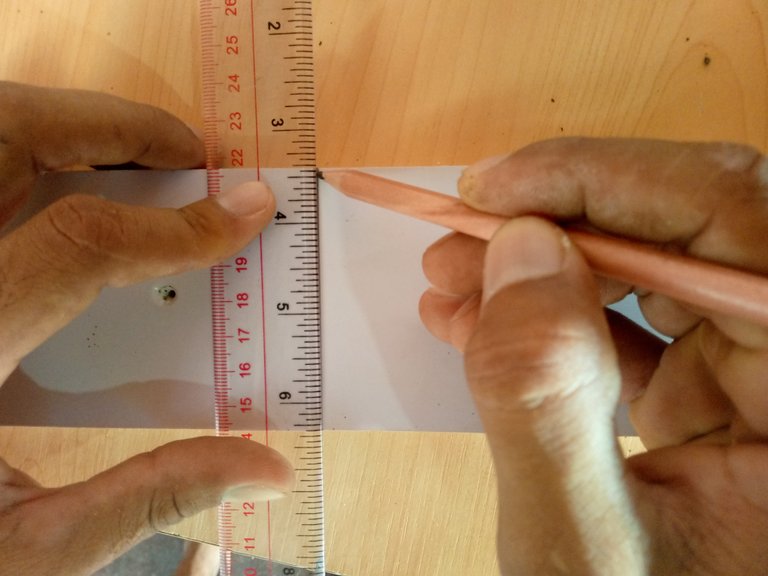
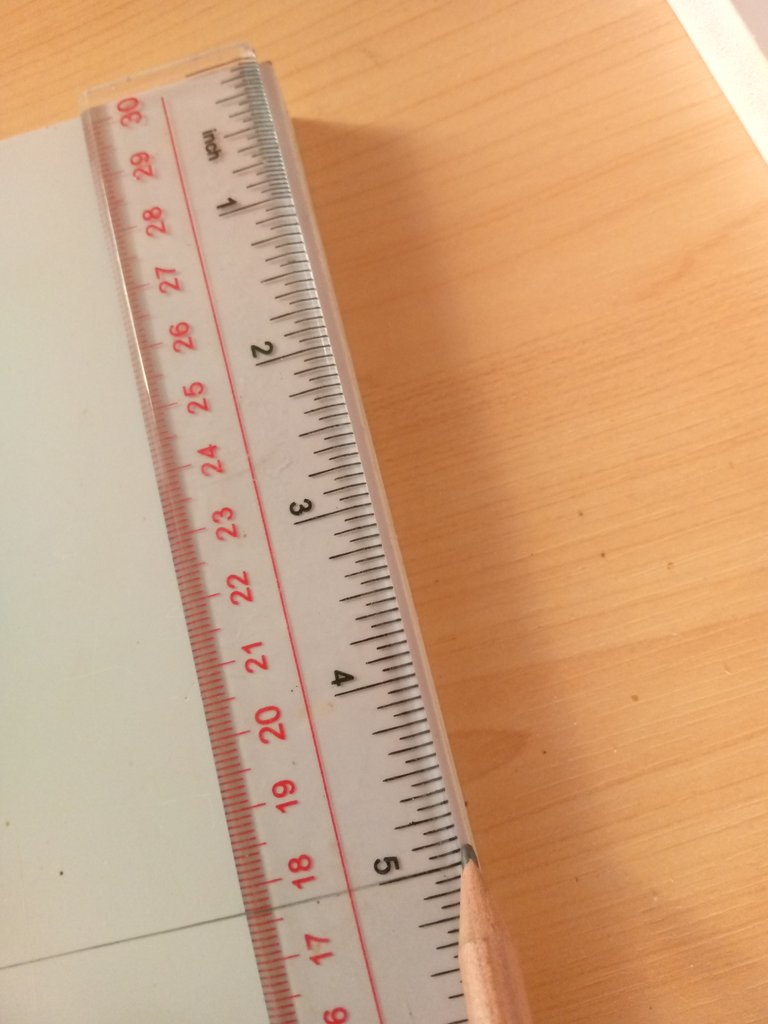
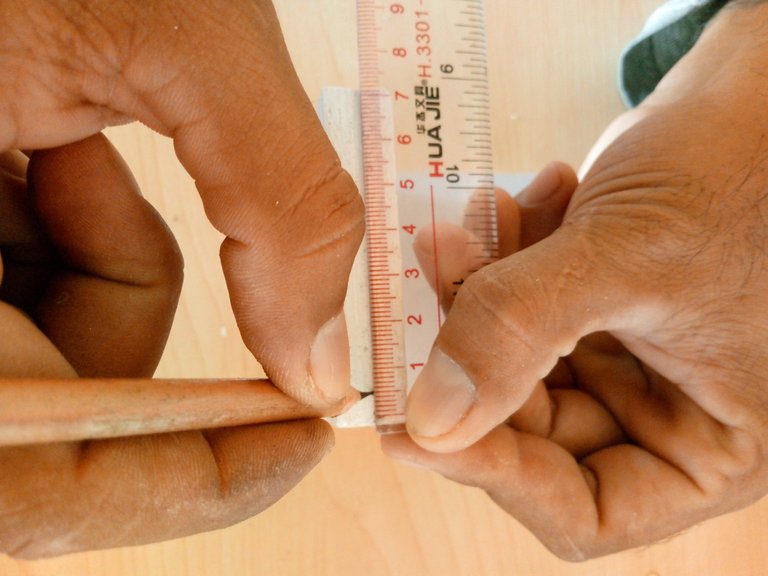
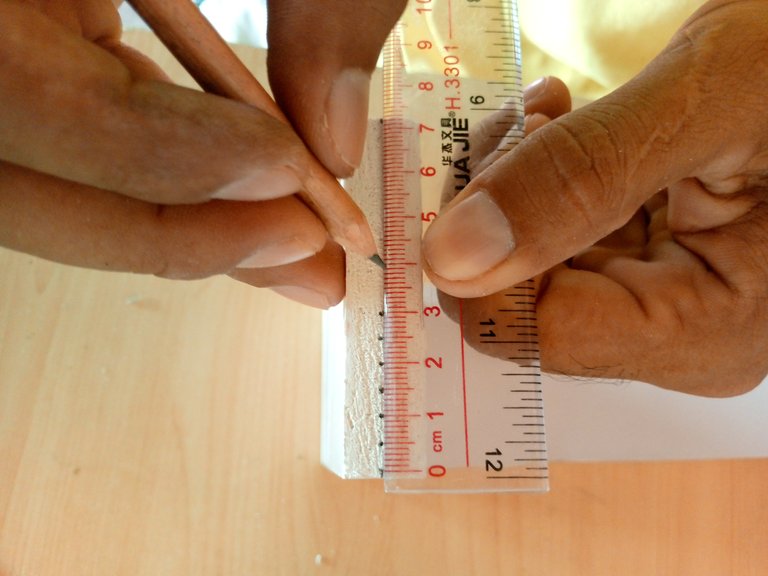
Lo primero que haremos sera tomar 1 trozo de madera y con la ayuda de el lapiz y la regla vamos a medir en 2 partes y luego trazaremos una linea, esta sera la guia para que quede un corte preciso.
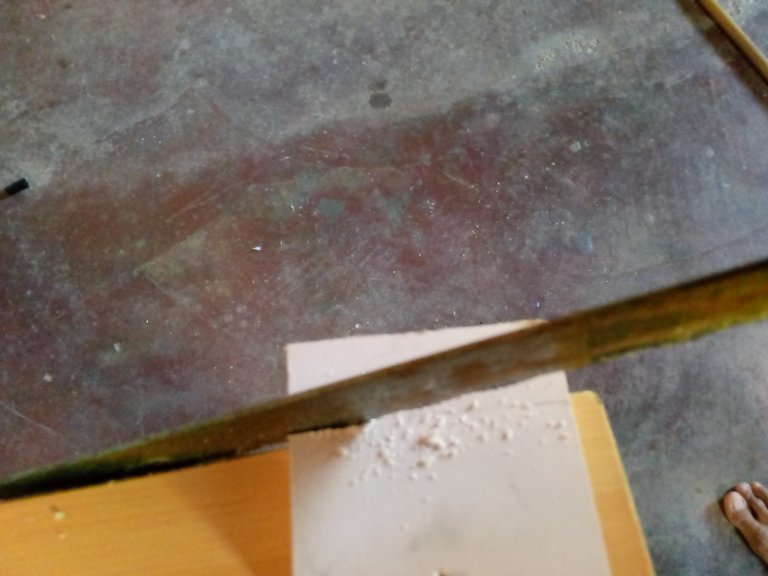
Luego vamos a tomar la hoja del serrucho y cortaremos la madera, seguiremos la lineas guias para tenerbun corte limpio, recordemos trabajar con mucho cuidado ya que cualquier descuido te puedes cortar o lastimar con la hoja de serrucho.
Ahora tomaremos las maderas y colocamos la larga abajo y encima colocamos los dos pedazos, tomando 2 tornillos tira fondos los ubicaremos detras de la madera, con la ayuda del martillo daremos unos toques para que se nos haga mas facil perforar la madera.
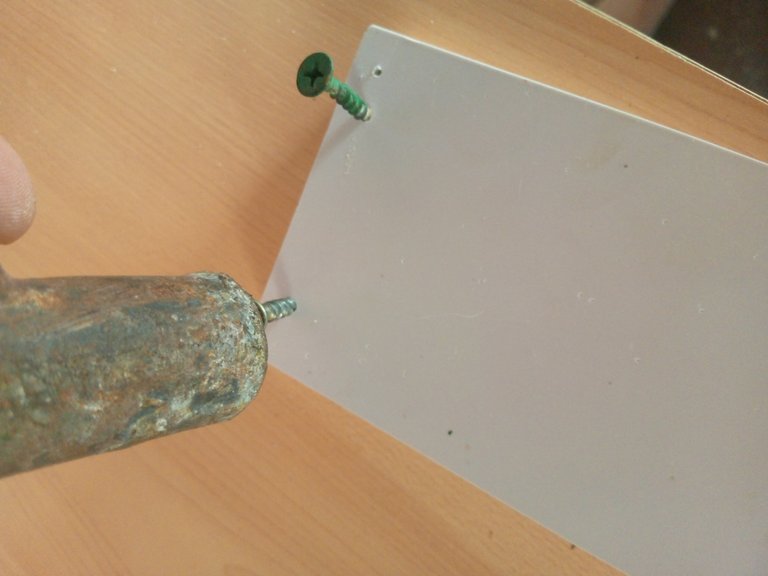
Con el destornillador de estría empezamos a introducir todo el tornillo, luego el otro lado hasta tener los 2 tornillos listos.
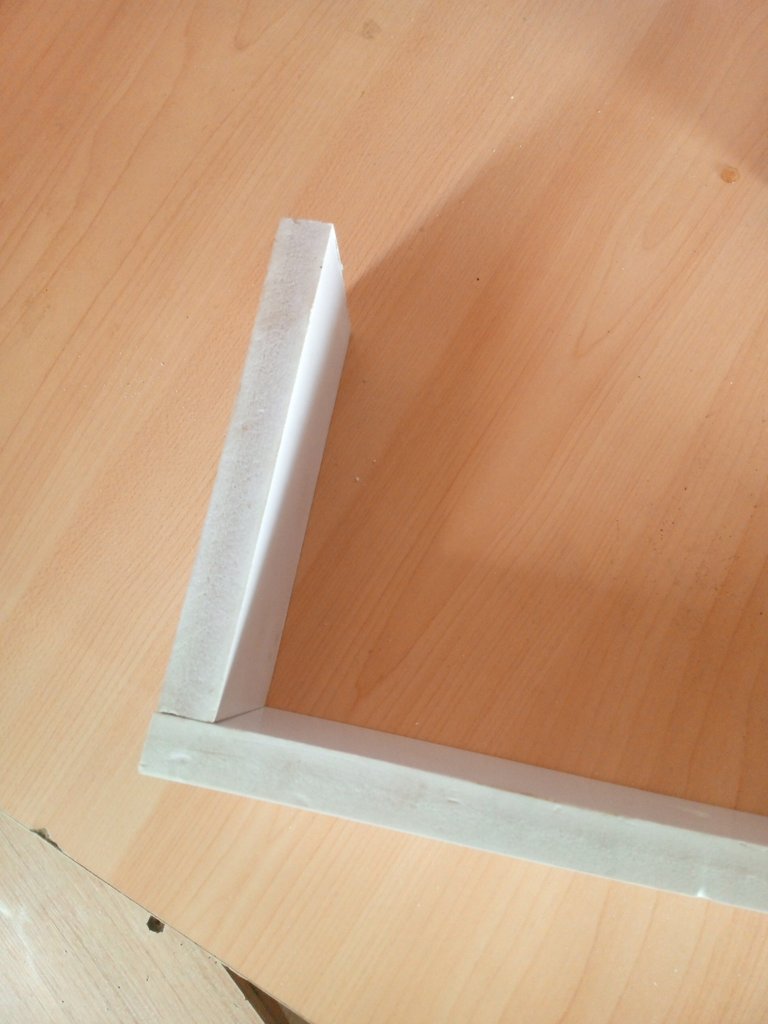
Seguimos con el otro pedazo de madera, del mismo modo que introducimos el anterior para que se vea de la siguiente manera.

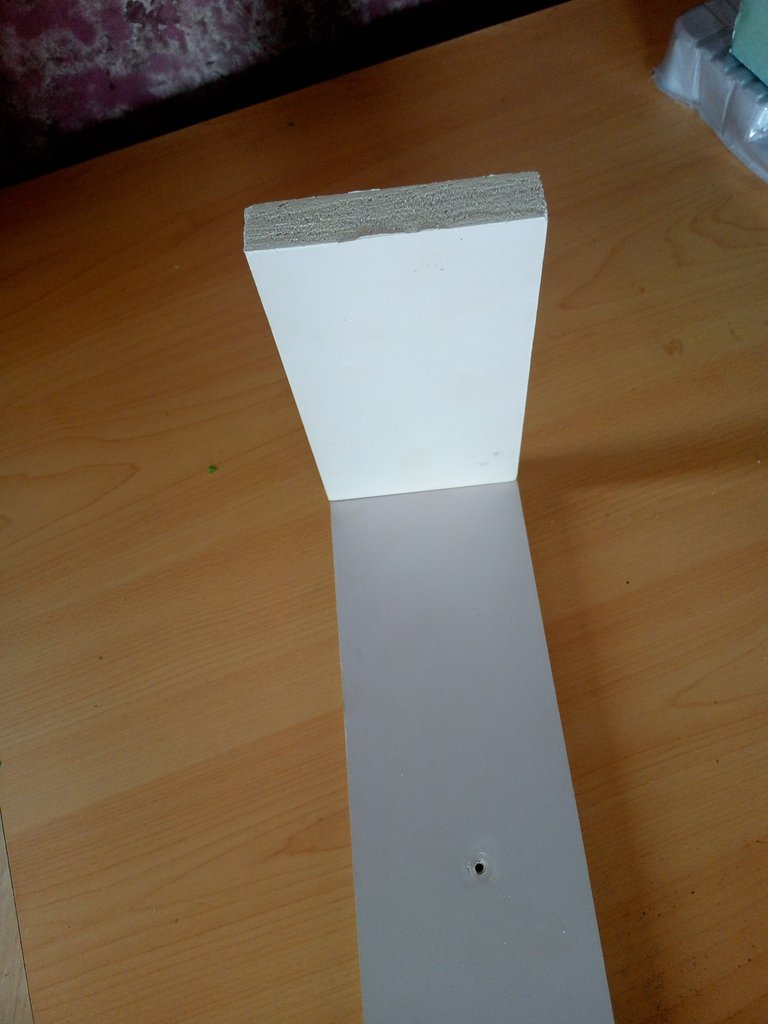
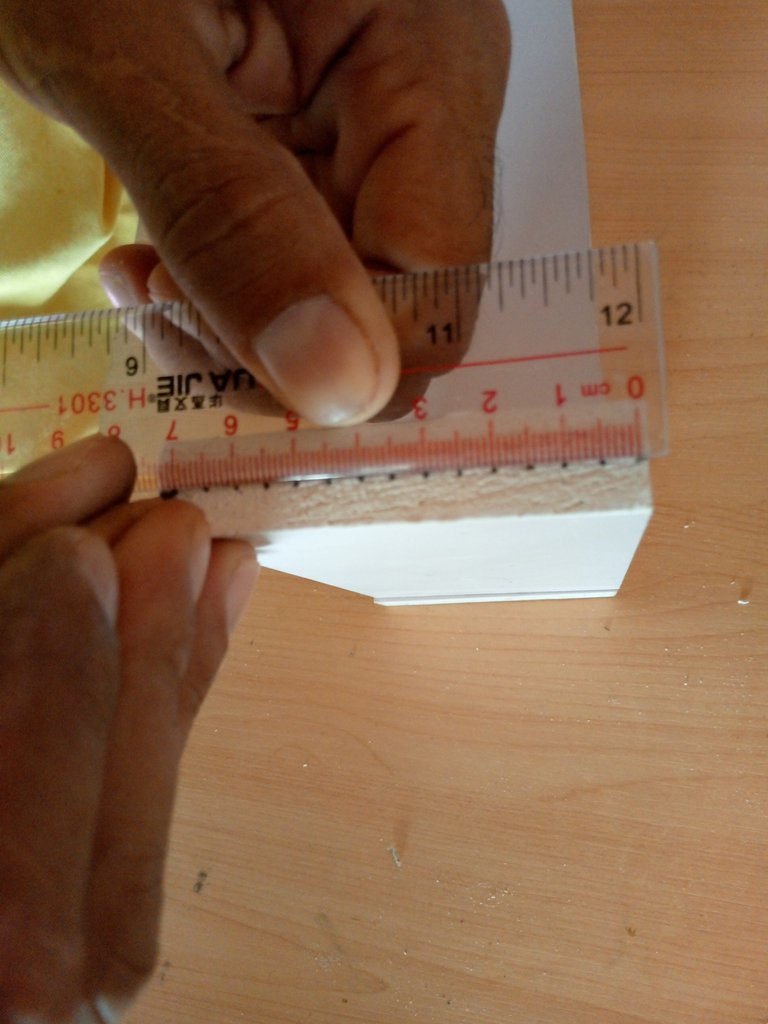
Tomaremos nuevamente el lapiz y la regla, por todo el centro de la superficie de la madera, vamos a medir 0,5 o medio centímetro y colocaremos un punto
Vamos a ir contando el medio centímetro y colocando el punto hasta el final, esto lo haremos en las 2 superficie de las maderas que colocamos.
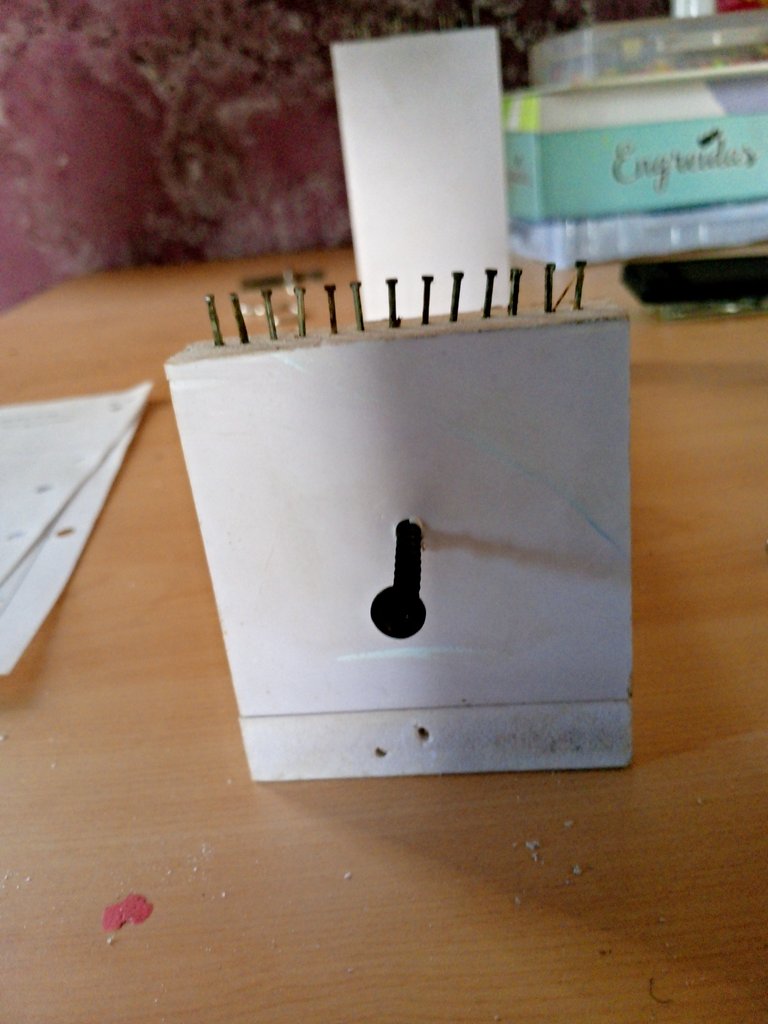
Ahora tomaremos los clavos de pared y con la ayuda de un martillo introduciremos 1 clavo en cada punto que marcamos con el lápiz
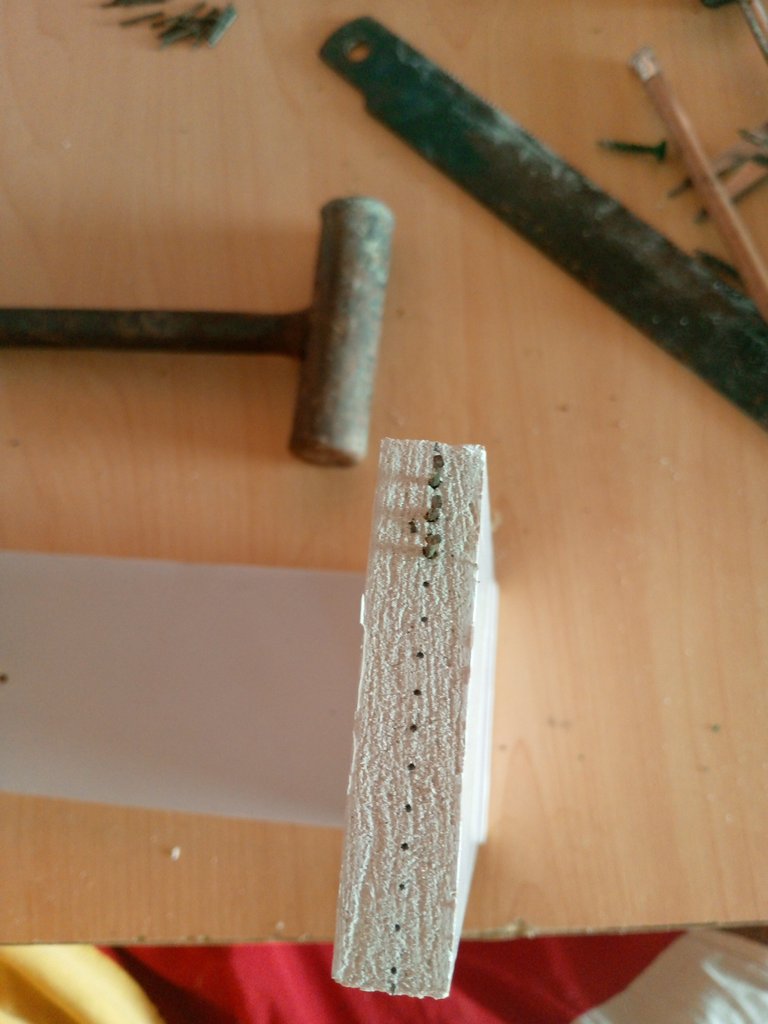
Al introducirlos todos se vera de la siguiente manera:


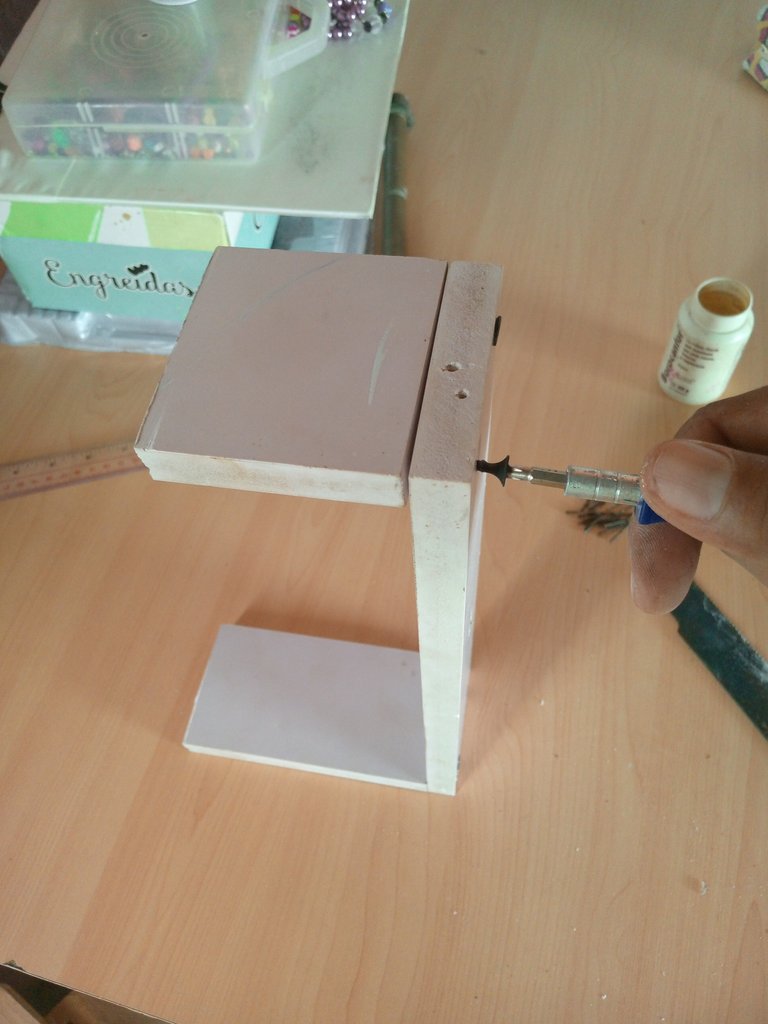
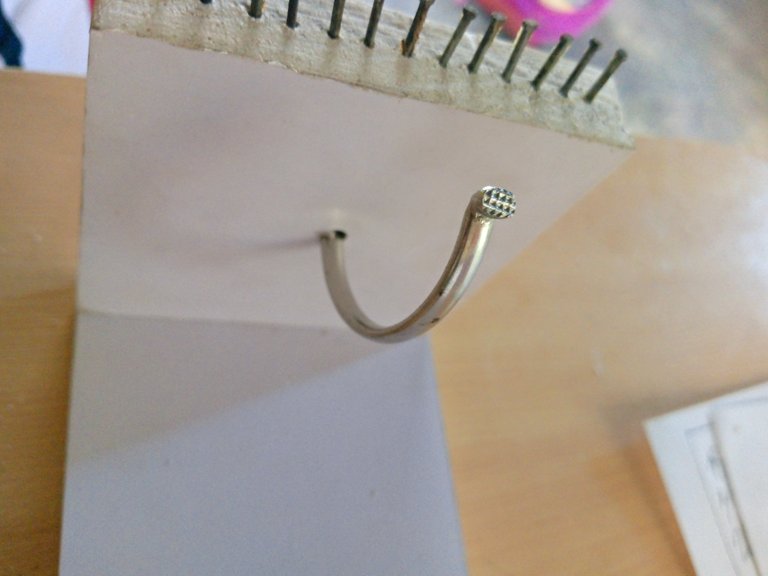
Para el último paso, conseguí una carpeta vieja y logra sacarles los ganchos para utilizarlos en este trabajo, retiramos un par de ganchos para utilizarlos.
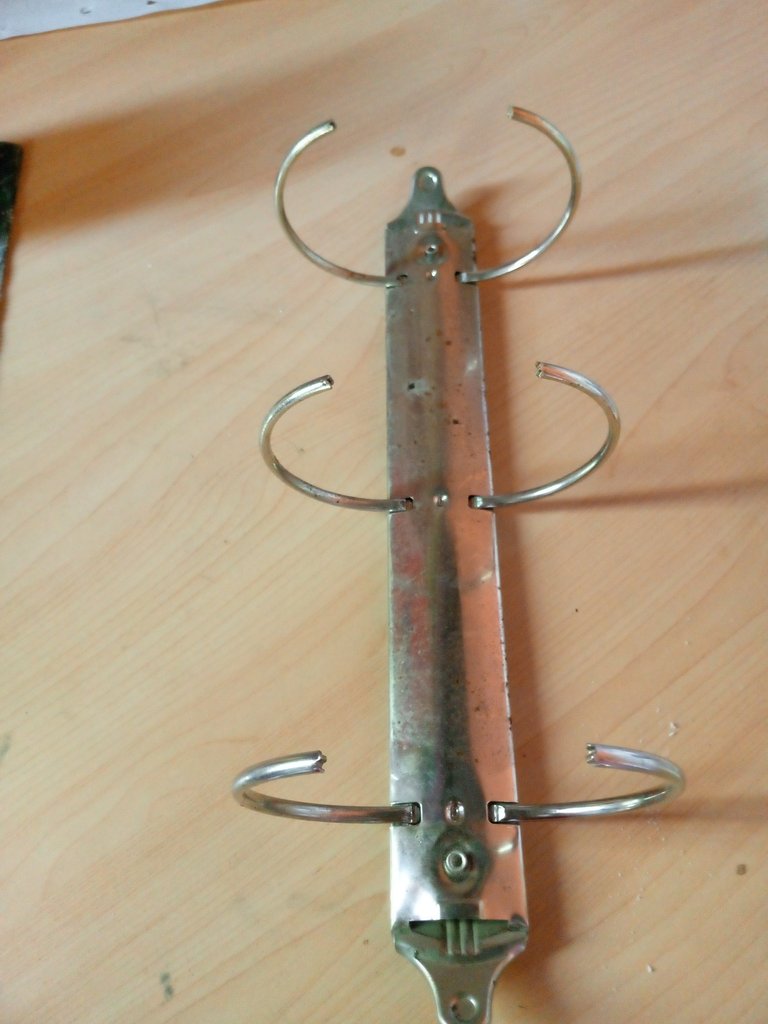
Con la ayuda de un tornillo perforamos la mdera y luego introducimos el gancho, de igual manera hicimos con el otro lado, la función de ellos sera para amarrar el Hilo.

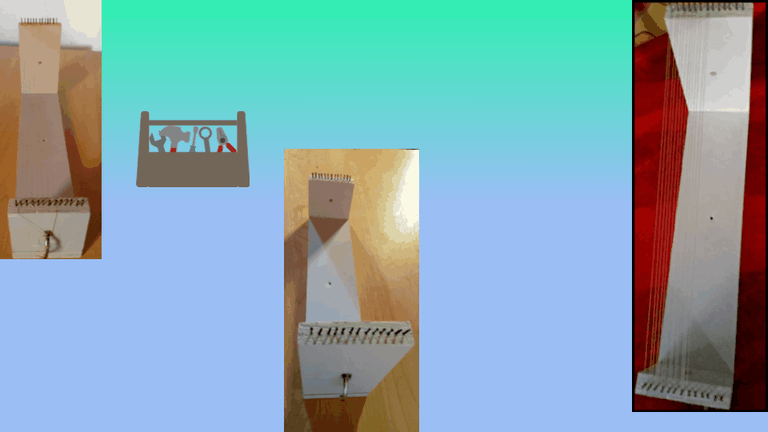
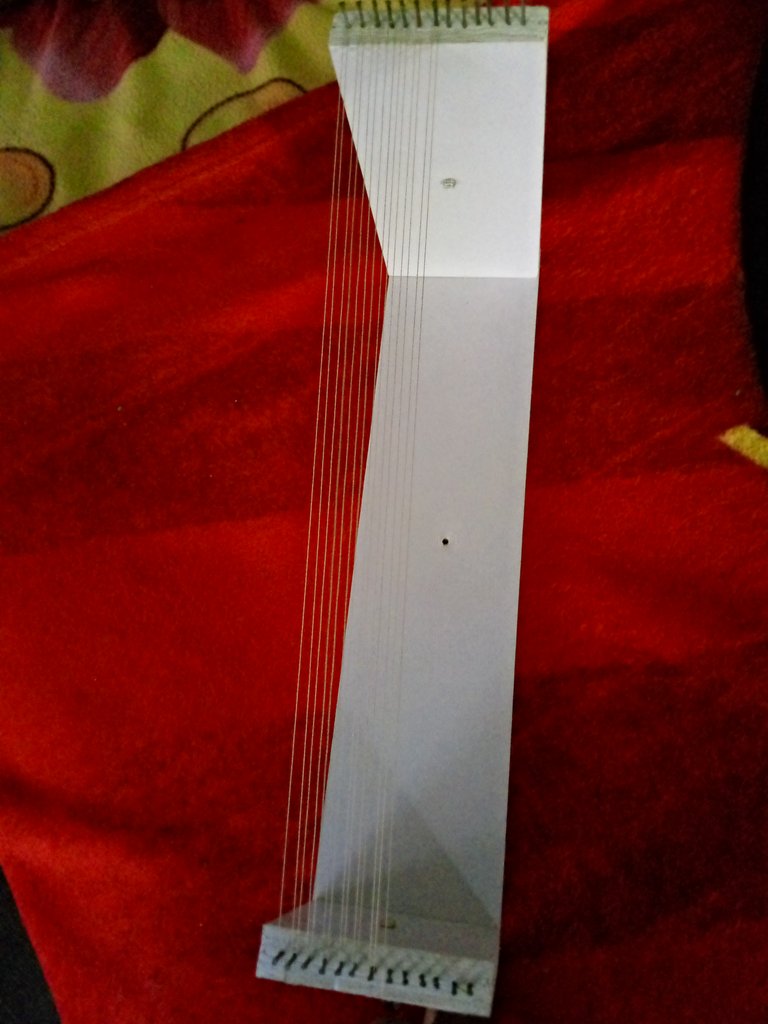
De esta manera quedaría listo nuestro telar de madera, ahora no hay impedimento para realizar las pulseras de Miyuki que me llaman la atención, espero haya sido de agrado este tutorial y les sirva de ayuda para que puedan hacer uno igual. Muchas bendiciones en sus vidas, por aqui les dejo el resultado final. Bendiciones
Las imágenes son de mi propiedad y fueron tomadas por mi teléfono tecno spark Go 2023.
Traductor Utilizado:Deepl traductor
Las imágenes son editadas mediante la aplicación editor de fotos canva
For no one is a secret my passion for costume jewelry accessories, a long time ago I wanted to make a miyuki style bracelet, but there was an impediment, was that I had no loom, it was very difficult for me to make it, but a few days ago I got an idea to make this instrument that was very necessary for me.
With materials that I had at home I put into practice this great idea, I want to show you the step by step process to create this jewelry tool, but first let's know the materials used.
Materials
- 2 pieces of wood 7.5cm wide and 17cm long.
- Saw blade
- Measuring Ruler
- Pencil
- Wall Nails
- 4 bottom strip screws
- Phillips screwdriver
- Hammer
- 2 Hooks
**Now let's know the Step by Step used for the realization of this working tool.
The first thing we will do is to take 1 piece of wood and with the help of the pencil and the ruler we will measure in 2 parts and then draw a line, this will be the guide for a precise cut.
Then we will take the saw blade and cut the wood, we will follow the guide lines to have a clean cut, remember to work very carefully because any carelessness you can cut or hurt yourself with the saw blade.
Now we will take the wood and place the long one below and on top we place the two pieces, taking 2 screws strip funds we will place them behind the wood, with the help of the hammer we will give a few touches to make it easier for us to drill the wood.
With the slotted screwdriver we start to insert the whole screw, then the other side until we have the 2 screws ready.
We continue with the other piece of wood, in the same way that we introduce the previous one so that it looks like this.
We will take again the pencil and the ruler, all over the center of the surface of the wood, we will measure 0.5 or half a centimeter and place a point.
We are going to go counting the half centimeter and placing the point until the end, we will do this on the 2 surfaces of the wood that we place.
Now we will take the wall nails and with the help of a hammer we will insert 1 nail in each point that we marked with the pencil.
When we insert them all it will look like this:
For the last step, I got an old folder and managed to get the hooks out of them to use them in this job, we remove a couple of hooks to use them.
With the help of a screw we perforate the wood and then we introduce the hook, in the same way we did with the other side, the function of them will be to tie the thread.
In this way our wooden loom is ready, now there is no impediment to make the Miyuki bracelets that call my attention, I hope this tutorial has been to your liking and will help you to make one just like it. Many blessings in your lives, here is the final result. Blessings
The images are my property and were taken by my tecno spark Go 2023 phone.
Translator Used:Deepl translator
Images are edited using canva photo editor application.
Interesante, para las personas que les gusta realizar este tipo de trabajo, es muy factible, incluso lo puedes ofrecer, y venderlos jijij, bien por ti, espero ahora ver esas joyas, saludos.
Jaja, está buena la idea de ofrecerlos no había pensado en eso gracias jeje, pronto mostraré los diseños, saludos
Que gran idea, ya puedes hacer las pulseras de una manera más cómoda, una herramienta muy buena para los que realizan pulseras tejidas, un saludo 😍
!DIY
!discovery 27
This post was shared and voted inside the discord by the curators team of discovery-it
Join our Community and follow our Curation Trail
Discovery-it is also a Witness, vote for us here
Delegate to us for passive income. Check our 80% fee-back Program
You can query your personal balance by
!DIYSTATSCongratulations @afrofat1! You have completed the following achievement on the Hive blockchain And have been rewarded with New badge(s)
Your next target is to reach 4500 upvotes.
You can view your badges on your board and compare yourself to others in the Ranking
If you no longer want to receive notifications, reply to this comment with the word
STOPQue buen trabajo, un telar siempre será algo de mucha importancia y utilidad
Muchas gracias, si es de mucha utilidad me hacía falta uno para poder realizar un trabajo que tengo en mente, bendiciones
Necesito que hagas uno de esos para mí , exelente trabajo amigo bendiciones
Ok amiga cuando quieras te hago uno, cualquier cosa avisas, jeje bendiciones
Listo.. házmelo jajaja ! 🤭❤️🤗🤗🤗✨🎉
Estamos pendientes entonces, jeje al conseguir las maderas te lo hago🤗
Lo bueno es que ya lo tienes ahí listo para futuras manualidades.
Lo bueno es que ya lo tienes ahí listo para futuras manualidades.
Eso es lo bueno, gracias hermano por leer mi post.
Un placer. Saludos.