


Hola, muy buenos días a todos. Hoy quiero compartir con ustedes un hermoso florero con rosas totalmente elaborado con materiales reciclados, objetos que tengo guardados en la casa, y restos de viejas manualidades. La idea de esta creación era lograr algo hermoso sin salir a comprar materiales.
Hello, good morning everyone. Today I want to share with you a beautiful vase with roses completely made with recycled materials, objects that I have stored at home, and leftovers from old crafts. The idea of this creation was to achieve something beautiful without going out to buy materials.

Es increíble todo lo que podemos hacer con el reciclaje cuando nos inspiramos en un momento y una persona especial, y desde mi niñez, en la casa y en la escuela nos enseñaron a crear regalos para las madres en su día con nuestras propias manos, desde una tarjetita hasta una delicada manualidad… en mi casa éramos 6 niños, yo la menor de todos, y dos madres, mi tía y mi mamá, y el día de las madres, para cada una iba una tarjeta y una manualidad elaborada por cada uno de nosotros… lo más divertido era el momento de construirlas porque pasábamos días escondidos tratando de que ellas no se dieran cuenta de lo que estábamos haciendo, de verdad que yo lo disfrutaba muchísimo, y desde ahí me quedó ese amor a las manualidades con material reciclado, ya que de la nada, hacíamos cosas muy bonitas.
A continuación les voy a dar los materiales que utilicé, y los pasos para cada parte del proceso. La elaboración de este florero está dividida en varias partes: el florero, las rosas, las hojas, y los tallos.
It is amazing what we can do with recycling when we are inspired by a special moment and a special person, and since my childhood, at home and at school we were taught to create gifts for mothers on their day with our own hands, from a little card to a delicate craft ... in my house we were 6 children, I was the youngest of all, and two mothers, my aunt and my mom, and on Mother's Day, for each one there was a card and a craft made by each one of us .... The most fun was the moment of making them because we spent days hiding trying not to let them realize what we were doing, I really enjoyed it very much, and from there I had this love for crafts with recycled material, because from nothing, we made very nice things.
Next I am going to give you the materials I used, and the steps for each part of the process. The elaboration of this vase is divided into several parts: the vase, the roses, the leaves, and the stems.

| MATERIALES | MATERIALS |
|---|---|
| -Un matero viejo | -An old pot |
| -Palitos de altura | -Sticks of height |
| -Retazos de papel crepé | -Pieces of crepe paper |
| -Pega blanca | -White glue |
| -Pintura de pared color blanco | -White wall paint |
| -Brochas | -Brochas |
| -Tijeras | -Scissors |
| -Papel higiénico | -Toilet paper |
| -Una bandeja de anime de desecho | -A scrap anime tray |
| -Periódico o revistas viejas | -Newspaper or old magazines -Tissue paper scraps |
| -Retazos de papel de seda | -Tissue paper scraps |
PASOS
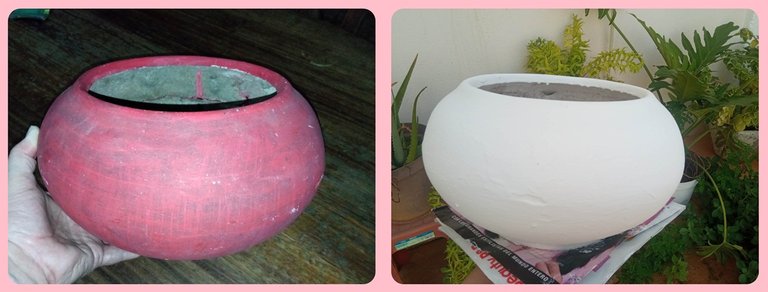
Para el florero, lo lavé muy bien y lo restauré pintándolo con un poco de pintura blanca de pared que tenía guardada. .
STEPS
For the vase, I washed it very well and restored it by painting it with some white wall paint I had saved.
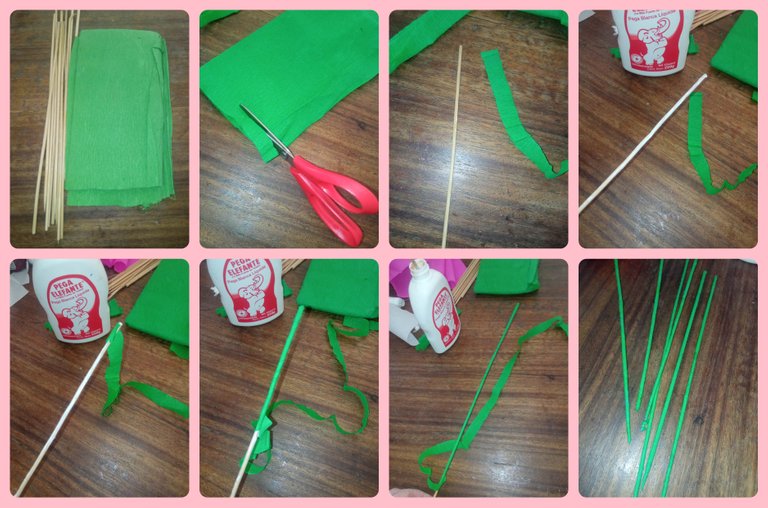
Para elaborar las hojas utilicé papel crepé verde y sin desdoblarlo, luego de trazar la forma de la hoja sobre él, recorté hasta obtener hojas grandes y hojas pequeñas.
To make the leaves I used green crepe paper and without unfolding it, after tracing the shape of the leaf on it, I cut it to obtain large leaves and small leaves.

Para elaborar los tallos utilicé palitos de altura que luego de recortar una tira de papel crepé verde de 1 cm de ancho, le coloqué un poco de pega blanca a lo largo, y lentamente fui girando el palito de altura hasta forrarlo por completo con la tira verde.
To make the stems I used tall sticks that after cutting out a strip of green crepe paper 1 cm wide, I put some white glue along the length, and slowly turned the tall stick until it was completely covered with the green strip.
Posteriormente, coloqué hojitas con pega blanca en algunos tallos para el follaje del florero.
Later, I placed some leaves with white glue on some stems for the foliage of the vase.

Para elaborar las rosas utilicé varias técnicas siendo la más fácil la que voy a mostrar a continuación. Recorté una lista de papel crepé de 10 cm de ancho.
To make the roses I used several techniques, the easiest one being the one I am going to show below. I cut a list of crepe paper 10 cm wide.

Doblé tres veces la esquina superior del papel, hacia adentro, en forma diagonal.
I folded the top corner of the paper three times, inward, diagonally.

Luego torcí de adentro hacia afuera la orilla doblada con mis dedos pulgares.
Volví a doblar hacia adentro una vez más, y nuevamente torcí la orilla doblada hacia afuera con mis dedos pulgares.
Then I twisted the folded edge inside out with my thumbs.
I folded inward once more, and again twisted the folded edge outward with my thumbs.

Este proceso lo repetí muchas veces hasta llegar al final del listón de papel.
I repeated this process many times until I reached the end of the paper ribbon.

Una vez culminado este proceso de torcer el papel, coloqué un poco de pega en la orilla, fijé un tallito de los que elaboré con palitos de altura, y comencé a girar el papel alrededor de éste dándole poco a poco la forma a los pétalos con mis dedos, siempre colocando un poco de pega en la orilla a medida que giraba el papel para que no se soltara mi trabajo.
Once I finished this process of twisting the paper, I put some glue on the edge, fixed a little stem I made with sticks, and began to turn the paper around it, giving little by little the shape of the petals with my fingers, always putting a little glue on the edge as I turned the paper so that my work would not come loose.

Al finalizar este proceso, y tener la rosa formada en el tallo, la sujeté fuerte amarrándola con un poco de hilo en la orilla, y luego cubrí ese espacio con un trozo de tira de papel verde.
At the end of this process, and having the rose formed on the stem, I held it tight by tying it with a bit of thread at the edge, and then covered that space with a piece of green paper strip.

Finalmente coloqué las hojas en la base de la flor para culminar el proceso de elaboración de mis rosas, las que también elaboré con otros tonos de papel crepé, y con papel higiénico para las rosas blancas.
Finally I placed the leaves at the base of the flower to finish the process of making my roses, which I also made with other shades of crepe paper, and with toilet paper for the white roses.


Con nuestras rosas ya terminadas, procedí a armar el florero colocando en su interior la bandeja de anime cubierta y reforzando el contorno de ésta con bolas de periódico o revistas viejas para que no se moviera al introducir los tallitos. La bandeja de anime la cubrí con un trozo de papel de seda para que no se notara lo que había en el interior del florero y así brindarle al mismo un aspecto más delicado.
With our roses already finished, I proceeded to assemble the vase by placing the covered anime tray inside and reinforcing its contour with newspaper balls or old magazines so that it would not move when the stems were inserted. I covered the anime tray with a piece of tissue paper so that it would not show what was inside the vase and give the vase a more delicate look.
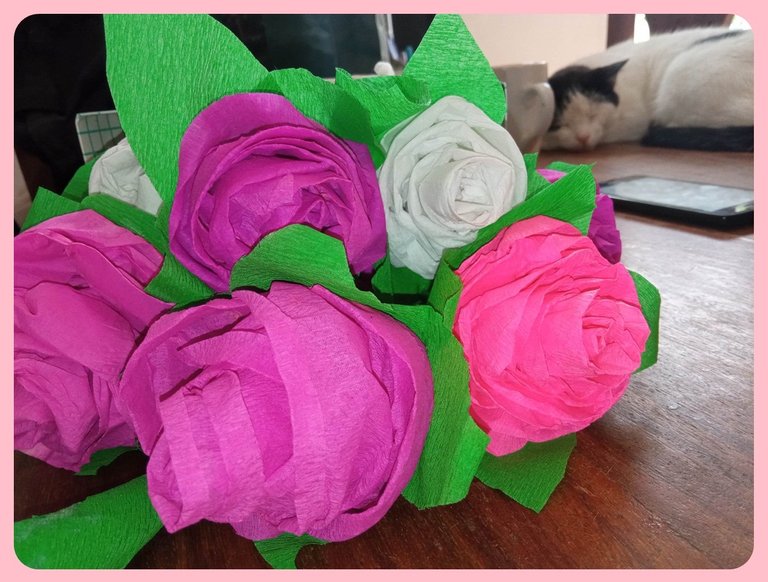

Éste es el resultado final de mi florero con rosas.
This is the final result of my vase with roses.

Espero que les haya gustado esta manualidad, aún están a tiempo de hacer un hermoso detalle con rosas para las mamitas en su día. Recuerden que éste es un modelo, pero ustedes pueden implementar floreros con otros materiales, lo importante es crear un ramo de rosas muy especial para mamá en su día, y que esté elaborado con sus propias manos. ¡Feliz viernes para todos!
I hope you liked this craft, you are still in time to make a beautiful detail with roses for moms on their day. Remember that this is a model, but you can implement vases with other materials, the important thing is to create a very special bouquet of roses for mom on her day, and that is made with your own hands. Happy Friday to all!
FUENTES DE IMÁGENES - IMAGE SOURCES:
Las Imágenes de Contenido pertenecen a mi Galería Personal.
The Content Images belong to my Personal Gallery.

Wow that is so pretty! My mother makes beautiful roses like you too! Then she gives them to me to sell! My mother's technique is pretty similar to yours. What we do differently is that when we are done with the rose, we add a little perfume. I love your work, keep it up! :)
Hi honey, thank you for visiting me and leaving me this beautiful message.
I learned to make them to teach my students how to make crafts with recycling. Every day I had to innovate because they were always asking for this kind of activities, and that's how I learned so many different ideas. I never thought of putting perfume on them, but it is a wonderful option to set the ambiance of the place where they are placed. A special greeting.
Bonito detalle para agasajar a las madres. Recuerdo cuando de pequeña hacíamos el regalo en el colegio. Era emocionante hacer estas manualidades. Gracias por compartir 🤗
Las rosas siempre me han parecido un símbolo del día de las madres, incluso regalar una sola es algo muy delicado. ☺️🌹
Esos recuerdos de infancia son hermosos, y más aún cuando los vamos transmitiendo a nuestros hijos. Gracias por visitarme amiga. 🌷✨
Un trabajo precioso Anita 😍...me encantó la elegancia que le da el color blanco del jarrón... Y la foto con el gatito en el fondo 😍💜... Buen trabajo. Un abrazo infinito y bendeciones para ti.
!DIY
!VSC
@chacald.dcymt has sent VSC to @annafenix
This post was rewarded with 0.1 VSC to support your work.
Join our photography communityVisual Shots
Check here to view or trade VSC Tokens
Be part of our Curation Trail
@chacald.dcymt ha enviado VSC a @annafenix
Éste post fue recompensado con 0.1 VSC para apoyar tu trabajo.
Únete a nuestra comunidad de fotografía Visual Shots
Consulte aquí para ver o intercambiar VSC Tokens
Se parte de nuestro Trail de Curación
Thank you for using the !DIY tag 💖🙌🏾
It was a great pleasure.
Thank you @stevenson7
You're welcome 🙂
Gracias princesa. 🌷✨
Llevaba días haciendo las rosas, quería compartirlas al menos unos días antes del domingo y gracias a Dios lo logré.🙏🏻
Quise hacerlo únicamente con rosas rosadas pero no tenía ya ese color de papel y la idea era construirlo con lo que tuviera en casa porque la temática era hacer un hermoso detalle para mamá sin salir de compras.
Vi una imagen en la web con un jarrón blanco 🤍 y me dije, éste es el color perfecto, le da mucha delicadeza al arreglo, ni siquiera transparente se veía tan delicado.
Lupe fue el detalle perfecto en esa foto, 🐈 jajaja, me percaté de él después que la tomé y realmente transmite mucha paz al escenario.
Gracias por pasar por mi post, y dejarme este valioso mensaje. Abrazos y bendiciones infinitos. ☺️🤗💕
You've created something great, I've never really thought of it that way, but you've given me a chance to think about it in a new way.
Hi, I love that it was like this.
I hope you can create a nice arrangement from this idea.
Thanks for visiting me and for commenting.
Regards.
Están bellísimas, un hermoso detalle para nuestras madres 👍
Gracias amiga. 🌷✨
Muchas gracias por apoyarme @chacald.dcymt. 🌷✨
Fantastic work. They look beautiful.
Thank you very much for your support.