

Greetings, creative friends and @diyhub community! I hope you're having a wonderful and blessed day. I'm happy to share a new sewing project inspired by the Splinterlands cards. The project is a beautiful hat with little ears for babies. The character Meriput Slinger wears a red hat with ears sticking out, and to make it even cuter and more suitable for babies, I added triangular ears. It's made with fleece fabric, which is soft and has a plush texture, perfect for keeping babies warm. It's a simple project that requires few materials, so I invite you to join me in the process.

Saludos amigos creativos y comunidad @diyhub, deseo que tengan un excelente y bendecido, día me siento feliz de compartir un nuevo proyecto de costura en el cual tomé como referencia a las cartas de Splinterlands, el proyecto consiste en un hermoso gorro con orejita para los bebés; el personaje Meriput Slinger, lleva un gorro rojo por el cual salen las orejas, para darle un estilo más tierno el gorro y acorde con los bebés agregué orejas triangulares; está elaborado con tela manta polar, que es suave y con textura de peluche, ideal para proteger a los bebés del frío, es un proyecto sencillo de hacer y requiere pocos materiales, les invito y me acompañen en el proceso de elaboración.


The materials used were:
Fleece blanket fabric
Pattern
Scissors
Sewing machine
Pins
Los materiales usados fueron:
Tela manta polar
Molde
Tijera
Máquina de coser
Alfileres

Elaboration
The first step in making the hat was to mark and cut the pieces; with the idea of passing a single side seam, I cut the front and back pieces into one, folded the fabric, right sides together and cut a rectangle of 42 * 17 cm and the ears which are four triangles.
Elaboración
El primer paso para hacer el gorro, fue marcar y cortar las piezas; con la idea de pasar una sola costura lateral, corté las piezas delantera y posterior en una, doblé la tela enfrenté los derechos y corté, la un rectángulo de 42 * 17 cm y la orejas que son cuatro triángulos.

Once the pieces were cut, the next step was to close the darts at the top of the hat. I pinned them in place and sewed them with a straight stitch.
To sew the ears, I placed the triangles right sides together, sewed around the perimeter, leaving the bottom open for turning, removed the excess fabric, and used a needle to pull out the top point.
Cortadas las piezas el siguiente paso fue cerrar las pinzas en la parte superior del gorro, fijé con alfileres y cosí con puntada recta.
Para coser las orejas, enfrenté los triángulos por el derecho, cosí por el contorno dejando la parte de abajo abierta para voltear, retiré el exceso de tela y con ayuda de una aguja saqué la punta superior.

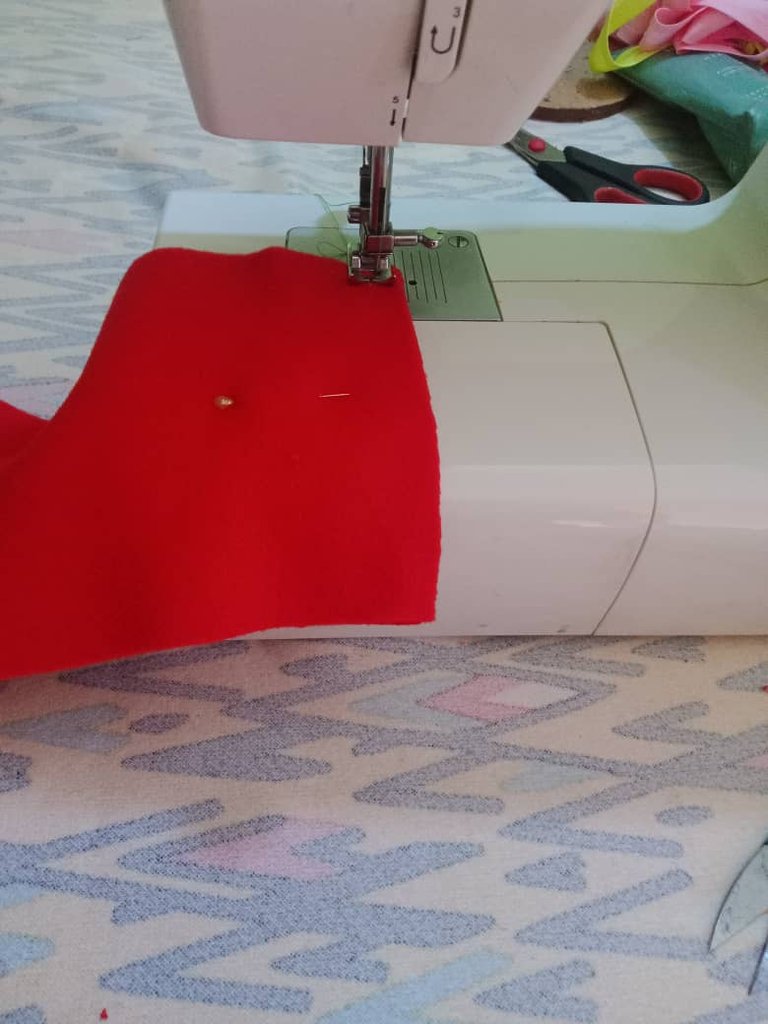


Once the ears were sewn on, I proceeded to assemble the hat. I placed the ears next to the darts, with the unsewn part facing upwards. I pinned the ears in place so they wouldn't move while sewing. I placed the other hat piece on top, pinned it in place, and sewed from the side to the other end. This step should be done carefully and slowly because the ears add thickness to the fabric, and sewing too quickly can easily break the needle. After sewing around the edge of the hat, I added another stitch to reinforce the area where the ears are.
Cosidas las orejitas procedí a emsamblar el gorro, coloqué las orejas al lado de las pinzas, de tal forma que la parte sin costura quede hacia arriba, fijé con alfileres las orejas para que no se muevan al momento de coser, pusé encima la otra pieza del gorro, sujeté con alfileres y cosí desde el costado hasta el otro extremo; en este paso se debe coser con cuidado y lento, porque las orejas aumentan el grosor a la tela y si se cose muy rápido hay altas probabilidades de que se rompa la aguja, cosido el contorno del gorro pasé otra costura para repisar y reforzar el área donde están las orejas.


Then I folded the rectangle in half, joined the ends, pinned them, and sewed with a straight stitch, right sides together. I turned it right side out and finished the edges with a zigzag stitch to prevent fraying.
Luego doblé por la mitad el rectángulo, uní los extremos, fijé con alfileres y cosí con puntada recta enfrentando los derechos, volteé y repisé los bordes con puntada de zigzag para evitar que se deshilache.


Next, I placed the hat right side up with the visor, pinned it, and sewed all around the edge using a straight stitch. I also added a zigzag stitch to reinforce the seam. With these simple steps, a beautiful and cute hat with ears for babies, inspired by the characters from Splinterlands, is finished.
Seguidamente enfrenté por el derecho el gorro con la visera, sujeté con alfileres y cosí por todo el contorno utilizando puntada recta, aquí también pasé puntada de zigzag para reforzar la costura, con estos sencillos pasos está terminado un hermoso y tierno gorro con orejas para los bebés, inspirado en los personajes de Splinterlands.


Baby projects are some of my favorites, and I loved how the hat turned out. The little ears give it a unique and adorable style, perfect for dressing babies and protecting them from the cold or sun. The fabric is cool and padded inside, keeping the baby warm and comfortable, so it won't irritate or bother their head. To personalize it, you can embroider it or add stickers of animals or characters from children's cartoons. My idea was to put a cat sticker on the visor, but I couldn't find one; the store only had fruit and ice cream stickers. Although, I think an ice cream sticker would look great on the hat. I hope you find this tutorial helpful and are inspired to make a simple hat for children and adults.
The right fabrics for this type of project are those that have stretch, a soft texture, and are breathable so that air can circulate and the baby's head doesn't sweat.
Los proyectos para bebés son de mis favoritos y me encantó como quedó el gorro, las orejitas le dan un estilo diferente y cuchi para vestir a los bebés y protegerlos del frío o del sol, la tela es fresca y acolchada por dentro, lo que permitirá mantener al bebé protegido y con una tela suave que no le va irritar o molestar en la cabeza, para personalizarlo se pueden bordar o agregar stickers de animales o personajes de las series infantiles animadas, mi idea era pegarle en la visera un sticker de gato, pero no lo conseguí, en la tienda solo habían de frutas y helados, aunque creo que un sticker de helado se verá muy bien en el gorro, espero el tutorial les sea de utilidad y se animen a realizar un sencillo gorrro para los niños y adultos.
Las telas adecuadas para este tipo de proyecto, son las que tienen elongación, textura suave y frescas para que el aire circule y la cabeza del bebé no sude.
Blessings!
Bendiciones!
Hasta luego!
Translated with https://www.deepl.com/translator
              All images are my own.

   Todas las imágenes son de mi autoría.
Delegate Tokens and HP to Fallen Angels to earn weekly rewards!
Delegate | Join to the guild
Thank you for your support
Thank you
Thank you for sharing this great hat making tutorial with all of us, which is incredibly inspiring for gaming characters.
Greetings @mdakash62, it's a nice project, inspired by the game, and easy to make.
Yes thanks
Have a wonderful day! 🤗😊
"Tu post ha sido valorado por el testigo Hispapro"
Quedo excelente el gorro inspirado en el fanart, el mismo color y se ve que el estilo es igual, tienes talento con la costura.
Saludos @hispapro.amb, muchas gracias por el apoyo, el gorro se ve cuchi.
WOW! It is so beautiful and lovely. Love its color and design. It looks amazing. Well done! Keep it up!
selected by @rezoanulvibes
Hi @diyhub, the color looks great and the ears add a cute touch.
Cheers!
Sending you Ecency curation votes.😉

Thank you so much for your support.
Is it just me, or does Meriput Slinger have a Christmas feel to his outfit? hahaha... Beautiful work, always captivated by your dedication and Splinterlands tributes ❤️
Hi friend, I also thought the character's hat had a Christmas feel to it; the color and lines are typical of Christmas scarves. I loved the result; the baby will look adorable in his new hat.
Happy Thursday!
Dear friend, a big hello! I'm in love with this hat. I can just imagine seeing a baby wearing it—how cute it must look with those little ears! Oh, how precious!❤️❤️❤️❤️❤️❤️❤️❤️❤️❤️❤️❤️❤️
Hi @lauracraft, I'm glad you liked it! The ears make it look adorable, and the baby will look handsome in his hat.
Happy Thursday!
Thanks for sharing! - @cieliss

Thank you so much for your support.