Hola amigos. Yo soy Lelys. Me da mucho gusto pasar a saludarles. Estoy muy feliz porque una niña podrá disfrutar de esta nueva creación que he elaborado. Siento mucha alegría cuando realizo manualidades para mis vecinas, ellas siempre se van contentas con lo que les hago.
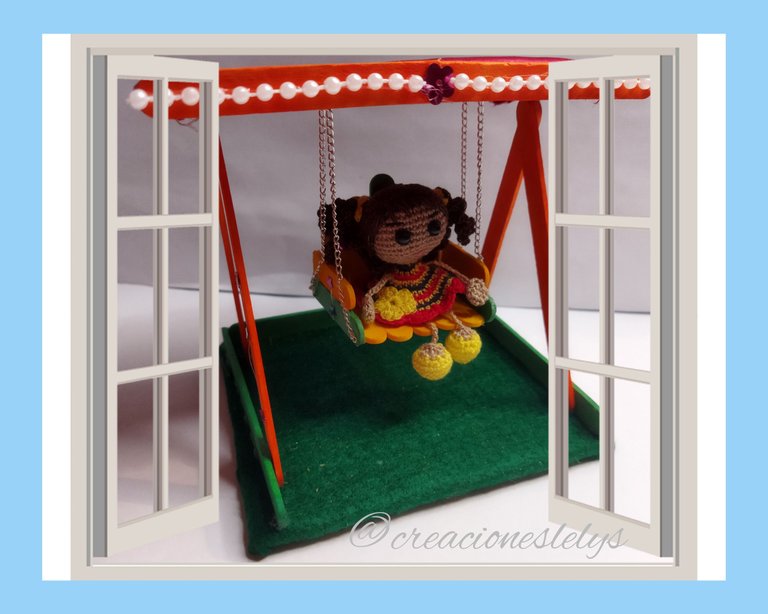
Espero que a ustedes también les guste. Aprovecho para compartir el paso a paso para elaborar este lindo balancín o columpio de juguete para las muñecas.
Hello friends. I am Lelys. It gives me great pleasure to stop by and say hello. I am very happy because a little girl will be able to enjoy this new creation that I have made. I feel a lot of joy when I make crafts for my neighbors, they are always happy with what I make for them.
I hope you like it too. I take this opportunity to share the step by step to make this cute rocking chair or toy swing for dolls.
Hace unos meses tejí varias muñecas pequeñas, entre ellas unas bamboleras muy lindas. Son pequeñas muñecas cuyos brazos y piernas se realizan con cadenetas tejidas. Ahora mis vecinas me sugirieron hacerle un columpio. Al principio lo dudé porque creí que sería demasiado pequeño. Me tomó un tiempo idearlo y al fin me decidí a realizarlo. Aquí te muestro cómo lo hice.
A few months ago I knitted several small dolls, among them some very cute bamboleras. They are small dolls whose arms and legs are made with woven chains. Now my neighbors suggested me to make her a swing. At first I hesitated because I thought it would be too small. It took me a while to come up with it and finally I decided to make it. Here I show you how I made it.
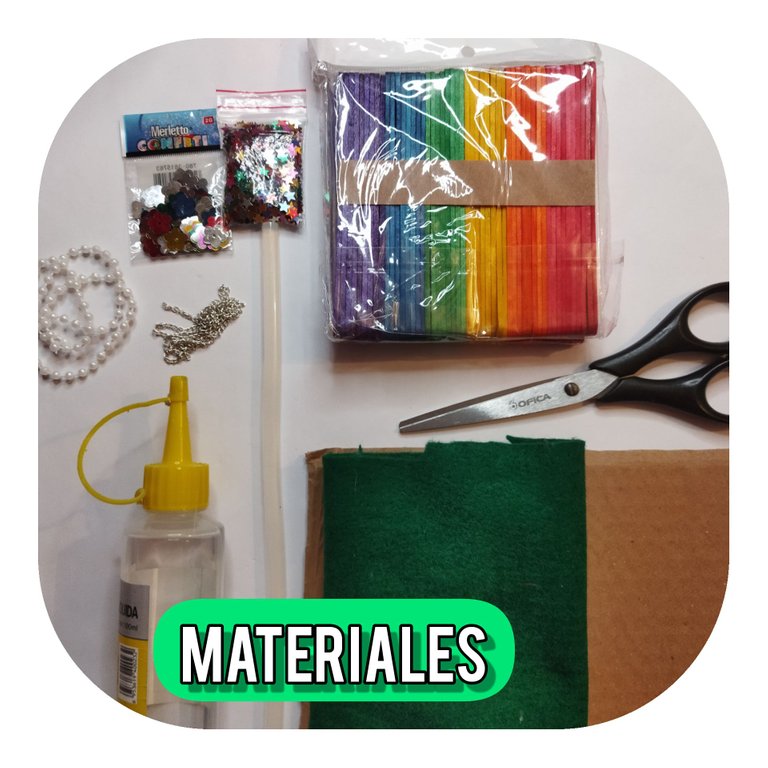
Los materiales que usé son: paletas de maderas. Estas paletas ya vienen pintadas en diferentes colores. Pegamento. Usé silicón frío y en barra. Tijeras. Fieltro de color verde. Cadenas delgada. Confites o lentejuelas. Cadena de cuentas plásticas color blanco. Estrellas de aluminio pequeñas en diferentes colores y cartón liso.
The materials I used are: wood pallets. These pallets come already painted in different colors. Glue. I used cold silicone and glue stick. Scissors. Green felt. Thin chains. Confetti or sequins. String of white plastic beads. Small aluminum stars in different colors and plain cardboard.
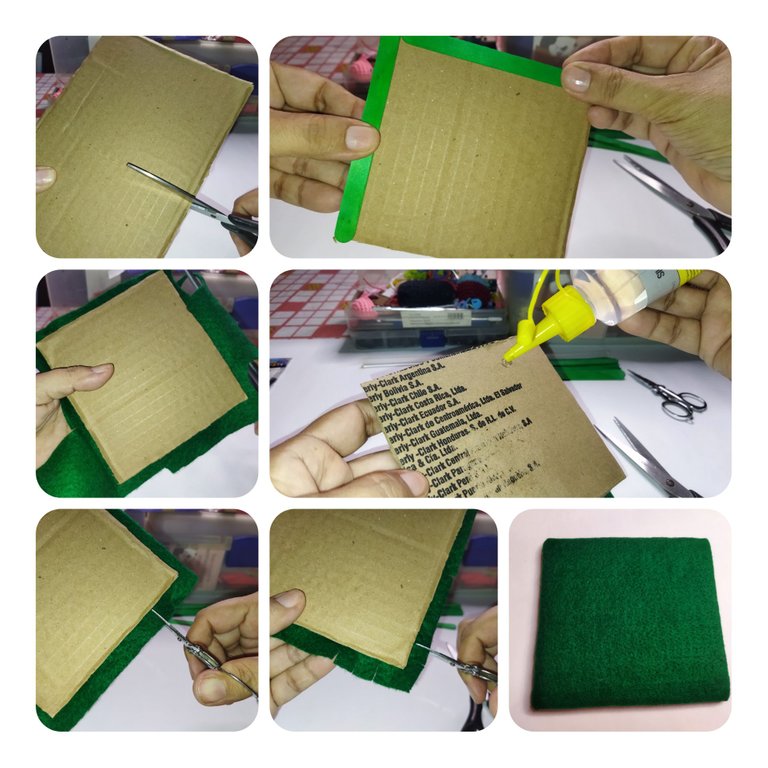
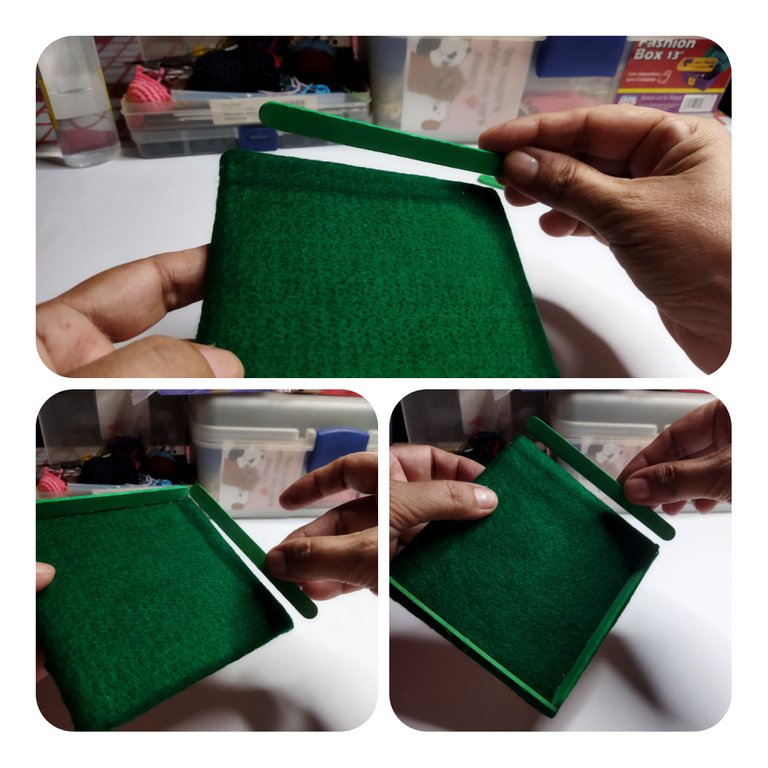
🌻 Empecé midiendo sobre el cartón según las medidas de las paletas. Luego corté un cuadrado en el cartón. Seguidamente lo monté sobre la tela de fieltro, medí, corté y pegué la tela para forrar el cartón. Para pegar las orillas utilicé silicón en barra o caliente.
🌻 I started by measuring on the cardboard according to the pallet measurements. I then cut a square out of the cardboard. Next I mounted it on the felt fabric, measured, cut and glued the fabric to line the cardboard. To glue the edges I used silicone stick or hot glue.
🌻 Sobre el cartón forrado con fieltro coloqué en tres de sus lados del cuadrado una paleta de color verde simulando una pequeña cerca.
On the cardboard lined with felt I placed a green palette on three sides of the square, simulating a small fence.
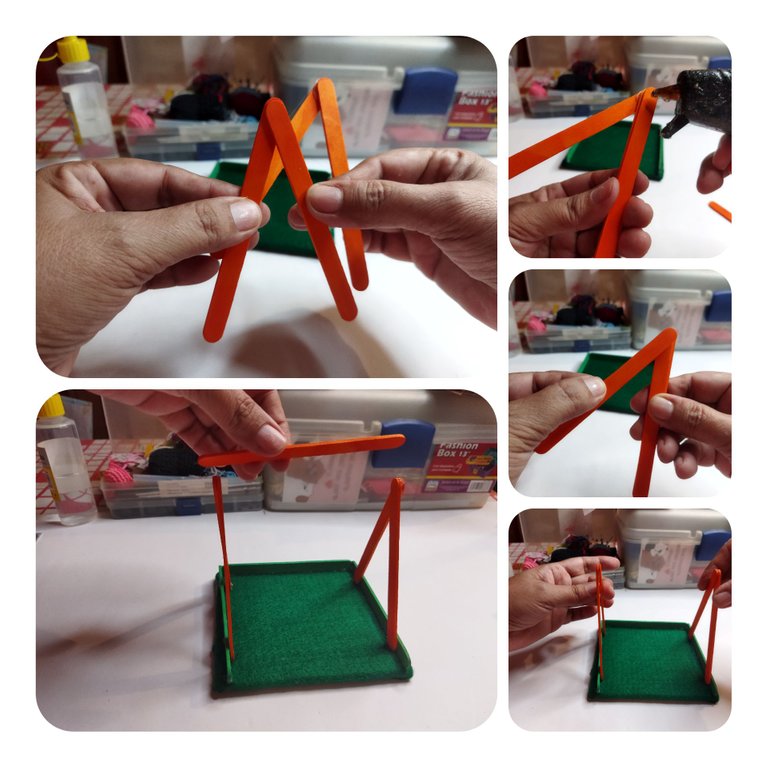
🌻 A continuación realicé las bases del columpio. Pegué en forma de A dos paletas de color naranja, hice dos piezas iguales. Las pegué en los laterales del cartón. Sobre ambas piezas pegué una paleta anaranjada para dar soporte. Usé silicón caliente.
Next I made the bases of the swing. I glued in the shape of A two orange pallets, I made two equal pieces. I glued them to the sides of the cardboard. On top of both pieces I glued an orange pallet to give support. I used hot silicone.
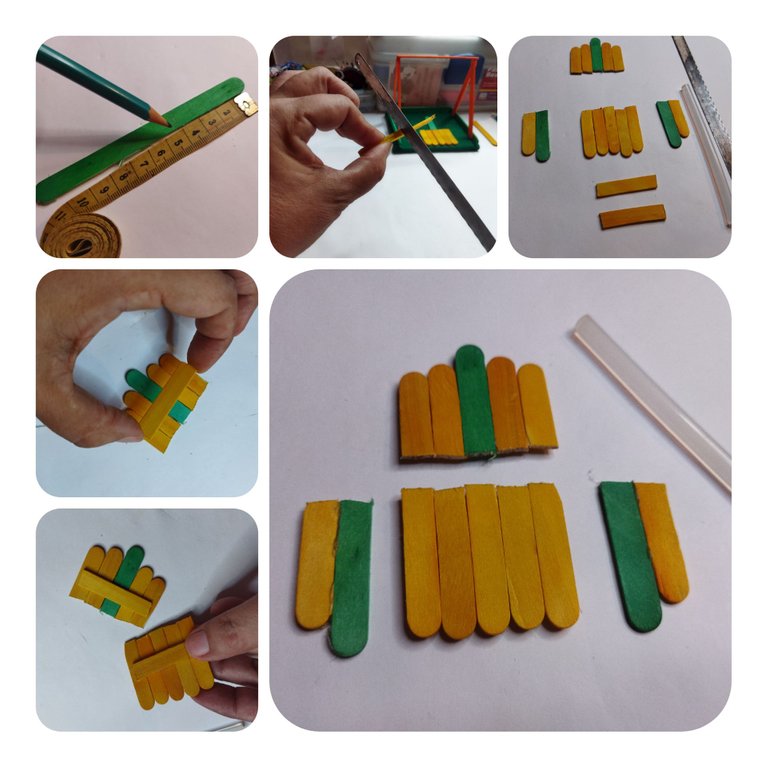
🌻 Para hacer la silla del columpio utilicé 14 trozos de paletas. Utilicé de diferentes medidas. Estas paletas las corté con una cegueta para serrucho. Inicié con una medida de 4 cm para el asiento y a partir de allí fui calculando para realizar el espaldar y los brazos de la silla. Adicional utilicé dos trozos para unir las piezas tanto de la silla como del espaldar. Luego procedí a unir todo y formar la silla.
🌻 To make the swing chair I used 14 pieces of pallets. I used different sizes. I cut these pallets with a saw blade. I started with a measurement of 4 cm for the seat and from there I was calculating to make the backrest and arms of the chair. Additionally I used two pieces to join the pieces of both the chair and the backrest. Then I proceeded to join everything together and form the chair.
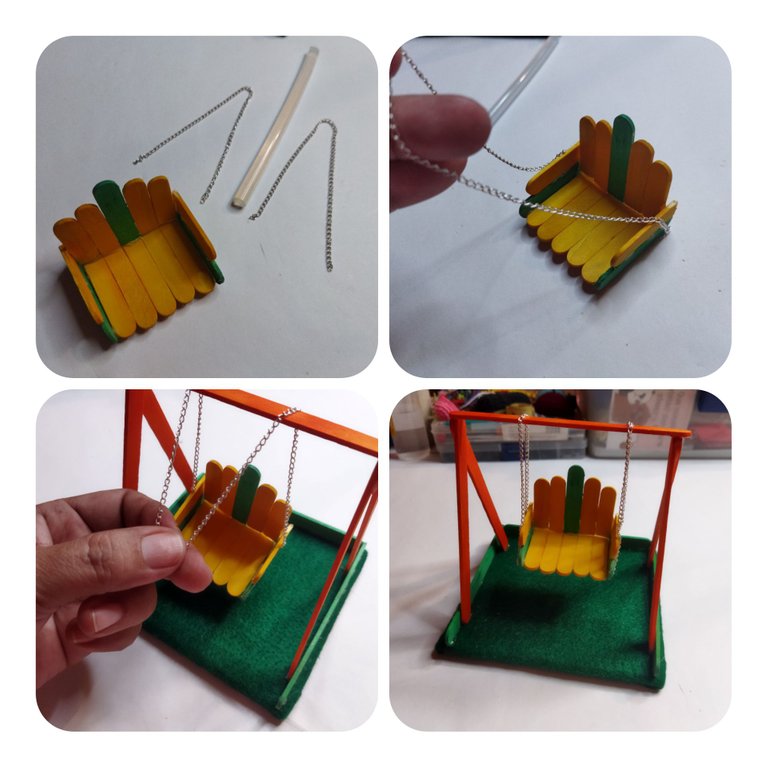
🌻 Después pegué en cada extremo de la silla un trozo de cadena para lograr que cuelgue y se balancee. Para hacer este paso medí cuidadosamente antes de pegar. Se debe pegar primero un extremo en la silla, medir bien y luego de pasar la cadena por sobre el columpio y pegar en el otro extremo. Luego fijé con silicón la cadena sobre el techo o la paleta que atraviesa los laterales.
🌻 I then glued on each end of the chair a piece of chain to make it hang and sway. To do this step I measured carefully before gluing. You must glue one end to the chair first, measure well and then pass the chain over the swing and glue on the other end. Then I attached the chain to the ceiling or the pallet that goes through the sides with silicone.
🌻 Cuando creí haber terminado se me ocurrió hacerle un techo para proteger a la linda BAMBOLERA de los rayos del sol. Tomé otro trozo de cartón, lo forré con una tela de seda roja. Decoré con perlas corridas y confites en forma de flor. Este techo lo pegué sobre la paleta anaranjada. Por los laterales en forma de A pegué unas estrellas de aluminio.
🌻 When I thought I was done, I thought of making a roof to protect the cute BAMBOLERA from the sun's rays. I took another piece of cardboard, lined it with a red silk fabric. I decorated it with pearls and confetti in the shape of a flower. This ceiling I glued on the orange palette. On the sides I glued some aluminum stars in the shape of an A.
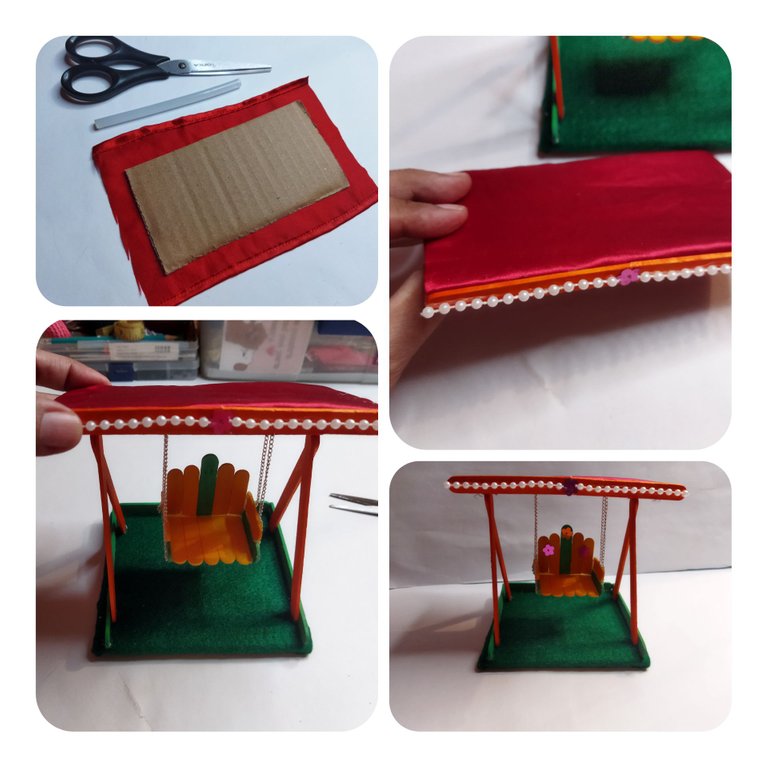
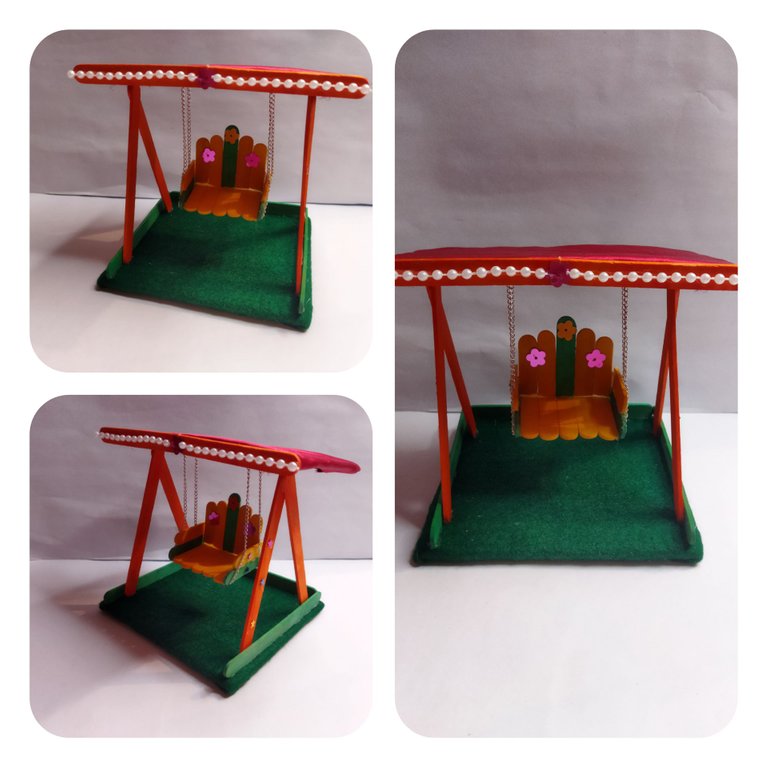
🌻 Así se ve el columpio que realicé para que mis vecinas jueguen con sus muñecas. Me gusta mucho el resultado. Como pueden apreciar queda muy lindo y se hace rápido. Lo más laborioso es cortar las paletas a la medida.
🌻 This is what the swing I made for my neighbors to play with their dolls looks like. I really like the result. As you can see it looks very nice and it is done quickly. The most laborious part is cutting the pallets to size.
Todas las fotos son de mi propiedad. Edité con Polish e Inshot. Usé el traductor de Deelp. Hasta la próxima.
All photos are my property. I edited with Polish and Inshot. I used Deelp translator. See you next time.
The rewards earned on this comment will go directly to the people sharing the post on Twitter as long as they are registered with @poshtoken. Sign up at https://hiveposh.com.
@creacioneslelys te pasaste... Me enamoré de esta cuchitura 😍😍😍 Felicitaciones amiga 🤗
Hola. Complaciendo a las niñas de mi calle. Feliz noche. Me alegro que te guste.
Ay no, esto quedó demasiado cuchi 🥰 Ya estoy grandecita, pero amo todo lo que tenga que ver con muñecas y sus accesorios 🤭
Hola. Que bueno que aún te gusten las muñecas. Eso es bueno. A la orden por si deseas alguna tejida. 😁
Thank you for sharing this amazing post on HIVE!
Your content got selected by our fellow curator @hafizullah & you just received a little thank you via an upvote from our non-profit curation initiative!
You will be featured in one of our recurring curation compilations and on our pinterest boards! Both are aiming to offer you a stage to widen your audience within and outside of the DIY scene of hive.
Join the official DIYHub community on HIVE and show us more of your amazing work and feel free to connect with us and other DIYers via our discord server: https://discord.gg/mY5uCfQ !
If you want to support our goal to motivate other DIY/art/music/homesteading/... creators just delegate to us and earn 100% of your curation rewards!
Stay creative & hive on!
Thanks you ☺️
Congratulations @creacioneslelys! You have completed the following achievement on the Hive blockchain and have been rewarded with new badge(s):
Your next target is to reach 4500 comments.
You can view your badges on your board and compare yourself to others in the Ranking
If you no longer want to receive notifications, reply to this comment with the word
STOPCheck out the last post from @hivebuzz:
Que lindo se ve, en verdad tienes mucha creatividad, has cuidado cada detalle. Qué lindo.
Hola amiga. Muchas gracias. Me distraje un rato haciendo esto. Saludos.
me encanta, de seguro la niña lo va a disfrutar.
Yay! 🤗
Your content has been boosted with Ecency Points, by @creacioneslelys.
Use Ecency daily to boost your growth on platform!
Support Ecency
Vote for new Proposal
Delegate HP and earn more