
Feliz y bendecido día tengan todos ustedes, es un gran placer para mí compartir nuevamente con todos ustedes en esta oportunidad les traigo mi primera participación en este concurso navideño que nos trae nuestra querida comunidad en la cual nos invita a compartir un poco de nuestra creatividad en cuanto a decoraciones y adornos navideños, para iniciar quiero invitar a los amigos @eumelysm @venusl19 @alexanderflx a participar y compartir con todos nosotros un poco de su creatividad y tradición navideña. Yo por mi parte en esta primera participación quise regalarles un muy lindo árbol navideño elaborado completamente con material reciclado donde el principal material utilizado fueron los cartones de huevos acá les comparto mi proceso de elaboración.
Have a happy and blessed day all of you, it is a great pleasure for me to share again with all of you on this occasion I bring you my first participation in this Christmas contest brought to us by our beloved community in which it invites us to share a little of our creativity in As for Christmas decorations and ornaments, to start I want to invite friends @eumelysm @venusl19 @alexanderflx to participate and share with all of us a little of their creativity and Christmas tradition.
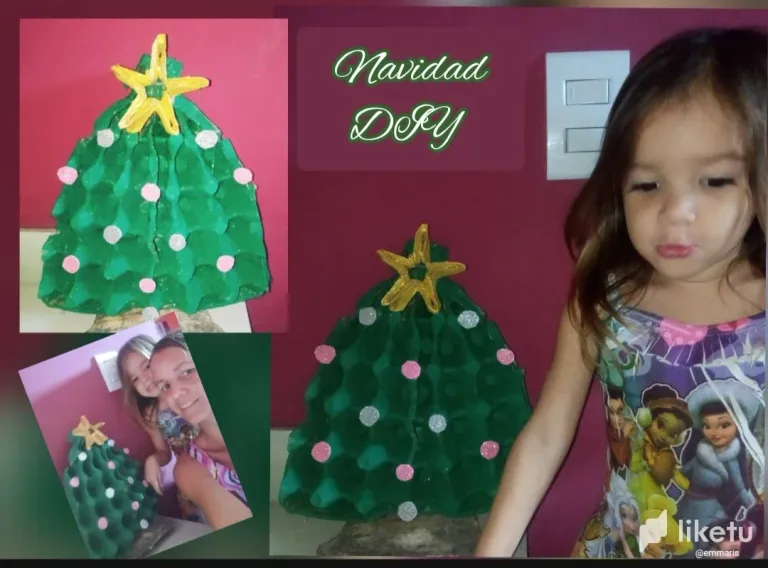
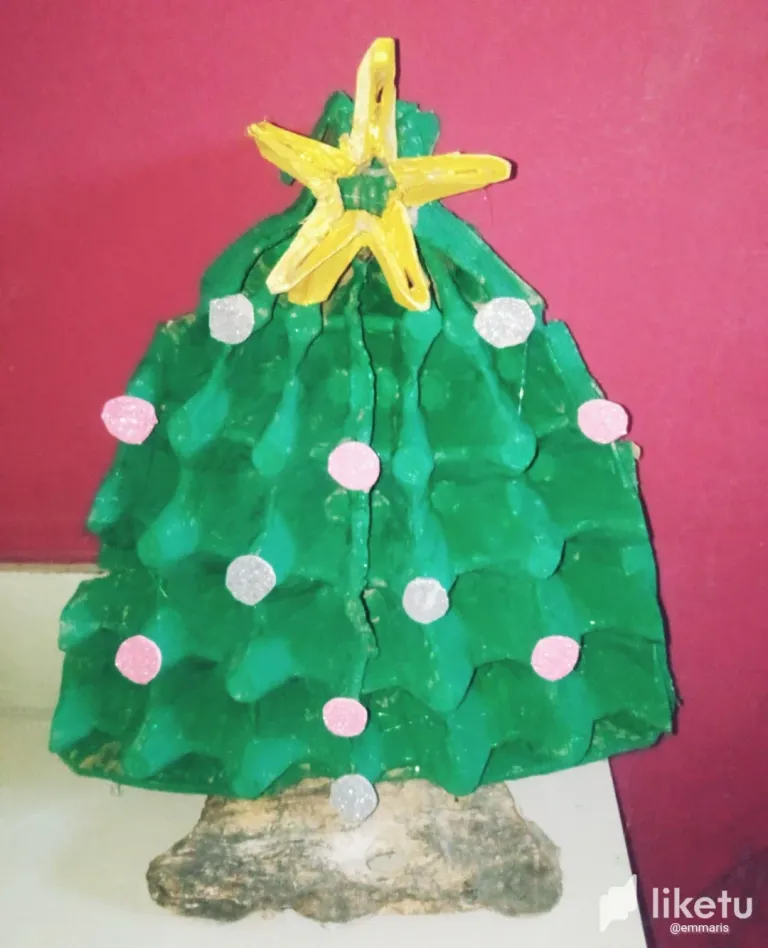
For my part, in this first participation I wanted to give you a very nice Christmas tree made entirely with recycled material where the main material used was egg cartons. Here I share my preparation process.
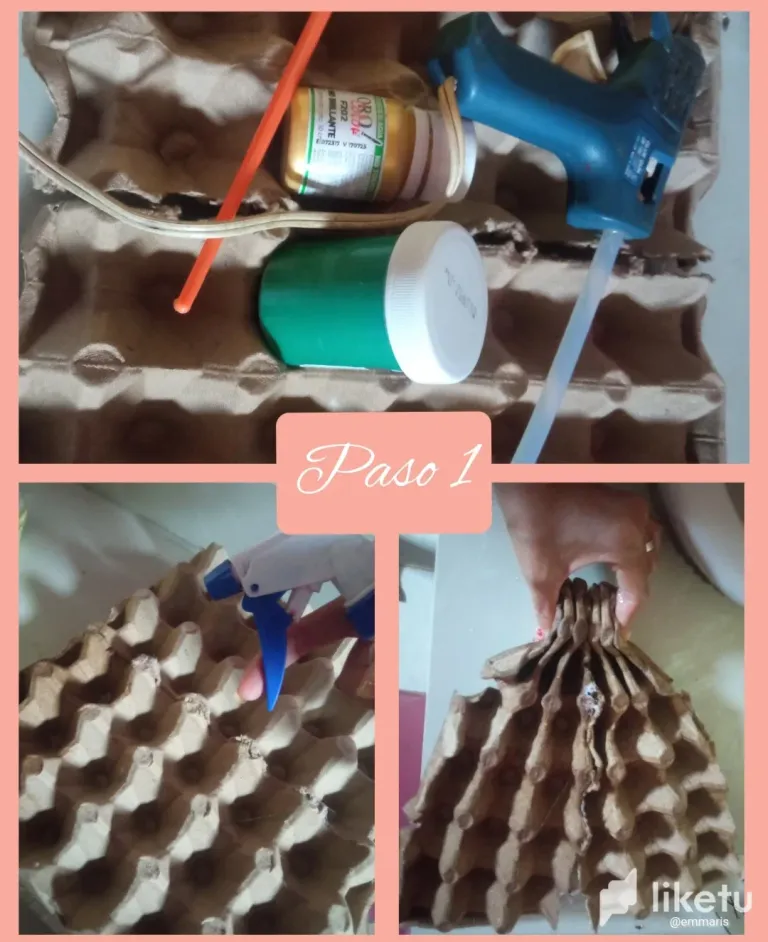
- cartones de huevos.
- pintura verde y dorada.
- retazos de foami.
- tijera.
- silicón
- egg cartons.
- green and gold paint.
- pieces of foam.
- scissors.
- silicone
✴️ Paso 1: para elaboración de este hermoso diseño iniciaremos elaborando la forma del árbol navideño para ello debemos utilizar un cartón de huevo completo en mi caso como no tenía uno completo decidí pegar dos medios cartones que tenía en casa pero si usted tiene uno completo úselo preferiblemente luego con un poco de agua y un spray rociamos y humedecemos el cartón de huevos hasta sentir que podemos moldearlo con las manos, entonces procederemos a unir la parte superior y realizar una forma piramidal o triangular tal cual pueden ver a continuación con una liga o trenza amasaremos la parte superior y colocaremos a secar el cartón.
✴️ Step 1: to create this beautiful design we will start by creating the shape of the Christmas tree. For this we must use a complete egg carton. In my case, since I did not have a complete one, I decided to glue two half cartons that I had at home, but if you have use a complete one, preferably then with a little water and a spray we spray and moisten the egg carton until we feel that we can shape it with our hands, then we will proceed to join the upper part and make a pyramid or triangular shape as you can see below with We will knead the upper part with a rubber band or braid and place the cardboard to dry.
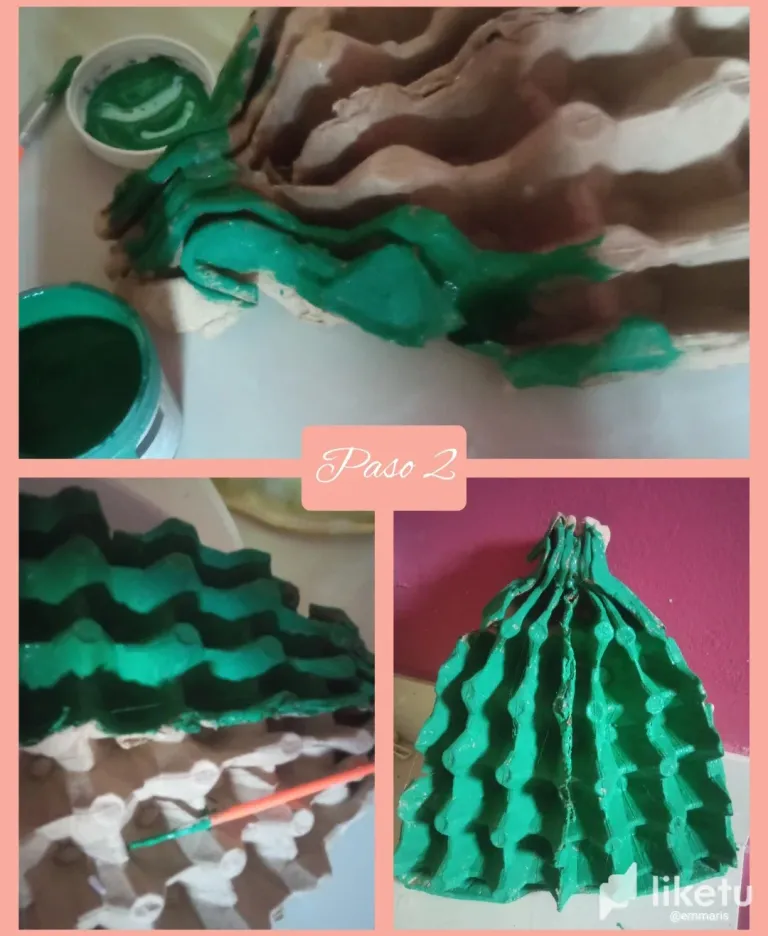
✴️ Paso 2: cuando el cartón ya esté seco lo tomamos nuevamente quitamos la liga que colocamos en la parte superior y con un poco de silicón pegamos para sostener esta forma puntiaguda y para continuar tomamos el pincel y la pintura verde y comenzamos a darle color a esta forma elaborada.
✴️ Step 2: when the cardboard is dry, we take it again, we remove the rubber band that we placed on the top and with a little silicone we glue it to hold this pointed shape and to continue we take the brush and the green paint and we begin to give color to this elaborate shape
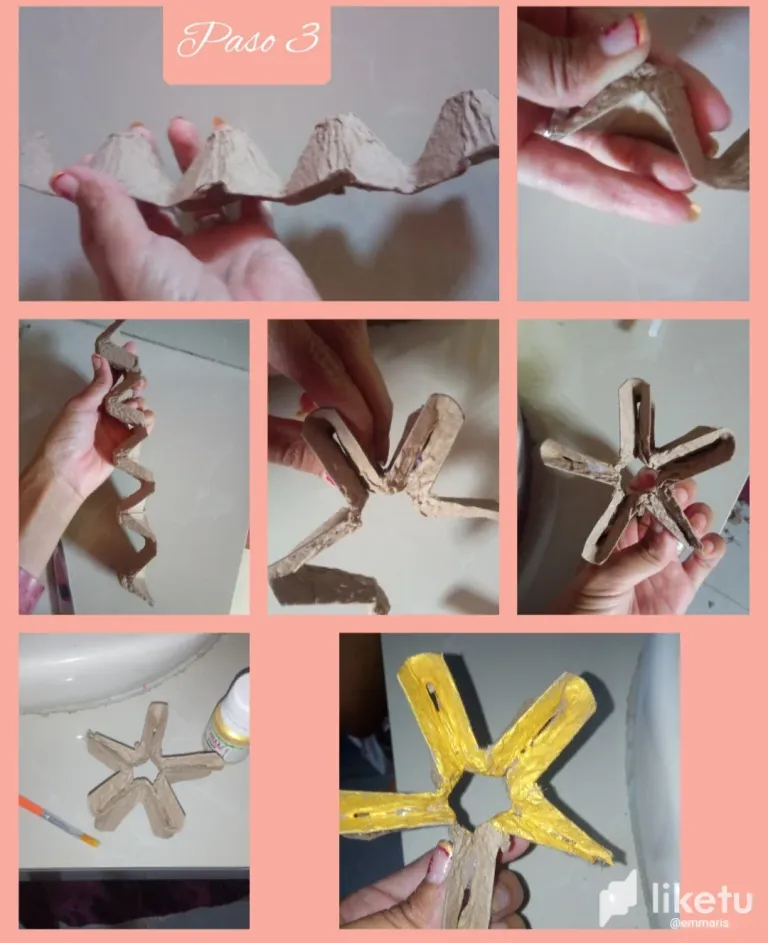
✴️ Paso 3: para continuar elaboraremos una linda estrella con el mismo material del cartón de huevos para ello cortaremos cinco piquitos de este cartón en forma lineal como pueden observarlo En las siguientes imágenes y luego a cada uno de estas formas le sacaremos una forma triangular tanto por la parte delantera como por la parte de atrás. Una vez teniendo ya la pieza como pueden elaborarla en las imágenes procedemos a moldearla y unir ambas puntas para sujetar un poco la forma podemos echar un poco de pega en las uniones y así daremos forma a esta hermosa estrella la cual luego para darle más belleza la pintaremos de color dorado y la colocaremos a secar.
✴️ Step 3: to continue we will make a nice star with the same material as the egg carton. For this we will cut five little points from this carton in a linear way as you can see in the following images and then from each of these shapes we will take a triangular shape both at the front and at the back. Once we have the piece as you can make it in the images, we proceed to shape it and join both tips to hold the shape a little.
We can put a little glue on the joints and thus we will shape this beautiful star which then, to give it more beauty, We will paint it gold and place it to dry.
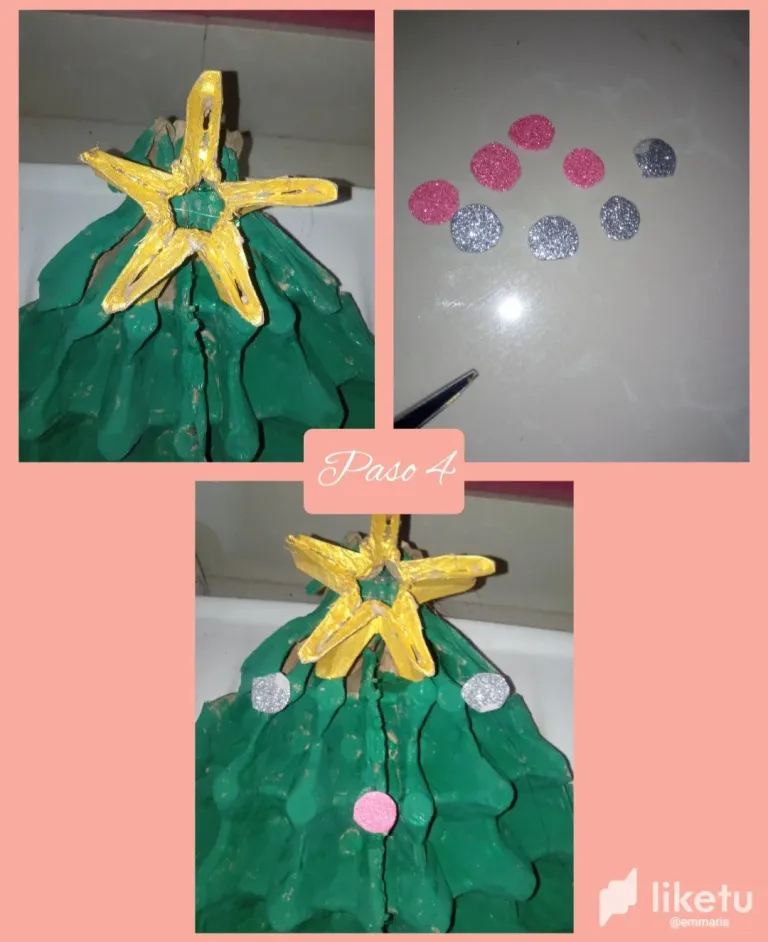
✴️ Paso 4: cuando ya esté seca la pintura de ambas piezas procederemos a pegar la estrella dorada en la parte superior de nuestro arbolito y para finalizar y darle un poco más de vistosidad y belleza a este lindo arbolito reciclado tomaremos pequeños retazos de foami o papel de color que tengamos en casa y realizaremos pequeñas formas circulares las cuales pegaremos en las puntitas del cartón de huevo en forma dispersa según sea su gusto y preferencia y así elaboraremos esta hermosa decoración navideña.
✴️ Step 4: when the paint on both pieces is dry, we will proceed to glue the gold star to the top of our tree and to finish and give a little more showiness and beauty to this cute recycled tree, we will take small pieces of foami or colored paper that we have at home and we will make small circular shapes which we will glue on the tips of the egg carton in a dispersed manner according to your taste and preference and thus we will create this beautiful Christmas decoration.
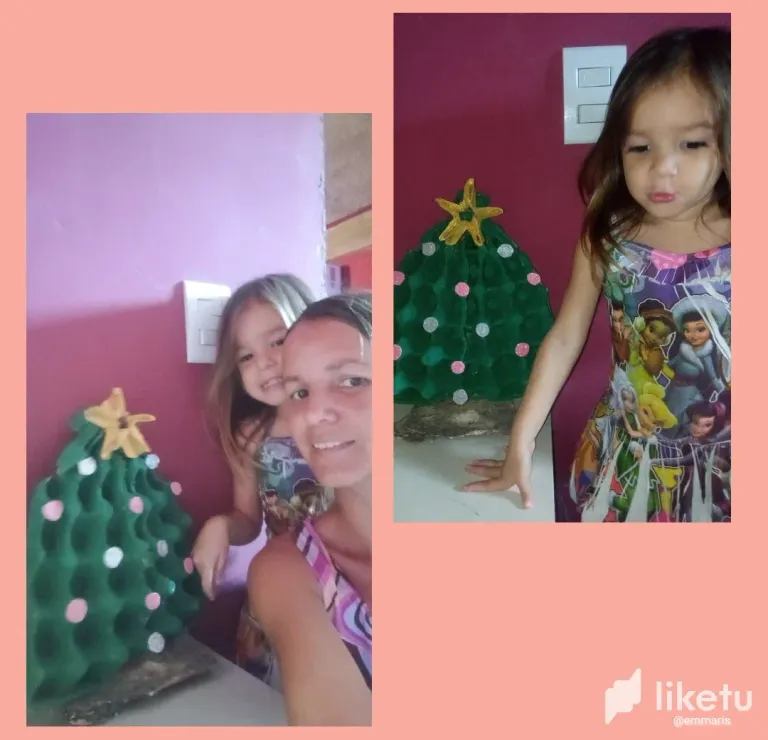
Mis queridos amigos Espero que esta muy sencilla elaboración sea del agrado de todos ustedes y este sencillo tutorial les pueda ser de utilidad y provecho para todos ustedes les agradezco por su visita. saludos y bendiciones.My dear friends, I tell you that my family has a large number of family traditions which we always try to carry out and share as a family. This preparation was made with my little girl who was next to me asking me and getting dirty with paint, but I think that's what it's about.
to share and create beautiful moments with our family. This is a very nice design in which we do not need to make large expenses and it can be a nice activity to return with our little ones and help us decorate our humble home.
Todas las Fotos son de mi autoría y fueron tomadas con mi Celular Redmi 9My dear friends I hope that this very simple preparation is to the liking of all of you and this simple tutorial can be useful and beneficial to all of you. I thank you for your visit.
greetings and blessings.
All Photos are my authorship and were taken with my Redmi 9 Cellphone
For the best experience view this post on Liketu
que lindo arbolito de navidad la niña se nota que lo disfruto muchos que buena participación
Amiga me encantó tu proyecto quedó estupendo te felicito
Graciase alegra que te haya gustado ☺️
Que hermoso árbol de navidad 🎄 me encanta, además tu niña se ve feliz con ese bello adorno navideño. Gracias por la invitación.
Saludos 😊
Gracias, espero ver tu participación ☺️
That is a nice Christmas tree. Thank you for participating in the contest. Good luck
thank you very much 😊
Muy creativo 🎄 la pequeña se ve feliz con el arbolito 😊🥰