Hello, dear hivers of this beautiful community. It is a pleasure to be with you and show you one more of my creations. Today I decided to decorate my baby's sandals for comfort reasons for her. I will tell you the reason for you to enter in context, it happens to my baby that this type of sandals bothers her a lot in the back of the foot and the part of the correct where the metal buckle is carved and it is very annoying for her because it came to irritate her skin. The first time we put these sandals on her nothing happened because they were too big for her, but as she has grown up they fit tighter and because of this I decided to decorate them with fabric. These sandals were given to me by a friend of my sister and I like them a lot, I didn't want to give them away and much less throw them away so I decided to give them another chance, I hope you like them and if it is the case this tutorial will be useful for you.

Hola, queridos hivers de esta hermosa comunidad. Es un placer estar con ustedes y mostrarle una más de mis creaciones. Hoy he decidido decorar las sandalias de mi bebé por motivos de comodidad para ella. Les contaré la razón para que entren en contexto, a mi bebé le sucede que este tipo de sandalias le molesta mucho en la parte de atrás del pie y la parte de la correcta donde está la hebilla de metal le talla y es muy molesto para ella porque llegó a irritar su piel. La primera vez que le colocamos estas sandalias no pasó nada porque estas le quedaban grandes, pero como ya ha crecido le quedan más ajustadas y debido a esto decidí decorarla con tela. Estas sandalias me las regaló una amiga de mi hermana y me gustan bastante no quería regalarlas y mucho menos botarlas por eso decidí darle otro otra oportunidad, espero que les guste y si es el caso les sea de utilidad este tutorial.
Materials:
- Sandals.
- Piece of fabric.
- Hand needle.
- Sewing machine.
- Scissors.
- Thin elastic.
- Shiny beads.
- Lighter.
- Height stick.

Materiales:
- Sandalias.
- Retazo de tela.
- Aguja manual.
- Máquina de coser.
- Tijera.
- Elástico delgado.
- Cuentas brillantes.
- Encendedor.
- Palito de altura.
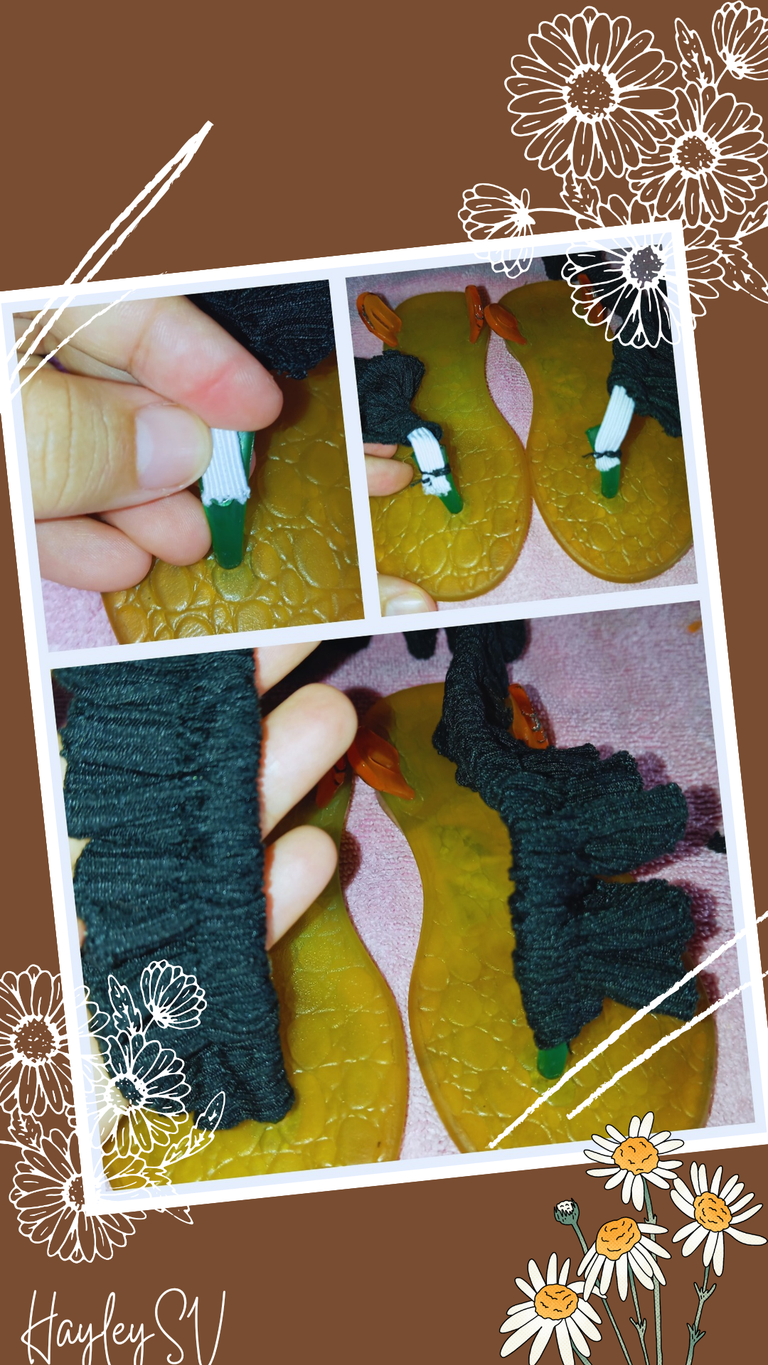
Step 1:
Cut the straps in the center of the sandal and the sides taking a rounded shape, with the lighter soften the edges, heat some lace or wire and we will make a hole in the center of the sandal where the grip of the toes goes.

Paso 1:
Cortar las correas del centro de la sandalia y de los lados sacándole una forma redondeada, con el encendedor suavizar los bordes, calentar alguna puntilla o alambre y haremos un agujero en el centro de la sandalia donde va el agarre de los dedos.
Step 2:
Cut 2 strips of the thickness you need, fold them and sew with a straight stitch leaving a space of one centimeter in the fold, this will be to introduce the elastic, this must have the length of the center of the sandal plus the length of the strap to hold the foot.

Paso 2:
Cortar 2 tira del grosor que necesitemos, doblarla y coser con puntada recta dejando un espacio en el doblez de un centímetro, este será para introducir la elástica, esta debe tener el largo de el centro de la sandalia más el largo de la correa para sujetar el pie.
Step 3:
Pull a little the elastic and sew to the center of the sandal for this it must be necessary to have made the hole in the rubber, then cover with fabric, make a stitch that is not seen, it should be as shown in the photos.
Paso 3:
Halar un poco la elástica y coser al centro de la sandalia para esto ha de ser necesario haberle hecho el agujero a la goma, luego cubriremos con la tela, hacerle una puntada que no se vea, debe quedar como se aprecia en las fotos.
Step 4:
With the piece that we cut from the center of the sandals we will measure the height at which to sew the strap of the sandal, once this is done we will proceed to sew. We secure the sides by measuring with the strap that we had cut we will place the fabric one below and the other above the rubber and we will seal with a seam in the center where the hole is.

Paso 4:
Con la pieza que cortamos del centro de las sandalias mediremos la altura a la cual coser la correa de la sandalia hecho esto procederemos a coser. Los lados los aseguramos midiendo con la correa que habíamos cortado colocaremos la tela una por debajo y la otra por encima de la goma y sellaremos con una costura por el centro donde está el agujero.
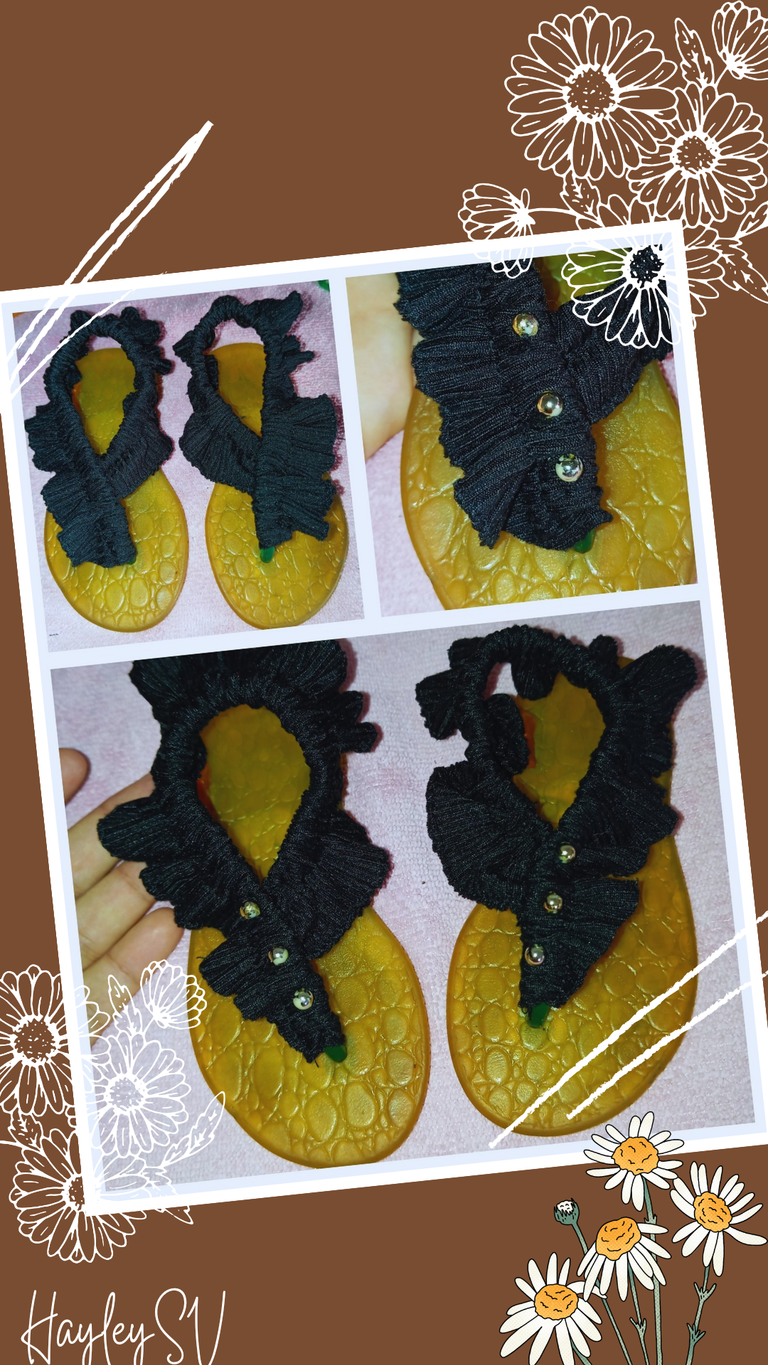
Step 5:
I placed the shiny beads and in the center of the sandal I cut out trying to reduce the volume from the tip of the sandal upwards and with this we are done.
Paso 5:
Solo quedan hacer los detalles, yo le coloqué las cuentas brillantes y en el centro de la sandalia recorte tratando de disminuir el volumen de la punta de la sandalia hacia arriba y con esto ya habremos terminado.
This idea seems super useful to me because I think that all women have bought sandals and they bother us. Personally, it has happened to me that the sandals usually take out the leather or the skin on the sides of the back of the heel where the tendon is and in the same way it has happened to me where the toe goes for the support of the sandal, If it has a sharp edge or is very hard that part I have broken the skin there and well I know how this feels so I did not want to leave the sandals like that for my daughter but, I preferred to transform it because the only thing was that the material was very annoying to her.

Esta idea me parece súper útil ya que creo que a todas las mujeres nos ha pasado que compramos unas sandalias y nos molestan. A mí en lo personal me ha sucedido que las sandalias suelen sacarme los cueritos o la piel de los costados de la parte de atrás del talón dónde está el tendón y de igual manera me ha sucedido que en donde va el dedo para el soporte de la sandalias, si tiene algún filo o es muy duro esa parte me has roto la piel allí y pues ya yo sé lo que se siente esto así que por eso no quise dejar las sandalias así para mi hija sino,que preferí transformarla porque igual a ella le quedan muy bien lo único era eso que el material le molestaba mucho
I hope this tutorial is useful and you can take advantage of it, tell me how you like this idea in the comments. A hug from the distance and take care of yourselves guys.
Espero sea de utilidad este tutorial y pues puedan sacarle provecho, cuéntenme que tal les parece esta idea en los comentarios. Un abrazo desde las distancia y cuídense mucho chicos.

Translation with DeepL
Photos taken with Redmi 12
Editing done in Canva
Traducción con DeepL
Fotos tomadas con Redmi 12
Edición realizada en Canva
Congratulations @hayleysv! You have completed the following achievement on the Hive blockchain And have been rewarded with New badge(s)
Your next target is to reach 2000 upvotes.
You can view your badges on your board and compare yourself to others in the Ranking
If you no longer want to receive notifications, reply to this comment with the word
STOPoh wow! The transformation is elegant, I even prefer the current look to before, and the fact that it is even more comfortable for your daughter is amazing, well done mama !diy
Thank you very much ☺️ My baby was delighted and comfortable.
You can query your personal balance by
!DIYSTATSCongratulations, you received an ecency upvote through the curator @ahmedhayat. Keep spreading love through ecency
aha that looks so beautiful, you are amazing. kepe up the good work. have a great day and week ahead.
Thank you for your support. 🥰
que genial! muy buenas para cambiarlas y darle otro toque!
great! very good to change them and give them another touch!
Así es, podemos darle otra oportunidad teniendo creatividad. Saludos 😊
This is beautiful, it looks so cute on her legs, you've done a great job with the transformation.
Thank you very much ☺️ Everything is for the good of my baby girl, the truth is that the material she had before was hurting her. Regards ☺️
Wow! I so much love the transformation. you sure did a nice job so thumbs up 👍
Thank you very much ☺️ 🥰
This is really beautiful