ENGLISH VERSION
Hello #DIYHub community, today I have the pleasure of publishing again in this beautiful community
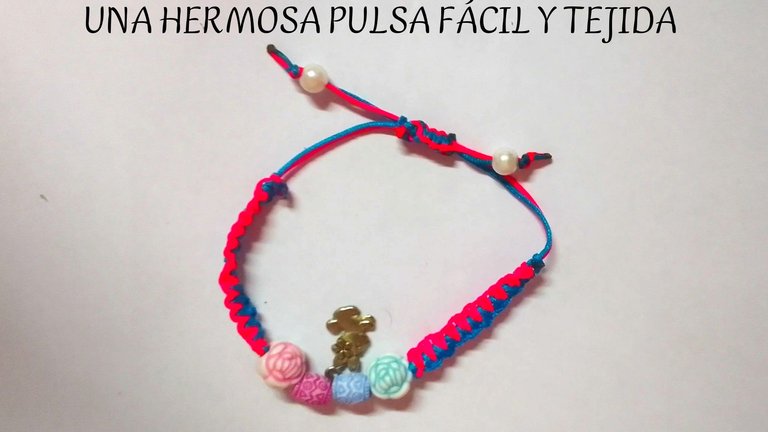
And this time I bring you a very easy way to make a pulse just using Chinese thread and some beads. It is really very simple and easy to make and above all very pretty.
Materials
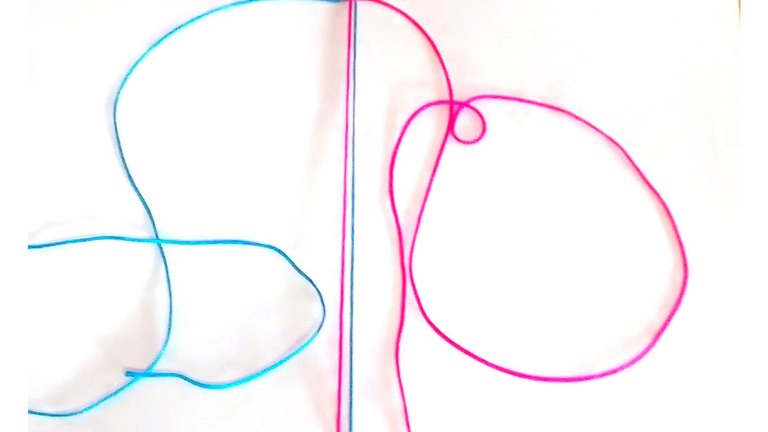
- 10 cm of pink Chinese thread and 10 of blue Chinese thread
- 25 cm of blue Chinese thread and 25 of pink Chinese thread
- Pearls (These are optional since you can customize them)
- 5cm of pink Chinese thread and 5cm of blue Chinese thread
FIRST STEP
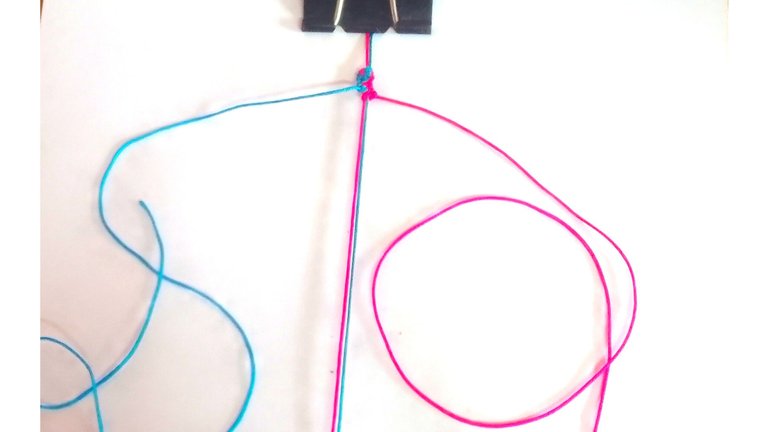
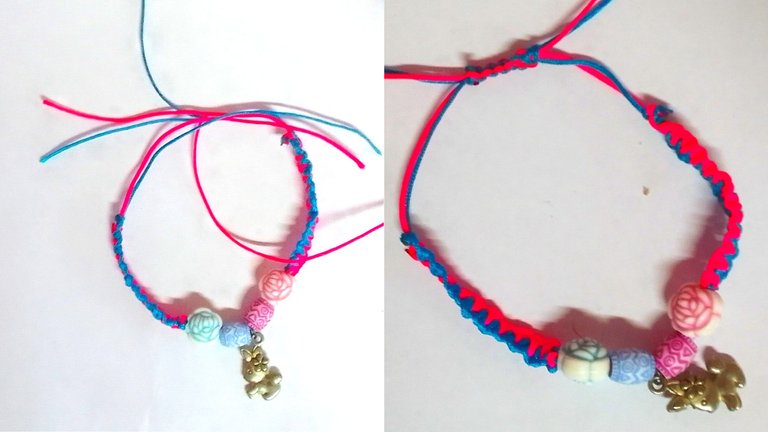
I started by placing the two 10 cm pieces of Chinese thread lengthwise and securing them with a tie in each corner so that it was well stretched so that the pink one was on the left and the blue one on the right. Then with a knot I joined the two 25cm pieces of thread. And I made a single 50cm one. I passed it under the two 10cm threads that were well stretched, leaving the side of the 25cm blue thread on the side of the 10cm pink thread and the 25cm pink thread remaining on the side of the 10cm blue thread.
SECOND STEP
After having the thread well organized, I began to weave the pulsa in this way: the 25cm blue thread is passed under the 10cm pink thread and a knot is tied and then with this same 25cm blue thread it will be tied again. go under it but this time tie a knot with the two 10cm threads and repeat these two procedures with the other side; that is to say. We pass the 25cm pink thread under the 10cm blue one, we tie a knot and then with this same 25cm pink thread we pass it under it again but this time with the two 10cm threads. This procedure is repeated several times
THIRD STEP
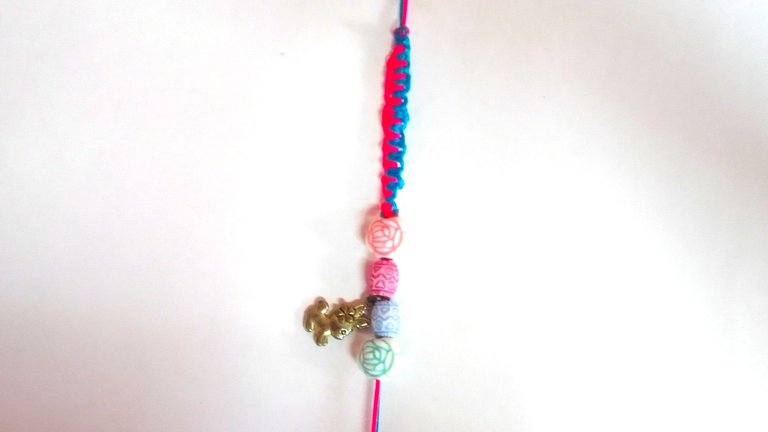
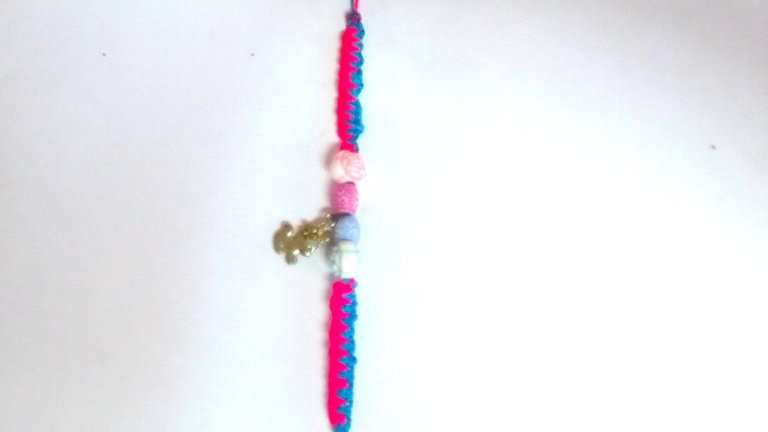
When the fabric is a little more advanced, it is personalized. I preferred to add pearls in rose shapes and in basin shapes and a rabbit pendant. I placed it in the following way: first the pearl with the pink rose and the pink basin, then the rabbit pendant, then the blue basin and finally the blue rose.
FACE STEP
After having customized the pulse, continue knitting until the thread runs out.
FIFTH STEP
Finally I closed the pulse. I had to use the 5 cm of blue Chinese thread, the 5 cm of pink thread, the uniforms for both of them for a knot and I started to knit the closure, this one if I did it with the macrame stitch; I passed the blue thread above the 10 cm threads just like the pink one, but I put this one under the 5 cm blue one.
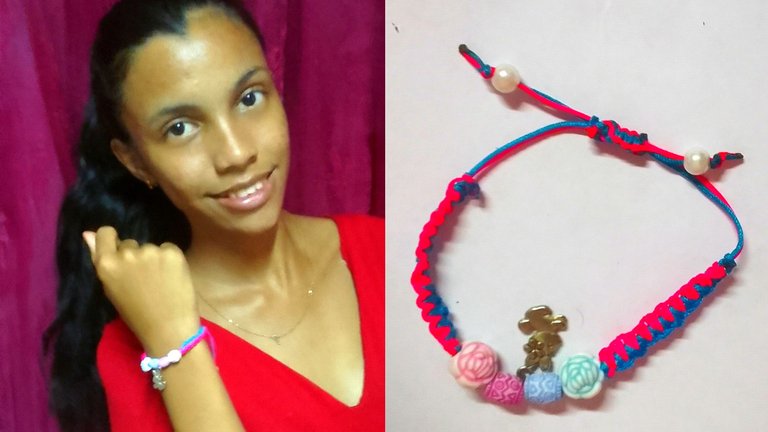
And this was the result of my press. I hope you like it and let me know in your comments. I wish you all a happy day
The photos were taken by my Samsung Galaxy A 03 Core phone and edited in canva
The text was translated by Deepl
VERSIÓN EN ESPAÑOL
Hola comunidad de #DIYHub hoy tengo el placer de publicar nuevamente en esta hermosa comunidad
Y esta vez les traigo una forma muy fácil de realizar una pulsa solo utilizando hilo chino y alguna perlitas. En verdad es muy sencilla y fácil de hacer y sobretodo muy bonita .
Materiales
- 10 cm de hilo chino rosado y 10 de hilo chino azúl
- 25 cm de hilo chino azúl y 25 de hilo chino rosado
- Perlitas ( Estas si son opcionales ya que las pueden personalizar)
- 5cm de hilo chino rosado y 5cm de hilo chino azúl
PRIMER PASO
Comencé colocando los dos pedazos de hilo chino de 10 cmm a lo largo y los sujete con una precilla en cada esquina para que quedara bien estirado de tal forma que el rosado quede en la izquierda y el azúl en la derecha . Luego con un nudito uní los dos pedacitos de hilo de 25cm. Y así formar uno solo de 50cm. Lo pasé por debajo de los dos hilos de 10cm que estaban bien estiradosss quedando el lado de el hilo azúl de 25cm de el lado de el hilo rosado de 10cm y el hilo rosado de 25cm quedando de el lado de el hilo azúl de 10cm
SEGUNDO PASO
Después de tenerlo bien organizado el hilo comencé a tejer la pulsa de esta forma: el hilo azúl de 25cm se pasa por debajo de el rosado de 10cm y se le hace un nudo y luego con este mismo hilo azúl de 25cm se va a volver a pasar por debajo pero esta vez de los dos hilos de 10cm se le hace un nudo y se repite estos dos procedimientos con el otro lado ; es decir. El hilo rosado de 25cm lo pasamos por debajo de el azul de 10cm le hacemos un nudo y luego con este mismo hilo rosado de 25cm lo volvemos a pasar por debajo pero esta ves de los dos hilos de 10 cm. Este procedimiento se repite varias veces
TERCER PASO
Cuando el tejido este un poco mas avanzado se personaliza yo preferí ponerle perlas en formas de rosa y en formas de cuencas y un dige de un conejo. Yo lo coloqué de la siguiente manera primero la perla con la rosa rosada y la cuenca rosado luego el dije de conejo después la cuenca azúl y por ultimo la rosa azúl
CUARRO PASO
Después de haber personalizado la pulsa continúe con el tejido hasta terminarse el hilo
QUINTO PASO
Por último realicé el cierre de la pulsa . tuve que utilizar los 5 cm de hilo chino azúl los 5cm de hilo rosado los uní a los dos por un nudito y comencé a tejer el cierre este si lo hice con el punto macrame ; el hilo azúl lo pase por arriba de los hilos de 10 cm al igual que el rosaso pero este lo puse por debajo de el azúl de 5cm .
Y este fue el resultado de mi pulsa espero que les guste y que me lo hagan saber en sus comentarios. Les deceo a todos un feliz día
Las fotos fueron tomadas por mi teléfono Samsung Galaxy A 03 Core y editadas en canva
El texto fue traducido por Deepl
The 10cm, 20cm and 50cm all over the steps can be very confusing 😅 but I guess it will become easier when following along with the steps. Thanks for taking out time to teach us how to make this, I'm sure someone will find this tutorial very useful
Thanks for your advice .
It is so colorful and charming. Love its design. Well done! Thank you for sharing this.
Thanks 🌼🌹🌻💐
https://reddit.com/r/blogs/comments/1azw7lw/a_beautiful_and_easy_pulse_una_hermosa_pulsa/
The rewards earned on this comment will go directly to the people( @heidy08 ) sharing the post on Reddit as long as they are registered with @poshtoken. Sign up at https://hiveposh.com.
Thanks
Lindo trabajo
!DIY
Gracias🌻🌹💐
Que bonito trabajo , una pulsa muy linda 👍
Gracias🌻🌼💐
This is called shambala in my country
I love the choice of colours you used
This is great work
Well done
Thanks
You’re welcome
Me encanta como queda el nudo macramé, especialmente cuando es realizado con hilo chino. Te quedó muy bonita esta pulsera.
Gracias 🌻💛🌼
esta bello! un gran trabajo!
it's beautiful! great job!
Gracias💐🌹