ENGLISH VERSION
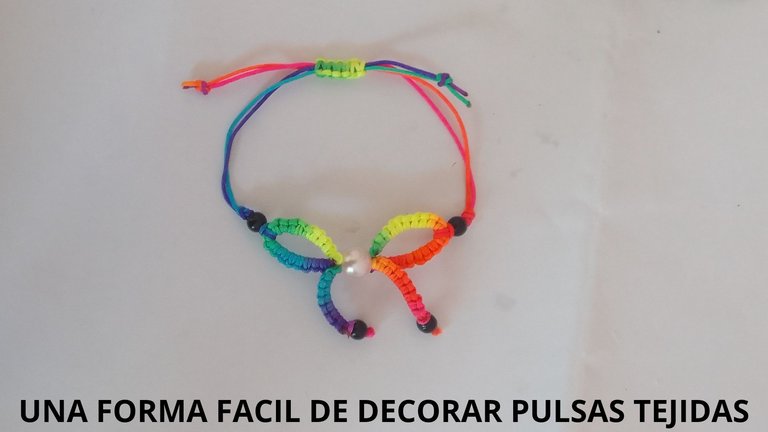
Hello #DIYHub community, today I have the pleasure of posting again in this beautiful community. This time I bring you an easy way to decorate woven pulsations. With an easy tie fabric. For this you only need Chinese thread of the color you prefer, I chose multicolored. Three pearls, one of them with the hole in the middle a little larger.
FIRST STEP
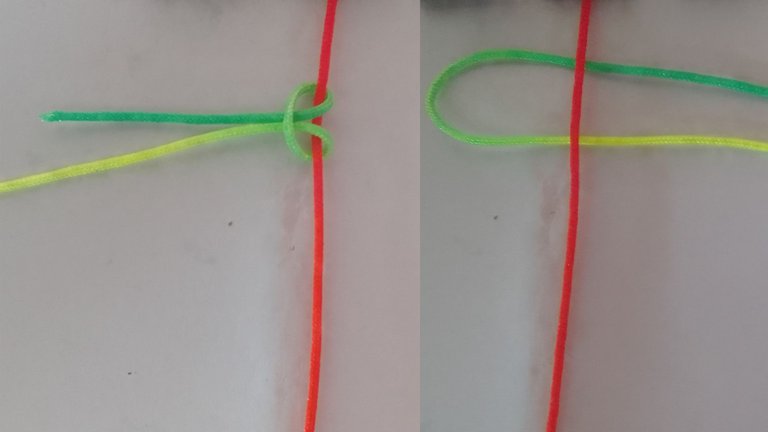
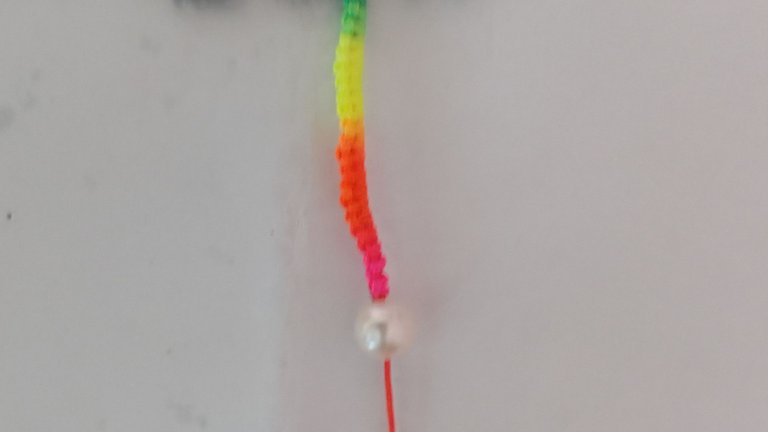
The first thing is to place 20cm of Chinese thread in such a way that it is well stretched and with a small piece of 30cm we will proceed to fold it at the end of the thread in such a way that a small piece is left pointed upwards. With the folded thread we pass it under the one that It is well stretched, always leaving a little piece unwoven. From right to left, always making sure that the tips are on the right side. And through the space left on the left side we will insert the two ends, passing them over the stretched thread, we tighten and our first lark knot is already made.
SECOND STEP
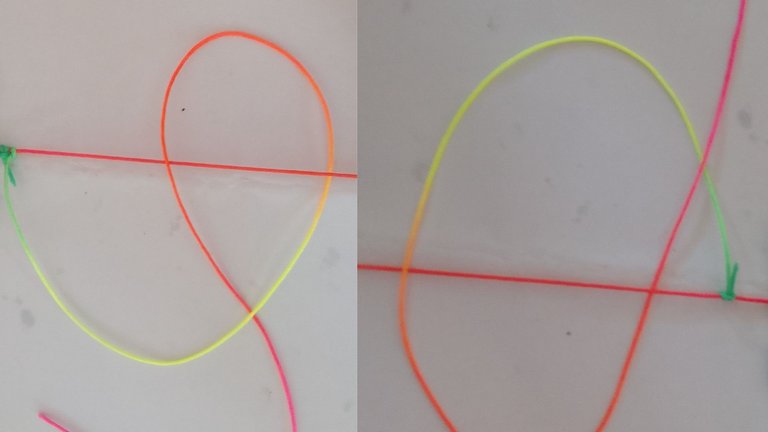
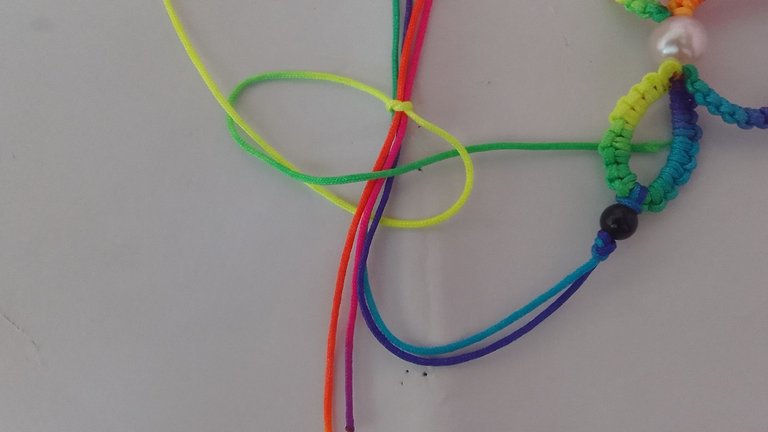
We will make the following knots in a different way. With the tips that were left on the left side. We will take the longest one and cross it to the right side above the stretched thread and we will cross it again to the left but this time below the stretched thread. This procedure is repeated but this time we will take the thread that is on the left and we will cross it to the right side but this time underneath and we will return it to the left side below the stretched thread. And so on until you have made 20 knots.
THIRD STEP
The next thing will be to place the pearl that has the largest hole on the thread that is well stretched. This will be the center of our bond.
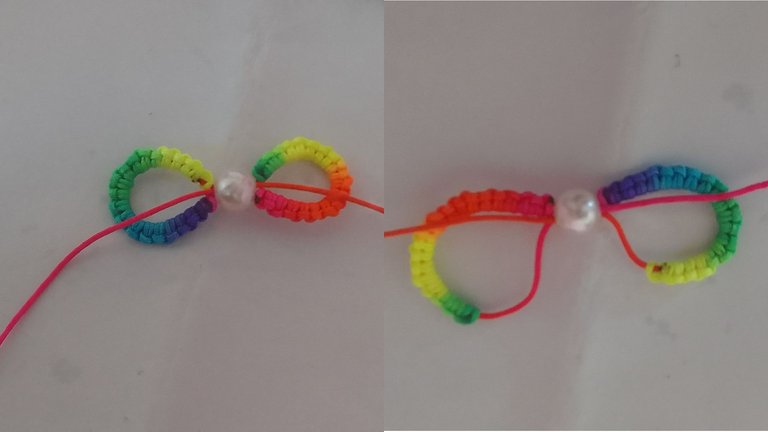
FOURTH STEP
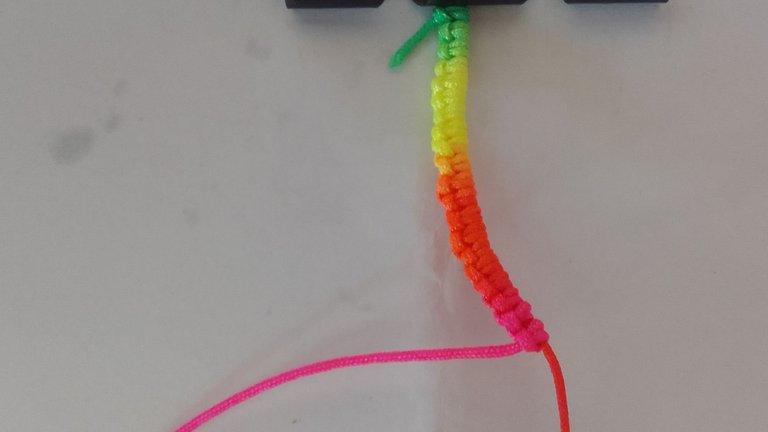
Now to carry out the other part, we will repeat the same procedure as before for this side. We will take another piece of 30cm Chinese thread and repeat the procedure until we have 20 lark knots. Pending that we have a little piece left over without weaving
Presentación Propuesta de Proyecto Scrapbook Doodle Marrón y Blanco_20240308_111947_0000.jpg

FIFTH STEP
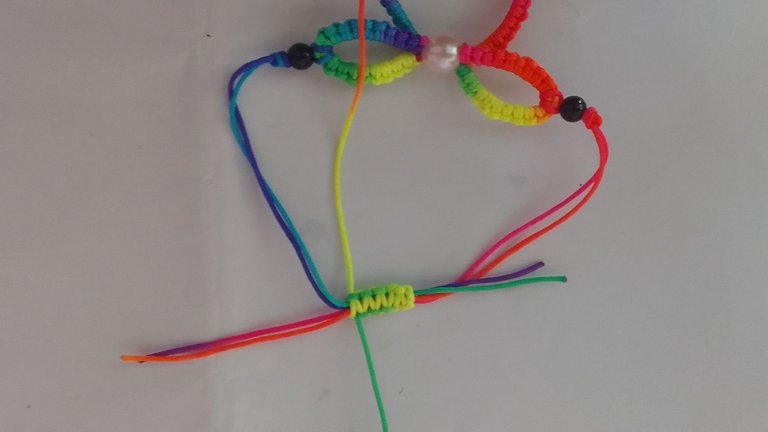
To make it take the shape of a bow, we will take one of the unwoven ends and insert it through the hole of the pearl and do the same with the other end. We press and our bond is already taking shape.
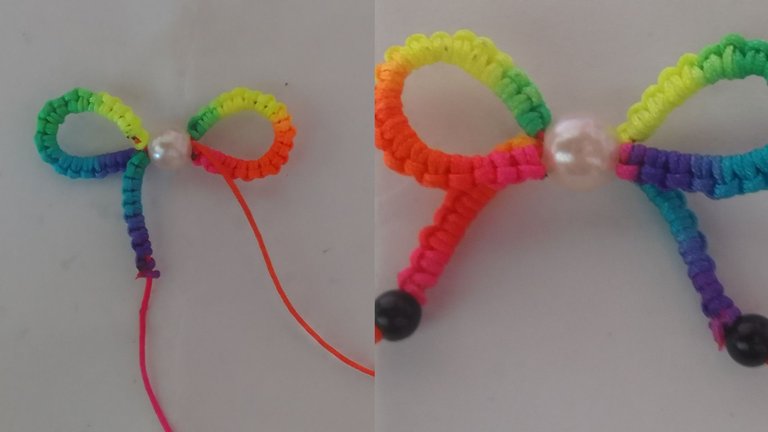
SIXTH STEP
For the legs of the bow, we will take the two ends that were left unwoven and we will knit each leg with approximately 10 knots with the lark knot. We place the two small pearls at the end of the legs of the bow
SEVENTH STEP
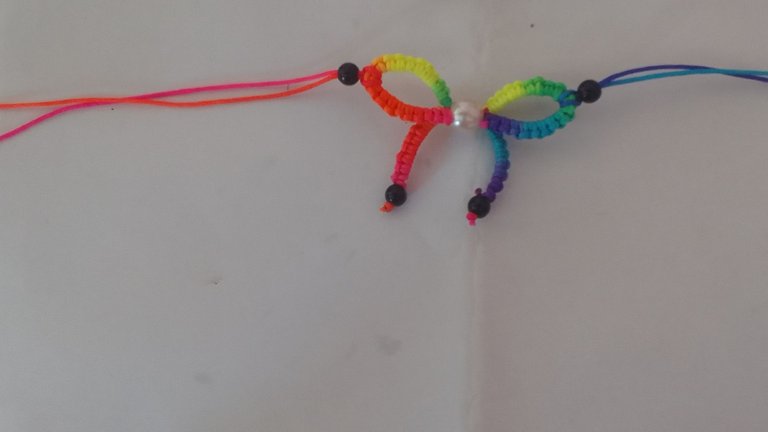
Now that we have our loop made, we will begin to perform the pulse. We will take a 14cm piece of Chinese thread and fold it in half. We pass it through one of the spaces of the loop, leaving the folded part on the side of the loop and the ends of the thread facing out. And we make a lark knot. We do the same on the other side. And now we have our pulse, we only need the closure
EIGHTH STEP
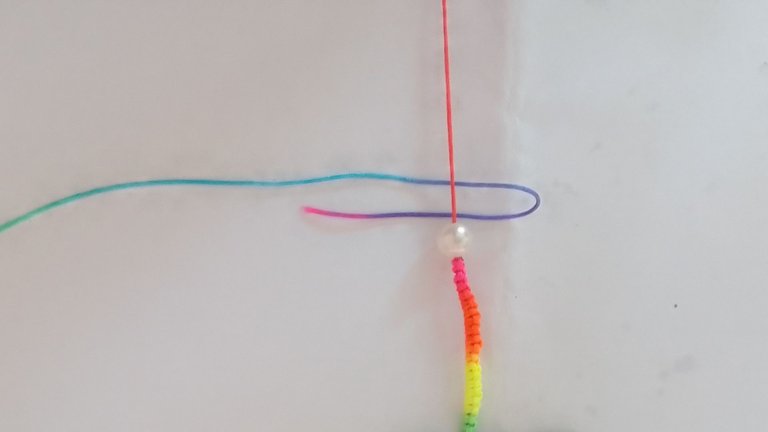
For the closure we will take a 10cm piece of Chinese thread and with the four ends of the pulse placed in the shape of a cross, we will begin to weave the closure. We take the 10cm thread and insert it under the tips in a cross shape. We make a normal knot. And we begin to weave with the macrame stitch.
This was the result of my work. Hope you like. I just have to wish you all a happy day.

The photos were taken by my Samsung Galaxy A 03 Core phone and edited in canva
The text was translated by Deepl
VERSIÓN EN ESPAÑOL
Hola comunidad de #DIYHub hoy tengo el placer de publicar nuevamente en esta hermosa comunidad. Esta vez les traigo una forma fácil de adornar pulsas tejidas. Con un fácil lazo tejido. Para esto solo se necesita hilo chino de el color que prefieras yo lo elegí multicolor. Tres perlas una de ellas con e agujero de el medio un poco mas grande.
PRIMER PASO
Lo primero es colocar 20cm de hilo chino de tal manera que quede bien estirado y con un pedacito de 30cm procederemos a doblarlo al final del hilo de tal manera que quede un pedacito de punta hacia arriba con el hilo doblado lo pasamos por debajo de el que esta bien estirado siempre dejando sin tejer un pedacito. De derecha a izquierda siempre pendiente de que las puntas queden del lado derecho. Y por el espacio que queda del lado izquierdo introduciremos las dos puntas pasandolas por encima de el hilo estirado, apretamos y ya esta echo nuestro primer nudo alondra.
SEGUNDO PASO
Los siguientes nudos los realizaremos de otrs manera. Con las puntas que quedaron de el lado izquierdo. Tomaremos la mas larga y la cruzaremos al lado derecho por encima de el hilo estirado y lo volveremos a cruzar para la izquierda pero esta vez por debajo de el hilo estirado. Se repite este procedimiento pero esta vez tomaremos el hilo que esta en la izquierda y lo cruzaremos al lado derecho pero ahora por debajo y lo devolvemos al lado izquierdo por debajo del hilo estirado. Y así hasta tener 20 nudos realizados.
TERCER PASO
Lo siguiente sera colocar la perla que tiene el agujero mas grande en el hilo que esta bien estirado. Este sera el centro de nuestro lazo.
CUARTO PASO
Ahora a realizar la otra parte repetiremos para este lado el mismo procedimiento de antes. Tomaremos otro pedacito de hilo chino de 30cm y repetimos el procedimiento asta tener 20 nudos alondra. Pendiente de que nos sobre un pedacito sin tejer.
QUINTO PASO
Para que tome forma de lazo tomaremos una de las puntas sin tejer y la introduciremos por el agujero de la perla y hacemos lo mismo con la otra punta. Apretamos y ya va tomando forma nuestro lazo .
SEXTO PASO
Para las patitas de el lazo, tomaremos las dos puntas que quedaron sin tejer y la tejeremos con el nudo alondra cada patita con 10 nudos aprocimadamente. Le colocamos las dos perlas pequeñas al final de las patitas de el lazo.
SÉPTIMO PASO
Ahora que ya tenemos nuestro lazo realizado comenzaremos a realizar la pulsa. Tomaremos un pedazo de hilo chino de 14cm y lo doblamos a la mitad. Lo pasamos por uno de los espacios de el lazo quedando la parte doblado de el lado de el lazo y las puntas de el hilo hacia afuera. Y realizamos un nudo alondra. Hacemos lo mismo de el orto lado. Y ya tenemos nuestra pulsa solo nos falta el cierre
OVTAVO PASO
Para el cierre tomaremos un pedacito de hilo chino de 10cm y con las cuatro puntas de la pulsa colocadas en forma de cruz, comenzaremos a tejer el cierre. Tomamos el hilo de 10cm y lo introduciremos por debajo de las puntas en forma de cruz. Realizamos un nudo normal. Y comenzamos a tejer con el punto macrame.
Este fue el resultado de mi trabajo. Espero que les guste. Solo me queda decearles a todos un feliz día.
Las fotos fueron tomadas por mi teléfono Samsung Galaxy A 03 Core y editadas en canva
El texto fue traducido por Deepl
https://reddit.com/r/blogs/comments/1barwns/an_easy_way_to_decorate_woven_pulses_una_forma/
The rewards earned on this comment will go directly to the people( @heidy08 ) sharing the post on Reddit as long as they are registered with @poshtoken. Sign up at https://hiveposh.com.
that's a beautiful piece of jewelry. Nice design too
So beauty your diy. Congrats.
Que pulsera más bonita, me ha gusto mucho la explicación de como hacerla.
Muy linda y colorida pulsera de lazo me encanta el centro con la perlas...genial trabajo en macramé
This is called shambala in my country and I’m impressed the kind of style you’ve made from this
The colours make it more pretty
Congratulations @heidy08! You have completed the following achievement on the Hive blockchain And have been rewarded with New badge(s)
Your next target is to reach 1750 upvotes.
You can view your badges on your board and compare yourself to others in the Ranking
If you no longer want to receive notifications, reply to this comment with the word
STOPCheck out our last posts: