( ENG)
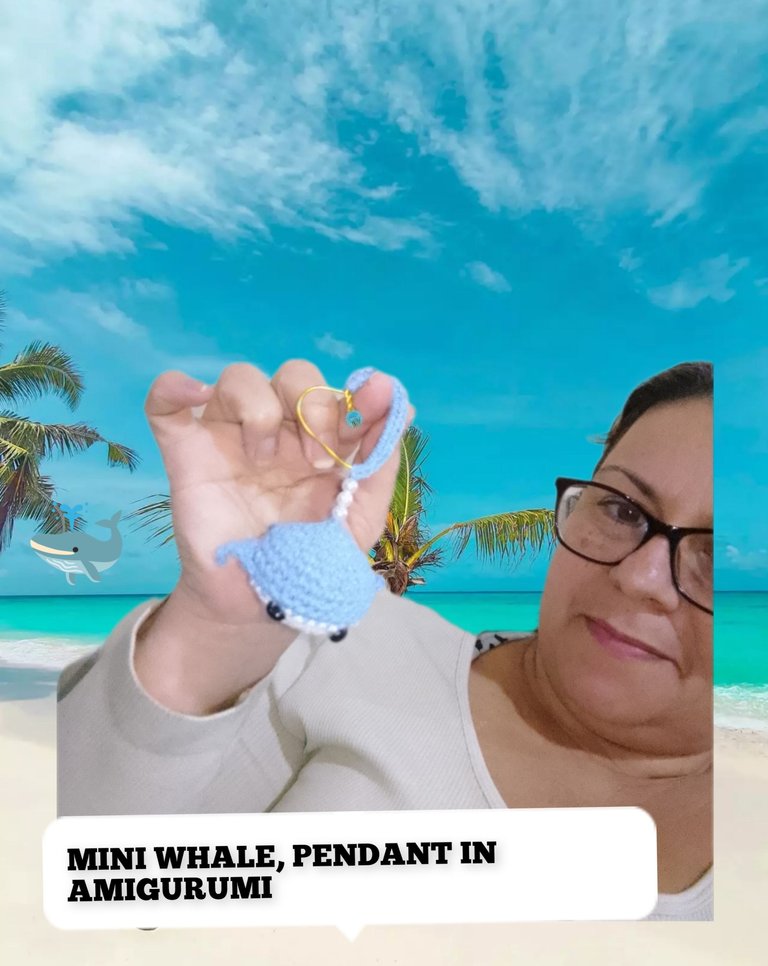
Hello everyone, after a few days of rest, I am pleased to be with you again, ready to start this month on the right foot, and wishing it full of success for you and many great ideas. Today I will show you how to make a beautiful and delicate baby whale, Amigurumi, designed as a pendant, you can use them on your keychains, or on the shoulder bags or purses, pens or bags that we use most frequently. So I invite you. Follow me and you will see how easy it is to make.
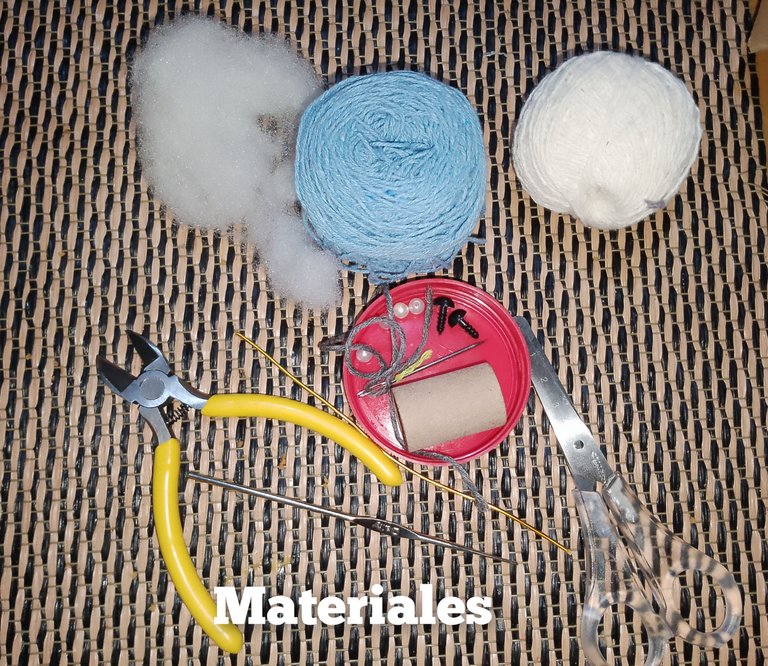
Used materials:
. Wick yarn for knitting, colors (white and blue).
. Wool needle.
.knitting needle.
. Safety eyes n4 . Stuffed.
. 30cm of wire.
. Cardboard tube (collected from wick thread).
. Scissors.
. Cutting pliers.
. white pearls
Steps:
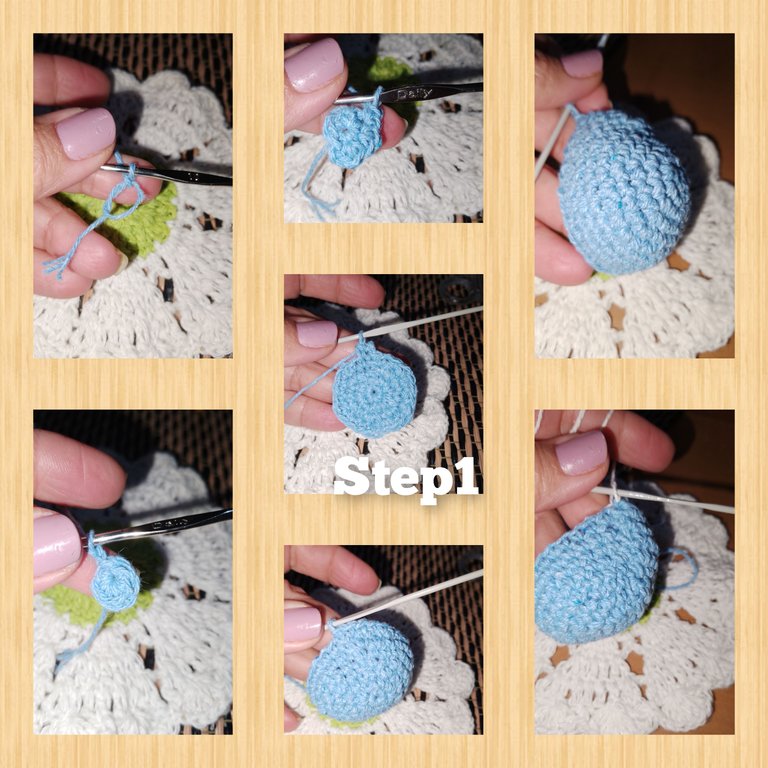
1.) in a magic ring, I knit six half crochets, I close the ring and knit over the first stitch a slipped stitch, for the next round, I knit, never increasing in each single crochet, giving me a toran of (12 sc). The next round, I will knit after a single crochet, I will knit an increase, to obtain (18sc), for round n4, after two single crochets I will knit an increase, for (24sc), for the next round, I will knit three single crochets followed of an increase and I will reach a total of (30p.b), from round 6/10, I will knit only single crochets.
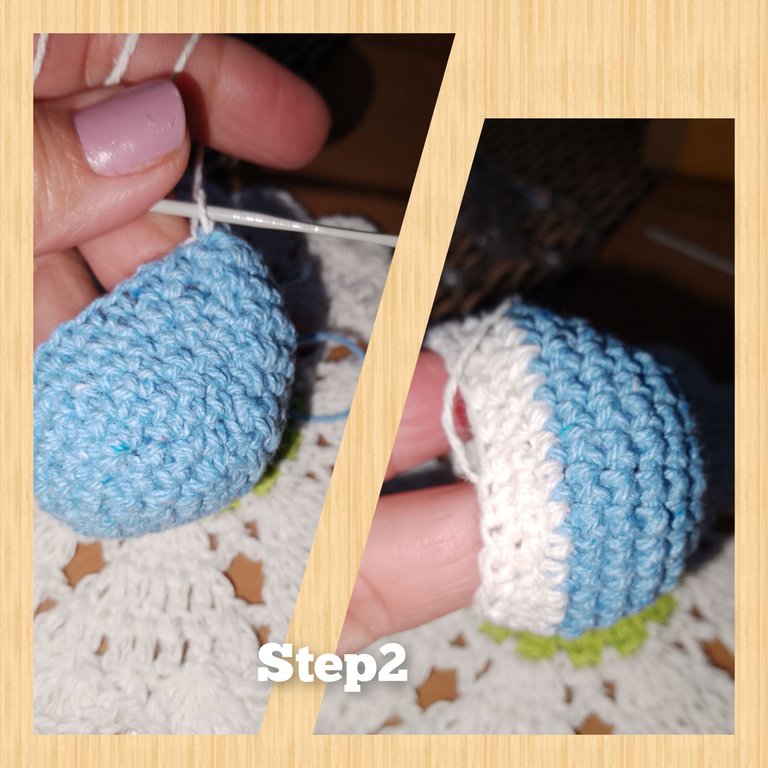
2.) for rounds 11/12, I will knit only single crochets, but changing the blue thread for the white one.
3.). For row n13, I will begin to make decreases, after three single crochets, for (24sc), the next after two single crochets, for (18), I continue with a single crochet and a decrease for (12sc).
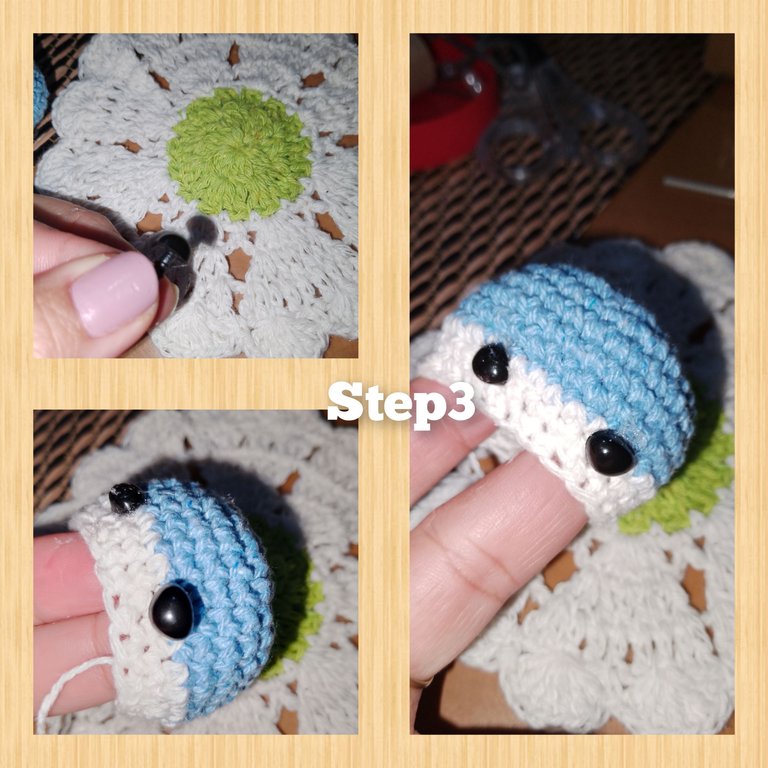
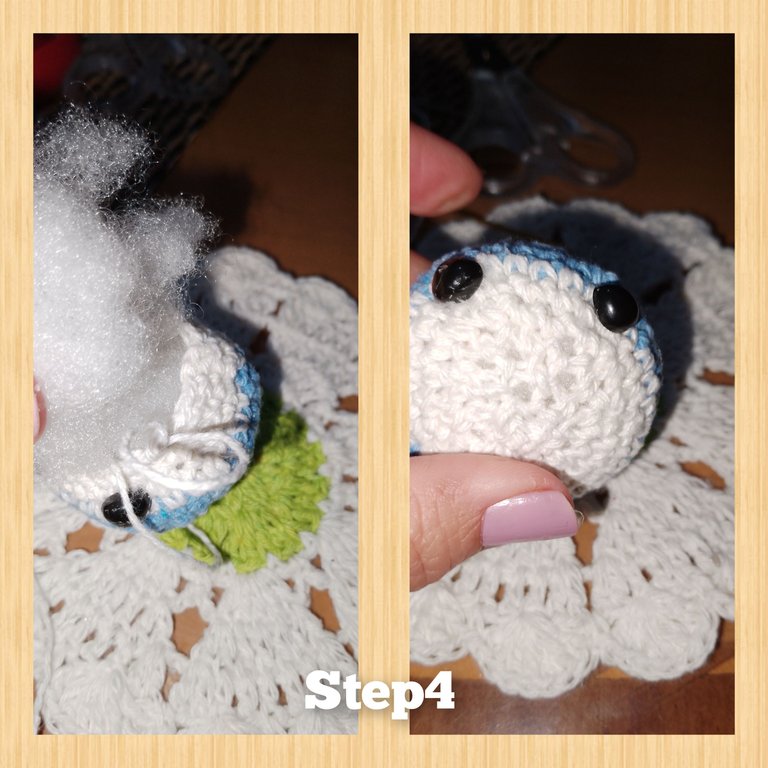
4.) In this step, I make a stop and the round where I changed the color of the thread, center and place the safety eyes, leaving six points of separation between them, and place a little filling, continuing the decreases , until I reach six decreases and close the small ball, which forms the body of the baby whale in Amigurumis.
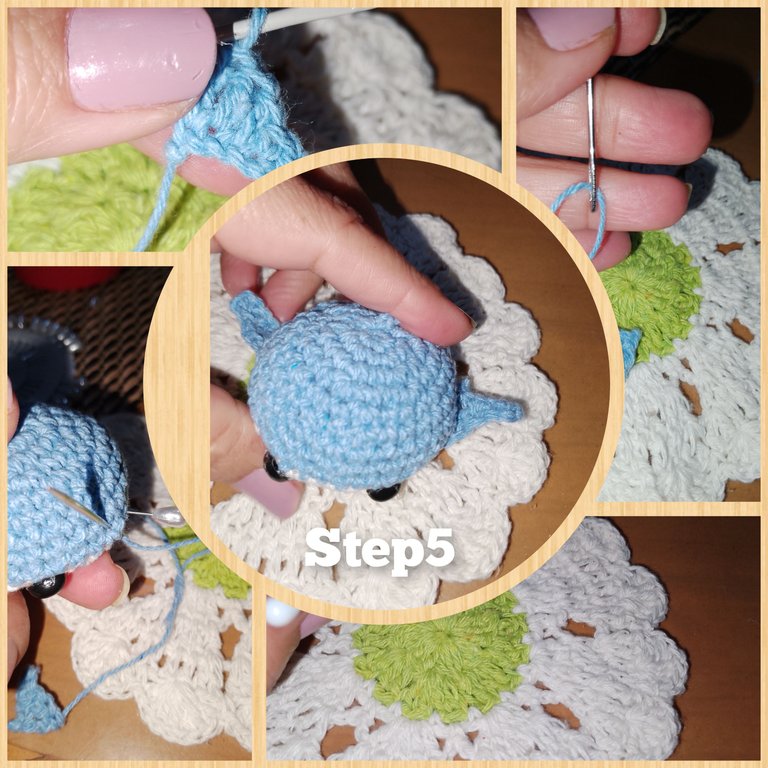
5.) in a chain of seven stitches, I return to chain n5, knit two, single crochet, continue with half a crochet and two double crochets. I leave a strand to glue the fin to the whale. This is how I repeat and obtain the two wings, I continue with the knitting and in a magic ring, I raise two chain stitches, then three double crochets, two half stitches and I close the ring, this will represent the tail of the whale. Now I mark with pins, to maintain the distance in the wings and the tail... with the wool needle, I begin to glue the pieces.
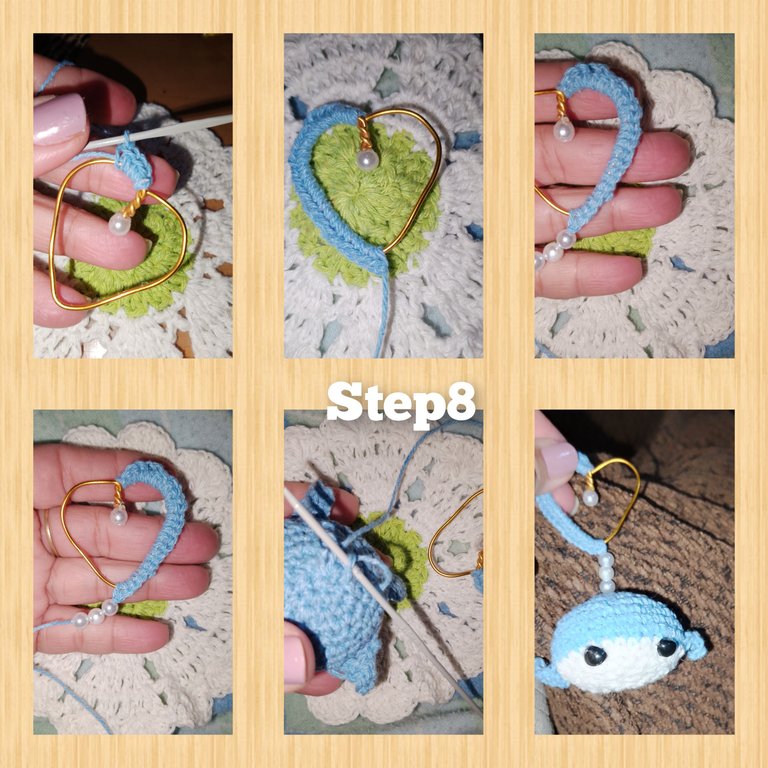
6.) With the help of the tube, I shape one side then the next and form a delicate heart, finding the tips in the center, I turn them several times, and cut the excess wire with the tweezers, then I place apearl.
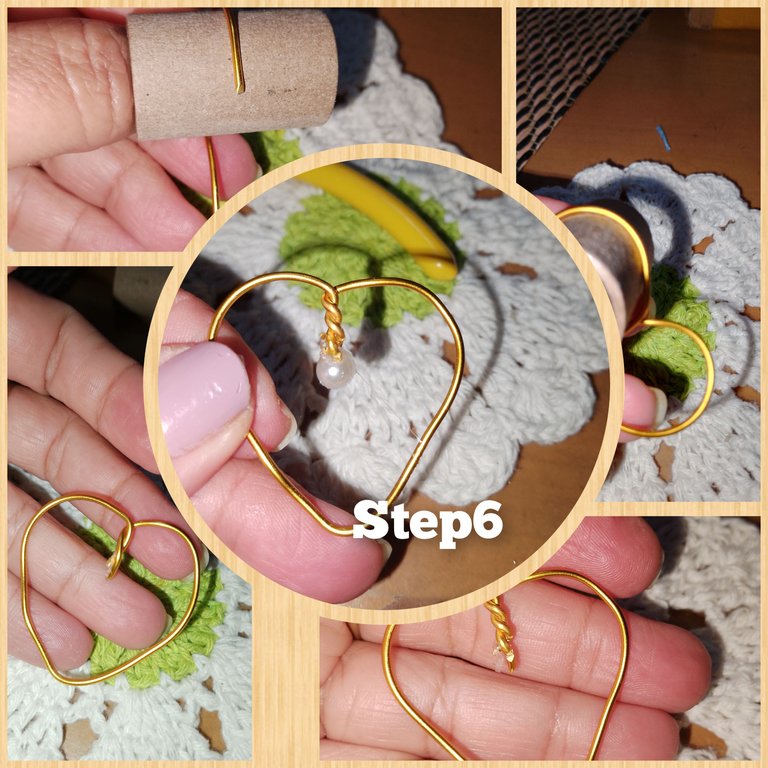
7.) Using the blue thread, I start to knit, from the top of one of the sides of the heart, and cover with half stitches, when I reach the bottom of the heart I cut the thread, leaving a thread, considerable, where I then insert three white pearls. With the knitting needle, involved the thread coming down from the heart. Wire and tie and secure, with slip stitches. I cut the residue, thus finishing today's project.
. All photos are my property, taken with my smartphone.
. Use incollage
. Use language translator.
It will be until a next opportunity.
(ESP)
Hola a todos, luego de unos días de descanso, me complace estar nuevamente con ustedes, lista, para comenzar con buen pie este mes, y deseando este lleno de éxitos para ustedes y de muchas grandes ideas. Yo les mostraré hoy como hacer una hermosa y delicada Ballena bebé, Amigurumi, ideada como colgante, puedes bien usarlas en tus llaveros, o en los bandoleros o carteras, corrales o bolsos que con más frecuencia usamos. Así que les invito. Seguirme y verás lo fácil que es su elaboración.
Materiales usados:
. Hilo pabilo para tejer, colores (blanco y azúl).
. Aguja lanera.
.aguja para tejer.
. Ojos de seguridad n4
. Relleno.
. 30cm de alambre.
. Tubito de cartón, (recolectado de hilo pabilo).
. Tijeras.
. Pinzas de corte.
. Perlas blan
Pasos:
1.) en un anillo mágico, tejo seis medios puntos, cierro el anillo y tejo sobre el primer punto un punto deslizado, para la siguiente vuelta, tejo,nunca aumento en cada punto bajo, dándome un toran de (12pb). La siguiente vuelta, tejere luego de un punto bajo, tejere un aumento, para obtener (18pb), para la vuelta n4, luego de dos puntos bajos tejere un aumento, para (24pb),para la siguiente vuelta, tejere tres puntos bajos seguido de un aumento y alcanzaré,nun total de (30p.b), de la vuelta 6/10, tejere solo puntos bajos.
2.) para las vueltas 11/12, tejere solo puntos bajos, pero cambiando el hilo de color azul, por el de color blanco.
3.). Para la vuelta n13, comenzare a hacer disminuciones, luego de tres punto bajo, para (24pb), la siguiente luego de dos puntos bajos, para (18), continuo con un punto bajo y una disminución para (12pb).
4.) En este paso,hago un alto y el la vuelta donde hice el cambio de color de el hilo, centro y coloco los ojos de seguridad, dejando seis puntos de separación entre ellos, y coloco un poco de relleno, continuo las disminuciones, hasta llegar a seis disminuciones y cierro la pequeña bolita, que forma el cuerpesito de la ballena bebé en Amigurumis.
5.) en una cadena de siete puntos, me devuelvo a la cadena n5, tejo dos, punto bajo, continuo con medio punto y dos puntos altos. Dejo una hebra para pegar la aleta a la ballena. Así repito y obtengo las dos alitas, continuo con el tejido y en un anillo mágico, levanto dos puntos cadenas, luego tres puntos altos, dos medios puntos y cierro el anillo, este representará, la colita de la ballena. Ahora marco con alfileres, para mantener la distancia en las alitas y la cola.. con la aguja lanera, comienzo a pegar las piezas.
6.) cona ayuda de el tubito, doy forma a un lado luego a el siguiente y formó un delicado corazón, encontradas las puntas en el centro, doy varias vueltas entre sí, y corto con la pinza el excedente de alambre, luego coloco una perla.
7.) usando el hilo de color azul, comienzo a tejer, desde la parte superior de uno de los lados de el corazón, y cubro con medios puntos, al llegar a la parte inferior de el corazón corto el hilo, dejando una hebra, considerable, dónde luego inserto tres perlas de color blanca. Con la aguja de tejer, involucró la hebra que baja desde el corazón. De alambre y ato y aseguro, con puntos deslizados. Corto el residuo, dejando así concluido el proyecto de el día de hoy.
. Todas las fotos son de mí propiedad, tomadas con mí teléfono inteligente.
. Use incollage
. Use traductor lenguaje.
Será hasta una próxima oportunidad.
aun no aprendo bien como tejer el crochet pero esta ballena me gusto mucho
Adorable.
This is a wonderful tutorial, you did a nice work, keep it up and thanks for sharing
Precioso 😍
That's a lovely pendant. The whale design is lovely.
quedo muy bonito!
it was very nice!
Este mini wale es hermoso.
Gracias cariño 😘
Hermoso trabajo amiga 😘
Muy agradecida mi linda amiga...hermosa noche