✨Bienvenidos. // Welcome. ✨
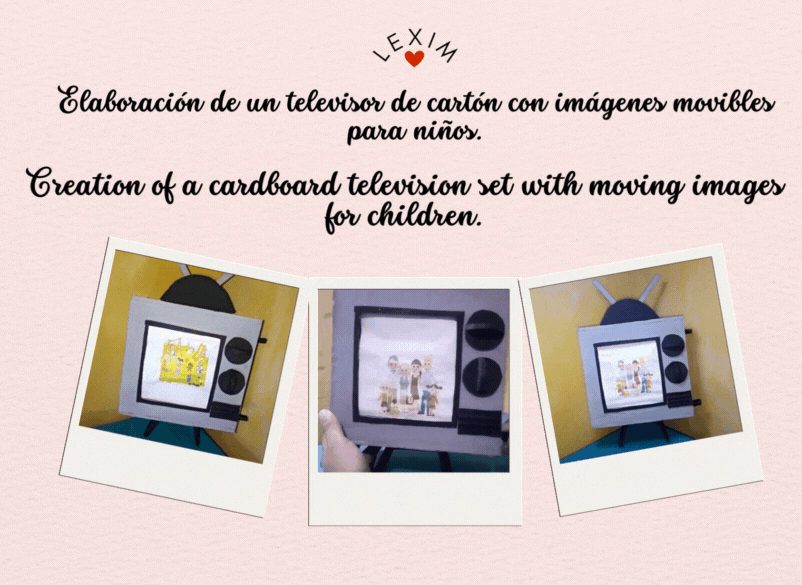
Hello everyone dear colleagues a pleasure to greet you. Today I want to share one of my creative activities that I like to do with much affection for you a step by step of a television with moving images super fun for the children of the house have fun and play with their friends this television is made with materials of profit giving use to the cardboard can use the images you want for their episodes help your children to make this fun television that I know you will love cheer up I hope you like it and is something useful for your children here I leave its elaboration.
Hola a todos queridos compañeros un gusto en saludarlos. Hoy les quiero compartir una de mis actividades creativas que me gusta hacer con mucho cariño para ustedes un paso a paso de un televisor con imágenes en movimiento súper divertido para que los niños de la casa se diviertan y jueguen con su amiguitos este television es hecho con materiales de provecho dándole uso al cartón puedes usar las imágenes que quieras para sus episodios ayuda a tu niños a realizar este divertido televisor que se que le encantara anímese espero que les guste y sea algo útil para tu niños acá les dejo su elaboración.

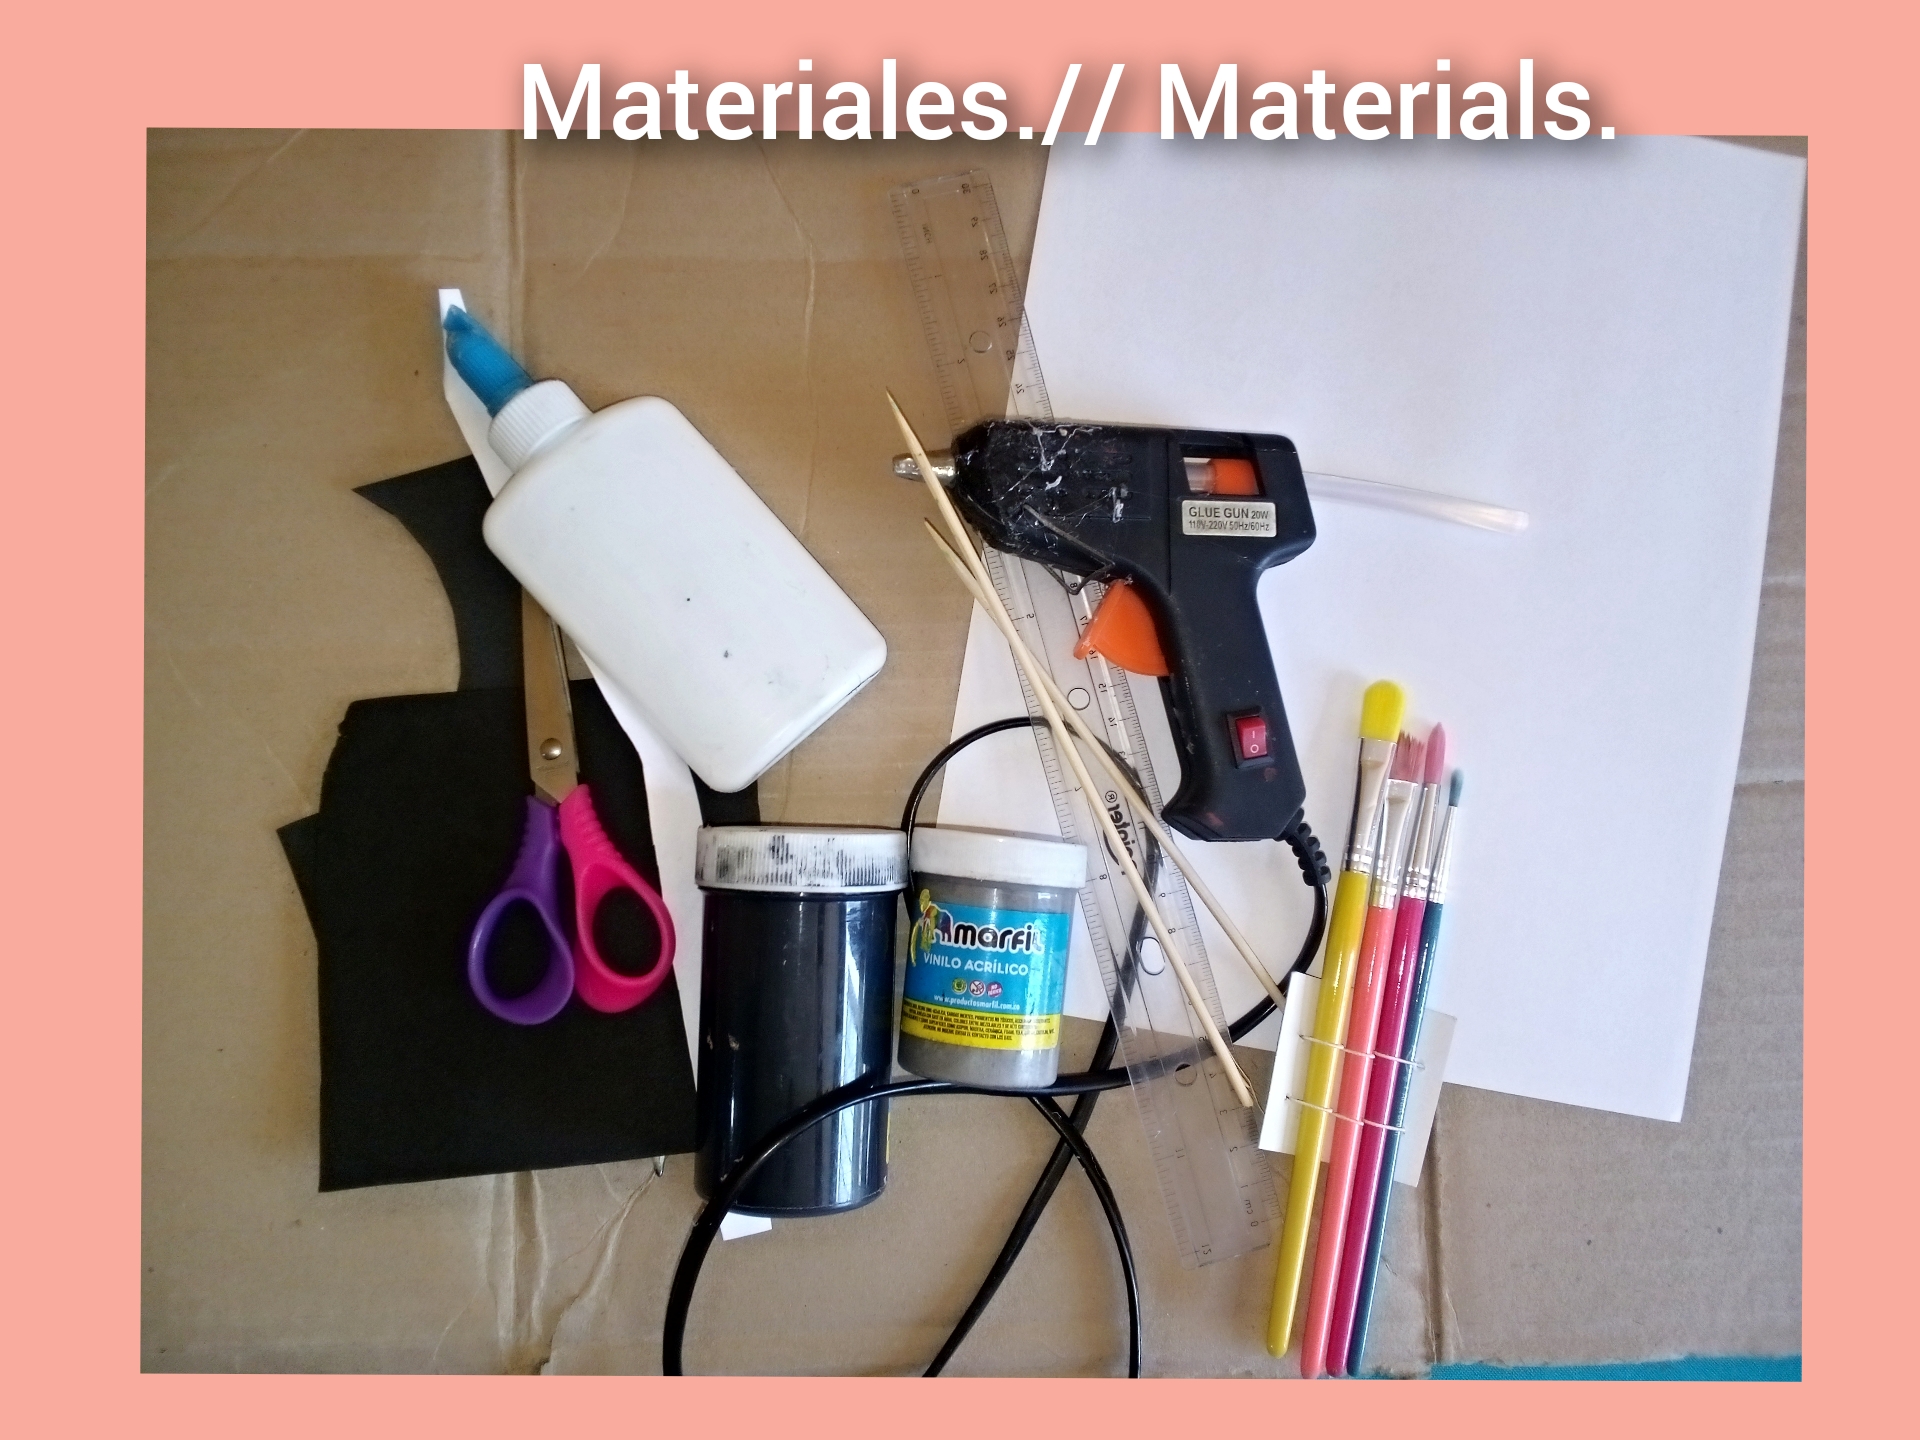
Materials.
Materiales.
- Cardboard.
- Acrylic paint.
- Brushes.
- Pencil.
- Ruler.
- Eva rubber.
- Toothpicks.
- Glue.
- 1 white sheet.
- Silicone gun.
- Cartón.
- Pintura acrílica.
- Pinceles.
- Lápiz.
- Regla.
- Goma Eva.
- Palillos.
- Pegamento.
- 1 hoja blanca.
- Pistola de silicón.
Step by step.
Paso a paso.
Paso 1. // Step 1.
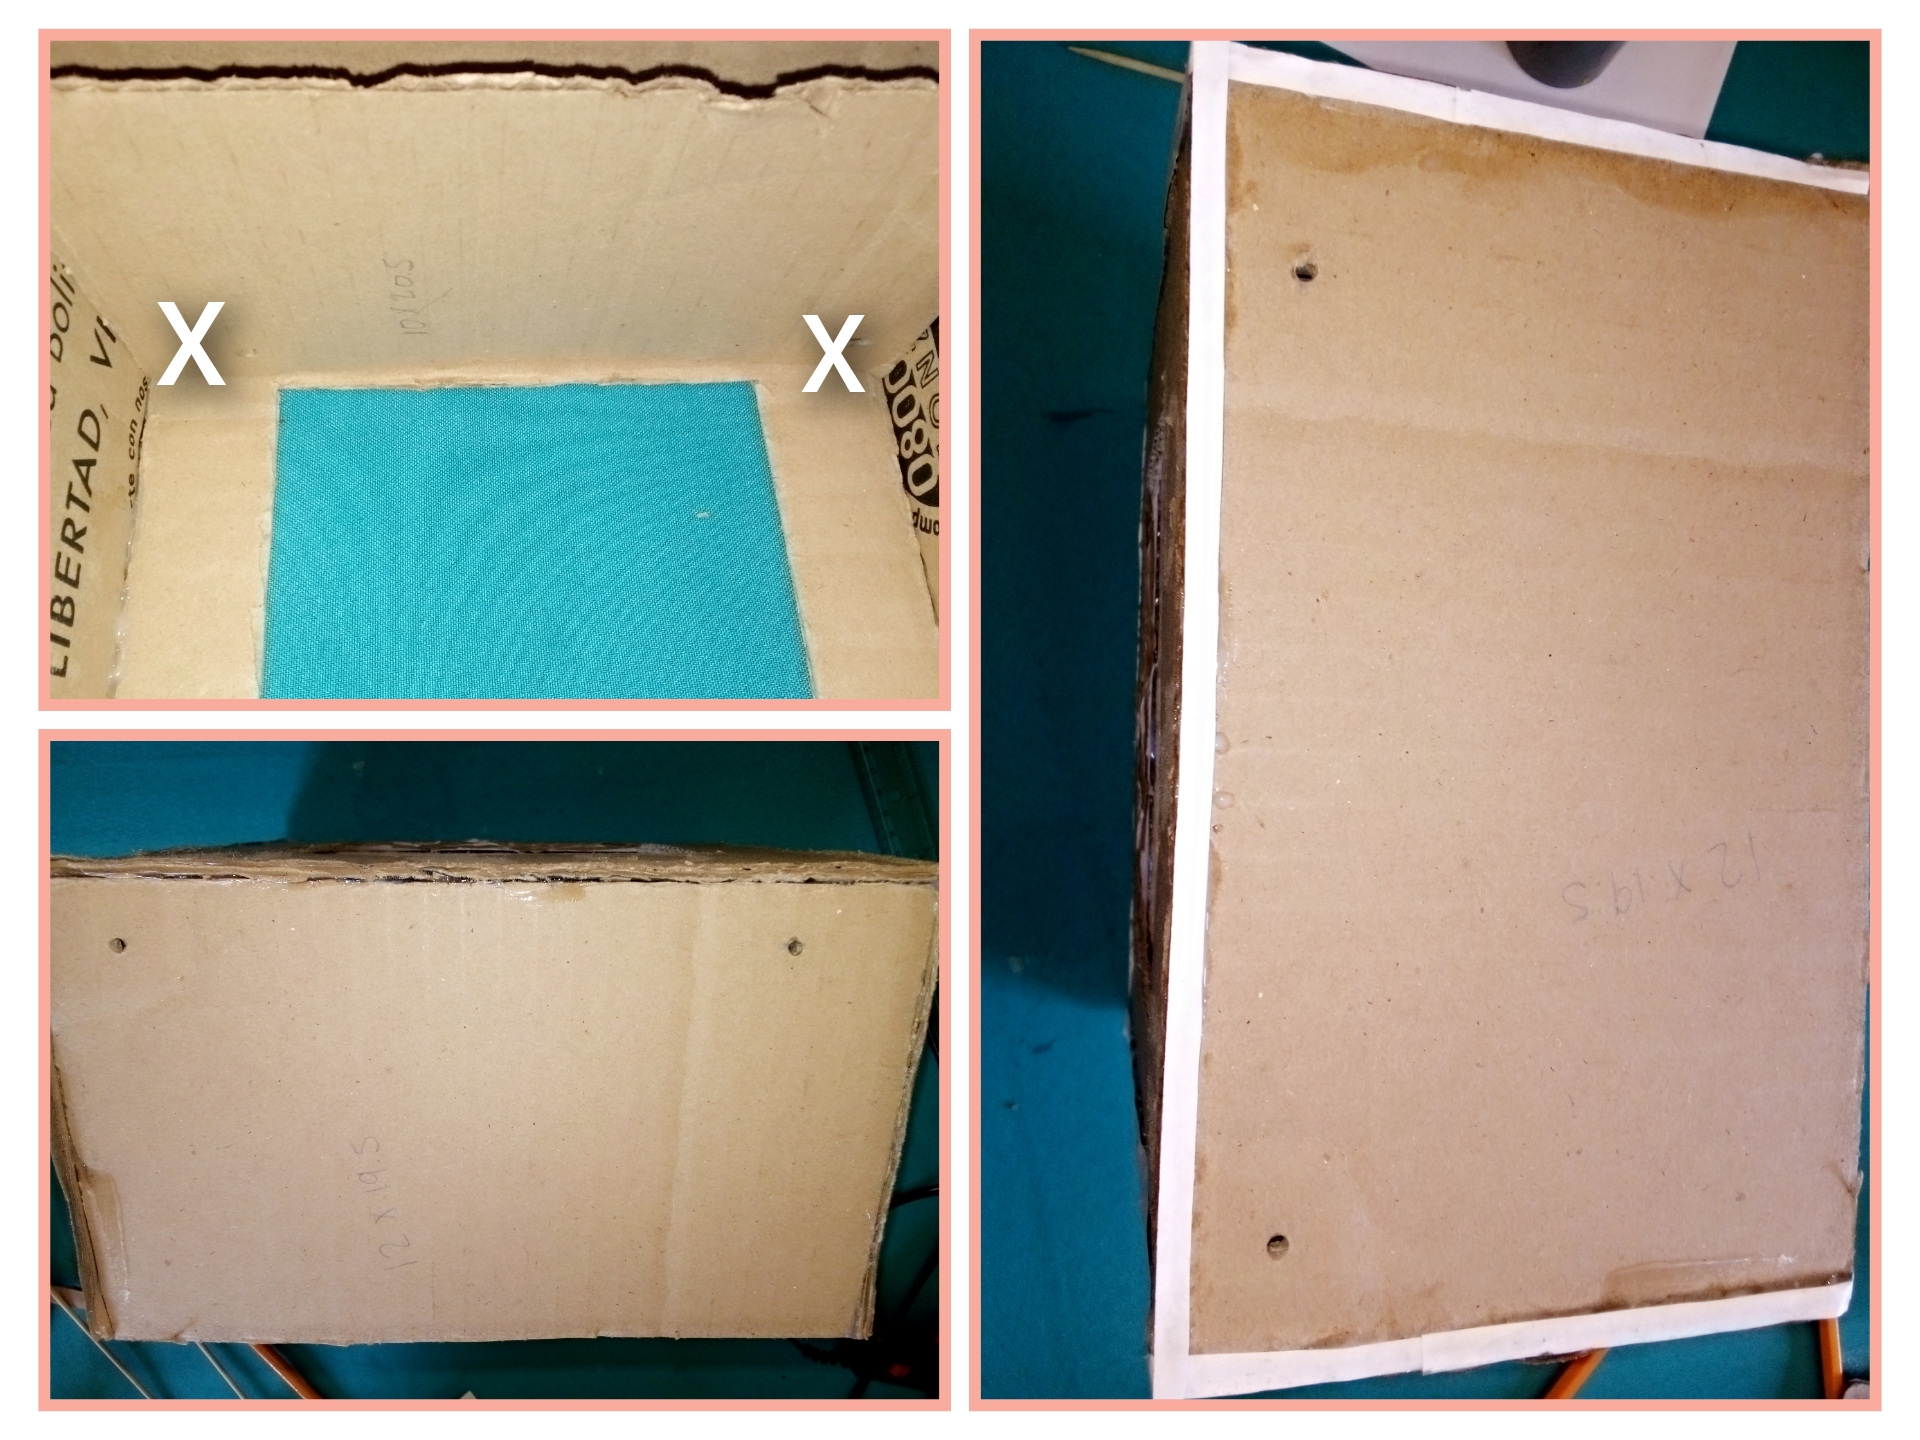
To make the TV, cut a 19x21 centimeters cardboard, and make a 12x13 centimeters square inside, leaving three centimeters on one side and cut two 12x 19.5 centimeters cardboards and glue them to the sides and make two 12x20.5 centimeters.
Para hacer el televisor corta un cartón de 19x21 centímetros, y realiza dentro un cuadro de unos 12x13 centímetros, dejando tres centímetros de un lado y corta dos cartones de 12x 19.5 centímetros y pega a los laterales y realiza dos de 12x20.5 centímetros.
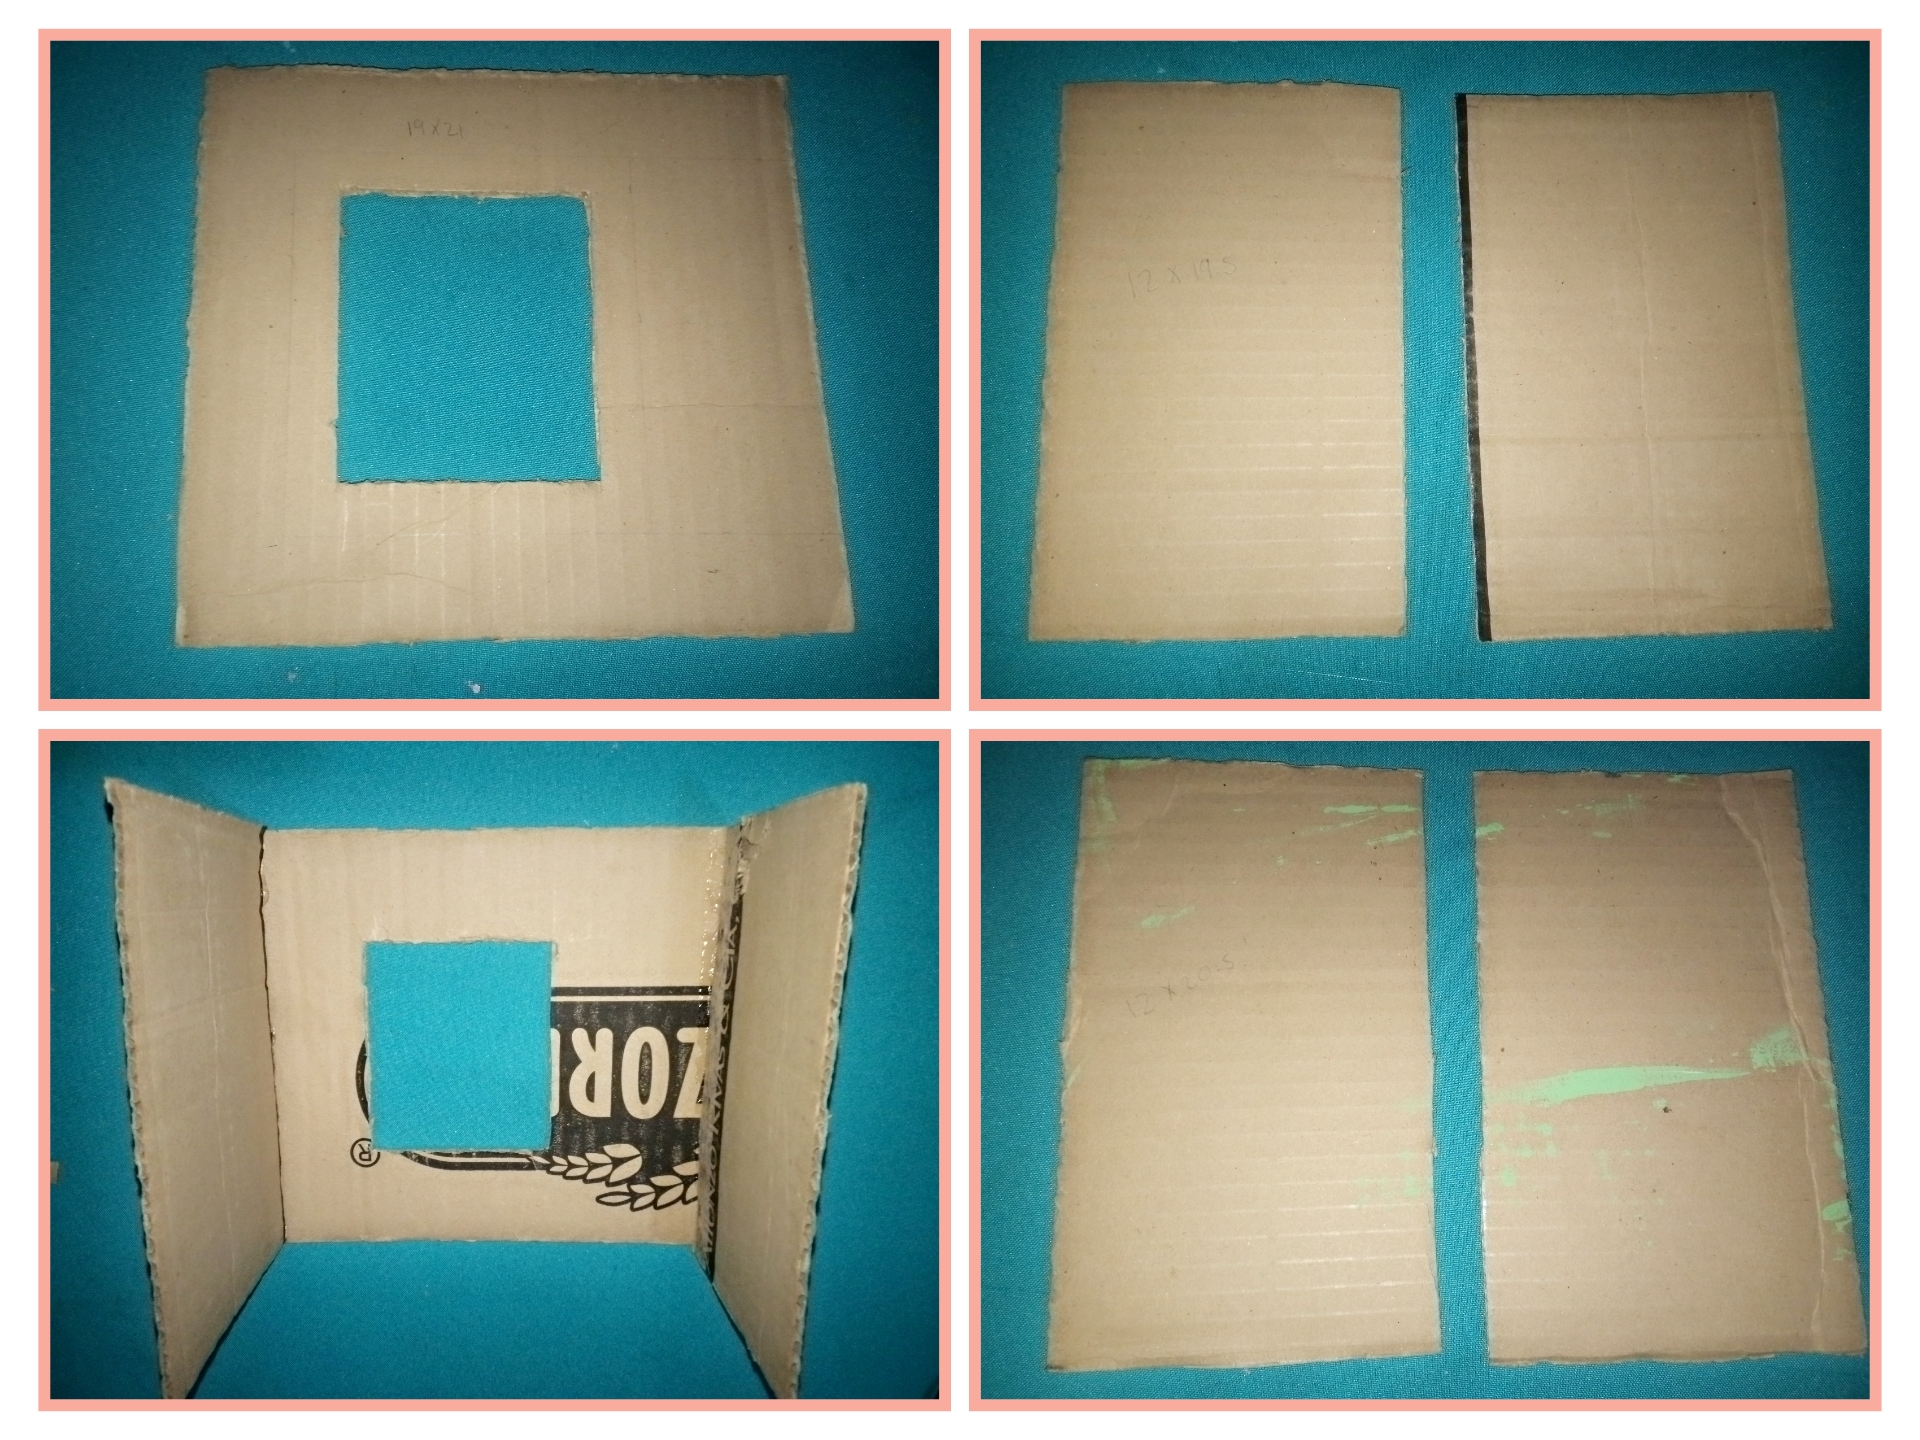
Paso 2. // Step 2
Glue with hot silicone the two cartons we made earlier, one on top and one on the bottom. And a 10x 20.5 centimeters cardboard, and glue inside the box.
Pega con silicón caliente los dos cartones que realizamos anteriormente uno arriba y otro abajo. Y un cartón de 10x 20.5 centímetros, y pega dentro de la caja.

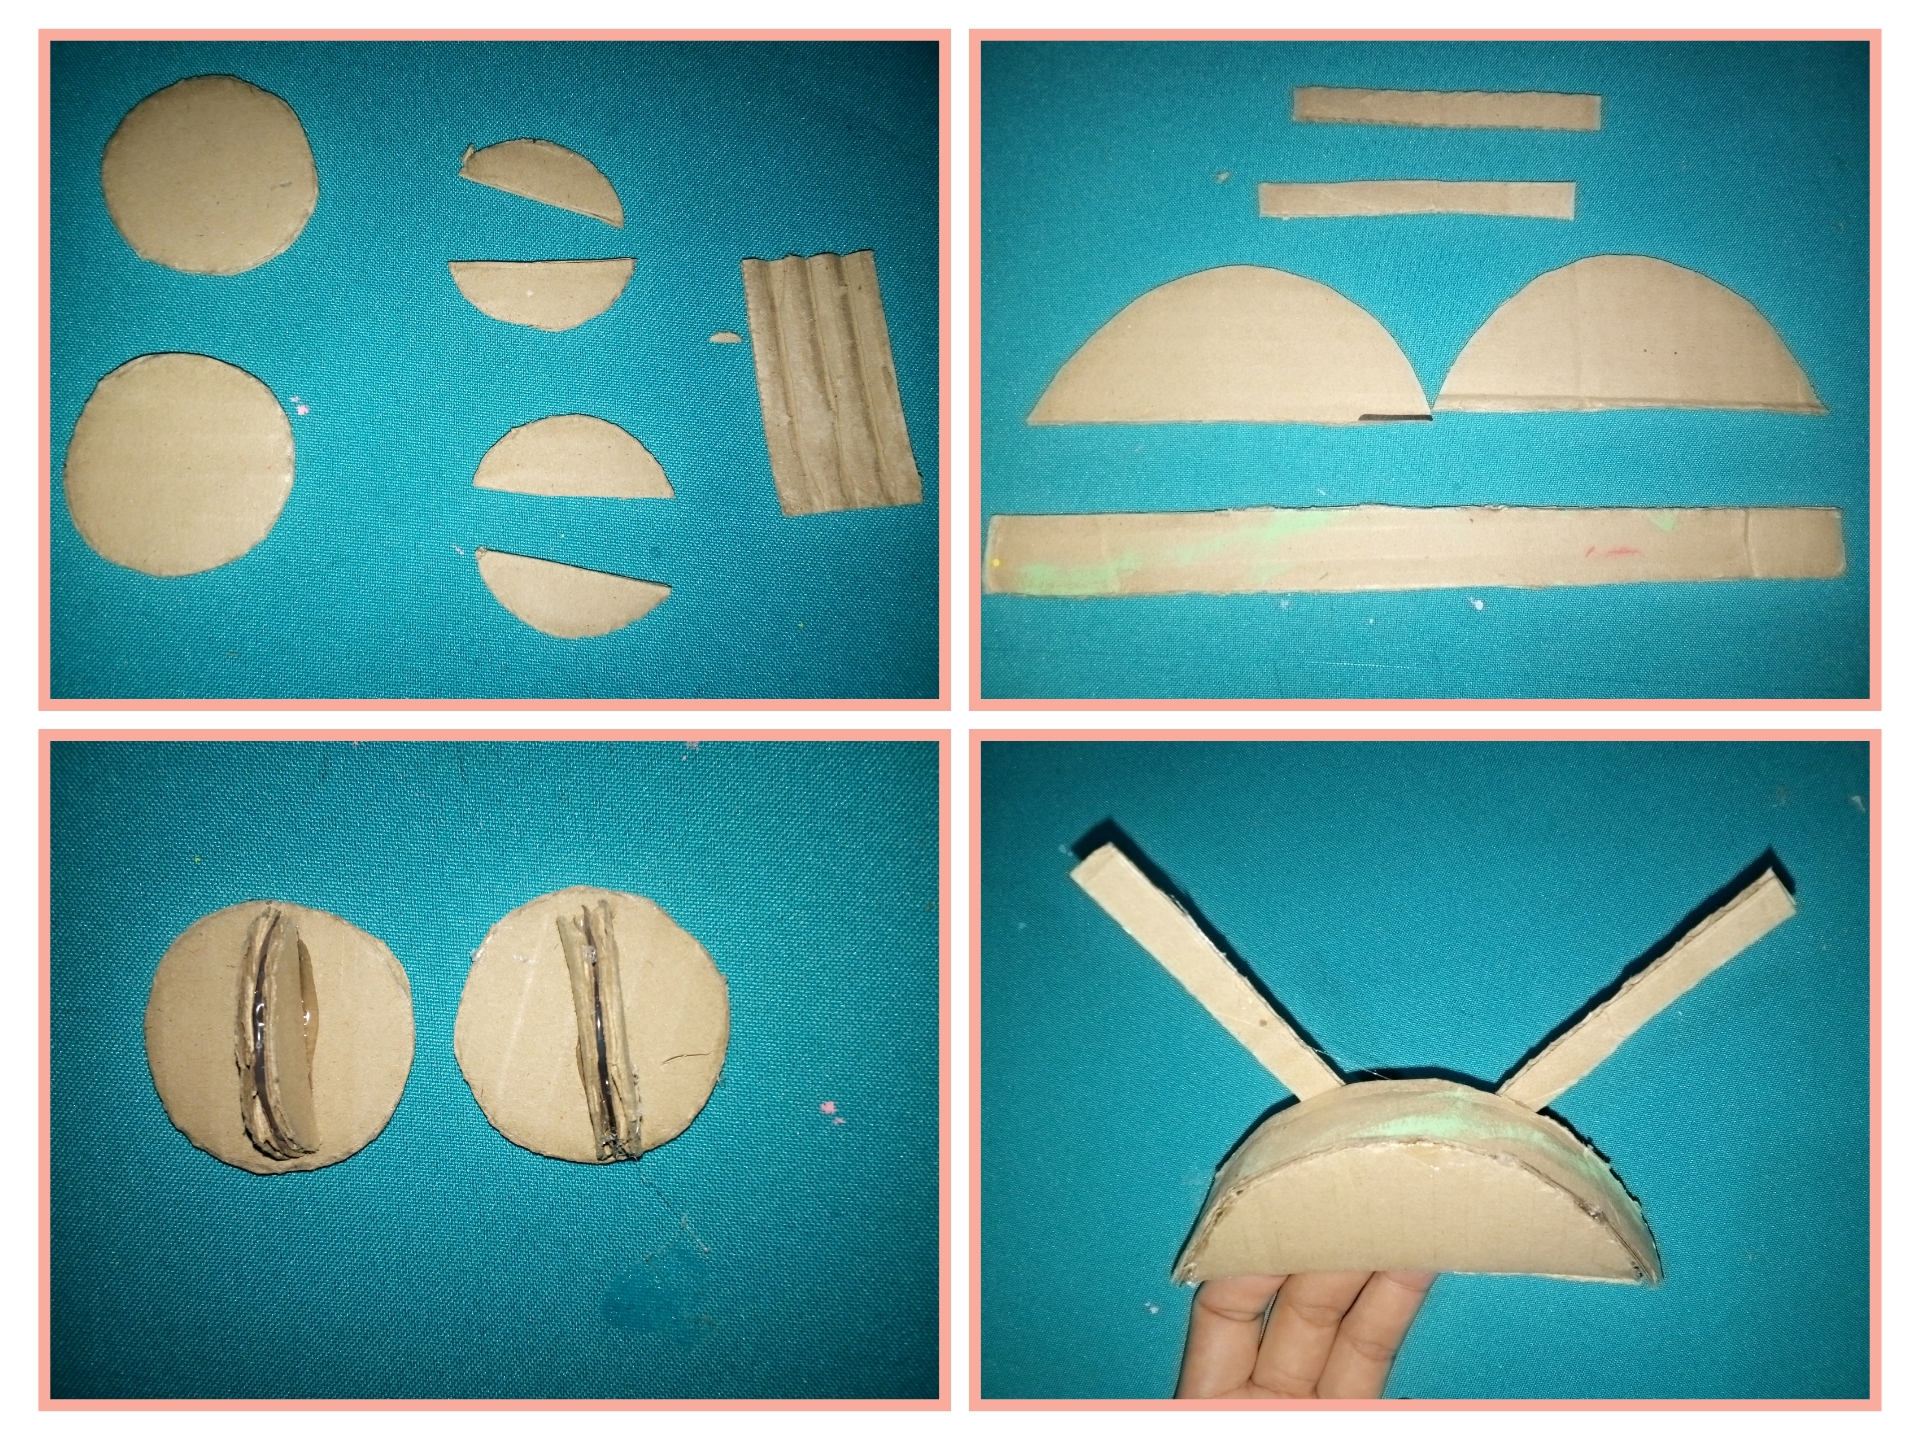
Paso 3. // Step 3.
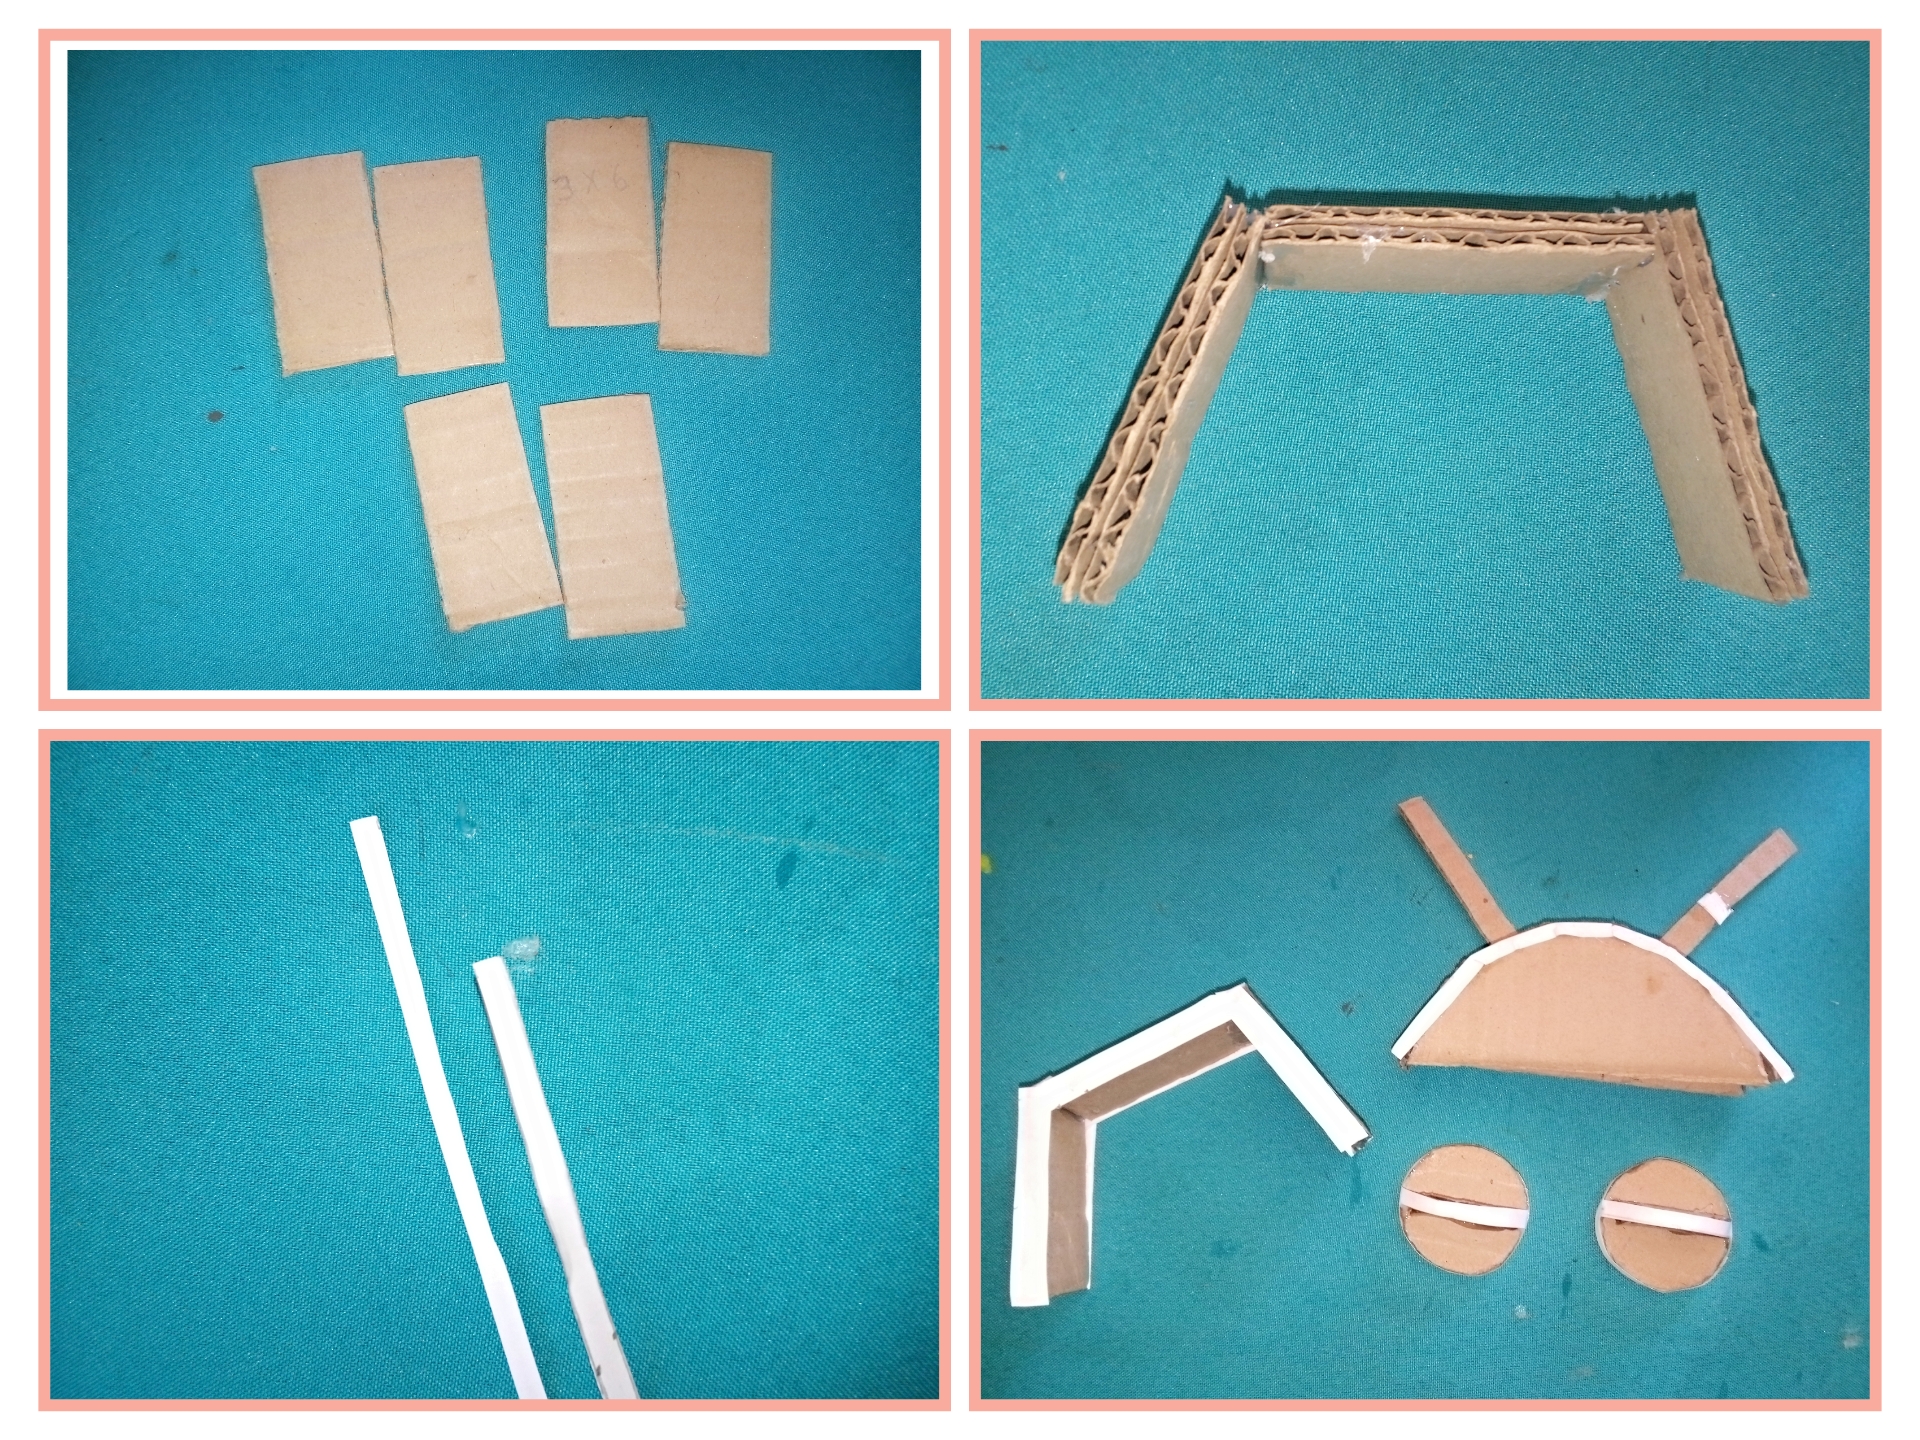
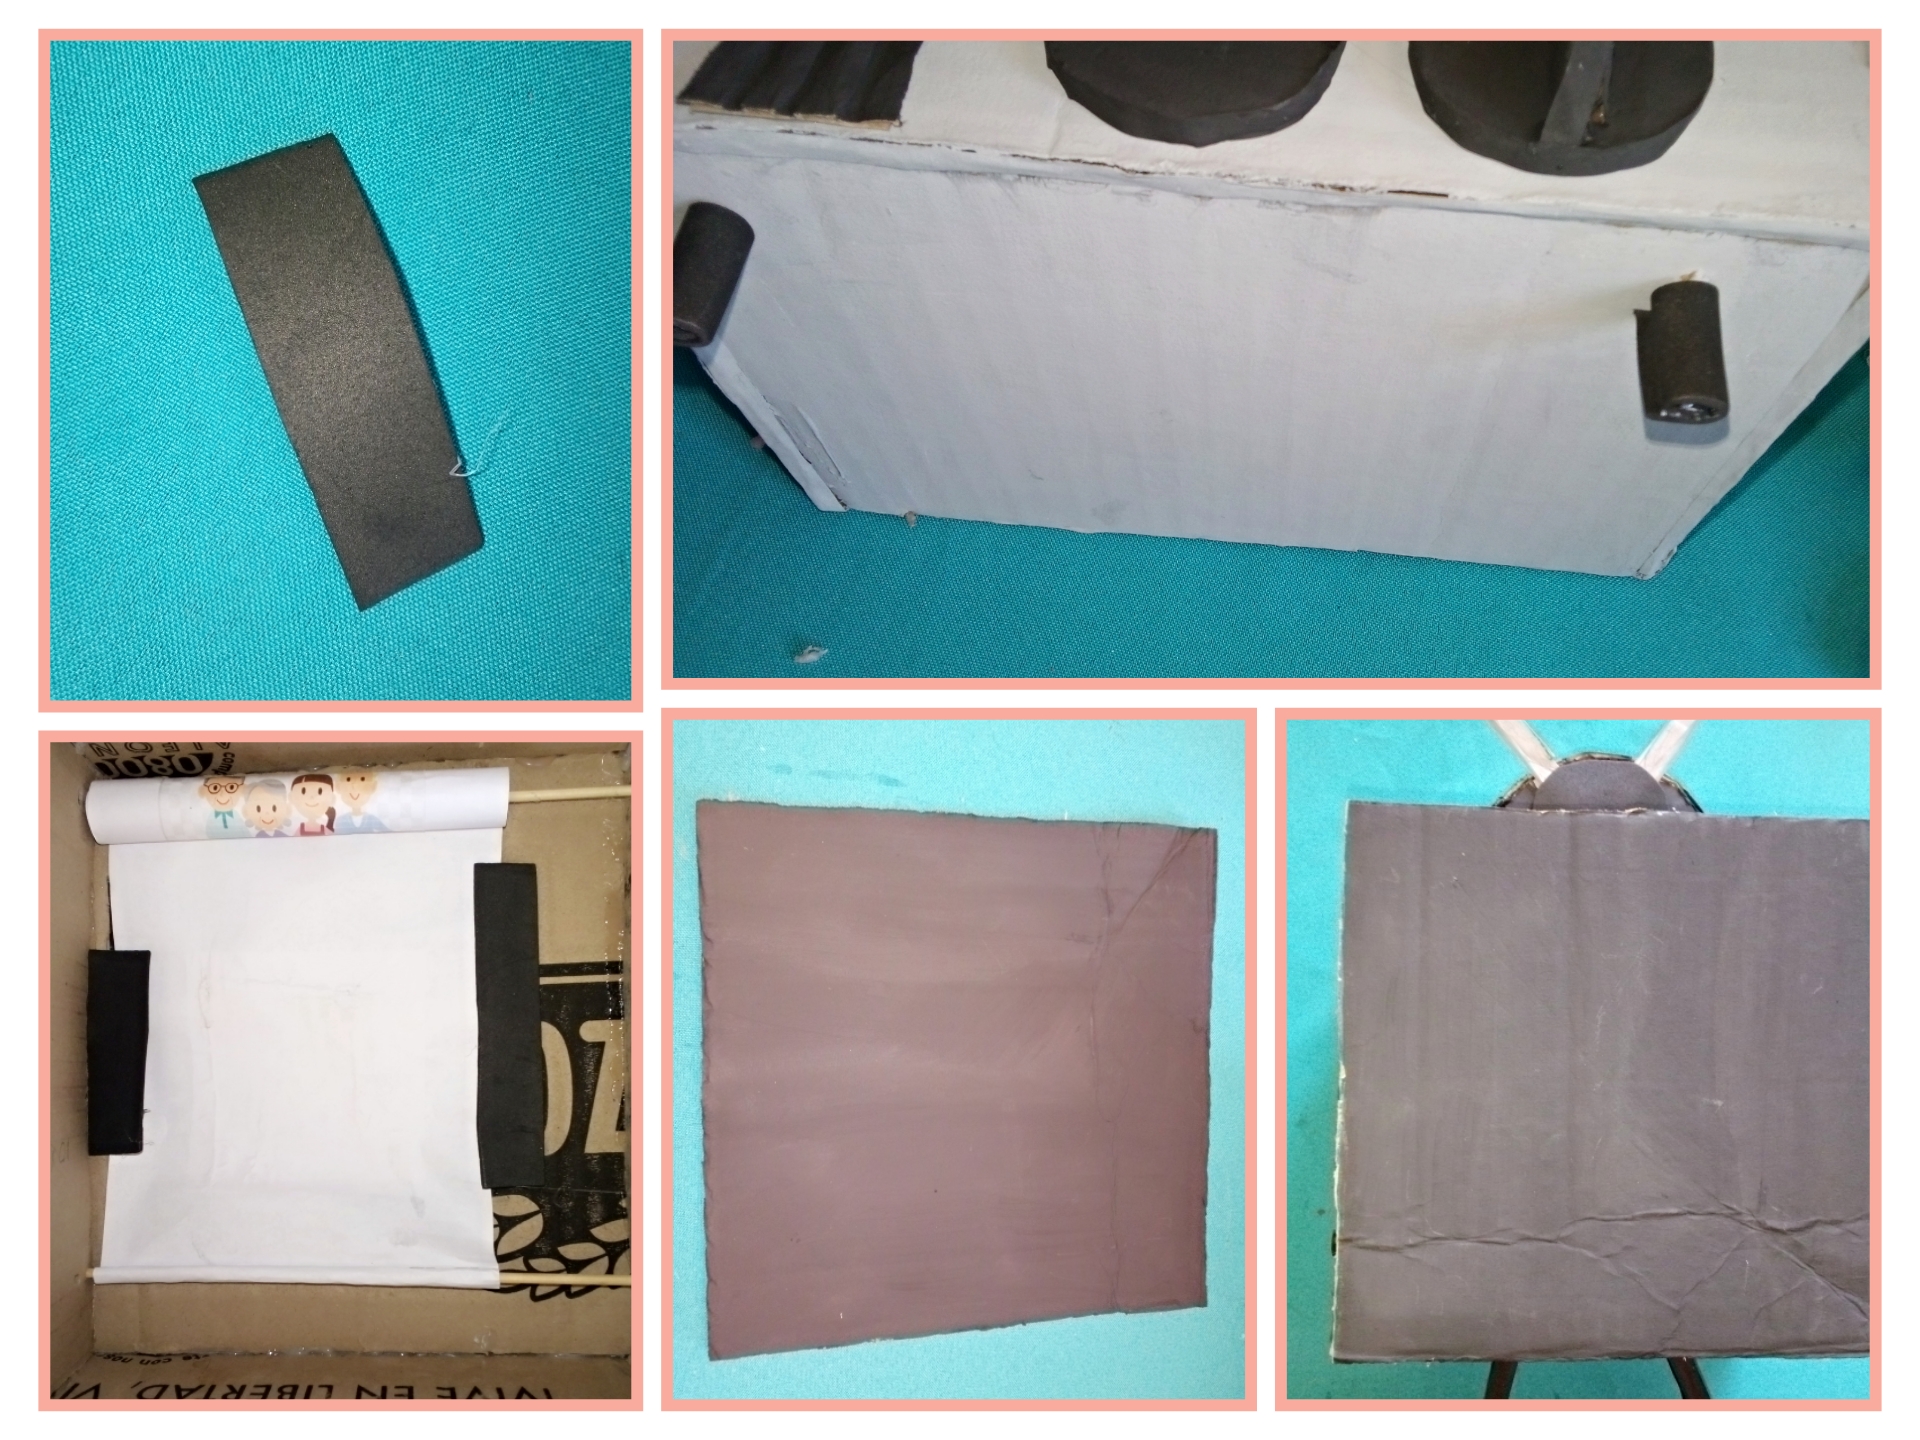
For the buttons make four circles of 4 centimeters and cut two in half and glue double two half circles and glue inside the circle twice. For the horn make a cardboard of 3 x 3 centimeters and remove a layer of cardboard so that it is wrinkled. For the antenna cut half a circle twice and a strip of about 2 x 12 centimeters, and two strips of 1 centimeters we assemble and glue inside the antenna.
Para los botones haz cuatro circulos de 4 centímetros y parte dos por la mitad pega doble dos medio circulo y pega dentro del círculo hazlo dos veces para la bocina haz un cartón de 3x 3 centímetros y quita una capa de cartón para que quede arrugada . Para la antenas corta medio circulo dos veces y una tira de unos 2 x 12 centimetros, y dos tiras de 1 centímetros armamos y pega dentra de la antena.
Paso 4. // Step 4.
For the legs of the TV make 6 pieces of cardboard of 3 x 6 centimeters, and double glue to obtain three pieces, glue one on top and two on the sides. With a strip of white paper cover the holes with glue. Make two holes inside the cardboard, one at the top and one at the bottom to insert the chopsticks to pass the episodes, and on the outside make two holes of the same height as the one on the inside.
Para las patas del televisor haz 6 piezas de cartón de 3 x 6 centímetros, y pega doble para obtener tres piezas pega una arriba y las dos a los lados. Con tira de hojas blancas tapa los agujeros con pegamento. Haz dentro del cartón dos agujeros uno arriba y uno abajo para introducir el palillos para pasar los episodios y por fuera igualmente haz dos agujeros de la misma altura que el de adentro.
Paso 5. // Step 5.
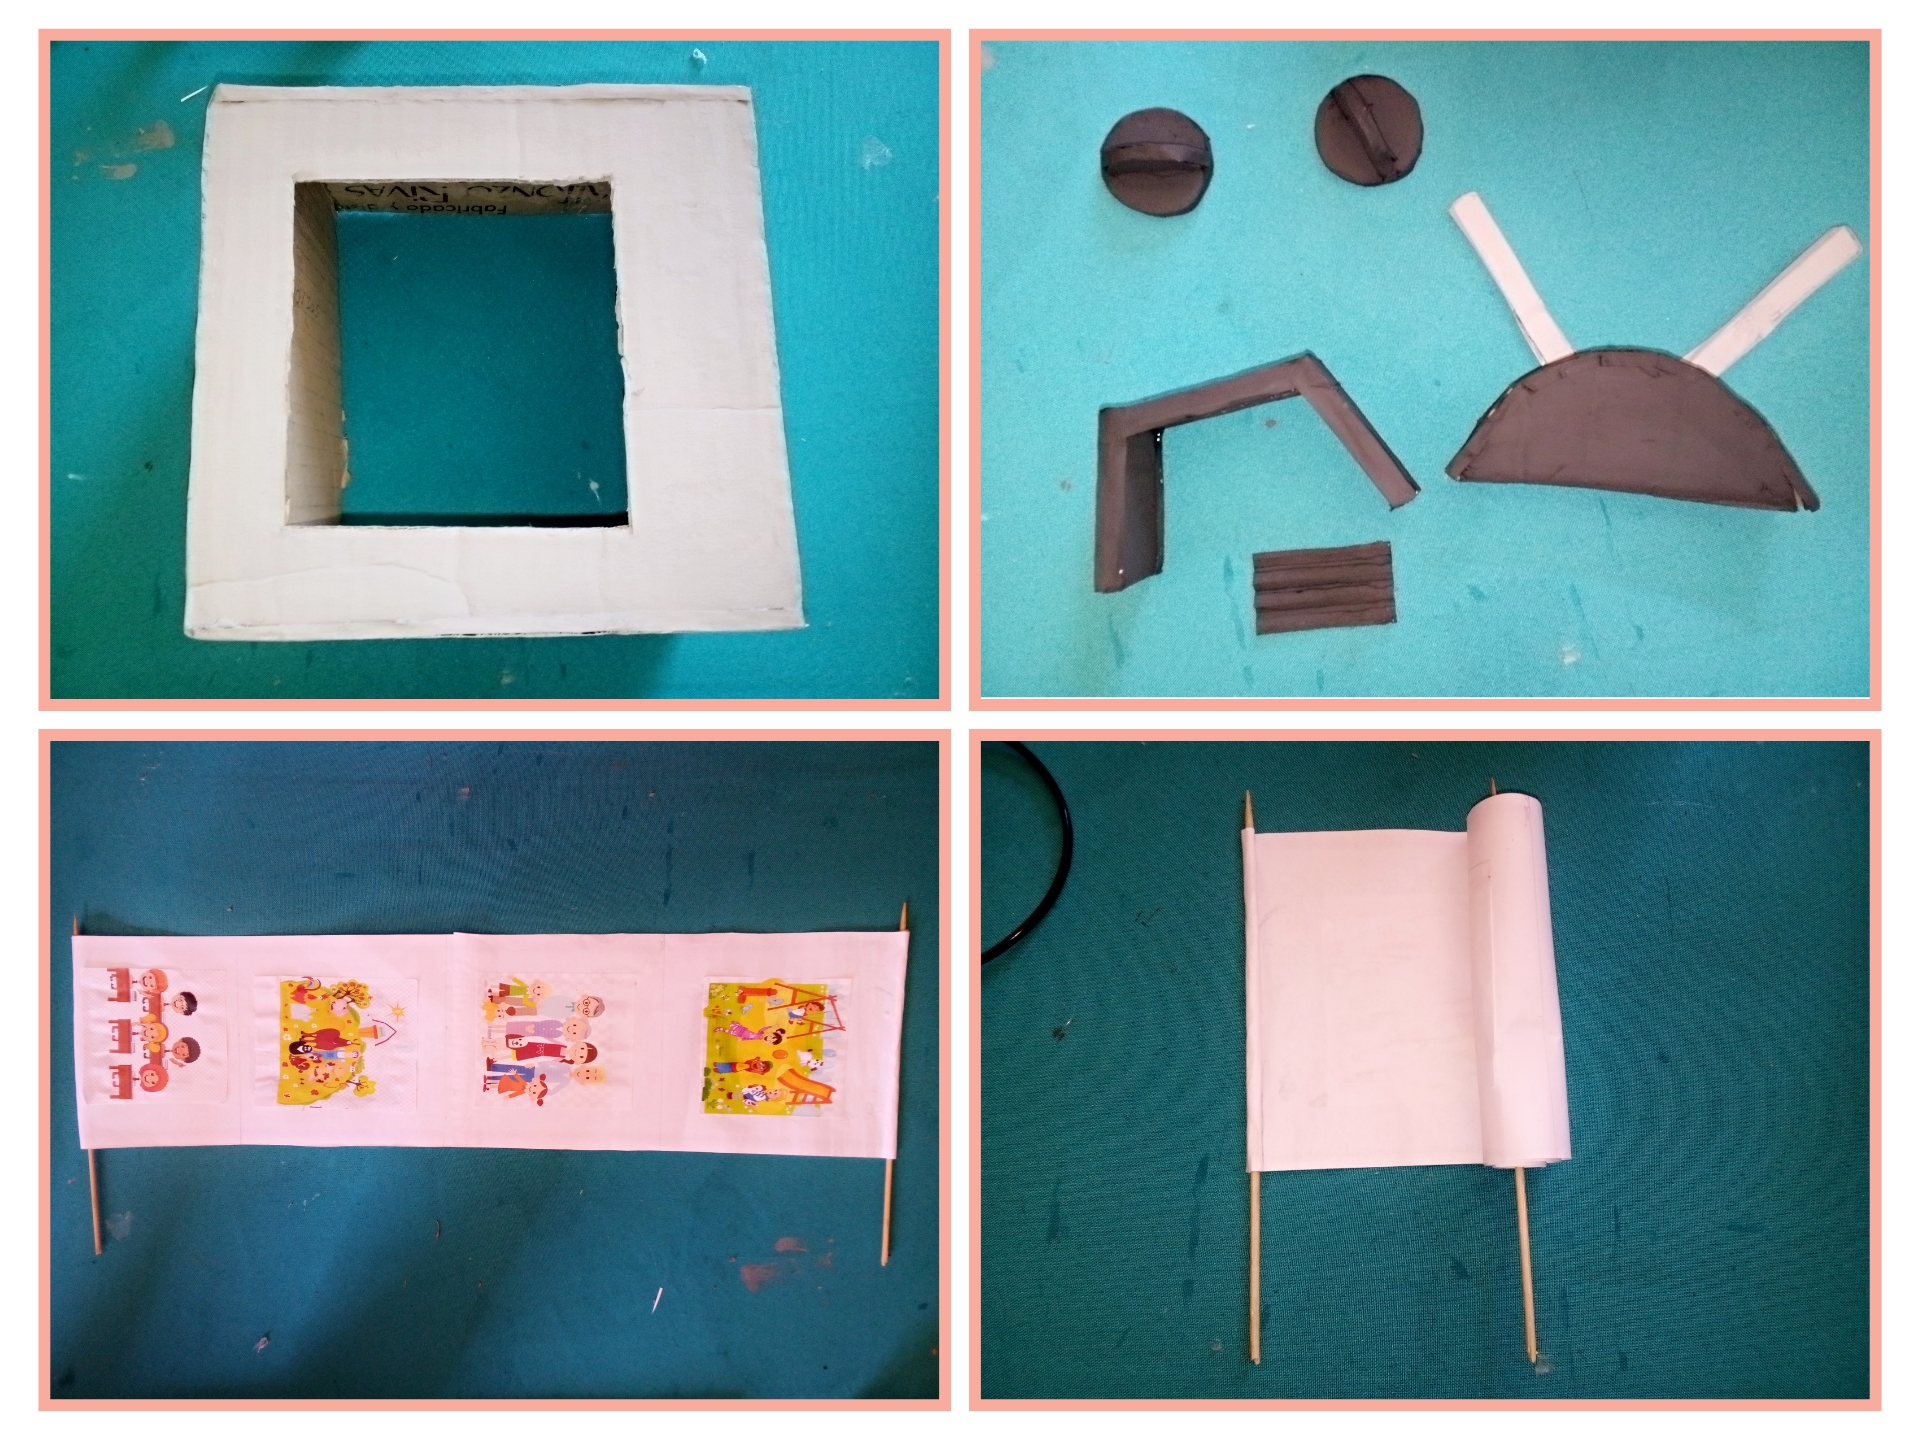
Paint the box, legs, buttons and antennas in the color you like. To make the episodes of our television take a white sheet of 13 x 60 centimeters, and paste the drawings you want or draw something to your liking. At each end glue two sticks of about 15 centimeters and roll the sheet a little and glue with hot silicone.
Pinta la caja, las patas, los botones y las antenas del color que más le guste. Para hacer los episodios de nuestra televisión coje una hoja blanca de 13 x 60 centímetros, y pega los dibujos que quieras o dibuja algo a tu gusto. En cada punta pega dos palillos de unos 15 centímetros y enrolla un poco la hoja y pega con silicón caliente.
Paso 6. // Step 6.
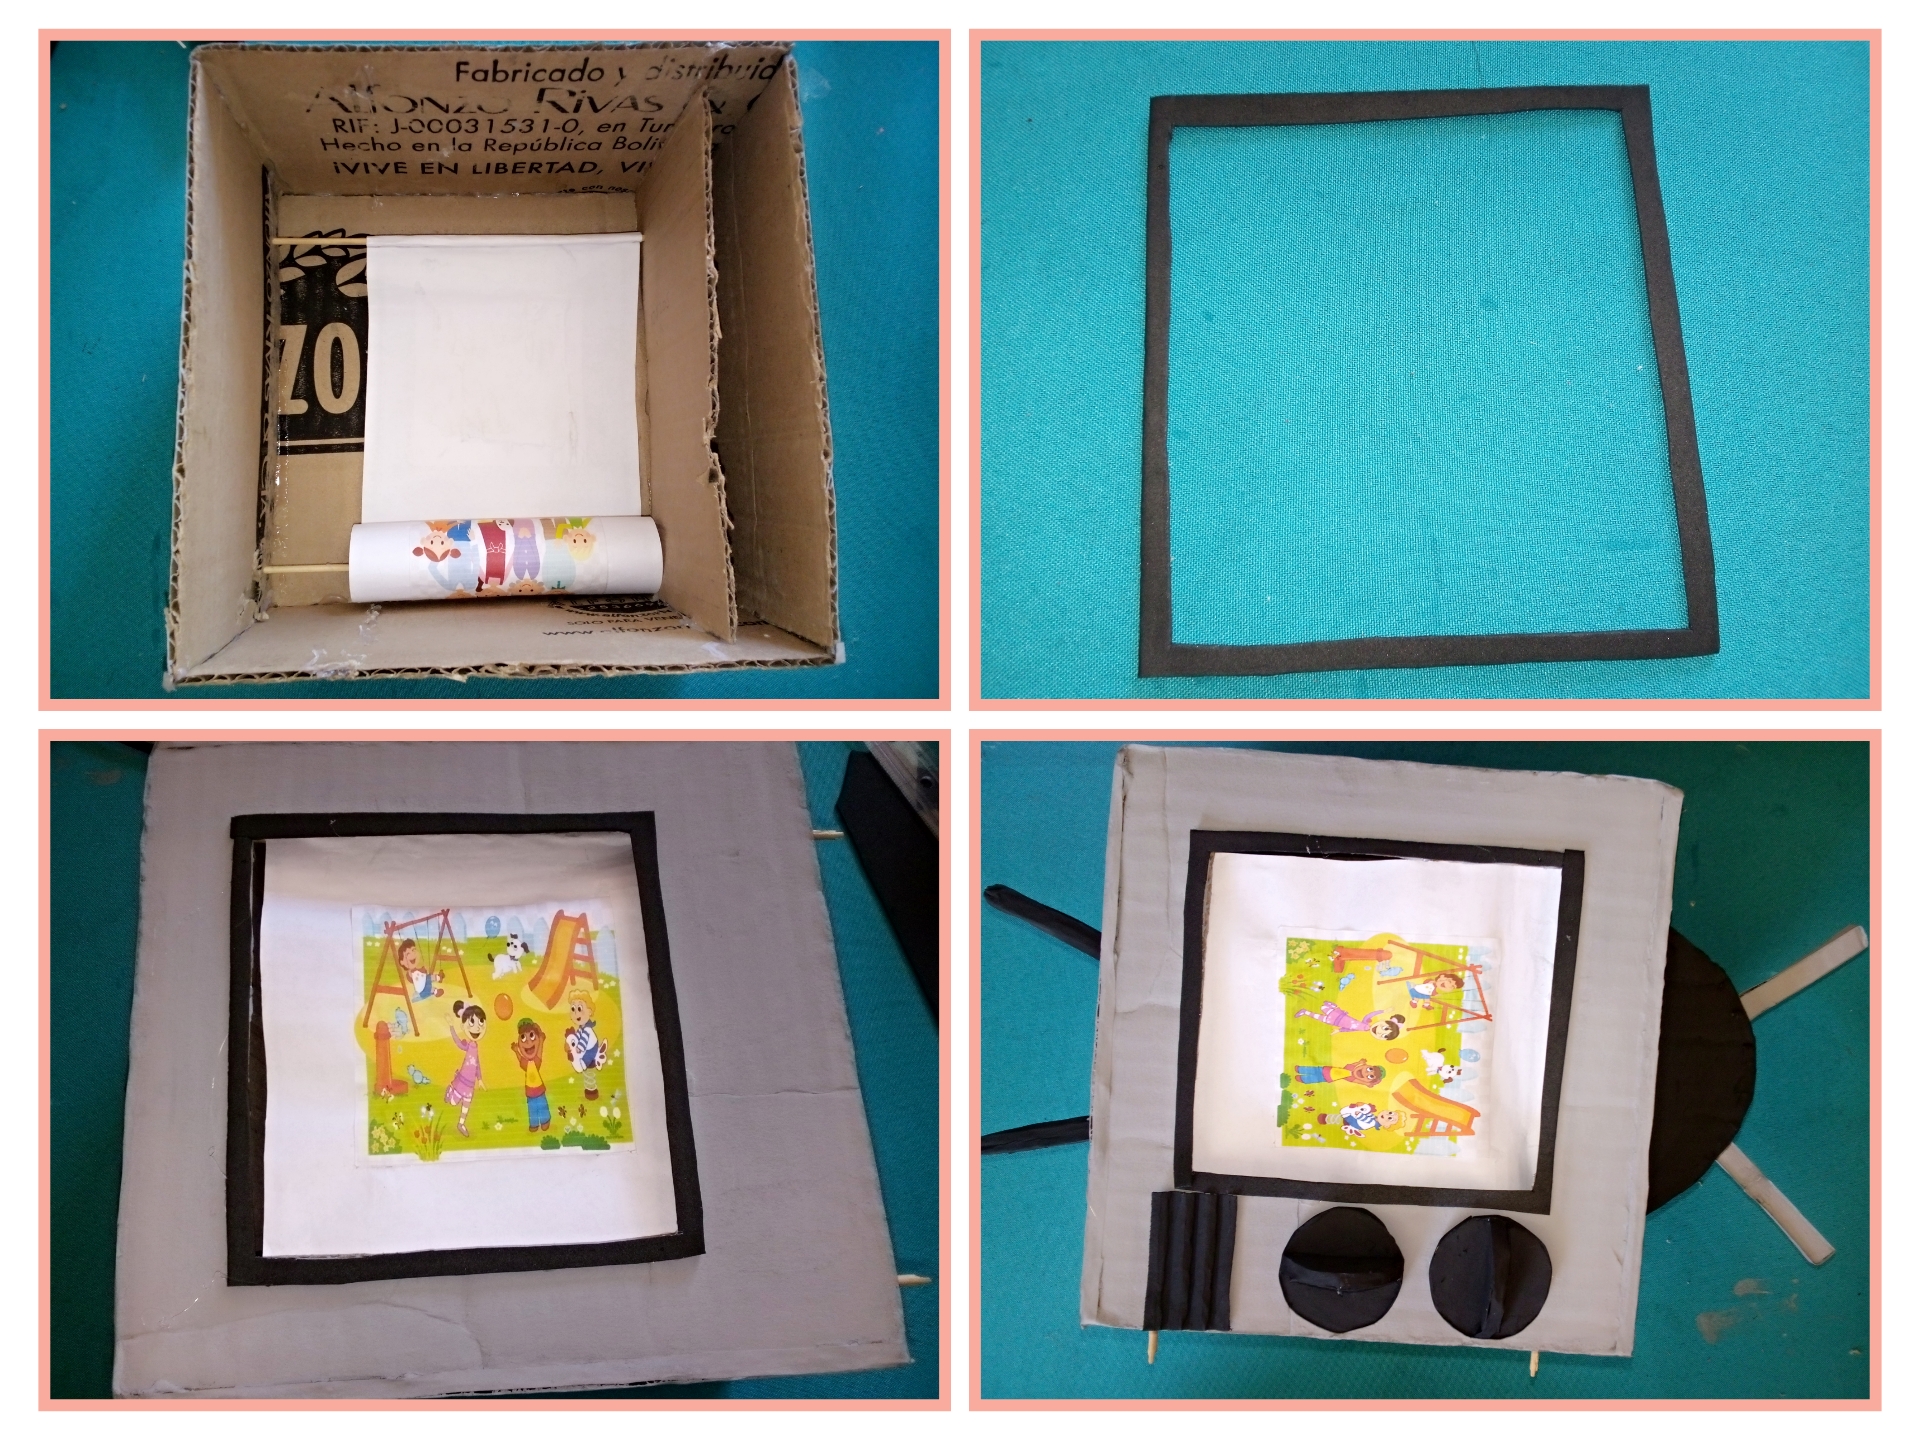
Next step, insert the episodes into the TV set into the holes that were made earlier, there will be sticks left over on the outside to pass the episodes through. Make a black eva rubber frame to the square of the TV and glue it with hot silicone. Glue the buttons, the speaker, the antenna and the legs.
Paso siguiente, introduces los episodios al televisor a los agujeros que se hicieron antes sobrará por fuera palillos para pasar los episodios. Haz un marco de goma Eva de color negro al cuadrado del televisor y pega con silicón caliente. Pega los botones, la bocina , la antena y la patas.
Paso 7. // Step 7.
Last step, with a strip of rolled up Eva glue to the sticks left over to pass the episodes. And also glue two strips inside so that the sheet does not come off and finally put a cardboard already painted 20.5 x20.5 centimeters.
Último paso, con tira de goma Eva enrollado pega a los palillos sobrante para pasar los episodios. Y también pega dos tira dentro para que la hoja no se salga y por último poner un cartón ya pintado de 20.5 x20.5 centímetros.
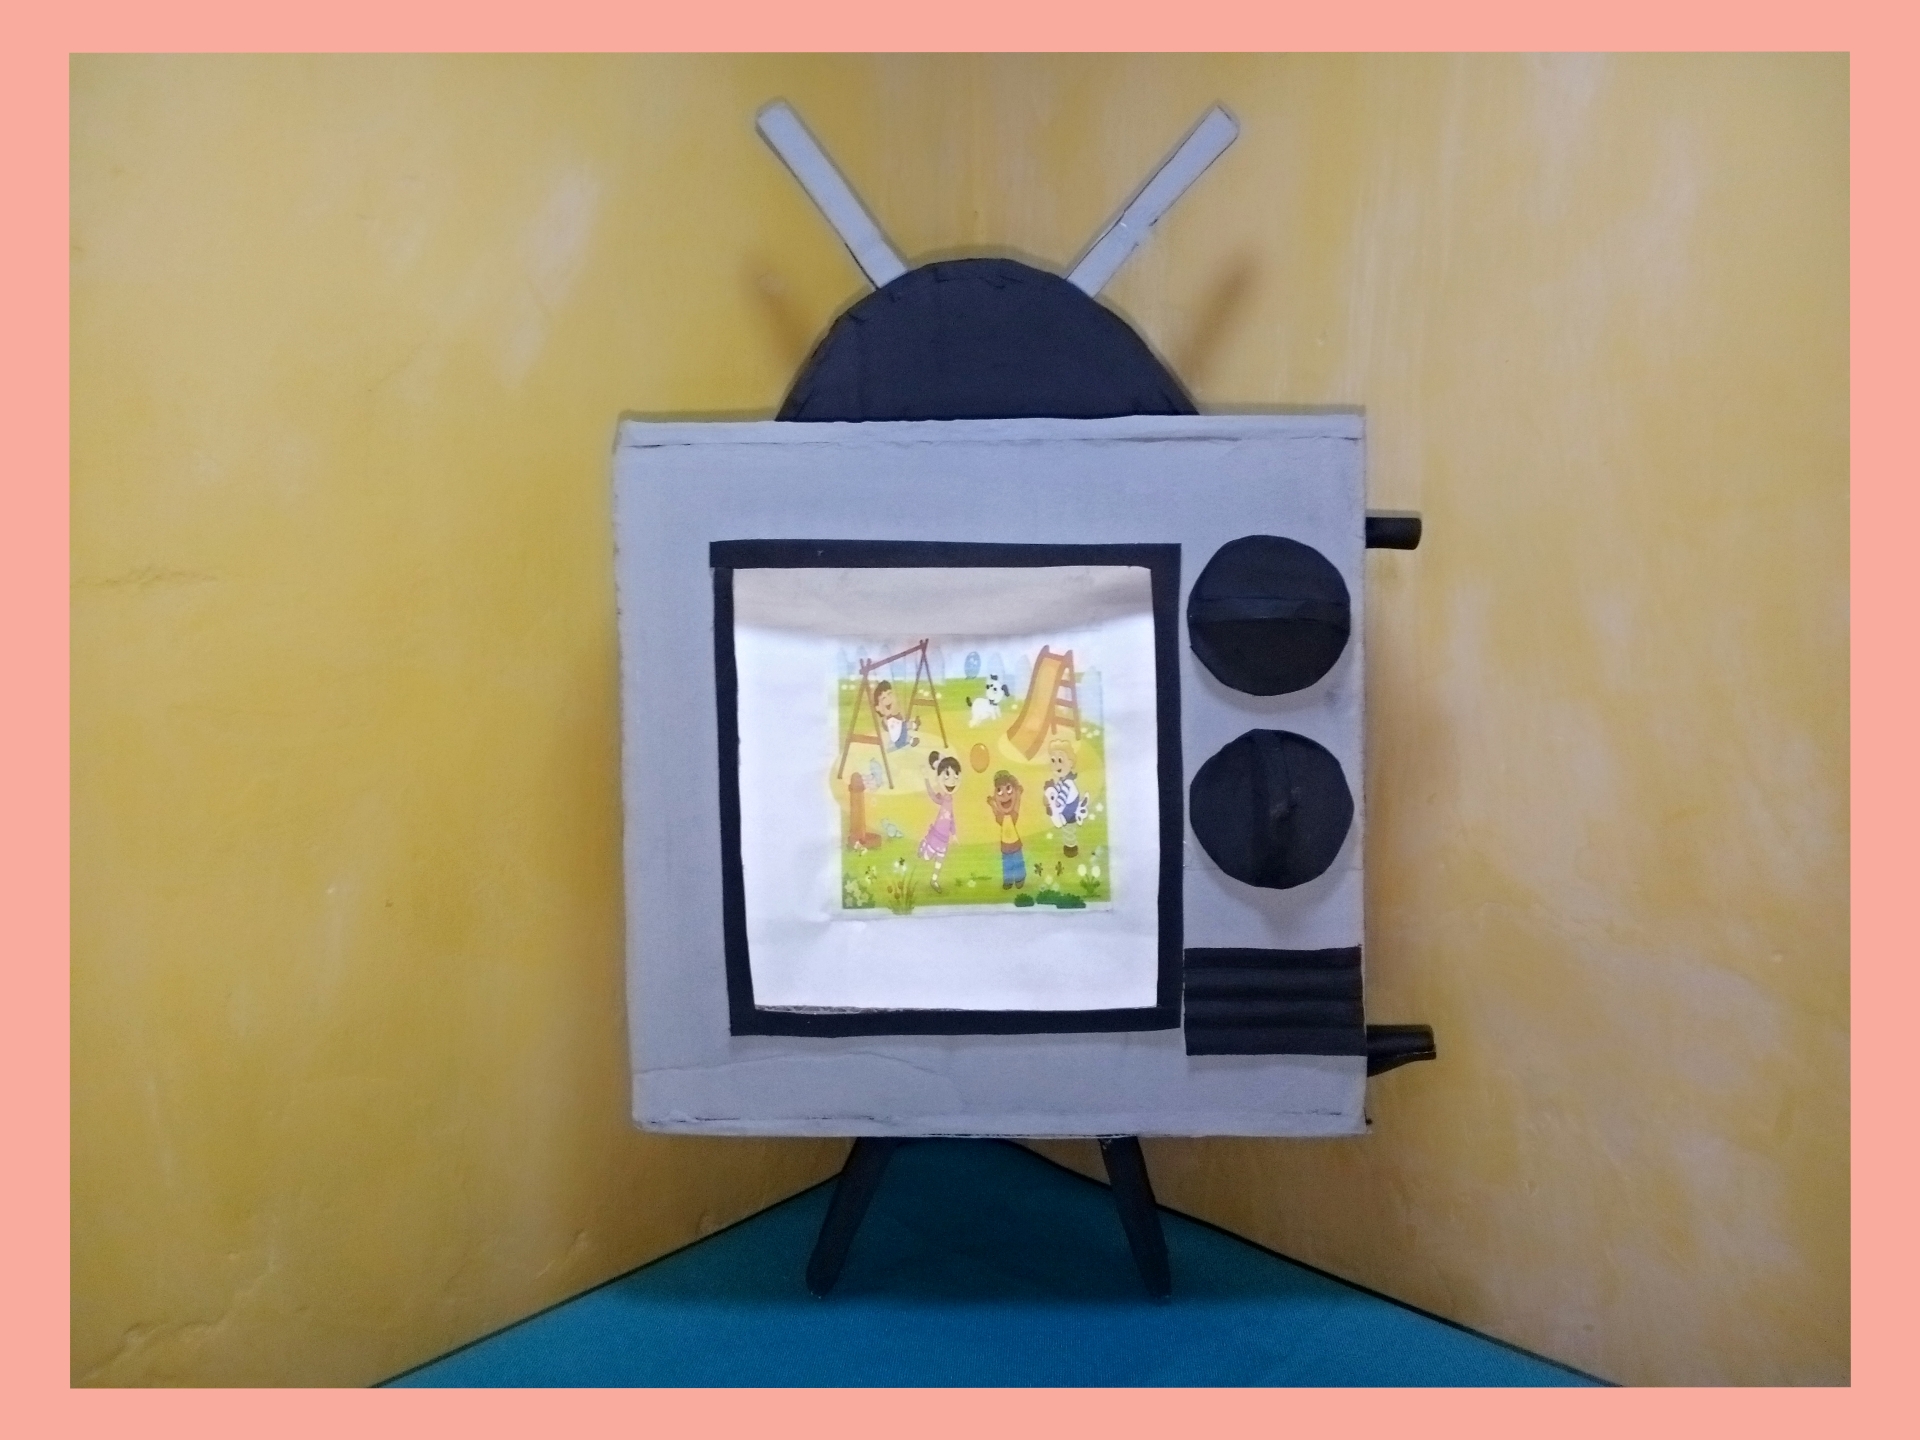
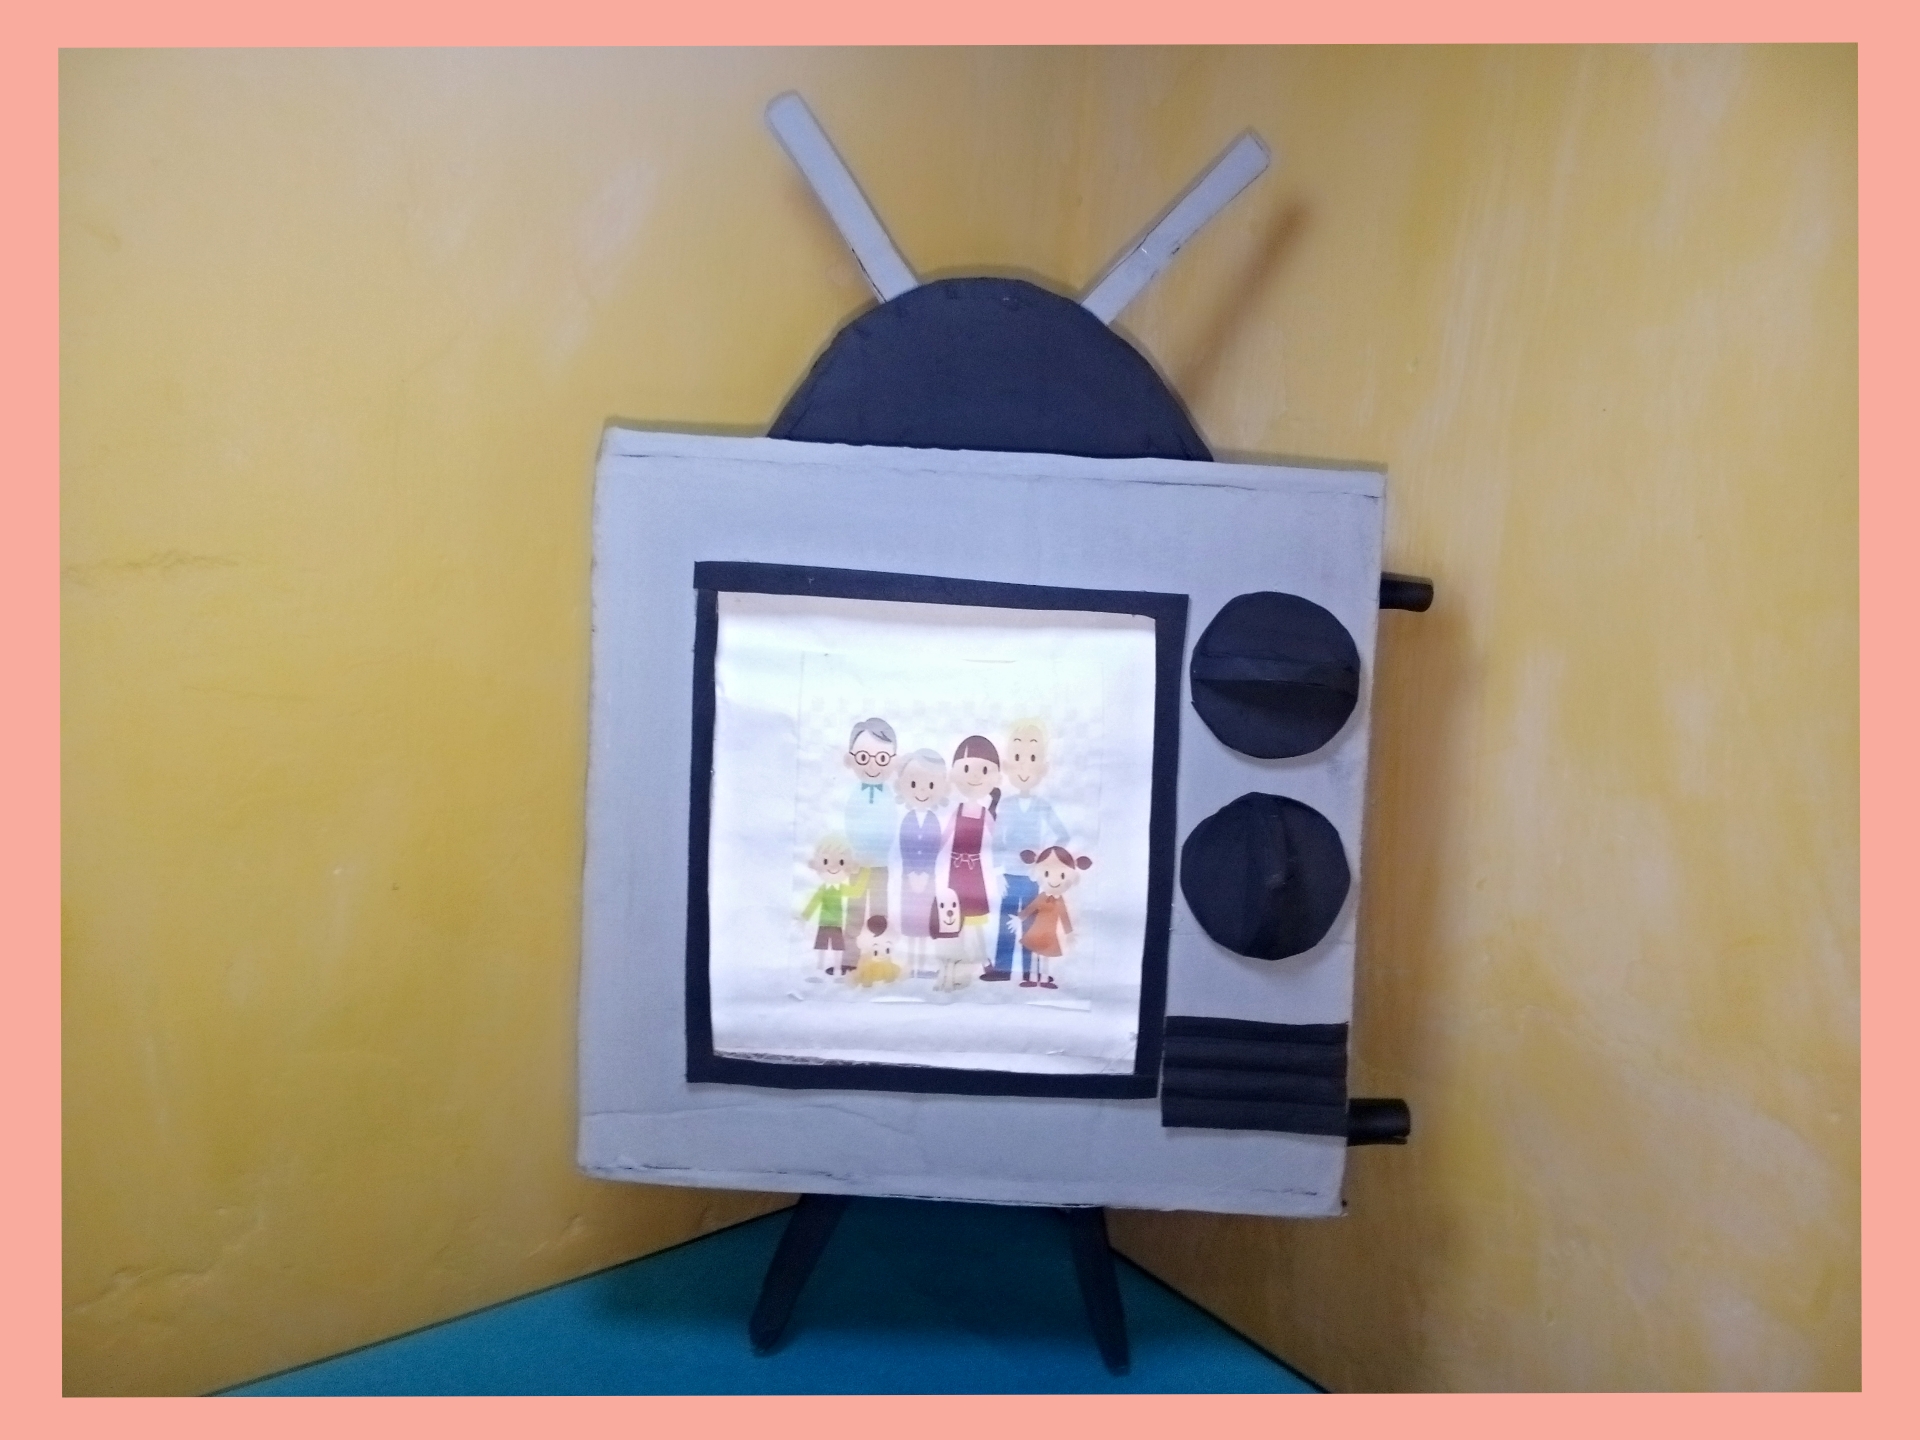
✨Final result. // Resultado final.✨

Gracias por visitar.
Todas las fotos y el contenido son originales que hago diariamente para mi blog. Para La traducción uso deepl los marcos y separadores es usado de canva .📷🖼️🤗
Thank you for visiting.
All photos and content are originals that I make daily for my blog. For translation I use deepl the frames and separators are used from canva .📷🖼️🤗

bueno es una excelente idea hacer que las imágenes se muevan, me encanto que usaste cartón para hacer el televisor siempre es bueno trabajar con material reutilizado
Gracias si el cartón es más facil de conseguir y es súper económico y las imágenes se hacen más divertida en movimiento que bueno que te encantó.
Congratulations @lexim! You have completed the following achievement on the Hive blockchain And have been rewarded with New badge(s)
Your next target is to reach 25000 upvotes.
You can view your badges on your board and compare yourself to others in the Ranking
If you no longer want to receive notifications, reply to this comment with the word
STOPA very creative and entertaining work for children. Thank you for sharing your work, step by step, in our community.
Yes, the idea of the television is very entertaining, it is something healthy that children can play healthily, thank you @diyhub for commenting, happy night.!!
Hey, que creatividad!
Demasiado bueno este televisor. Tal vez se podría adaptar este diseño para obsequiar fotografías de una manera muy dinámica.
!LUV
Si claro me parece bien la idea de las fotografías queda genial gracias por comentar.
Congratulations, your post has been upvoted by @dsc-r2cornell, which is the curating account for @R2cornell's Discord Community.
Enhorabuena, su "post" ha sido "up-voted" por @dsc-r2cornell, que es la "cuenta curating" de la Comunidad de la Discordia de @R2cornell.
Gracias por el apoyo 🤗 @dsc-r2cornell