WELCOME TO MY BLOG
From my humble home I want to wish the entire Hive family a Merry Christmas and a happy new year. The December season, in my country, is used for the renovation and remodeling of our homes, many spend their time painting and cleaning thoroughly, others discard what is useless and buy new things if possible. At the end of this year we decided to spend it at home and make some changes that were already needed and of course decorate some spaces with Christmas motifs.
The budget that we manage in our home is limited, even so, that did not stop us to make some changes and many of the decorations were made with material that we already had and some recycled.
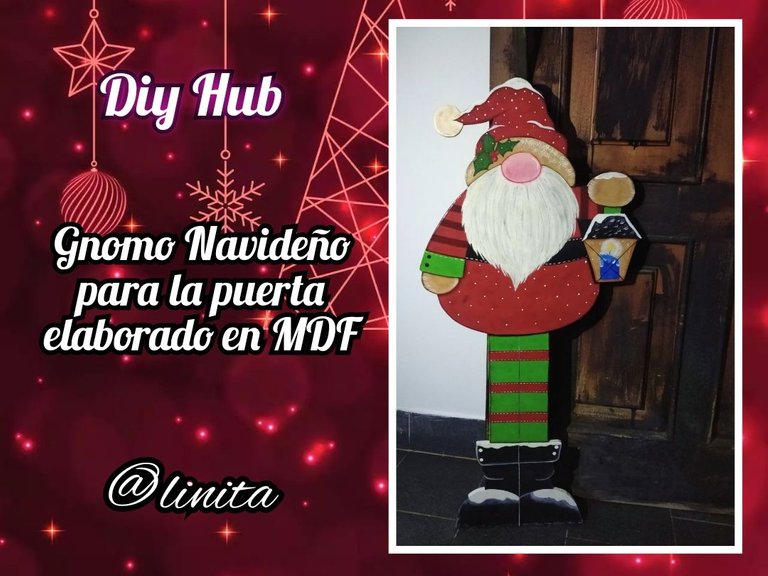
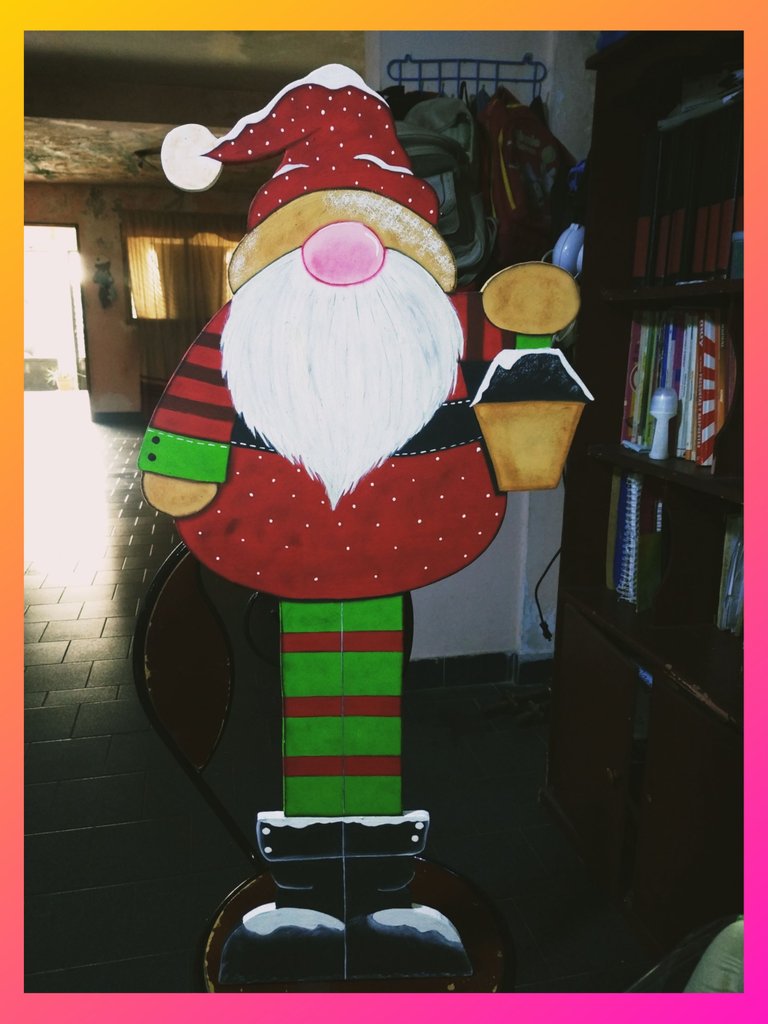
Today I present to you a Christmas Gnome made of MDF, this is not only an ornament for my door, but it also has the function of supporting it so that it does not close when drafts enter or exit. I had the idea of doing it for a long time, only I couldn't find the ideal piece of wood to make the wedge that would hold the door. One day I met a carpenter friend and between conversations the subject of his work came up and I took the opportunity to ask him for a wedge and he very kindly gave it to me. It is thanks to him that today I can present this project to you. Hope you like.
Without further ado, let's get started.
BIENVENIDOS A MI BLOG
Desde mi humilde hogar quiero desearle a toda la familia de Hive una Feliz Navidad y un venturoso año nuevo. La época decembrina, en mi país, es aprovechada para la renovación y remodelación de nuestras viviendas, muchos ocupan su tiempo en pintar y limpiar a fondo, otros a desechar lo que no sirve y comprar, si cabe en su posibilidad, cosas nuevas. El fin de este año decidimos pasarlo en casa y realizar algunos cambios que ya le hacían falta y desde luego adornar con motivos navideños algunos espacios.
El presupuesto que manejamos en nuestro hogar es limitado, aun así eso no nos detuvo para realizar algunos cambios y muchos de los adornos los realizamos con material que ya teníamos y algunos reciclados.
Hoy les presento un Gnomo Navideño realizado on MDF, éste no es solo un adorno para mi puerta, sino que también cumple la función de sostenerla para que no se cierre cuando entran o salen corrientes de aire. Desde hace mucho tiempo tenía la idea de hacerlo, sólo que no encontraba el trozo de madera ideal para hacer la cuña que mantendría la puerta sujeta. Un día me encontré con un amigo carpintero y entre conversaciones salió el tema de su trabajo y aproveché la oportunidad de pedirle una cuña y él muy amablemente me la obsequió. Gracias a él es que hoy puedo presentarles este proyecto. Espero que les guste.
Sin más, comencemos.
MATERIALS
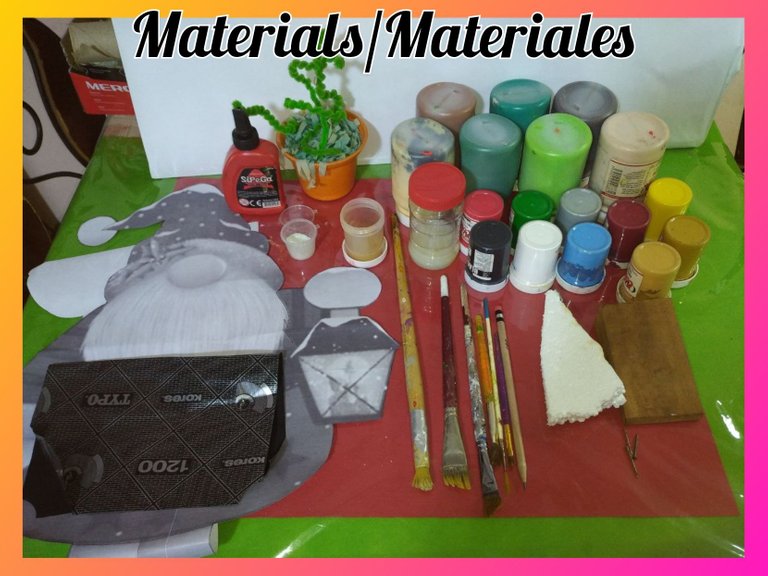
To make this beautiful Gnome we will need the following materials and tools:
- A 100 cm x 100 cm MDF sheet
- Christmas Gnome Pattern
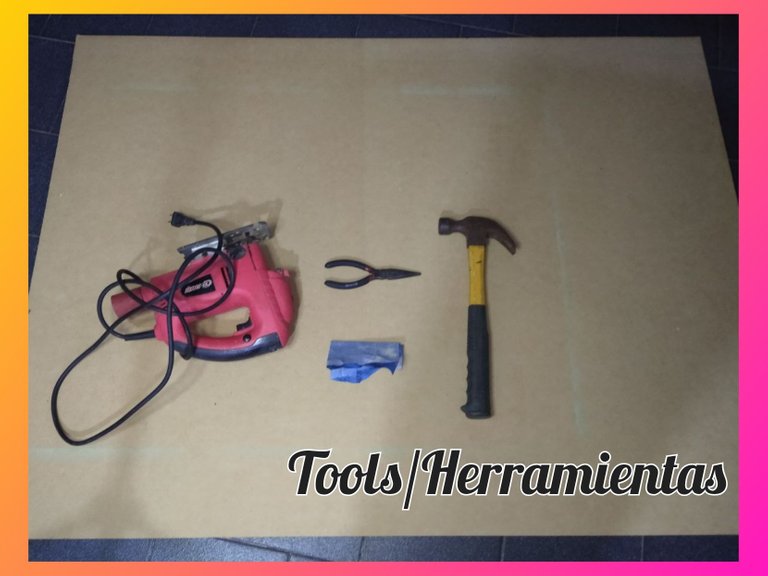
- Close manual jigsaw
- Hammer
- Wood nails
- Gripper
- No. 180 and No. 80 sandpaper
- Baby cot of wood
- Cold paints (red, red wine, apple green, Amazon green, black, white, ochre, brown)
- Brushes (flat, angular, liner, round)
- Acrylic wax
- A piece of sponge
- Carbon paper
- White paste
- MDF sawdust
- Graphite pencil
MATERIALES
Para realizar este bello Gnomo necesitaremos los siguientes materiales y herramientas:
- Una lámina de MDF de 100 cm x 100 cm
- Patrón de Gnomo Navideño
- Cierra caladora manual
- Martillo
- Clavos para madera
- Pinza
- Lijas Nº 180 y Nº80
- Cuña de madera
- Pinturas al frío (rojo, vino tinto, verde manzana,verde amazonas, negro, blanco, ocre, marrón)
- Pinceles (plano, angular, liner, redondo)
- Cera acrílica
- Un trozo de esponja
- Papel carbón
- Pega blanca
- Aserrín del MDF
- Lápiz de grafito
STEP BY STEP // PASO A PASO
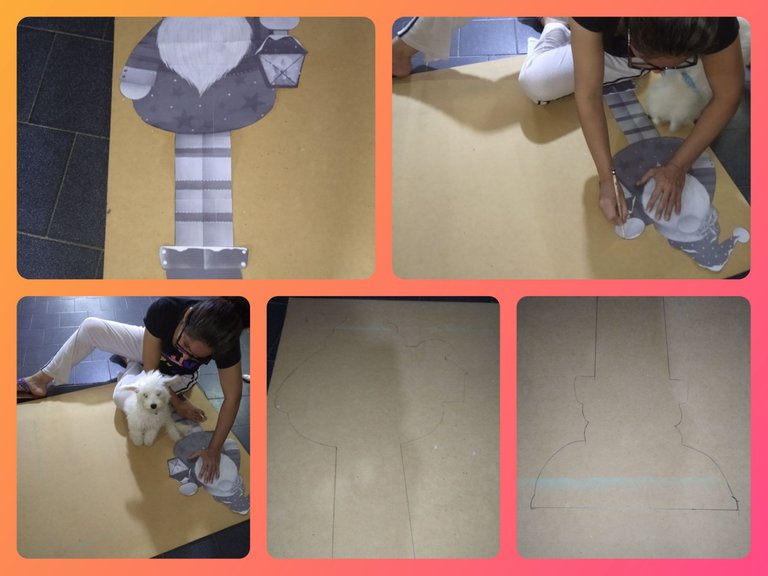
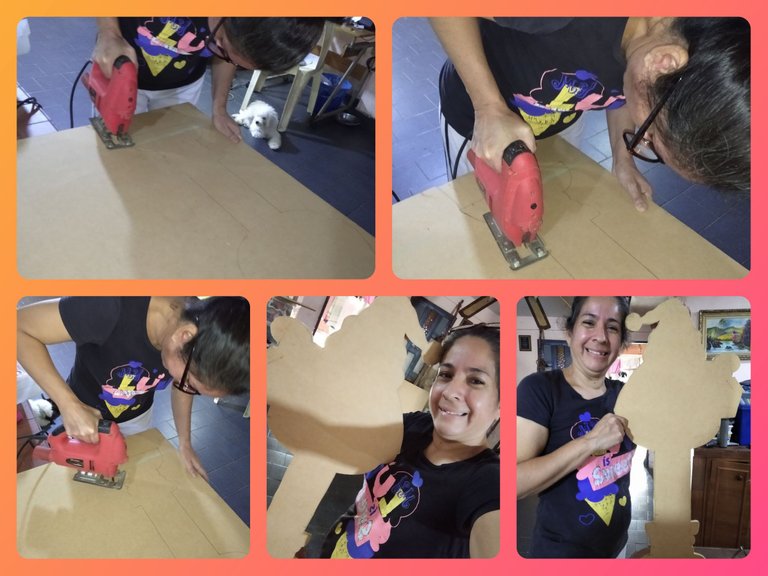
The first thing we will do is situate ourselves in a comfortable place where we can trace the design, since it is a large piece. As you can see in the images, in addition to being comfortable I also had the help of Fiu Fiu, who is the most comfortable when it comes to doing the job hahahahaha.
We place the pattern and trace only the outline of the design since it is for cutting. If we trace the entire figure we run the risk of making mistakes with the lines and cutting more than is due. This is as a precaution since on several occasions I had the misfortune of making such a mistake.
Lo primero que haremos es ubicarnos en un sitio cómodo donde poder realizar el trazado del diseño, ya que es una pieza grande. Cómo pueden notar en las imágenes, además de estar cómoda también conté con la ayuda de Fiu Fiu, quien es el más cómodo a la hora de realizar el trabajo jajajajaja.
Colocamos el patrón y trazamos solamente el contorno del diseño ya que es para cortar. Si trazamos toda la figura corremos el riesgo de equivocarnos con las líneas y cortar más de lo debido. Esto es por precaución ya que en varias oportunidades tuve la desdicha de cometer semejante error.
We cut the figure with the jig machine, which we must also locate in a place where we can cut without risk of having an accident, always taking into account the space so that the jig cutter can cut without stumbling over anything. This is a job that requires patience and skill when making the curved cuts.
Cortamos la figura con la máquina caladora que también debemos ubicarla en un lugar donde podamos cortar sin riesgos de tener algún accidente, siempre teniendo en cuenta el espacio para que la caladora corte sin tropiezos de nada. Este es un trabajo que requiere paciencia y destreza al momento de realizar los cortes curvos.
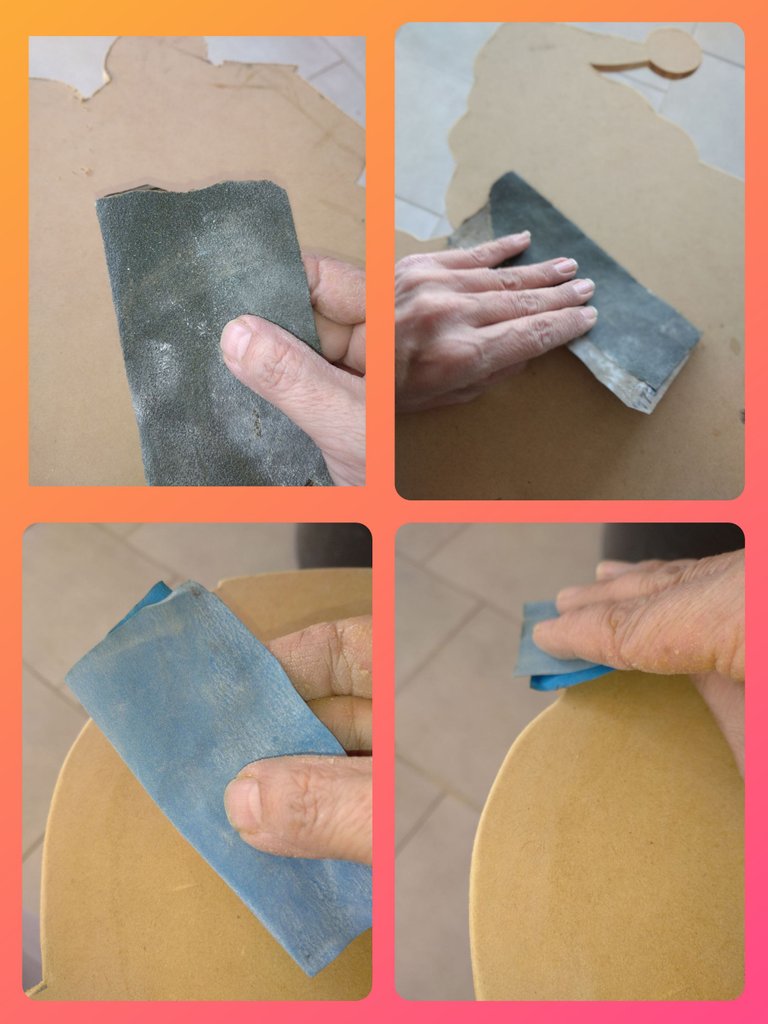
The next step is to eliminate with a coarse sandpaper No. 80 or 100, the imperfections left by the cut on the edges and then smooth with a fine sandpaper No. 180 to facilitate the sliding of the paint.
El paso siguiente es eliminar con una lija gruesa Nº 80 o 100, las imperfecciones que deja el corte en los bordes y después suavizamos con una lija fina Nº 180 para facilitar el deslizamiento de la pintura.
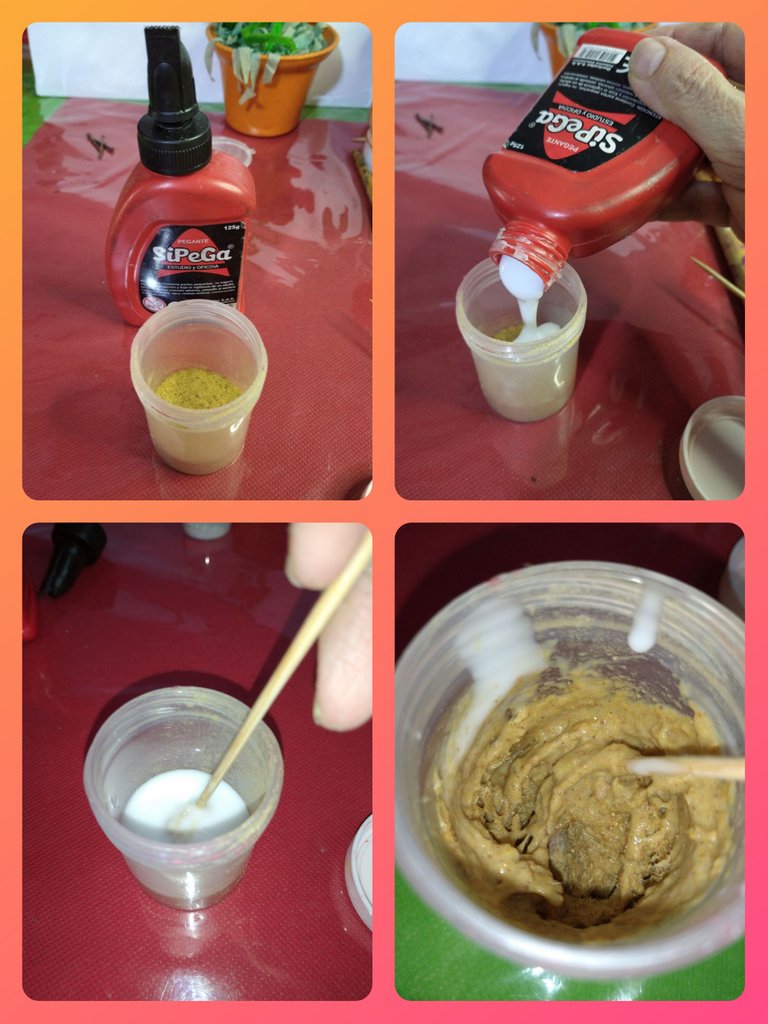
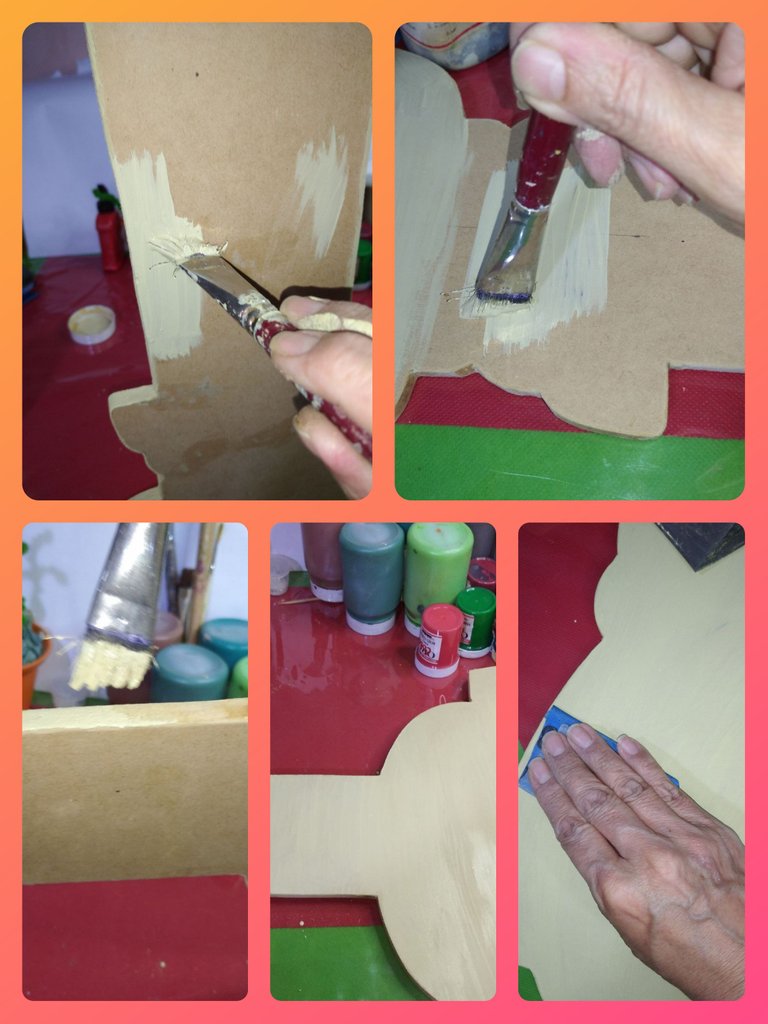
Once the piece has been sanded, we proceed to make a glue with the waste or sawdust that we collected when we made the cut and a little white glue. The ideal would be to use glue, which is a stronger glue, but since I didn't have it, I used white glue. This glue is very good when we want our pieces to be well secured.
Una vez lijada la pieza procedemos a realizar un pegamento con los residuos o aserrín que recogimos cuando realizamos el corte y un poco de pega blanca. Lo ideal sería utilizar cola, que es un pegamento más fuerte, pero en vista que no tenía, utilicé la pega blanca. Este pegamento es muy bueno cuando queremos que nuestras piezas queden bien aseguradas.
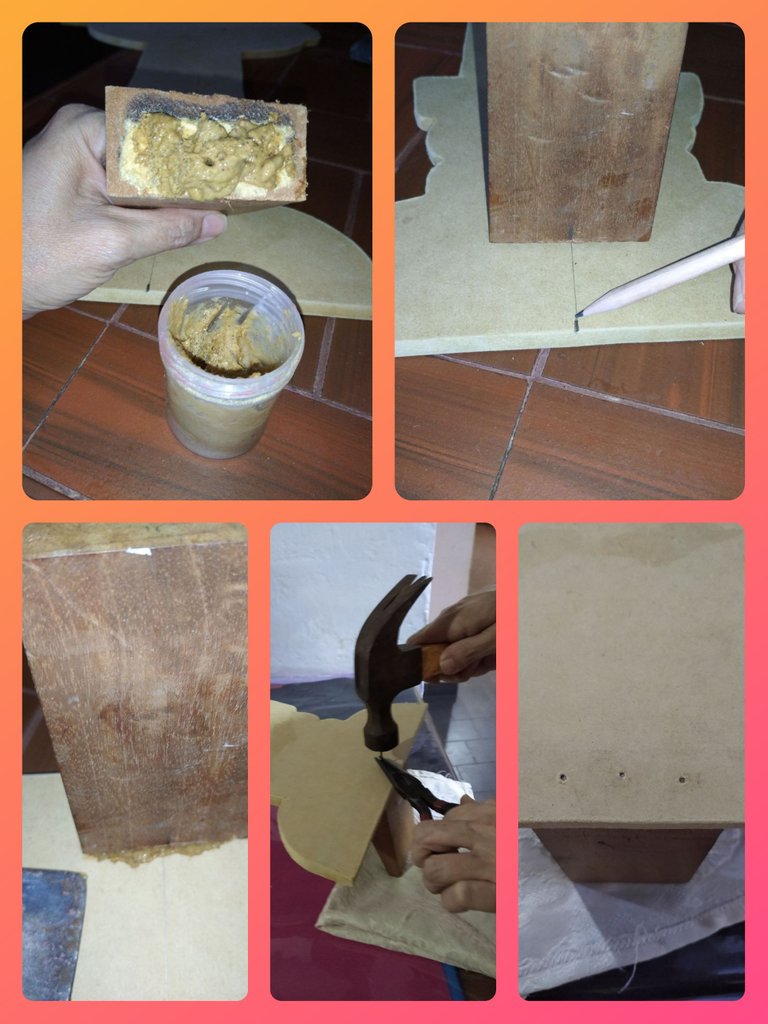
We apply a good amount of the glue prepared on the wooden wedge and stick it on the bottom center of the Gnome. We remove the excesses that remain by applying pressure and let it dry for an hour or more.
Once it has dried, we secure with 3 wooden nails. We place the piece in a place that is horizontal and firm so that the wedge does not come off when we hammer.
Aplicamos una buena cantidad del pegamento preparado en la cuña de madera y la pegamos en la parte inferior central del Gnomo. Eliminamos los excesos que quedan al hacer presión y dejamos secar por una hora o más.
Una vez que se ha secado, aseguramos con 3 clavos de madera. Colocamos la pieza en un lugar que quede de forma horizontal y firme para que no se despegue la cuña cuando realicemos los martillazos.
Now with a flat brush and cold vanilla paint, we make the base to draw the gnome. We let it dry and with the fine sandpaper No. 180 we eliminate the excesses or lumps that the paint could have left and thus soften the wood more to facilitate painting.
Ahora con un pincel plano y pintura al frío vainilla, realizamos la base para dibujar el gnomo. Dejamos secar y con la lija fina Nº 180 eliminamos los excesos o bultos que pudo dejar la pintura y así suavizar más la madera para facilitar el pintado.
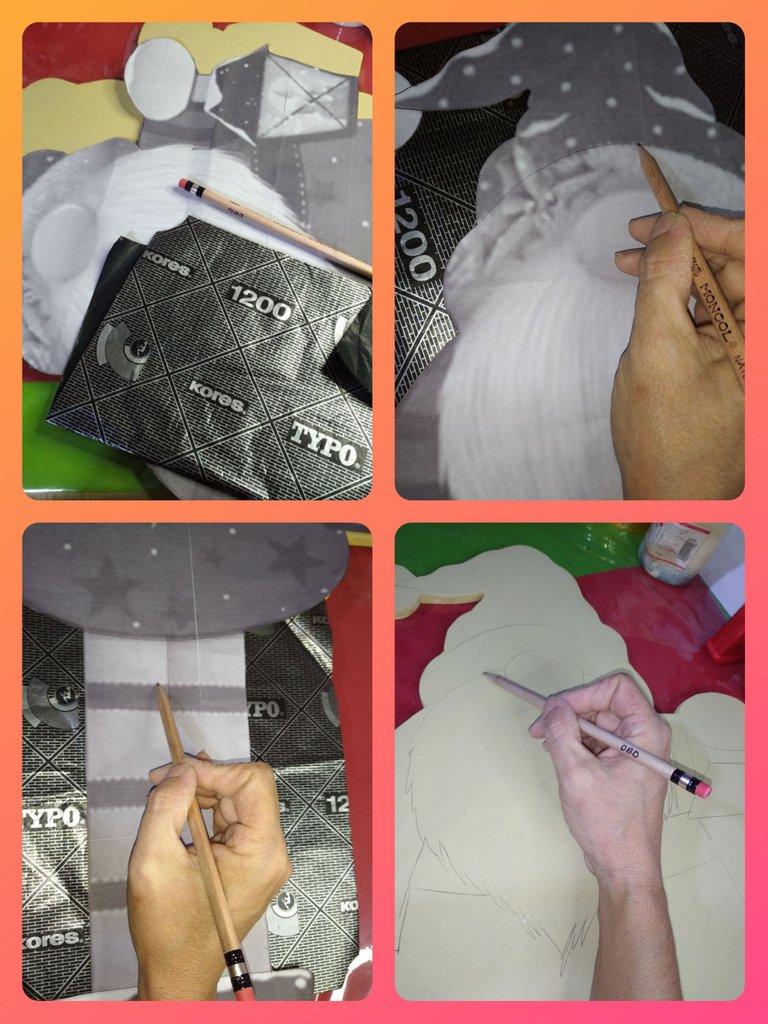
Es momento de trazar nuestro diseño, para ello utilizamos el patrón de Gnomo, el papel carbón y el lápiz de grafito. Una vez trazado y retirado el papel, con el lápiz realizamos las líneas y perfeccionamos nuestro diseño.
It is time to trace our design, for this we use the Gnome pattern, the carbon paper and the graphite pencil. Once the paper has been drawn and removed, with the pencil we make the lines and perfect our design.
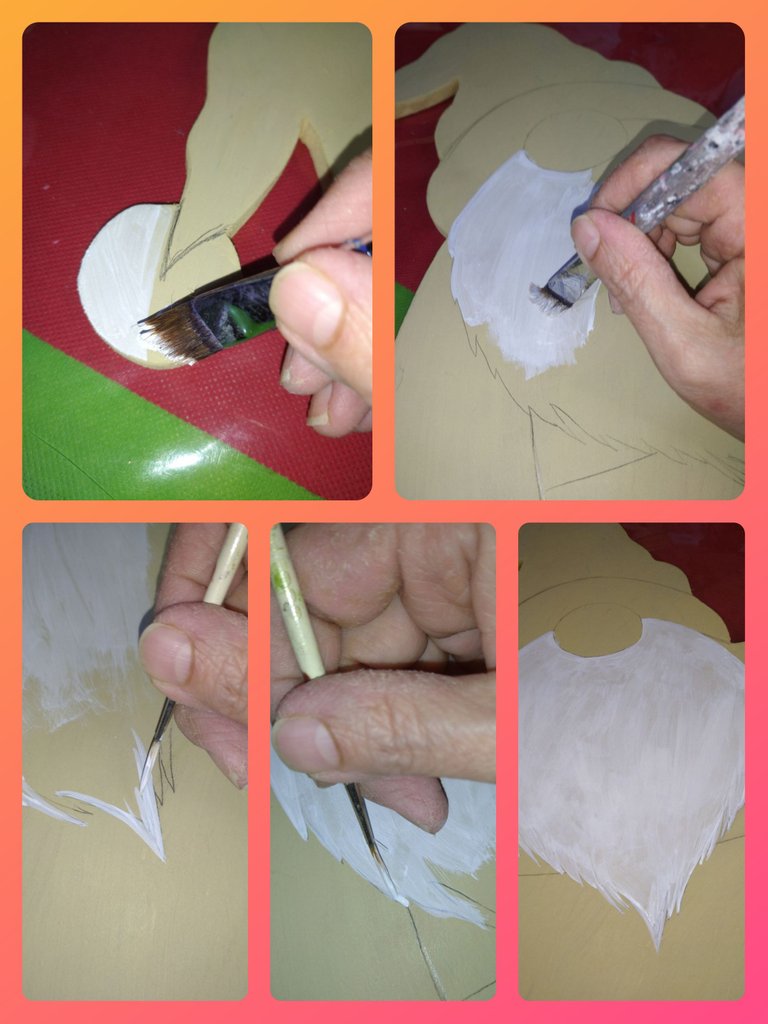
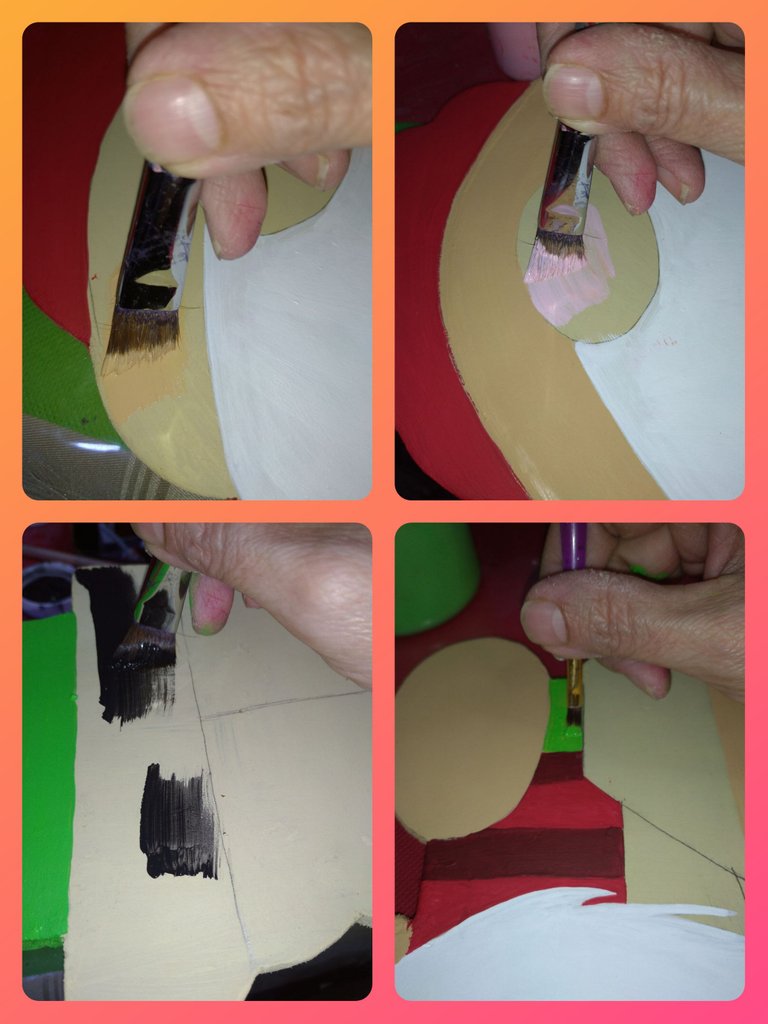
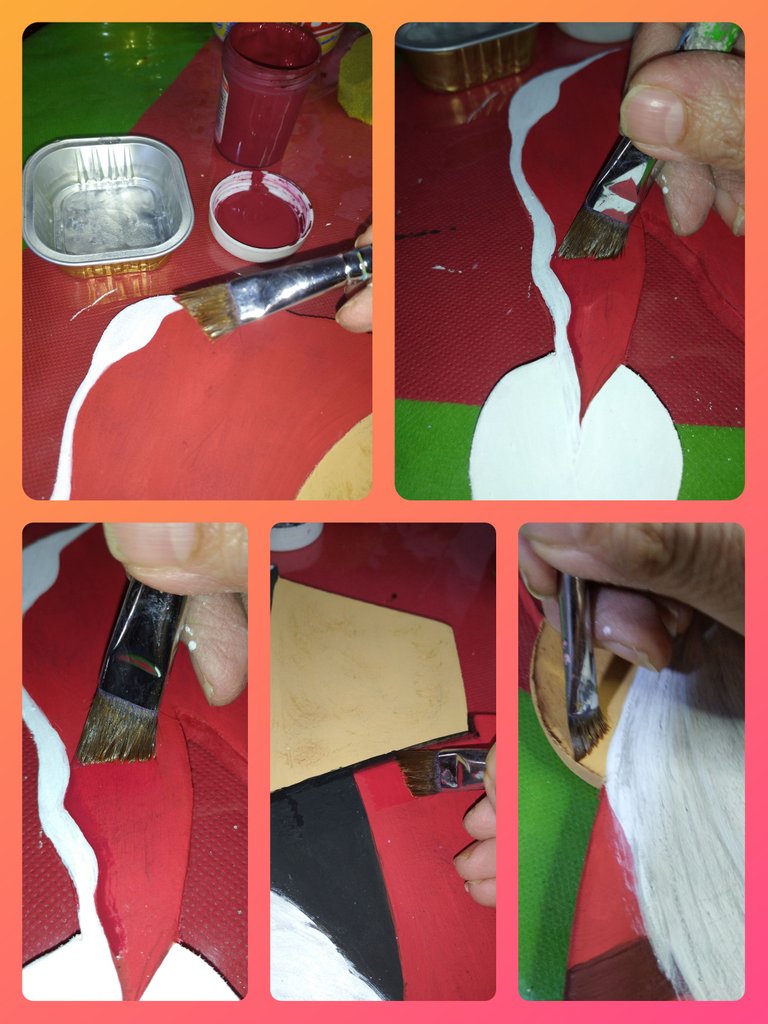
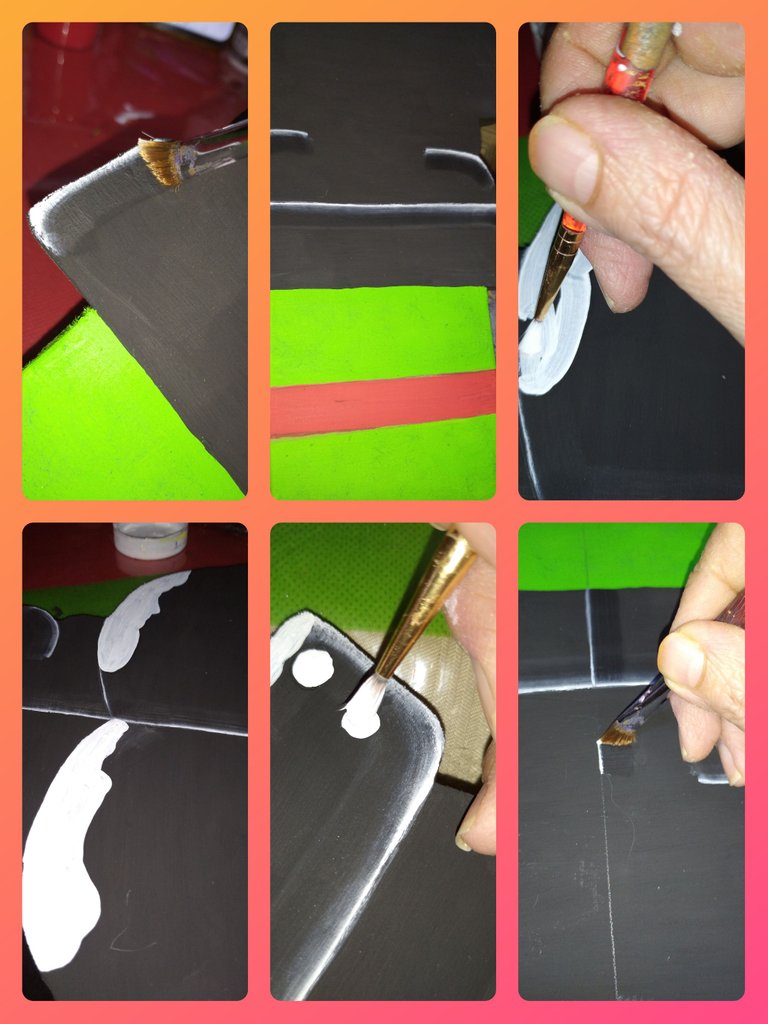
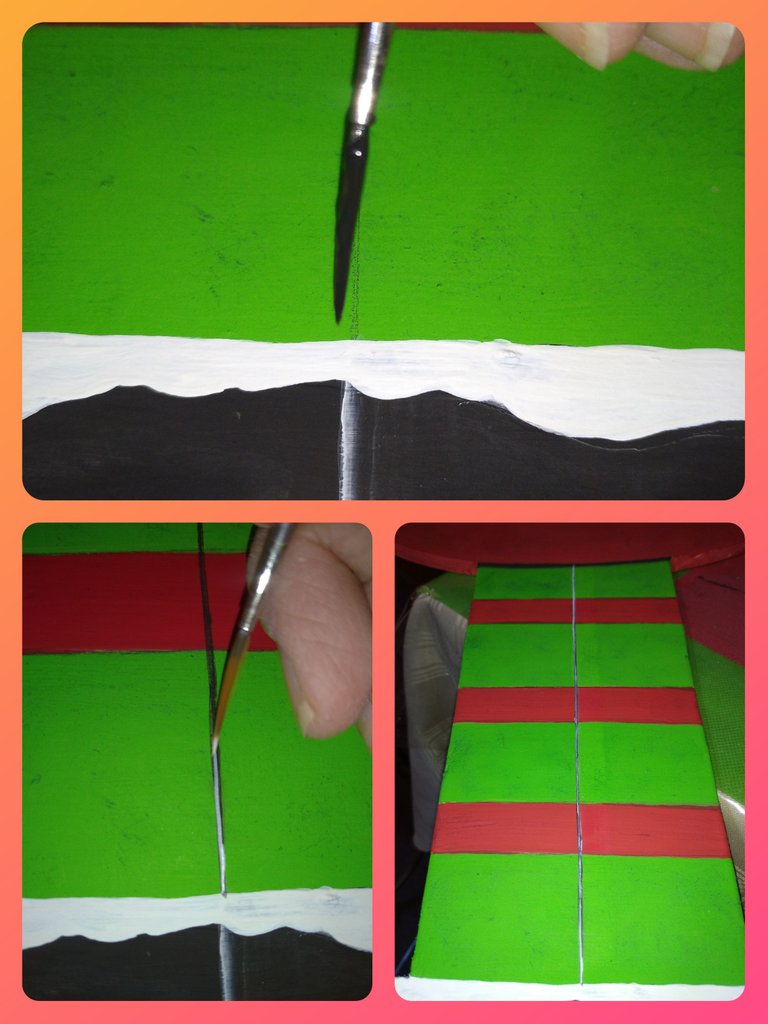
We begin to paint the Gnome with the paints selected for each space. When the pieces are large, the way of painting is more comfortable because you can make the brushstrokes without fear of going over the lines. I started by making the parts in white, using the angle brush to draw the dividing lines neatly. Each part took two coats of white paint to obtain a better finish.
Comenzamos a pintar el Gnomo con las pinturas seleccionadas para cada espacio. Cuando las piezas son grandes, la forma de pintar es más cómoda porque puedes realizar las pinceladas sin temor de pasar las líneas. Comencé realizando las partes de color blanco, utilizando el pincel angular para trazar las líneas divisoras de forma prolija. Cada parte llevó dos capas de pintura blanca para obtener mejor acabado.
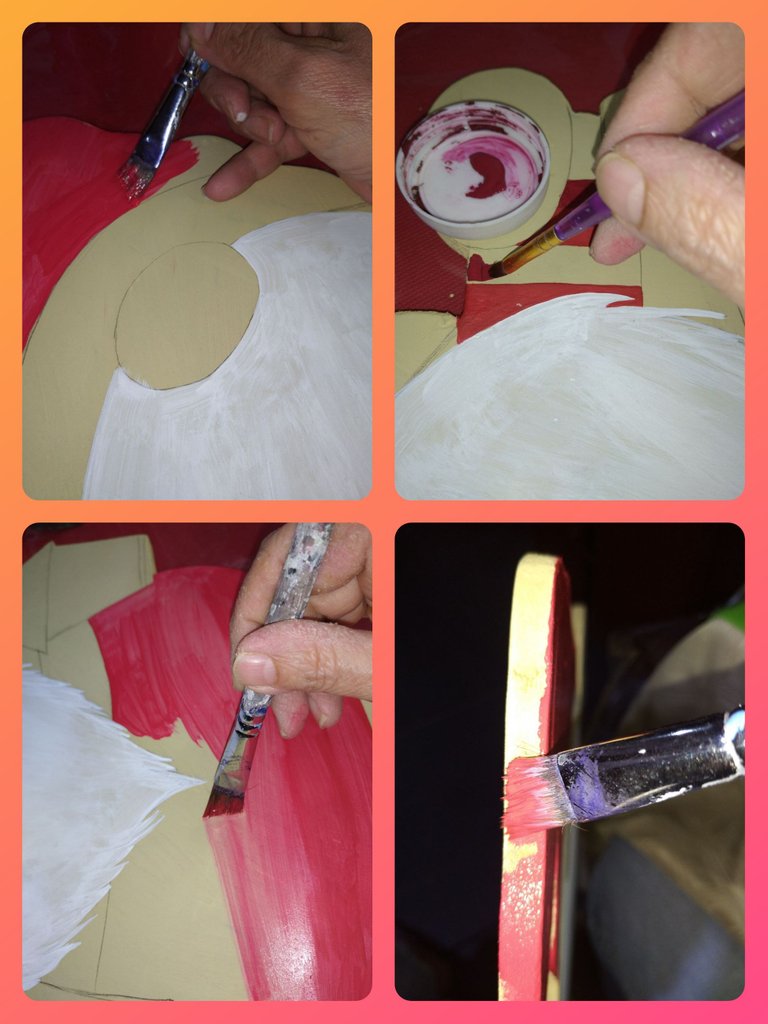
We also do it with the red parts, taking into account painting all the edges of the figure. We also make two layers of red.
Igualmente realizamos con las partes de color rojo, tomando en cuenta pintar todos los bordes de la figura. También realizamos dos capas de color rojo.
We paint the hat, the lamp, the legs, the boots and the rest of the Gnome, using ocher, black, apple green, white and pink paints.
Pintamos el gorro, la lámpara, las piernas, las botas y el resto del Gnomo, utilizando las pinturas ocre, negro, verde manzana, blanco y rosado.
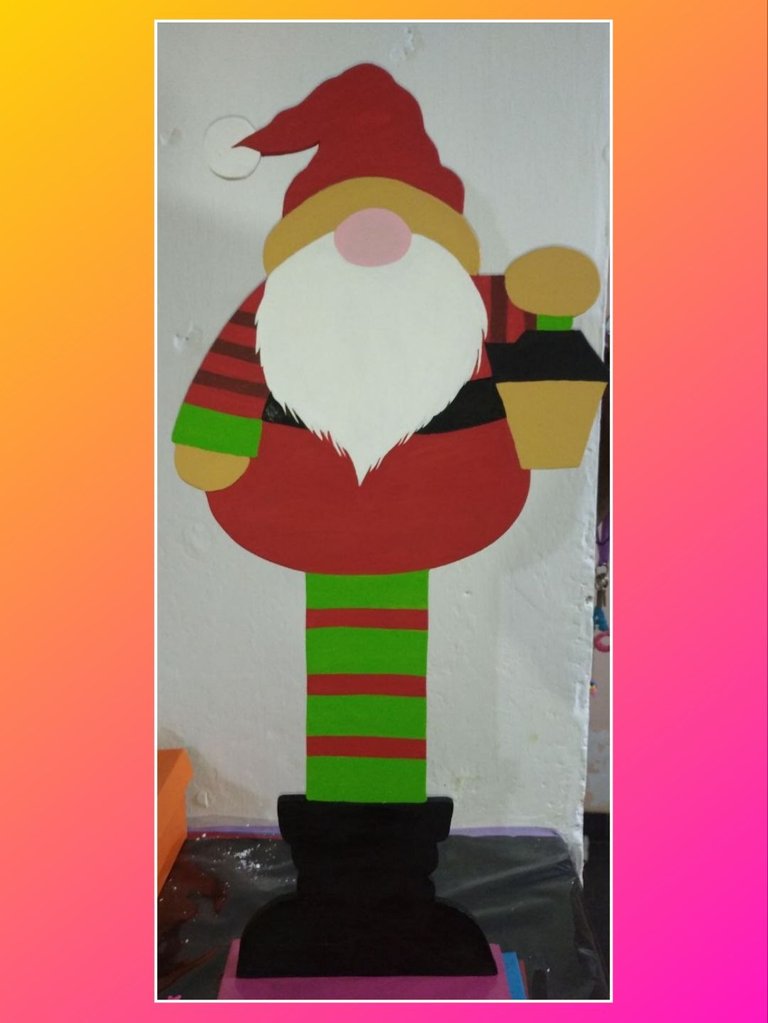
This is the result once we have painted each part of the Gnome
Este es el resultado una vez que hemos pintado cada parte del Gnomo
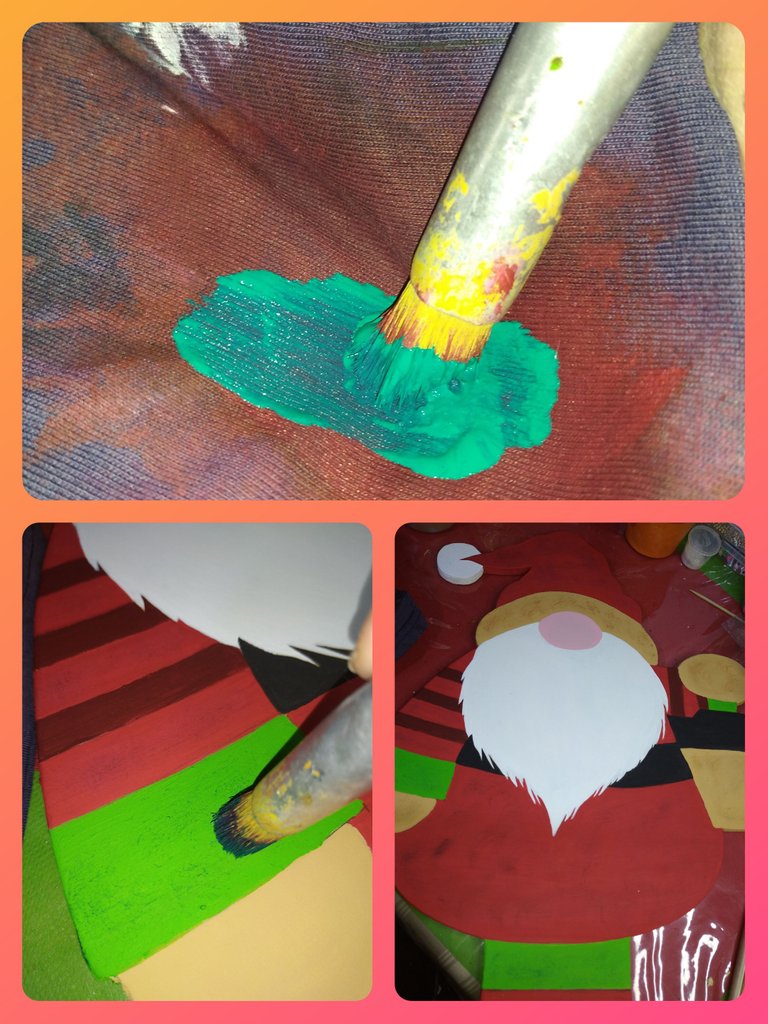
We begin to apply the techniques to highlight the figure. With a round brush with soft cells, we perform the blending technique, which consists of reloading the brush several times with paint and going through a cloth to remove excesses and leaving only a small amount to make circular paths on the selected surface and highlight that part. . This blending is done with paints of colors that are more intense or lighter than the base. In the case of Gnome, I blended with darker tones. For example, in the area with an ocher base, I blended with a brown tone, thus giving a darker shade. In the same way in the rest of the design, changing paints according to the color of the base to blend.
Comenzamos a aplicar las técnicas para resaltar la figura. Con un pincel redondo de celdas suaves realizamos la técnica de difuminado, que consisten en recargar el pincel varias veces de pintura y pasar por una tela para eliminar los excesos y dejar sólo una pequeña cantidad para realizar trazados circulares sobre la superficie seleccionada y resaltar esa parte. Este difuminado se realiza con pinturas de colores más intensos o más claros que la base. En el caso de Gnomo realicé el difuminado con tonos más oscuros. Por ejemplo, en la zona con base ocre, realicé el difuminado con un tono marrón, dando así un matiz mas oscuro. De la misma forma en el resto del diseño, cambiando de pinturas de acuerdo al color de la base a difuminar.
With the round brush and the liner I made lines on the part of the hat and the lamp giving it the appearance of thick snow.
Con el pincel redondo y el liner realicé lineas en la parte del gorro y la lámpara dándole aspecto de nieve gruesa.
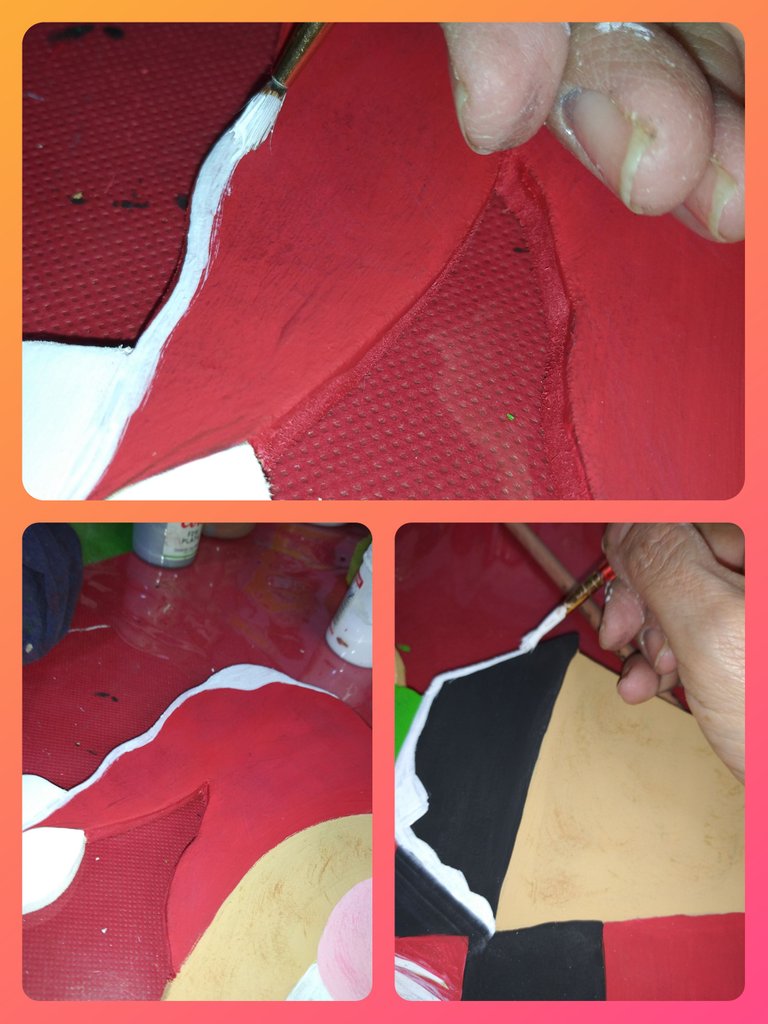
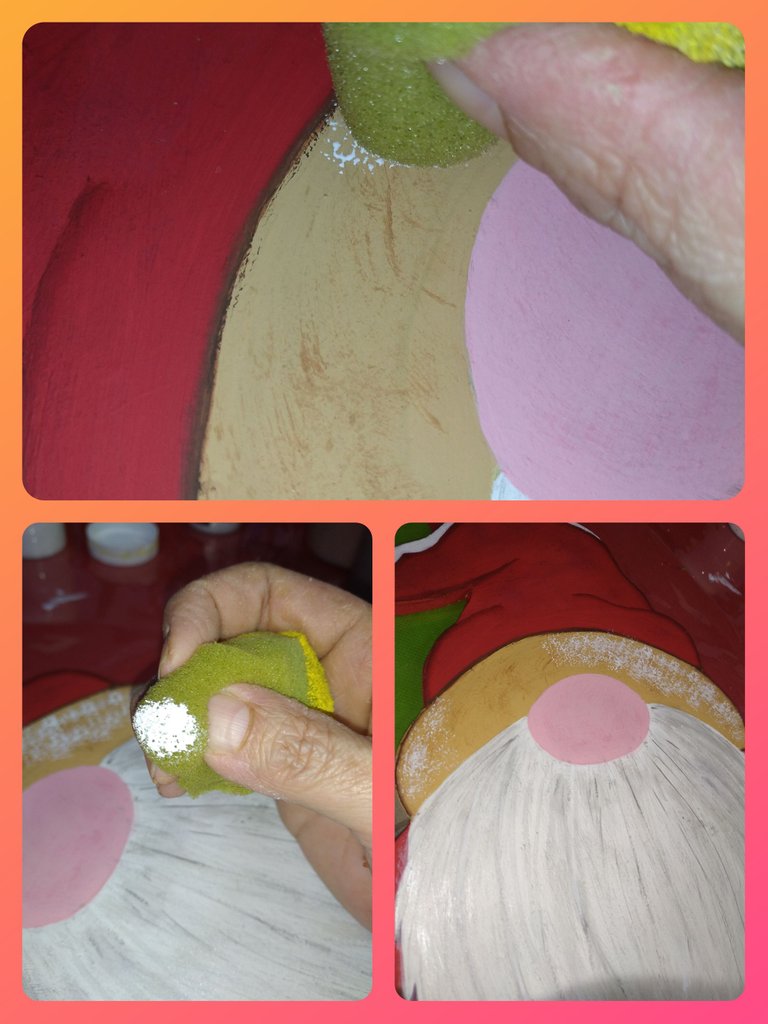
Then I did the shading technique, using the angled brush, a little water and the paint selected according to the space to be shaded. This technique consists of recharging the brush with water and removing a little and then dipping the tip into the paint and drawing along the edge of the painting or the area that we want to highlight with the shading.
Luego realicé la técnica del sombreado, utilizando el pincel angular, un poco de agua y la pintura seleccionada de acuerdo al espacio a sombrear. Esta técnica consiste en recargar el pincel con agua y eliminar un poco para luego sumergir la punta en la pintura y realizar el trazado por el borde de la pintura o por la zona que queremos resaltar con el sombreado.
To create the effect of hair or hair in the beard, I used a brush with uneven cells and silver paint, making long strokes throughout the area and with the liner brush I highlighted the ends of the beard.
Para realizar el efecto de cabello o pelo en la barba utilicé un pincel de celdas disparejas y pintura plateada, realizando pinceladas largas por toda la zona y con el pincel liner resalté las terminaciones de la barba.
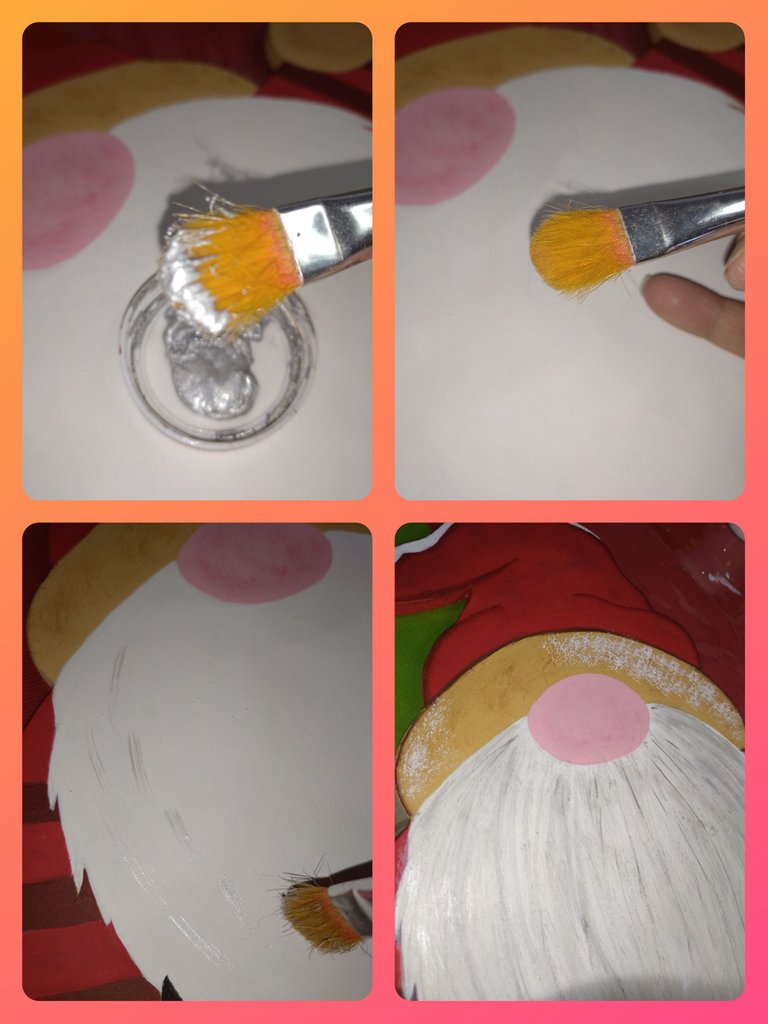
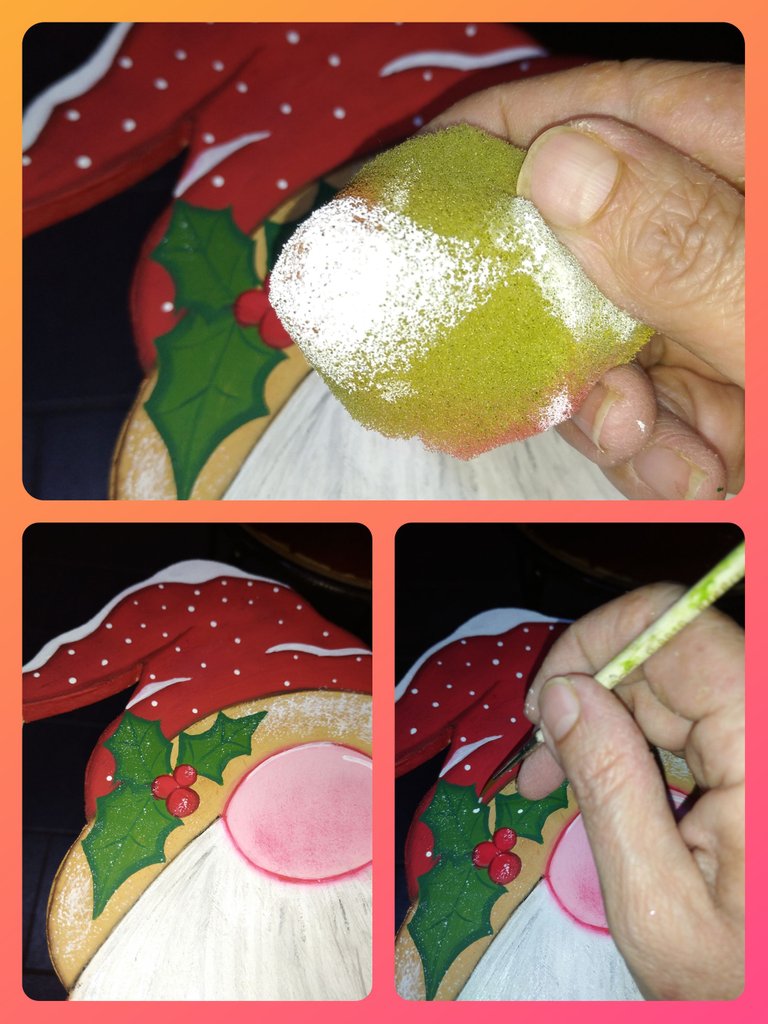
To create the effect of snowflakes in the areas of the hat, boots and lamp, I used the sponge technique, which consists of recharging a piece of sponge in the paint and tapping the area to be painted. I really like this technique because it gives a beautiful finish to the piece.
Para realizar el efecto de copitos de nieve en las zonas del gorro, las botas y la lámpara utilicé la técnica del esponjado, que consiste en recargar un trozo de esponja en la pintura y dar pequeños golpecitos en la zona a pintar. Esta técnica me gusta mucho porque le da un hermoso acabado a la pieza.
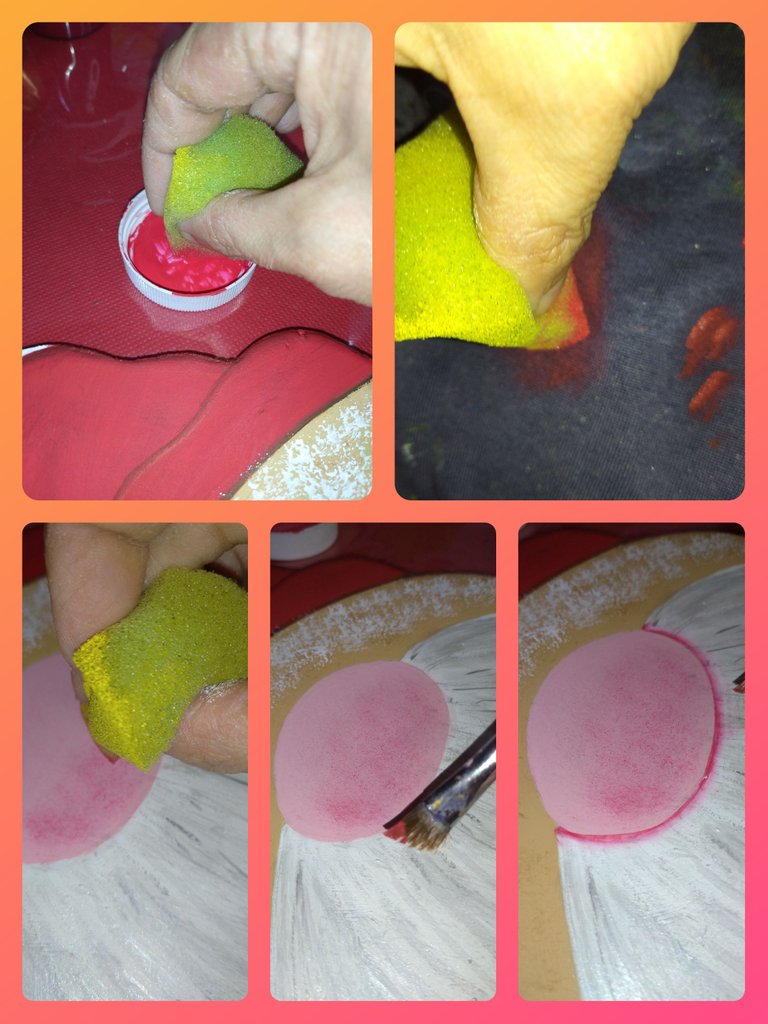
For the nose part I also used the sponge but this time I applied it as a blush. You reload the sponge with red paint and remove as much of the excess paint as possible, then rub in the nose area and it looks very nice. Then to highlight I did a shading around the contour of the nose.
Para la parte de la nariz también utilicé la esponja pero esta vez la apliqué tipo rubor. Recargas la esponja en pintura roja y eliminas lo más que puedas el exceso de pintura luego frotas en la zona de la nariz y queda muy lindo. Luego para resaltar realicé un sombreado por el contorno de la nariz.
For the area of the boots I did shading with white paint. I also made snow effect on the upper part and tips of the boots. I made a dividing line between boots and also placed details with white paint.
Para la zona de las botas realicé sombreado con pintura blanca. Además realicé efecto nieve en la parte superior y puntas de las botas. Realicé una linea divisora entre botas y coloqué detalles tabién con pintura blanca.
I wanted to highlight the legs and arms of the Gnome with brushstrokes of broken lines and shading in amazon green and red wine. I also made dividing lines on the legs with white and black paint.
Las piernas y brazos del Gnomo quise resaltarlas con pinceladas de líneas entrecortadas y sombreado en verde amazonas y vinotinto. Además realicé líneas divisoras en las piernas con pintura blanca y negra.
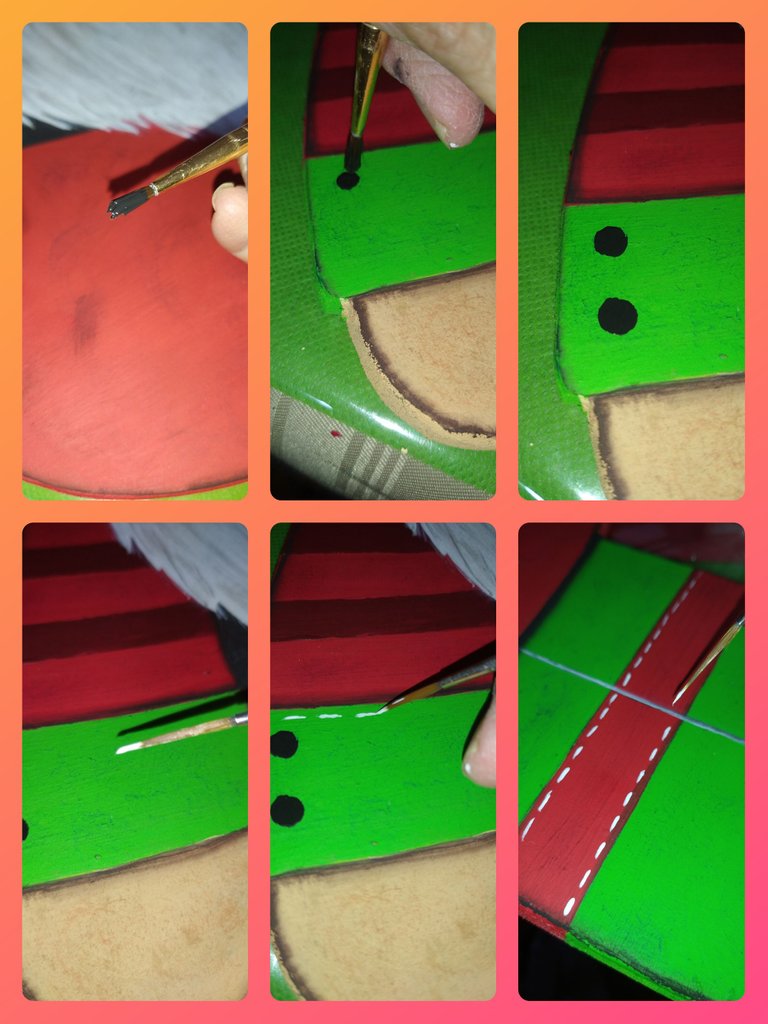
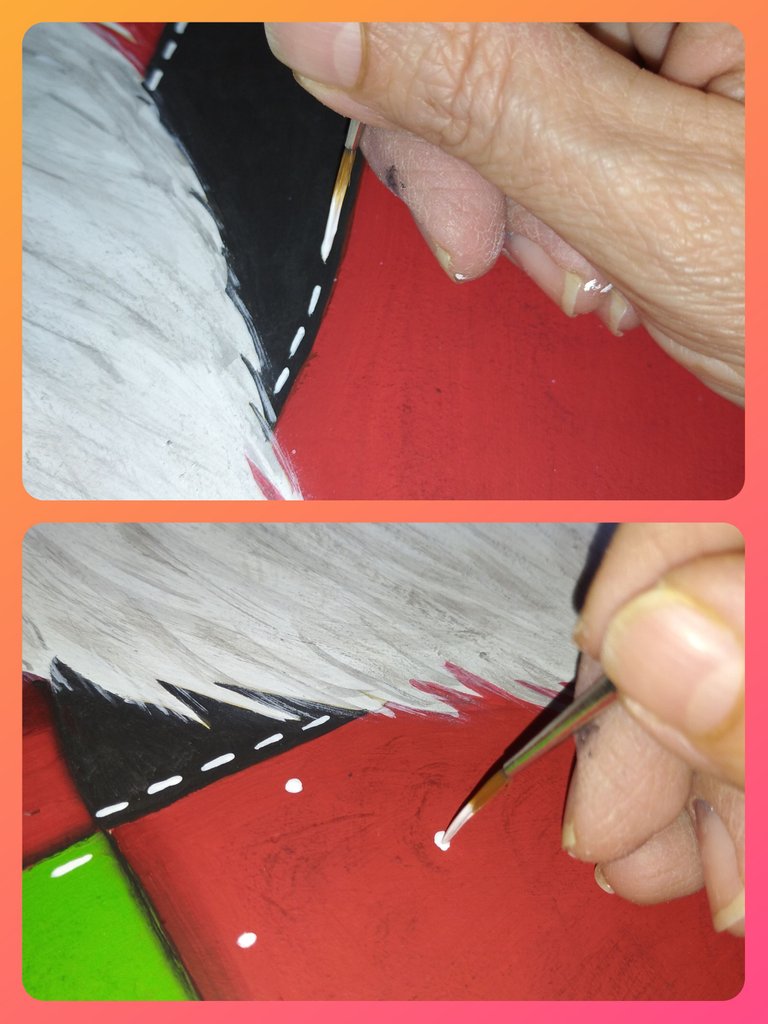
Then with the liner brush and white paint I made scattered dots and broken lines on the belt and on the suit.
Luego con el pincel liner y pintura blanca hice puntos dispersos y líneas entrecortadas en el cinturón y en el traje.
In the same way I made decorative lines on the nose and hat.
De la misma forma realicé líneas decorativas en la nariz y gorro.
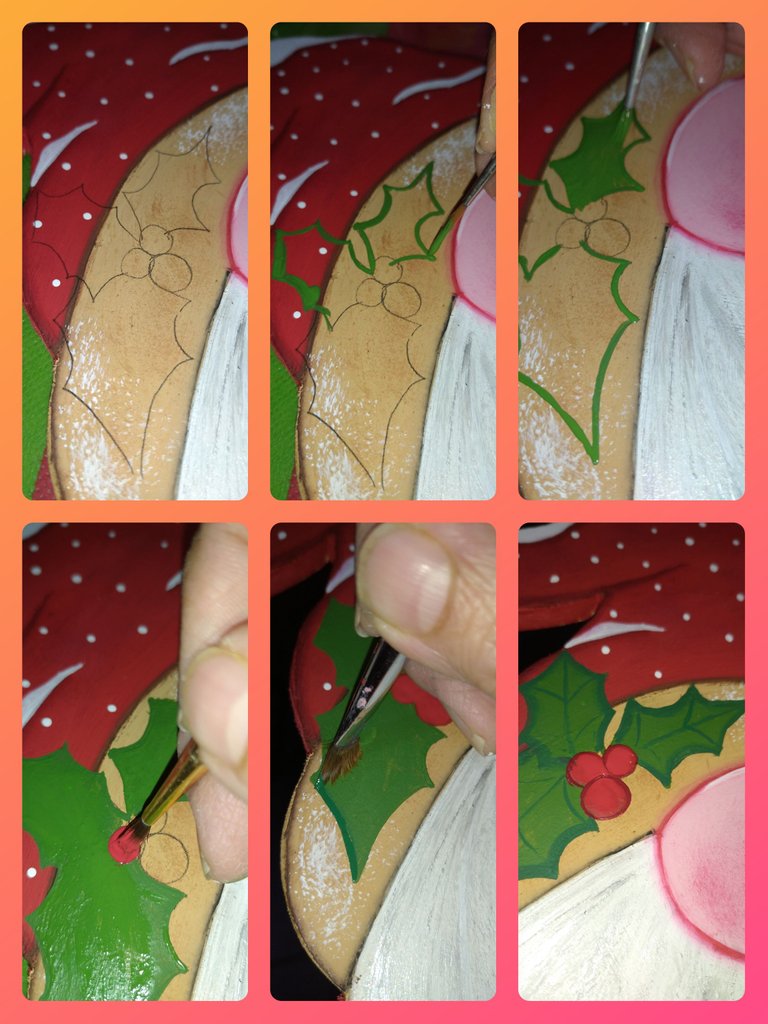
Once the process of the techniques was finished, to finish and give it the final touches I painted a leaf with cherries on the hat. I used the liner brush, the angular and the round one and paints of forest green, amazon green and red.
Ya terminado el proceso de las técnicas, para terminar y darle los últimos retoques le pinté una hojas con cerezas en el gorro. Utilicé el pincel liner, el angular y el redondo y punturas verde bosque, verde amazonas y rojo.
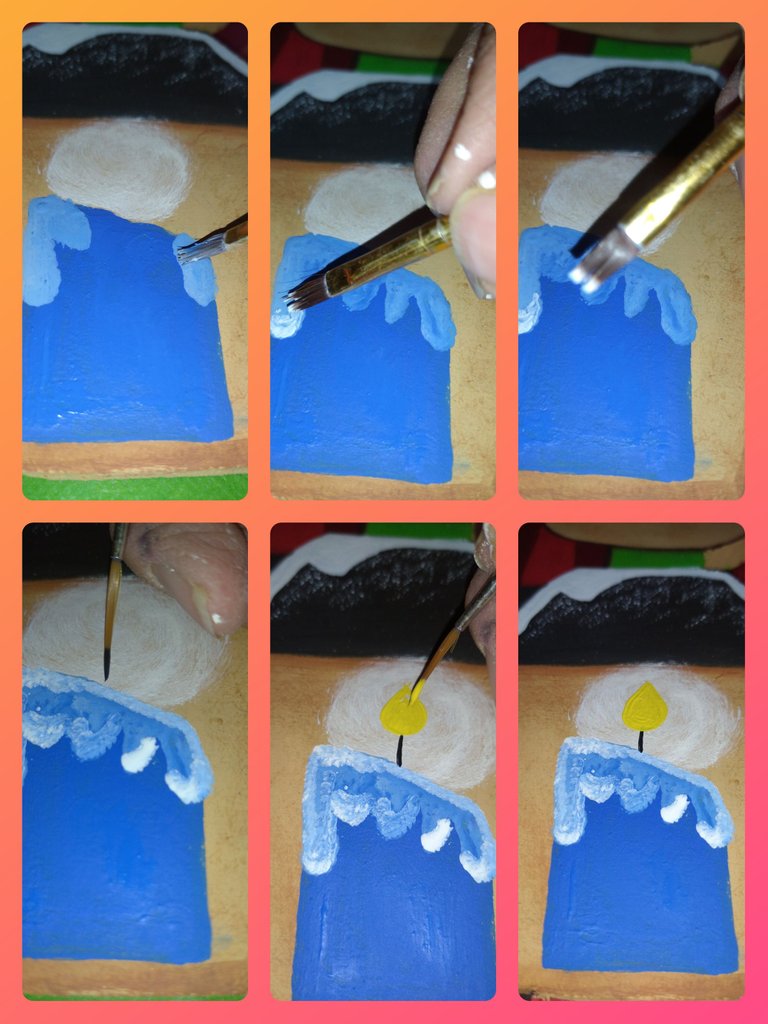
And the candle that cannot be missing from the lamp. With blue paint and the round brush I drew the sail and detailed it in white, yellow and black paint.
Y la vela que no puede faltar en la lámpara. Con pintura azul y el pincel redondo dibujé la vela y los detallen en pintura blanca, amarilla y negro.

We let the paint dry very well before carrying out the next step, which is to give shine and protection to the piece. For this we will use a preferably smooth sponge and acrylic wax. This wax is ideal for this type of pieces because it protects them from humidity. It also gives a special shine and finish to the MDF pieces.
Dejamos secar muy bien la pintura antes de realizar el siguiente paso que es darle brillo y protección a la pieza. Para ello utilizaremos una esponja preferiblemente lisa y cera acrílica. Esta cera es ideal para este tipo de piezas porque las protege de la humedad. Además le da un brillo y acabado especial a las piezas de MDF.
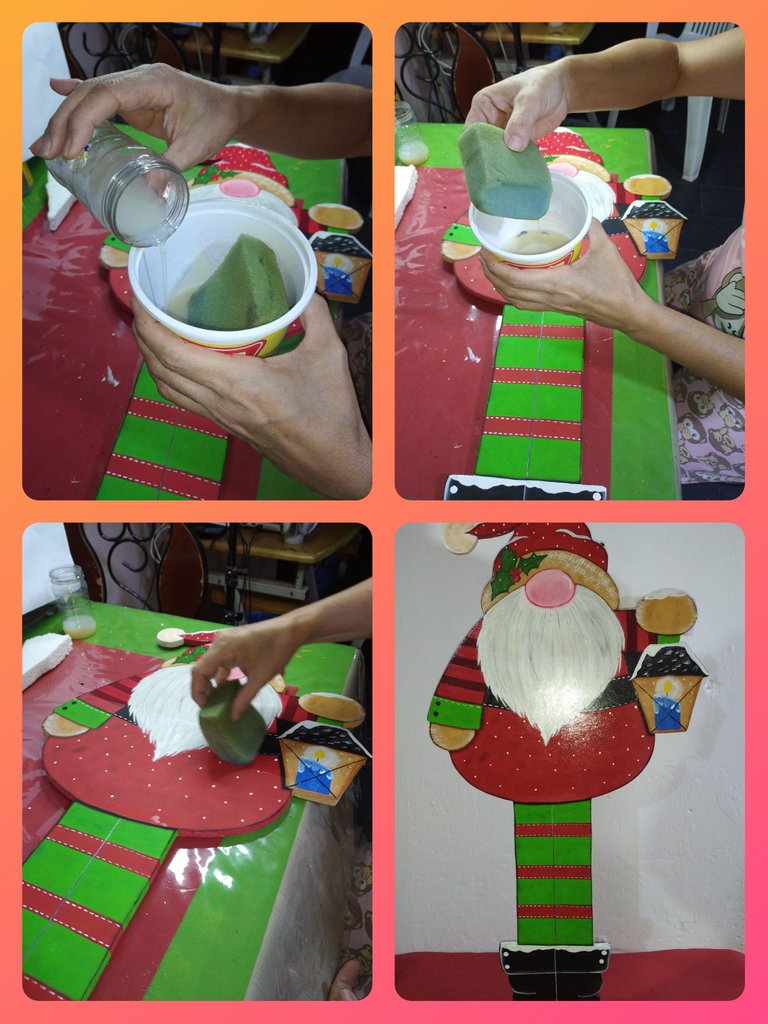
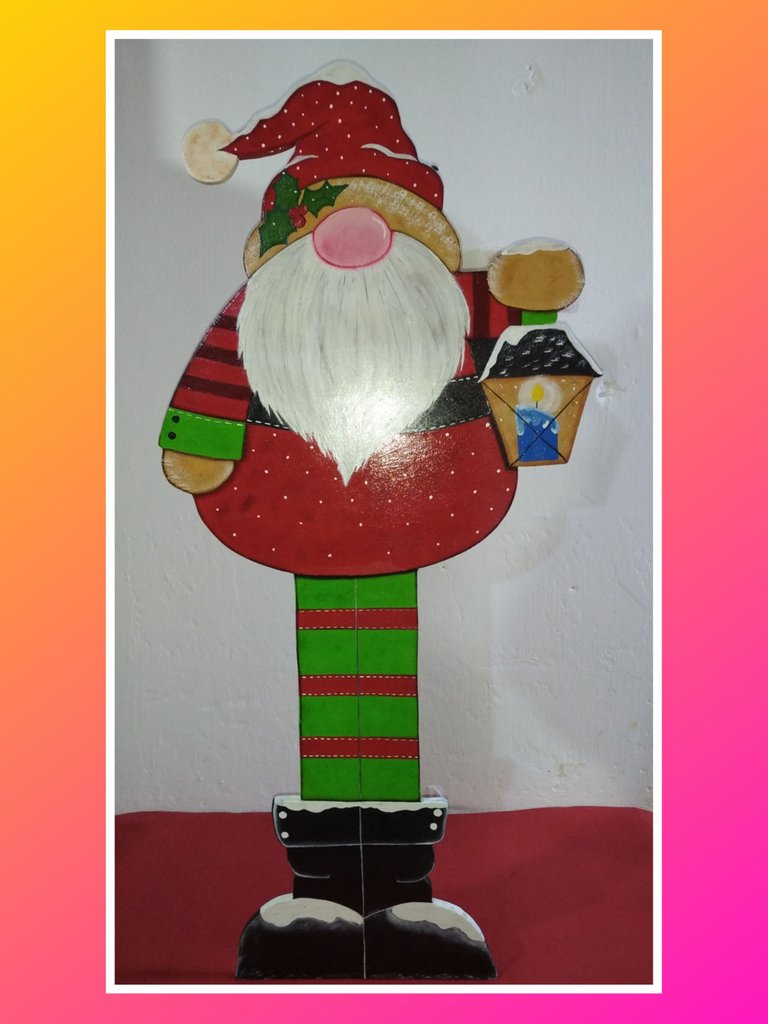
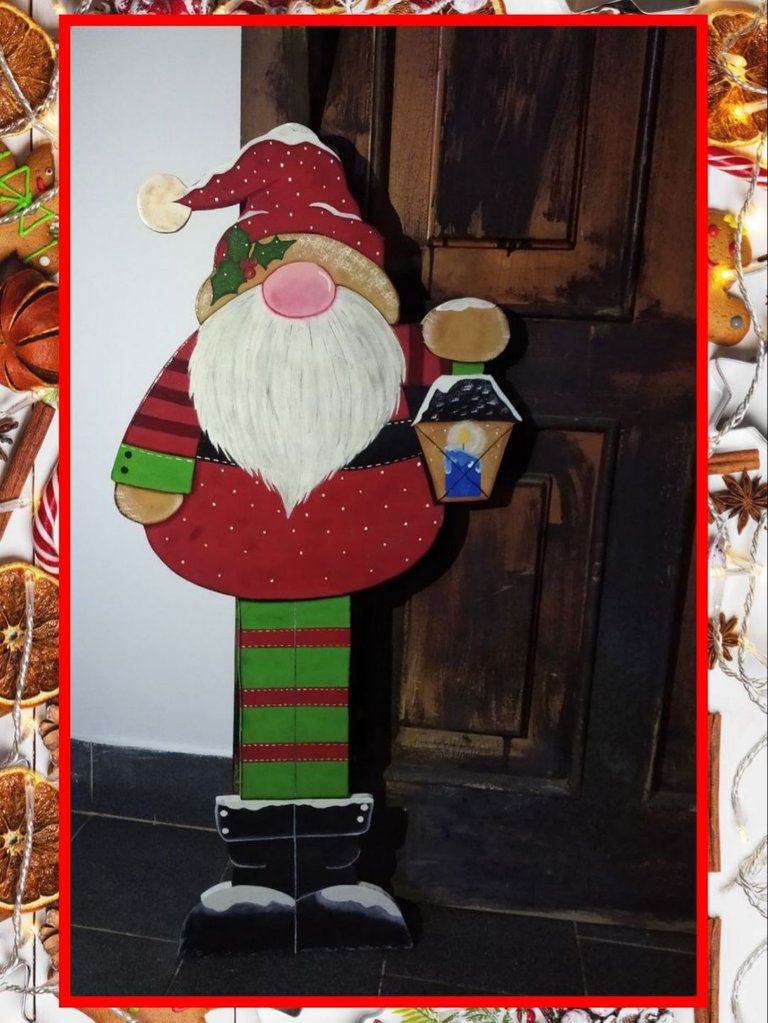
The Christmas Gnome is ready. It will remain at the entrance of my house throughout the Christmas season. Not only will it decorate the entrance to my house, but it will also serve as a support to prevent it from closing at all times. I hope you like it. See you next time.
Ya está listo el Gnomo Navideño. Permanecerá en la entrada de mi cada durante toda la temporada de navidad. No sólo decorará la entrada de mi casa, sino que también servirá de sostén para evitar que se cierre a cada momento. Espero les guste. Nos vemos en la próxima.
Todas las fotos son de mi autoría, tomadas con mi teléfono POCO M3
Para la edición de las fotos y separadores utilicé Polish
Utilicé https://translate.google.com para la traducción

Para la edición de las fotos y separadores utilicé Polish
Utilicé https://translate.google.com para la traducción
~~~ embed:1608196333646630914 twitter metadata:MTMxNDgxMTk2fHxodHRwczovL3R3aXR0ZXIuY29tLzEzMTQ4MTE5Ni9zdGF0dXMvMTYwODE5NjMzMzY0NjYzMDkxNHw= ~~~
The rewards earned on this comment will go directly to the people( @lisbethseijas, @creacioneslelys ) sharing the post on Twitter as long as they are registered with @poshtoken. Sign up at https://hiveposh.com.
Felicidades. Tu creación navideña está bellísima. Realizaste un excelente trabajo, mucho detalle y color.
Gracias por mostrar el proceso de elaboración con todos los pasos, el que quiera replicarlo no dudará en leer este tutorial.
Saludos. Feliz Navidad 🎉🎂😁
Muchas gracias por tu comentario, siempre tan motivador 😁. Eso intento siempre que realizo una pieza, ser lo más precisa para que quienes quieran hacerlo se les haga menos difícil la labor. Saludos.
Thank you for sharing this post in the DIYHUB Community!
Your content got selected by our fellow curator ashikstd & you just received a little thank you upvote from us for your great work! Your post will be featured in one of our recurring compilations which are aiming to offer you a stage to widen your audience within the DIY scene of Hive. Stay creative & HIVE ON!
Please vote for our hive witness <3
Excelente tutorial, te felicito buen trabajo
Muchas gracias ☺️
Un trabajo sin duda muy curioso y lindo para decorar en Navidad gracias y felicidades
Wow! ¡Que belleza de adorno! Se ve que te tomó tiempo porque tiene muchos detalles. Por alguna razón me recuerda a un personaje de una comiquita, pero no logro descifrar cuál 😁 ¡Me encantó!
Dear @linita,
Our current proposal (#199) will expire end of December. May we ask you to review and support the our proposal renewal (#248) so our team can continue its work next year?
You can support it on Peakd, Ecency, or using HiveSigner.
https://peakd.com/me/proposals/248
Thank you!
Great work, your guests would be surprised seeing it.