WELCOME TO MY BLOG
Christmas is approaching and in many homes in our country you feel that spirit that makes you want to decorate your house with details alluding to Christmas. It is in this month of November when we begin to see what things we can reuse from the previous year, what we can modify or what new decorations we want to beautify our home. For a long time, at home, the use of useful materials has helped us save a lot, what we think is useless turns out to get us out of trouble and we can create incredible things.
This time I want to show you how some boxes of light bulbs were very useful for me to make the base of some beautiful Christmas decorations to decorate the switches in my home. My daughters have come to call me a hoarder, which is not true, because I only keep things that I know I will really use, including cardboard boxes, toilet paper rolls and absorbent towels, mayonnaise containers, among other things .
So if you are one of those who think they are garbage, in this project I show you how to reuse light bulb boxes and small pieces of felt and transform them into something as decorative as the decorations for the light switches.
Three models that you can choose the one you like best if you don't want to clash with the decoration or you can do as I do that I like the variety in terms of Christmas decoration. So I invite you to get excited about recycling and at the same time to decorate your house to welcome this time of year that most of us love. Without further ado, let's get started.
BIENVENIDOS A MI BLOG
Ya se acerca la navidad y en muchos hogares de nuestro país se siente ese espíritu que te lleva a querer decorar tu casa con detalles alusivos a la navidad. Es en este mes de noviembre cuando empezamos a ver que cosas podemos reutilizar de l año anterior, qué podemos modificar o qué nuevos adornos queremos para embellecer nuestra casa. Desde hace mucho tiempo, en casa el uso de materiales de provecho nos ha servido de mucho ahorro, lo que creemos inservible, resulta que nos saca de apuro y podemos crear cosas increíbles.
En esta ocasión les quiero mostrar como unas cajas de bombillos me fueron de gran utilidad para realizar la base de unos lindos adornos navideños para decorar los apagadores de mi hogar. Mis hijas han llegado a llamarme acumuladora compulsiva, cosa que no es cierto, porque solo guardo cosas que sé que realmente utilizaré, entre ellas, las cajas de cartón, los rollos del papel sanitario y toallas absorbentes, los envases de mayonesa, entre otras cosas.
Así que si eres de los que crees que son basura, en este proyecto te muestro como reusar unas cajas de bombillos y pequeños retazos de fieltro y transformarlos en algo tan decorativo como lo son los adornos para los apagadores.
Tres modelos que puedes escoger el que más te guste si no te quieres desentonar la decoración o puedes hacer como yo que me gusta la variedad en cuanto a decoración navideña se refiere. Así que te invito a que te entusiasme a reciclar y a la vez a decorar tu casa para darle la bienvenida a esta época del año que la mayoría de las personas amamos. Sin más, comencemos.
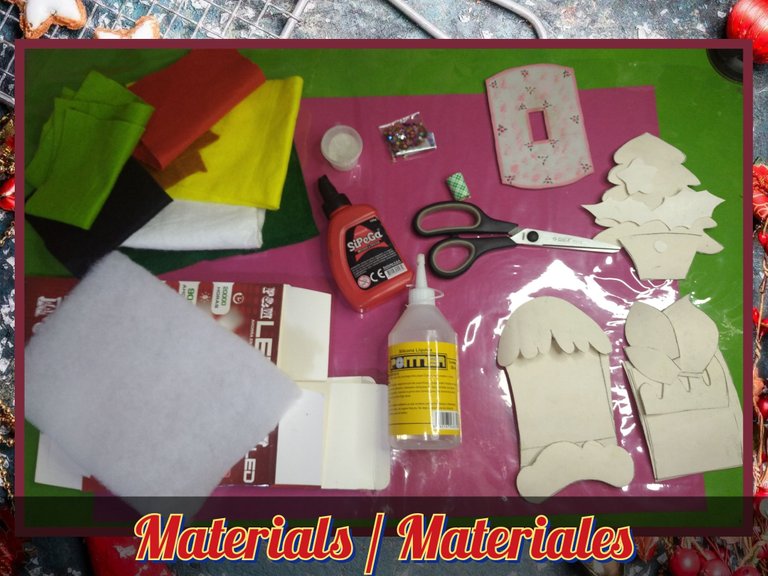
MATERIALS
- Boxes of light bulbs or any other that you can reuse
- Pieces of felt in assorted colors
- Patterns for Christmas dampers
- Scissors
- Pencil
- Sparkles assorted colors
- Confetti
- White paste
- Liquid silicone
- Synthetic padding
- Double-sided adhesive tape
MATERIALES
- Cajas de bombillos o cualquier otro que puedas reusar
- Retazos de fieltro de colores variados
- Patrones para apagadores navideños
- Tijera
- Lápiz
- Escarchas colores variados
- Confeti
- Pega blanca
- Silicón líquido
- Relleno sintético
- Cinta adhesiva doble cara
STEP BY STEP // PASO A PASO
MODEL Nº1
The first model that we are going to make is very easy, simple and very quick to do.
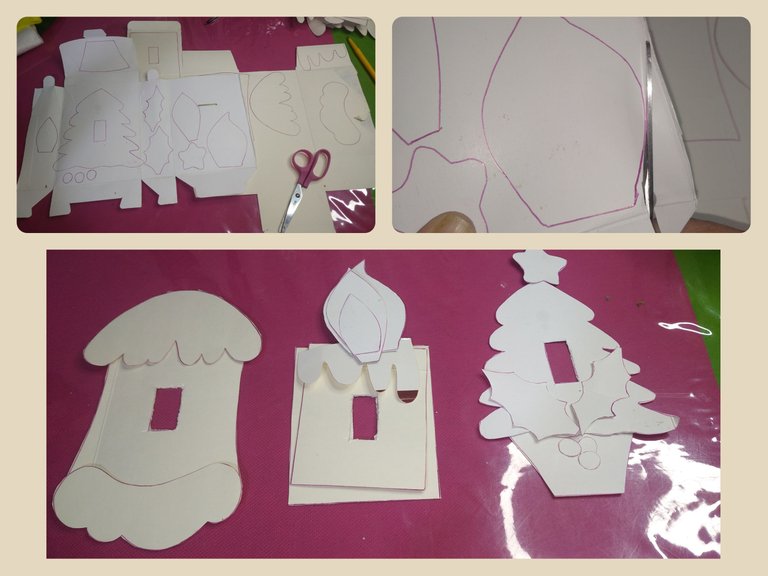
The first thing we will do is take the molds or patterns and we will mark on the cardboard boxes each of the pieces that will serve as the base to assemble the project and in turn give it strength to prevent it from bending.
MODELO Nº1
El primer modelo que vamos a realizar es muy fácil, sencillo y muy rápido de hacer.
Lo primero que haremos será tomar los moldes o patrones y marcaremos sobre las cajas de cartón cada una de las piezas que nos servirá de base para armar el proyecto y a su vez darle dureza para evitar que se doble.

We cut out each of the traced pieces and order them by models.
Recortamos cada una de las piezas trazadas y ordenamos por modelos.
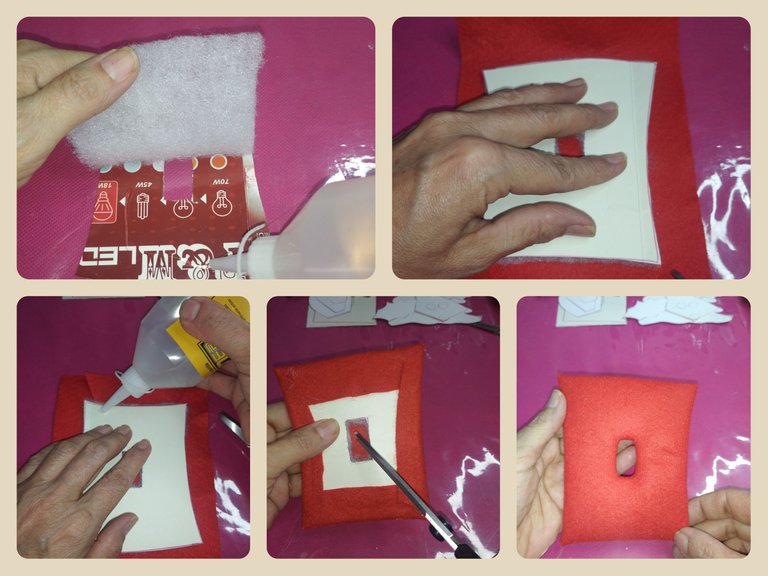
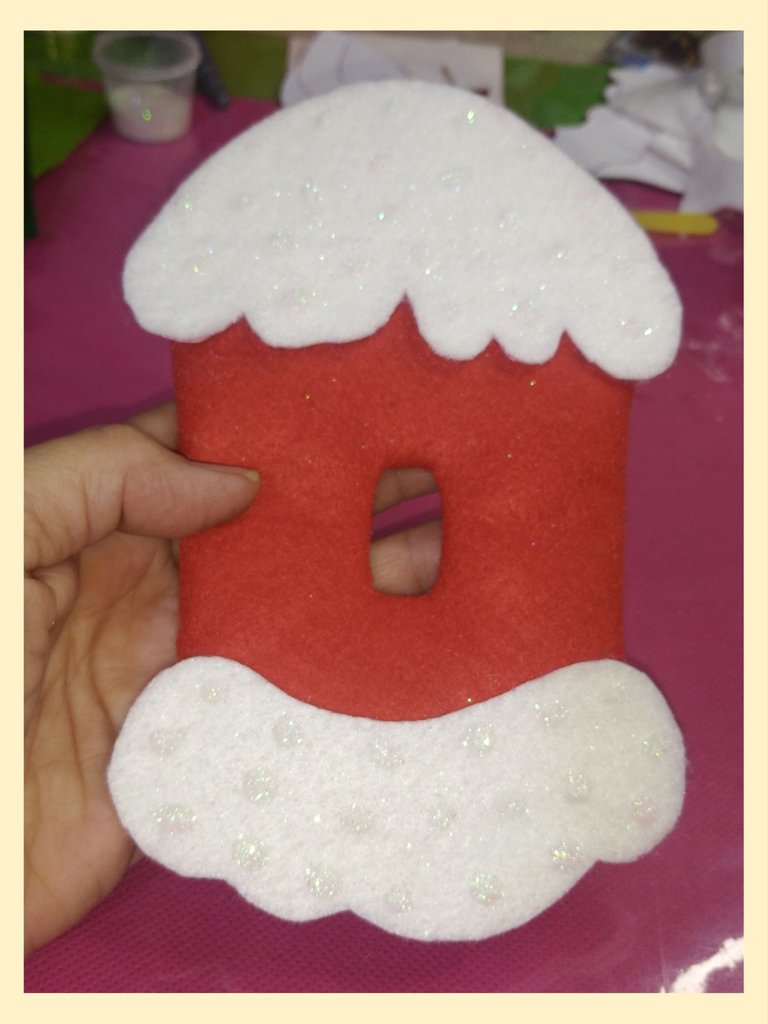
We take the pieces of the model Nº1 that corresponds to a house with snow. We take the base of the damper and cut the synthetic padding flush with the pattern.
Tomamos las piezas del modelo Nº1 que corresponde a una casa con nieve. Tomamos la base del apagador y recortamos el relleno sintético al ras del patrón.
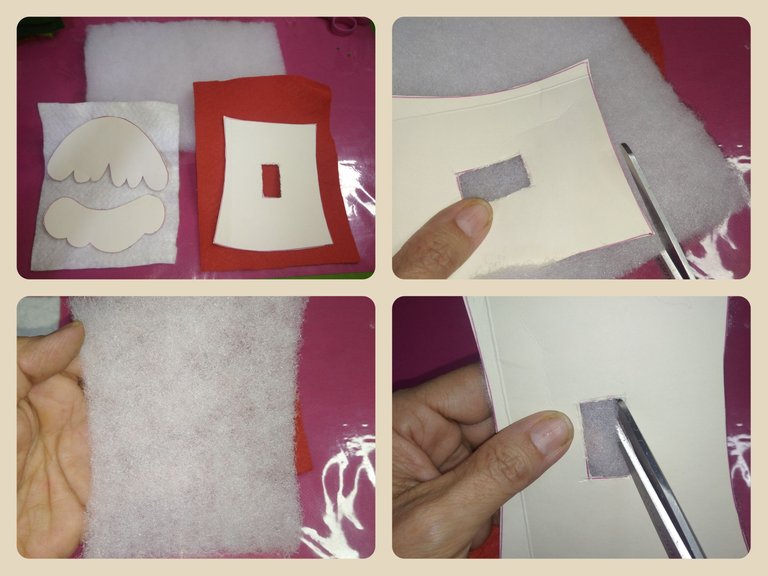
With liquid silicone we fix the cardboard filling and cover it with red felt. We make the opening in the center for the damper.
Con silicón líquido fijamos el relleno del cartón y forramos con el fieltro rojo. Realizamos la abertura en el centro para el apagador.
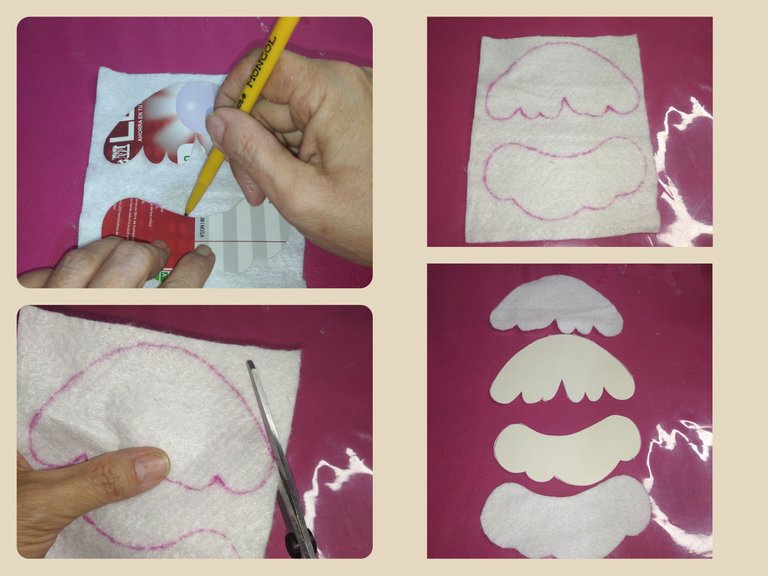
Now we mark the roof and floor pieces on the white felt, and cut along the marking line.
Ahora marcamos las piezas del techo y el piso en el fieltro blanco,y cortamos sobre la línea de marcado.
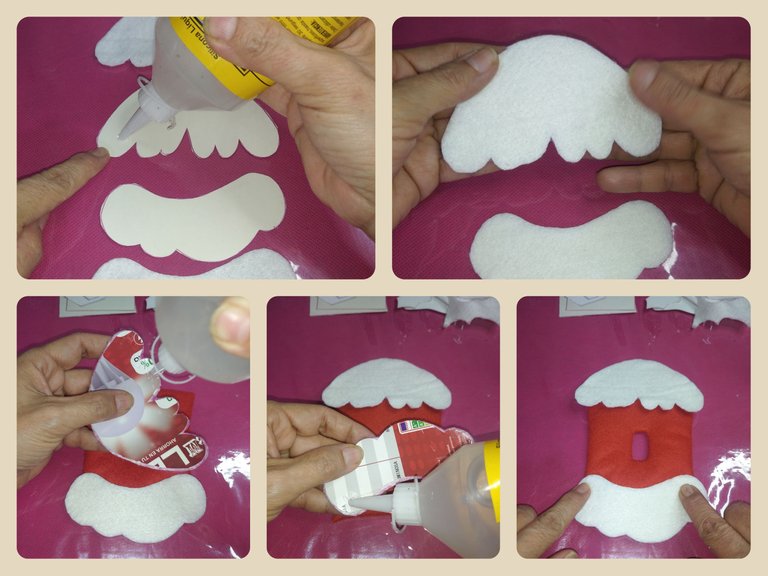
We join the felt and the base with liquid silicone and glue the large red piece of the damper.
Unimos con el silicón líquido el fieltro y la base y pegamos a la pieza grande roja del apagador.
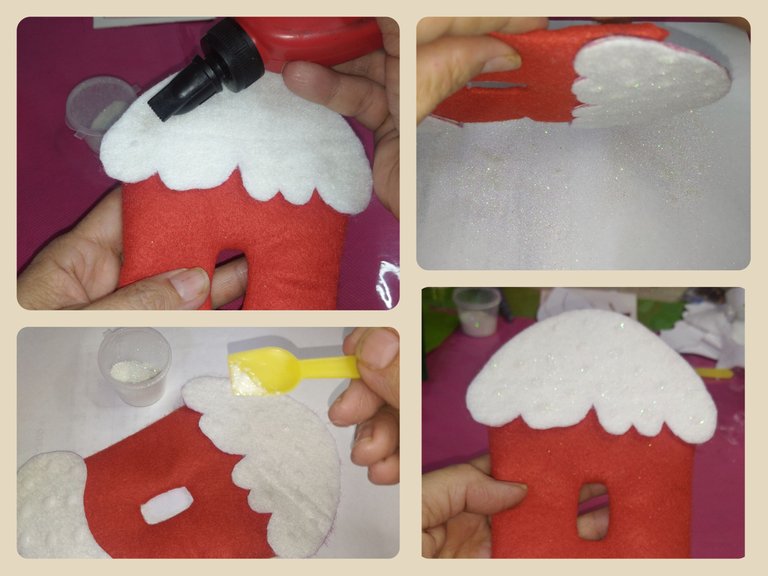
We make the details using the white paste and the litmus frost. We make scattered dots and then sprinkle glitter on each one.
And we already have our first model ready.
Realizamos los detalles utilizando la pega blanco y la escarcha tornasol. Hacemos puntos dispersos y luego rociamos escarcha en cada uno.
Y ya tenemos listo nuestro primer modelo.
MODEL Nº2
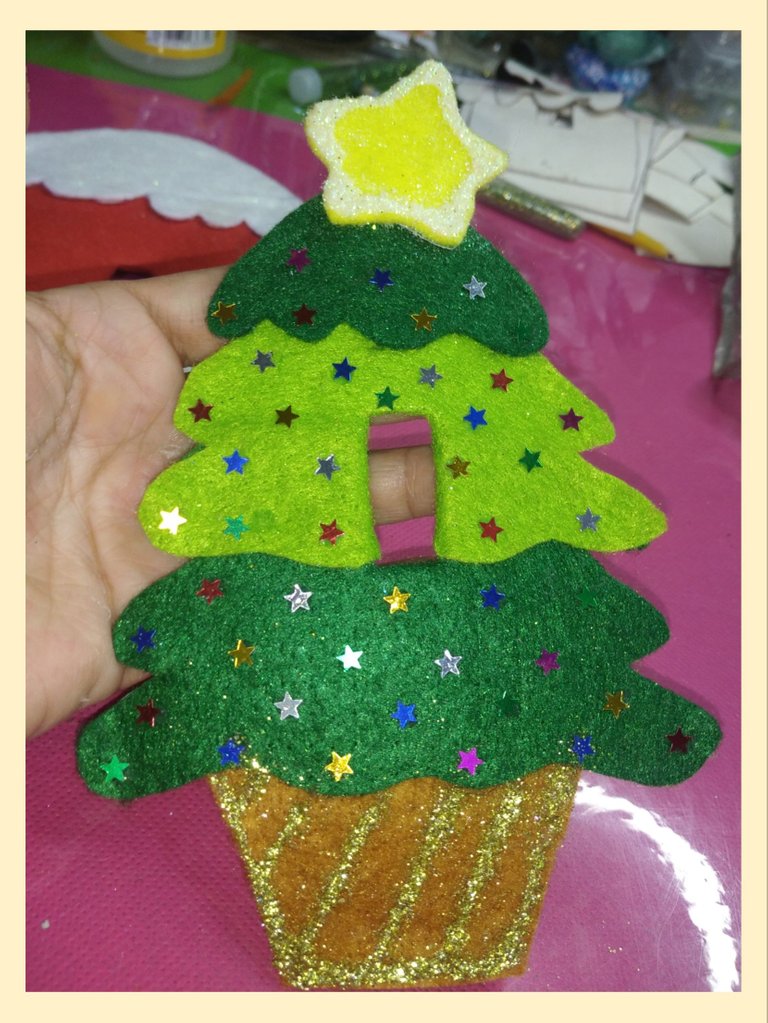
The second model is a Christmas tree. Like the snow house, it is also very easy to make.
We begin by tracing the molds on the cardboard and the pieces of felt corresponding to each selected color respectively and we cut them, always above the tracing.
MODELO Nº2
El segundo modelo se trata de un árbol de navidad. Al igual que la casa de nieve, también es muy fácil de hacer.
Comenzamos trazando los moldes sobre el cartón y los retazos de fieltro correspondiente a cada color seleccionado respectivamente y los recortamos, siempre por sobre el trazado.

We glue each piece on the cardboard and assemble the tree.
Pegamos cada pieza sobre el cartón y armamos el arbolito.
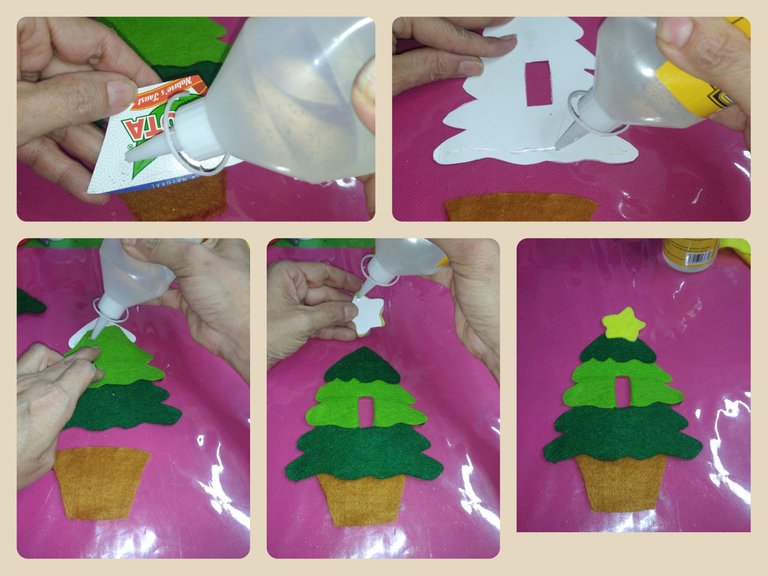
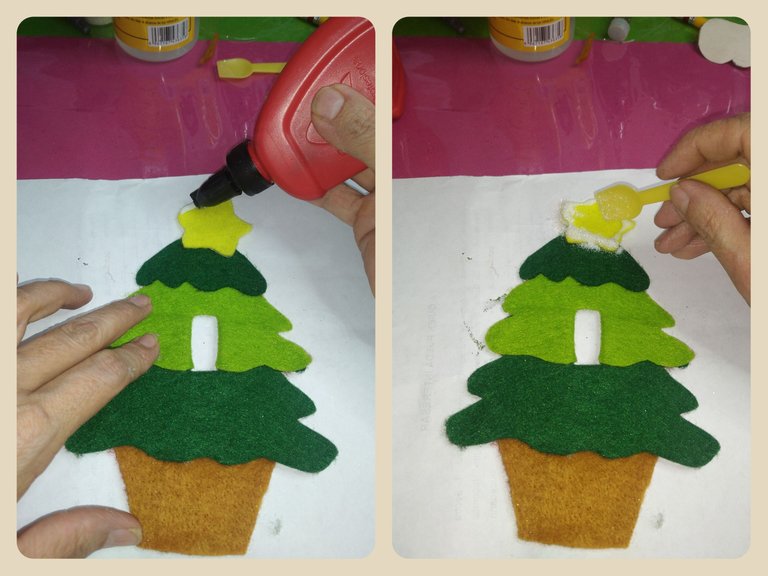
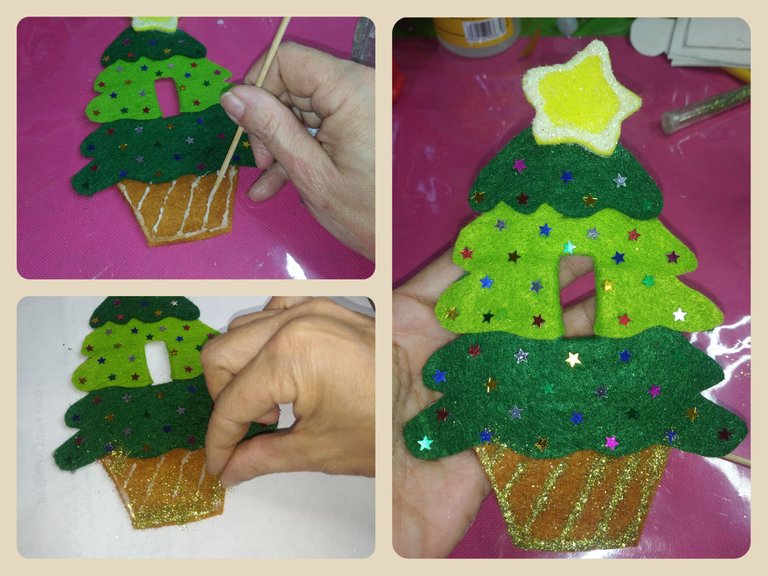
We make the details with the white paste and iridescent and golden frost on the star.
Realizamos los detalles con la pega blanca y escarcha tornasol y dorada sobre la estrella.
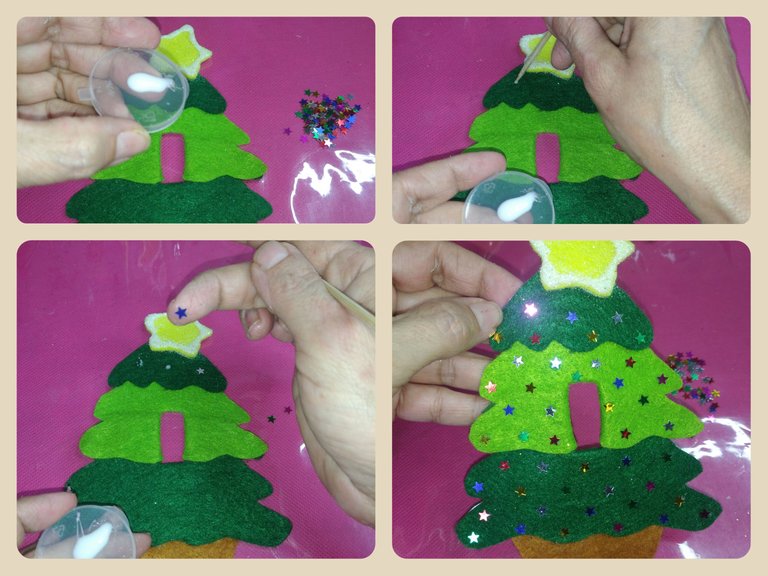
With a brush stick we make dots with white glue on the tree and stick the confetti in the shape of stars.
Con un palito a pincel hacemos puntos con pega blanca sobre el arbol y pegamos los confetis con forma de estrellas.
And finally, we make stripes with the toothpick and white glue and sprinkle with golden frost on the pot of the tree.
Y por último, realizamos rayas con el palillo y pega blanca y rociamos con escarcha dorada sobre el maceta del árbol.
MODEL Nº3
And to culminate this beautiful project, we made the third model. This one is a little more laborious because it has more pieces but it is still very easy to do.
Mark and cut out the felt and stuffing pieces.
MODELO Nº3
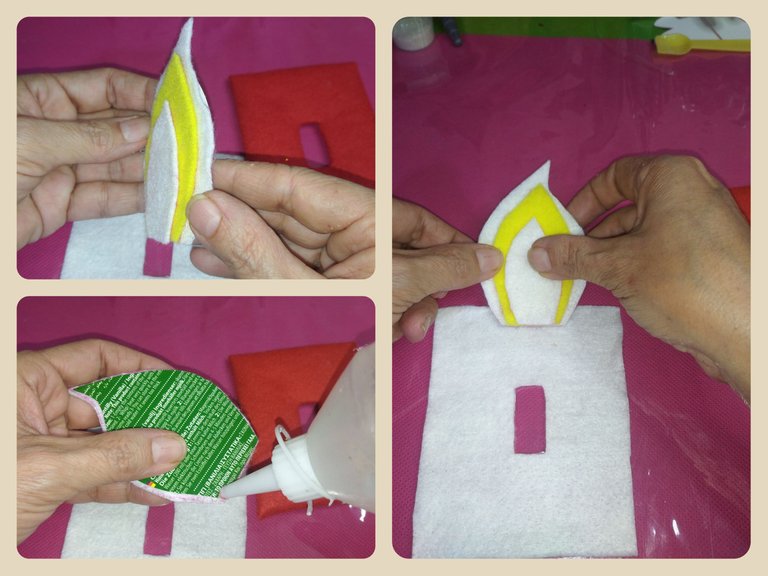
Y para culminar este hermoso proyecto, realizamos el tercer modelo, una vela navideña. Este es un poco más laborioso porque tiene más piezas pero igualmente es muy fácil de realizar.
Marcamos y cortamos las piezas de fieltro y relleno.
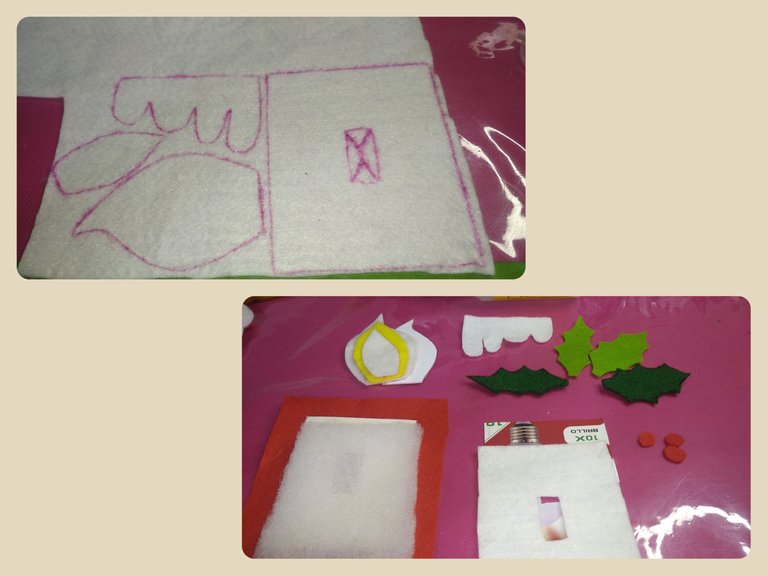
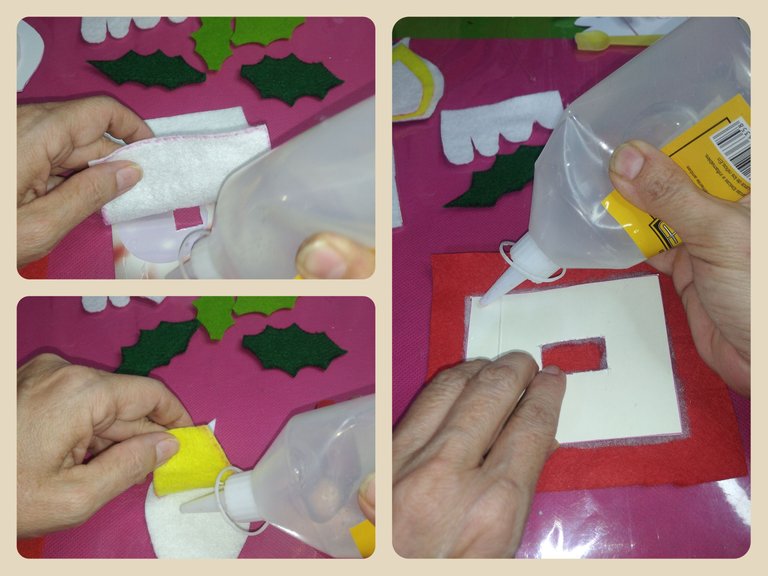
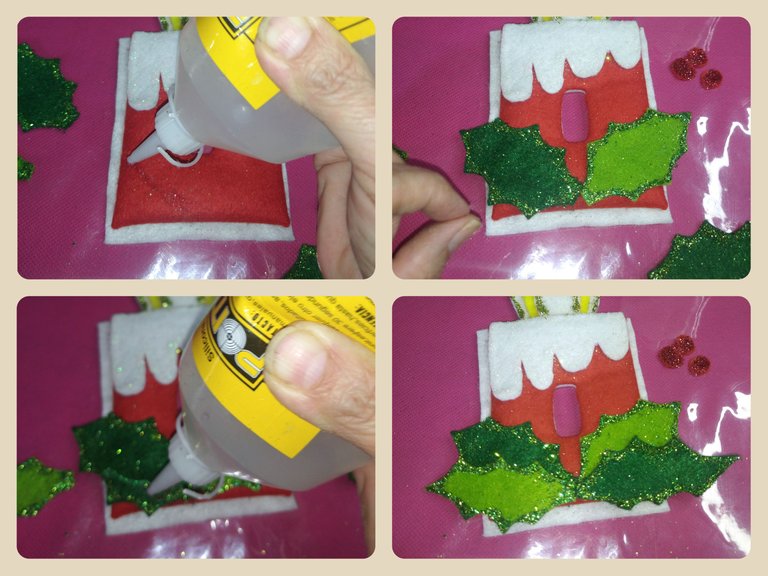
We glue the first white piece of the damper on the cardboard with liquid silicone. The candle flame is made with three pieces of different sizes, two white and one yellow that goes in the middle of the white ones.
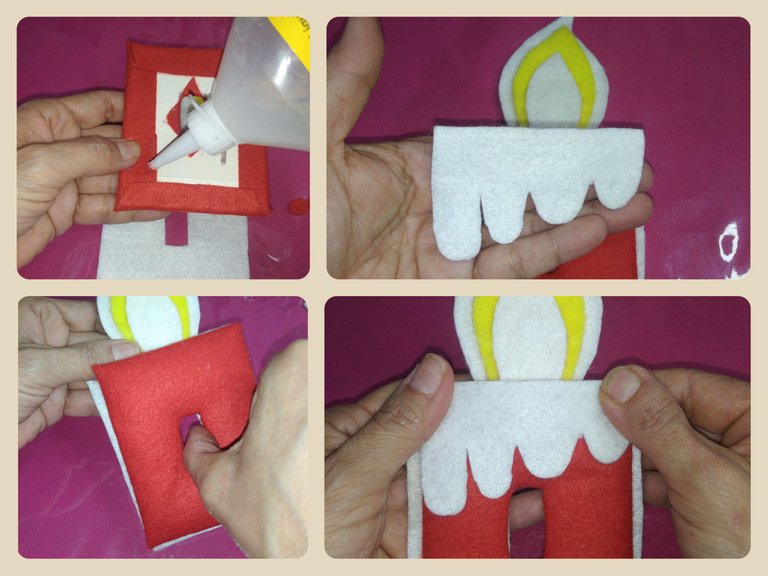
Then the second red piece of the damper, we will make it like the one of the model Nº1, we place the filling and we cover it.
Pegamos con silicón líquido la primera pieza blanca del apagador sobre el cartón. La llama de la vela se realiza con tres piezas de diferentes tamaños, dos blancas y una amarilla que va en medio de las blancas.
Luego la segunda pieza roja del apagador, la realizaremos como la del modelo Nº1, colocamos relleno y forramos.
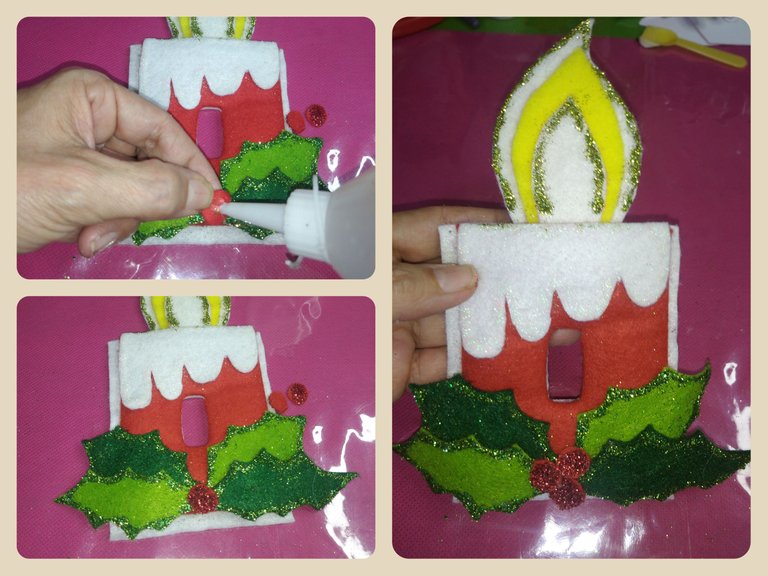
We join the three pieces with silicone. We put the white base. we glue the flames on the upper edge and then the red lid on top, to form the candle. and then we place the white felt to simulate the melted candle.
Unimos las tres piezas con silicón. Colocamos la base blanca. pegamos las llamas en el borde superior y luego la tapa roja encima, para formar la vela. y luego colocamos el fieltro blanco para simular la vela derretida.
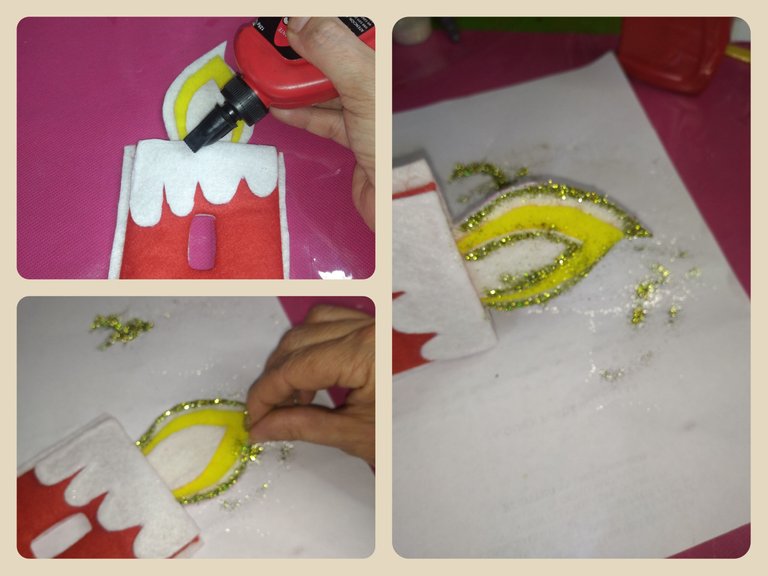
We decorate the edges with white glue and sprinkle with golden frost and litmus on the flames and the melted candle.
Decoramos los bordes con pega blanca y rociamos con escarcha dorada y tornasol sobre las llamas y la vela derretida.
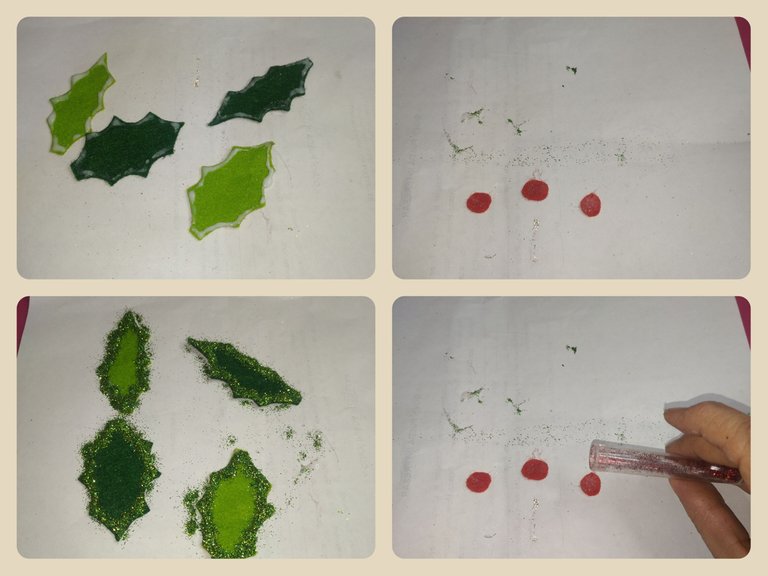
We also decorate the leaves with white glue and green glitter and the balls with red glitter.
Igualmente decoramos las hojas con pega blanca y escarcha verde y las bolas con escarcha roja.
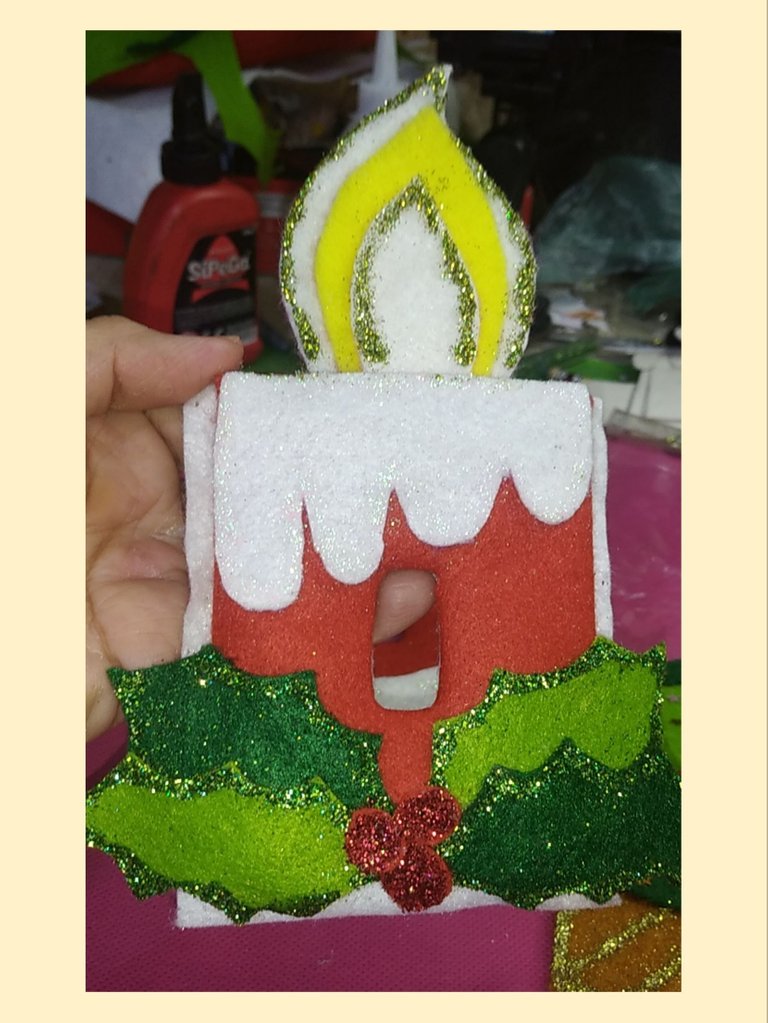
Once the leaves and balls are dry, glue them to the base of the candle with liquid silicone and let it dry.
We place double-sided adhesive tape on the back of each of our models.
Una vez secas las hojas y las bolas, pegamos en la base de la vela con silicón líquido y dejamos secar.
Colocamos en la parte trasera de cada uno de nuestros modelos la cinta adhesiva doble cara.
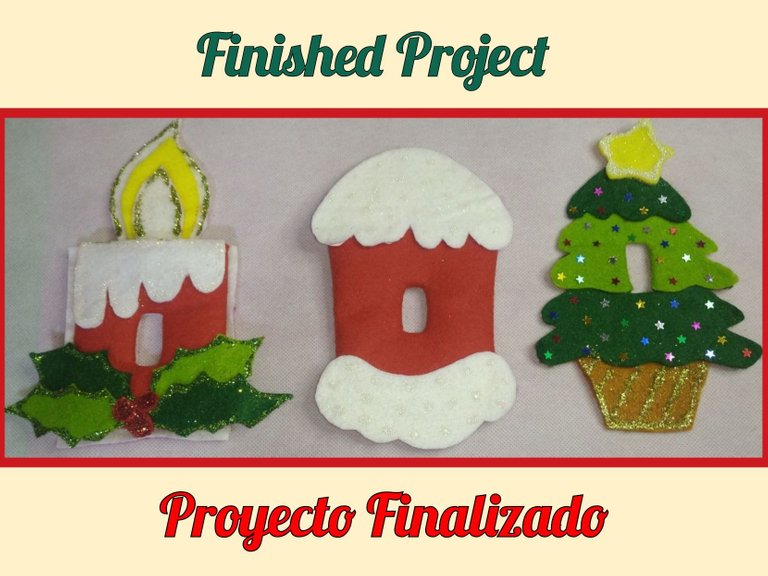
Tres proyectos que podemos realizar en una tarde y que sin duda se verán preciosos en nuestros apagadores. Y como siempre les recuerdo, que muchos de los materiales de desechos son reutilizables y que podemos sacarle provecho. Me encantó poder compartir con todos ustedes este paso a paso. Espero les guste. Nos vemos en la próxima.
Three projects that we can carry out in one afternoon and that will undoubtedly look beautiful on our dampers. And as I always remind you, that many of the waste materials are reusable and that we can take advantage of it. I loved being able to share this step by step with all of you. I hope you like it. See you next time.
Todas las fotos son de mi autoría, tomadas con mi teléfono POCO M3
Para la edición de las fotos y separadores utilicé CANVA Y Polish
Utilicé https://translate.google.com para la traducción

Para la edición de las fotos y separadores utilicé CANVA Y Polish
Utilicé https://translate.google.com para la traducción
Hermosos, me encanta como quedan en fieltro, yo los hago es en foami y tambien quedan lindos ♥️
Holaaaaa, si también los he hecho en foami y con mdf, de hecho los que tenia eran de foami pero hay que renovar. Todos quedan lindos. Estos son los primeros que hago con fieltro y también me encantaron. Gracias por comentar. Saludos.
Entiendo, con tantas ideas hay que probar cada año con algo nuevo, yo tengo que hacer unos para esta navidad, aun estoy pensando en el diseño
~~~ embed:1595238888280399873 twitter metadata:MTQyMjQxMzkxNTI3NTgxMjg2NHx8aHR0cHM6Ly90d2l0dGVyLmNvbS8xNDIyNDEzOTE1Mjc1ODEyODY0L3N0YXR1cy8xNTk1MjM4ODg4MjgwMzk5ODczfA== ~~~
The rewards earned on this comment will go directly to the people( @madushanka, @mariajcastro28 ) sharing the post on Twitter as long as they are registered with @poshtoken. Sign up at https://hiveposh.com.
Thank you for sharing this post in the DIYHUB Community!
Your content got selected by our fellow curator jasonmunapasee & you just received a little thank you upvote from us for your great work! Your post will be featured in one of our recurring compilations which are aiming to offer you a stage to widen your audience within the DIY scene of Hive. Stay creative & HIVE ON!
Please vote for our hive witness <3
Que creatividad amiga, te quedaron hermosos todos pero mi favorito fue el de forma de vela, se ve fácil de hacer pero cuando uno comienza a realizarlos es que el problema comienza jajajajaj, tengo que intentar hacerlo a ver qué tal.
Holaaaaa, también es mi favorito, es muy fácil, sólo que tiene más partes.