
WELCOME TO MY BLOG
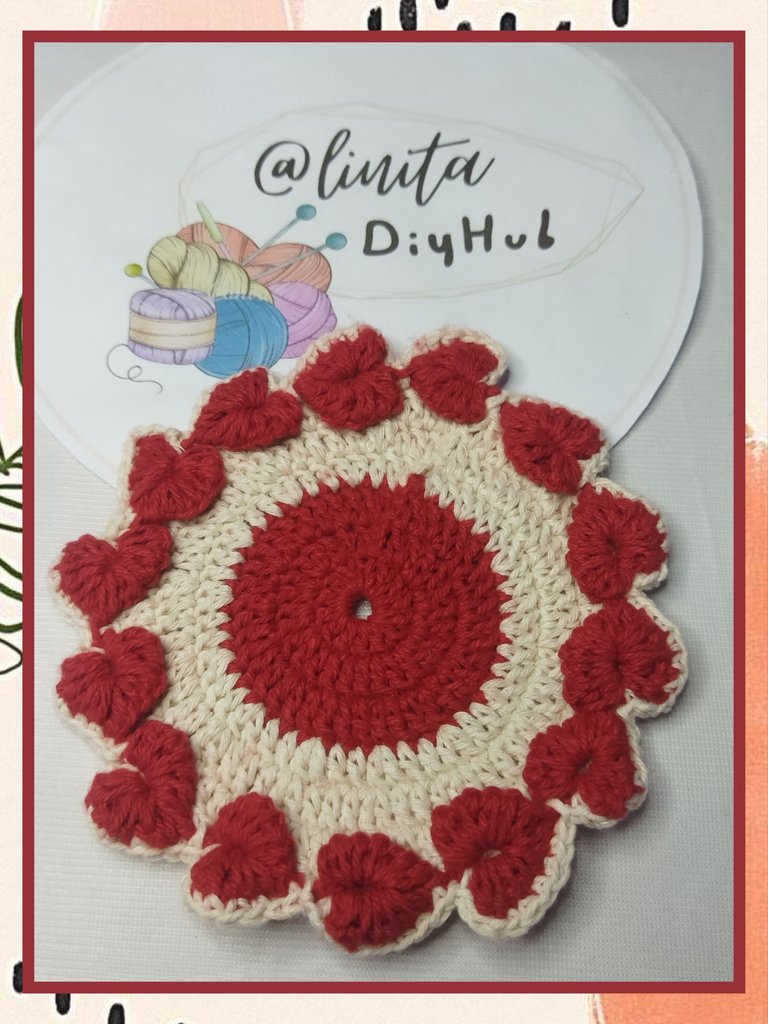
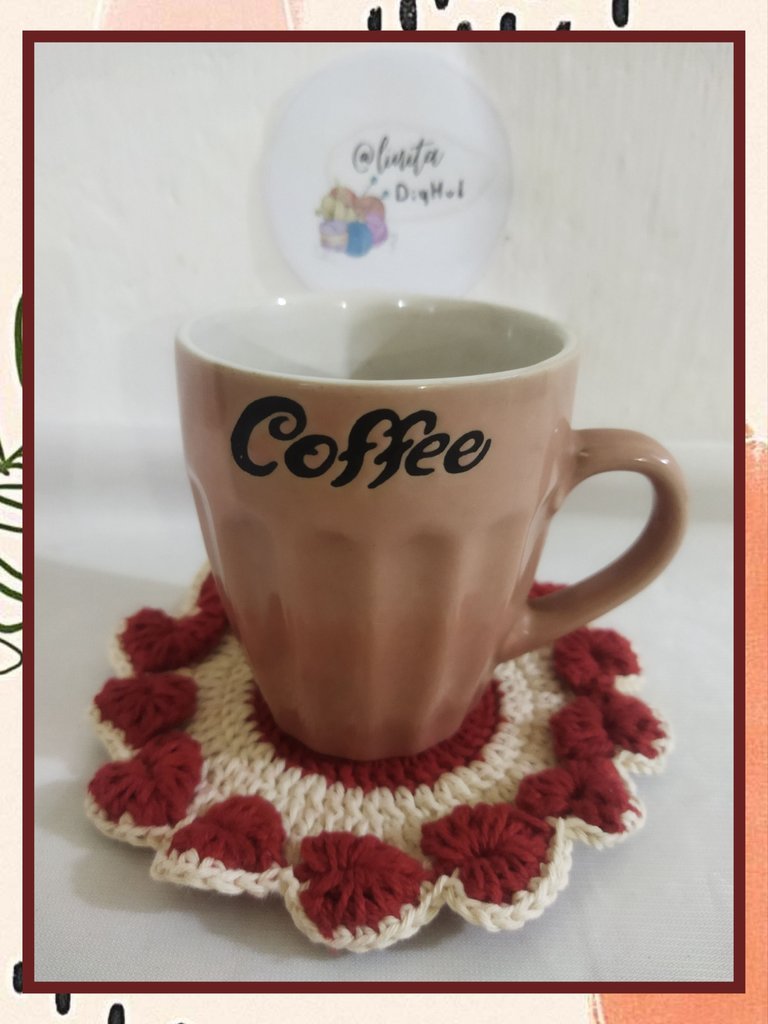
Hellooooo, hellooooooo! Greetings my dear DiyHub creatives. We continue with the crochet fever. Today I will share with you some very practical and necessary coasters to use at home or if you have a food service business too. With them we avoid liquid stains on our tables or tablecloths that can damage them. Also, if you are a novice or want to start learning this beautiful technique, with these coasters you can start learning some of the basic points. Without further ado, let's get started.
BIENVENIDOS A MI BLOG
¡Holaaaa, holaaaaa! Saludos mis estimados creativos de DiyHub. Seguimos con la fiebre del crochet. Hoy les compartiré unos posavasos o posatazas muy prácticos y necesarios para usar en casa o si tienes un negocio de servicio de comida también. Con ellos evitamos manchas de líquido en nuestras mesas o manteles que pueden dañarlos. Además, si eres novata o quieres comenzar a aprender esta linda técnica, con estos posavasos te puedes iniciar para ir aprendiendo algunos de los puntos básicos. Sin más que decir, comencemos.
MATERIALS
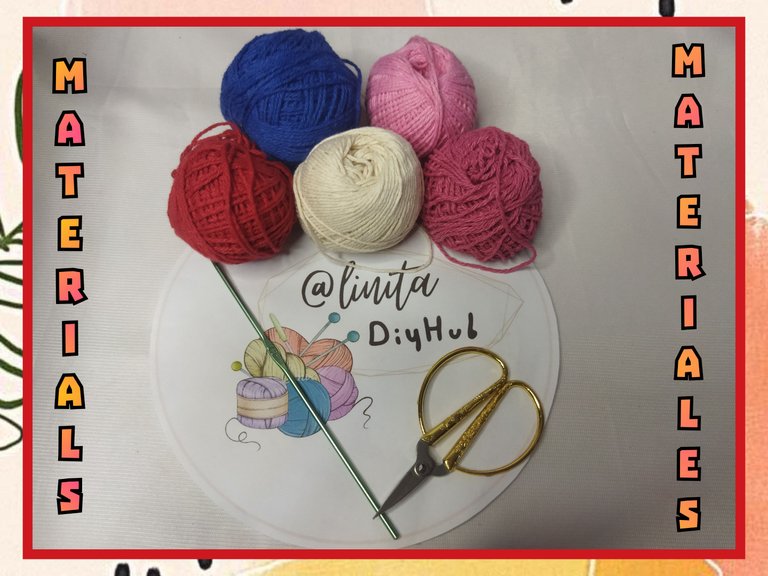
- 1 mm cotton threads
- 2.5 mm knitting needles
- Wool needle
- Scissors
MATERIALES
- Hilos de algodón de 1 mm
- Agujas para tejer de 2,5 mm
- Aguja lanera
- Tijera
STEP BY STEP // PASO A PASO
LAP Nº 1
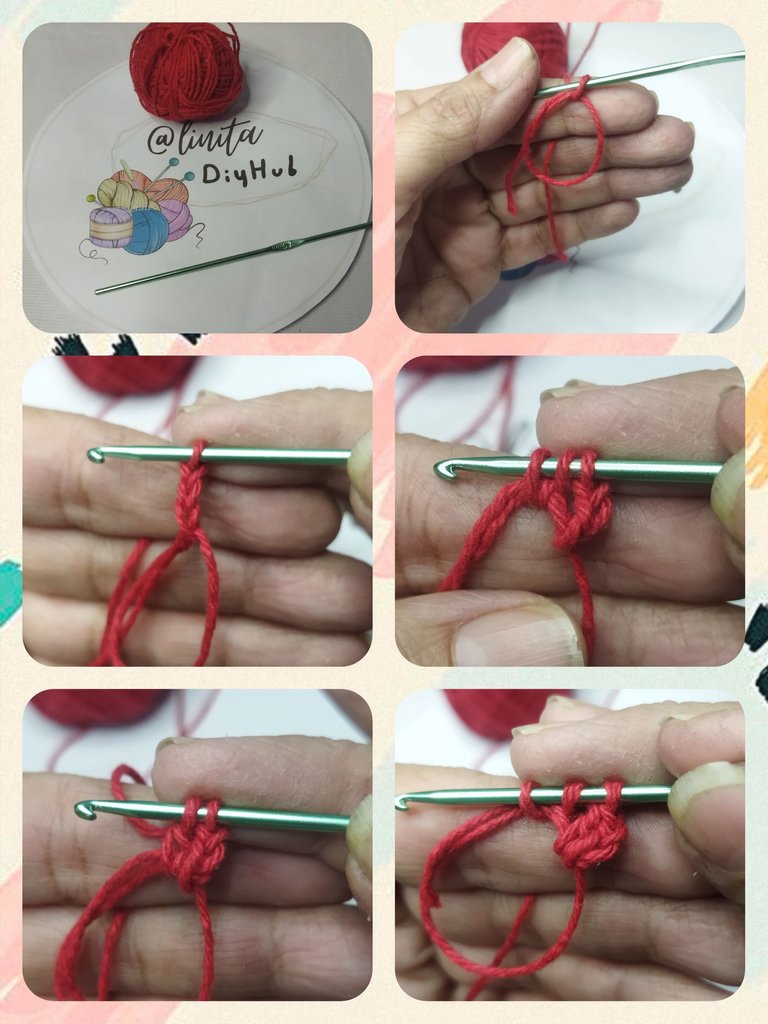
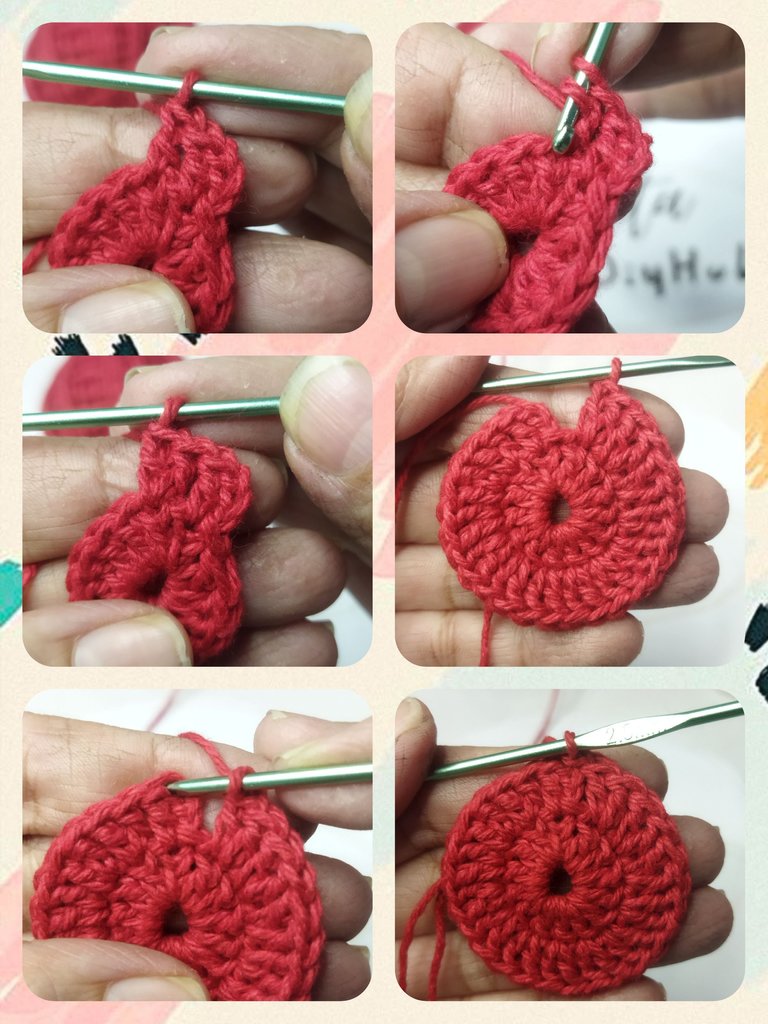
For this coaster we are going to use two shades of 1 mm cotton thread. Red and off white. We start the weaving with the red thread making a magic ring. Then we pick up 3 chain stitches to replace the first double crochet. Next we make 13 double crochets for a total of 14 double crochets.
VUELTA Nº 1
Para este posavasos vamos a utilizar dos tonos de hilo de algodón de 1 mm. Rojo y blanco hueso. Iniciamos el tejido con el hilo rojo realizando un anillo mágico. Luego levantamos 3 puntos cadenas para sustituir el primer punto alto. Seguidamente realizamos 13 puntos altos para un total de 14 puntos altos.
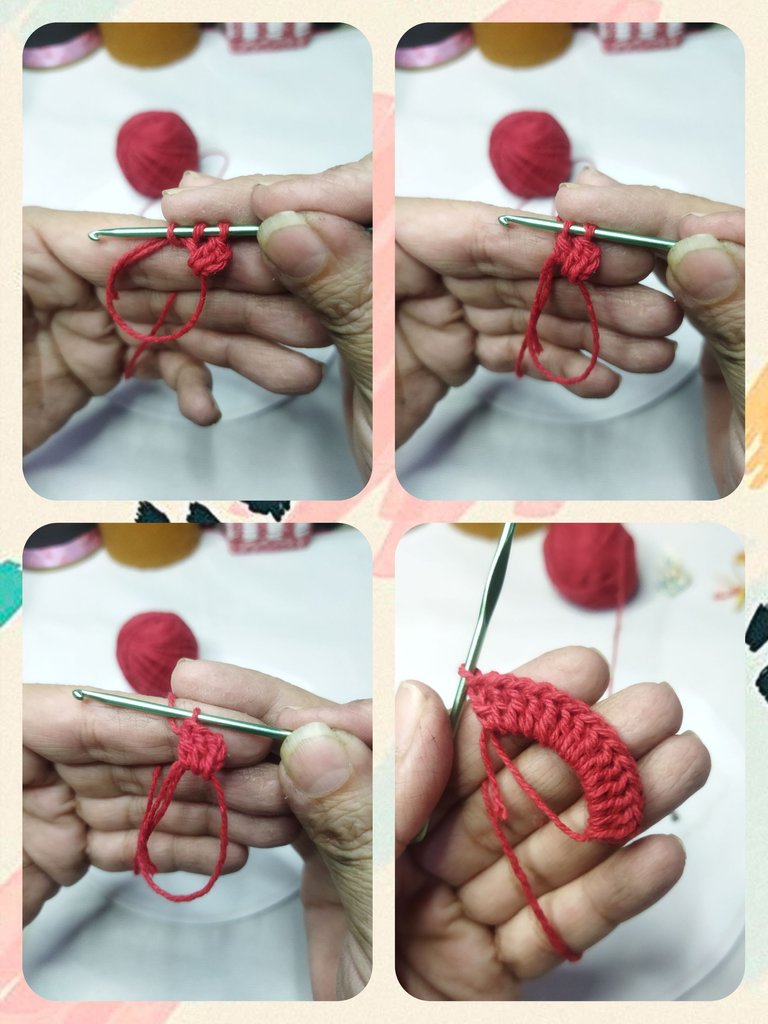
We close the magic ring and in the third chain at the beginning of the round we make a slipped stitch to close the circle of our first round.
Cerramos el anillo mágico y en la tercera cadena del inicio de la vuelta realizamos un punto deslizado para cerrar el circulo de nuestra primera vuelta.

LAP Nº 2
We begin the second round by making three chain stitches, at that same point where we raised the chain we raised a double crochet.
We move on to the next point from the previous round and make two double crochets.
Then in the next stitch we make two double crochets again and so on until we finish the round.
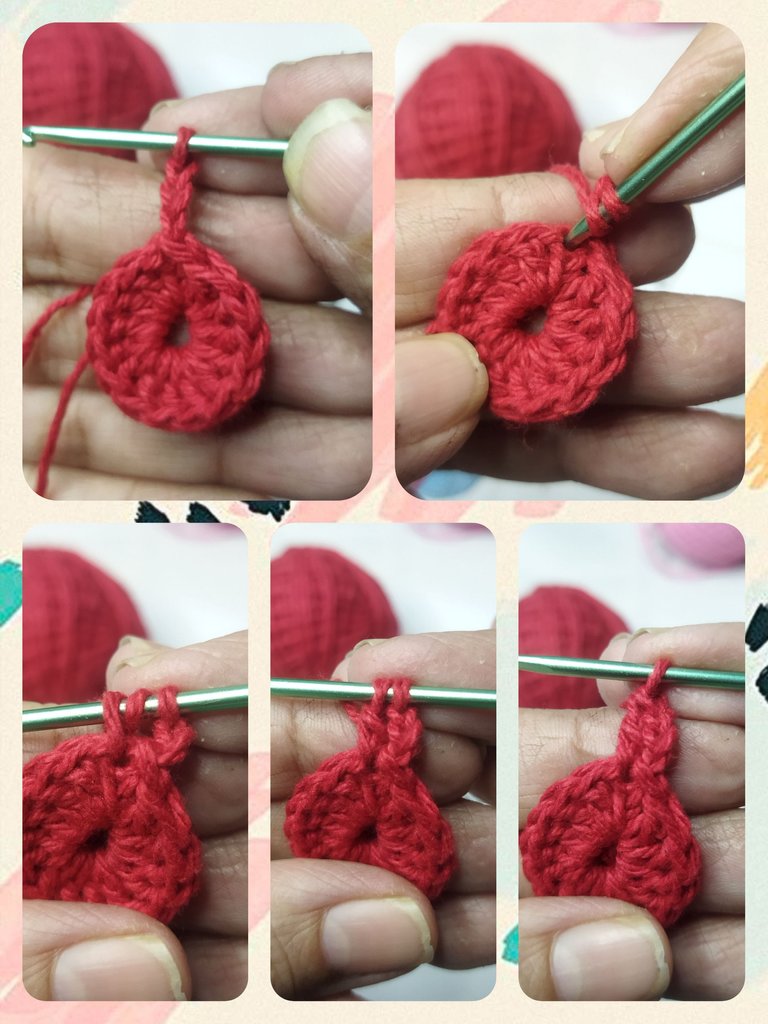
Two double crochets in each stitch from the previous round for a total of 28 double crochets on this round.
We close the round by making a slipped stitch in the third link of the starting chain.
VUELTA Nº 2
Comenzamos la segunda vuelta realizamos tres puntos cadenas, en ese mismo punto donde levantamos la cadena levantamos un punto alto.
Pasamos al siguiente punto de la vuelta anterior y realizamos dos puntos altos.
Seguidamente en el siguiente punto realizamos dos puntos altos nuevamente y así hasta terminar la vuelta.
Dos puntos altos en cada punto de la vuelta anterior para un total de 28 puntos altos en esta vuelta.
Cerramos la vuelta realizando un punto deslizado en el tercer eslabón de la cadena de inicio.
LAP Nº 3
In this third round we are going to make 2 double crochets in the first stitch, where the first double crochet will be replaced by three chain stitches, then in the next stitch we make 1 double crochet. We continue with 2 double crochets in the next stitch and 1 double crochet in the next one until we finish the round with a total of 42 double crochets.
We close the round by making a slipped stitch in the third link of the starting chain.
VUELTA Nº 3
En esta tercera vuelta vamos a realizar 2 puntos altos en el primer punto, donde el primer punto alto será sustituido por tres puntos cadenas, luego en el siguiente punto realizamos 1 punto alto. Seguimos con 2 puntos altos en el siguiente punto y 1 punto alto en el que sigue hasta finalizar la vuelta con un total de 42 puntos altos.
Cerramos la vuelta realizando un punto deslizado en el tercer eslabón de la cadena de inicio.

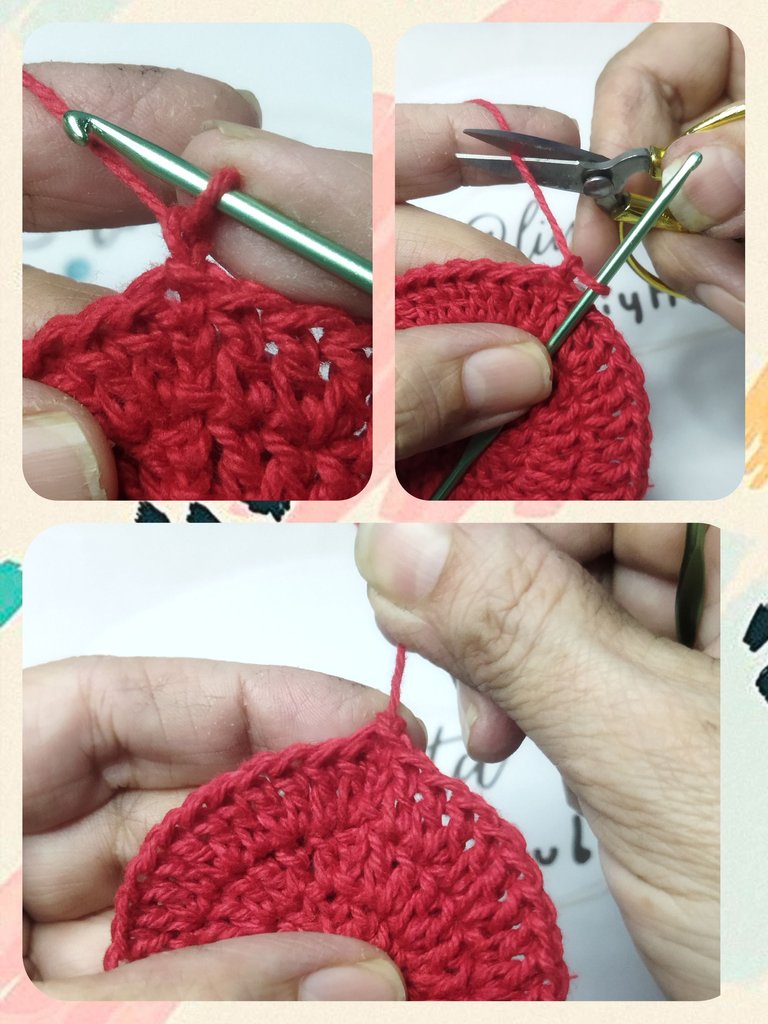
Until this round we used the red thread. We perform a chain stitch, cut the thread and adjust.
Hasta esta vuelta usamos el hilo rojo. Realizamos un punto cadena, cortamos el hilo y ajustamos.
LAP Nº 4
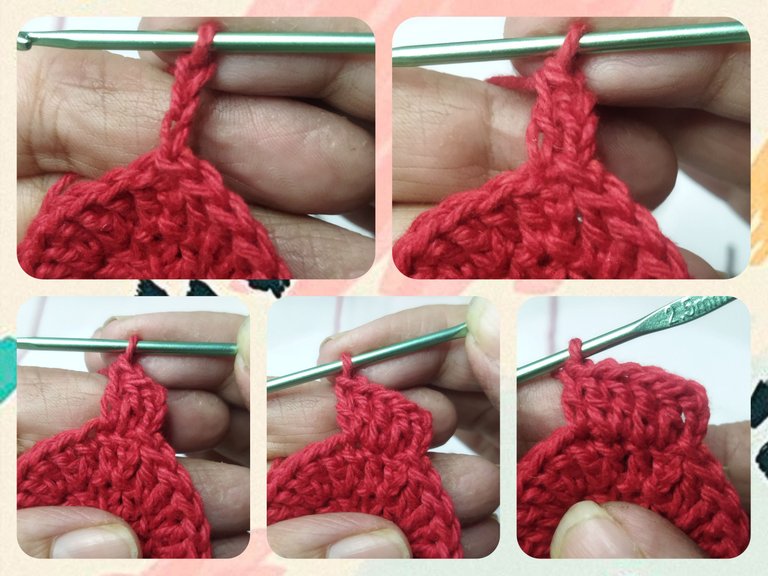
From this round to No. 6, we are going to use the off-white thread. We take the yarn and make a slip stitch in the first stitch of the previous round and lift two chain stitches for a total of 3 with the slip stitch. In this round we are going to work with two double crochets in the first stitch, 1 double crochet in the next one and 1 double crochet in the next one that follows.
VUELTA Nº 4
A partir de esta vuelta hasta la Nº 6, vamos a utilizar el hilo blanco hueso. Tomamos la hebra y realizamos un punto corredizo en el primero punto de la vuelta anterior y levantamos dos puntos cadenas para un total de 3 con el punto corredizo. En esta vuelta vamos a trabajar con dos puntos altos en el primer punto, 1 punto alto, en el siguiente y 1 punto alto en el siguiente que sigue.
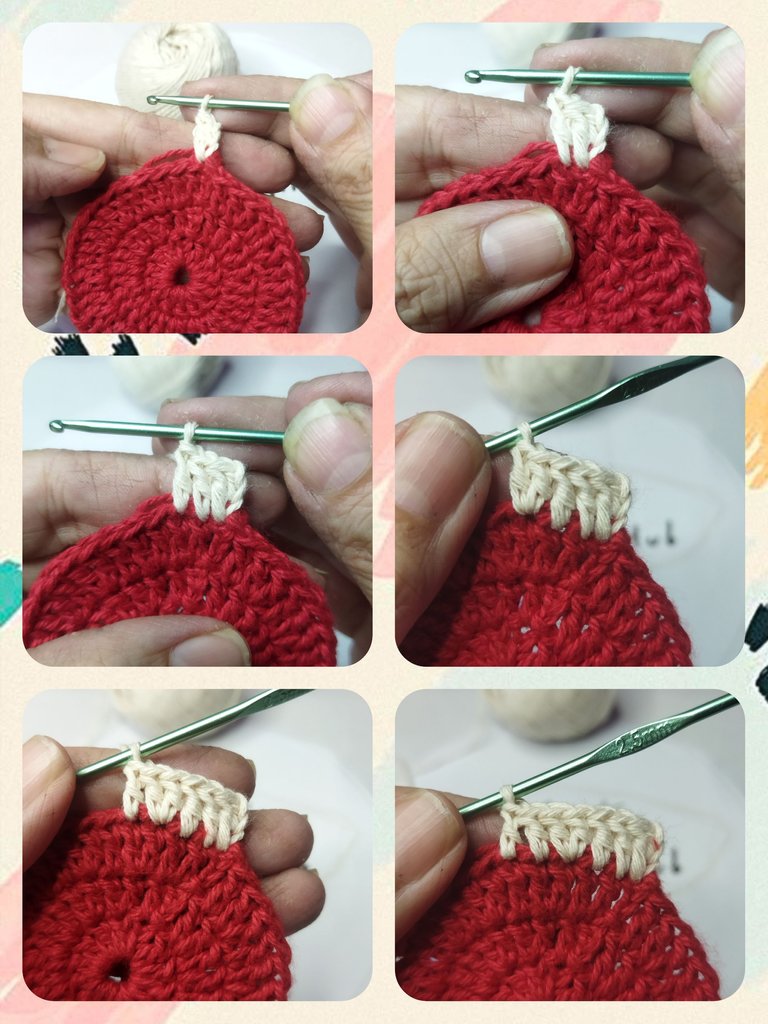
At the end of the round we should have 56 double crochets. We close with a slipped stitch.
Al finalizar la vuelta debemos tener 56 puntos altos. Cerramos con un punto deslizado.
LAP Nº 5
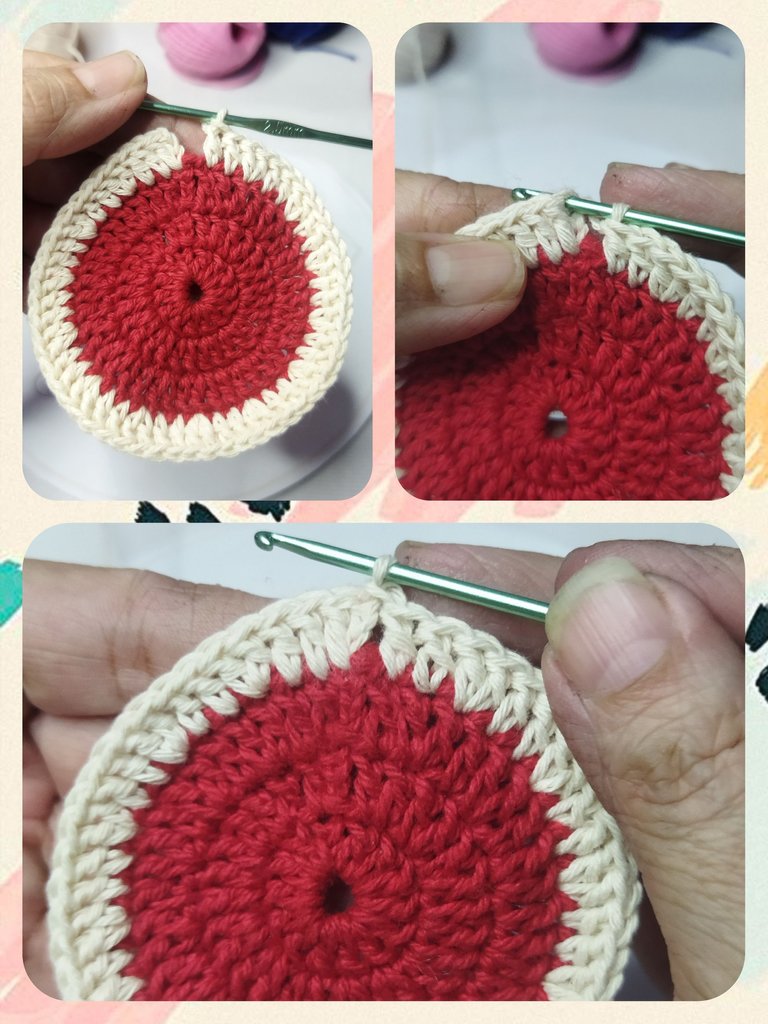
On this round we are going to make two double crochets in the first stitch, 1 double crochet in the next one, 1 double crochet in the next one and 1 double crochet in the next one. And we repeat the series until we finish the round.
VUELTA Nº 5
En esta vuelta vamos a realizar dos puntos altos en el primer punto, 1 punto alto en el siguiente, 1 punto alto en el que sigue y 1 punto alto en el próximo. Y repetimos la serie hasta terminar la vuelta.
At the end of the round we have to have 70 double stitches. We close with a slipped stitch in the chain stitch at the beginning of the round.
Al finalizar la vuelta tenemos que tener 70 puntos altos. Cerramos con un punto deslizado en el punto cadena de inicio de la vuelta.
LAP Nº 6
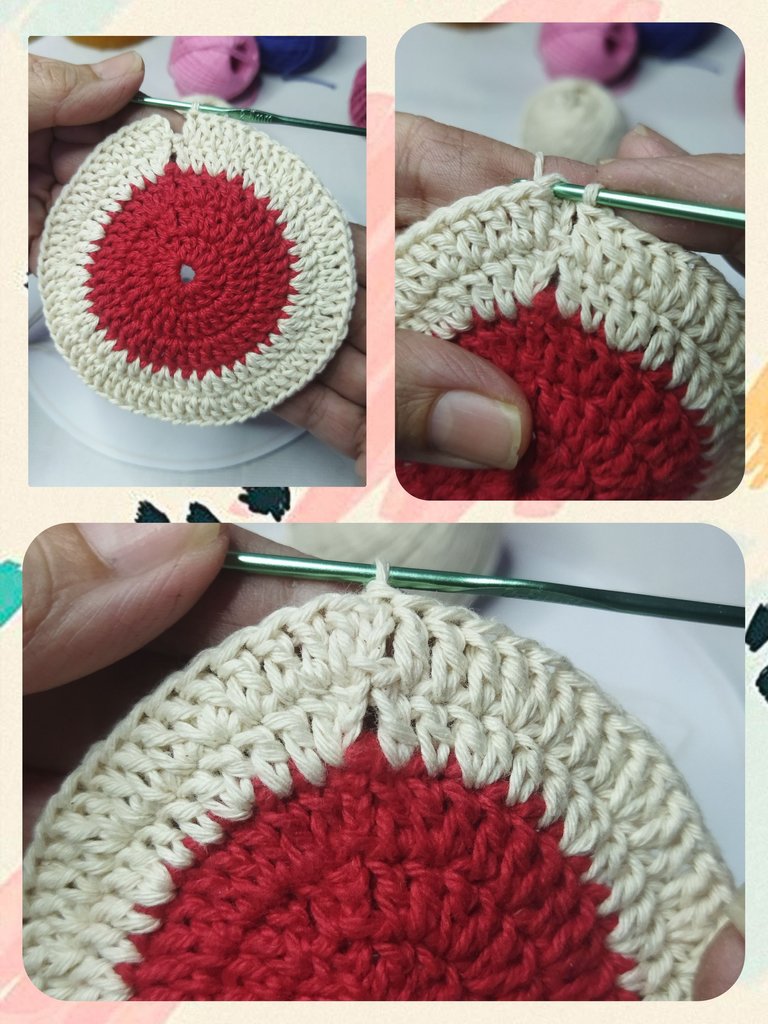
In this round we are going to make 2 double crochets in the first stitch of the previous round and 4 double crochets in the next 4 stitches, that is, 1 stitch in each one, this series is 6 double crochets.
VUELTA Nº 6
En esta vuelta vamos a realizar 2 puntos altos en el primer punto de la vuelta anterior y 4 puntos altos en los 4 puntos siguientes,es decir 1 punto en cada uno, esta serie es de 6 puntos altos.
We finished the round with a total of 84 double crochets. We close with a slipped stitch. We make a chain, cut the thread and adjust the knot.
Finalizamos la vuelta con un total de 84 puntos altos. Cerramos con un punto deslizado. Hacemos una cadena cortamos el hilo y ajustamos el nudo.
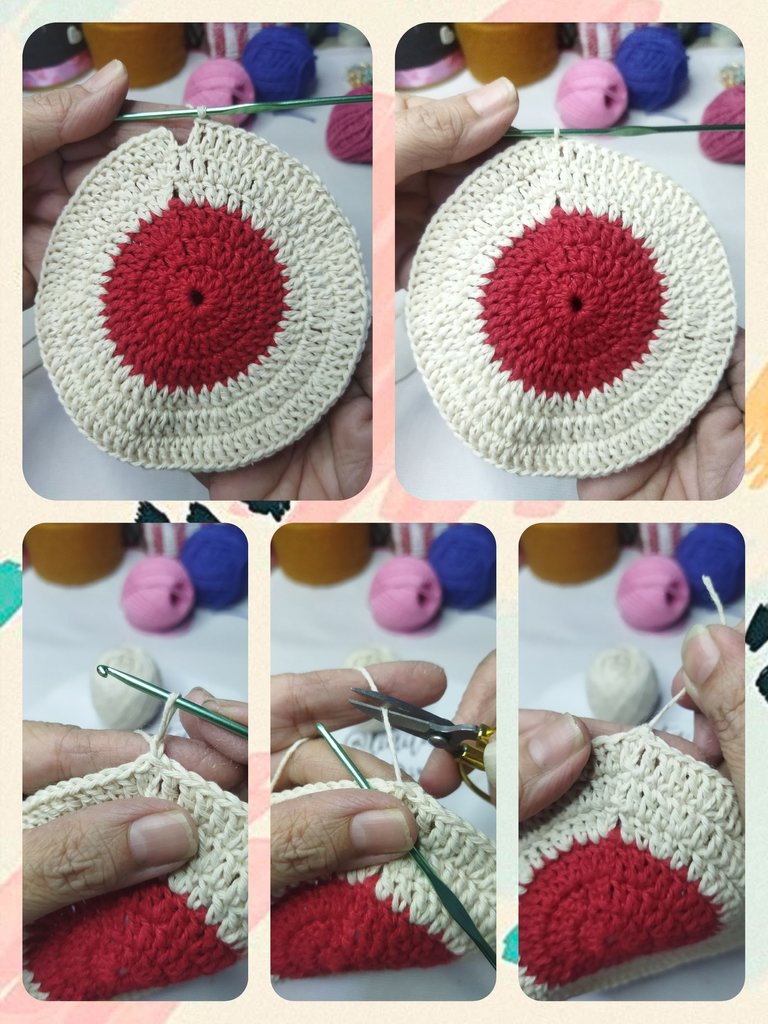
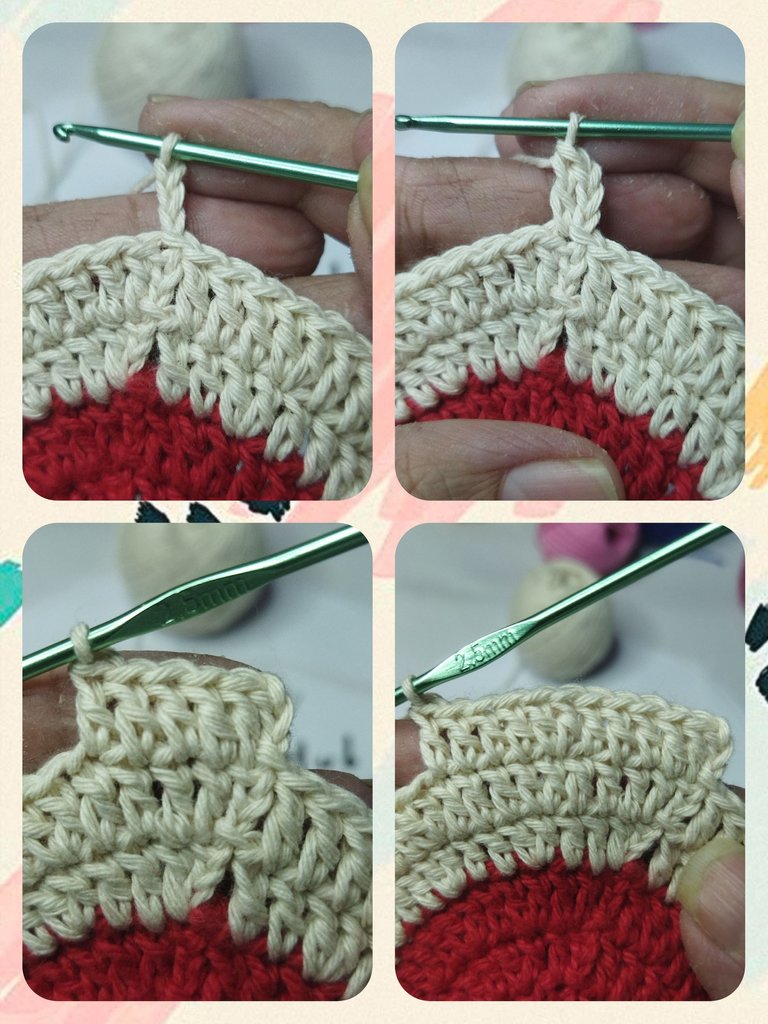
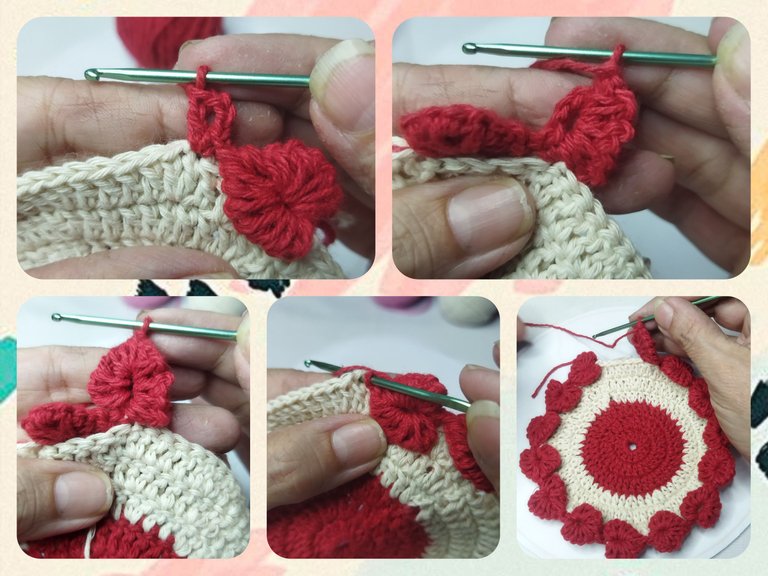
LAP Nº 7
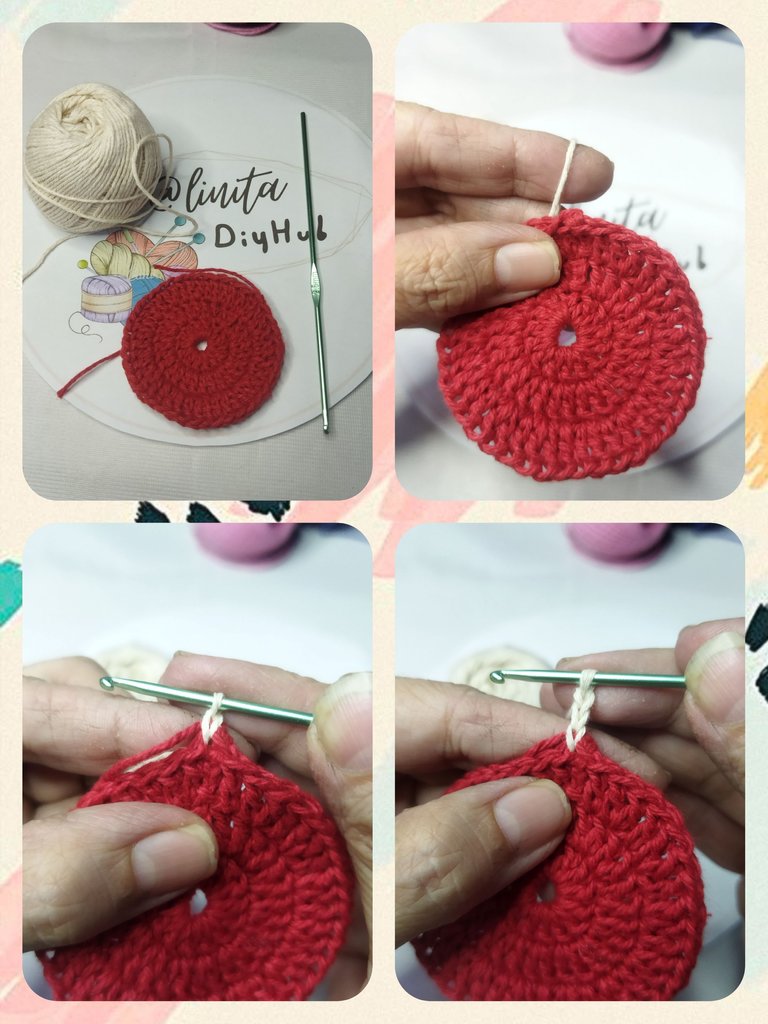
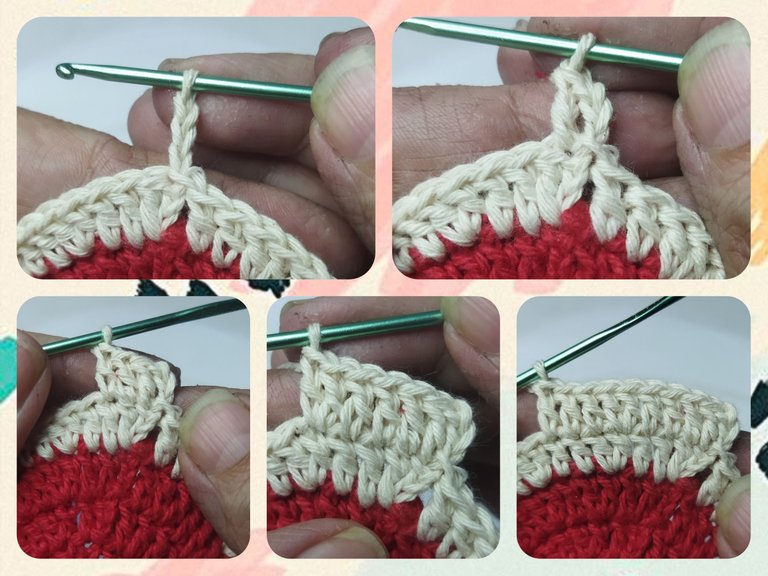
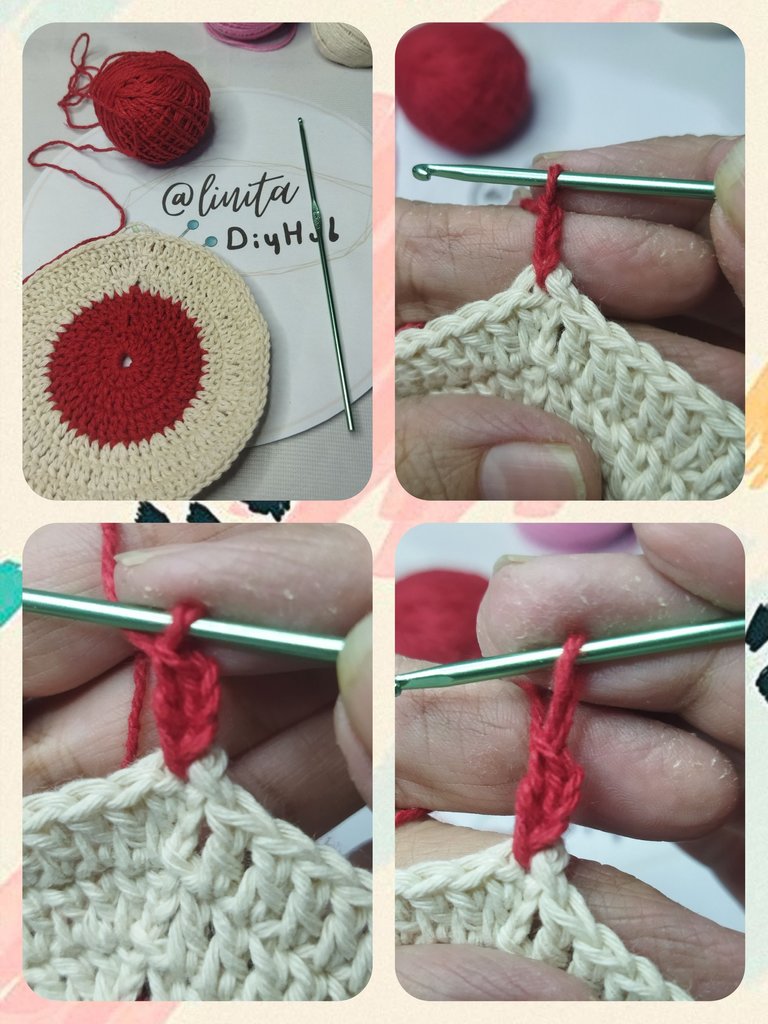
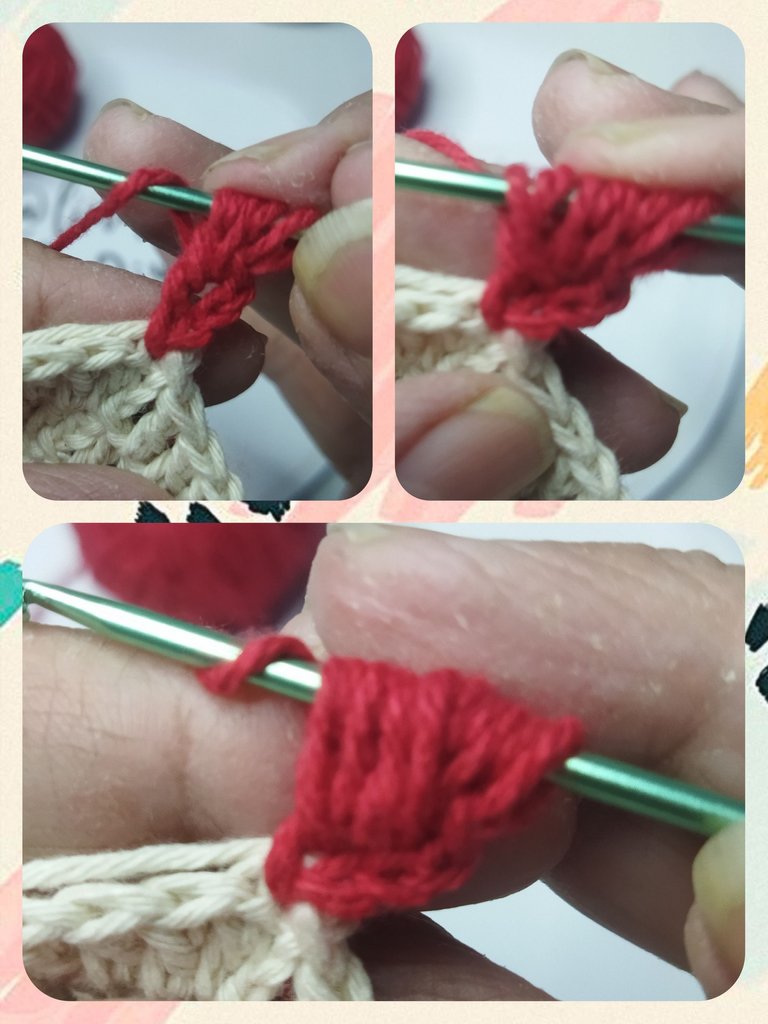
In this round we change again to the red thread. We are going to make some hearts to decorate the coaster.
We take the yarn and in the first loop stitch above we make a slip knot and lift 3 chain stitches and a high loop at that same point.
We stretch the link thread approximately 1 cm.
VUELTA Nº 7
En esta vuelta cambiamos nuevamente al hilo rojo. Vamos a realizar unos corazones para decorar el posavaso.
Tomamos la hebra y en el primer punto de vuelta anterior realizamos un nudo corredizo y levantamos 3 puntos cadenas y un tonto alto en ese mismo punto.
Estiramos el hilo del eslabón 1 cm aproximadamente.
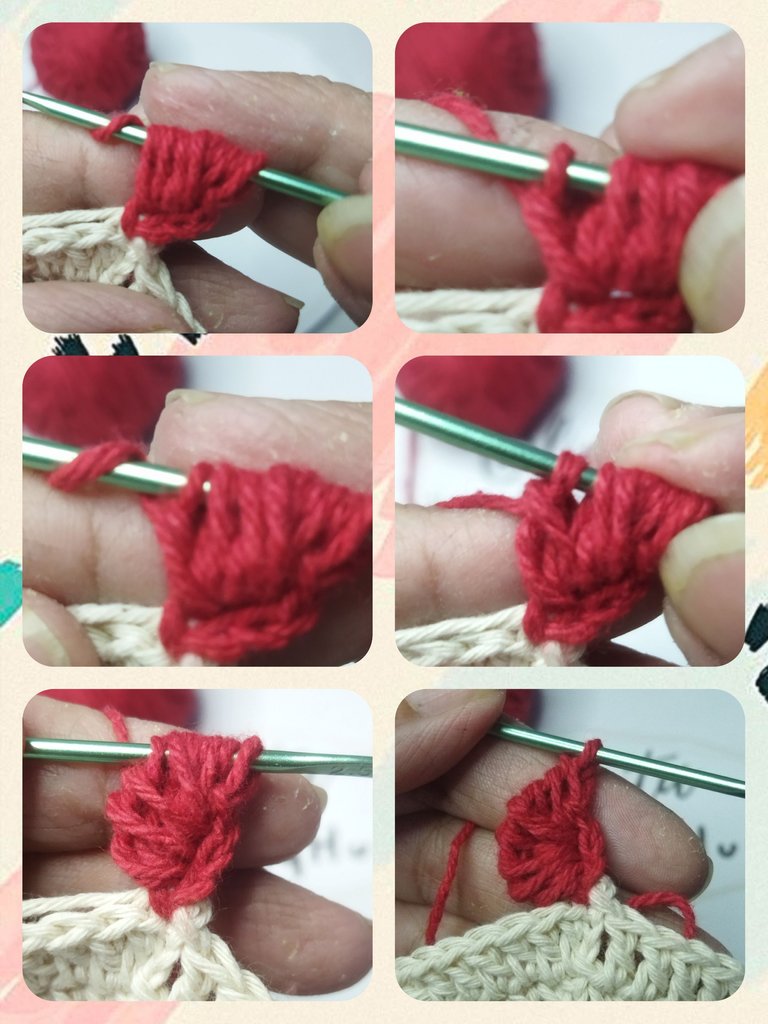
We take a loop and we are going to insert the needle between the two double stitches, pull the thread. Here we are going to have 3 loops on the needle. We take a loop again and introduce it again between the two points and pull the thread for 5 loops. We are going to carry out this process 4 more times for a total of 13.
Tomamos una lazada y vamos a introducir la aguja entre los dos puntos altos,halamos el hilo. Aqui vamos a tener 3 lazadas en la aguja. Tomamos nuevamente una lazada e introducimos nuevamente entre los dos puntos y halamos el hilo para 5 lazadas. Este proceso lo vamos a realizar 4 veces más para un total de 13.
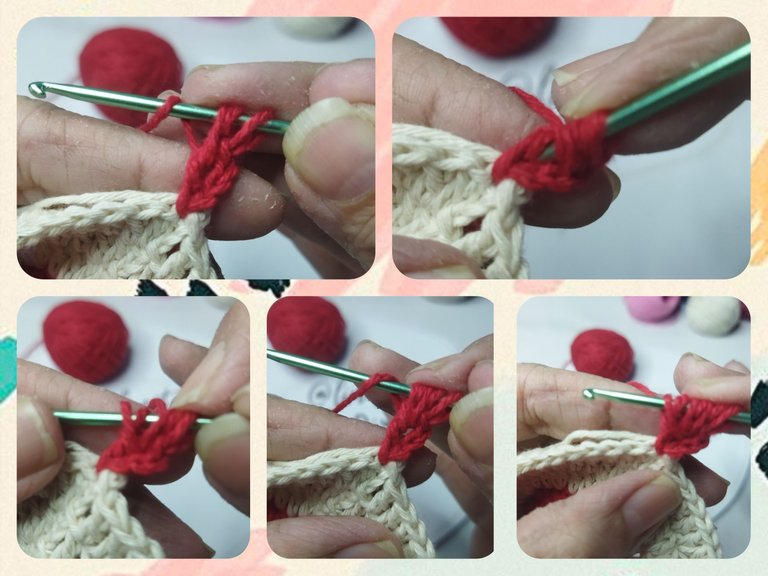
Now we are going to close the loops. We take a loop and we are going to pass the needle through two of the loops that we have formed. We take the loop again and go through two more and so on until we go through the remaining 9. The last pass will be for the 3 that remain. Thus forming half of the heart.
Ahora vamos a cerrar las lazadas. Tomamos una lazada y vamos a pasar la aguja por dos de las lazadas que tenemos formadas. Tomamos lazada nuevamente y pasamos por dos más y así sucesivamente hasta pasar por las 9 restantes. La última pasada será por las 3 que quedan. Formando así la mitad del corazón.
For the other half of the heart we are going to turn the fabric and repeat the previous process but this time we are going to stop 7 loops between the two double crochets.
That is, we take yarn over, we go between the two points, we pull the thread, we take yarn over again and we go through the two points and so on 5 more times for a total of 15 yarn overs.
Para la otra mitad del corazón vamos a girar el tejido y repetimos el proceso anterior pero esta vez vamos a parar 7 lazadas por entre los dos puntos altos.
Es decir, tomamos lazada, pasamos entre los dos puntos, halamos el hilo, tomamos lazada nuevamente y pasamos por los dos puntos y así 5 veces más para un total de 15 lazadas.
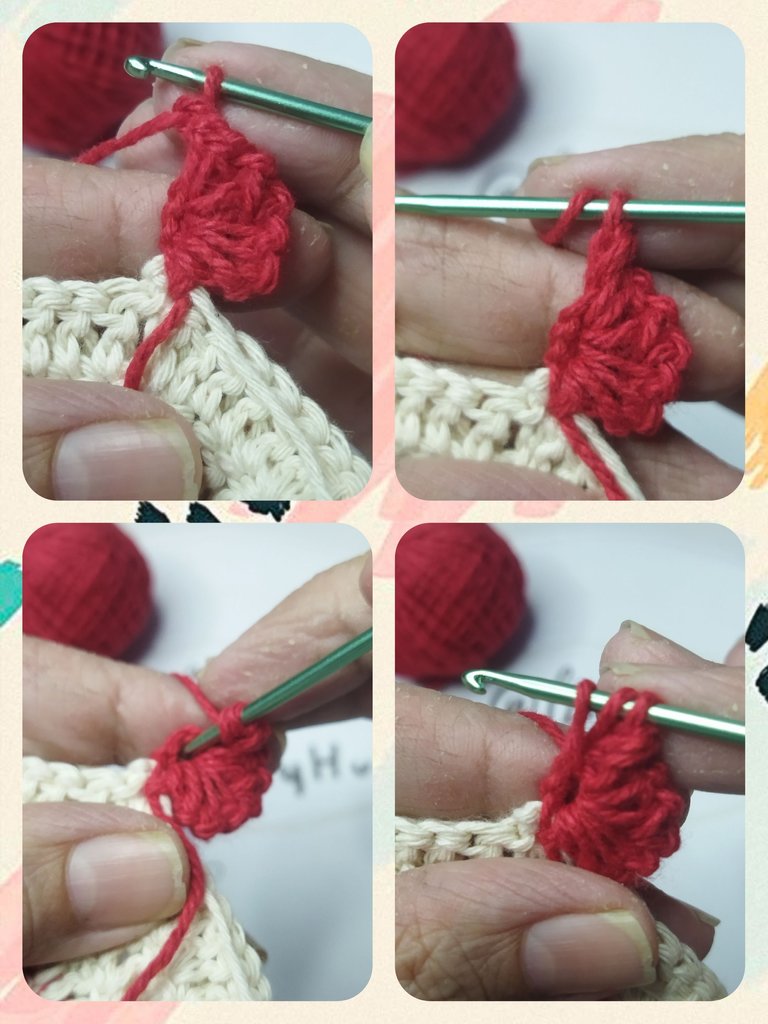
We close the heart by taking a yarn over and passing two by two until finishing the 15 stitches for a total of 7 stitches. Forming the heart completely.
Cerramos el corazón tomando una lazada y pasando de dos en dos hasta finalizar los 15 puntos para un total de 7 puntos. Formando el corazón completamente.
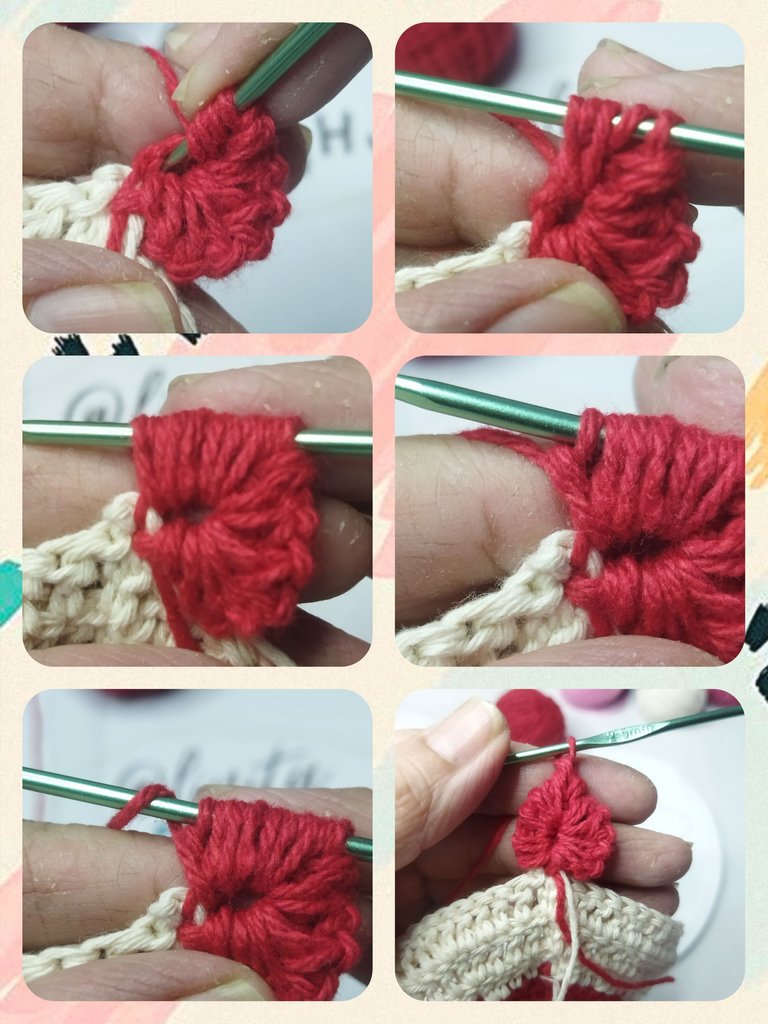
We turn the fabric to the right side and we are going to count 6 stitches from the previous round and there we are going to insert the heart making a single crochet. Leaving the heart in relief on the base of the fabric.
Giramos el tejido a la parte derecha y vamos a contar 6 puntos de la vuelta anterior y allí vamos a insertar el corazón realizando un punto bajo. Quedando el corazón en relieve sobre la base del tejido.

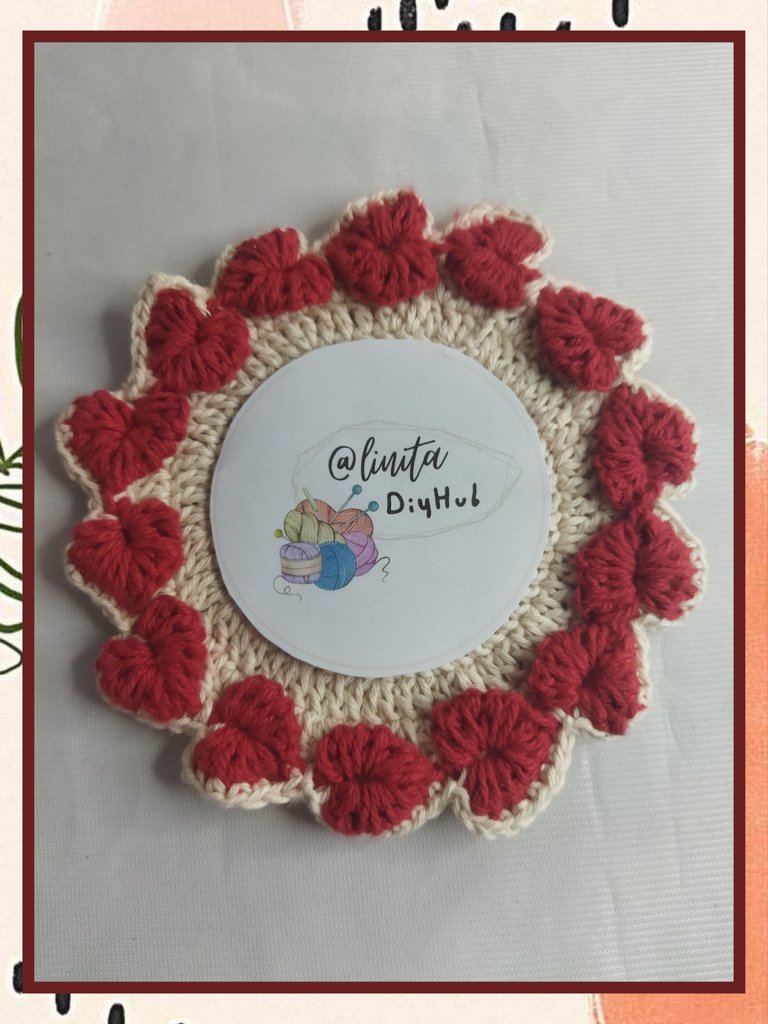
We repeat the process until we finish the round with a total of 14 hearts.
Repetimos el proceso hasta finalizar la vuelta con un total de 14 corazones.
We close with a slipped stitch in the first point where we started, make a chain stitch, cut the thread and adjust.
Cerramos con un punto deslizado en el primer punto donde iniciamos, realizamos un punto cadena, cortamos el hilo y ajustamos.

LAP Nº 8
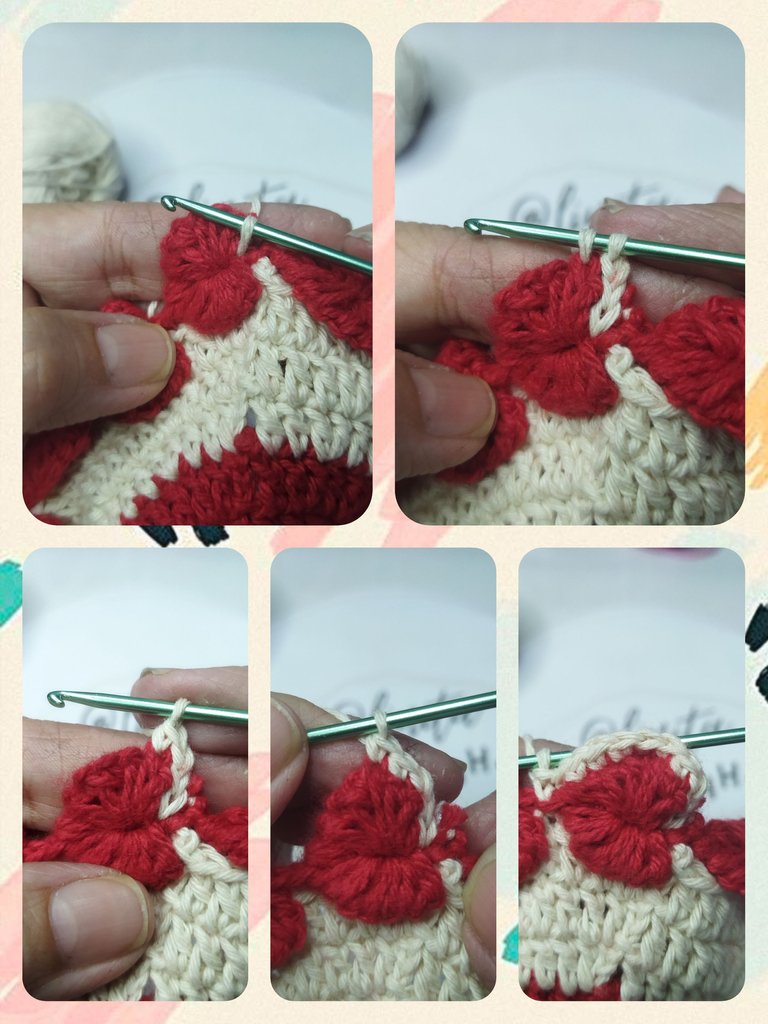
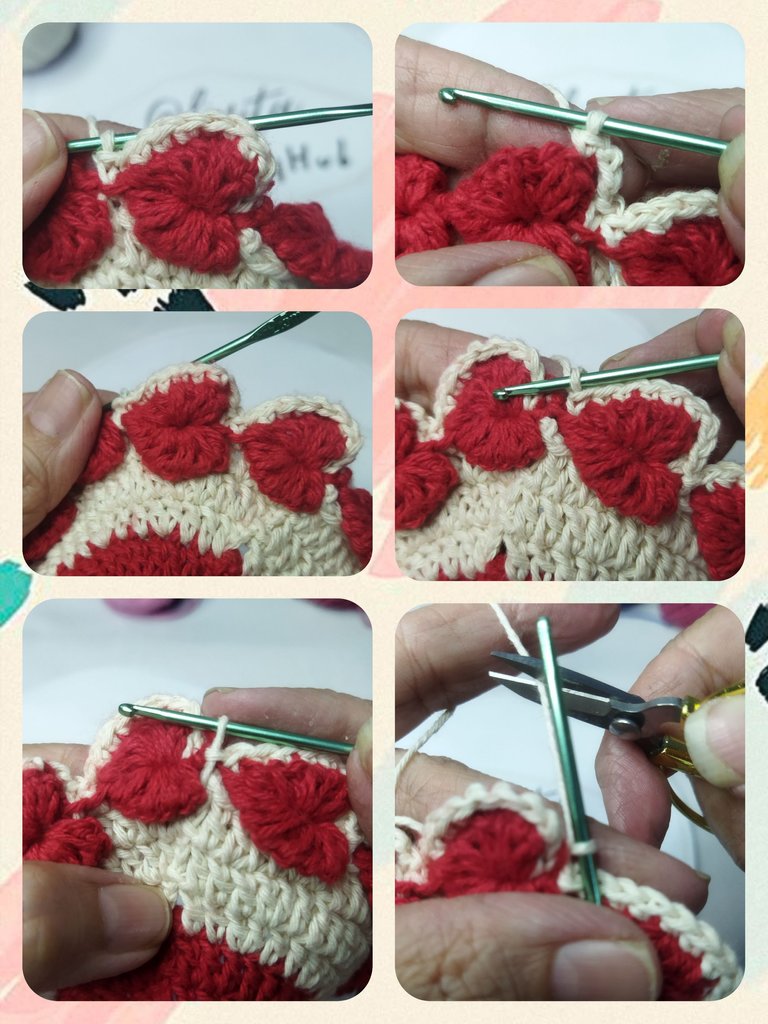
And to finish, we are going to embroider with chains and single stitches around the hearts with white thread.
We insert the needle into the first stitch of the previous round and make a slip knot, we lift 3 chains and insert into the first link of the heart and make a single crochet, we continue making single crochets around the heart and when we reach the tip, we make a slipped stitch at the beginning of the next heart and repeat the process until finishing the round.
VUELTA Nº 8
Y ya para finalizar, vamos realizar un bordado con cadenas y puntos bajos alrededor de los corazones con el hilo blanco.
Insertamos la aguja en el primer punto de la vuelta anterior y realizamos un nudo corredizo, levantamos 3 cadenas e insertamos en el primer eslabón del corazón y realizamos un punto bajo, seguimos realizando puntos bajos alrededor del corazón y al llegar a la punta, realizamos un punto deslizado al inicio del siguiente corazón y repetimos el proceso hasta finalizar la vuelta.
We finish with a slipped stitch where we started, perform a chain stitch and cut the thread.
Finalizamos con un punto deslizado donde iniciamos, realizamos un punto cadena y cortamos el hilo.
With the wool needle we are going to hide the excess threads on the back of the fabric.
Con la aguja lanera vamos a esconder los hilos sobrantes por la parte trasera del tejido.
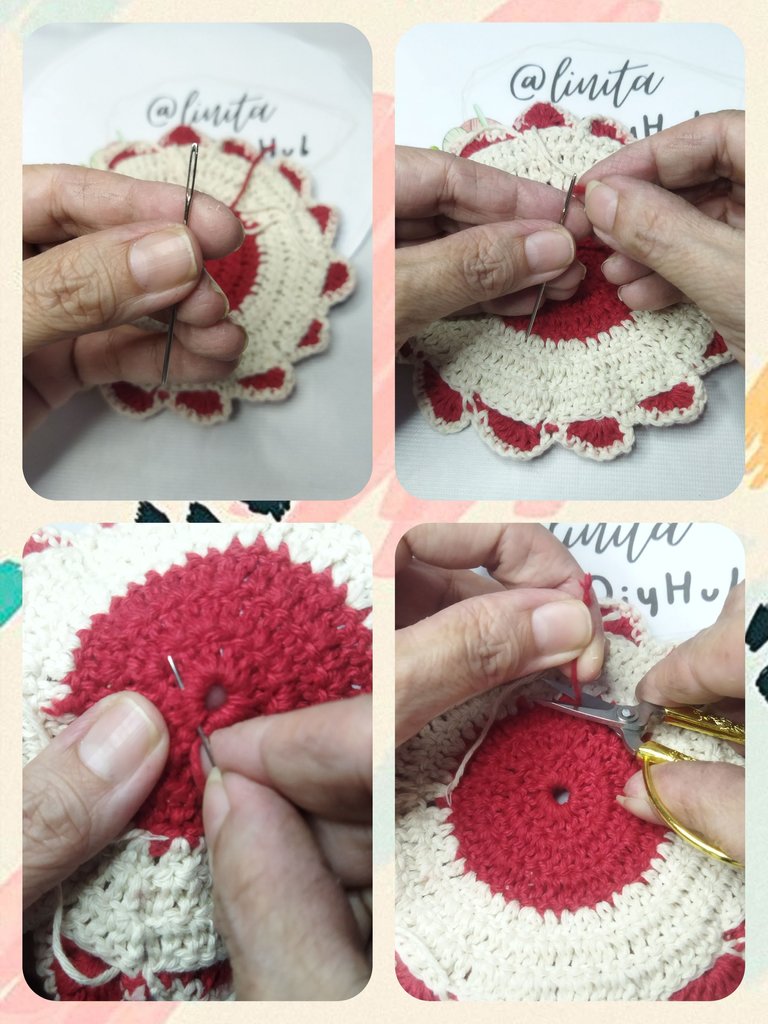
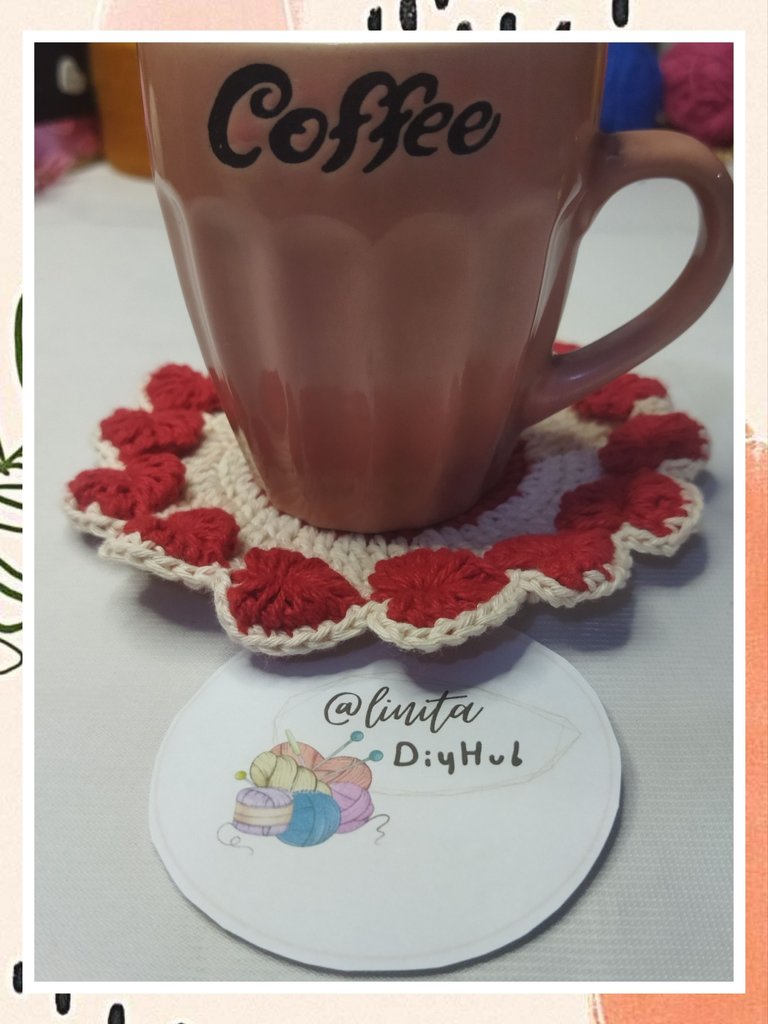
PROJECT COMPLETED
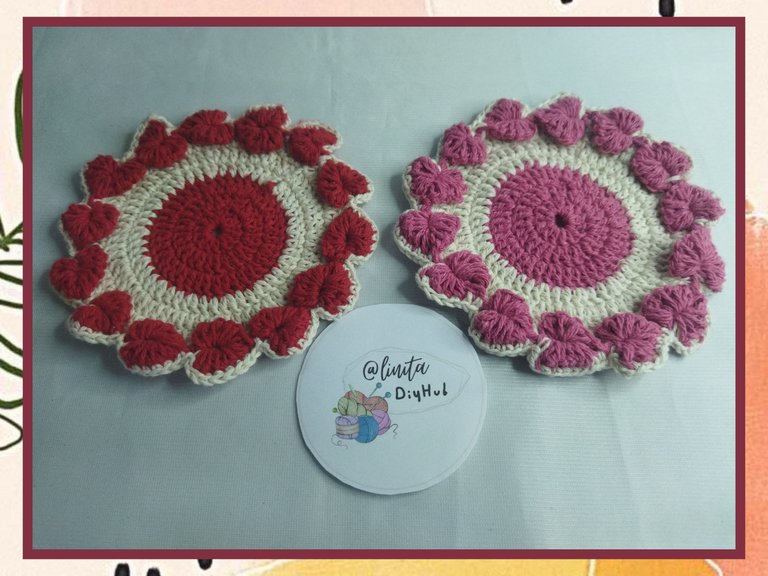
We can make them with the colors we want to create harmony on our table, breakfast nook or wherever we use them by creating combinations of threads. I really like the variety of colors. So if you like coasters this idea is for you. I hope you like it. See you next time.
PROYECTO FINALIZADO
Podemos realizarlos con los colores que queramos para crear armonía en nuestra mesa, desayunador o donde quiera que los utilicemos realizando combinaciones de hilos. A mi me gusta mucho la variedad de colores. Así que si te gustan los posavasos esta idea es para ti. Espero te guste. Nos vemos en la próxima.
Me encanta.... 😍💖😁 Sobretodo porque soy fan de todo lo que tenga corazones jajaja... Y es que te quedó super lindo de verdad 😍👍
Ay me alegro que te haya gustado. A mi también me gustan los corazones jejejejeje. El primer corazón me costó realizarlo la verdad, pero después que le agarré la vuelta, los demás fueron super fácil. Gracias por comentar. Saludos.
Jajajaja... Siempre es así cuando tejemos algo nuevo amiga, pero rapidito le hagarramos el hilo jajajaja... 😁
Precioso el diseño, muy completo el paso a paso. Ambas combinaciones se ven muy lindas, ese detalle de corazones en el borde esta de lujo. Gracias por compartir.
Demasiado lindo. Que bueno que te haya gustado. Ya estoy por terminar el set completo, con azul y verde 😁
Qué bien, se verán lindos todos. Te felicito. 😍
Gracias por compartir @linita, buen inicio, te ha quedado genial. Me encantó.
This one looks gorgeous and the use of different colors adds a wonderful touch. Well done.
Crochet coasters?! Of course, haha
Amazing 👏🏿
!DIY
!discovery 27
This post was shared and voted inside the discord by the curators team of discovery-it
Join our Community and follow our Curation Trail
Discovery-it is also a Witness, vote for us here
Delegate to us for passive income. Check our 80% fee-back Program
muy lindo trabajo. decorativo y útil
very nice work. decorative and useful
El detalle de los corazones alrededor, los hace diferentes. Gracias por compartir.