WELCOME TO MY BLOG
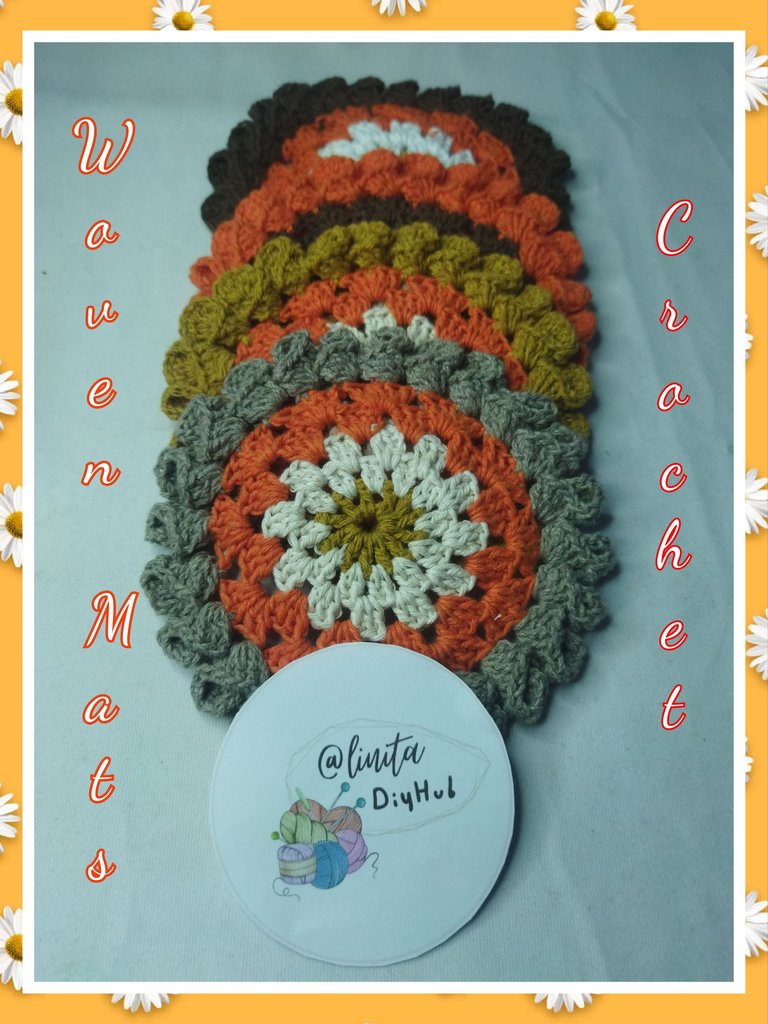
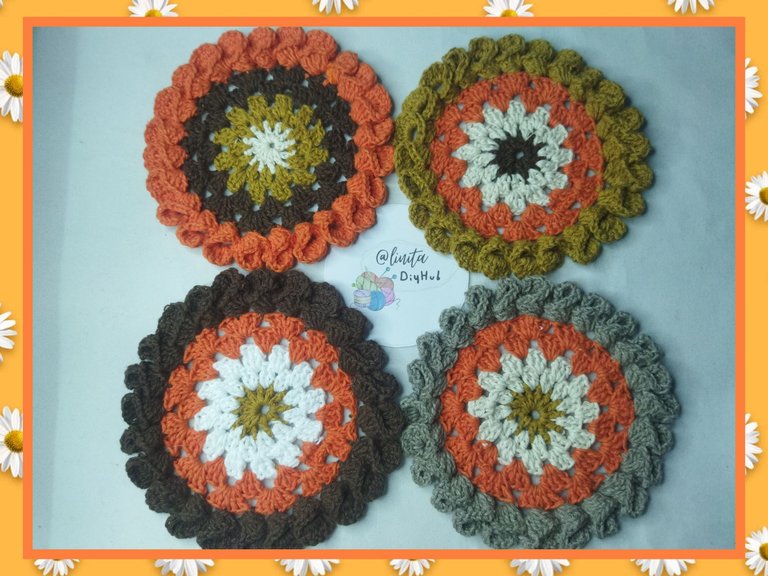
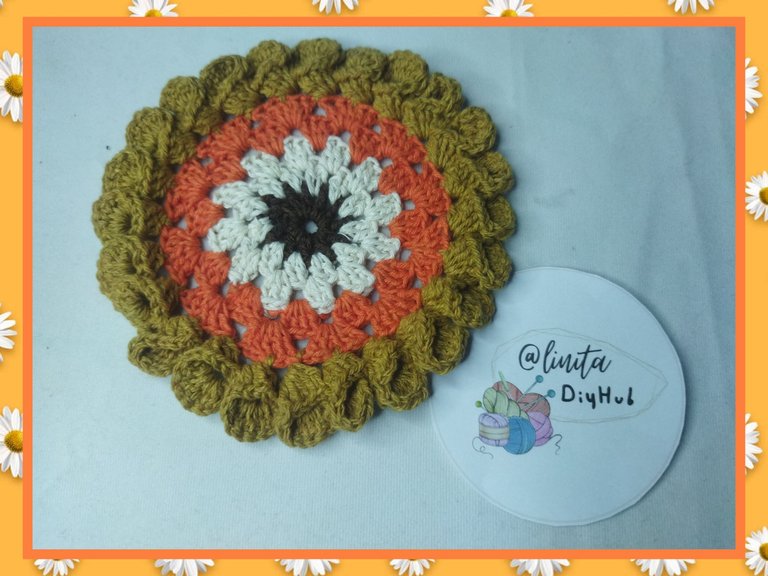
Hellooooo, hellooooooo! Greetings my dear DiyHub creatives. There are infinite creations that we can make with crochet and decorating our home with these fabrics is a matter of taste, but every day there are more ideas that come with having a warehouse of threads to make them. As I already told you, I am very enthusiastic about knitting. On this occasion I made a series of 15 cm mats to decorate the coffee tables with small ornaments to give harmony to my house. These are simple mats so you can make them without any fear if you are just starting out in weaving. Made with basic stitches that grouped together form beautiful figures in our design. I invite you to follow the step by step. Let's get started.
BIENVENIDOS A MI BLOG
¡Holaaaa, holaaaaa! Saludos mis estimados creativos de DiyHub. Son infinitas las creaciones que podemos realizar a crochet y decorar nuestra casa con estos tejidos es cuestión de gustos pero cada día hay más ideas que provoca tener un almacén de hilos para hacerlos. Yo, como ya les dije, estoy muy entusiasmada tejiendo. En esta oportunidad realicé una serie de tapetes de 15 cm para decorar las mesas de centro con adornos pequeños para darle armonía a mi casa. Estos son tapetes sencillos para que los puedas realizar sin ningún temor si apenas estás iniciando en el tejido. Realizado con puntos básicos que agrupados forman figuras preciosas a nuestro diseño. Te invito a seguir el paso a paso. Comencemos.

MATERIALS
- 1 mm cotton threads (brown, ocher, white, orange and bone)
- 2.5 mm knitting needles
- Wool needle
- Scissors
MATERIALES
- Hilos de algodón de 1 mm (marrón, ocre, blanco, naranja y hueso)
- Agujas para tejer de 2,5 mm
- Aguja lanera
- Tijera
STEP BY STEP // PASO A PASO
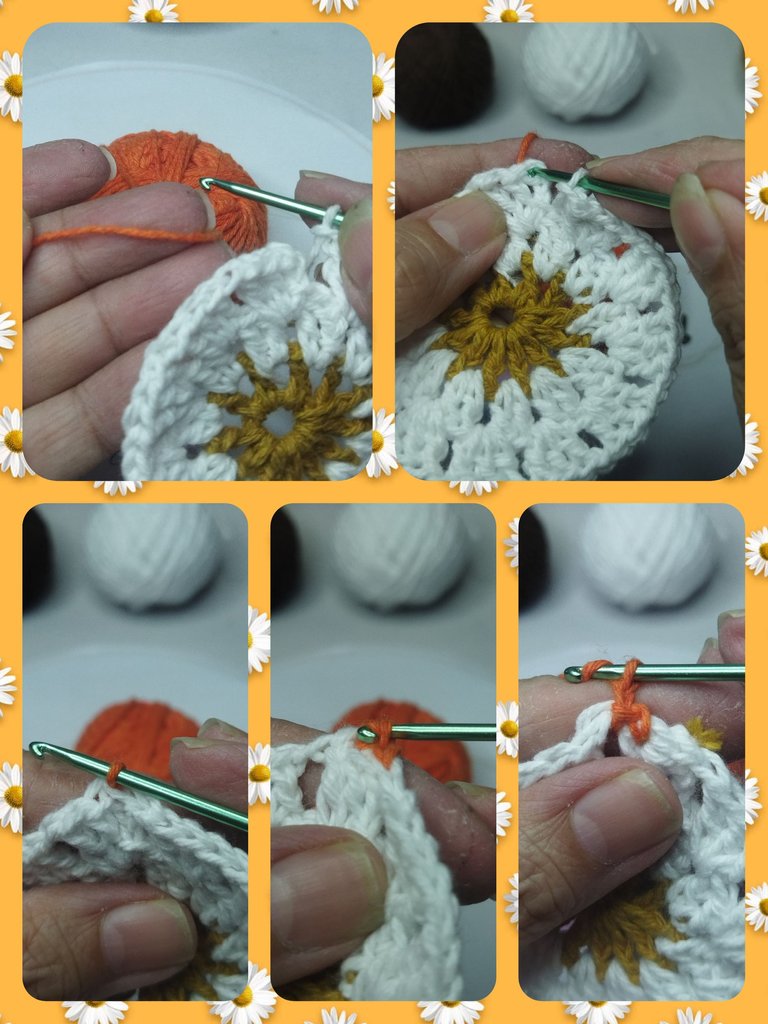
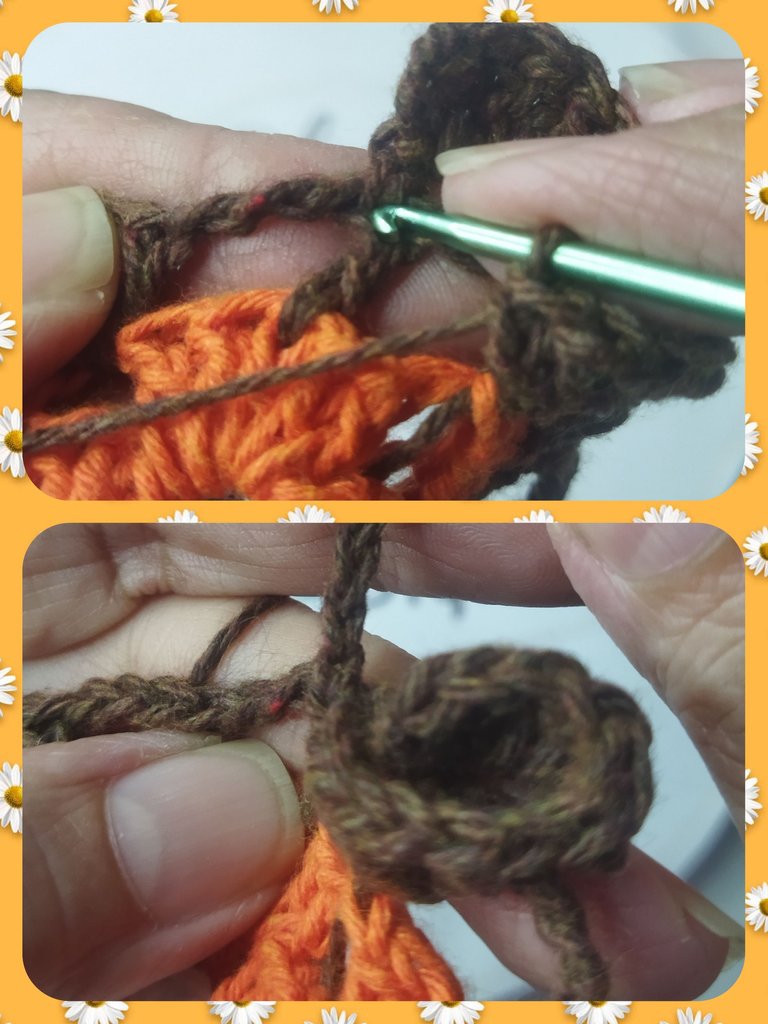
LAP Nº 1
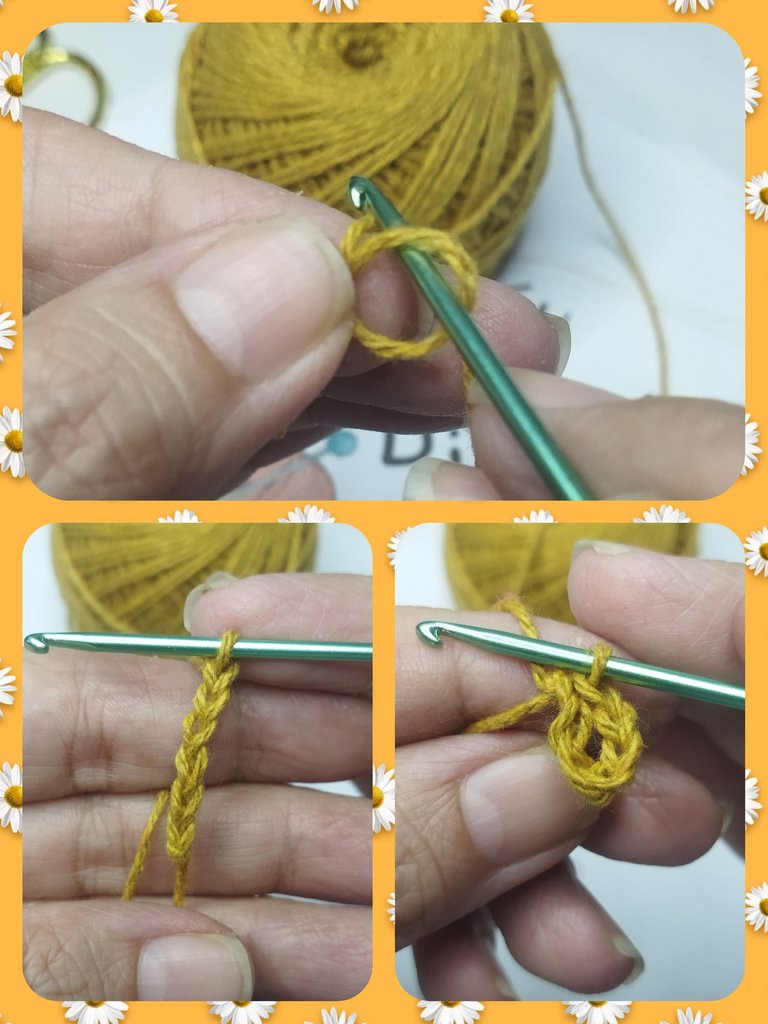
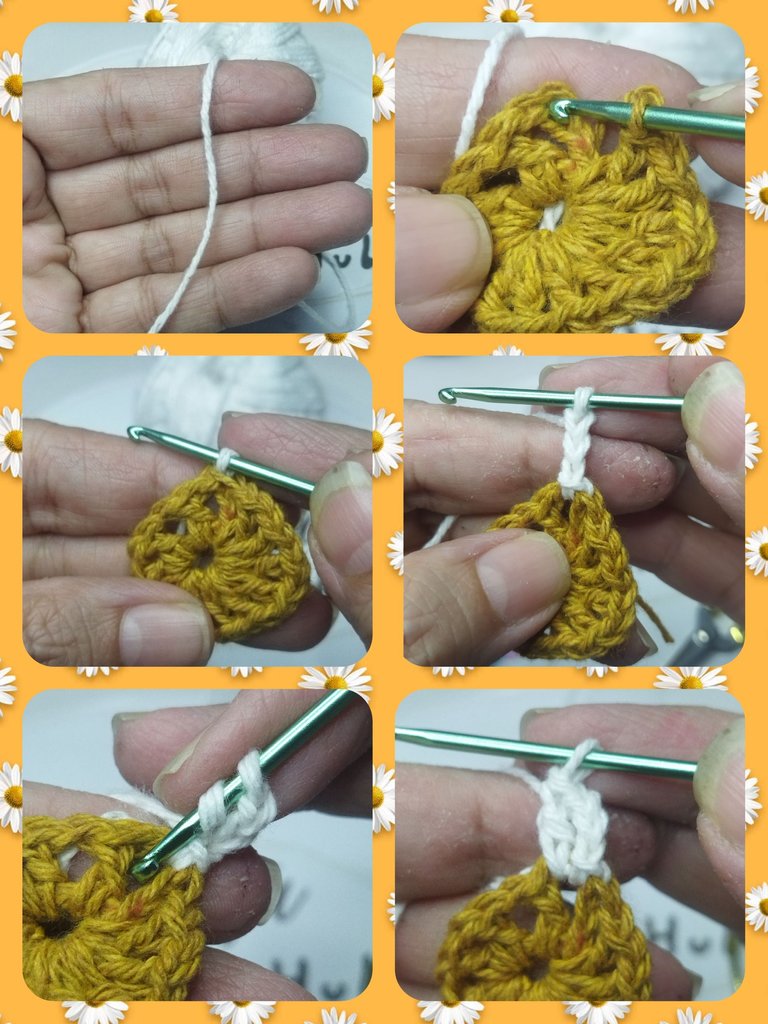
We will start with the ocher thread. We begin by making a sliding knot and then continue with chains that we will close at the first point of the chain, forming a circle.
VUELTA Nº 1
Iniciaremos con el hilo color ocre. Comenzamos realizando un nudo corredizo para luego continuar con cadenas que cerraremos en el primer punto de la cadena, formando un circulo.
LAP Nº 2
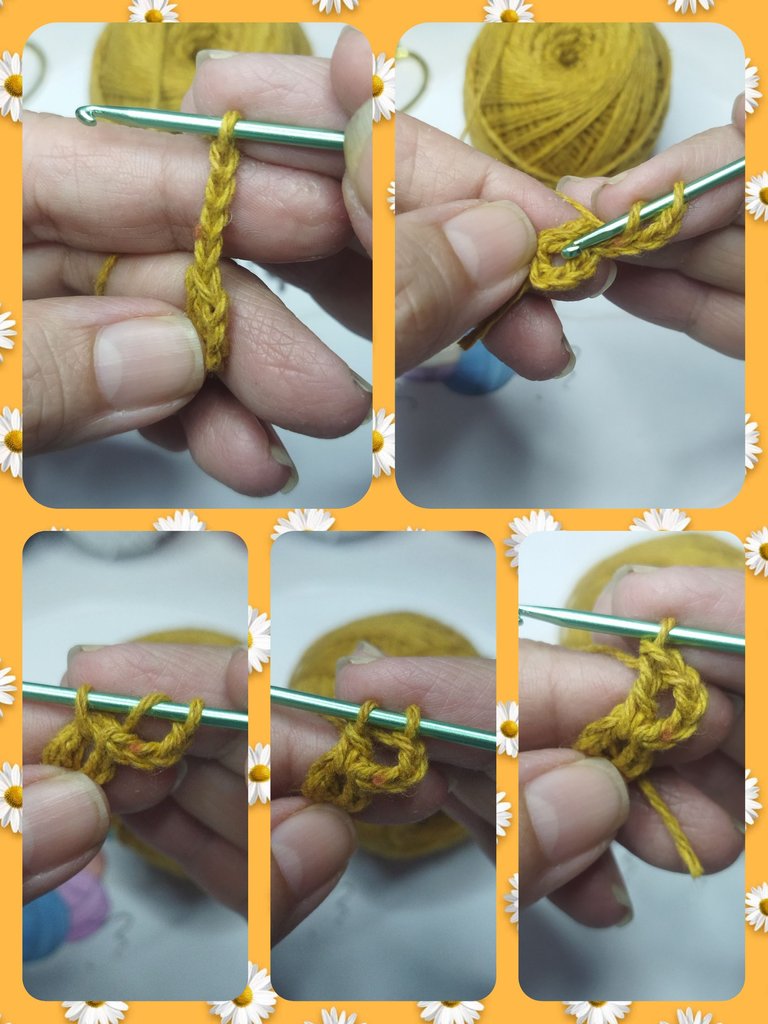
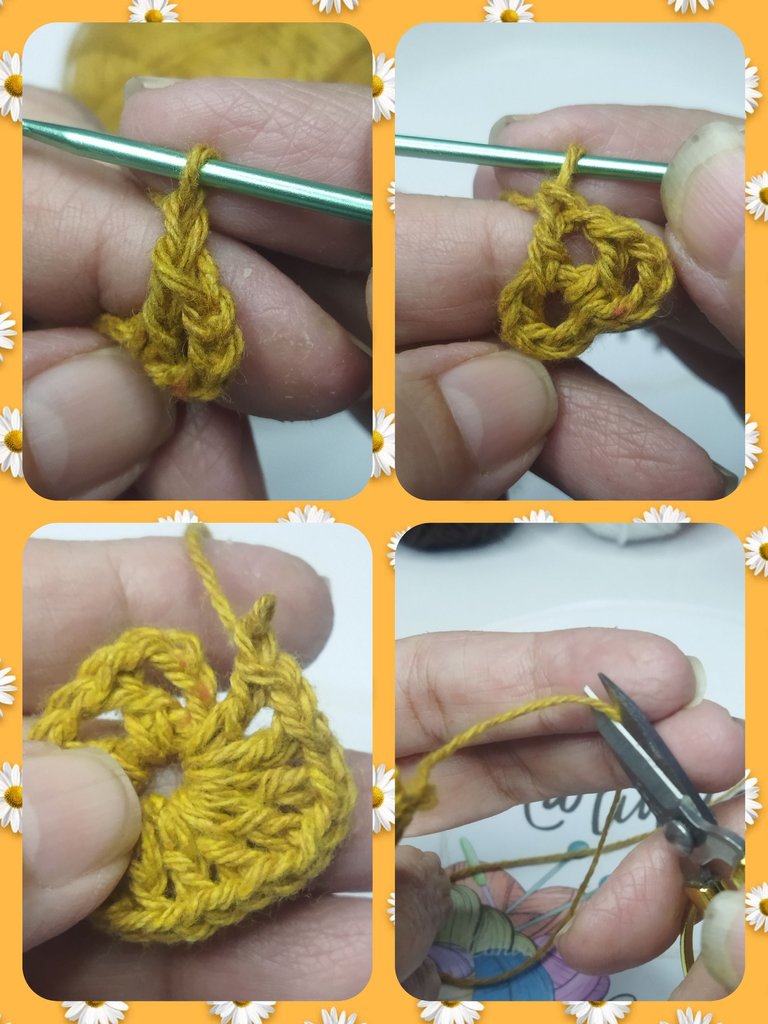
We make 3 chains to replace the first double crochet and a separating chain. Then inside the circle we will make 11 double crochets, interspersing 1 chain stitch between each double crochet. At the end of the round we will have 12 double crochets.
Without closing the loop, we cut the thread leaving about 5 cm.
VUELTA Nº 2
Realizamos 3 cadenas para sustituir el primer punto alto y una cadena de separación. Luego dentro del circulo realizaremos 11 puntos altos intercalando 1 punto cadena entre cada punto alto. Al finalizar la vuelta tendremos 12 puntos altos.
Sin cerrar la vuelta, cortamos el hilo dejando unos 5 cm.
LAP Nº 3
For the 3rd round we are going to change to the white thread, with this we are going to close the previous round by introducing the needle into the third starting chain and making a slip stitch. In this way we close without noticing the change of thread.
We begin the 3rd round by making a slipped stitch to bring the beginning of the fabric to the separation point between the double crochets. There we make 3 chains replacing the first double crochet, followed by a double crochet.
VUELTA Nº 3
Para la 3 vuelta vamos a hacer cambio al hilo blanco, con éste vamos a cerrar la vuelta anterior introduciendo la aguja en la tercera cadena de inicio y hacemos un punto deslizado. De este modo cerramos sin que se note el cambio de hilo.
Iniciamos la 3 vuelta realizando un punto deslizado para llevar el incio del tejido al punto de separación entre los puntos altos. Allí hacemos 3 cadenas en sustitución del primer punto alto, seguido de un punto alto.
Then we make a separating chain stitch and continue the entire round by making two double crochets in each separating point of the previous round followed by a chain. At the end of the round we close with a slipped stitch.
Luego realizamos un punto cadena de separación y continuamos toda la vuelta realizando dos puntos altos en cada punto de separación de la vuelta anterior seguidos de una cadena. Al finalizar la vuelta cerramos con un punto deslizado.
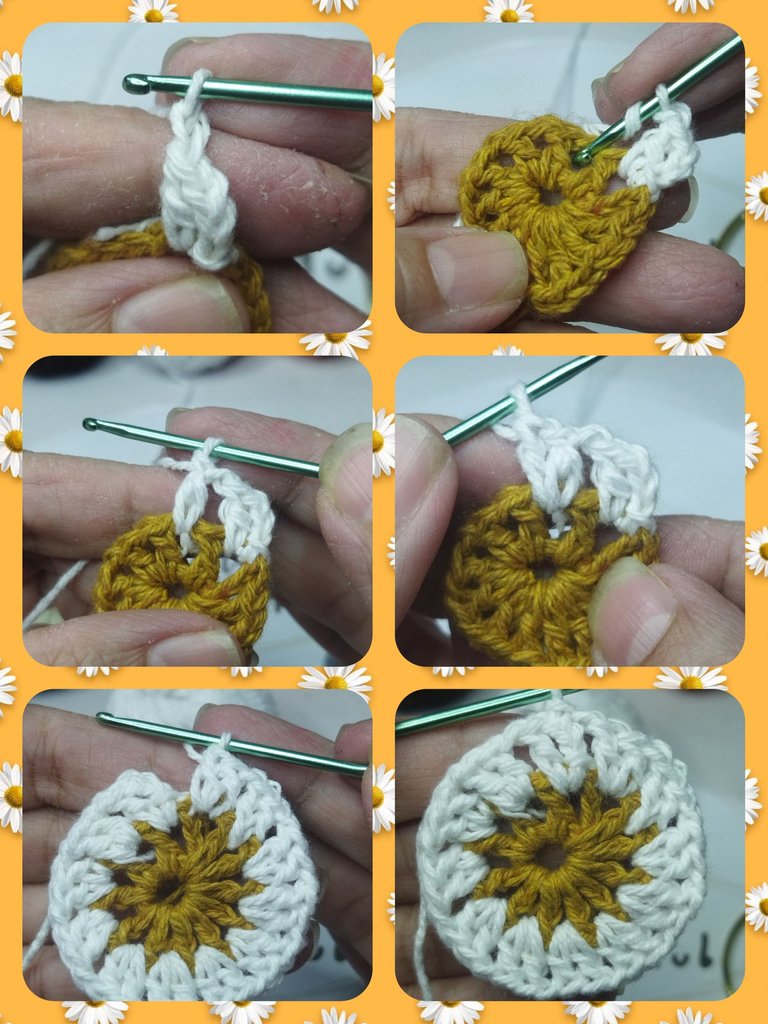
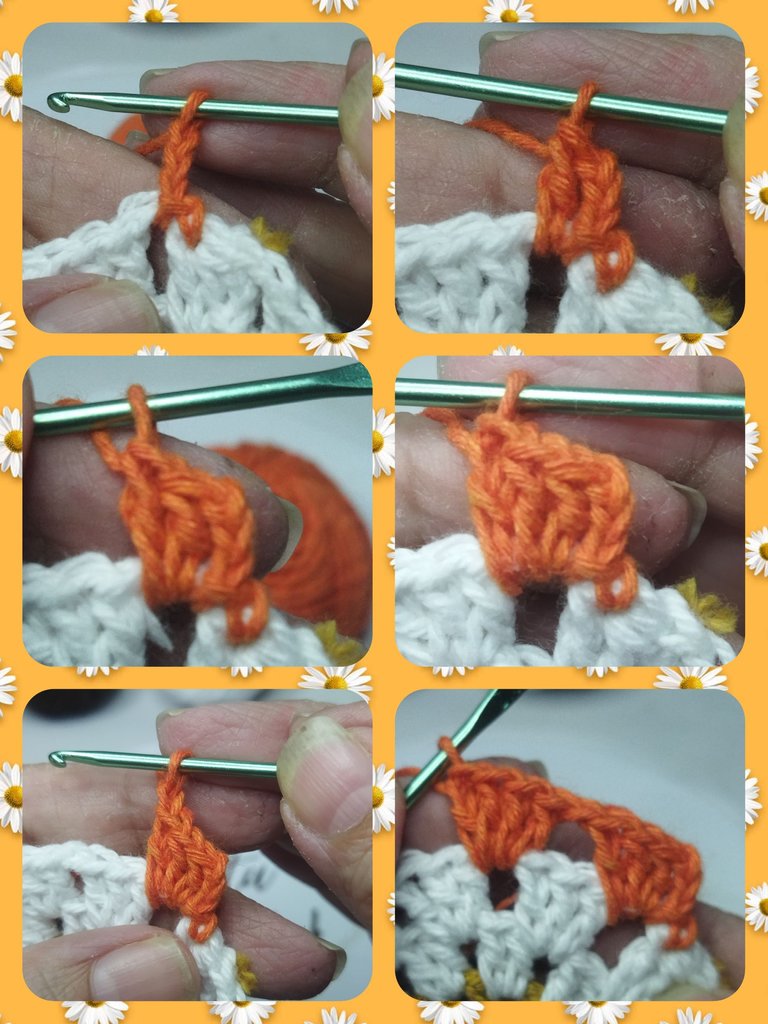
LAP Nº 4
We make 3 slipped stitches over the previous high stitches until we reach the separation point where we will start the 4th. lap.
We lift 3 chain stitches and 2 double crochets followed by a chain stitch. We continue in the next space separating the previous round with 3 double crochets and 1 chain stitch and so on until finishing the round.
Without closing the loop, we cut the thread to make the color change, leaving approximately 5 cm.
VUELTA Nº 4
Realizamos 3 puntos deslizados sobre los puntos altos anteriores hasta llegar al punto de separación donde iniciaremos la 4ta. vuelta.
Levantamos 3 puntos cadenas y 2 puntos altos seguidos de un punto cadena. Continuamos en el siguiente espacio de separación de la vuelta anterior con 3 puntos altos y 1 punto cadena y así hasta terminar la vuelta.
Sin cerrar la vuelta, cortamos el hilo para hacer el cambio de color, dejando 5 cm aproximadamente.
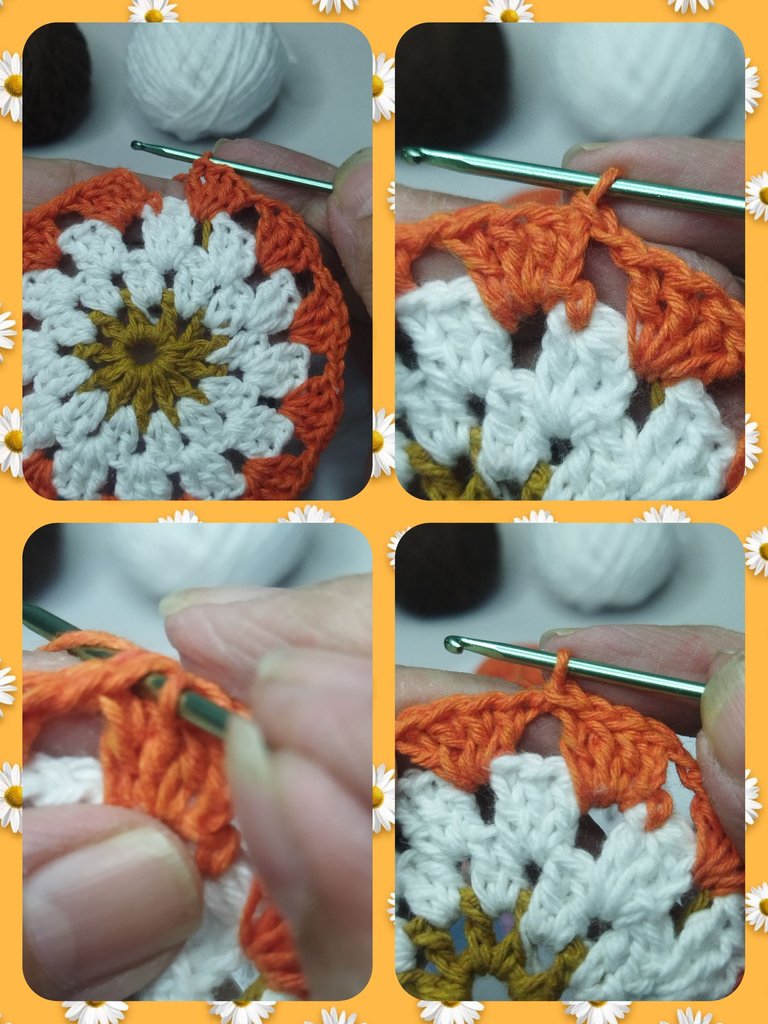
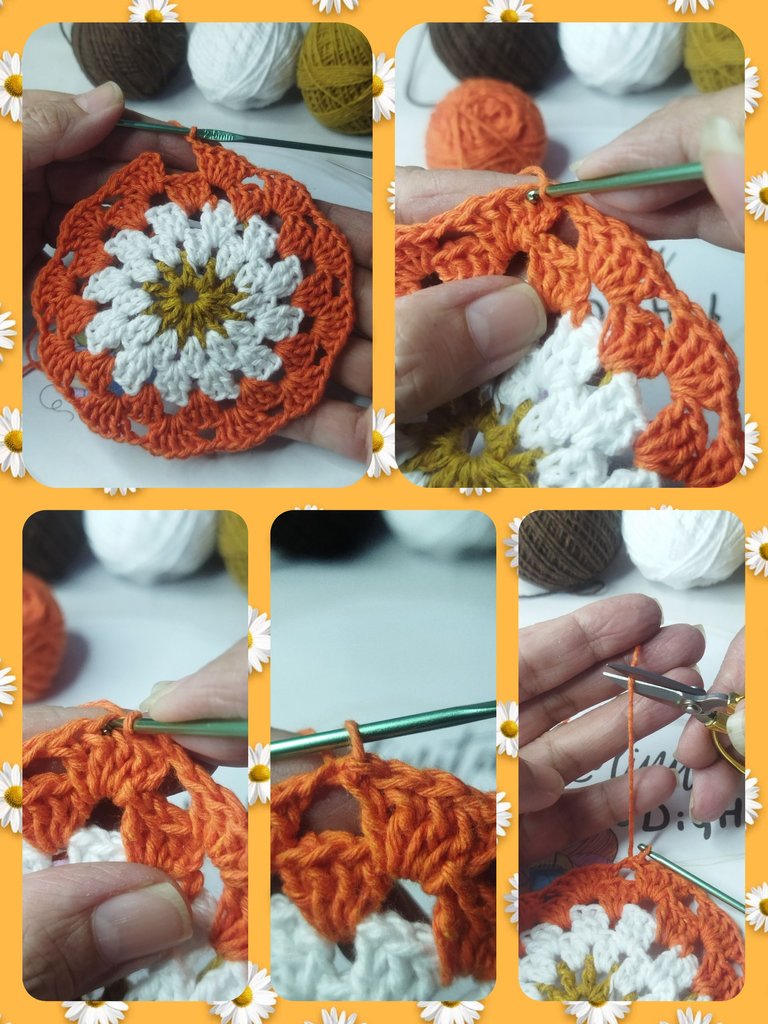
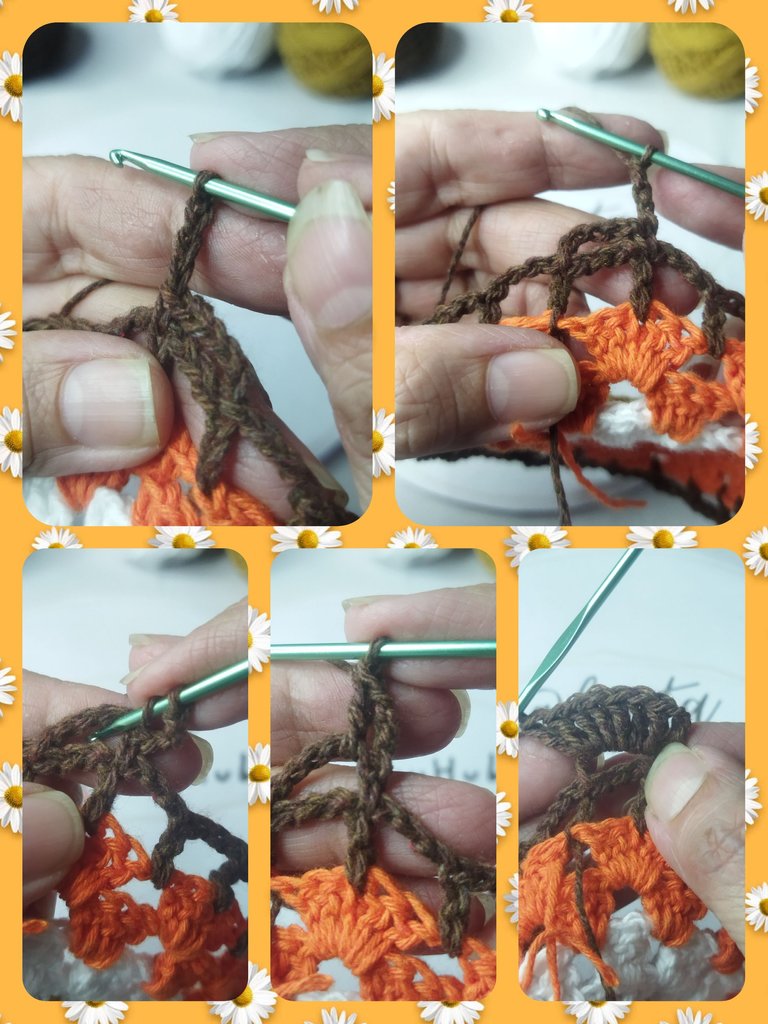
LAP Nº 5
We change to the orange thread. With this we close the previous round with a slipped stitch and continue knitting by making 4 slipped stitches over the high stitches of the previous row until we reach the space between the high stitches.
VUELTA Nº 5
Cambiamos al hilo naranja. Con éste cerramos la vuelta anterior con un punto deslizado y continuamos el tejido realizando 4 puntos deslizados sobre los puntos altos de la vuelta anterior hasta llegar al espacio entre los puntos altos.
We pick up 3 chains and form 3 double crochets for a total of 4 double crochets, followed by a separating chain. We make 5 double crochets in each space of the previous round until the round is completed.
We close with a slipped stitch in the 3rd starting chain.
Levantamos 3 cadenas y formamos 3 puntos altos para un total de 4 puntos altos, seguidos de una cadena de separación. Realizamos 5 puntos altos en cada espacio de la vuelta anterior hasta culminar la vuelta.
Cerramos con un punto deslizado en la 3 cadena de inicio.
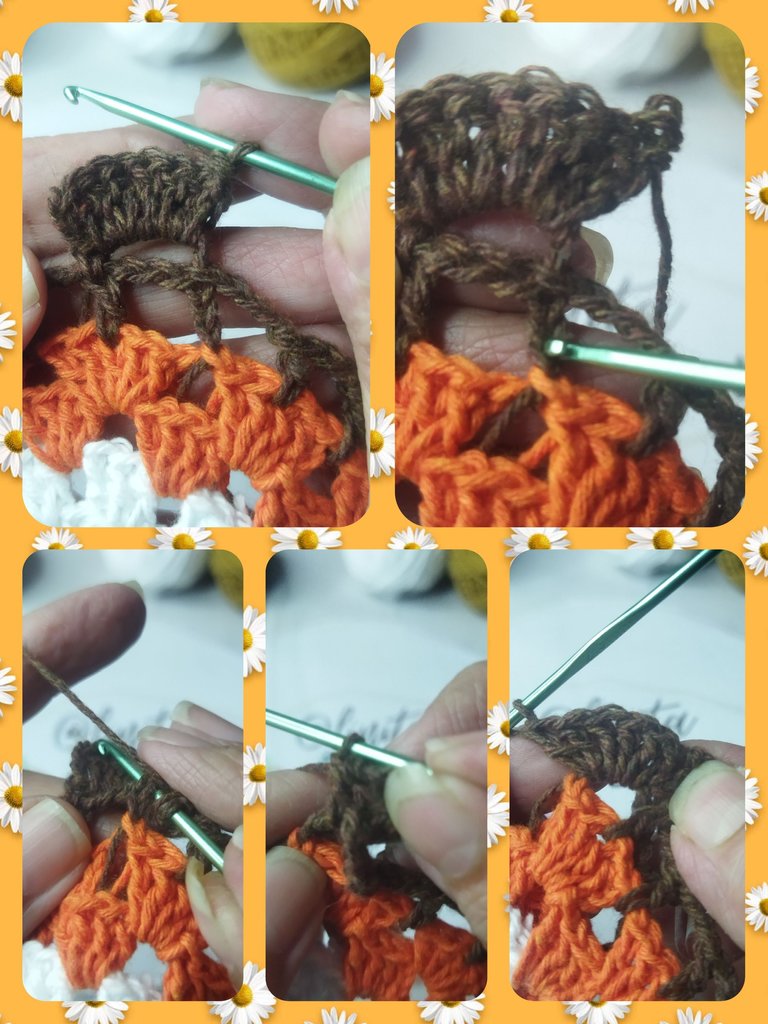
LAP Nº 6
We make 5 slipped stitches until we reach the separation point of the previous round. We lift 3 chains and 4 double crochets followed by a chain stitch. We repeat at the next separation point until completing the round. We close with a slipped stitch and make 4 more slipped stitches in each double crochet of the previous round until we reach the separation point. We cut the thread.
VUELTA Nº 6
Realizamos 5 puntos deslizados hasta llegar al punto de separación de la vuelta anterior. Levantamos 3 cadenas y 4 puntos altos seguidos de un punto cadena. Repetimos en el siguiente punto de separación hasta culminar la vuelta. Cerramos con un punto deslizado y realizamos 4 puntos deslizados más en cada punto alto de la vuelta anterior hasta llegar al punto de separación. Cortamos el hilo.
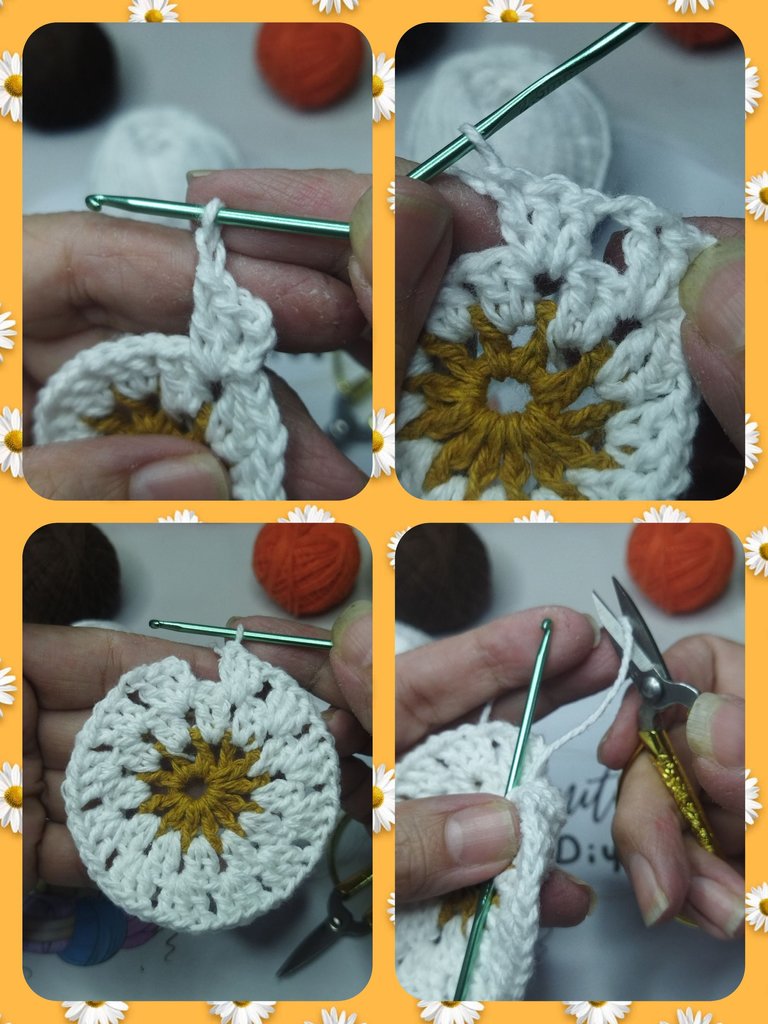
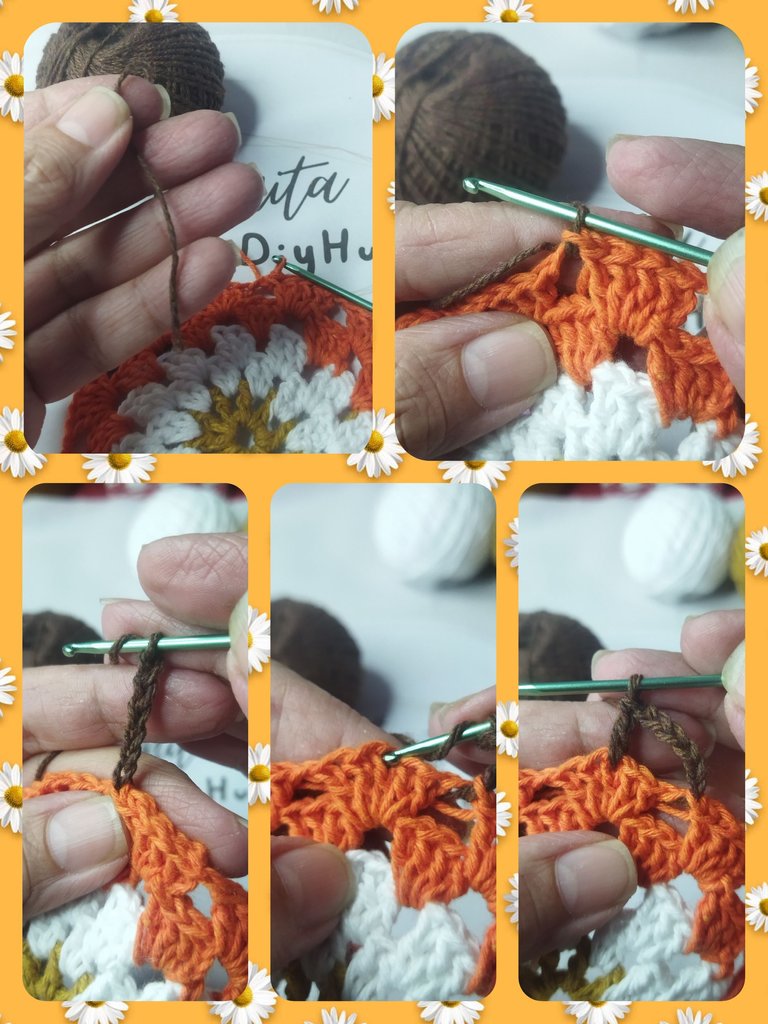
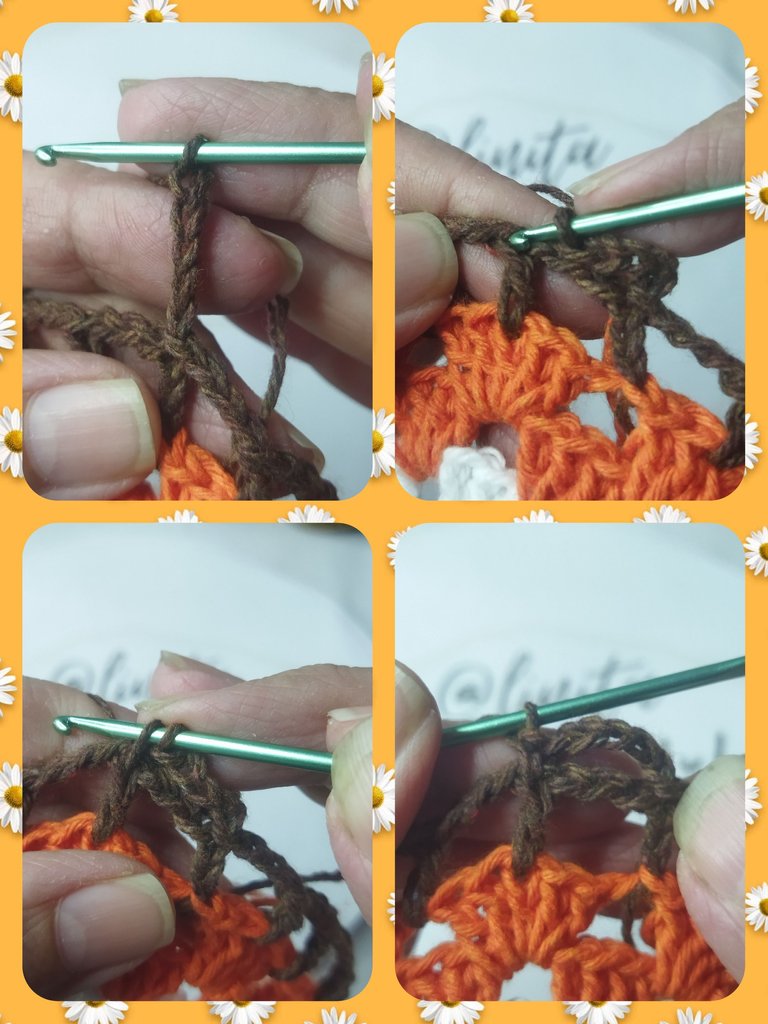
LAP Nº 7
We change to the brown thread and lift chains. We insert the needle into the third double crochet of the previous round and make a double crochet, we continue with 3 chains and then 1 double crochet in the next separation stitch and so on until completing the rounds. We close with a slipped stitch in the third chain from the beginning.
VUELTA Nº 7
Hacemos cambio al hilo marrón y levantamos cadenas. Insertamos la aguja en el tercer punto alto de la vuelta anterior y realizamos un punto alto, seguimos con 3 cadenas y luego 1 punto alto en el siguiente punto de separación y así sucesivamente hasta culminar las vuelta. Cerramos con un punto deslizado en la tercera cadena del inicio.
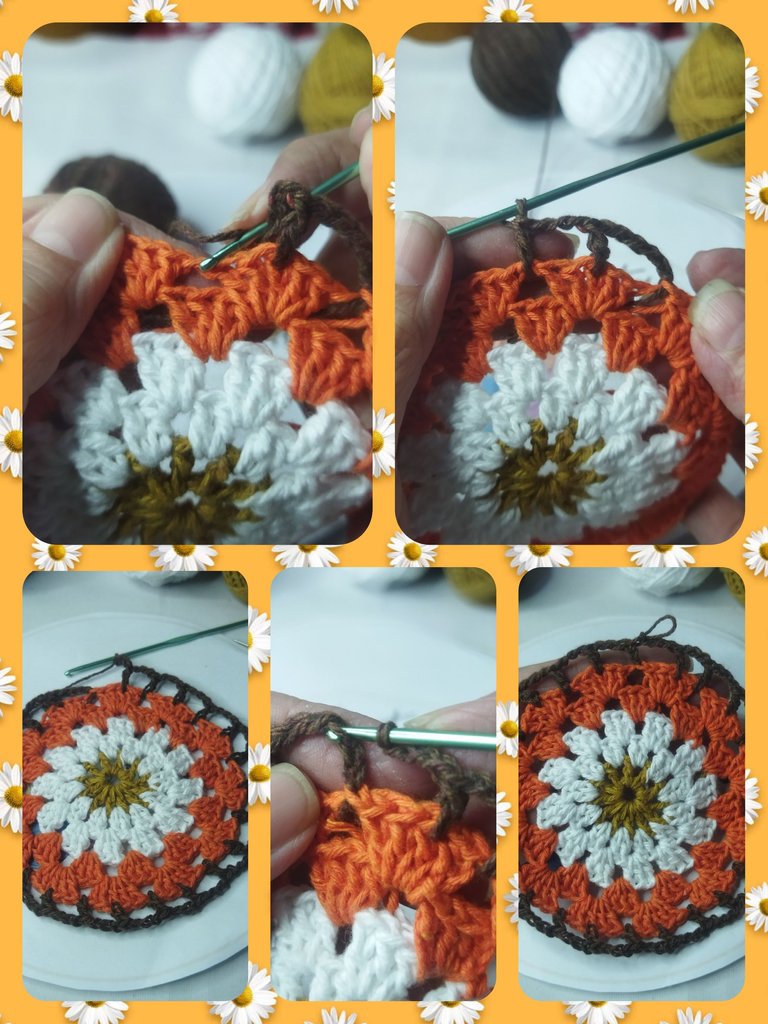
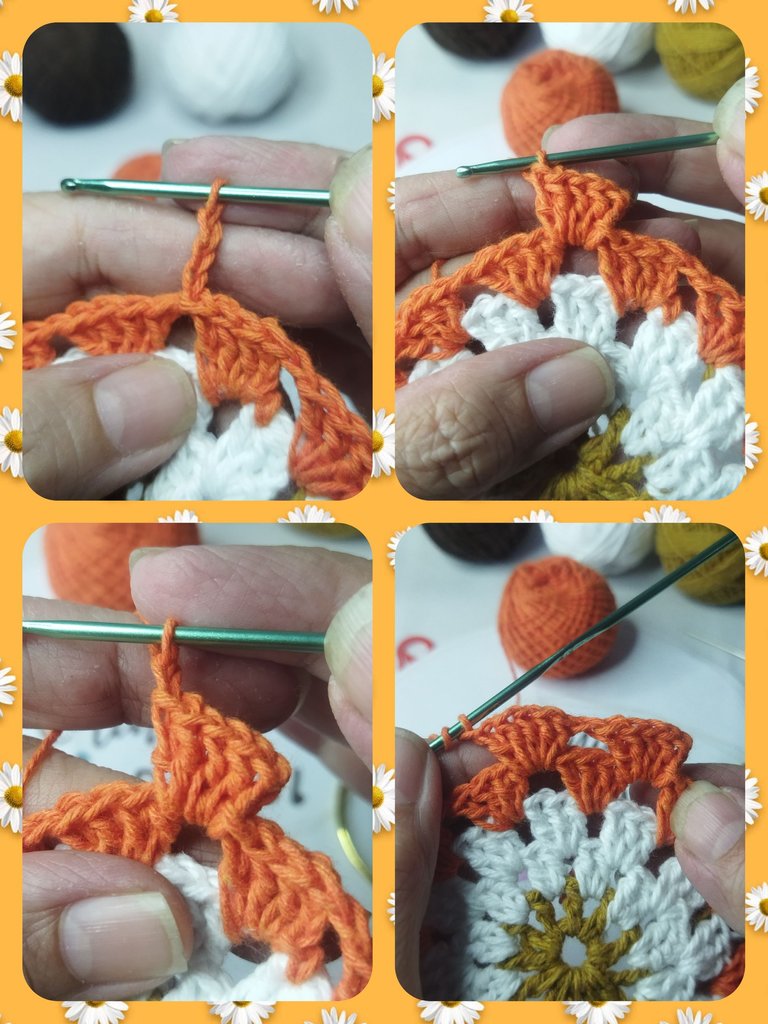
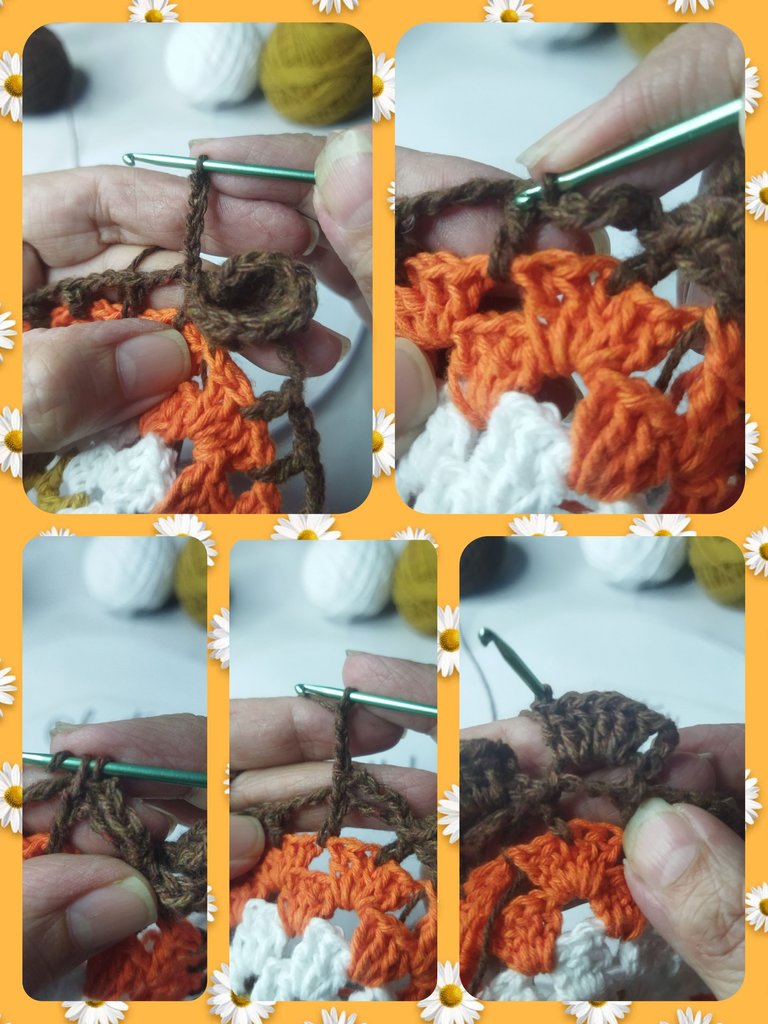
LAP Nº 8
We start this round with 5 chain stitches that we will insert in the next double crochet and make a single crochet.
VUELTA Nº 8
Iniciamos esta vuelta con 5 puntos cadenas que insertaremos en el siguiente punto alto y realizamos un punto bajo.
Then we make 3 chain stitches and turn the fabric. Inside the arch formed with the 5 chains we knit 6 double crochets for a total of 7 stitches with the 3 initial chains.
Luego realizamos 3 puntos cadenas y giramos el tejido. Dentro del arco formado con las 5 cadenas tejemos 6 puntos altos para un total de 7 puntos con las 3 cadenas inicial.
Here we must pay attention because now we are going to crochet double crochets in the double crochet found in the previous row.
Aqui debemos prestar atención porque ahora vamos a tejer puntos altos en el punto alto que se encuentra en la vuelta anterior.
Once the 6 double crochets have been knitted, we will close with a slipped stitch in the double crochet that is below the 7 double crochets that we made at the beginning. Giving a very nice shape to the fabric.
Una vez tejidos los 6 puntos altos vamos a cerrar con un punto deslizado en el punto alto que se encuentra debajo de los 7 puntos alto que realizamos al inicio. Dando un forma muy linda al tejido.
We repeat the process in each space of the previous round until the round is completed and at the end we close with a slipped stitch in the first double crochet of the previous round. We cut the thread.
Repetimos el proceso en cada espacio de la vuelta anterior hasta culminar la vuelta y al finalizar cerramos con un punto deslizado en el primer punto alto de la vuelta anterior. Cortamos el hilo.
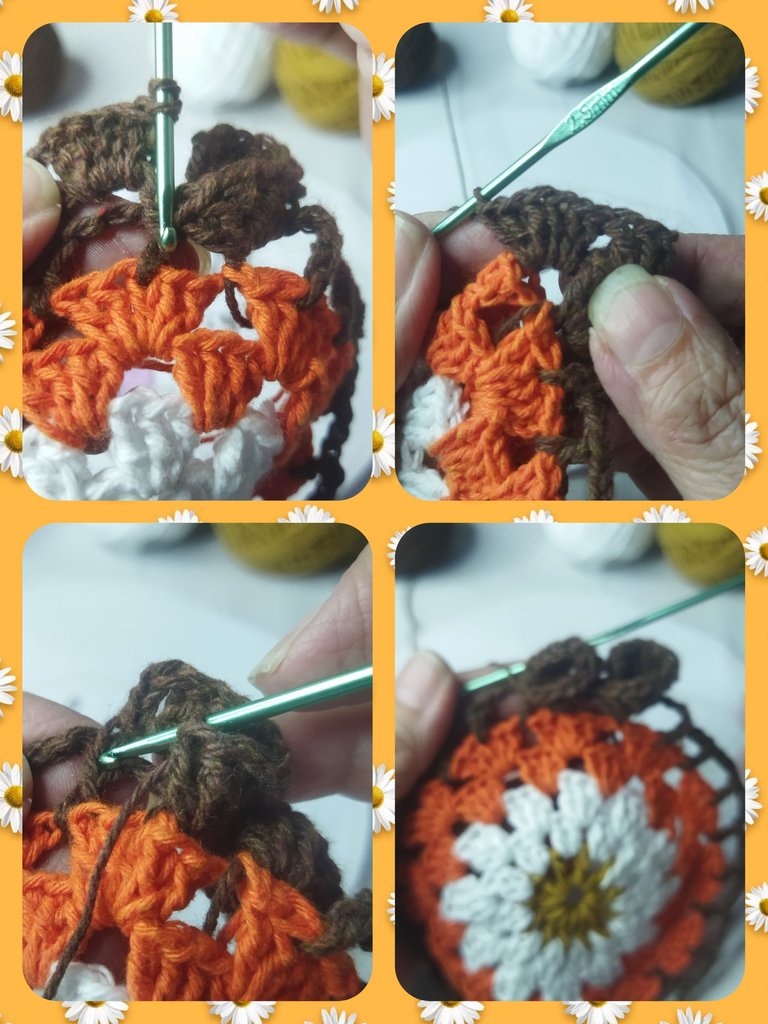

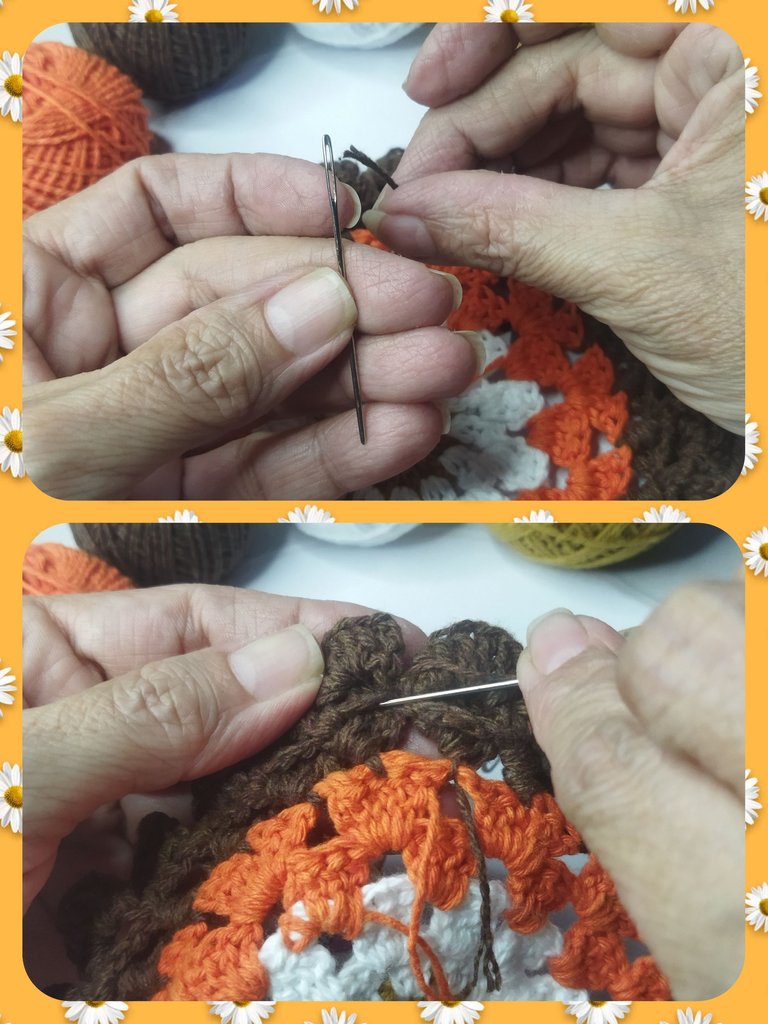
To finish, we hide the excess threads with the wool needle inside the fabric itself and cut the remaining thread.
Para finalizar escondemos los hilos sobrantes con la aguja lanera por dentro del mismo tejido y cortamos el restante de hilo.
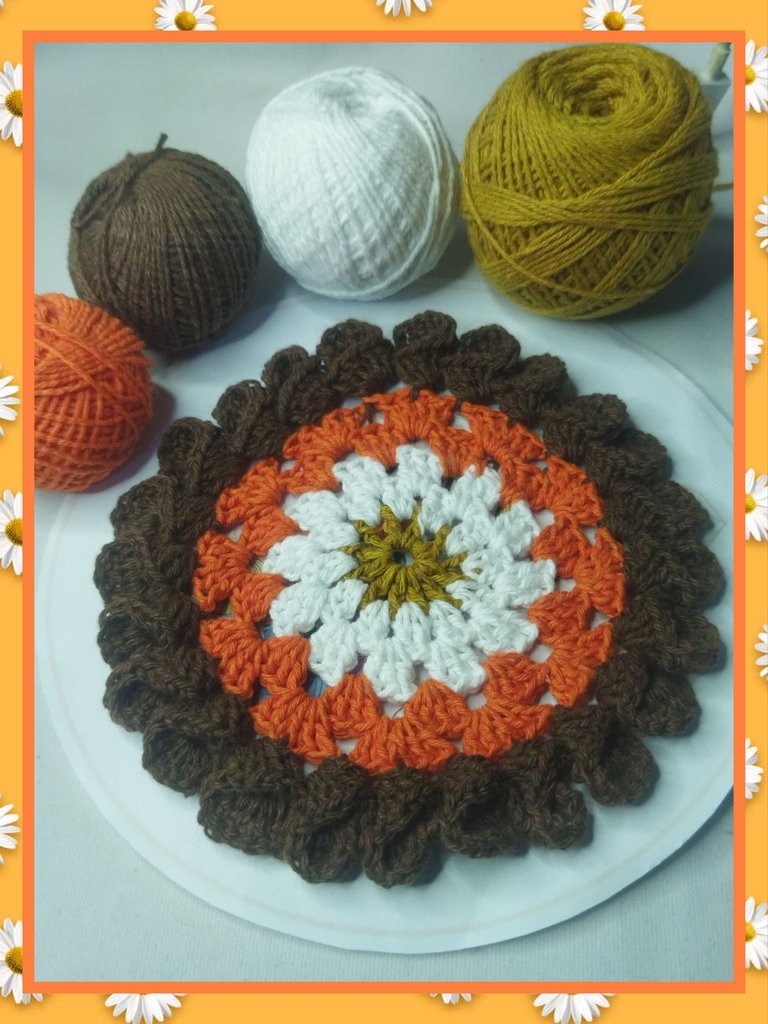
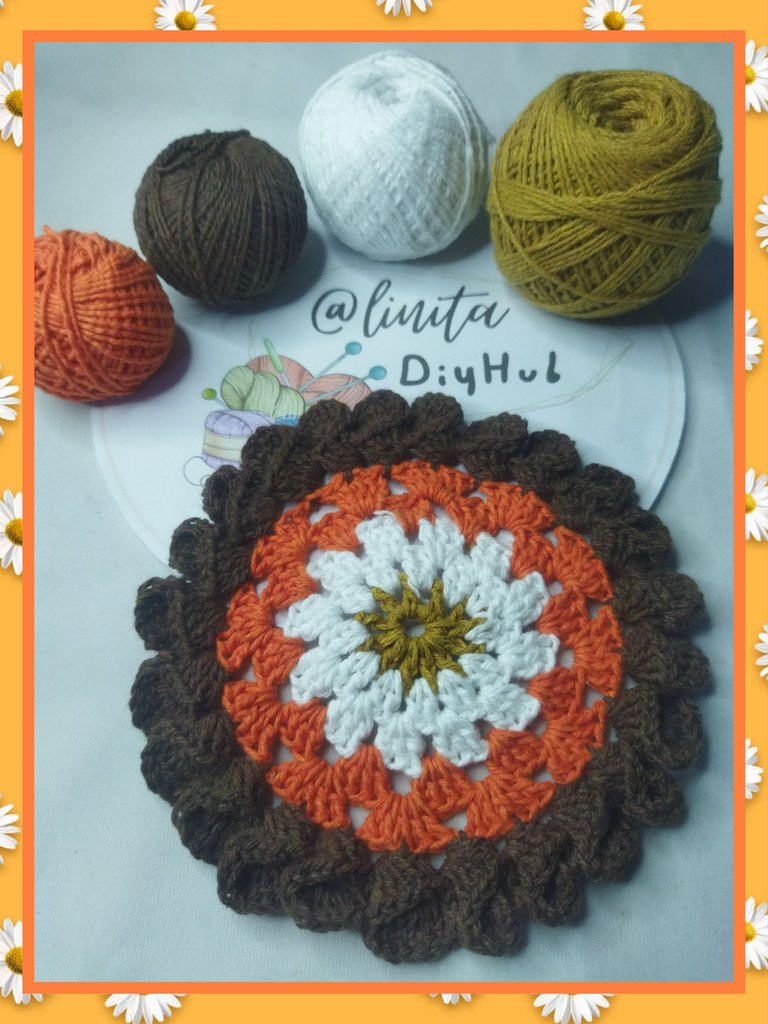
PROJECT COMPLETED
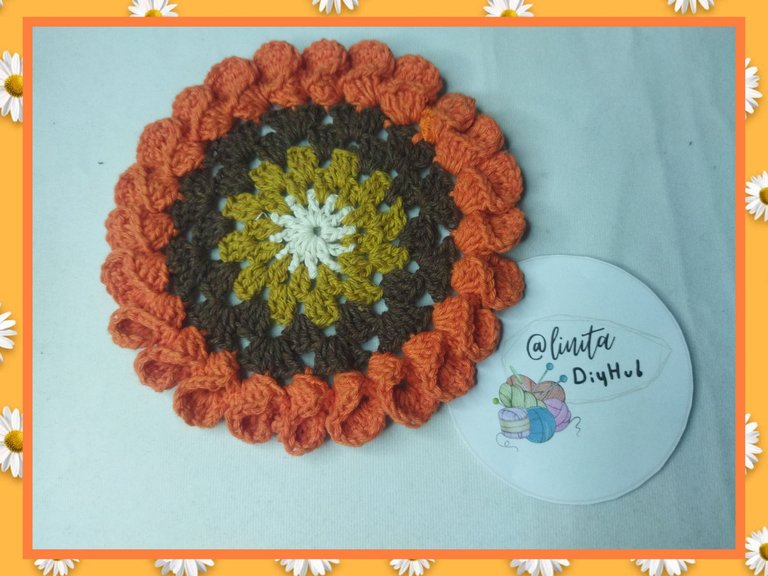
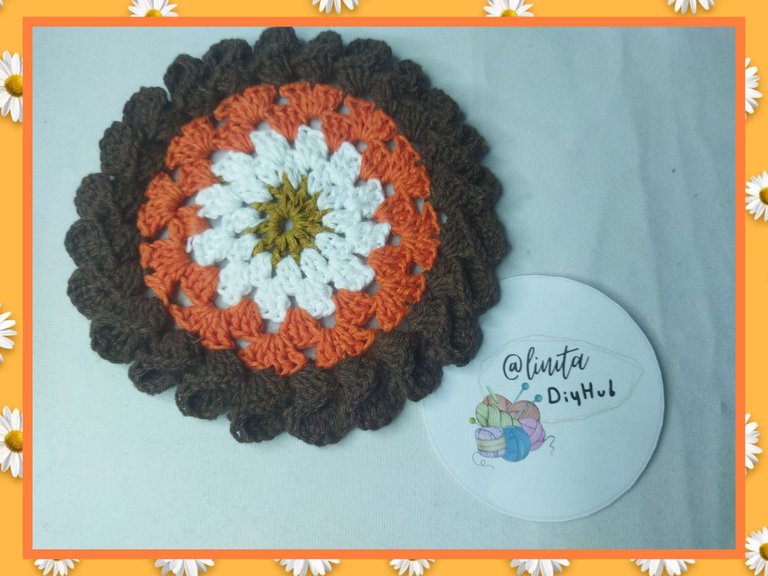
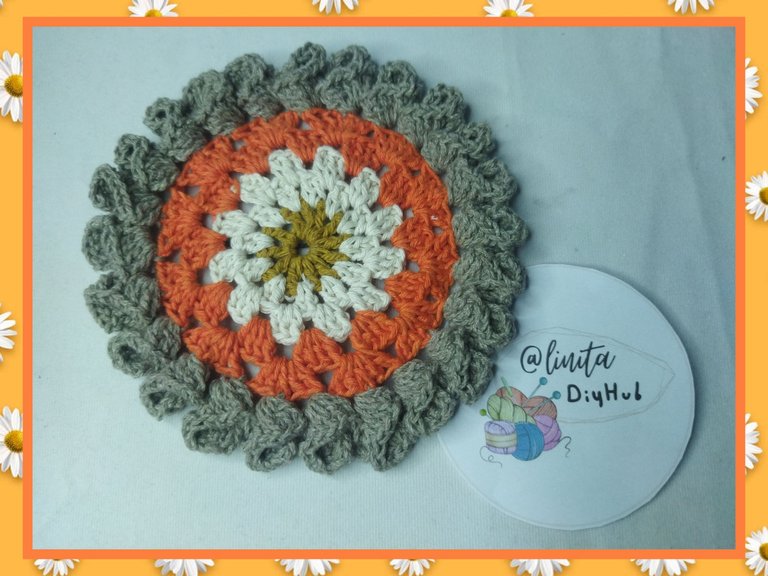
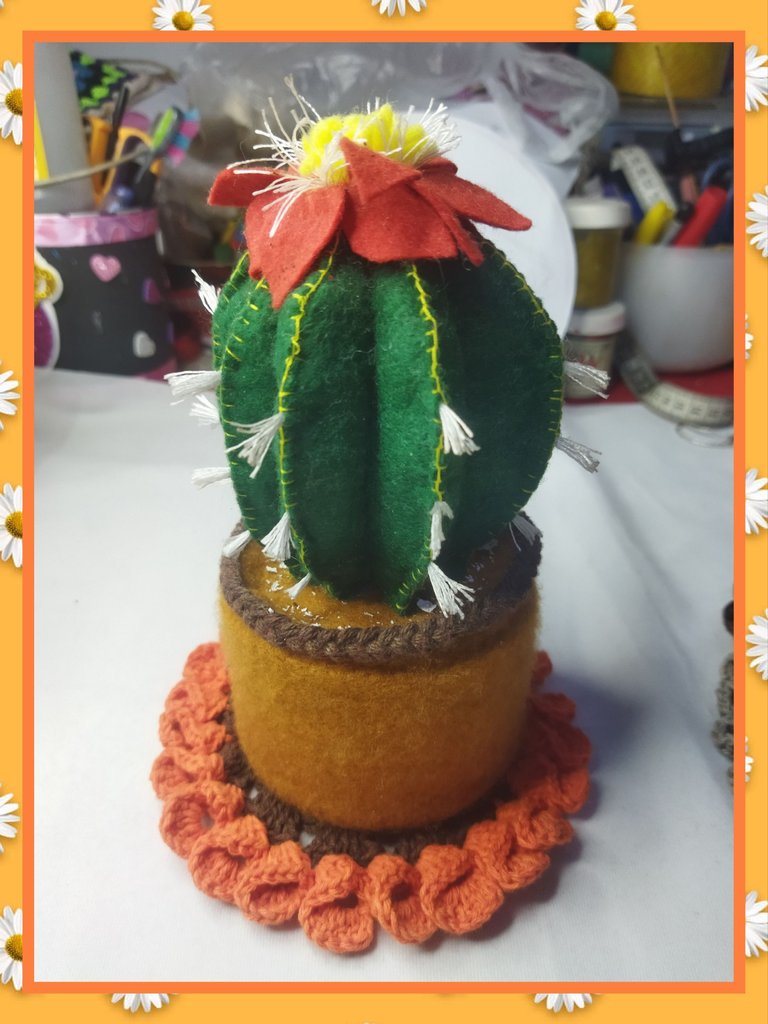
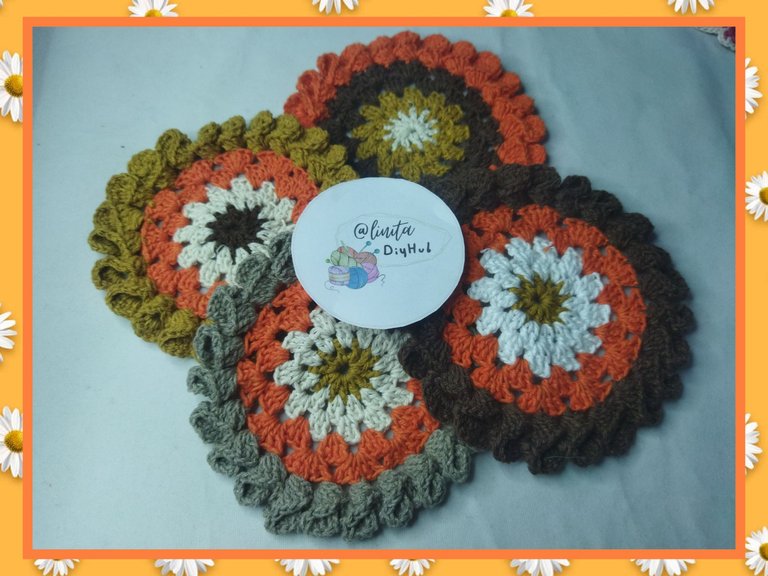
These mats measure 15 cm in diameter. If you want to make them bigger, you just have to increase each round and combine the colors as you like. I made this set of 4 rugs with the combination of the 4 colors to highlight the space more. I hope you like it. See you next time.
PROYECTO FINALIZADO
Estos tapetes tienen una medida de 15 cm de diámetro. Si quieres hacerlos más grandes sólo tienes que ir realizando aumento en cada vuelta y hacer la combinación de los colores como más te guste. Este set de 4 tapetes los realicé con la combinación de los 4 colores para resaltar más el espacio. Espero les guste. Nos vemos en la próxima.
Hola @linita me gustó la combinación de colores que usaste, esta es una idea genial para posa vasos o para colocar las tazas de café y que no se moje la mesa. Quedaron hermosos 👍🏽
Si, como posavasos es genial también. Todas las ideas que se nos puedan ocurrir, si los ponemos doble nos servirían también de agarraollas, por su tamaño sería fantástico. Gracias por aportar tu idea. Saludos.
Hermoso trabajo.
Siempre admiro a las personas que se dedican a realizar este tipo de manualidades.
Saludos
Muchas gracias, me alegro que te haya gustado. Saludos.
Hola te han quedado hermoso, me encantó el tejido y los colores muy lindos. Gracias por compartir cariño.
Gracias amiga querida. Saludos.
There are a lot of ideas to decorate our home and what you did is one of them. Woven mats look great and it makes our home more beautiful. Well done!
Thanks You ☺️☺️
Congratulations @linita! You have completed the following achievement on the Hive blockchain And have been rewarded with New badge(s)
Your next target is to reach 50000 upvotes.
You can view your badges on your board and compare yourself to others in the Ranking
If you no longer want to receive notifications, reply to this comment with the word
STOP