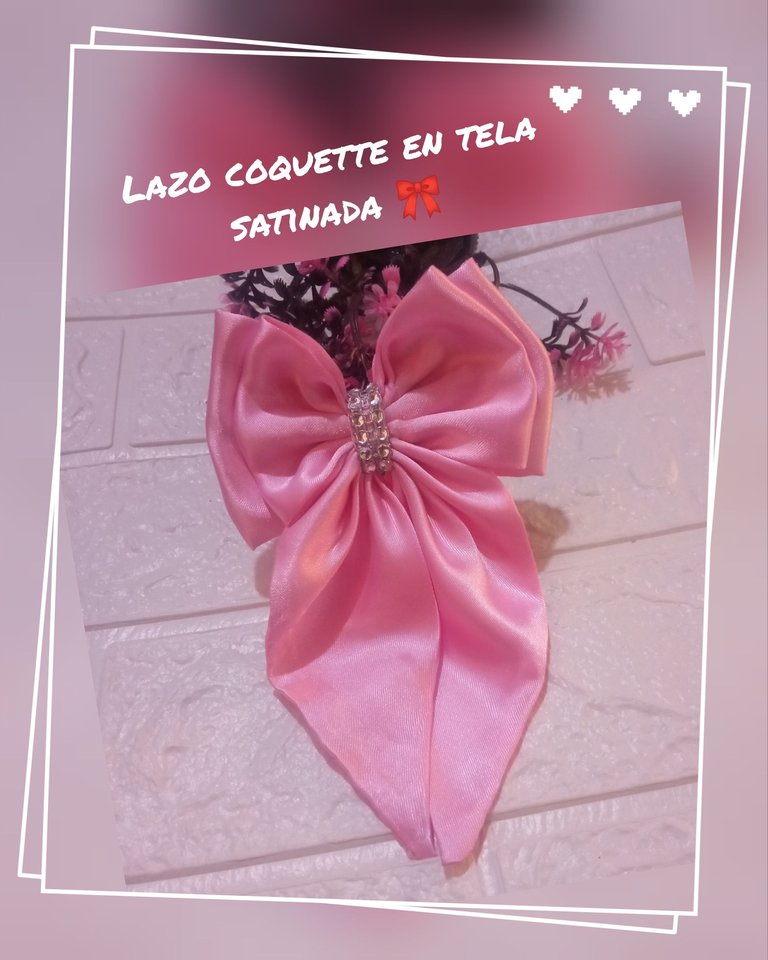
Hola, hola comunidad de #hive y comunidad de #Diyhub deseo se encuentren todos bien, yo por acá con ustedes para compartirles el tutorial o paso a paso para realizar un bello y hermoso lazo 🎀 coquette para niñas en tela satinada, un lazo bellísimo muy delicado , los invito a visitar mi blog y ver hasta final el tutorial.
Hello, hello #hive community and #Diyhub community I wish you all well, I am here with you to share with you the tutorial or step by step to make a beautiful and beautiful bow 🎀 coquette for girls in satin fabric, a beautiful and very delicate bow, I invite you to visit my blog and see until the end of the tutorial.
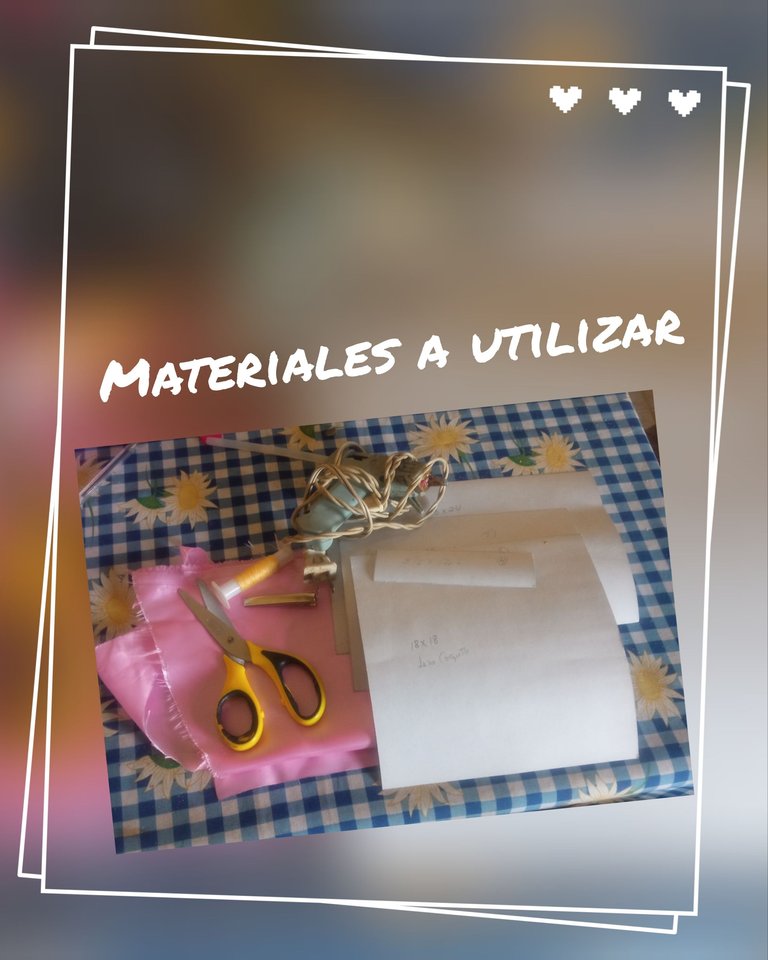
Materiales a utilizar
☑️ Tela satinada en el color de su preferencia, yo estoy utilizando color rosado.
☑️ Patrones en cartón de las medidas.
☑️ Tijeras.
☑️ Aguja e hilo de coser.
☑️ Yesquero o encendedor.
☑️ 5 cm de falso strack.
☑️ Pinza tipo caiman de metal.
☑️ Pistola de silicón.
☑️ Barra de silicón.
☑️ 1 bolígrafo o lápiz para marcar.
Materials to use
☑️ Satin fabric in the color of your choice, I am using pink.
☑️ Patterns on cardboard of the measurements.
☑️ Scissors.
☑️ Sewing needle and thread.
☑️ Tinder or lighter.
☑️ 5 cm of fake strack.
☑️ Metal alligator clip.
☑️ Silicone gun.
☑️ Silicone stick.
☑️ 1 marking pen or pencil.
Tutorial o paso a paso
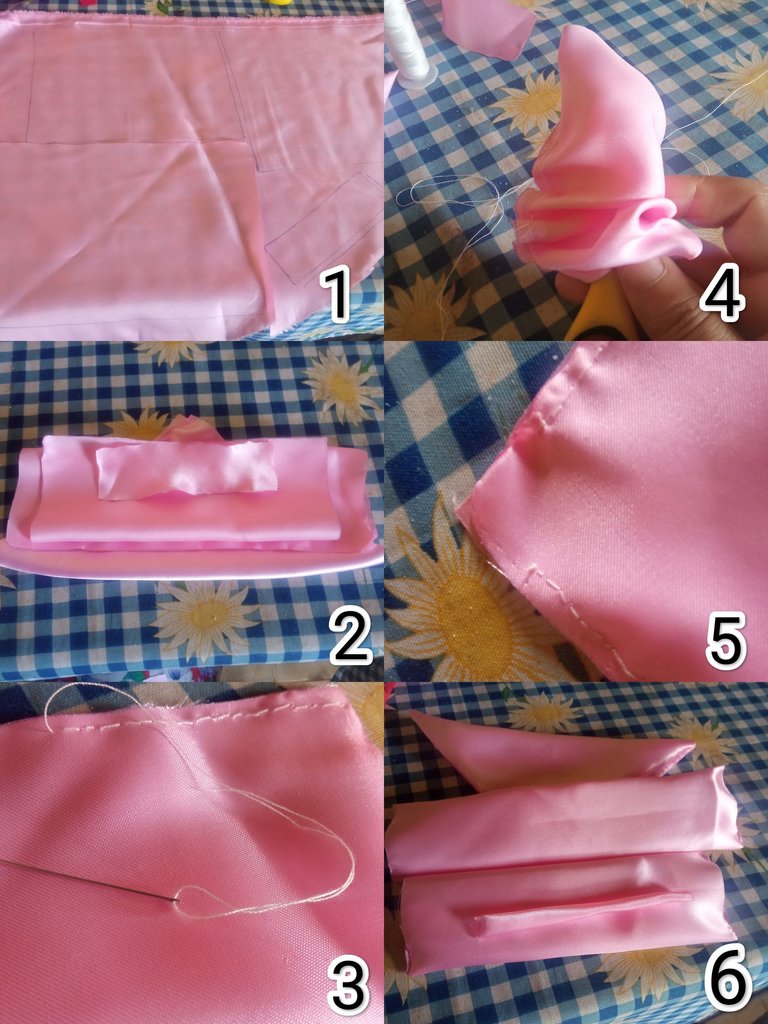
Comienzo marcando con bolígrafo el patrón en la tela satinada ,luego corto las piezas y con el Yesquero o encendedor quemo todas las orillas para evitar que se deshilachen , luego coso a mana dando pequeñas puntadas las piezas que van a formar la parte de arriba del lazo, luego las volteo al derechos ayudándome con las tijeras, luego coso la parte que complementa el lazo igual volteo al derecho y aquí debo de sacar las puntas en las esquinas ( 1 al 6)
Tutorial or step by step
I start marking with a pen the pattern on the satin fabric, then I cut the pieces and with the Yesquero or lighter I burn all the edges to avoid fraying, then I sew by hand giving small stitches the pieces that will form the top of the loop, then I flip them to the right helping me with the scissors, then I sew the part that complements the loop I flip it to the right and here I must remove the tips in the corners (1 to 6).
Luego plancho todas las piezas, luego marco la mitad de los rectangulares y doblo las dos piezas el lado derecho hacia el izquierdo y el izquierdo hacia el derecho, que quede como un centímetro encima del Primer doblez, luego coloco una encima de la otra y doy varias puntadas y halo el hilo para darle forma al lazo ( 7 al 12).
Then I iron all the pieces, then I mark the middle of the rectangles and fold the two pieces right side to the left and left side to the right, so that it is about one centimeter above the first fold, then I place one on top of the other and give several stitches and pull the thread to shape the loop (7 to 12).
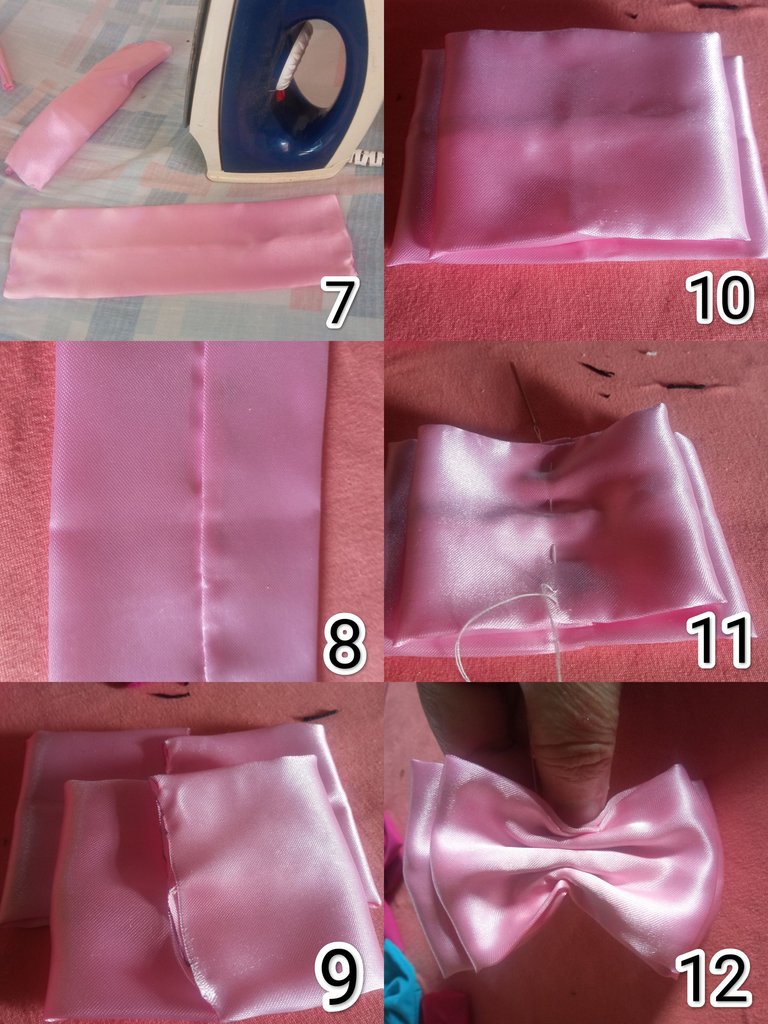
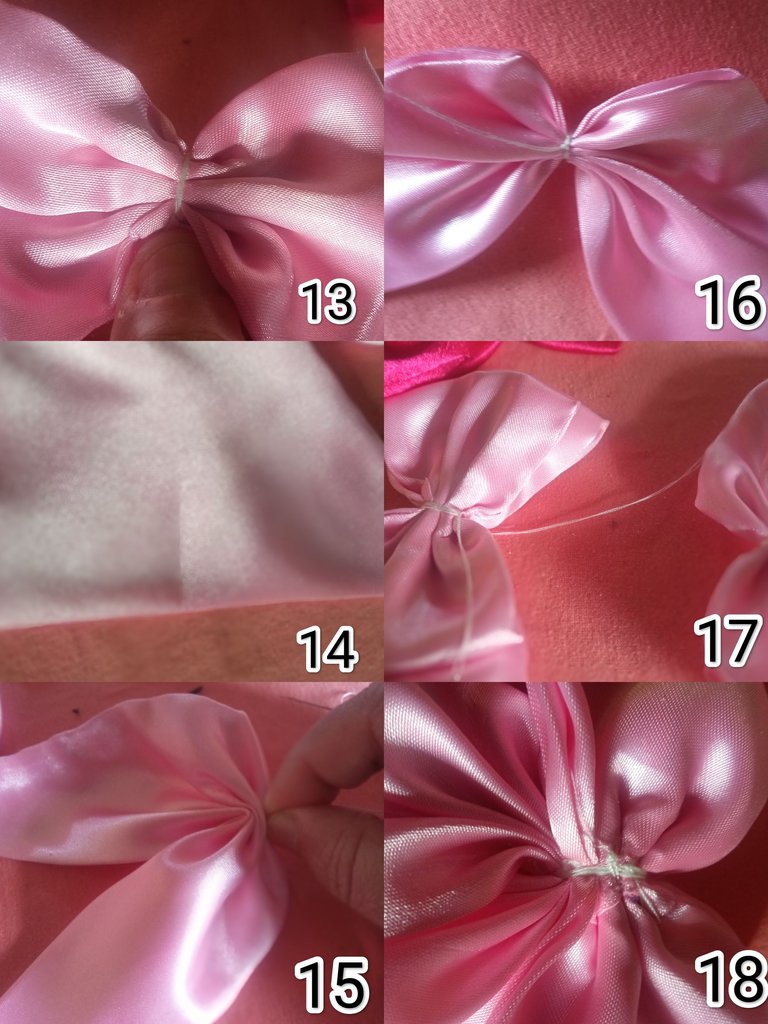
Luego doy varias vueltas al hilo sobre el lazo y cierro bien, luego marco el centro de la otra parte del lazo , doy varias puntadas halo el hilo y doy varias vueltas al hilo ,realizo varias puntadas en la parte de atrás y uno las dos piezas con tres puntadas y repito el paso de dar varias vueltas al hilo ,aseguro bien ( 13 al 18).
Then I make several turns of the thread on the loop and close it well, then I mark the center of the other part of the loop, I make several stitches, pull the thread and make several turns of the thread, I make several stitches on the back and join the two pieces with three stitches and repeat the step of making several turns of the thread, I secure it well (13 to 18).
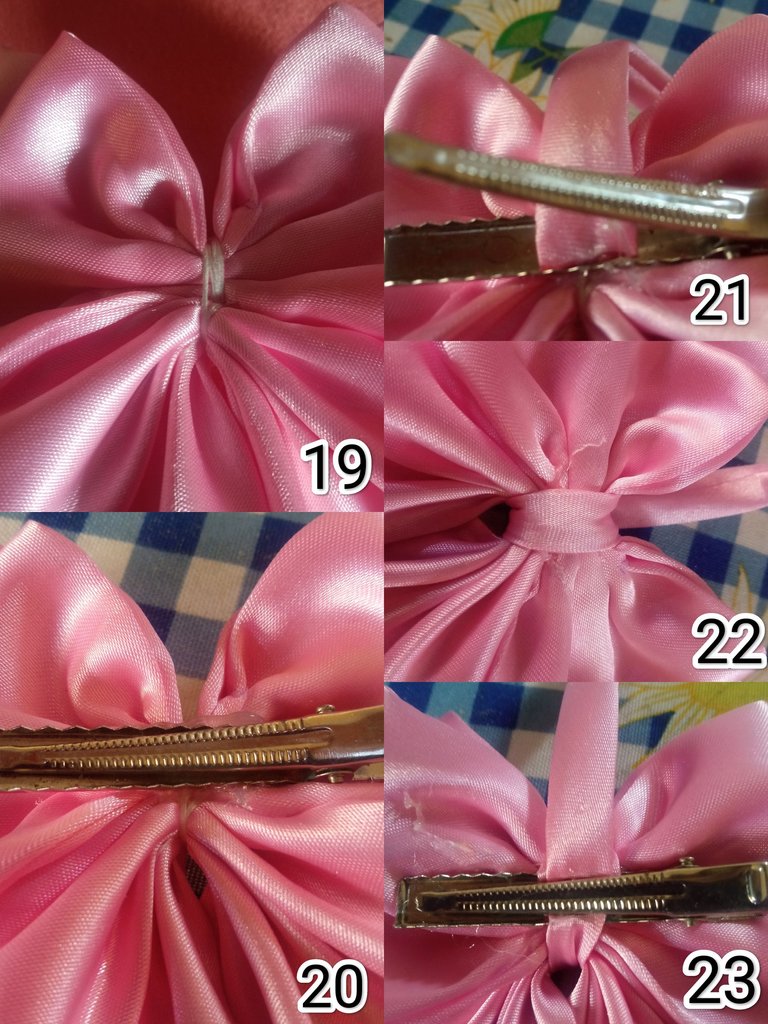
Luego coloco silicón caliente en la parte de atrás del lazo y coloco la pinza ,luego coloco la pieza de tela pequeña en la pinza con silicón , lo paso por la parte de adelante y pego , corto lo sobrante de la pieza, luego coloco un pedacito de falso strack en la pieza delgada y así doy por terminado este lindo proyecto (19 al 23).
Then I place hot silicone on the back of the loop and place the clamp, then I place the small piece of fabric on the clamp with silicone, pass it through the front and glue, cut the excess of the piece, then I place a piece of fake strack on the thin piece and thus I finish this nice project (19 to 23).
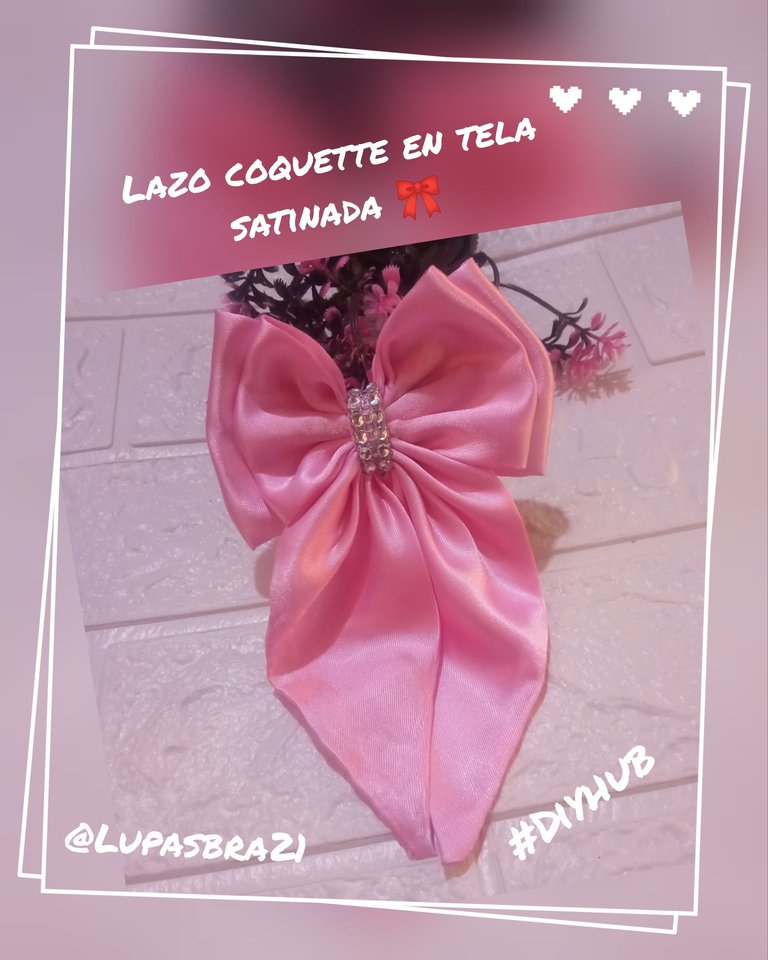
La verdad es una pieza muy delicada y quedó hermoso ese lazo coquette 🎀, espero sea de su agrado y será hasta una próxima oportunidad.
The truth is a very delicate piece and it was beautiful that coquette bow 🎀, I hope you like it and it will be until a next opportunity.
Todas las fotos son de mi autoría @lupasbra21, fueron tomadas con mi teléfono inteligente Redmi , usé la aplicación polish para la edición de fotos y usé el traductor Deepl translate.
All photos are my authorship @lupasbra21, they were taken with my Redmi smartphone , I used the polish app for photo editing and I used the translator Deepl translate.

Congratulations @lupasbra21! You have completed the following achievement on the Hive blockchain And have been rewarded with New badge(s)
Your next target is to reach 150 posts.
You can view your badges on your board and compare yourself to others in the Ranking
If you no longer want to receive notifications, reply to this comment with the word
STOPCheck out our last posts:
Gracias por el apoyo.
¡Eso es genial @lupasbra21! ¡Estamos emocionados de ver tu progreso en Hive! ¡Estamos ansiosos por verte lograr el próximo!
Such lovely bow, that would surely compliment the little ones dress. Well done
Gracias por el comentario y gracias por el apoyo.
Gracias por el comentario, gracias por el apoyo, si es el complemento perfecto.
Te quedó bellísimo este trabajo. Este tipo de lazos y accesorios coquette están muy de moda últimamente.
Gracias amiga @rosana6 por tu comentario, los lazos coquette en cualquier presentación es la tendencia.
You made a beautiful bow, and the pink color is giving. 😊
Gracias amiga @ene22 , me alegra que te haya gustado.
Hermoso te quedo, me gusta
Gracias, me alegro que te haya gustado amiga @mailyn45