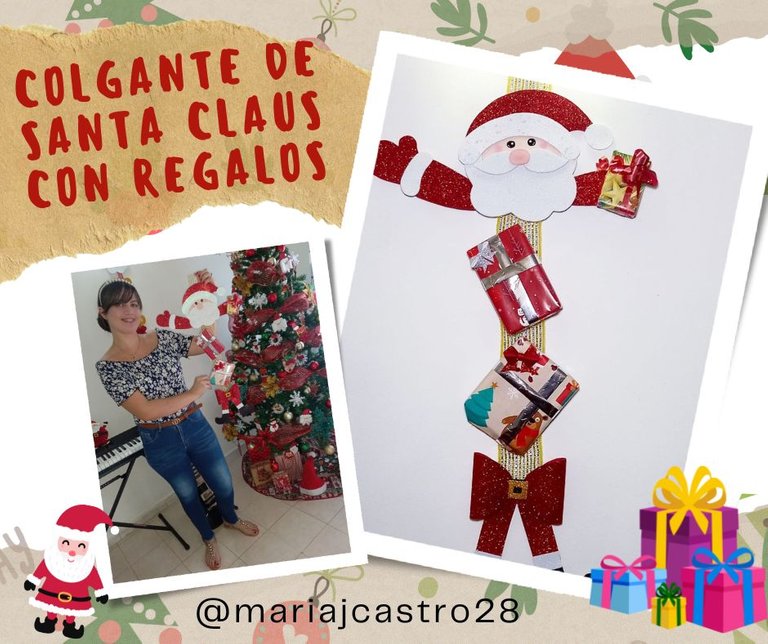
¡Saludos Comunidad Creativa! 🎄 | ¡Greetings Creative Community! 🎄
Espero que se encuentren muy bien, en este hermoso día les traigo un nuevo tutorial navideño que estoy segura de que les encantará tanto como a mí, hoy les enseñaré a crear un lindo adorno colgante de Santa Claus con regalos, ideal para decorar cualquier espacio de nuestro hogar y darle un toque navideño, como siempre espero que les guste, sin más que agregar, ¡vamos a crear!
I hope you are very well, on this beautiful day I bring you a new Christmas tutorial that I am sure you will love as much as I do, today I will teach you how to create a cute Santa Claus hanging ornament with gifts, ideal for decorating any space our home and give it a Christmas touch, as always I hope you like it, without further ado, ¡let's create!

🎅 Foami escarchado blanco y rojo.
🎅 Foami color piel sin escarcha.
🎅 Lazo de foami.
🎅 Malla navideña.
🎅 Lápiz.
🎅 Silicón caliente.
🎅 Rubor.
🎅 Pintura negra.
🎅 Pincel.
🎅 Tijeras.
🎅 Cartón.
🎅 Hoja de papel.
🎅 Corrector de tinta o pintura blanca.
🎅 Cajitas de regalo pequeñas.
🎅 White and red frosty foami.
🎅 Foami skin color without frost.
🎅 Foami bow.
🎅 Christmas mesh.
🎅 Pencil.
🎅 Hot silicone.
🎅 Blush.
🎅 Black paint.
🎅 Brush.
🎅 Scissors.
🎅 Cardboard.
🎅 Sheet of paper.
🎅 Ink concealer or white paint.
🎅 Small gift boxes.


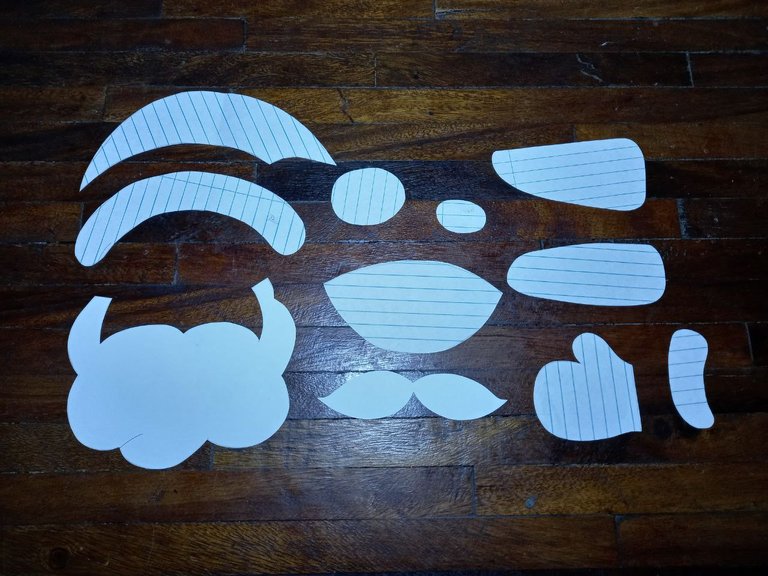
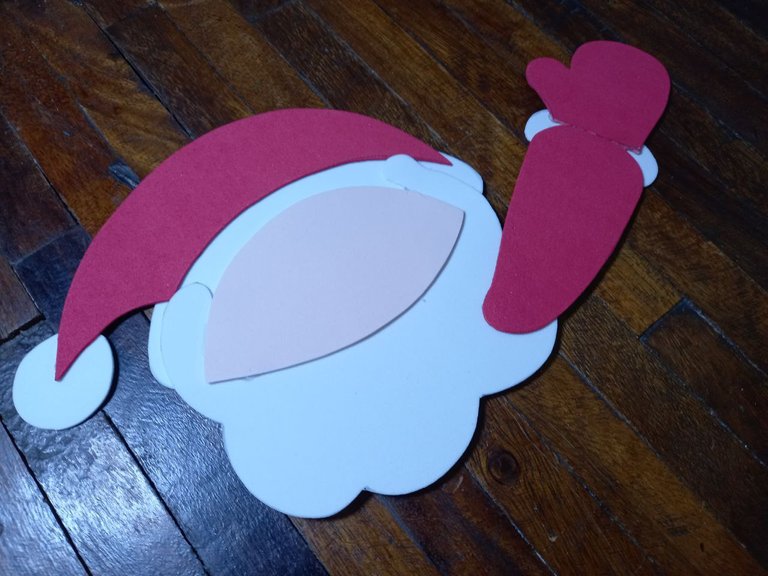
🎅 PASO 1. Comenzamos haciendo en la hoja de papel cada pieza con la que formaremos a nuestro Santa Claus, solo necesitaremos la parte superior, es decir, rostro y brazos, así que hacemos estas partes en el papel para usarlas cono patrón, las transferimos al foami en sus colores correspondientes y recortamos.
🎅 STEP 1. We begin by making each piece with which we will form our Santa Claus on the sheet of paper, we will only need the upper part, that is, the face and arms, so we make these parts on the paper to use them as cones. pattern, we transfer them to the foami in their corresponding colors and cut them out.

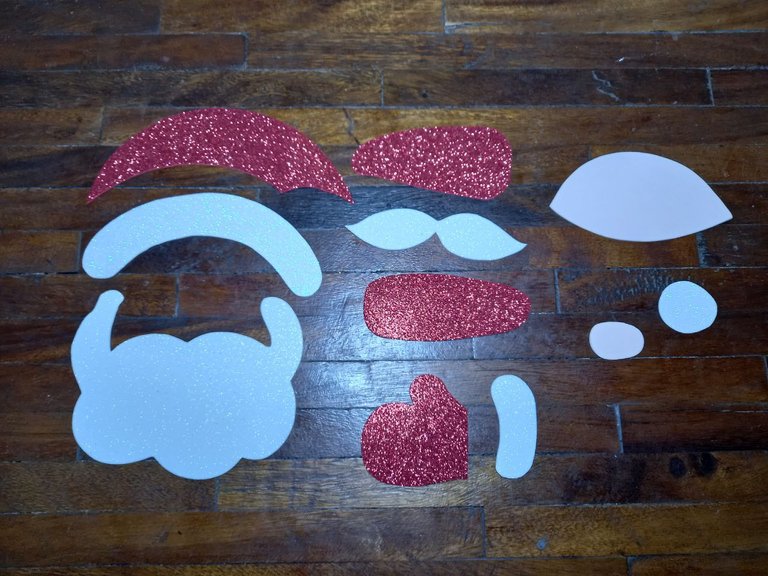
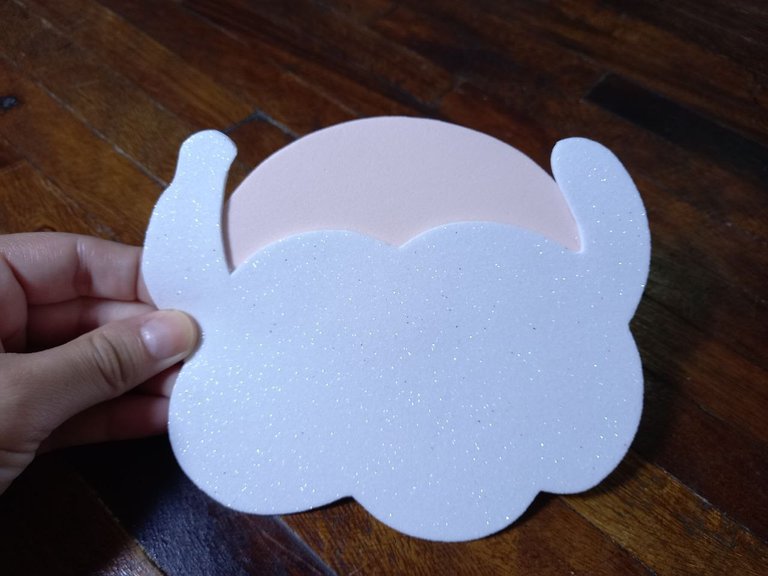
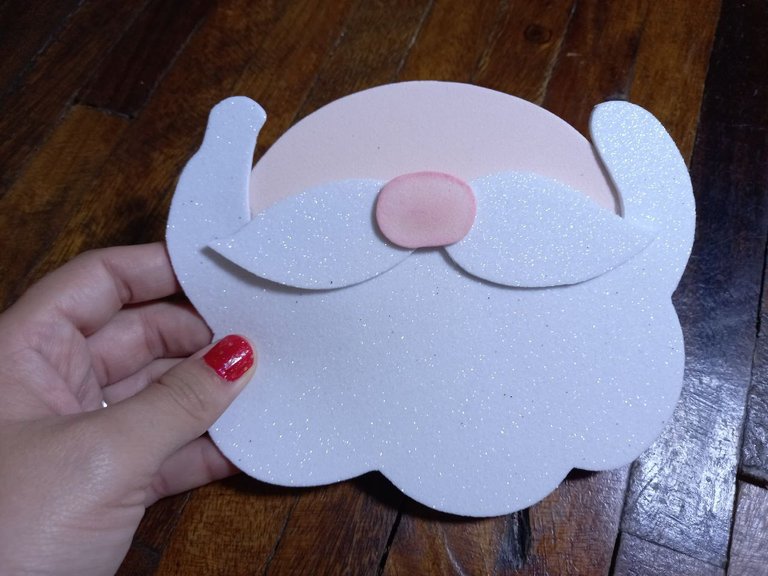
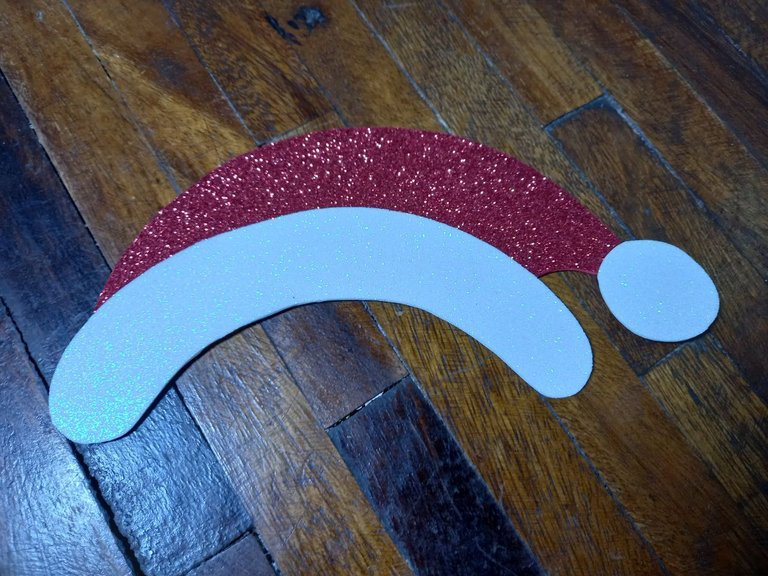
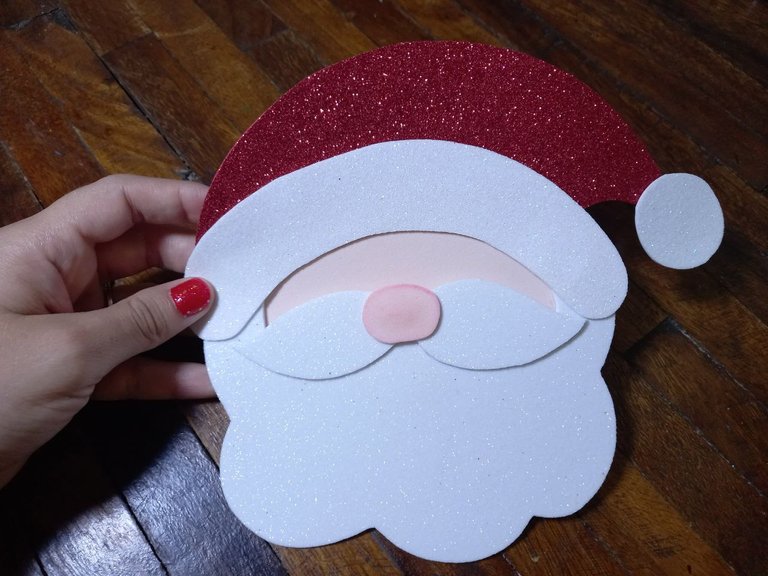
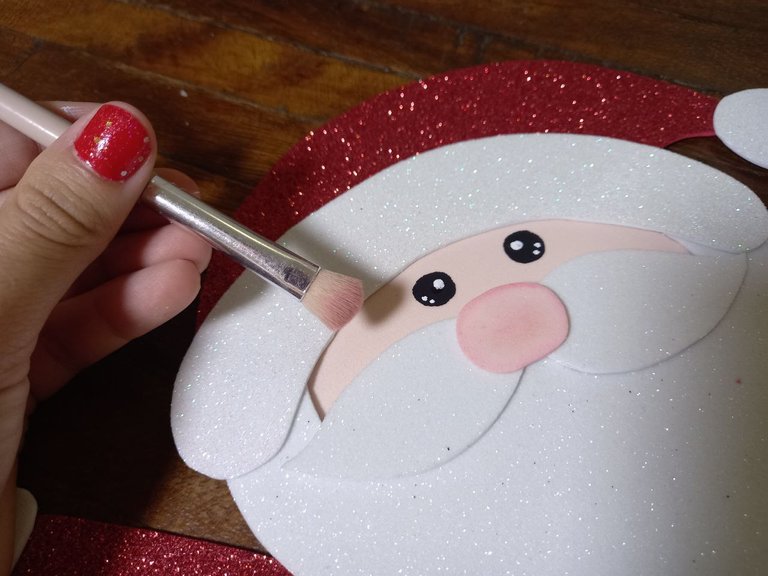
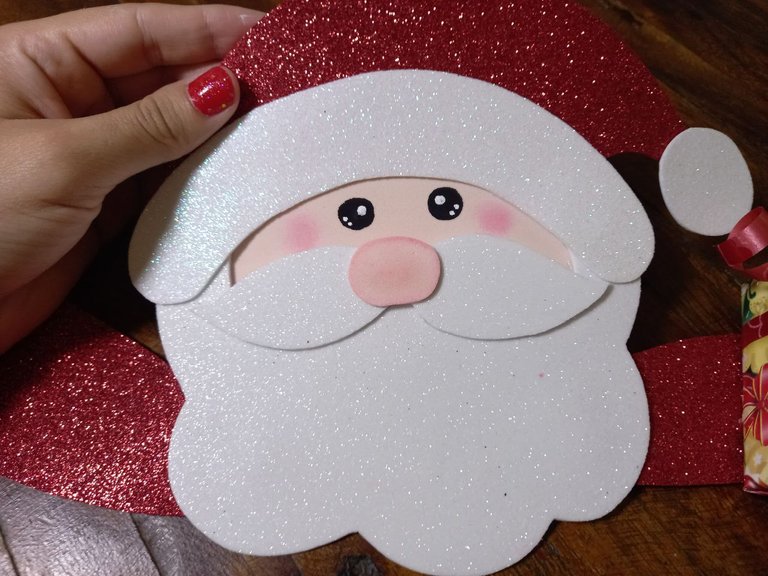
🎅 PASO 2. Comenzamos a formar nuestro Santa Claus uniendo sus piezas, pegamos la barba sobre el rostro, el bigote sobre la barba y la nariz sobre el bigote justo en el centro pero antes de pegar esta última pieza tomamos un poquito de rubor y le pasamos la brocha por todo el borde para darle un poco de color, luego formamos el gorro y lo pegamos en la parte superior de la cabeza.
🎅 STEP 2. We begin to form our Santa Claus joining his pieces, we glue the beard on the face, the mustache on the beard and the nose on the mustache right in the center but before gluing this last piece we take a little of blush and we brush all over the edge to give it a little color, then we form the hat and glue it to the top of the head.

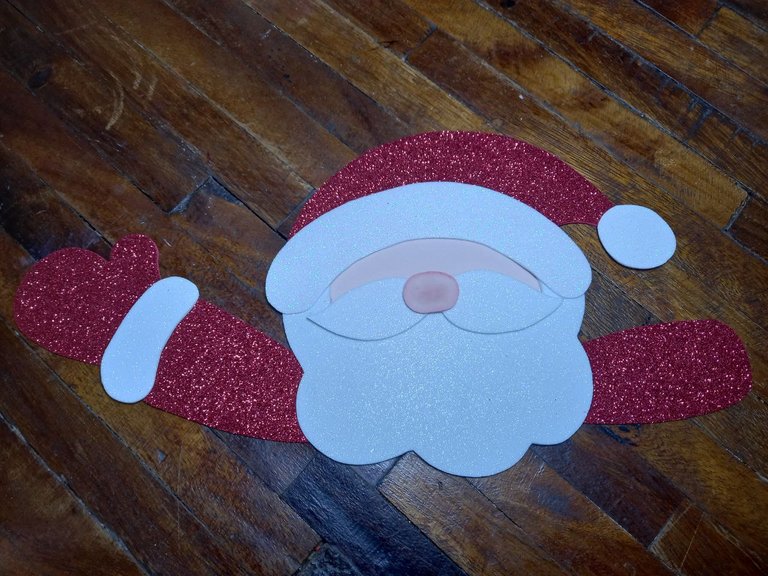
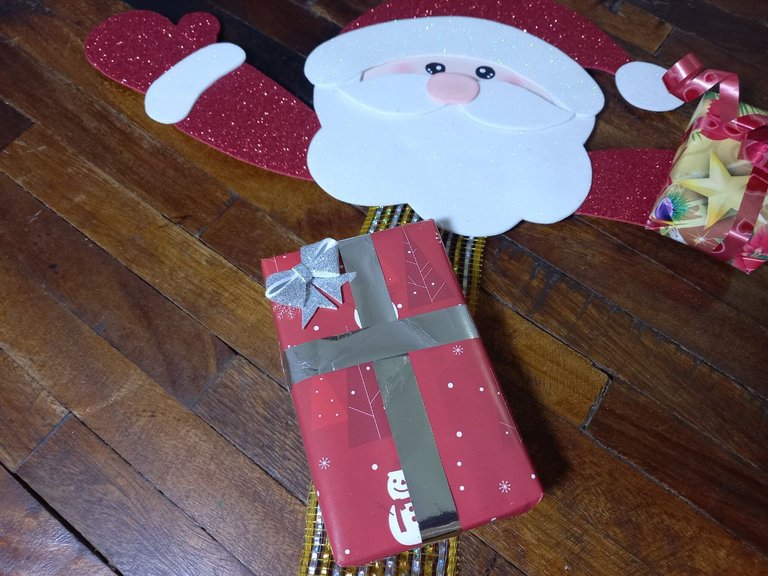
🎅 PASO 3. Unimos las piezas de los brazos y cuando los tengamos completos los pegamos en la parte trasera de la barba quedando hacia los lados, luego vamos a pegar una de las cajitas de regalo sobre el brazo que no tiene mano.
🎅 STEP 3. We join the pieces of the arms and when we have them complete we glue them to the back of the beard, leaving them to the sides, then we are going to glue one of the gift boxes on the arm that does not have a hand .


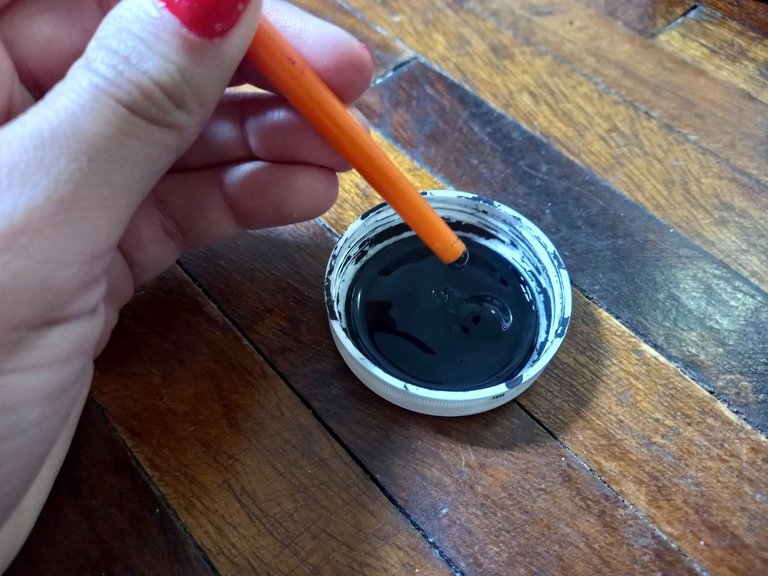
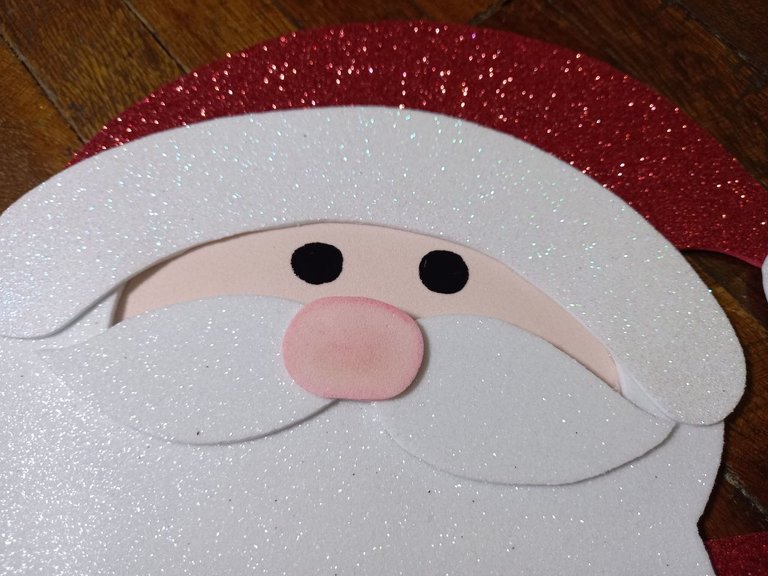
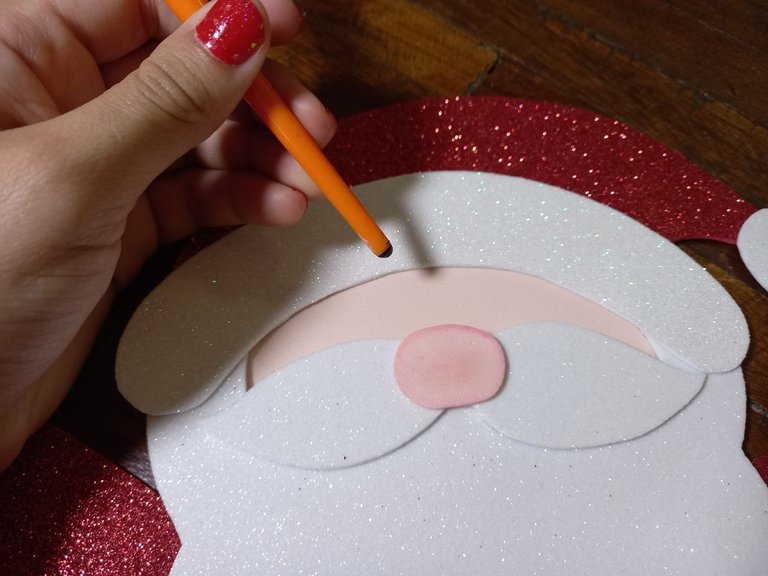
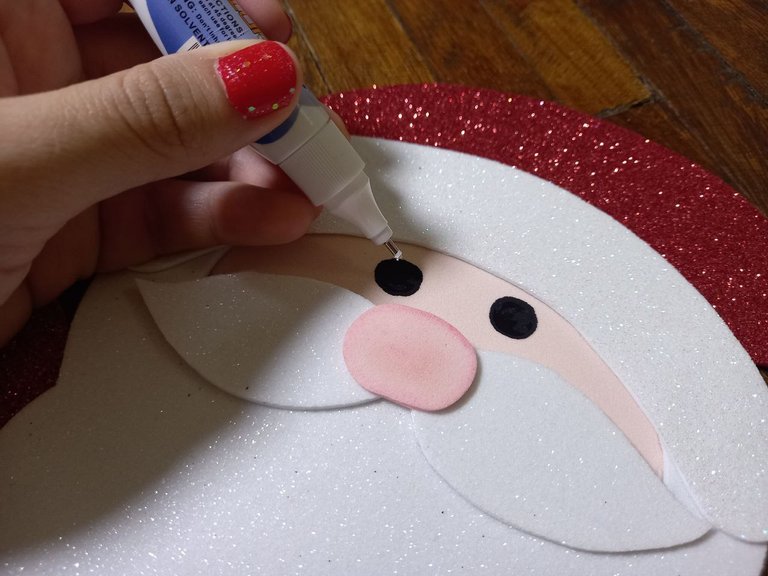
🎅 PASO 4. Procedemos a hacer los ojos, para ello tomamos un poco de pintura negra con la parte trasera del pincel y dibujamos 2 círculos en el rostro de Santa Claus, esperamos a que se seque bien y le dibujamos 2 puntitos blancos con el corrector de tinta o pintura blanca, luego de los ojos le dibujamos las mejillas con rubor.
🎅 STEP 4. We proceed to make the eyes, for this we take a bit of black paint with the back of the brush and draw 2 circles on the face of Santa Claus, we wait for it to dry well and we draw 2 dots white with the ink concealer or white paint, after the eyes we draw the cheeks with blush.
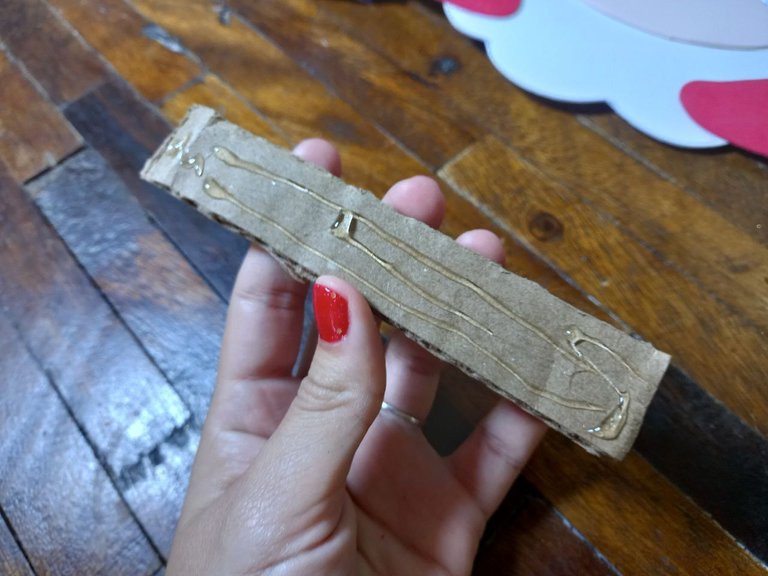
🎅 PASO 5. Una vez que se sequen los ojos le damos la vuelta al Santa Claus y vamos a recortar 2 tiras de cartón para pegarlas detrás de los brazos con el fin de que se mantengan firmes a la hora de colgar el adorno.
🎅 STEP 5. Once the eyes are dry, we turn the Santa Claus over and we are going to cut 2 cardboard strips to stick them behind the arms so that they remain firm when hanging the ornament.

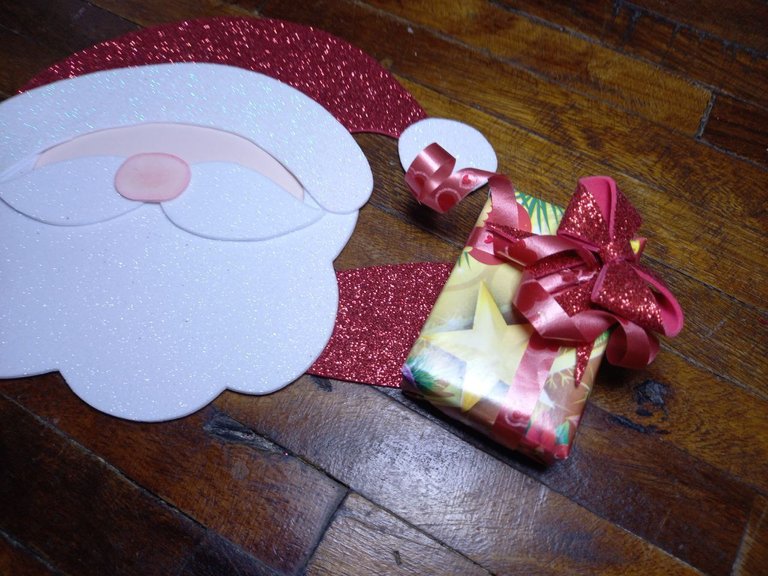
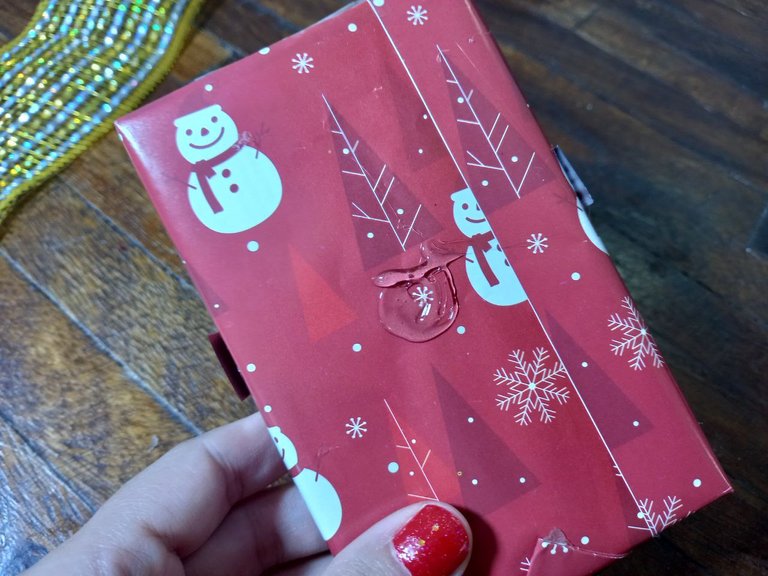
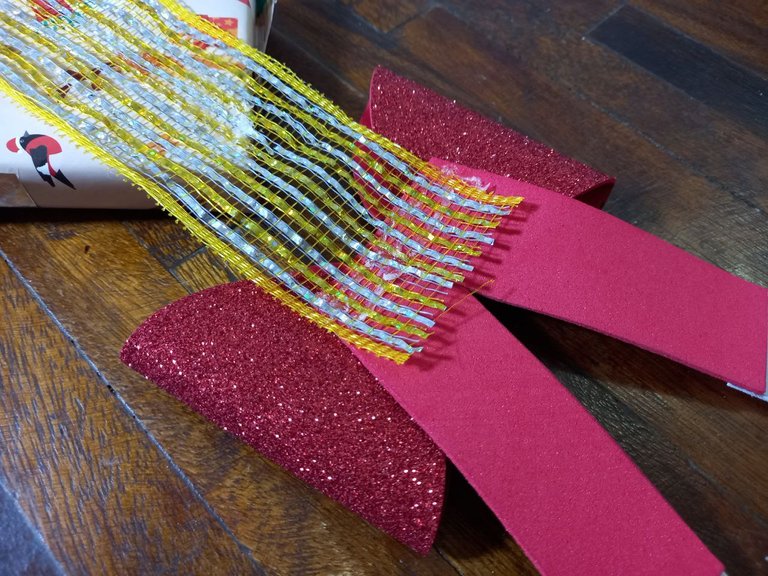
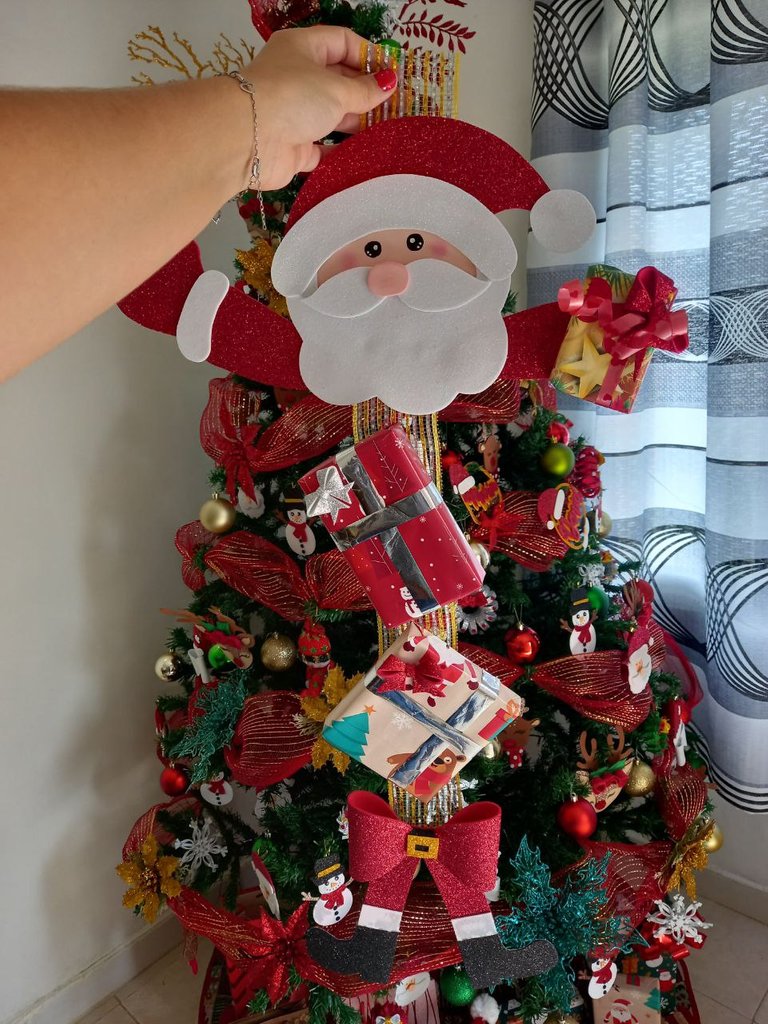
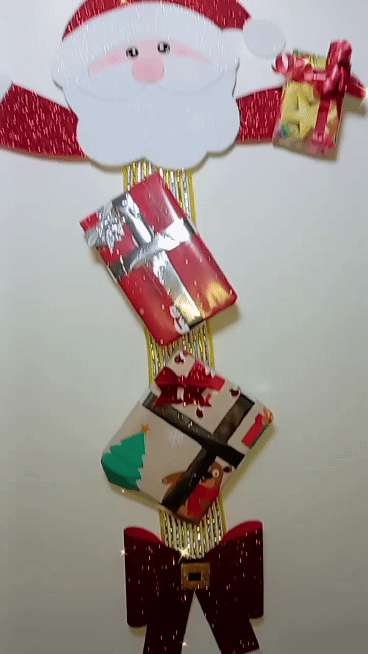
🎅 PASO 6. En la parte trasera del Santa Claus justo en el centro pegamos uno de los extremos de la malla navideña, en mi caso estoy usando una dorada pero ustedes pueden usar la del color que deseen, luego de pegarla la extendemos y en la parte frontal vamos a pegar 2 cajitas de regalo sobre la malla, una debajo de otra, ese será como el cuerpo de nuestro Santa, estas son simples cajitas de medicamento que forré con papel de regalo navideño y les coloqué una cinta y un lazo, aquí les dejo mi tutorial para que puedan a prender a forrar estas cajitas si no lo saben hacer.
🎅 STEP 6. In the back of the Santa Claus right in the center we glue one of the ends of the Christmas mesh, in my case I am using a gold one but you can use the color you want, after gluing it the We extend and on the front side we are going to glue 2 gift boxes on the mesh, one below the other, that will be like the body of our Santa, these are simple medicine boxes that I lined with Christmas wrapping paper and put a ribbon on them and a loop, here I leave my tutorial so that you can learn how to cover these little boxes if you don't know how to do it .
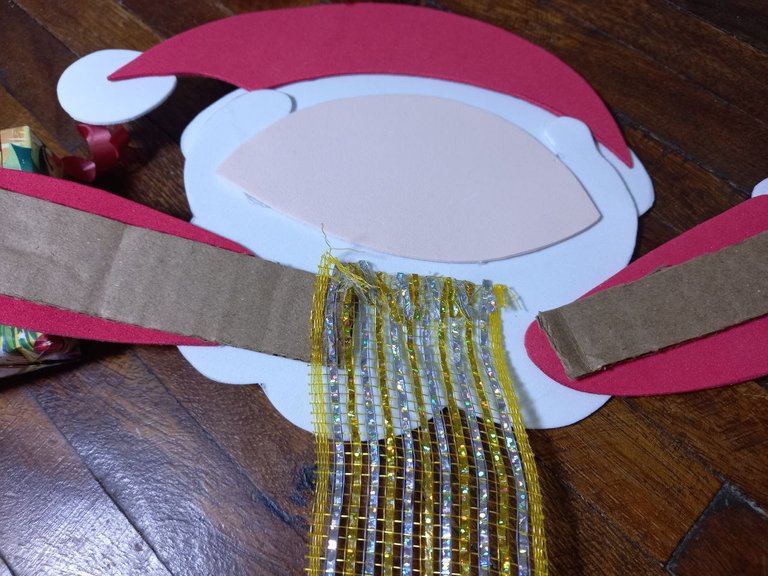
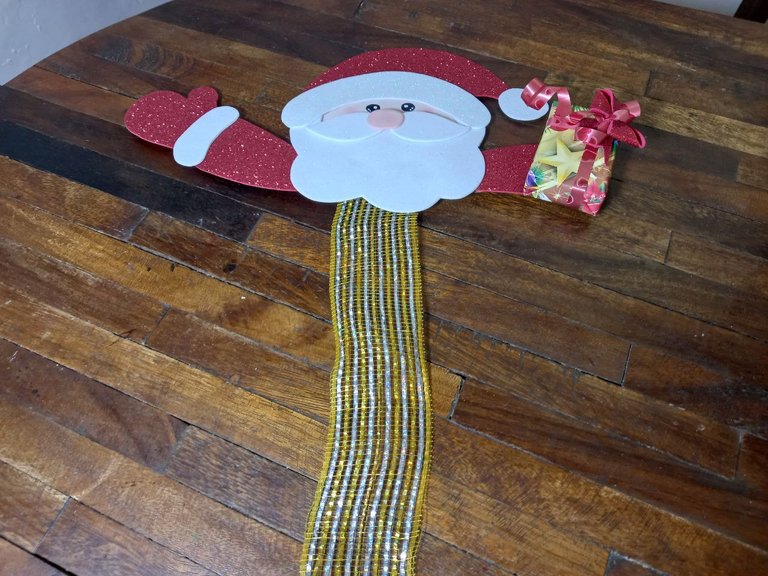
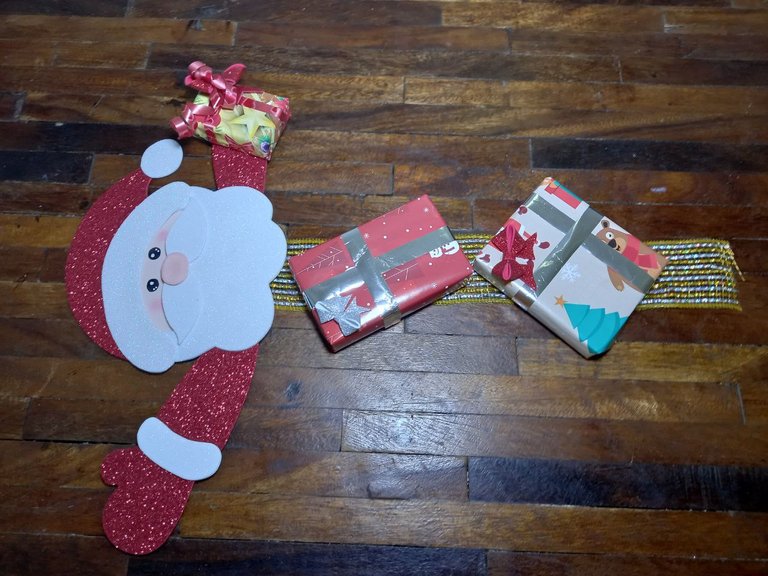
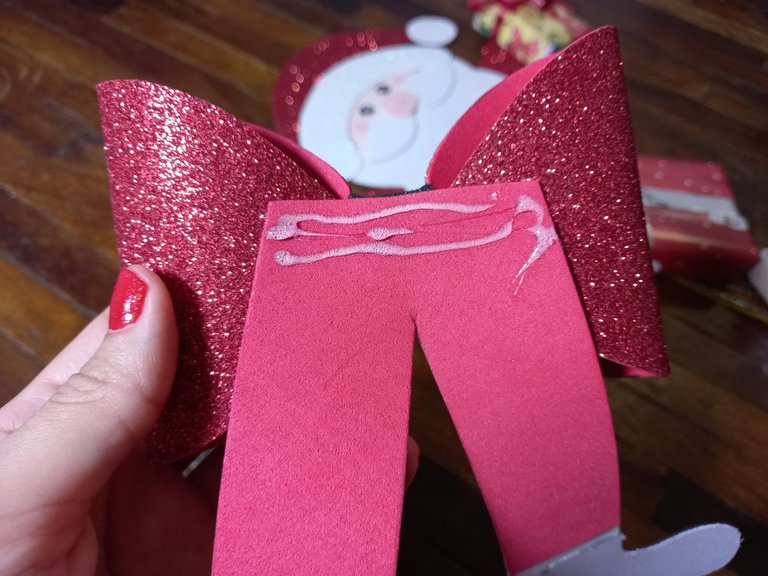
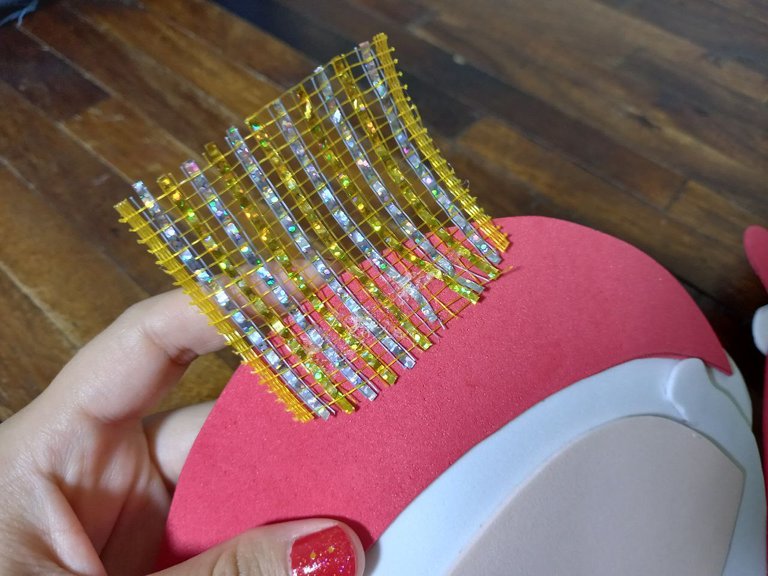
🎅 PASO 7. Ya por último vamos a pegar en el extremo inferior de la malla un lindo adorno de foami que lleva un lazo y unas piernas, será la pieza final de nuestro Santa Claus y aquí les dejo el tutorial donde explico cómo lo elaboré, seguidamente vamos a pegar una pequeña tira de malla en la parte superior trasera del Santa, justo detrás del gorro, esa es la parte que pegaremos a la pared para colgar el adorno pero ustedes pueden colocarle cualquier otra pieza para colgarlo como prefieran.
🎅 STEP 7. Finally we are going to glue a nice foami decoration that has a bow and some legs to the lower end of the mesh, it will be the final piece of our Santa Claus and here I leave the tutorial where I explain how I made it, then we are going to glue a small strip of mesh on the upper back part of the Santa, just behind the hat, that is the part that we will stick to the wall to hang the ornament but you can place any other piece to hang it as you prefer.

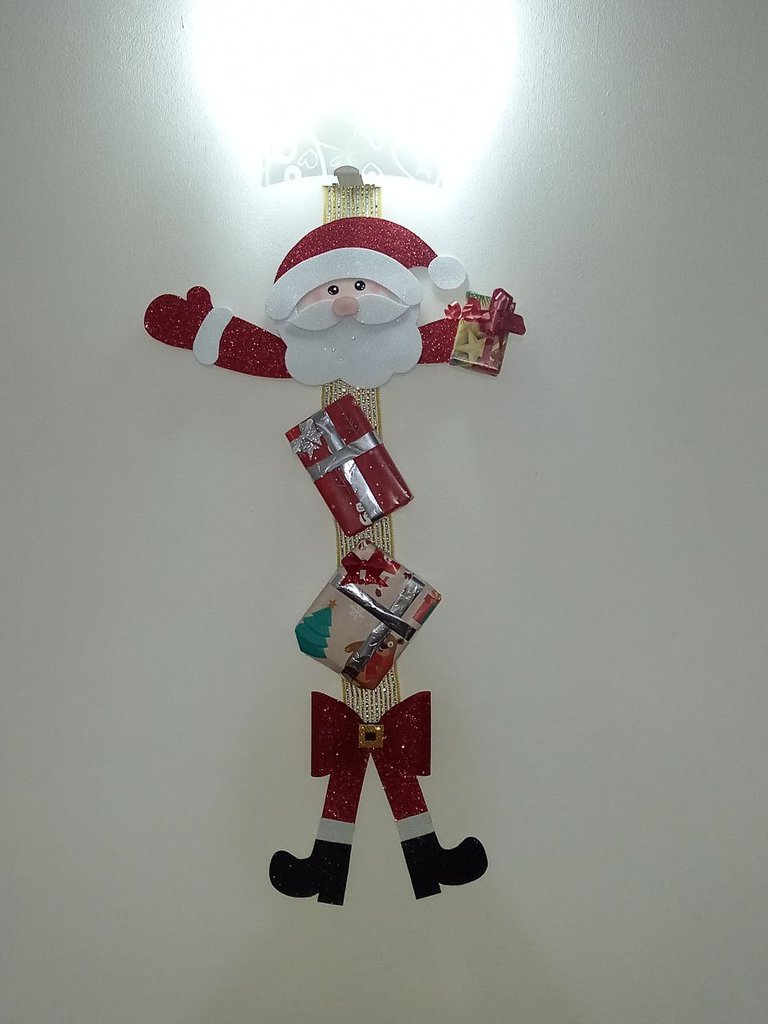
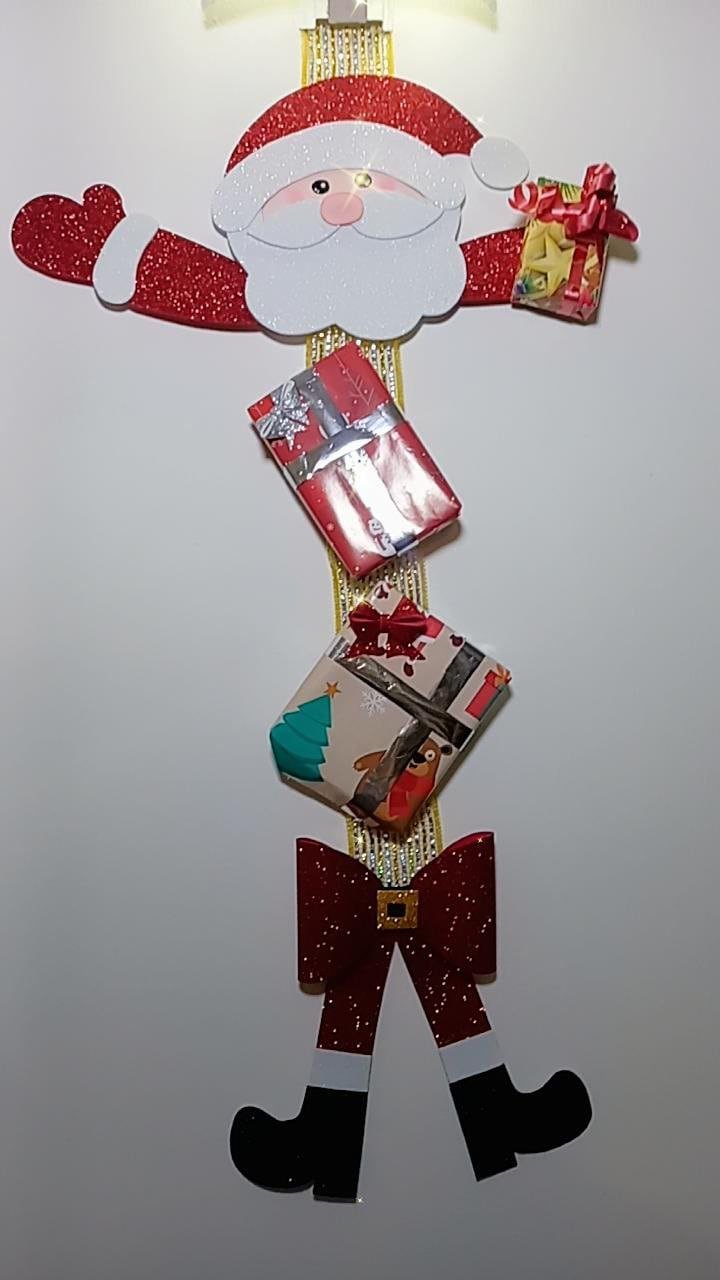
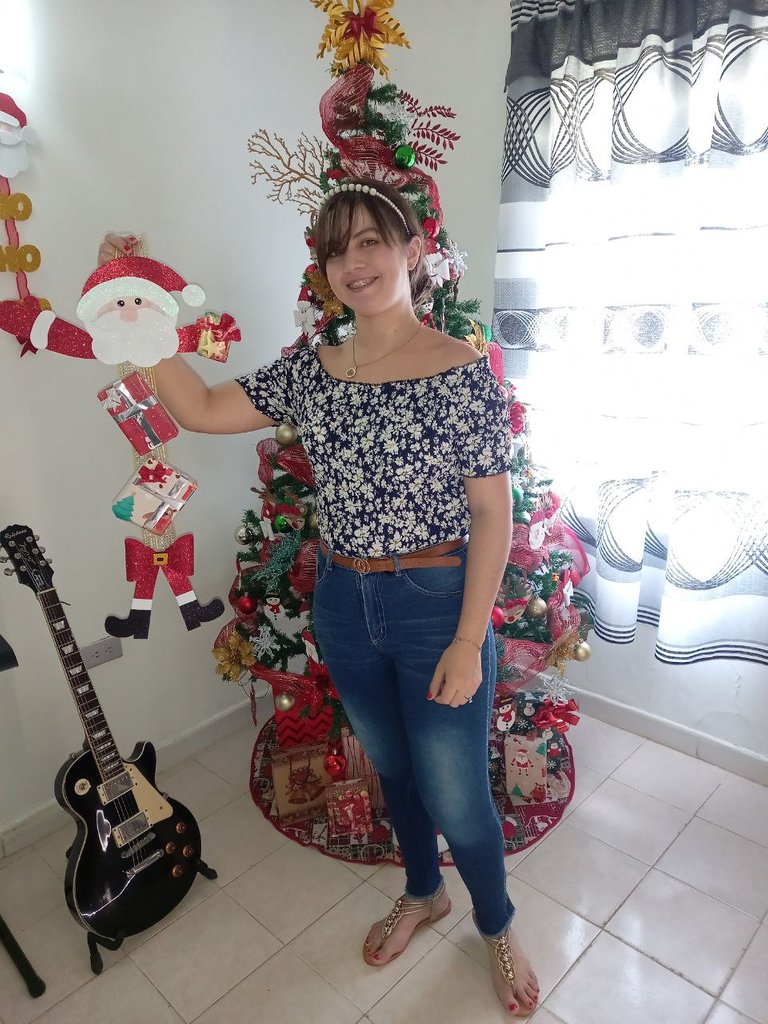
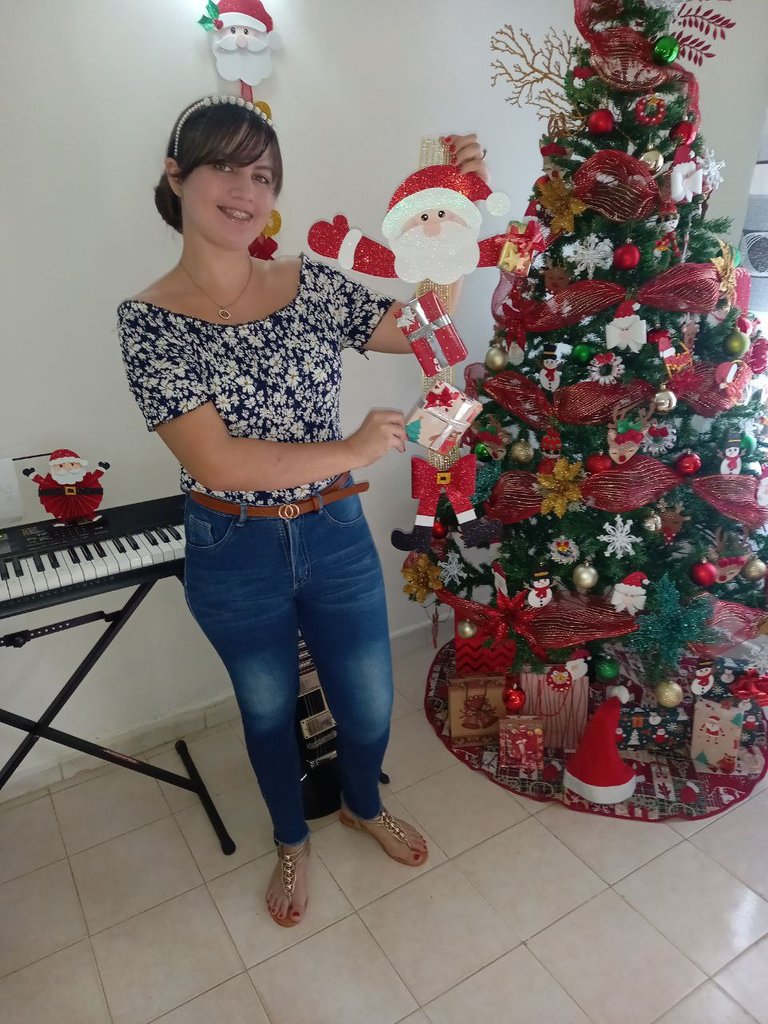
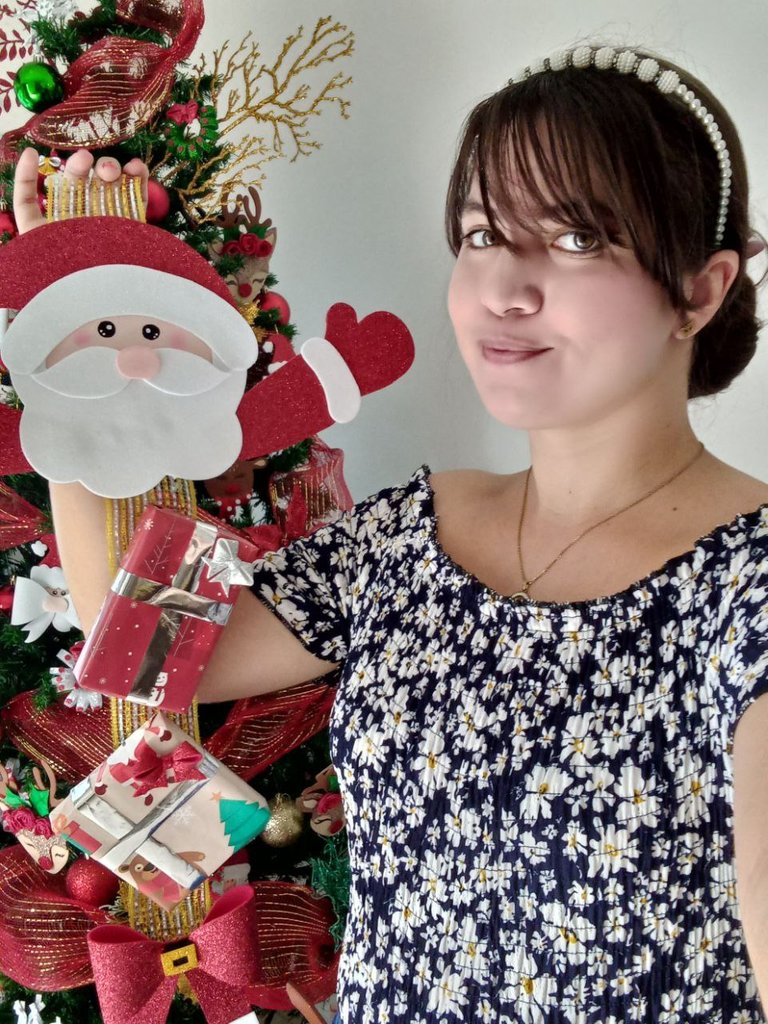
¡Y listo! De esta manera tan fácil es como he elaborado este hermoso adorno colgante de Santa Claus para decorar mi sala, la verdad tenía muchas ideas en mente sobre cómo hacerlo y a medida que lo iba haciendo se me iban ocurriendo cosas nuevas y fue así como resultó al final, me encantó como quedó y me encantó más aún cuando lo puede colocar en la pared, decidí pegarlo debajo de una lámpara y queda hermoso, es el lugar perfecto para él y es uno de los adornos más llamativos de mi sala, sin duda lo amé y espero que a ustedes también les haya gustado, gracias por visitar mi blog, espero que este tutorial haya sido de aire agrado y el resultado les haya gustado tanto como a mí, nos vemos pronto con un nuevo tutorial navideño.
And ready! In this easy way is how I made this beautiful Santa Claus hanging ornament to decorate my living room, the truth is that I had many ideas in mind about how to do it and as I was doing it, new things occurred to me and that is how it turned out in the end I loved how it turned out and I loved it even more when you can place it on the wall, I decided to stick it under a lamp and it looks beautiful, it's the perfect place for it and it's one of the most striking decorations in my room, I certainly loved it and I hope you liked it too, thanks for visiting my blog, I hope you liked this tutorial and liked the result as much as I did, see you soon with a new Christmas tutorial.


Todas las fotografías son de mi propiedad.
Fotografías capturadas con mi Samsung Galaxy A12
Separador de texto elaborado en Canva.
Nos vemos en mi próxima publicación.
¡Tengan un feliz día!
All photographs are my property.
Photos captured with my Samsung Galaxy A12
Text separator made in Canva.
See you in my next post.
¡Have a happy day!
~~~ embed:1603075938551562244 twitter metadata:Mjc1MDI2ODk4fHxodHRwczovL3R3aXR0ZXIuY29tLzI3NTAyNjg5OC9zdGF0dXMvMTYwMzA3NTkzODU1MTU2MjI0NHw= ~~~
~~~ embed:1603199098504486912 twitter metadata:MTU4MzU3NDk1MTk4MTk5NDAwMnx8aHR0cHM6Ly90d2l0dGVyLmNvbS8xNTgzNTc0OTUxOTgxOTk0MDAyL3N0YXR1cy8xNjAzMTk5MDk4NTA0NDg2OTEyfA== ~~~
The rewards earned on this comment will go directly to the people( @yolimarag, @sugarelys, @lacochinaensalsa, @derppunk ) sharing the post on Twitter as long as they are registered with @poshtoken. Sign up at https://hiveposh.com.
Que hermoso ese santa, me encanto 😍
Gracias mi Vane bella ♥️♥️♥️
Hola, amiga. Que idea tan bonita😍 Gracias por compartirla💜✨
Gracias linda, me alegra mucho que te guste ✨️
Me encanta este santa amiga es muy original, me gusto mucho 👏👏
Muchas gracias amiga, que bueno saber que te gustó, gracias por el apoyo compartiendo mi publicación, un abrazo! ❄️🌟
Amiga me encanto todooo!!! Desde los santas marcando cada material que utilizaste hasta el paso a paso y el maravilloso y tierno resultado, ahora si te pasaste de creativa jajaja 😱😍
Amiga que maravilla que te haya gustado, de verdad que me alegra, no puedo evitar dejar salir mi espíritu navideño y lleno todo de detalles, gracias por tu visita y tu lindo comentario, besos! ✨️
So cute 🥰 I loved it
Gracias bella ✨️
Hola amiguita que colgante mas bello.. Pará darle un toque extra a las decoraciones navideñas..💗✨
Hola amiga, muchas gracias, pues precisamente para eso lo hice, para darle un mejor toque a mi sala con respecto a la decoración y quedó perfecto ✨️ un abrazo amiga ❤️
Ay amiga! Que cosita tan tierna 🤭 lo amó, lo quiero para mí jaja. ❤️
Cada detalle es espectacular. Utilizar el lazo que hiciste anteriormente en algo totalmente diferente me parece una idea increíble.
Me encantó amiga bellísimo de verdad. ❤️
Amiga linda, muchas gracias, sabía que te encantaría, este fue el uso que te dije que le había dado a ese lazo, no fue tal como lo planeé sino que a medida que iba ideando como sería este adorno se me ocurrían cosas nuevas y añadir ese lazo le dio el toque perfecto, gracias por pasar amiga, besos 😘
Sí amiga , quedó increíble , súper belloo ❤️🥰.
Jaja te entiendo tanto, a veces tienes una idea pero a medida que vas elaborando algo vas cambiando cosas y sale algo totalmente distinto a lo que tenías planeado hacer.
Pero nada amiga, muy hermoso. Besos!❤️
♥️♥️♥️
Saludos @mariajcastro28, una idea muy original y creativa para decorar en navidad, está perfecto para adornar la puerta, gracias por compartir.
Bendiciones!
Hola muchas gracias, pues si, yo lo coloqué debajo de una de las lámparas de mi sala pero en la puerta también quedaría muy bien, de hecho en donde sea que lo pongas, gracias por tu visita, me alegra que te gustara esta idea, saludos!
Definitivamente te ha quedado hermosísimo 💕, me encantan todas las manualidades y ésta es súper creativa 😍
Gracias amiga, de verdad aprecio mucho tu comentario y me alegra mucho saber que te ha gustado este adorno, espero que puedas recrearnos, saludos! ✨️
Que beloooo!! Tienes talento amiga no me canso de decírtelo. Este te quedó espectacular, además que siento que puede quedar bien en cualquier parte de la casa y ambienta muy lindo. Un abrazo @mariajcastro28 💜
Ay amiga que bella, eres de esas personas que siempre han apoyado mis creaciones y de verdad agradezco mucho eso, me alegra mucho que te guste lo que hago, sabía que esto me había quedado lindo pero como me lo dices lo ves mejor de lo que yo puedo verlo ❤️ Te envío un fuerte Abrazo 🤗
😚☺💕💜
Thank you for sharing this post in the DIYHUB Community!
Your content got selected by our fellow curator semarekha & you just received a little thank you upvote from us for your great work! Your post will be featured in one of our recurring compilations which are aiming to offer you a stage to widen your audience within the DIY scene of Hive. Stay creative & HIVE ON!
Please vote for our hive witness <3