Holis queridos compañeros de Diyhub, es un placer para mí estar con ustedes nuevamente en esta ocasión para participar en este hermoso concurso navideño.
Hello dear Diyhub colleagues, it is a pleasure for me to be with you again on this occasion to participate in this beautiful Christmas contest.
Es mi primera vez participando en un concurso así que espero hacerlo bien, aún me siento nueva e inexperta en la plataforma. 😊
It is my first time participating in a contest so I hope to do well, I still feel new and inexperienced on the platform. 😊
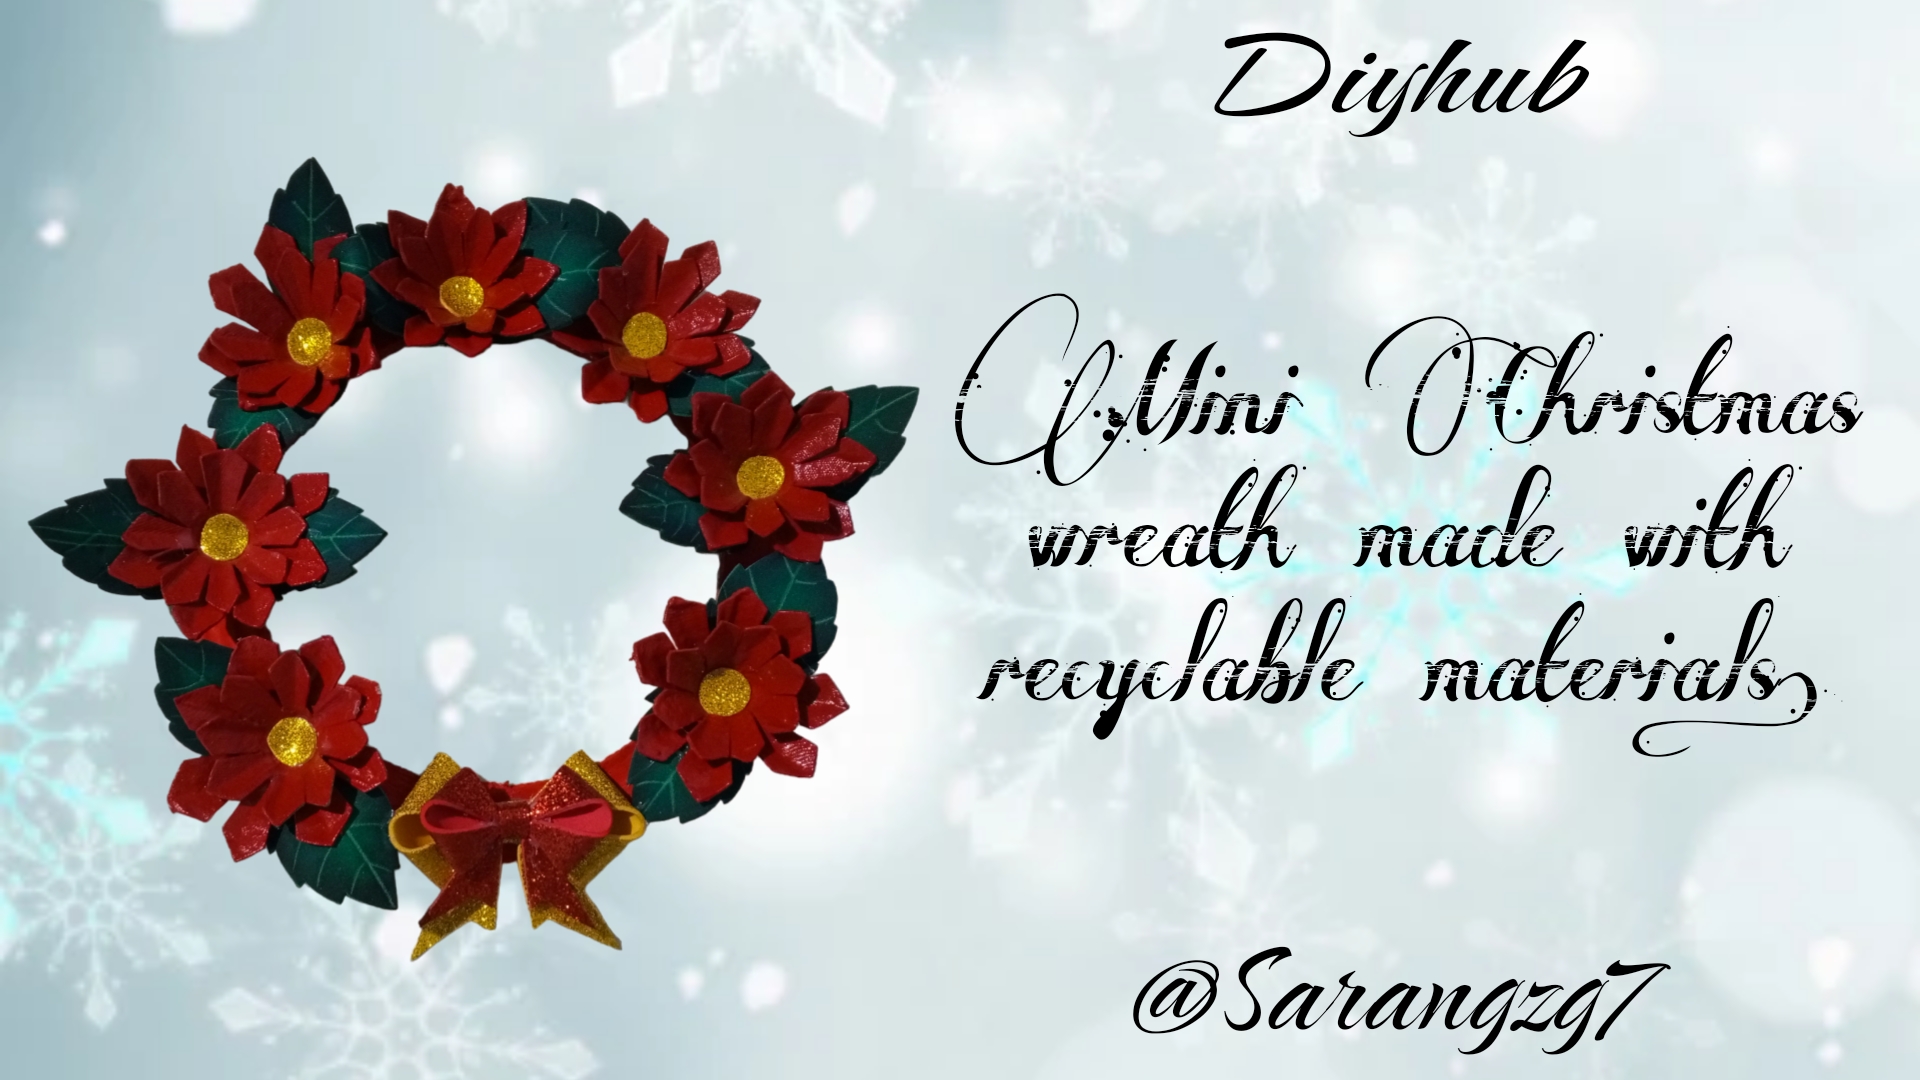
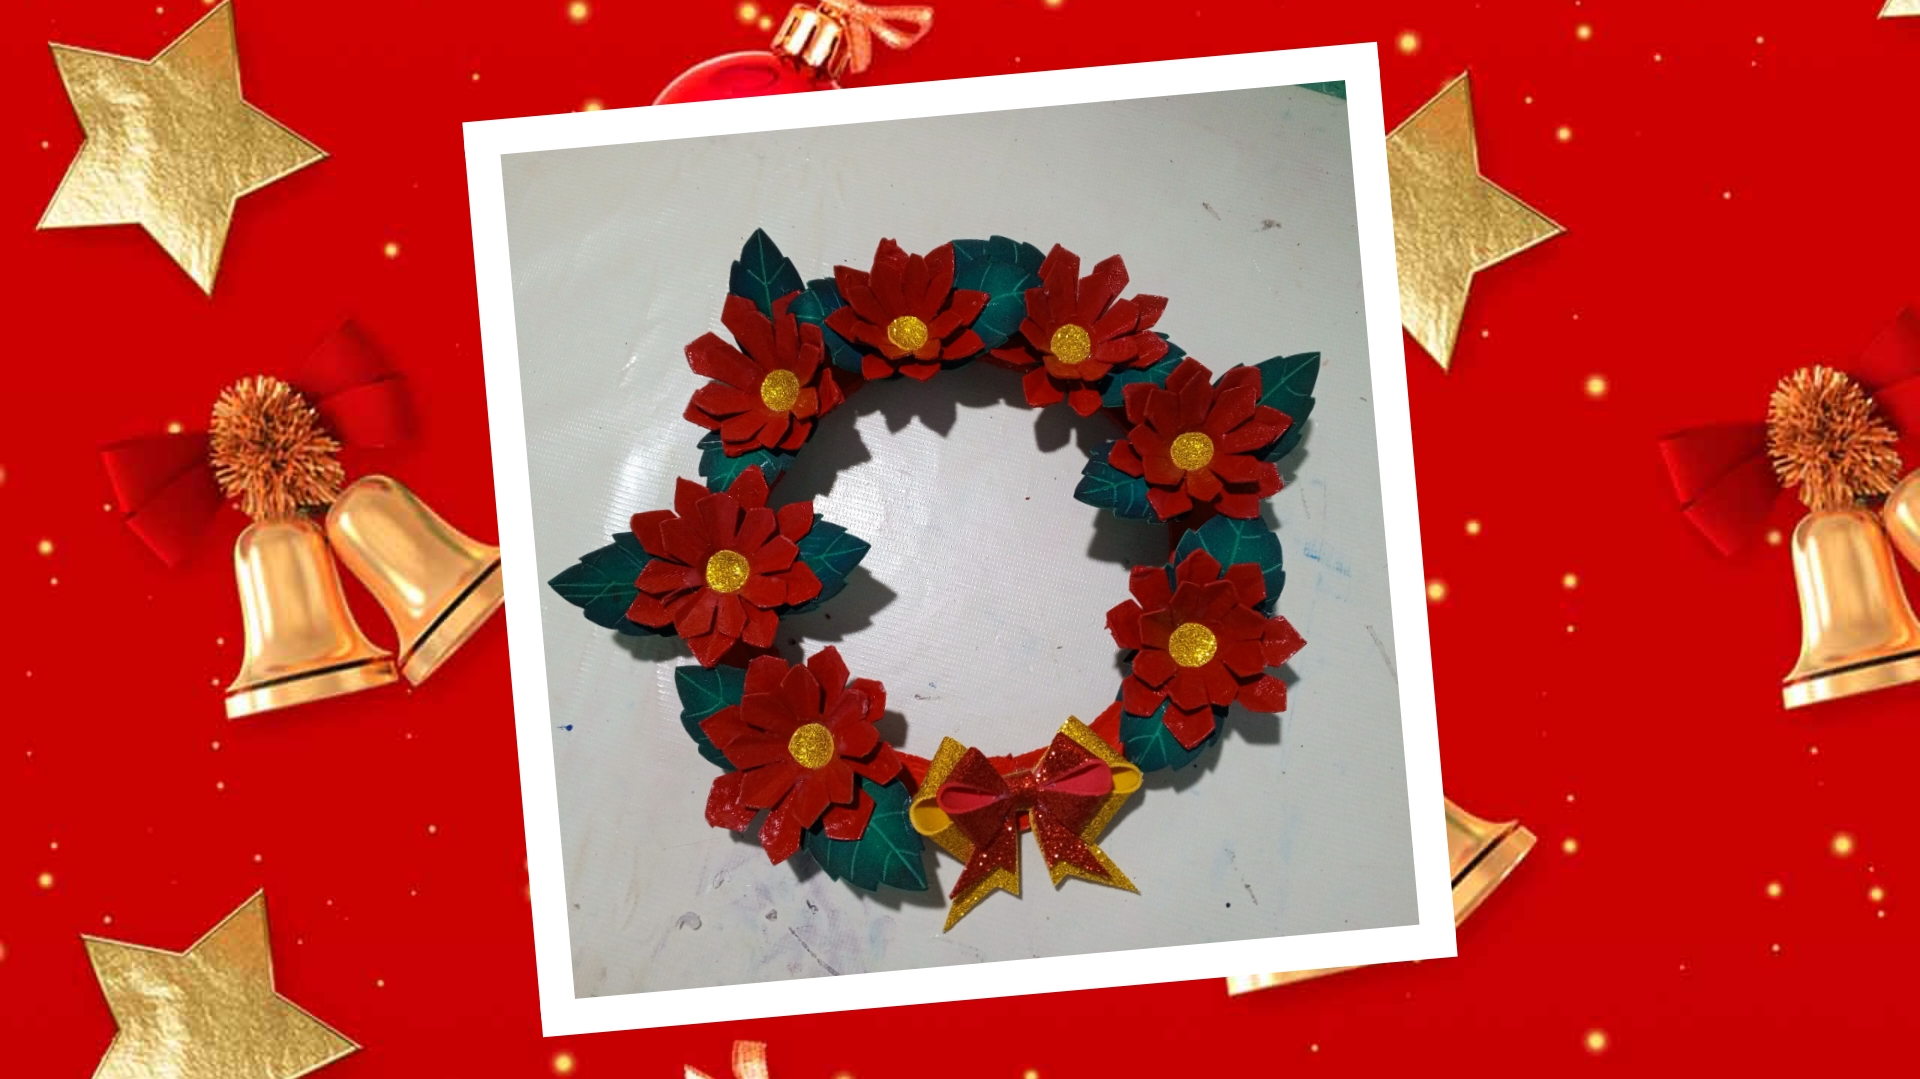
Hoy les quiero compartir esta hermosa mini corona navideña.
Today I want to share this beautiful mini Christmas wreath.
Una de las mejores cosas que tiene está mini corona navideña es que está hecha materiales reciclables que todos tenemos en nuestras casas, así que además de ser bastante económica ayuda a cuidar el medio ambiente.
One of the best things about this mini Christmas wreath is that it is made from recyclable materials that we all have in our homes, so in addition to being quite economical, it helps take care of the environment.
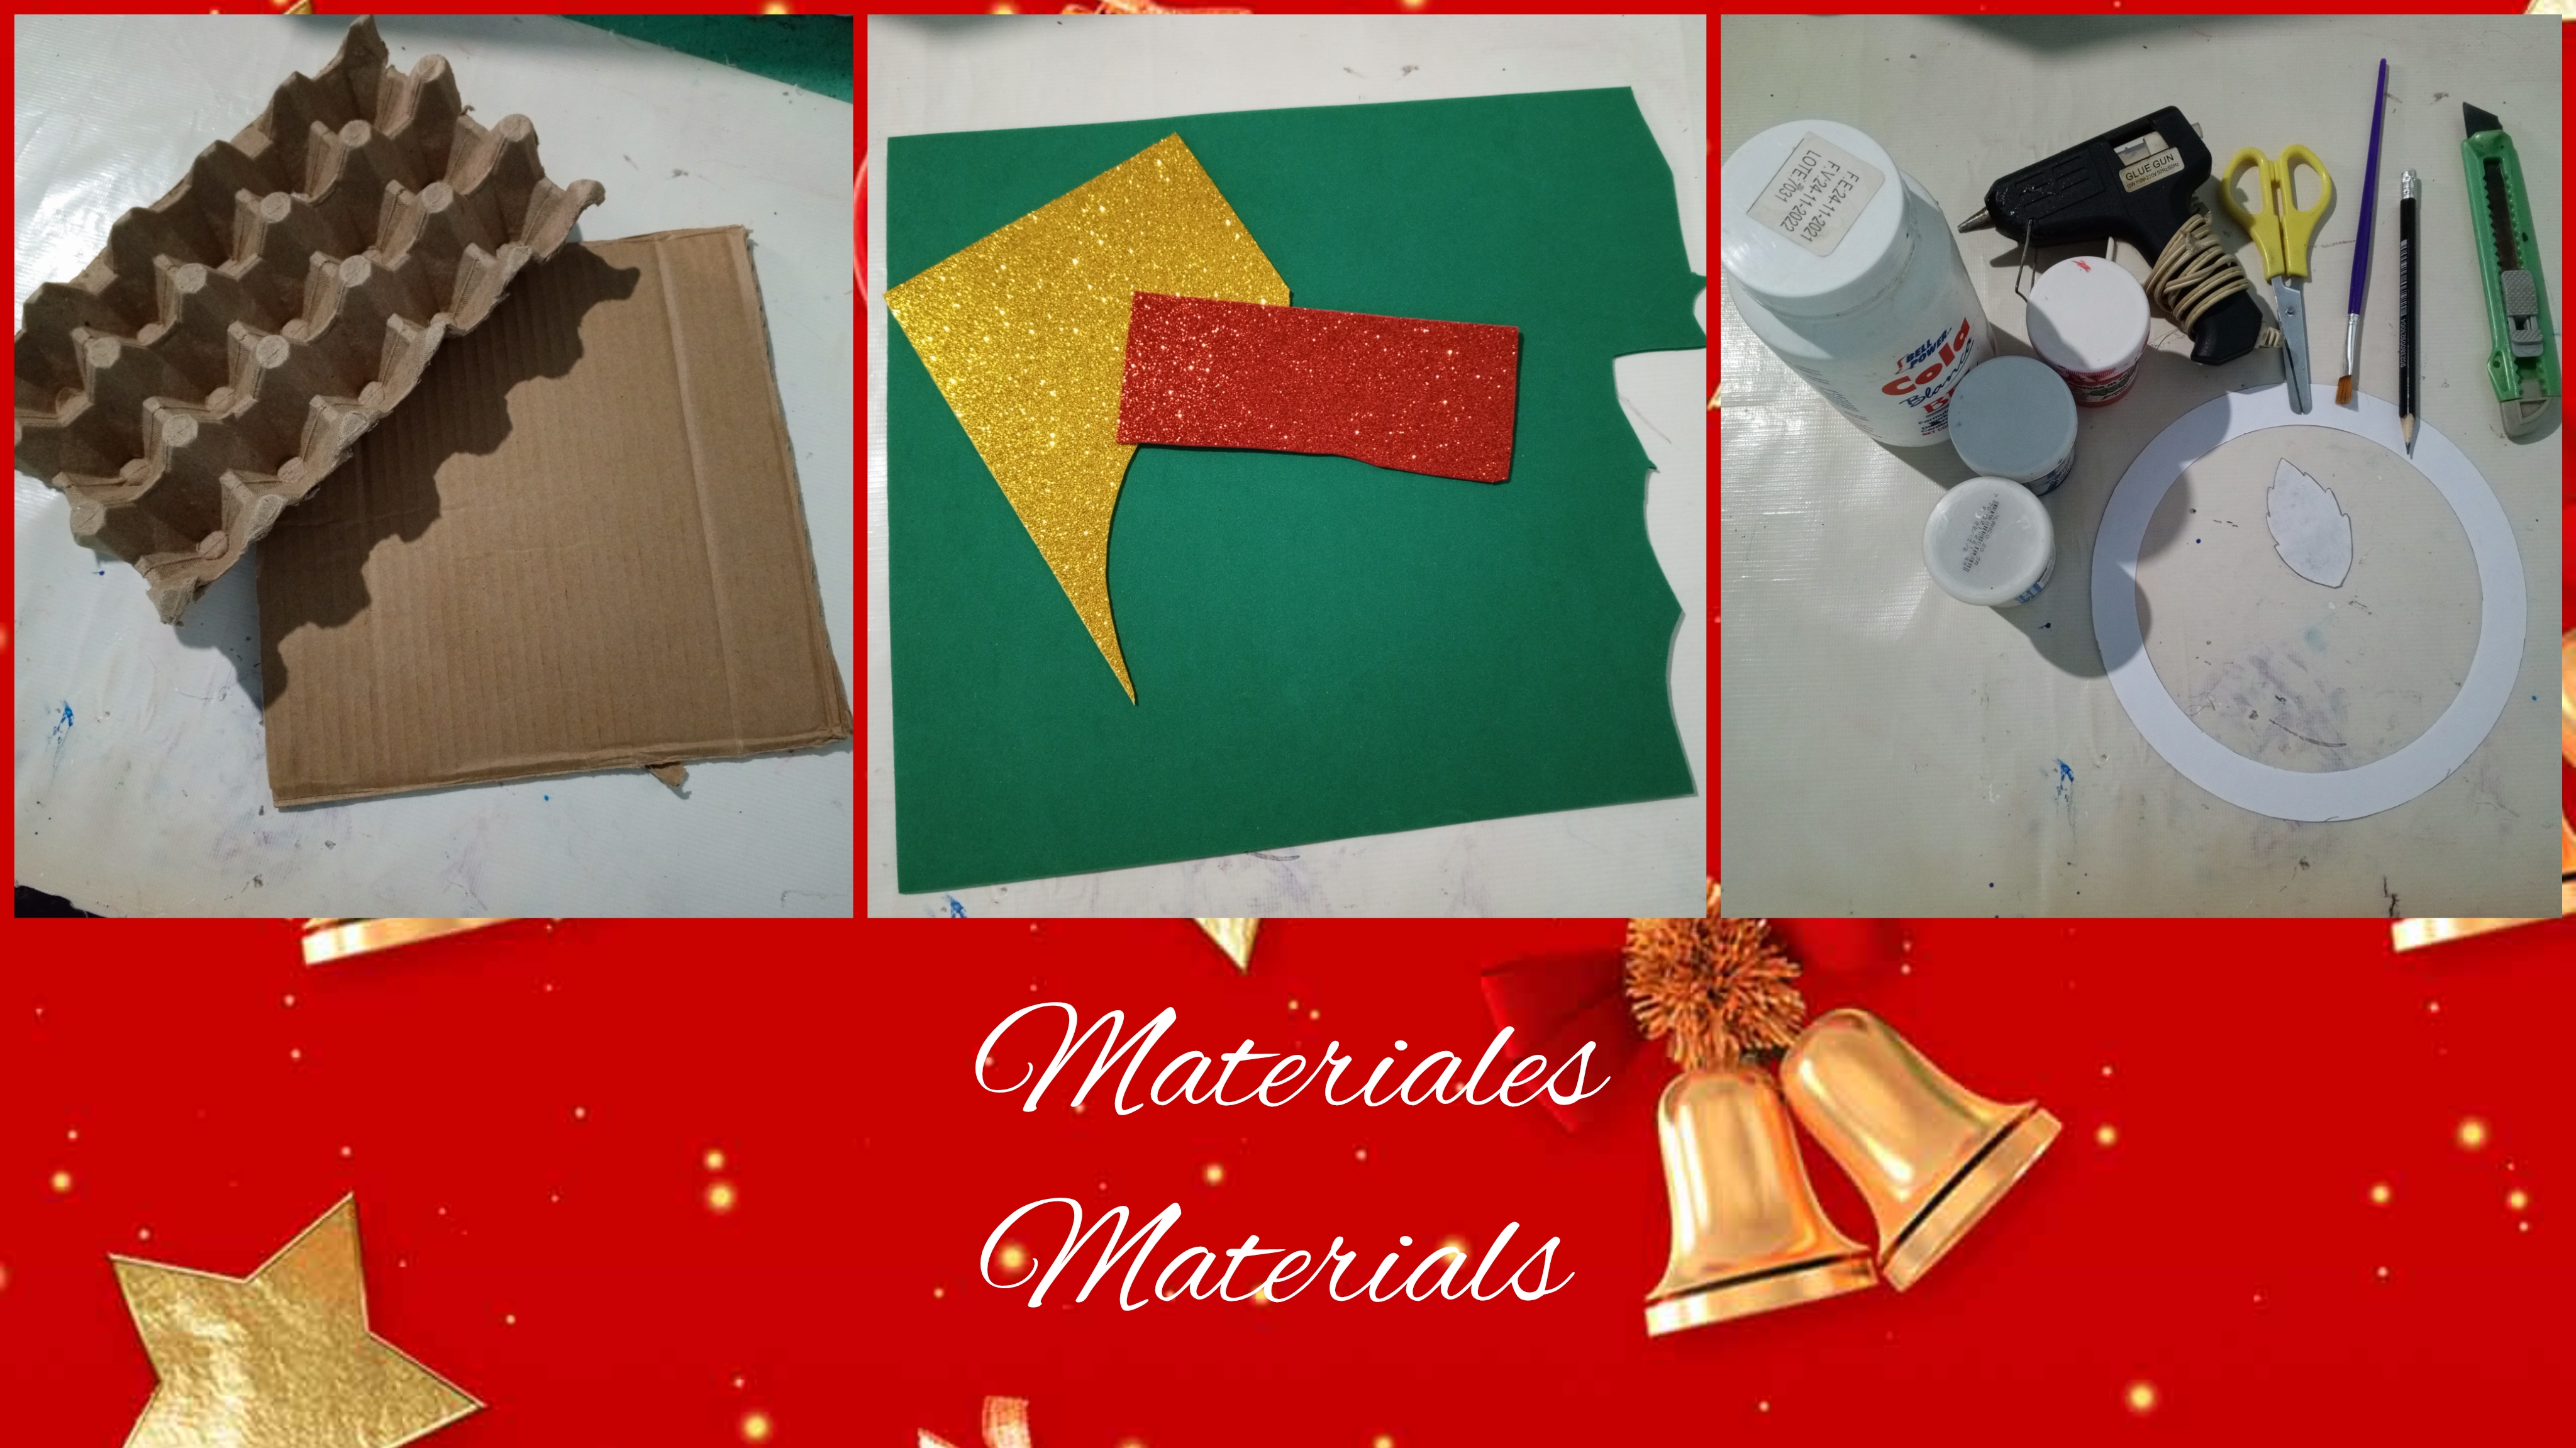
Los materiales que utilicé para su elaboración fueron los siguientes
The materials I used to make it were the following:
- Cartón de huevo.
- Cartón.
- Foami sencillo verde,
- Foami escarchado rojo y dorado.
- Cúter.
- Tijera.
- Pega blanca.
- Pintura al frío blanca, azul y roja.
- Pincel.
- Silicón.
- Pistola de silicón.
- Lápiz.
- Molde para la hacer la base cricular y para hacer las hojas.
- Regla.
🌟Materials🌟
- Egg carton.
- Cardboard.
- Simple green foam,
- Red and gold frosted foam.
- Cutter.
- Scissors.
- White glue.
- White, blue and red cold paint.
- Brush.
- Silicone.
- Silicone gun.
- Pencil.
- Mold to make the circular base and to make the leaves.
- Ruler.
Ahora acompañe a ver el paso a paso de esta hermosa corona. 😍
Now come along to see the step by step of this beautiful crown. 😍
🥰Step by step🥰
✨Circular base✨
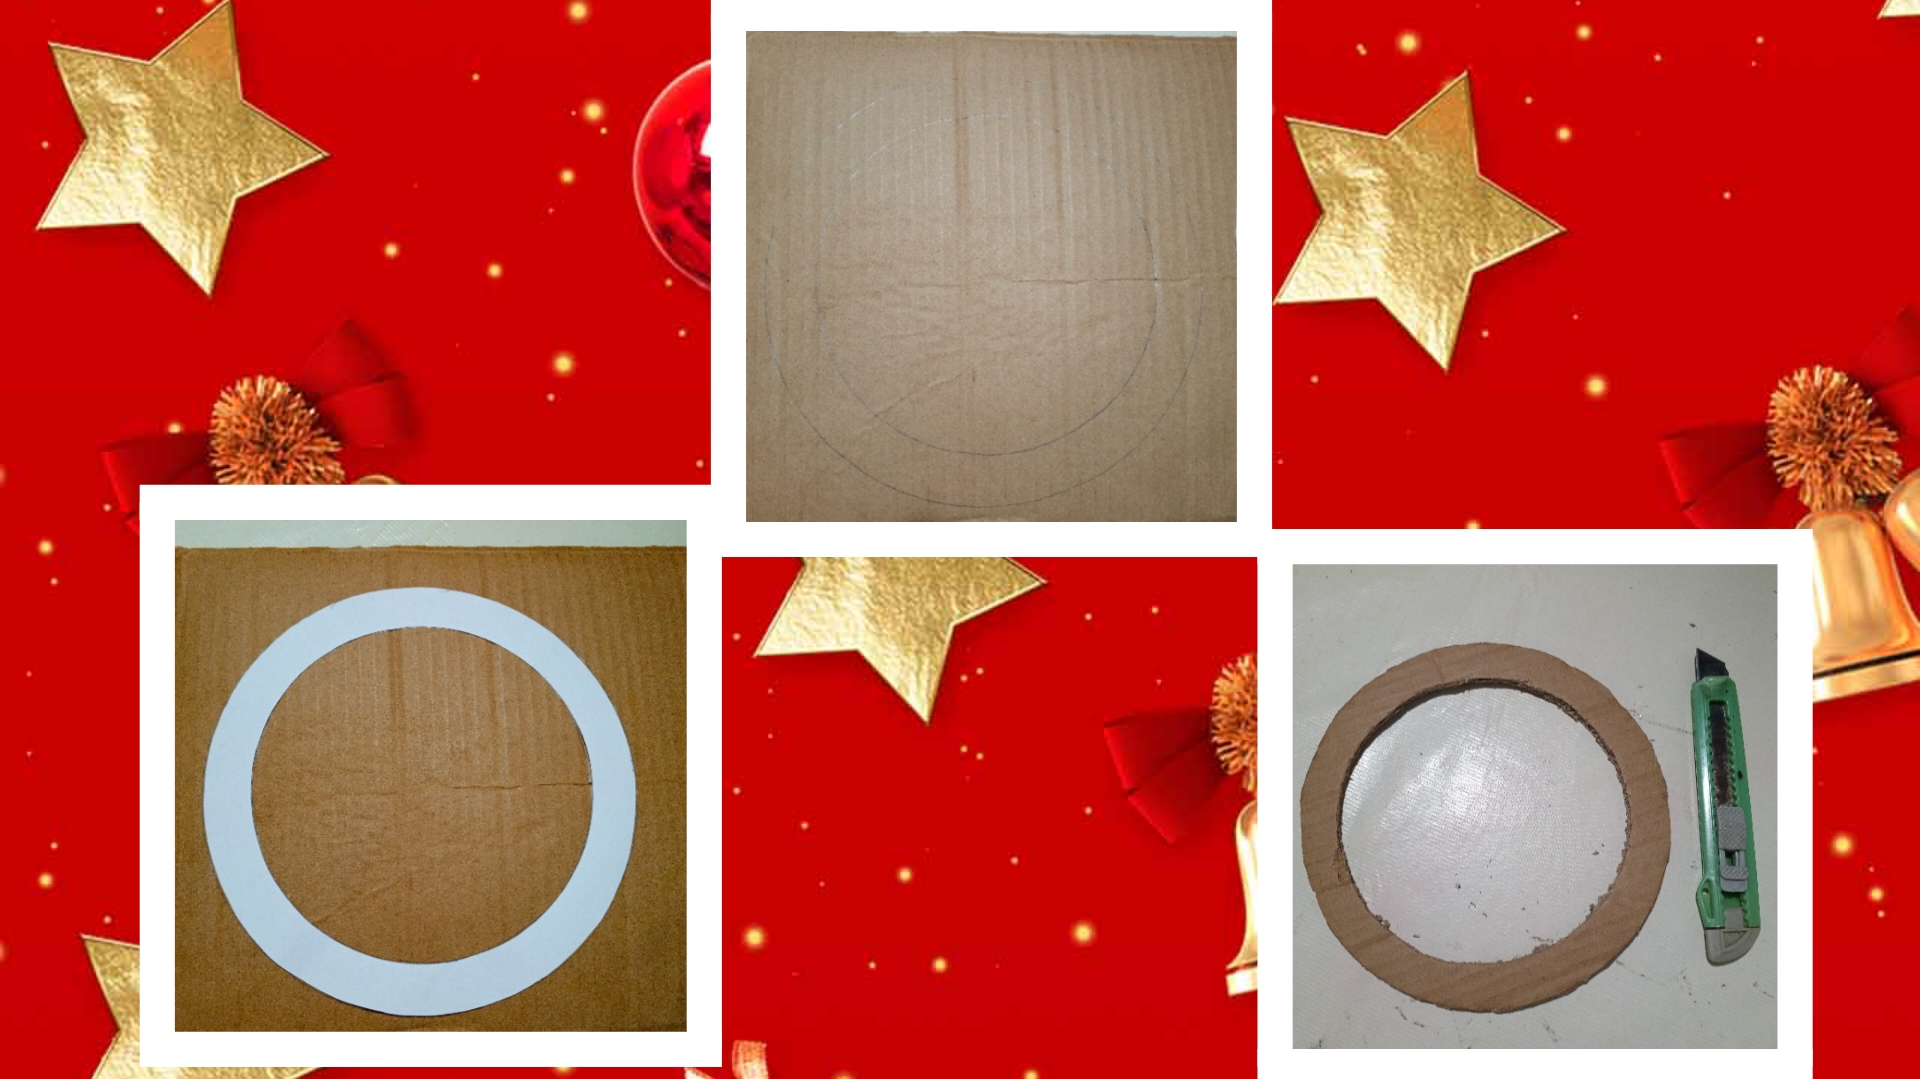
Comencé haciendo la base cricular para la corona, para esto utilicé un molde circular que había hecho para otra manualidad y me pareció perfecto y del tamaño ideal para la mini corona.
I started by making the circular base for the crown, for this I used a circular mold that I had made for another craft and it seemed perfect and the ideal size for the mini crown.
Con un lápiz traspase el molde al cartón y con la ayuda de un cúter y también unas tijeras lo recorte.
With a pencil transfer the mold to the cardboard and with the help of a cutter and also scissors cut it out.
✨Painting the base✨
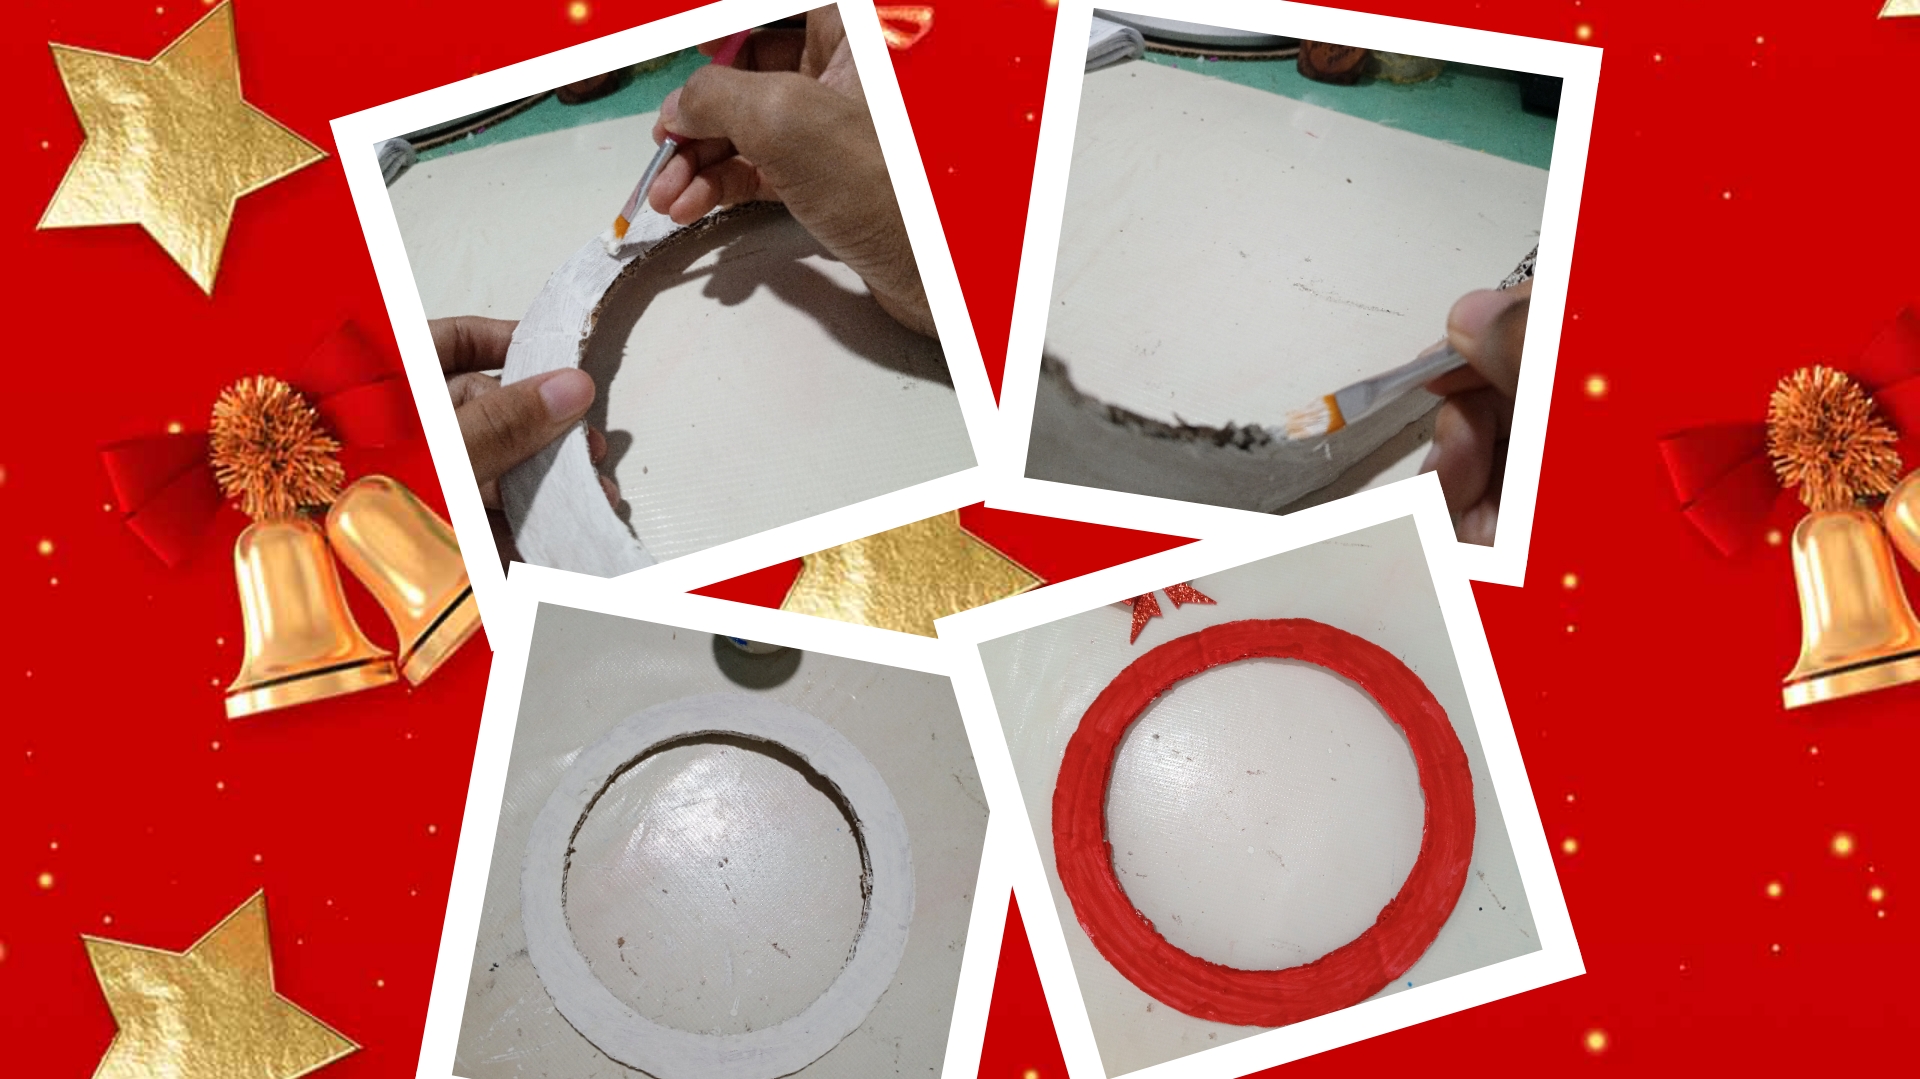
Luego comencé a pintar la base, tengo que admitir que me hubiese gustado pintarla verde, pero no tengo ese color así que decidí hacerlo con pintura blanca y roja.
Then I started to paint the base, I have to admit that I would have liked to paint it green, but I don't have that color so I decided to do it with white and red paint.
Le puse el blanco como base para que quede más uniforme al aplicar la pintura roja.
I put the white one as a base so that it will be more uniform when applying the red paint.
Luego le deje secar mientras hacía el sienguiente paso.
Then I let it dry while I did the next step.
✨Flower preparation✨
El siguiente paso fue la elaboración de las flores de noche buena con cartón de huevo, quiero tomarme un momento para expresar el amor 🥰 que siento por este material, de verdad es un material muy noble y hermoso para hacer flores. 😍
The next step was making the Christmas Eve flowers with egg carton, *I want to take a moment to express the love 🥰 that I feel for this material, it really is a very noble and beautiful material to make flowers. * 😍
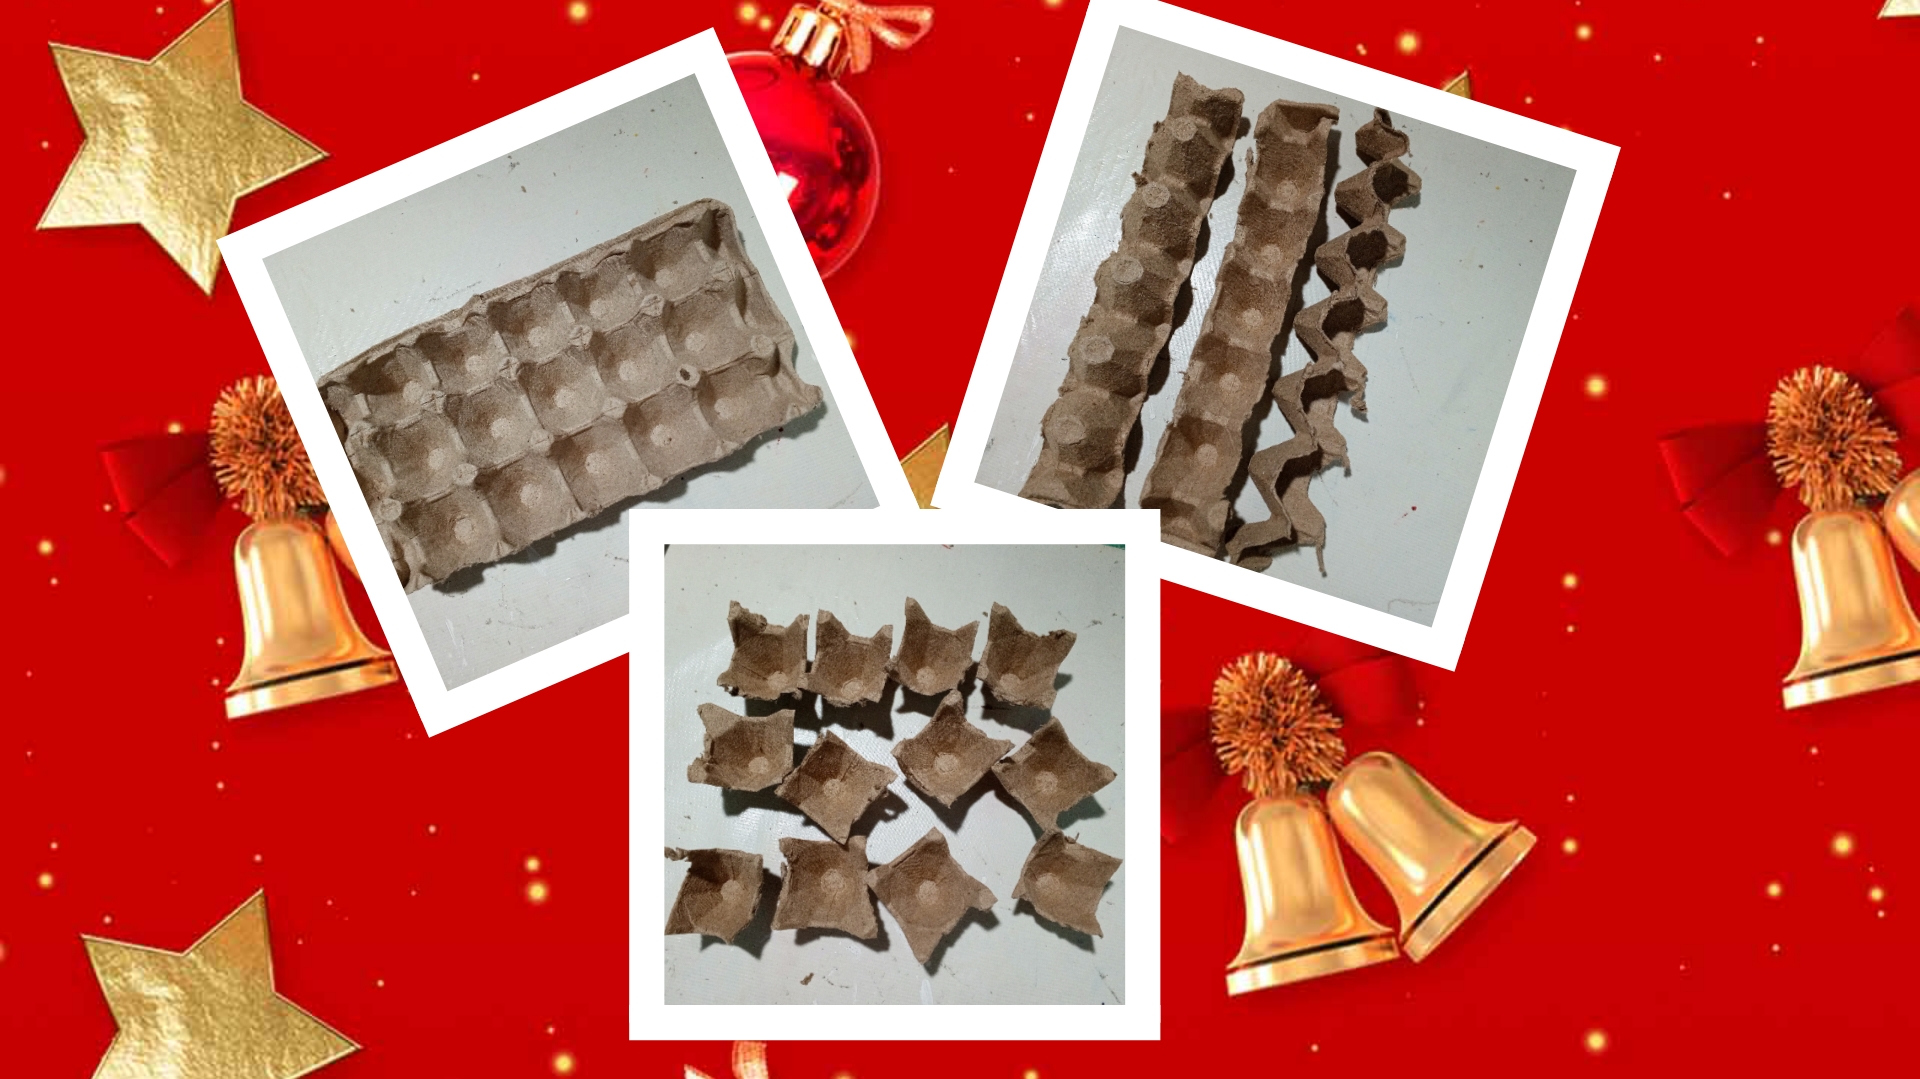
Primero comencé dividiendo el cartón de huevo, cómo pueden ver en la imagen, primero en hileras y luego cada hilera la dividí en cada unos de los pequeños compartimentos del cartón de huevo.
First I started dividing the egg carton, as you can see in the image, first into rows and then I divided each row into each of the small compartments of the egg carton.
Cada uno de esos compartimentos nos van a servir para hacer nuestras flores.
Each of these compartments will be used to make our flowers.
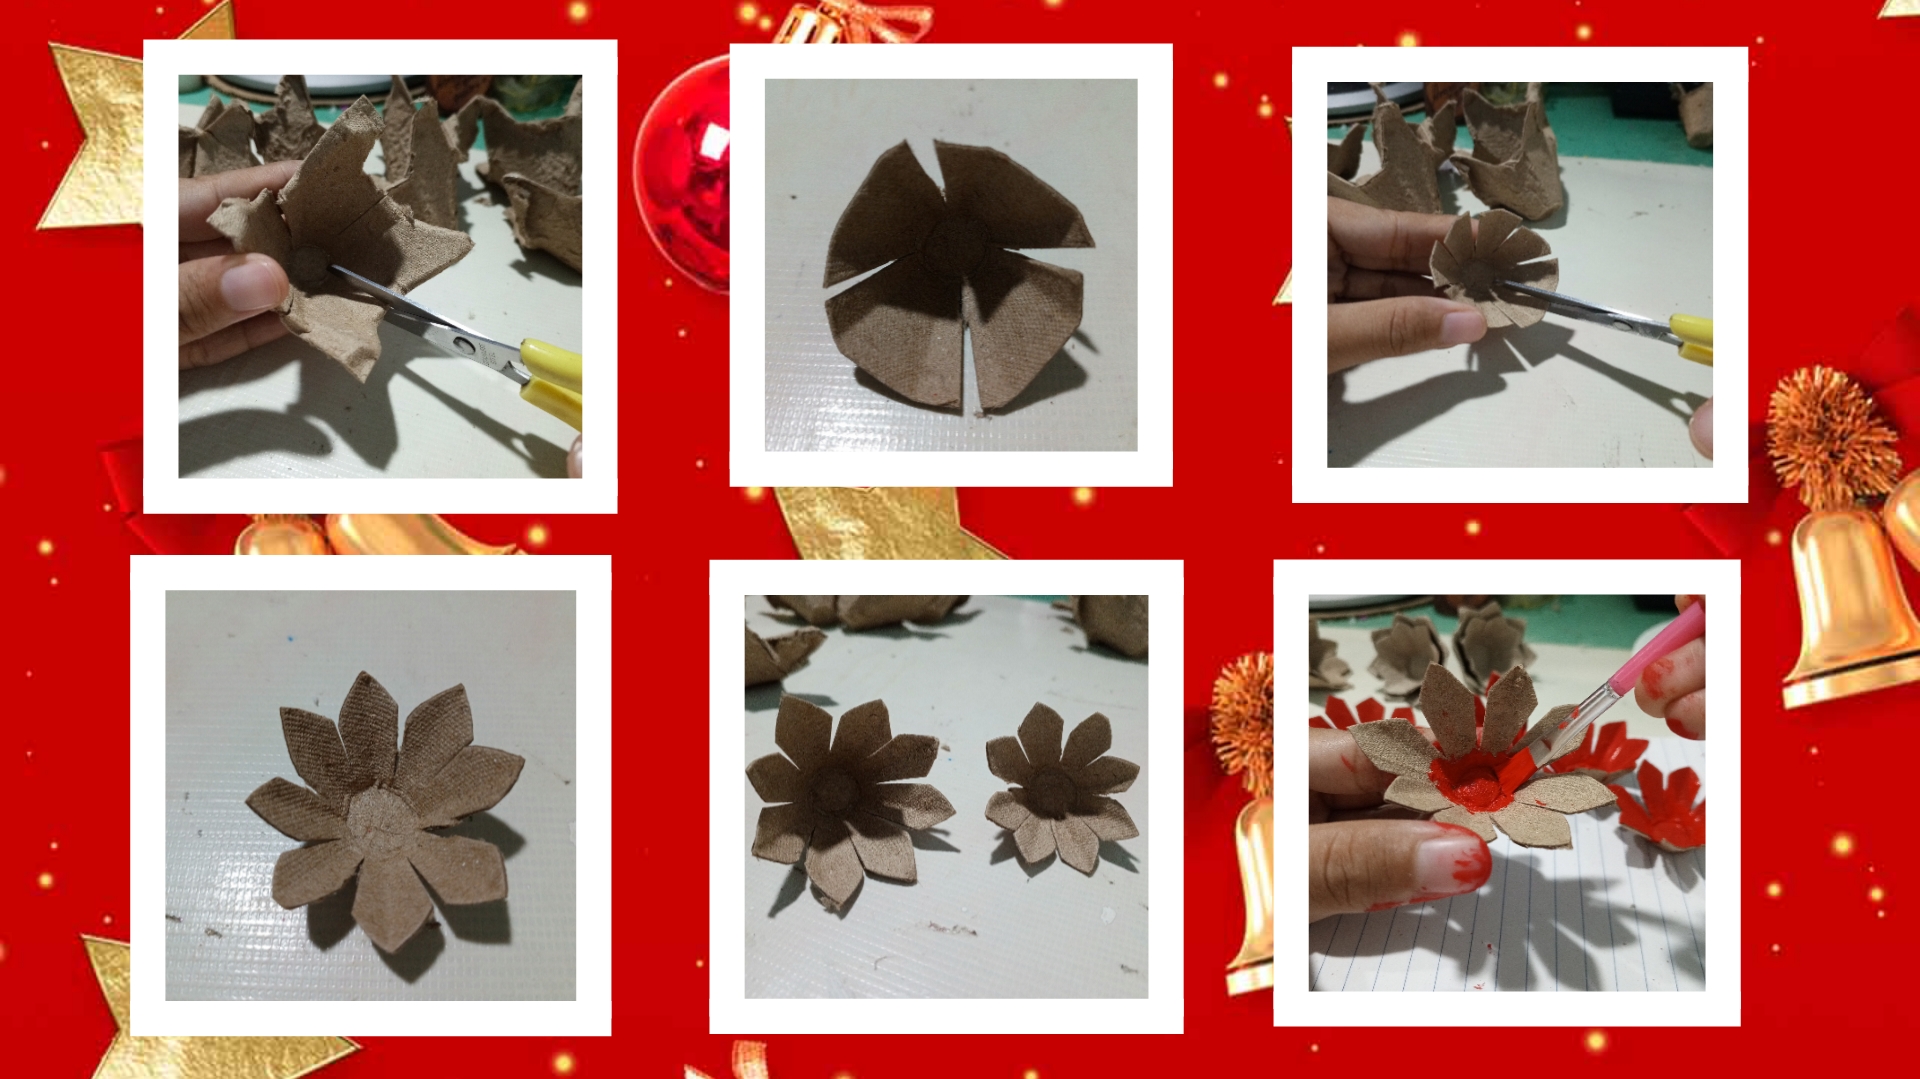
Luego tome una pieza y le hice un corte en el centro de sus cuatro lados sin picarla completamente quedando cómo ven en la imagen una flor de 4 pétalos, pero como lo que quiero es una flor de 8 pétalos hice otro corte en el centro de esos 4 pétalos.
Then I took a piece and made a cut in the center of its four sides without chopping it completely, leaving as you see in the image a flower with 4 petals, but since what I want is a flower with 8 petals I made another cut in the center of those 4 petals.
Además pique la pieza por la mitad para disminuir su tamaño ya que está es la pieza que va en la parte de arriba, por lo tanto de ser más pequeña y luego le dí esa forma puntiaguda a los pétalos.
Then I took one of the compartments and made a cut in the middle of each of its four sides, as you can see the piece looks like it is divided into 4 parts, then I also made a cut in the middle of those four parts to form a flower with 8 petals.
Repetí el mismo procedimiento con otra pieza de cartón de huevo solo que está vez pique un poco más arriba para que me quedara más grande que la pieza anterior y poder colocarla debajo.
I repeated the same procedure with another piece of egg carton, only this time I cut it a little higher so that it would be larger than the previous piece and I could place it underneath.
Para estar flores necesite 7 piezas pequeñas y 7 piezas grandes.
To make these flowers you need 7 small pieces and 7 large pieces.
Cuando tuve todas mis piezas listas procedí a pintarlas con pintura roja al frío, procuré pintarlas bien por los dos lados y las deje secar bien.
When I had all my pieces ready I proceeded to paint them with cold red paint, I tried to paint them well on both sides and let them dry well.
✨Assembly of the flowers✨
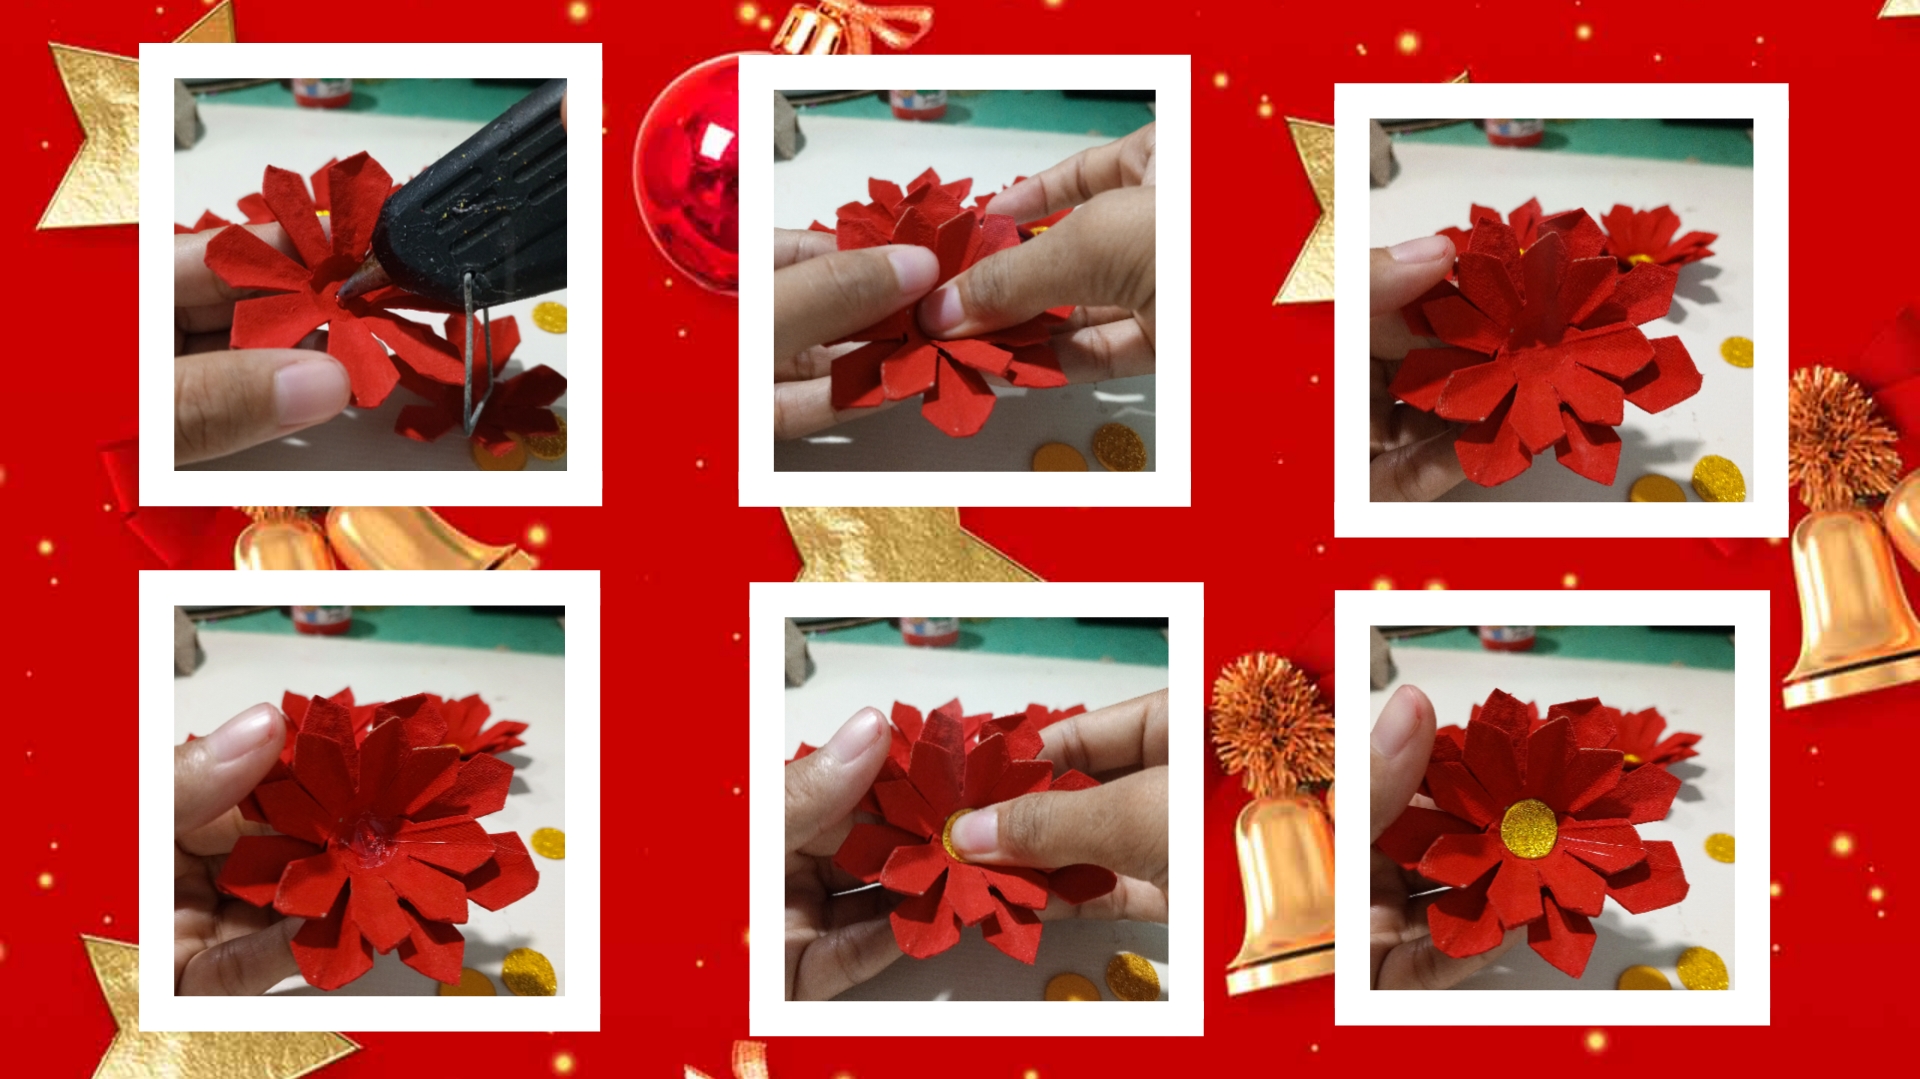
Para el armado de las flores, puse silicón caliente en el centro de la pieza más grande y rápidamente, antes de que se secara en silicón, coloque la pieza más pequeña encima, presionando unos segundos para que se pegará bien.
To assemble the flowers, I put hot silicone in the center of the largest piece and quickly, before it dried in silicone, placed the smaller piece on top, pressing for a few seconds so that it would stick well.
Para hacer el pistilo de mis flores de noche buena recorte unos pequeños círculos de foami dorado escarchado y los coloque en el centro con silicón caliente.
To make the pistil of my Christmas Eve flowers, I cut out some small circles of frosted gold foam and placed them in the center with hot silicone.
Algo que me encanta hacer es ponerle pega blanca por encima a las flores para que le dé ese acabado brillante que tanto me gusta.
Something I love to do is put white glue on top of the flowers to give it that shiny finish that I like so much.
Luego de ese paso es muy importante dejarlas secar muy bien, si es posible frente a un ventilador, o eso es lo que hago yo para acelerar el proceso.🤭
After this step it is very important to let them dry very well, if possible in front of a fan, or that is what I do to speed up the process.🤭
✨Preparation of the sheets✨
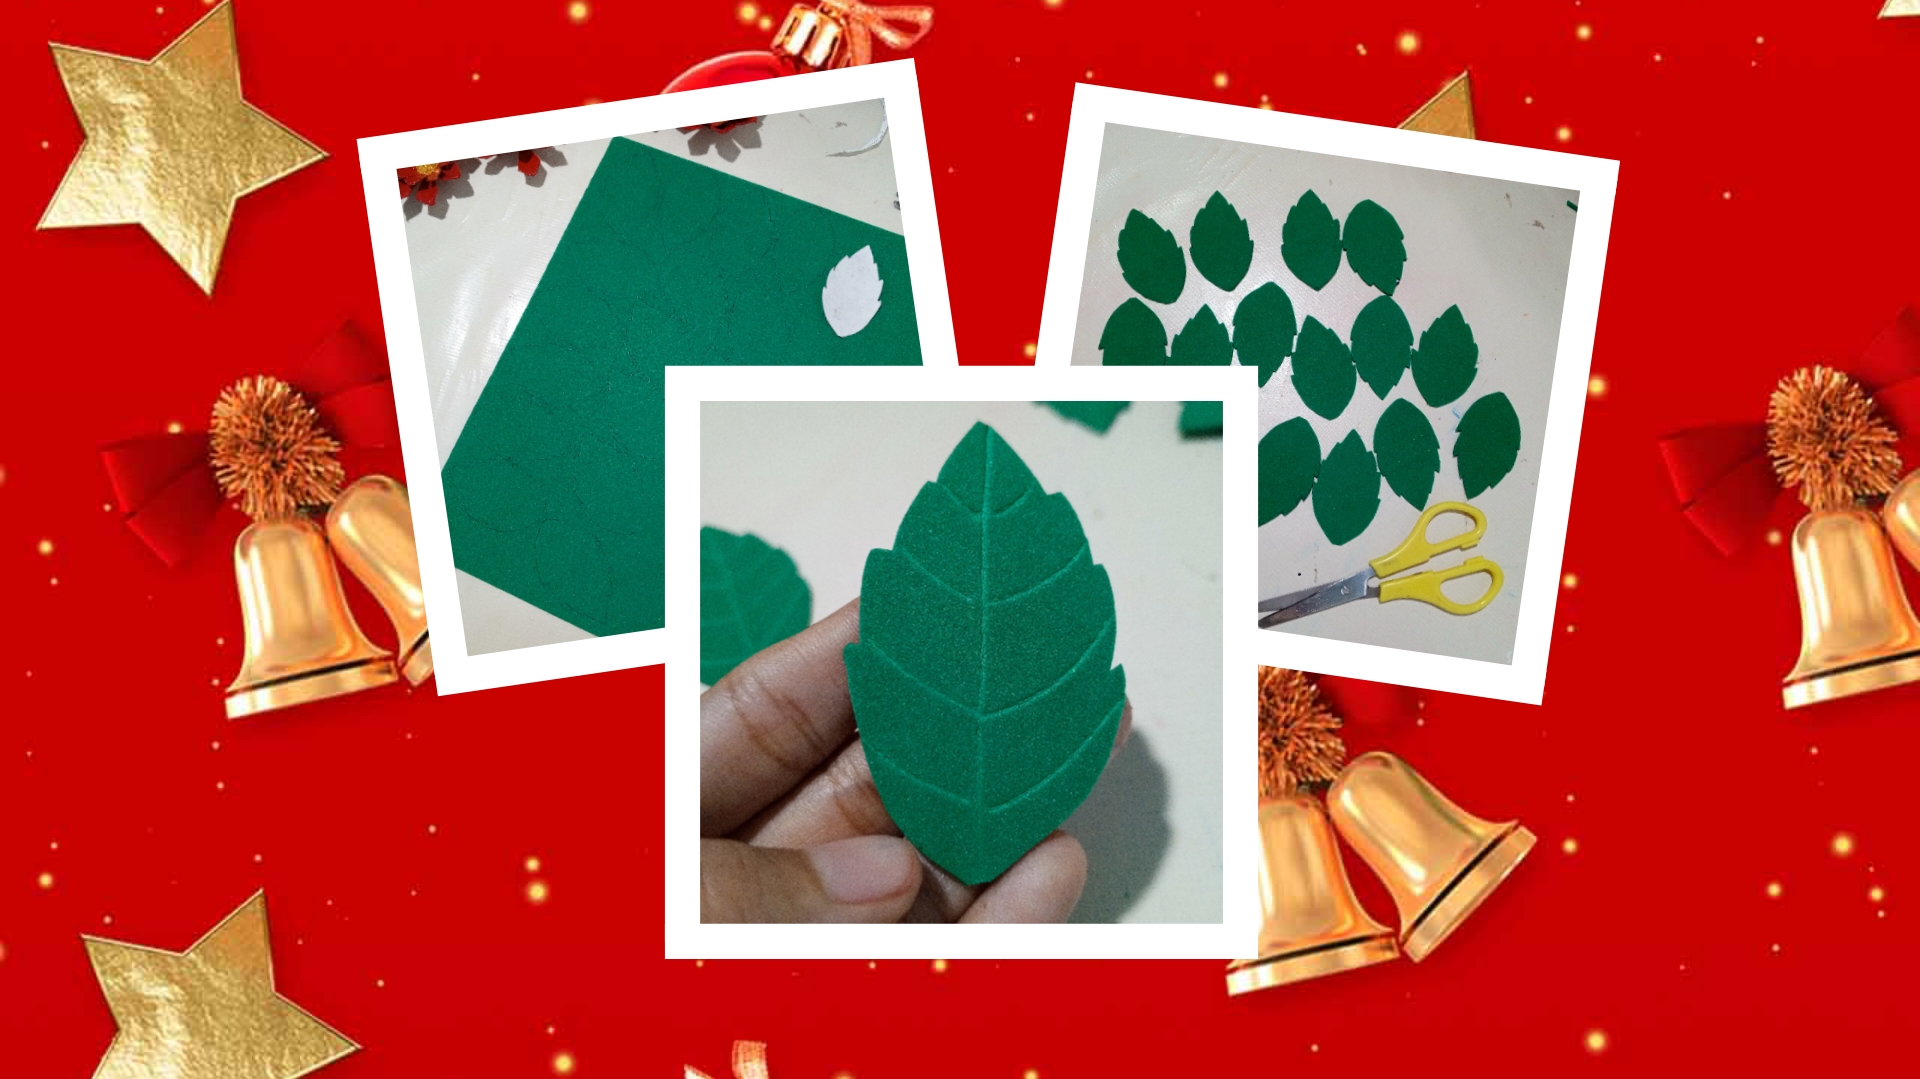
Para las hojas traspase mi molde al foami verde sencillo con la ayuda de un lápiz y las recorte.
For the leaves, I transferred my simple green foam mold with the help of a pencil and cut them out.
Luego con la punta de un palillo de altura les hice las nervaduras que llevan las hojas, ustedes pueden hacerlo con un mondadientes o con cualquier herramienta que tenga punta, pero que no sea un lápiz o un bolígrafo la idea no es rayar la hoja.
Then with the tip of a tall toothpick I made the ribs that the leaves have. You can do it with a toothpick or with any tool that has a point, but other than a pencil or a pen, the idea is not to scratch the sheet.

Luego para darle más aspecto natural a las hojas, con un pañito y dando toquesitos con el dedo les aplique pintura azul al frío, y de la misma manera convine azul con rojo y le di otra pequeña capa de pintura para darle aún más naturalidad y vida a las hojas.
Then to give the leaves a more natural appearance, with a cloth and dabbing with my finger I applied blue paint to them in the cold, and in the same way I combined blue with red and gave it another small layer of paint to give it even more naturalness and life to the leaves.
Elaboré en total 14 hojas dos para cada flor.
I made a total of 14 sheets, two for each flower.
✨Gluing the leaves to the flowers✨
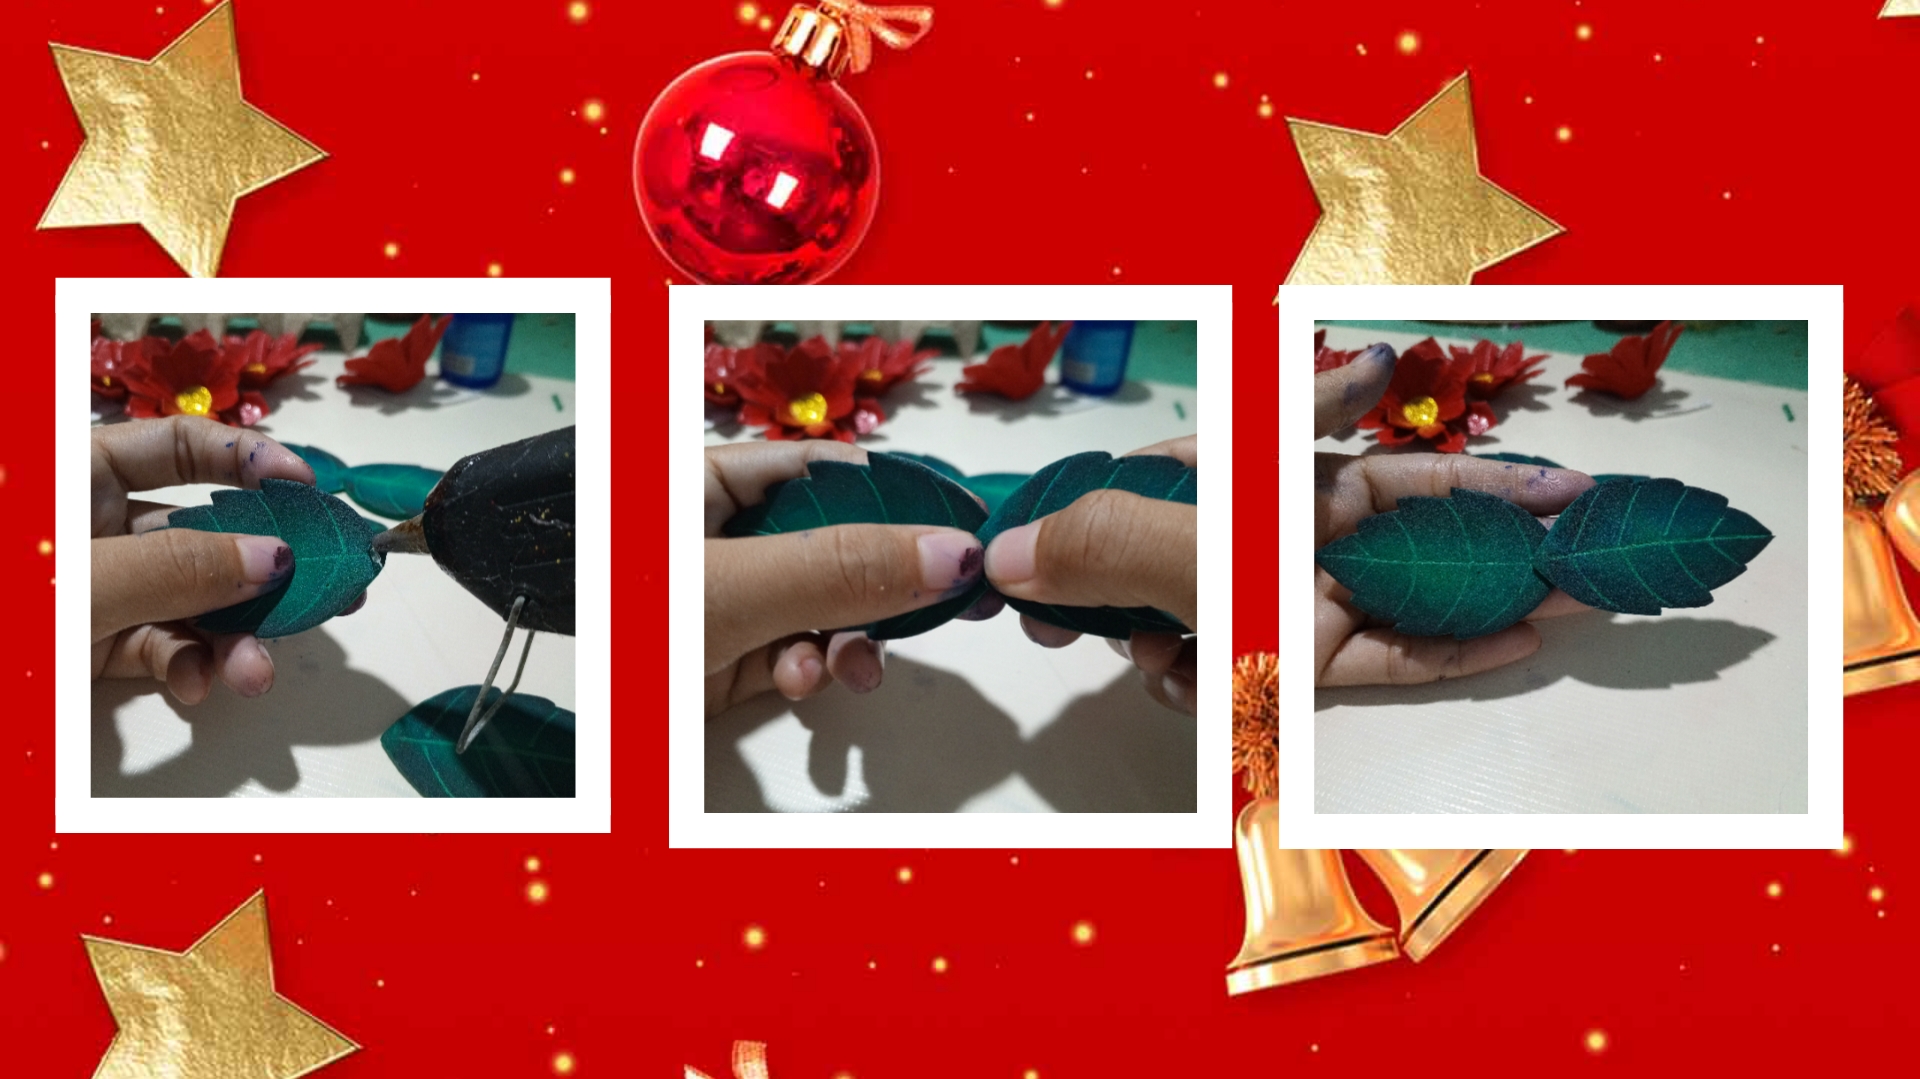
Luego con silicón caliente uni una hoja con la otra cómo pueden apreciar en la imagen.
Then with hot silicone I joined one sheet to the other as you can see in the image.
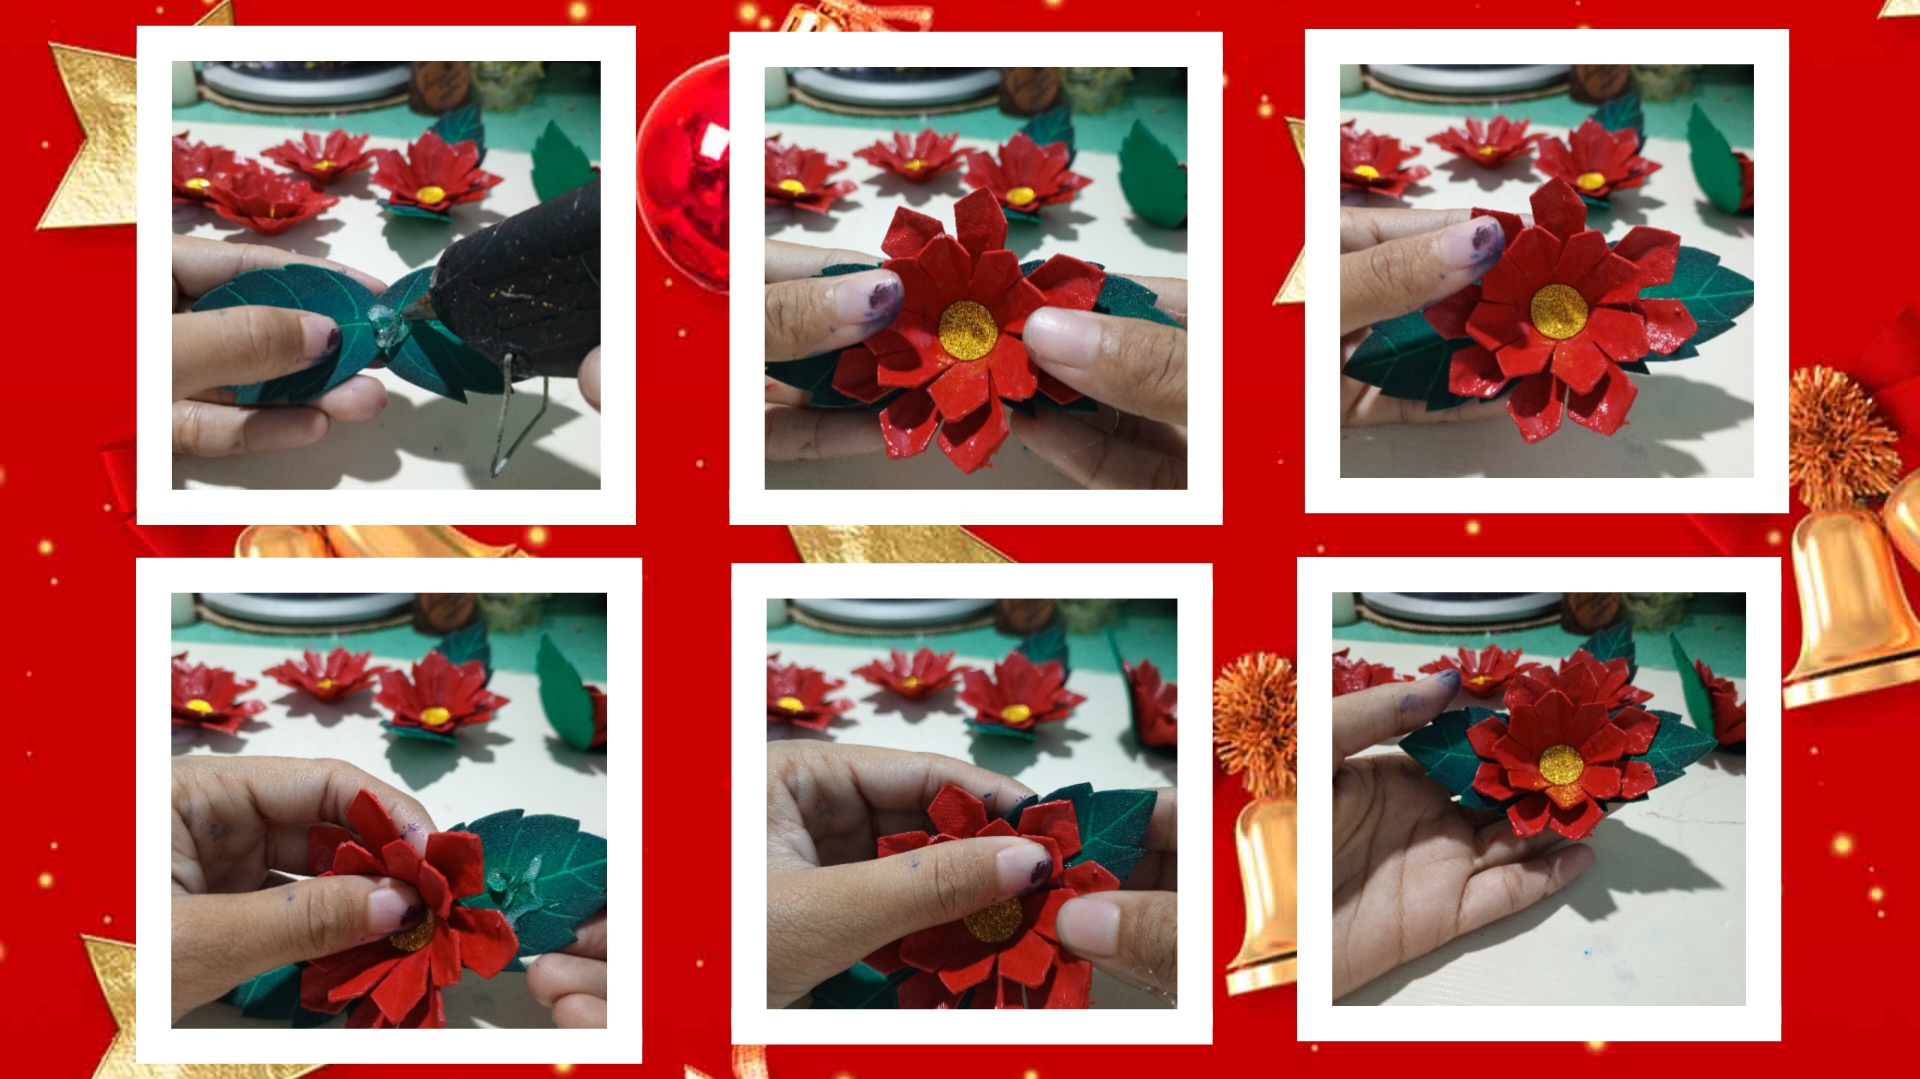
En todo el medio de la unión de las hojas coleque silicón caliente y pegue la flor allí en todo el centro. También coloque silicón en las hojas para pegarlas a los laterales de las flores.
Place hot silicone in the middle of the union of the leaves and glue the flower there in the entire center. Also put silicone on the leaves to stick them to the sides of the flowers.
Y listas las flores. 🥹
And the flowers are ready. 🥹
Pero eso no es Todo también elabore unos lindos lazitos para ponerlos en el centro de mi corona.
But that's not all. I also made some cute little bows to put in the center of my crown.
✨Making the bows✨
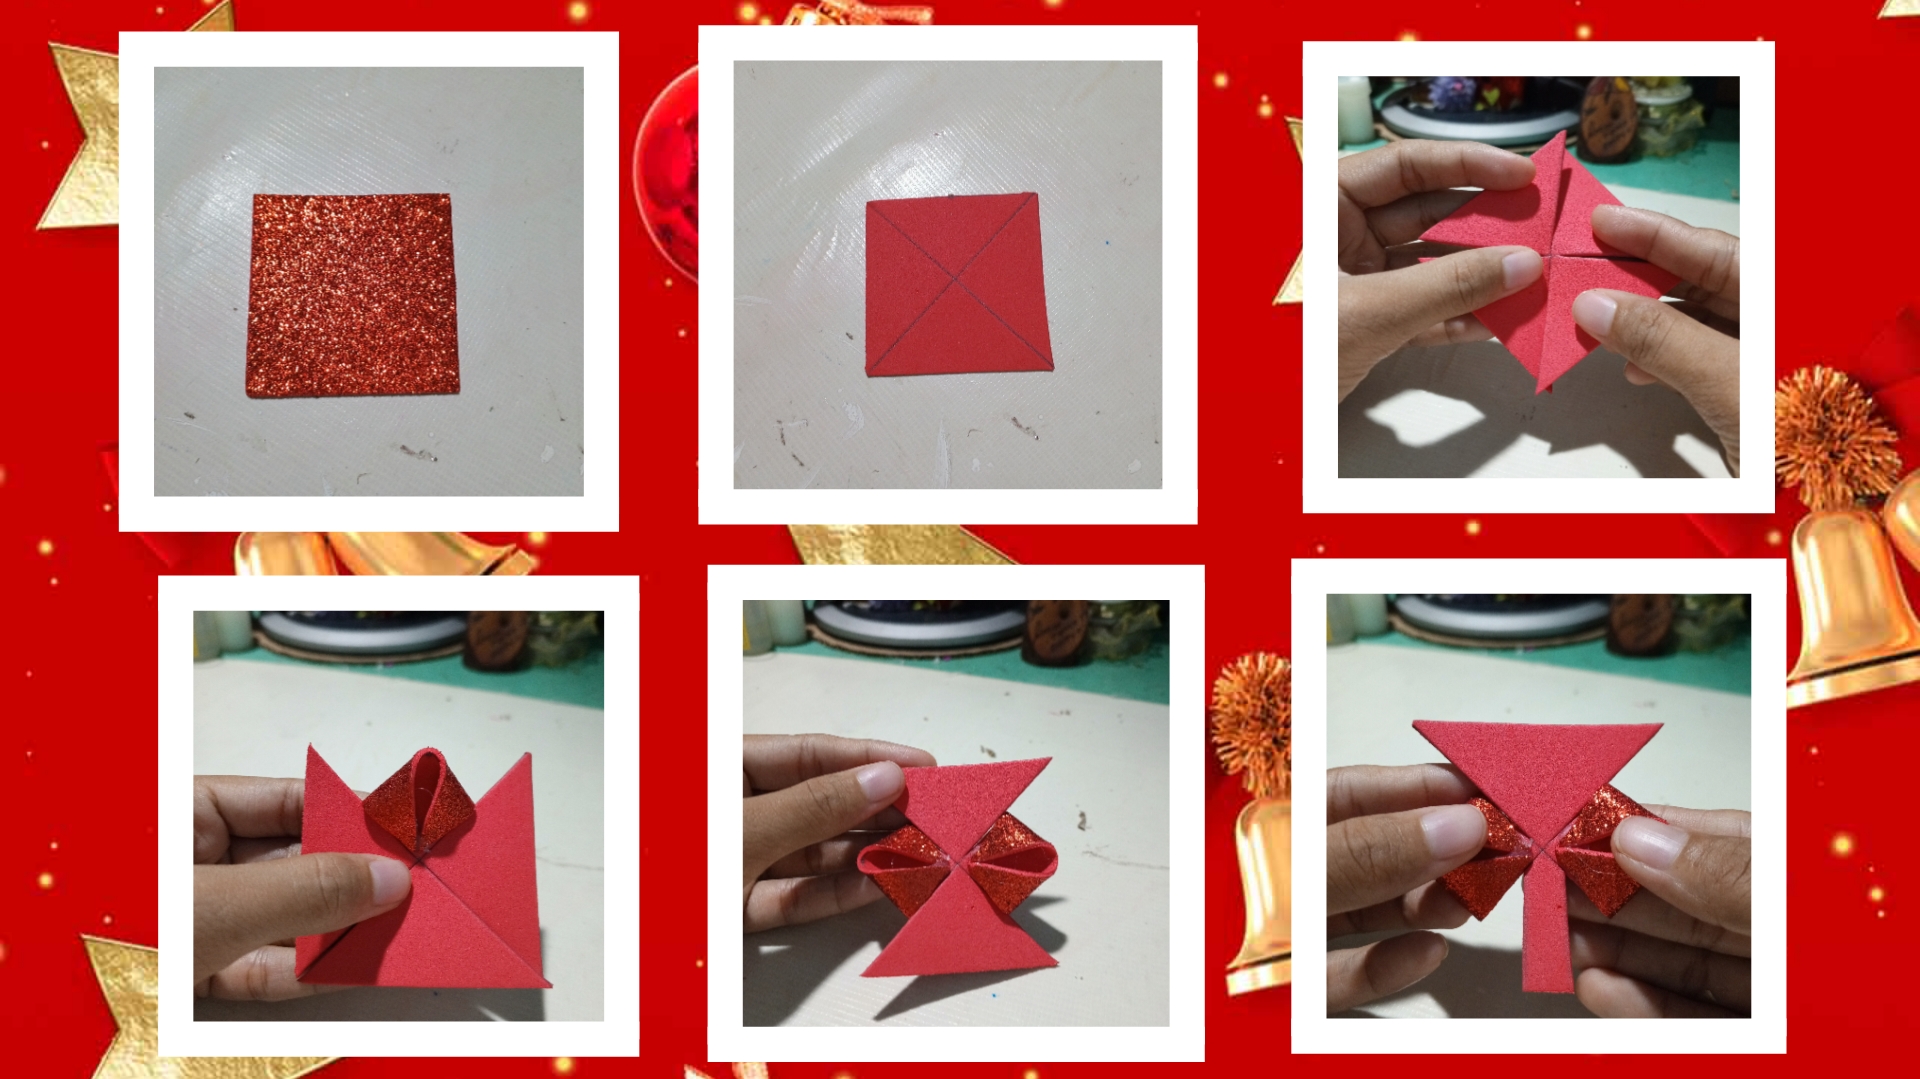
Para hacer el lazo, hice en mi foami escarchado rojo un cuadrado de 6 x 6 Cm.
To make the bow, I made a 6 x 6 cm square in my red frosted foam.
Lo recorte y con ayuda de una regla traze dos líneas diagonales por todo el centro del cuadrado formando como una especie de cruz.
Cut it out and with the help of a ruler draw two diagonal lines throughout the center of the square, forming a kind of cross.
Luego hice cuatro cortes siguiendo las líneas que traze, pero sin cortar por completo el cuadrado, o sea dejando la parte del centro sin cortar, de esta manera el cuadrado nos quedará dividido en 4 triángulos.
Then I made four cuts following the lines I drew, but without cutting the square completely, that is, leaving the center part uncut, in this way the square will be divided into 4 triangles.
Luego tome uno de esos 4 triángulos le coloque silicón caliente en cada punta y luego lo doble hacia dentro uniendo ambas puntas en el centro e hice lo mismo con el lado apuesto del cuadrado y de esta manera se formarán las orejitas de nuestro lazo.
Then take one of those 4 triangles, place hot silicone on each end and then fold it inwards, joining both ends in the center and I did the same with the right side of the square and in this way the ears of our bow will be formed.
Luego a otro de los triángulos lo recorte para que quedará una tira fina de foami.
Then I cut out another of the triangles so that a thin strip of foam will remain.
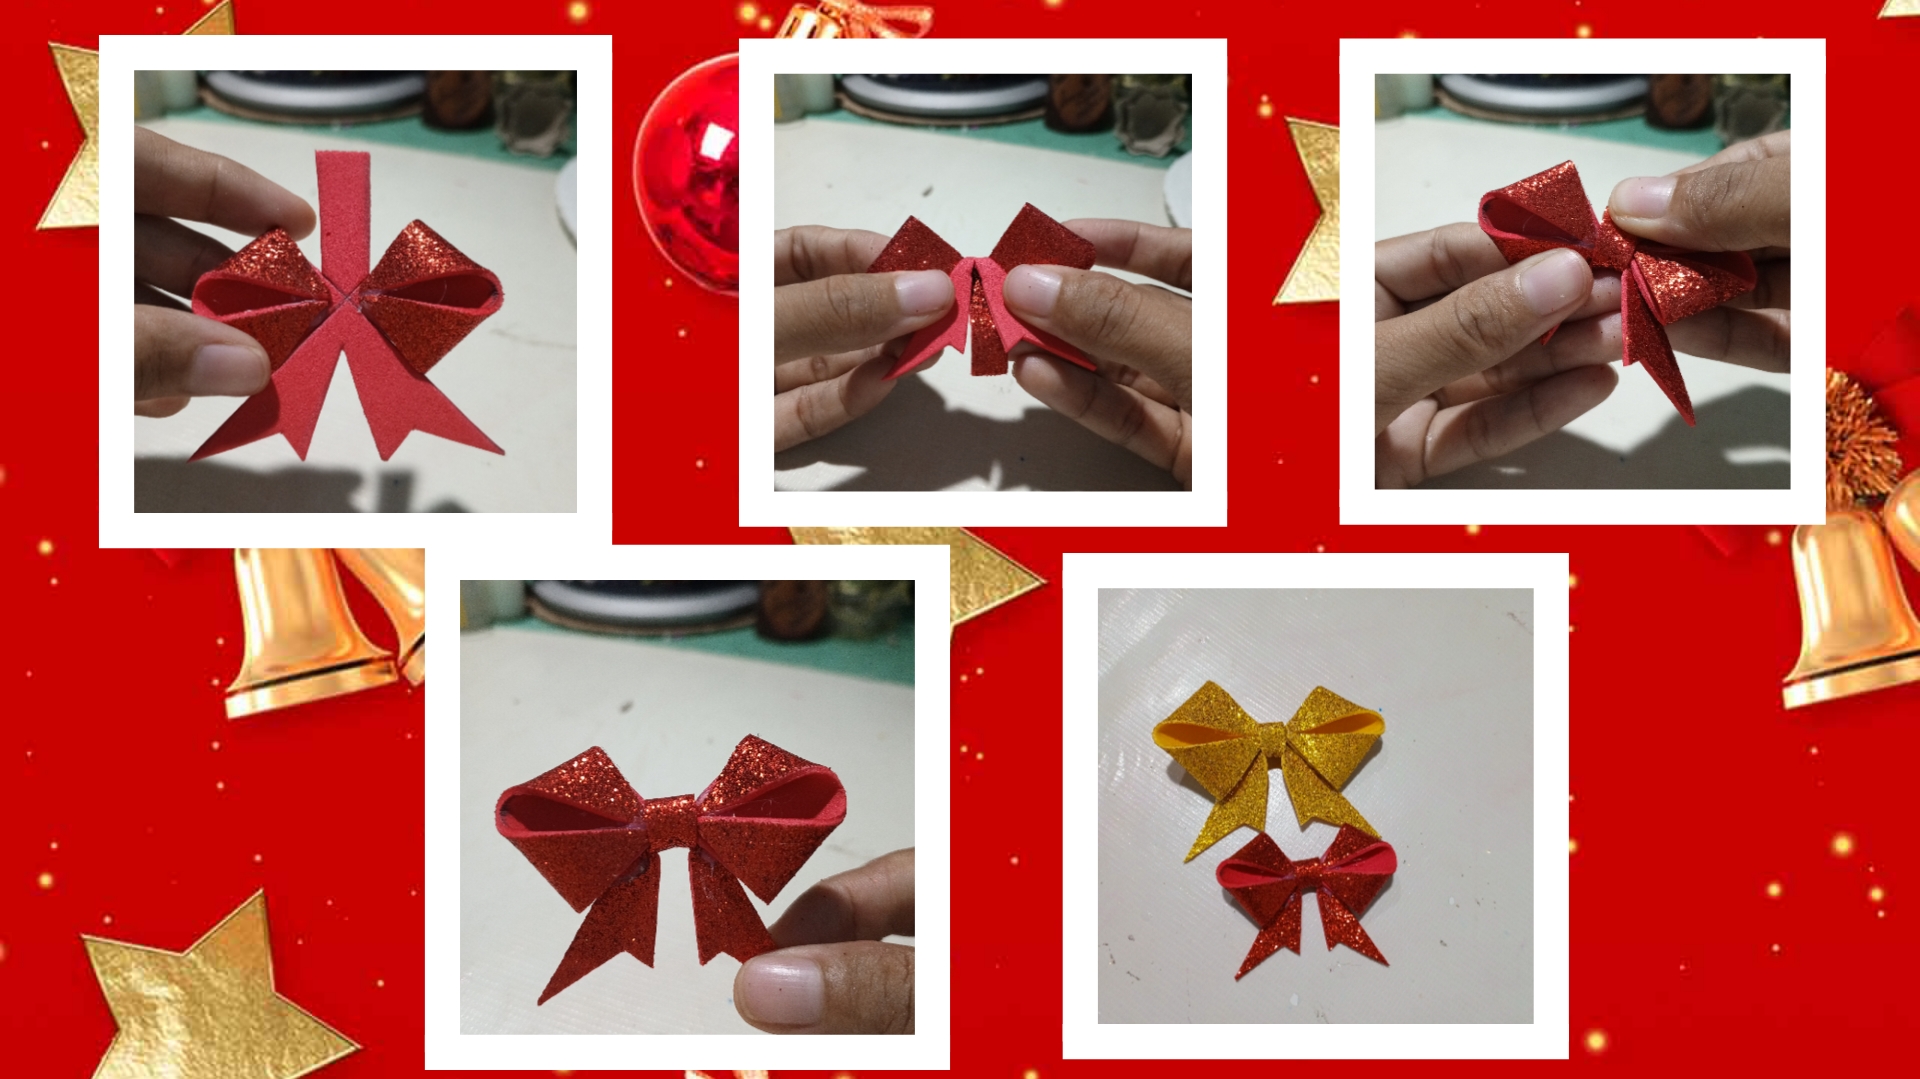
A la otra pieza le saque la parte del centro para formar las tiras del lazo, luego voltee la pieza y doble las tiras hacían abajo, para luego enrrollar al rededor la tira larga que picamos primero y luego pegamos con silicón caliente. (Mil disculpas si no logro explicar tan bien, espero que las imágenes puedan darjar todo más claro)
From the other piece I took out the center part to form the strips of the bow, then turn the piece over and fold the strips down, and then roll the long strip that we chopped first and then glued with hot silicone around it. (I apologize if I can't explain it so well, I hope the images can make everything clearer)
Y así quedó mi lazo, luego hice otro dorado un poco más grande de 8x8 Cm.
And this is how my bow looked, then I made another golden one a little larger, 8x8 Cm.
Listos todo los apliques el último paso fue pegar todo a la base y este fue el resultado.
Once all the appliqués were ready, the last step was to glue everything to the base and this was the result.
Espero les haya gustado mi participación y se animen a hacer una mini corona como esta.
I hope you liked my participation and are encouraged to make a mini crown like this.
Nos vemos en un próximo post, que estén bien y Dios los bendiga, bye.🥰😘💜🌹🪷
See you in a next post, be well and God bless you, bye.🥰😘💜🌹🪷
Todas las imágenes de este post son de mi autoría tomadas con mi teléfono Tecno Spark 10 Pro editadas en PicsAr y FotoGrid
All the images in this post are my own, taken with my Tecno Spark 10 Pro phone edited in PicsAr and FotoGrid
Traducción al inglés: Traductor Google.
https://translate.google.com/?hl=es&sl=es&tl=en&op=translate
English translation: Google Translate. https://translate.google.com/?hl=es&sl=es&tl=en&op=translate
Esa corona navideña te quedó hermosa! Y tomaste muy buenas fotos, de seguro resaltará y embellecera cualquier lugar en donde lo pongas. 🎀🎄
Muchas gracias! Qué lindo comentario 😍
Congratulations @sarangzg7! You have completed the following achievement on the Hive blockchain And have been rewarded with New badge(s)
Your next payout target is 100 HP.
The unit is Hive Power equivalent because post and comment rewards can be split into HP and HBD
You can view your badges on your board and compare yourself to others in the Ranking
If you no longer want to receive notifications, reply to this comment with the word
STOPTo support your work, I also upvoted your post!
Check out our last posts:
Thank You very much! 🥰😍
That's great @sarangzg7! We're excited to see your accomplishments on Hive! We keep cheering you on for your next goal!
Thank you, I really appreciate the encouragement you give me. 🥰
Se ve muy bonito, excelente la idea de las flores
Muchas gracias, que bueno que te gustó!.
Impressive! It is so beautiful. Love it. Great job!
Oh thank You very much! 😍🥰
Muy hermosa corona @sarangzg7 , exelente paso a paso, feliz tarde 🌹🌷🌸🪷🌺💐💮🏵️🌼🌻☘️
Muchas gracias, aprecio mucho tu lindo comentario. 🥰
Madre mía, qué preciosura. Esto definitivamente lo voy a guardar. Quiero hacerlo también. Gracias, querida.