Hello creative friends! I hope you are having a great week. After a long time I wanted to participate in a contest again and I loved the idea that this wonderful community offers. As you can imagine in my field there are thousands of things to do with the theme of the moon but I finally decided on Sailor Moon.
Hola amigos creativos!!! Espero estén teniendo una excelente semana. Después de mucho tiempo quise volver a participar de un concurso y me encantó la idea que ofrece esta maravillosa comunidad. Como imaginarán en mi rubro hay miles de cosas para hacer con la temática de la luna pero finalmente me decidí por Sailor Moon.
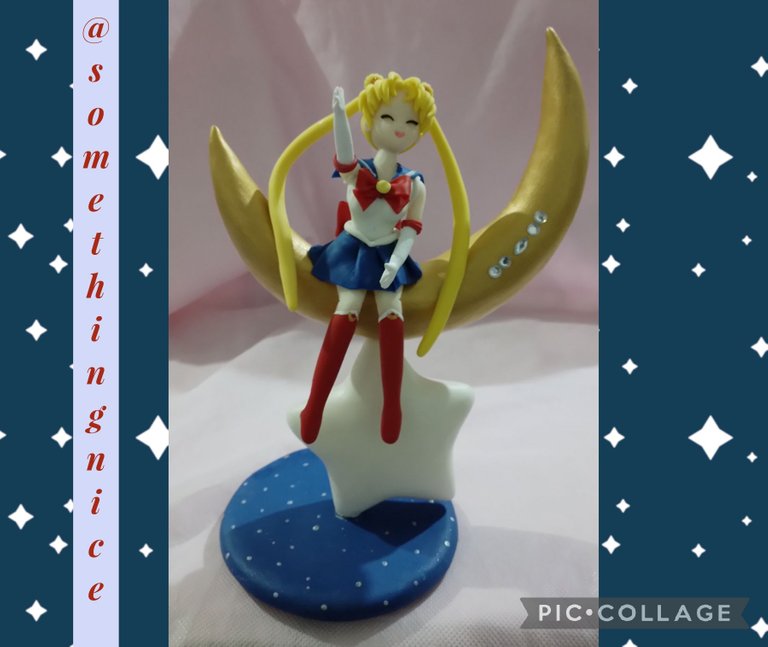
I did this project using images from Pinterest and following some steps from the Souvenirs Trebol de 4 tutorial on their YouTube channel. I leave the link
Este proyecto lo hice utilizando imágenes de Pinterest y siguiendo algunos pasos del tutorial de Souvenirs Trebol de 4 en su canal de YouTube. Les dejo el link
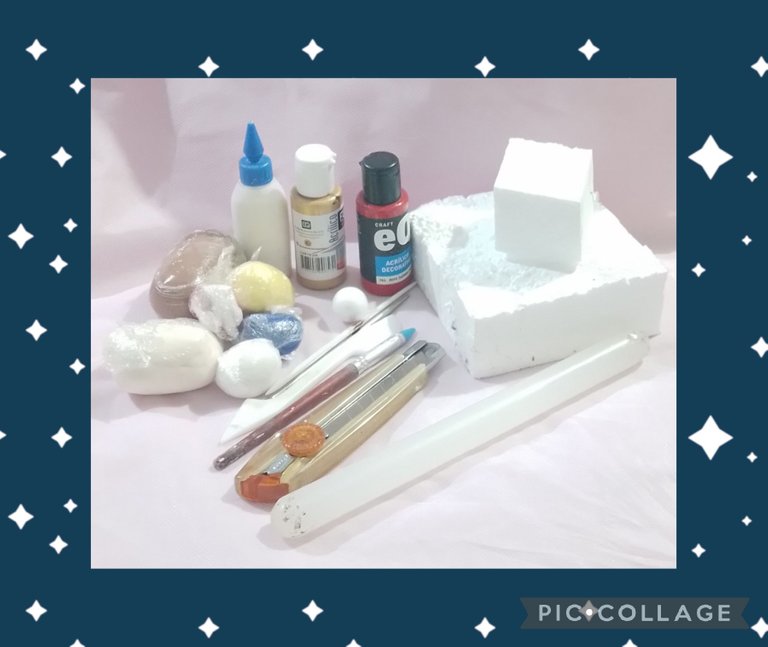
Materials
🌛 cold porcelain
🌛 vinyl glue
🌛 Steks
🌛 rolling pin
🌛 styrofoam sphere
🌛 Styrofoam blocks
🌛 styrofoam cover
🌛 cutter
🌛 acrylics
🌛 rhinestones (optional)
Materiales
🌛 porcelana fria
🌛 cola vinilica
🌛 estecas
🌛 palo de amasar
🌛 esfera de telgopor
🌛 bloques de telgopor
🌛 tapa de telgopor
🌛 cutter
🌛 acrílicos
🌛 strass (opcional)
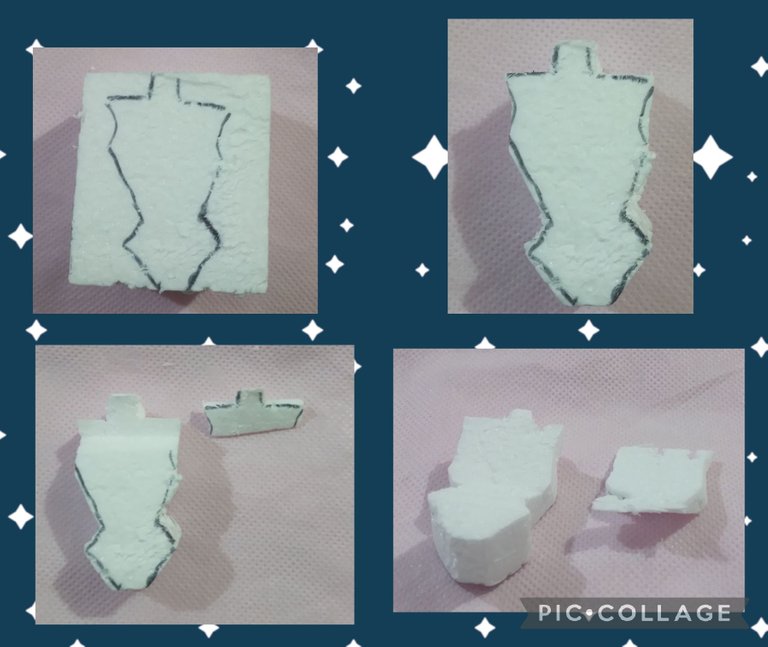
As I have said on another occasion, you always have to work with images not only to see the details but also to know the proportions.
In this case, I drew the torso on paper of the size I needed and transferred it to a block of styrofoam.
Using a cutter we must pierce the contour, in the upper part remove a portion as well as in the back part.
Como ya he dicho en otra oportunidad siempre hay que trabajar con imágenes no solo para ver los detalles sino para saber las proporciones.
En este caso dibuje el torso en papel del tamaño que necesitaba y lo pasé a un bloque de telgopor.
Utilizando un cutter debemos calar el contorno, en la parte superior quitar una porción al igual que en la parte trasera.
With the cutter we shape by removing all the straight parts, if necessary we can use a very fine sandpaper to smooth.
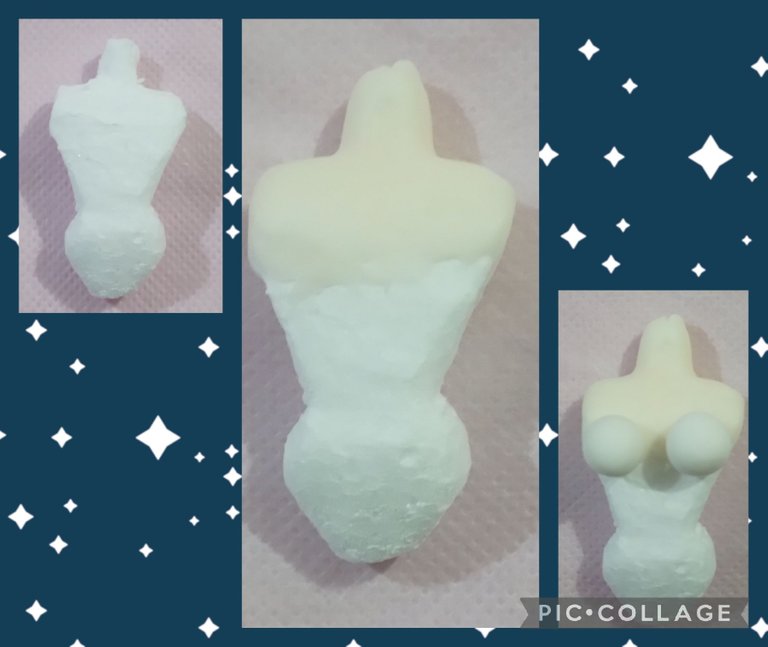
Stretch skin-colored cold porcelain and cover the upper part from the front to the back, remove the excess and erase the marks with water.
Add two very small balls for the breasts.
Con el cuter damos forma quitando todas las partes rectas, si es necesario podemos utilizar una lija muy fina para suavizar.
Estirar porcelana fria color piel y cubrir la parte superior desde el frente hacia atrás, quitar el excedente y borrar las marcas con agua.
Agregar dos bolitas muy pequeñas para los senos.
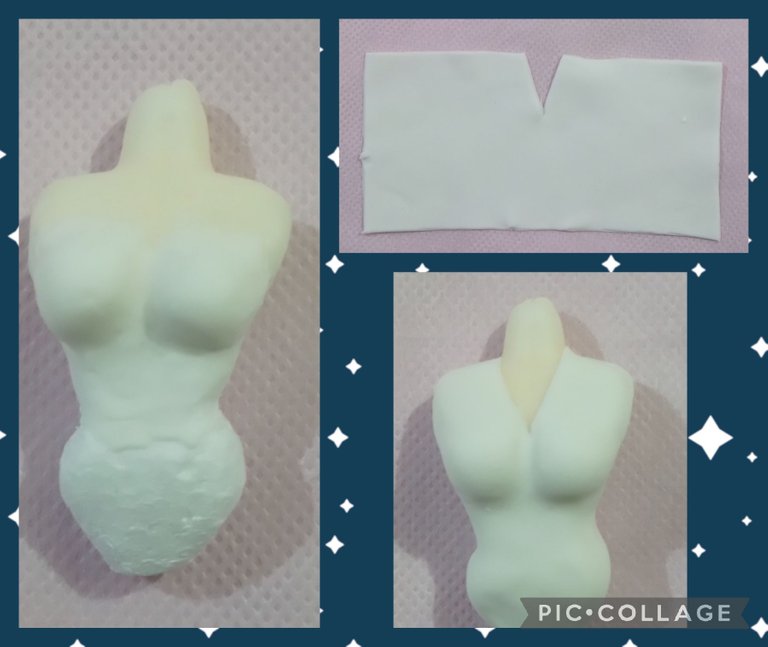
With some steka press on the sides so that it is integrated (keep in mind that the volume should not be much since it is a teenager).
Stretch white dough, cut a rectangle and at the top remove a portion in the shape of a triangle.
Cover the torso from front to back trying to match the neckline. Remove the surplus.
Con alguna esteca presionar en los lados para que quede integrado (tener en cuenta que no debe ser mucho el volumen ya que es una adolescente).
Estirar masa blanca , cortar un rectángulo y en la parte superior quitar una porción en forma de triángulo.
Cubrir el torso de adelante hacia atrás tratando de que coincida el escote. Quitar el excedente.
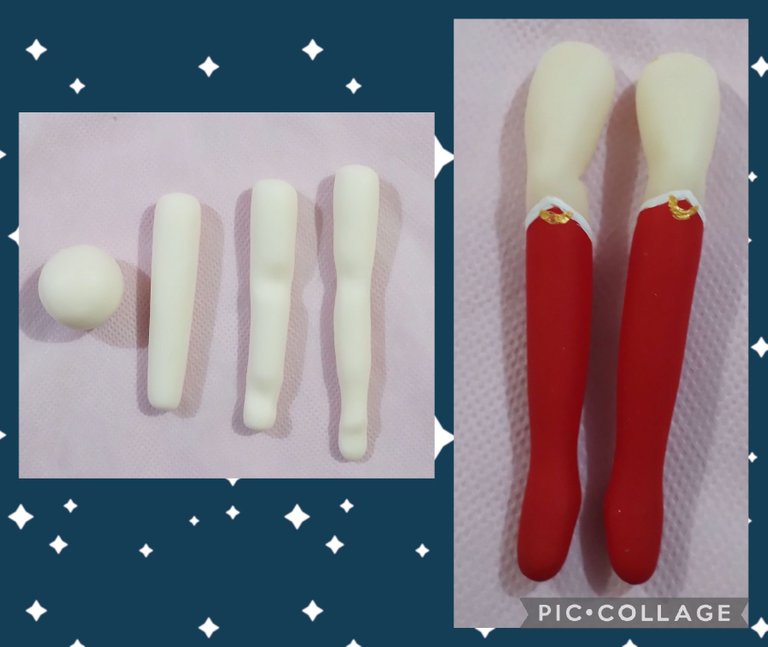
For the legs, make two equal balls, stretch leaving a thinner end, mark at the knee and ankle. Tune giving shape to each part. Paint with acrylic to simulate the boots.
Para las piernas hacer dos bolitas iguales, estirar dejando un extremo más fino, marcar a la altura de la rodilla y el tobillo. Afinar dando forma a cada parte. Pintar con acrílico para simular las botas.
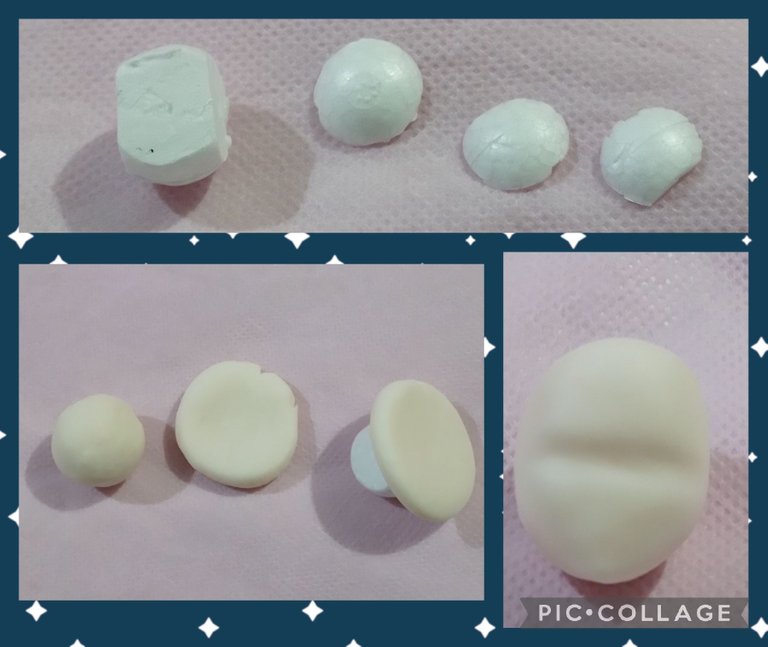
For the head we took a portion from the sphere in the front and also on each side.
Make a skin-colored ball, flatten and place on the flat part of the sphere, taking the dough backwards until covering the entire surface. Mark the separation of the face and forehead.
Para la cabeza le quitamos a la esfera una porción en el frente y también en cada lado.
Hacer una bolita color piel, aplanar y poner sobre la parte plana de la esfera, ir llevando la masa hacia atrás hasta cubrir toda la superficie. Marcar la separación de la cara y la frente.
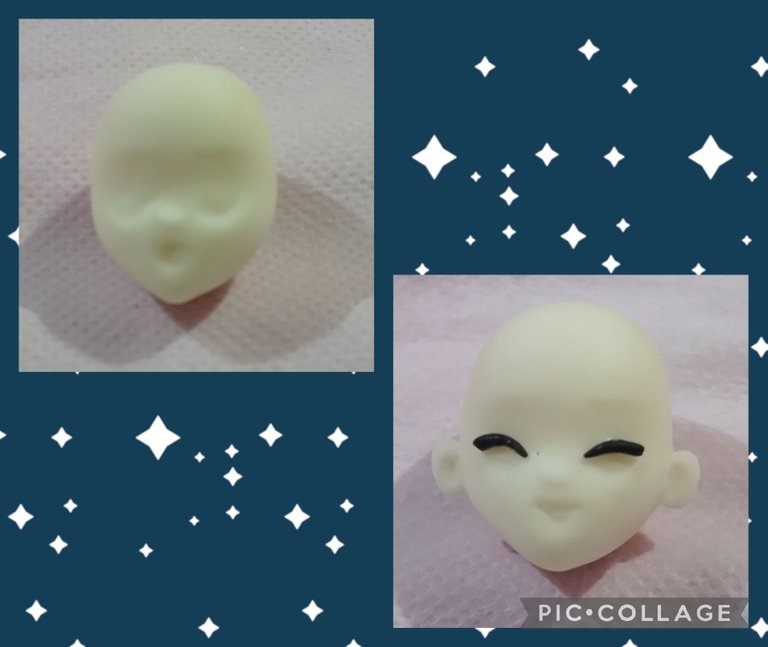
With a stick, go taking mass to form the nose, mark the socket of the eyes and the mouth. Shape the chin into a point.
For the ears, make two equal balls, shape them into cylinders, glue and hollow out.
For the eyes, roll out very thin black dough, shape it into a curve and paste.
Con una esteca ir llevando masa para formar la nariz, marcar la cuenca de los ojos y la boca. Dar forma de punta al mentón.
Para las orejas hacer dos bolitas iguales, dar forma de cilindro, pegar y ahuecar.
Para los ojos estirar masa negra muy fina, dar forma curva y pegar.
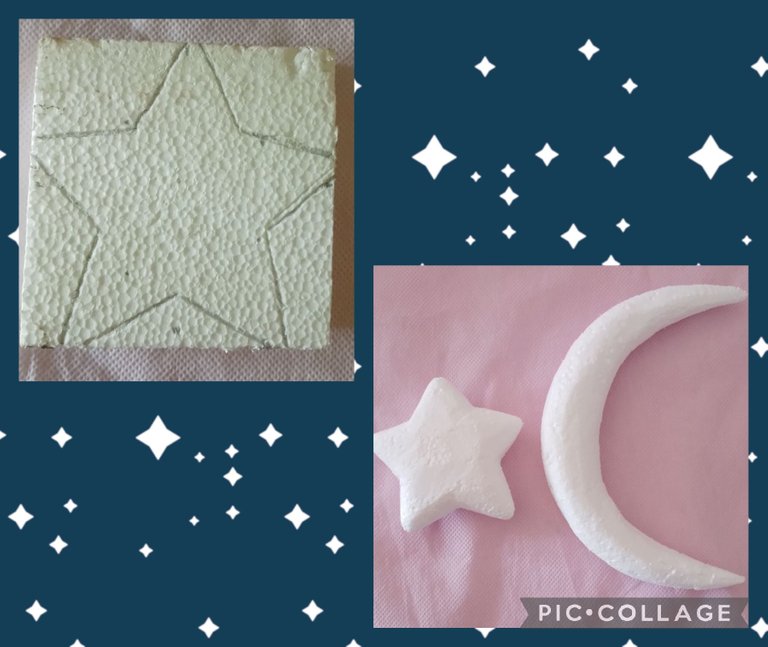
On a block of styrofoam draw a star, cut and round. Repeat the process with the moon.
En un bloque de telgopor dibujar una estrella, calar y redondear. Repetir el proceso con la luna.
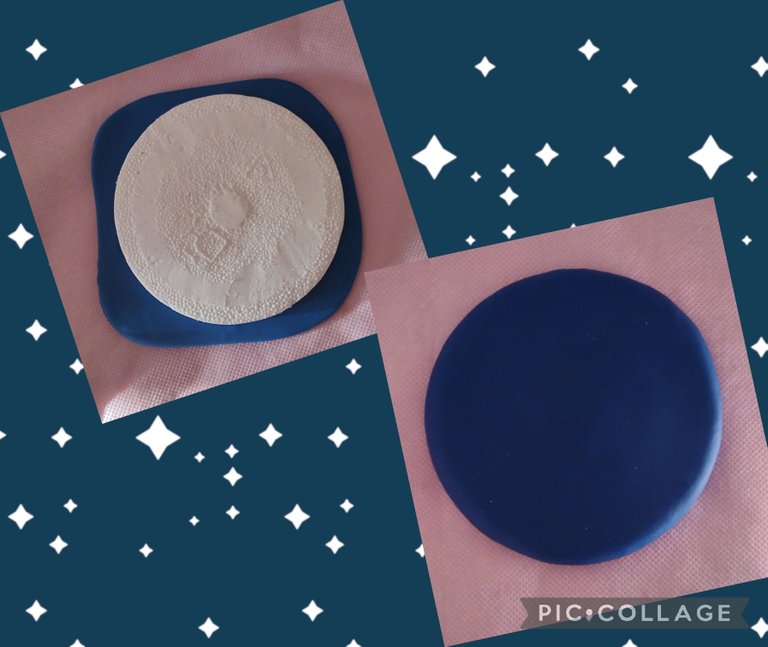
Roll out the blue dough and glue the styrofoam cover, remove the excess. Repeat the process on the other side.
Estirar masa azul y pegar la tapa de telgopor, quitar el excedente. Repetir el proceso del otro lado.

Make a ball, stretch leaving thinner at the ends, use the kneading stick to flatten, cover the entire surface of the moon, remove the excess and erase the marks.
Hacer una bolita, estirar dejando más fino en los extremos, utilizar el palo de amasar para aplanar, cubrir toda la superficie de la luna, quitar el excedente y borrar las marcas.
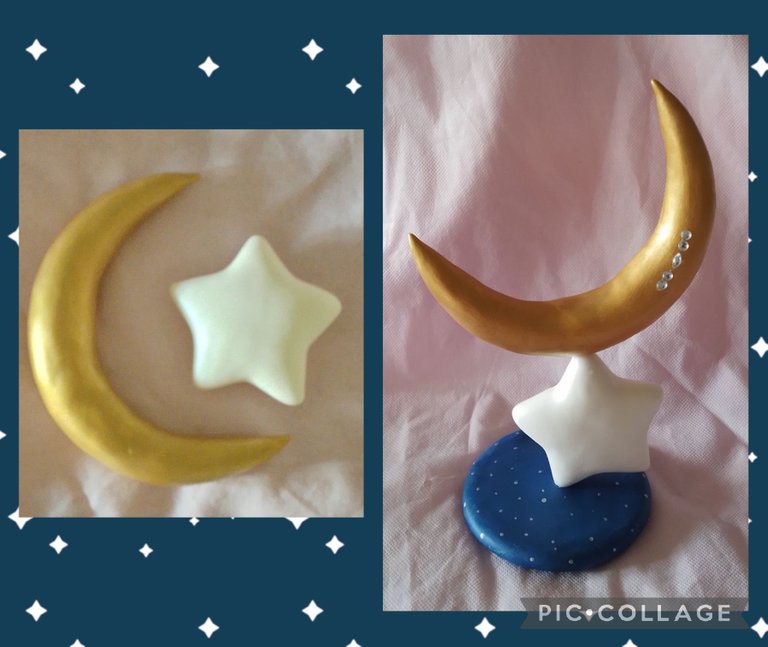
Paint the moon with gold acrylic. Repeat the process with the star.
Assemble the base joining the lid with the moon and the star using a piece of wire that goes through the three pieces. Decorate with rhinestones. With silver or white acrylic make some dots at the base to simulate the stars.
Pintar la luna con acrílico dorado. Repetir el proceso con la estrella.
Armar la base uniendo la tapa con la luna y la estrella utilizando un trozo de alambre que atraviesa las tres piezas. Decorar con strass. Con acrílico plateado o blanco hacer unas puntos a la base para simular las estrellas.
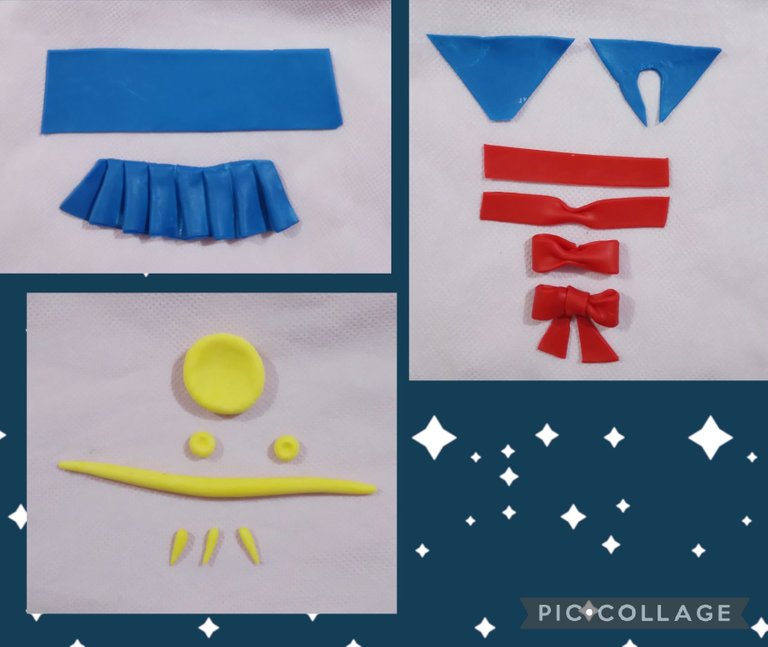
For the skirt, cut a rectangle and form folds.
For the flap, cut a triangle and pierce the center.
For the bows, cut a strip, make a ruffle in the center and at the ends that we then bring to the center, add a strip in the middle and triangular-shaped strips that we glue on the back.
For the hair, make a helmet and glue it covering the entire head, mark in the middle and make lines to simulate the hair. For the rims, make two equal balls and hollow out the center, glue two red strass stones or simply make two red balls. For the wicks, make two little balls, stretch enough, leaving thin ends. For the bangs, make several balls, shape an elongated teardrop and curve.
Para la pollera cortar un rectángulo y formar pliegues.
Para la solapa cortar un triángulo y calar el centro.
Para los moños cortar una tira, hacer un fruncido en el centro y en los extremos que luego los llevamos al centro, agregar una tira en el medio y tiras con forma triangular que pegamos por detrás.
Para el pelo hacer un casco y pegar cubriendo toda la cabeza, marcar al medio y hacer líneas para simular los pelos. Para los rodetes hacer dos bolitas iguales y ahuecar en el centro, pegar dos piedras de strass rojo o simplemente hacer dos bolitas rojas. Para las mechas hacer dos bolitas, estirar bastante dejando fino en los extremos. Para el flequillo hacer varias bolitas, dar forma de lágrima alargada y curvar.
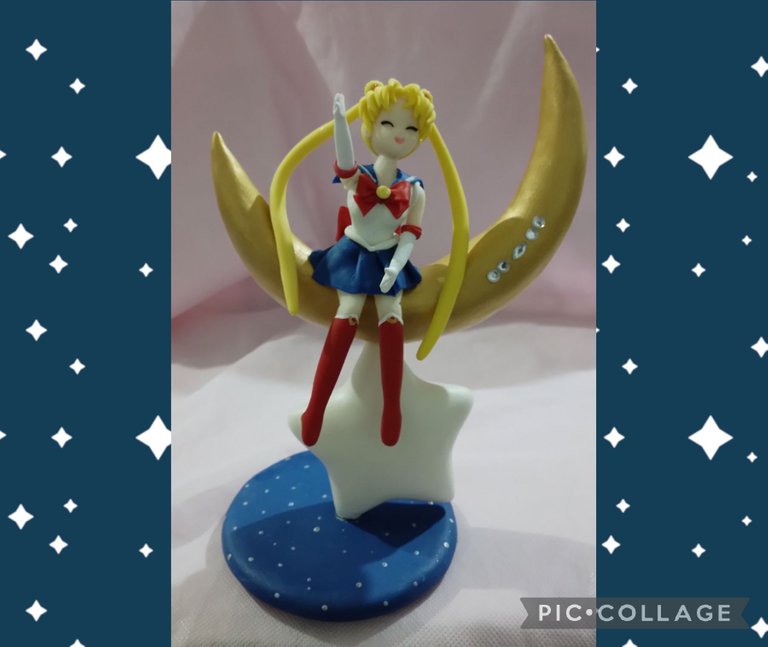
Finally, paint the flap with white acrylic and the lips with pink.
For this post I took photos with my Samsung A03 cell phone and used the PicCollage app and Google translate.
I hope you liked it and I wish you all the best of luck 🤞!!!
Greetings. Andrea 💜💜💜
Por último pintar con acrílico blanco la solapa y con rosado los labios.
Para este post tomé fotos con mi teléfono celular Samsung A03 y utilicé la aplicación PicCollage y el traductor de Google.
Espero les haya gustado y les deseo mucha suerte 🤞 a todos!!!
Saludos. Andrea 💜💜💜
Awwww esto está muy cute @somethingnice gran trabajo.
!discovery 30
Hola @mili2801 👋, muchas gracias 😊💜
This post was shared and voted inside the discord by the curators team of discovery-it
Join our community! hive-193212
Discovery-it is also a Witness, vote for us here
Delegate to us for passive income. Check our 80% fee-back Program
Te quedó hermoso este trabajo, como todo lo que haces. Me enamoré de esta hermosa Luna 💕 Te deseo muuuucho éxito en este concurso. ¡Bello!
Hola @creacioneslelys 👋 muchas gracias por tu deseo 😊💜
The rewards earned on this comment will go directly to the people( @creacioneslelys ) sharing the post on Twitter as long as they are registered with @poshtoken. Sign up at https://hiveposh.com.
Thank you for sharing this post in the DIYHUB Community!
Your content got selected by our fellow curator priyanarc & you just received a little thank you upvote from us for your great work! Your post will be featured in one of our recurring compilations which are aiming to offer you a stage to widen your audience within the DIY scene of Hive. Stay creative & HIVE ON!
Please vote for our hive witness <3
Hi @diyhub ,thank for the support 😊
This is so so beautiful ✨. I like the way you organized everything.
Hi @wongi 👋 Thank you very much 😊
It's always a pleasure ✨
Qué hermosoo quedó tu trabajo!! Me encanta Sailor Moon, fuiste muy creativa a la hora de elegir que hacer para presentar tu entrada. Muchas gracias por compartir el proceso. Saludoss!!
Hola @mariamglow 👋 que bellas palabras, muchas gracias 😊💜
¡Te quedó hermosa! Estoy enamorada de esa Sailor Moon. Tienes mucho talento ✨💕
Hola @mandysmoon 👋 muchas gracias 💓
Te quedó genial el trabajo, usando telgopor como relleno se ahorra masa flexible , gracias por la idea.
Hola @samuell12 🖐 muchas gracias!!! es así, el telgopor sirve para dar una base sólida además de ahorrar masa. Hoy en dia ae usa mucho el tallado de telgopor y lo unico que hay que hacer después es cubrirlo con porcelana fria 😊
Hello friend, excellent work, it was beautiful, the details of the step by step are well explained, I congratulate you and wish you luck in the contest.
Hola amigo, excelente trabajo, quedó hermoso, los detalles del paso a paso están bien explicados, te felicito y te deseo suerte en el concurso.🙂
Muchas gracias @lauracraft por tus deseos😊💜
Well done! I really liked your work)
Thank you @elenka 😊💜