ENGLISH CONTENT
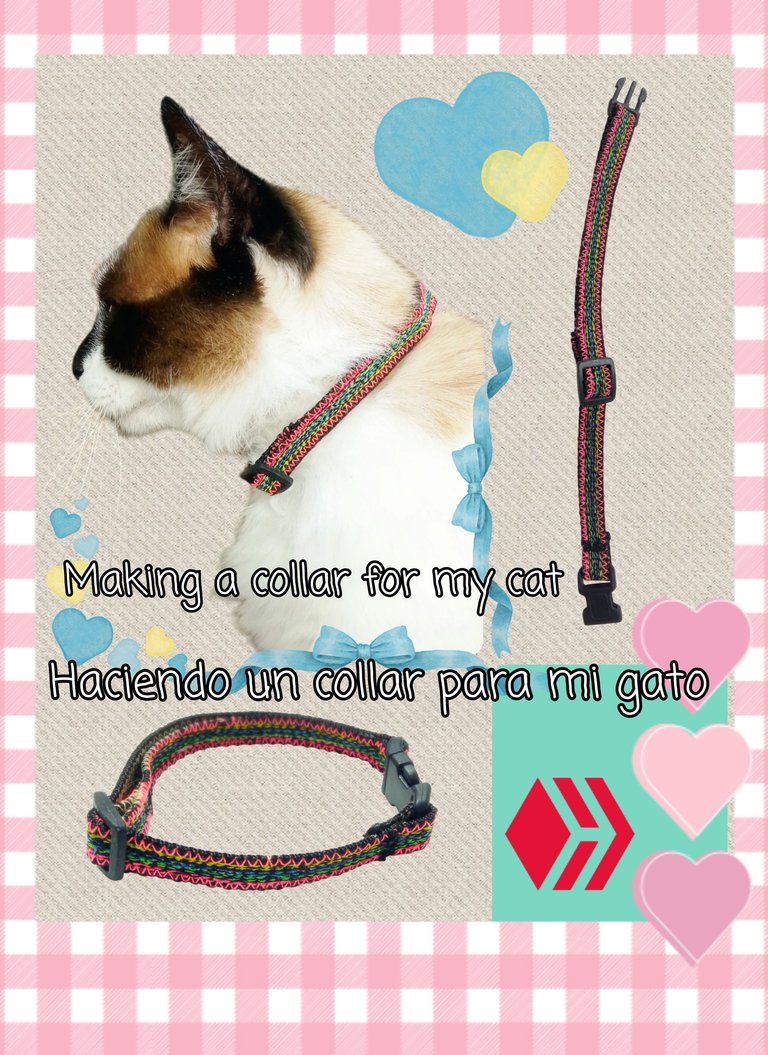
Hello to all the members of this community and cat lovers! A few months ago I had planned to make a new cat harness for my cat Ikki, but due to my emotional ups and downs, I postponed the matter until my trip was close enough for me to realize that I should hurry with that project... unfortunately, I didn't get the materials I needed in time, but luckily, I was able to make a new collar for my cat, since he tends to damage them very often (whether they are bought or made by me, in fact, the bought ones don't last as long 😆).
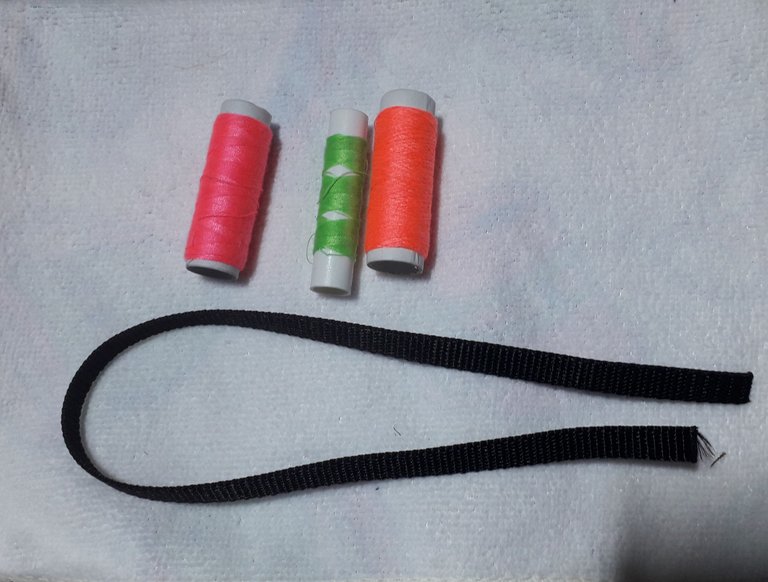
😺 Materials: 😺
- Thick webbing.
- Plastic buckle.
- Plastic adjuster.
- Thread.
The size of the buckle and adjuster can be your preference, although it's best not to use too large a strap for greater comfort. As for the strap, it's preferable to use a strong strap with a width that can slide through the buckle and adjuster without difficulty.

The length I used to make the collar is about 43 cm (I bought a meter to save the rest). The funny thing is, I was looking for a more striking color, since my cat is black 😢 but since the buckle and the regulator were too small (I took it from one of the collars that Ikki damaged), the only ribbon I could find was that color. But that didn't stop me; I thought about what could solve that problem and after being home, I thought about some fluorescent threads I have.
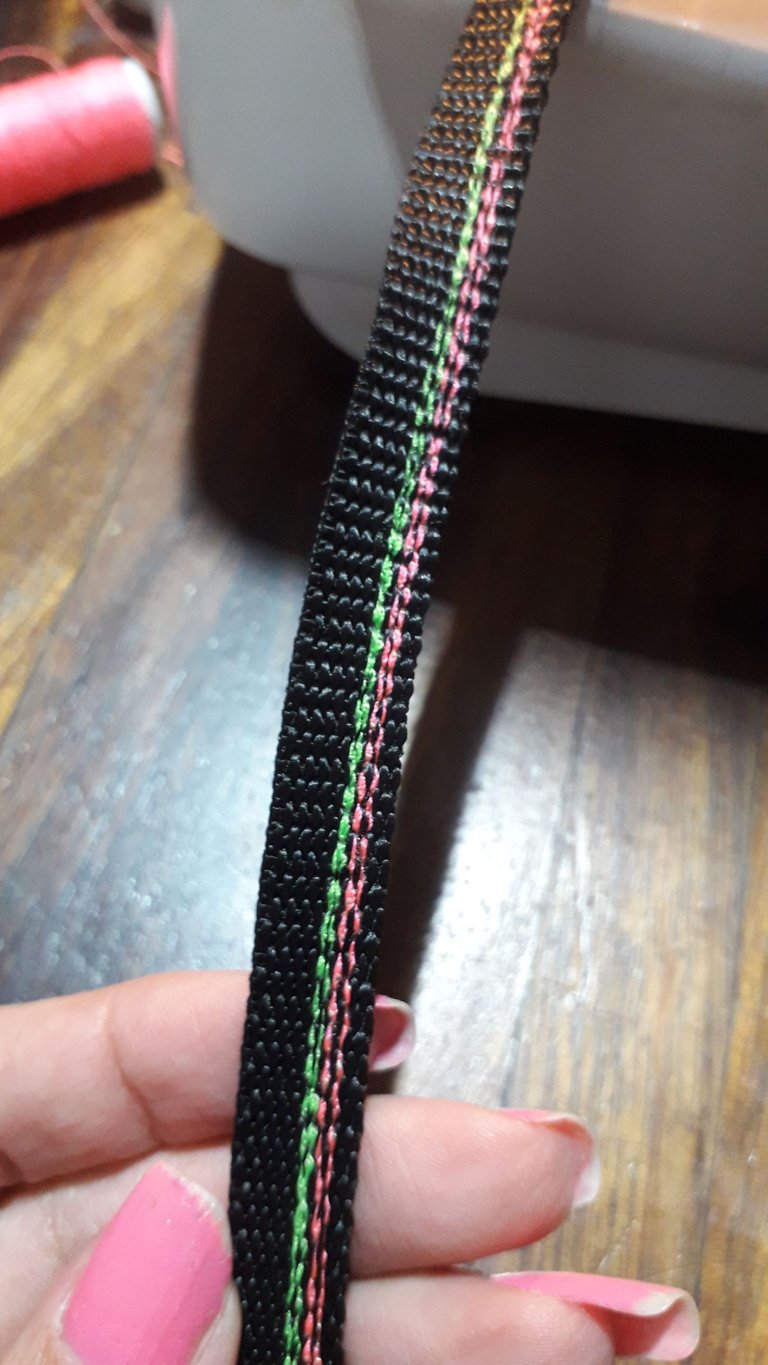
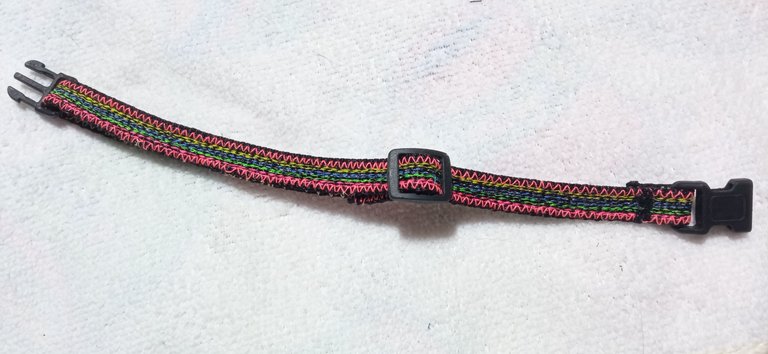
What occurred to me was to make several straight stitches, varying the colors. To do this, I used a type of stitch on my machine called "Triple Straight Stitch." I like to use it a lot when I need to make a thicker line than a normal straight stitch. That way, I alternated the thread colors.
 |  |  |
|---|
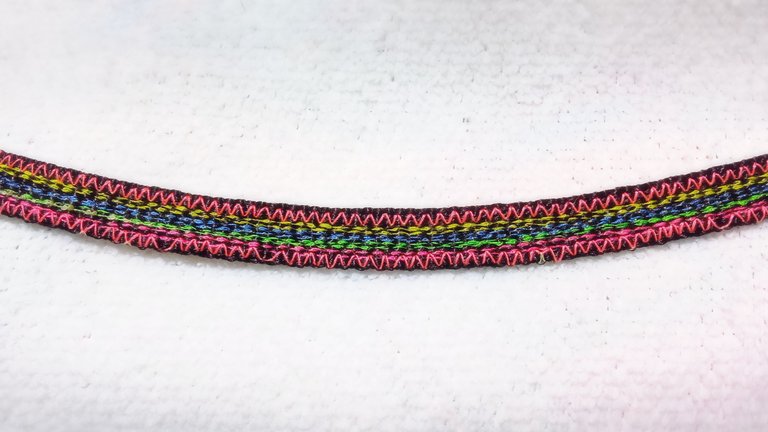
For the edges, I thought it best to change the stitch type to a zigzag, choosing the smallest stitch size and a bright thread, and then the ribbon decoration was complete. I quite liked the result, as it really stood out, which was the goal.
Using a lighter, I burned the ends of the tape and proceeded to insert one end of it into the center of the regulator, making a straight seam to seal it.
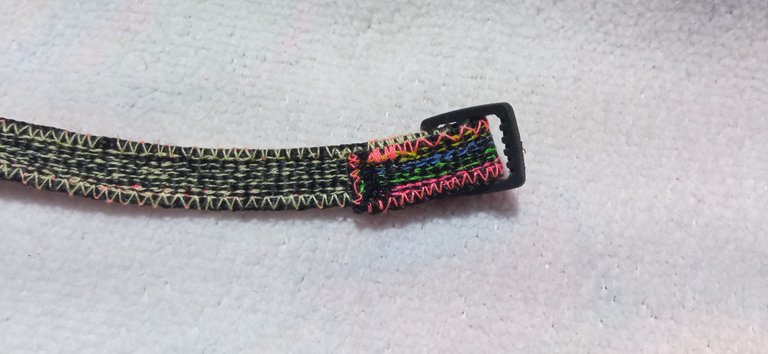
Then, I put one of the buckle pieces (the one with the tips) into the ribbon, so it looks like the photo:

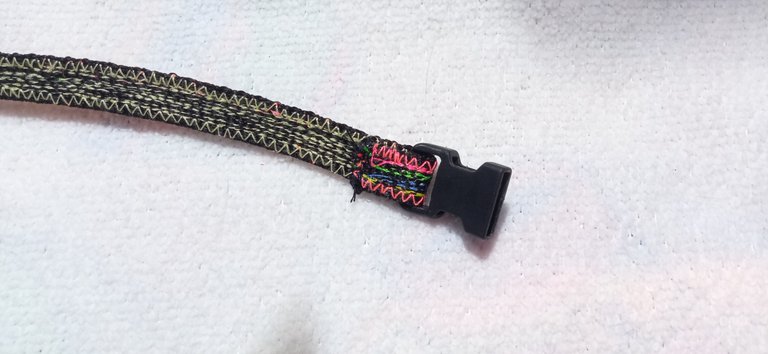
Next, I inserted the end of the tape through the plastic regulator, leaving it like this:

To finish, I sealed the remaining end of the ribbon with a straight seam after inserting the other buckle piece. Using a lighter, I burned off the excess threads.
And just like that, the collar was ready. As you can see, it doesn't look like it was originally just a plain black ribbon. The best thing about this type of collar is that it's adjustable to the cat's neck size and is easy to put on and take off. Not to mention that if the ribbon gets damaged, the buckles and adjuster can be recycled (as I did). Honestly, I prefer making them rather than buying them, as I feel it's a more personal gift for my cat, and I can customize it to my liking 😌
 |  |
|---|
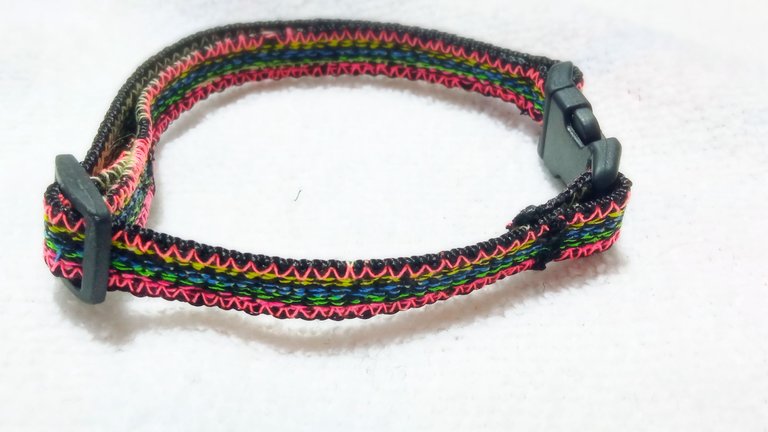
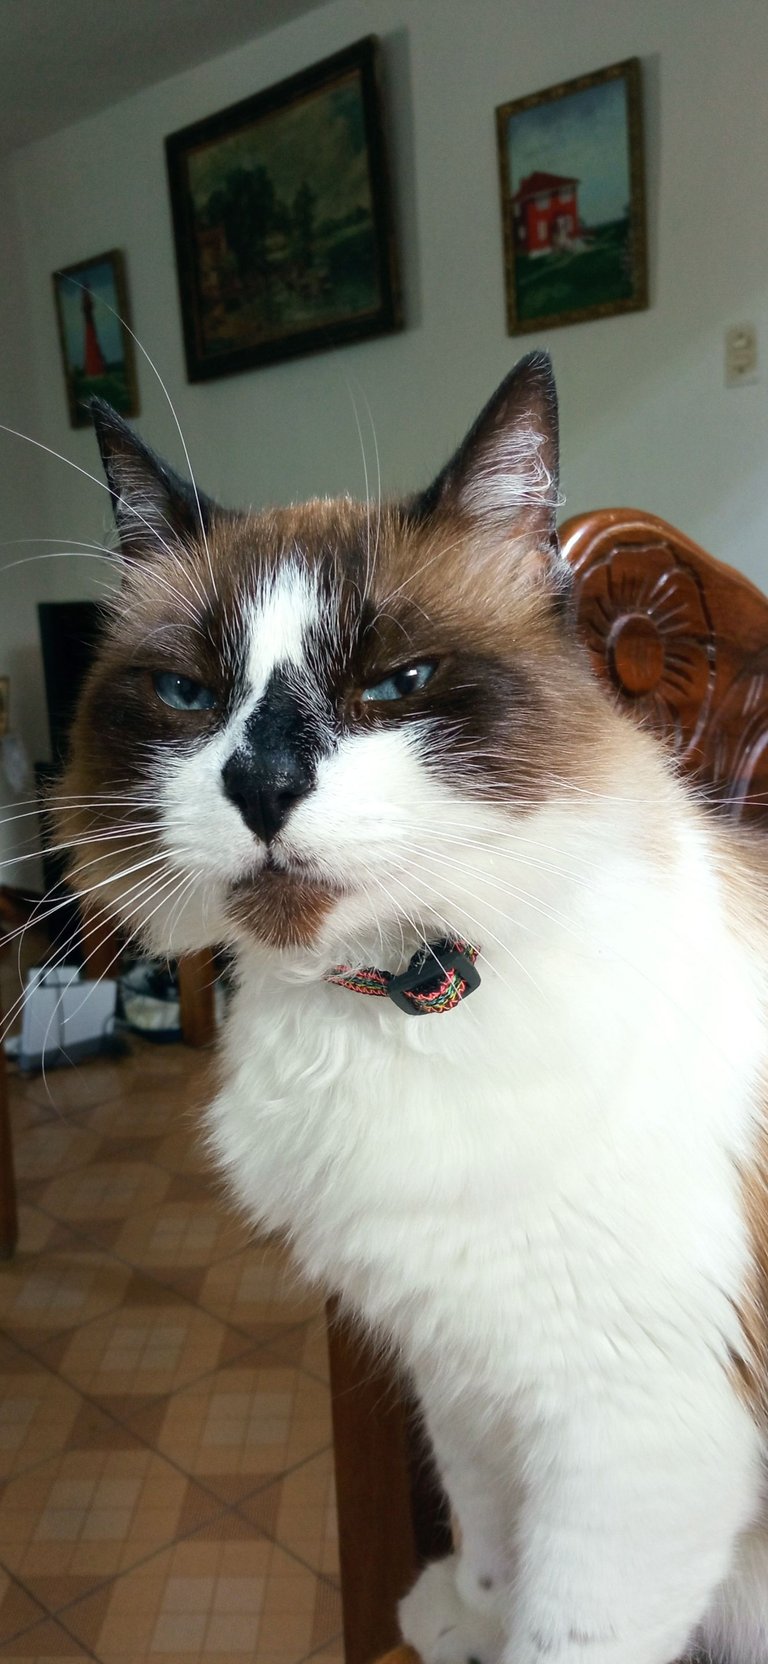
As a model for these cases, I usually use Ying, my sister's cat. She very kindly let me put the collar on him and posed for me so I could take some pictures of how it looks... although Ying is hairier than my cat, so finding a good angle to show the collar was difficult, but not impossible hehe. I can't wait to put it on Ikki and take his respective pictures 😇
 |  |
|---|
Thank you very much for visiting my post. I hope you found it interesting.
💚 See you next time! 💚

CONTENIDO EN ESPAÑOL
¡Hola a todos los integrantes de ésta comunidad y amantes de los gatos! Hace unos meses había planeado hacerle una nueva pechera o arnés a mi gato Ikki, pero debido a mis altibajos emocionales, pospuse el asunto hasta que mi viaje se acercó lo suficiente como para darme cuenta de que debía apresurarme con ese proyecto... lamentablemente, no conseguí a tiempo los materiales que necesitaba, pero por suerte, pude realizar un collar nuevo para mi gato, ya que los suele dañar con mucha frecuencia (ya sean comprados o hechos por mí, de hecho, los comprados le duran menos 😆).
😺 Materiales: 😺
- Cinta gruesa.
- Hebilla plástica.
- Regulador de plástico.
- Hilos.
El tamaño de la hebilla y del regulador, puede ser de nuestra preferencia, aunque lo más recomendable es que no sea muy grande, para mayor comodidad. En cuanto a la cinta, es preferible una cinta resistente y del ancho que pueda deslizarse a través de la hebilla y del regulador, sin dificultad.
El largo que uso para realizar el collar es de unos 43 cm (yo compré un metro para reservar el resto). Lo curioso es que, yo estaba buscando un color más llamativo, ya que mi gato es de color negro 😢 pero como la hebilla y el regulador que tenía, era pequeño (lo tomé de uno de los collares que Ikki dañó), la única cinta que conseguí, fue de ese color. Pero, eso no me detuvo, pensé en que podría solucionar ese inconveniente y tras estar en casa, pensé en algunos hilos fluorescentes que tengo.
Lo que se me ocurrió, fue hacer varias costuras rectas variando el color. Utilicé para ello, un tipo de puntada de mi máquina llamado "Triple punto recto"; me gusta usarlo mucho para las ocasiones en las que necesite hacer una línea más gruesa que la costura recta normal. De esa forma, fui alternando los colores de los hilos.
| | |
|---|
Para los bordes, pensé en que lo mejor sería cambiar el tipo de puntada por el zig zag, seleccionando el tamaño más pequeño y un hilo vistoso, quedando listo el decorado de la cinta. Me gustó bastante el resultado, ya que, resalta bastante y ese era el objetivo.
Con un encendedor, quemé las puntas de la cinta y procedí a introducir uno de los extremos de la misma en la parte central del regulador, haciendo una costura recta para sellar.
Luego, metí una de las piezas de la hebilla (la que tiene las puntas) en la cinta, para que se vea como en la fotografía:
Seguidamente, introduje el extremo de la cinta por el regulador plástico, quedando entonces de ésta forma:
Para finalizar, sellé con una costura recta el extremo faltante de la cinta, luego de meterle la otra pieza de la hebilla. Con un encendedor, quemé los hilos sobrantes.
Y de ésta forma, el collar estuvo listo. Como pueden ver, no parece que en un inicio fuese una cinta negra sin ningún adorno. Lo mejor de éste tipo de collar es que es ajustable al tamaño del cuello del gato y es fácil de poner y quitar, sin mencionar que de dañarse la cinta, puede reciclarse las hebillas y el regulador (como lo hice yo). La verdad, prefiero hacerlos que comprarlos, ya que siento que es un regalo más personal para mi gato y puedo hacerlo a mi gusto 😌
| |
|---|
Como modelo para estos casos, suelo utilizar a Ying, el gato de mi hermana. Muy amablemente me dejó colocarle el collar y posó para que pudiera tomar unas fotografías de cómo se ve... aunque Ying es más peludo que mi gato, así que encontrar un ángulo adecuado para que se viese el collar, fue difícil, más no imposible jeje. Estoy ansiosa por colocárselo a Ikki y tomarle sus respectivas fotitos 😇
| |
|---|
Muchas gracias por haber visitado mi publicación. Espero que les haya parecido interesante.
💚 ¡Hasta una próxima oportunidad! 💚
The rewards earned on this comment will go directly to the people( @suezoe ) sharing the post on Reddit as long as they are registered with @poshtoken. Sign up at https://hiveposh.com. Otherwise, rewards go to the author of the blog post.
The collar looks nice and it looks great on your cat as well, well done and thanks for sharing.
I'm glad it looked much better than I imagined 😊 Ying was only the model this time (my cat lives in another city), but as soon as I get the clasps, I will make a collar especially for him 😉 Thank you so much for visiting my post and for the support 😘💚
I came for the cat pictures and I'm leaving with great joy, because it's a great quality post. Thanks for gracing our community with your creativity, at DIYHub we admire content creators like you. The cat looks beautiful...
Hahaha I understand you, it was necessary to get Ying's cooperation to be able to properly show the product, luckily, there were no inconveniences 😌 Thank you very much for visiting my publication and for commenting, I am very glad that you liked my project and the way I prepared the post, I always try to make it interesting 😉💚
Congratulations, your post has been curated by @dsc-r2cornell. You can use the tag #R2cornell. Also, find us on Discord
Felicitaciones, su publicación ha sido votada por @ dsc-r2cornell. Puedes usar el tag #R2cornell. También, nos puedes encontrar en Discord
que bello, te quedo genial!
how beautiful, it looks great!
¡Muchísimas gracias! Me alegra mucho que te haya gustado el resultado final 😊 Gracias igualmente por visitar mi publicación y por comentar 🤗💚
Nice!
Thank you very much! I'm glad you liked it 😊💚
A pleasure!