ENGLISH CONTENT
Hello all craft lovers! For my anniversary with my boyfriend, I wanted to make him something special. After he mentioned to me that he wanted to have physical photographs of us, I looked for a way to do it, but in a compact way. That's how I found The Chinese Thread Book, a craft originally created to store sewing implements, such as needles. By making it with paper, you can add messages and in my case, small size photographs.
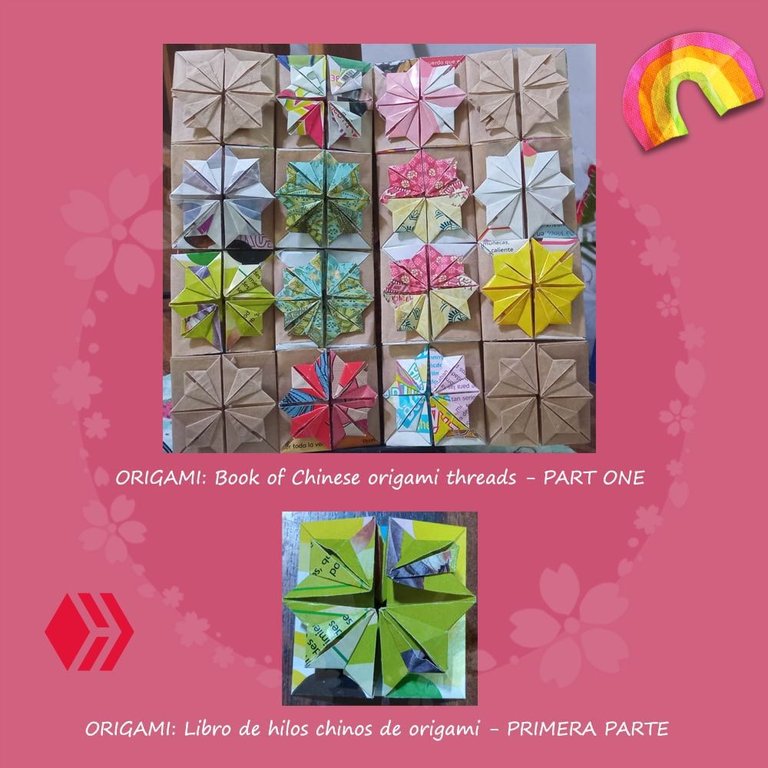
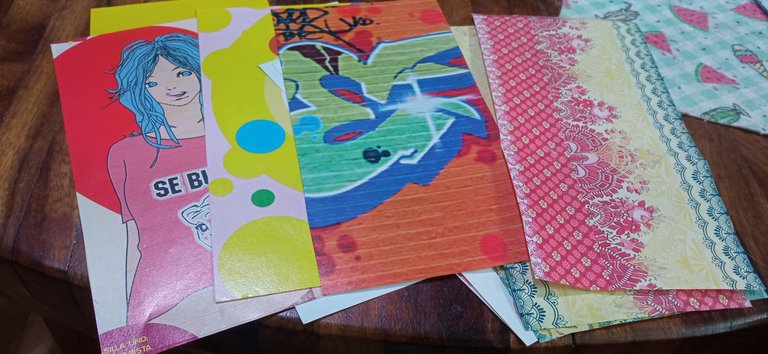
Since the tutorial has several steps and it was difficult for me to record it, I will show you over several posts how to do it. In this post, I will show you how to make the piece that I consider to be the most elaborate, but once you make a couple, you will basically learn the procedure by heart and the rest of the pieces will be easy for you. To do this, I used magazine cutouts with figures, wrapping paper and kraft paper, since I used the materials I had available.
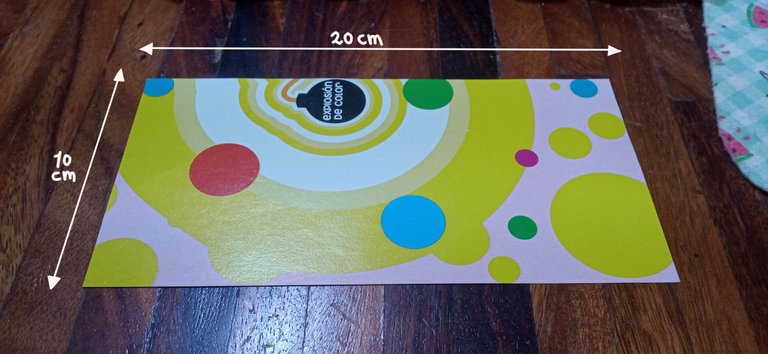
To make this first piece, you need a 10x20 cm strip of paper. We fold it, bringing the top and bottom parts together, as well as the sides, to obtain a cross-shaped mark on the paper.
 |  |  |
|---|
Then, we created new marks by folding the top and bottom once again, this time bringing their edges together, using the mark located in the center as a guide.
 |  |
|---|
We do the same with the side edges, obtaining what I think looks like a "window".
 |  |
|---|
We return to paying attention to the sides, folding them guided by the mark obtained in the previous step.
 |  |
|---|
Afterwards, we turn the paper over, as we are going to proceed to make the following folds on the opposite side where we have been making the marks. In the corners, we are going to fold in a triangular shape, guided by the second mark, so that these triangles come together.
 |  |
|---|
Next, we open the piece and proceed to fold from the top, guided by the mark obtained by folding the triangles. In this way, in the corners, we will again make smaller triangular folds than the previous ones. We do the same, but from the bottom.
 |  |  |
|---|
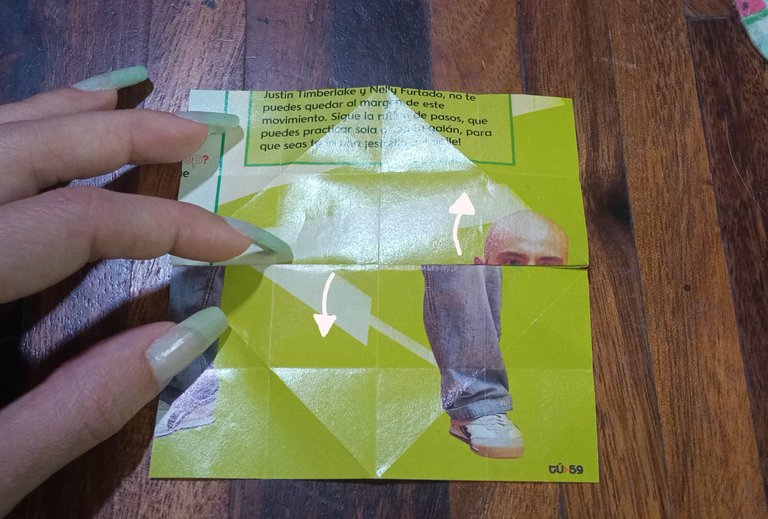
Now, we open and turn the piece again (remember that we had already turned it once?) and on this side, thanks to the folds we made previously, the paper will be able to give way to adopt the shape seen in the photographs down.
 |  |
|---|
With this, we can fold the piece to obtain a figure like the one seen in the first photograph below. Then, we must lift both tabs as seen in the second photograph below, simply to obtain a new fold, but we return it as it was previously.
 |  |
|---|
If everything went well, it should look like this on both sides:
 |  |
|---|
Now, we fold the tabs towards the center as follows:
 |  |
|---|
We rotate the piece to be able to fold this part like this:
 |  |
|---|
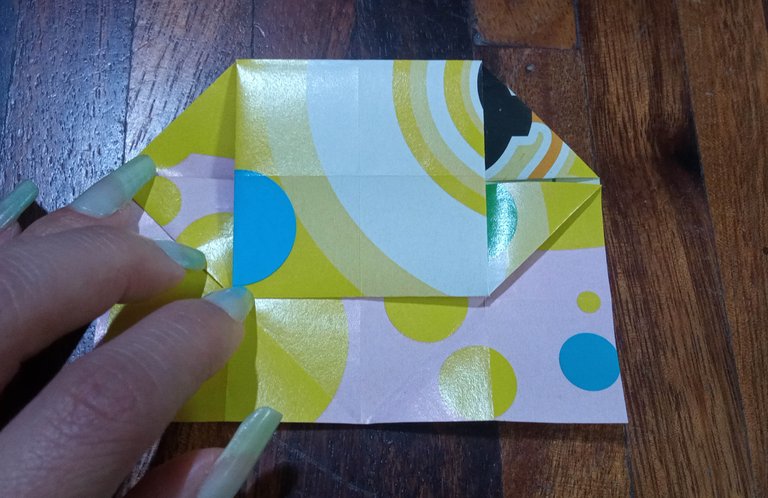
Thanks to the folds, we can fold the small corners until we obtain a pair of rhombuses, like this:
 |  |  |
|---|
Now, we can lower the tab and fold the sides:
 |  |  |
|---|
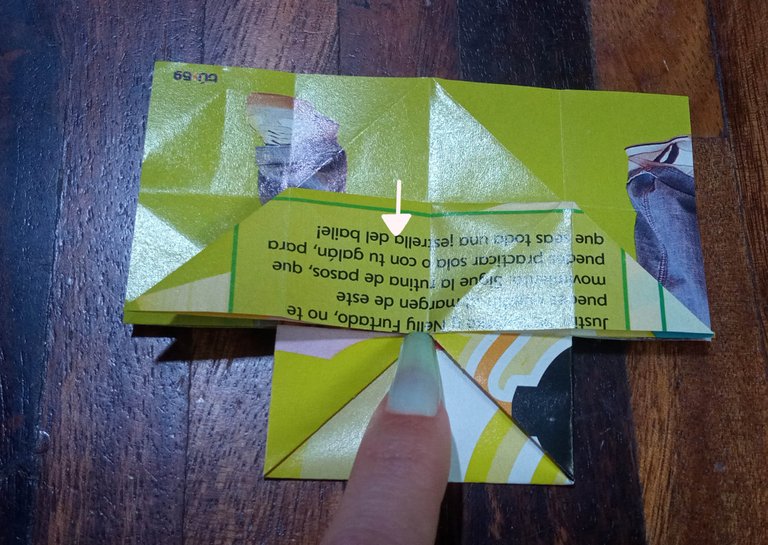
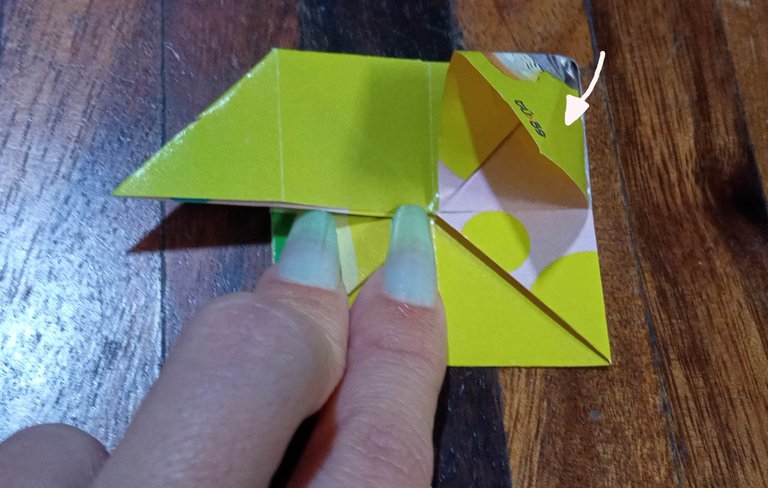
At this step, we will notice that the steps are repeated:
 |  |  |
|---|
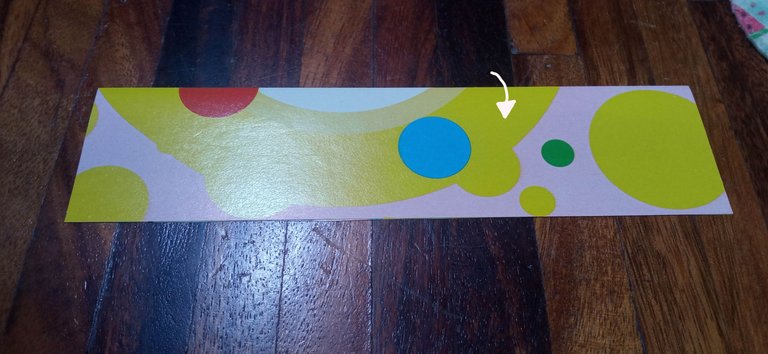
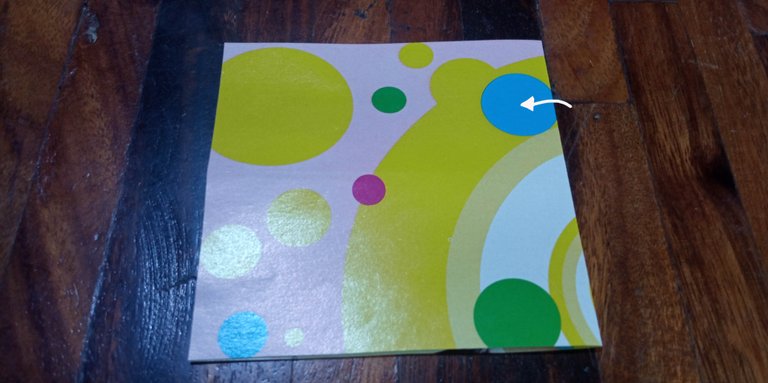
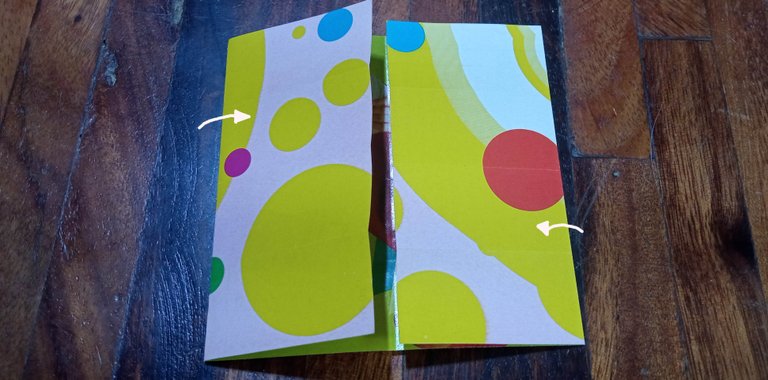
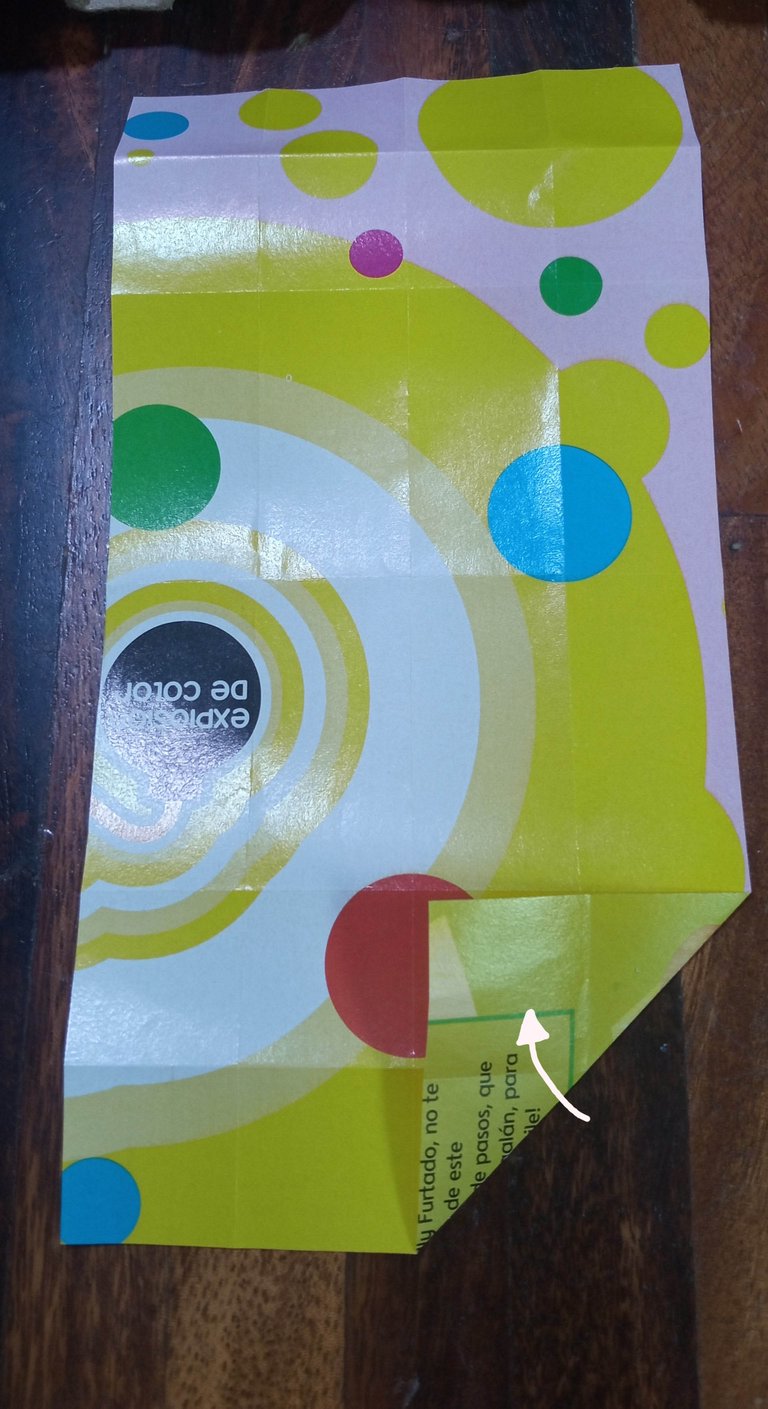
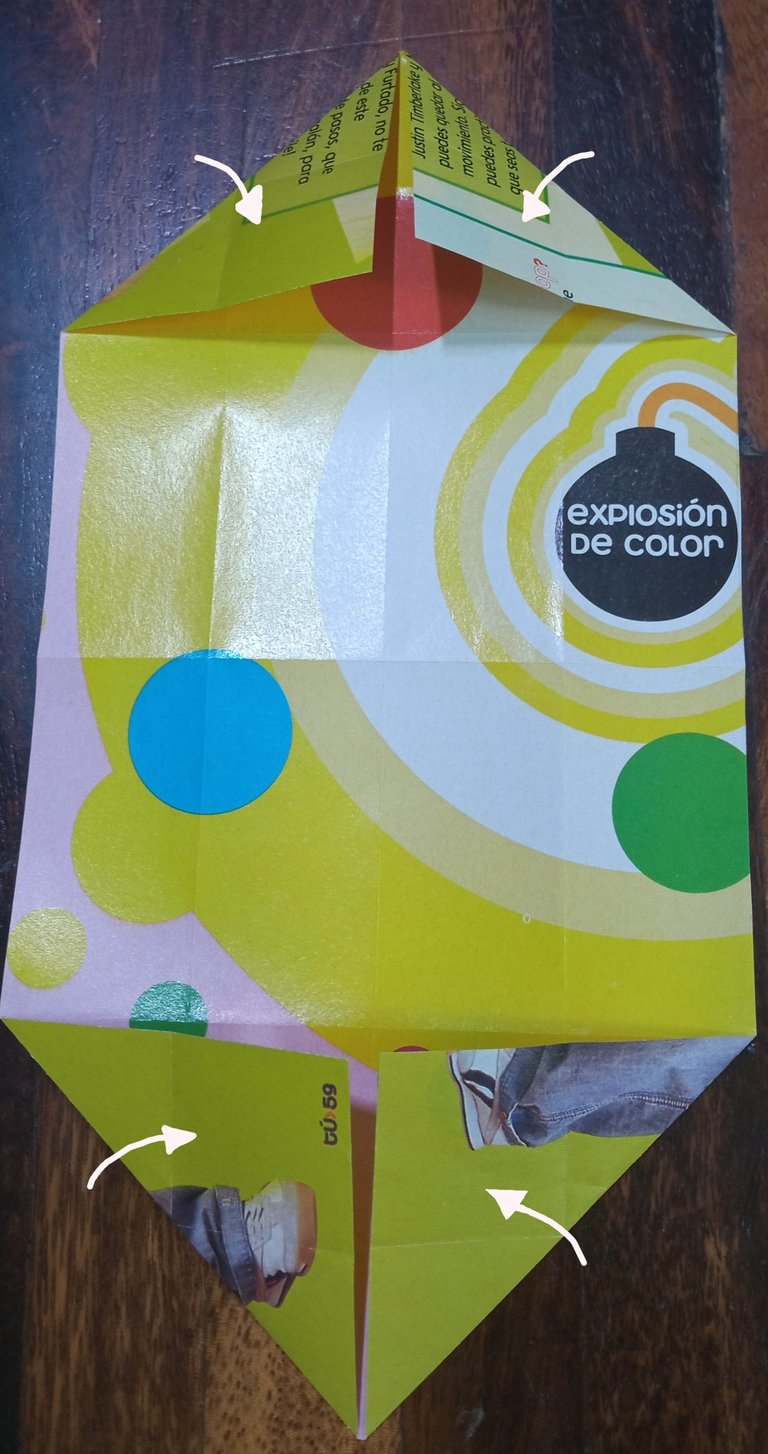
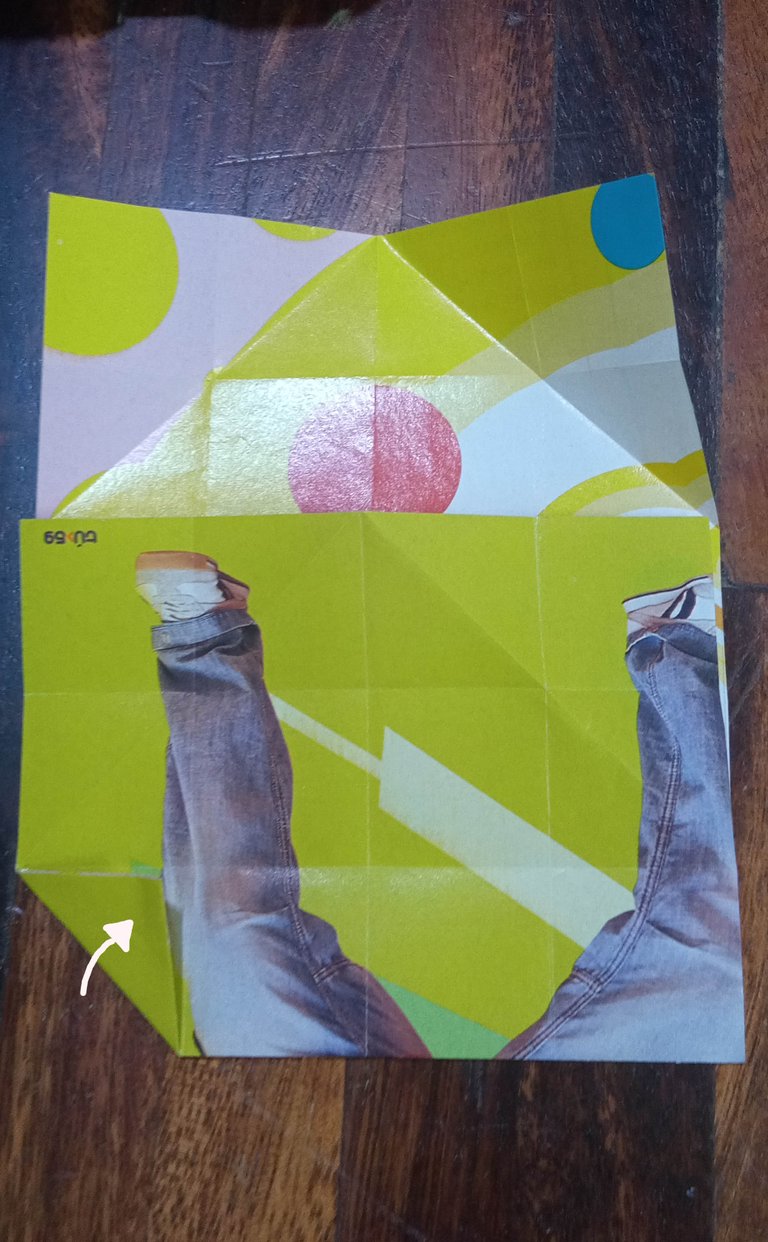
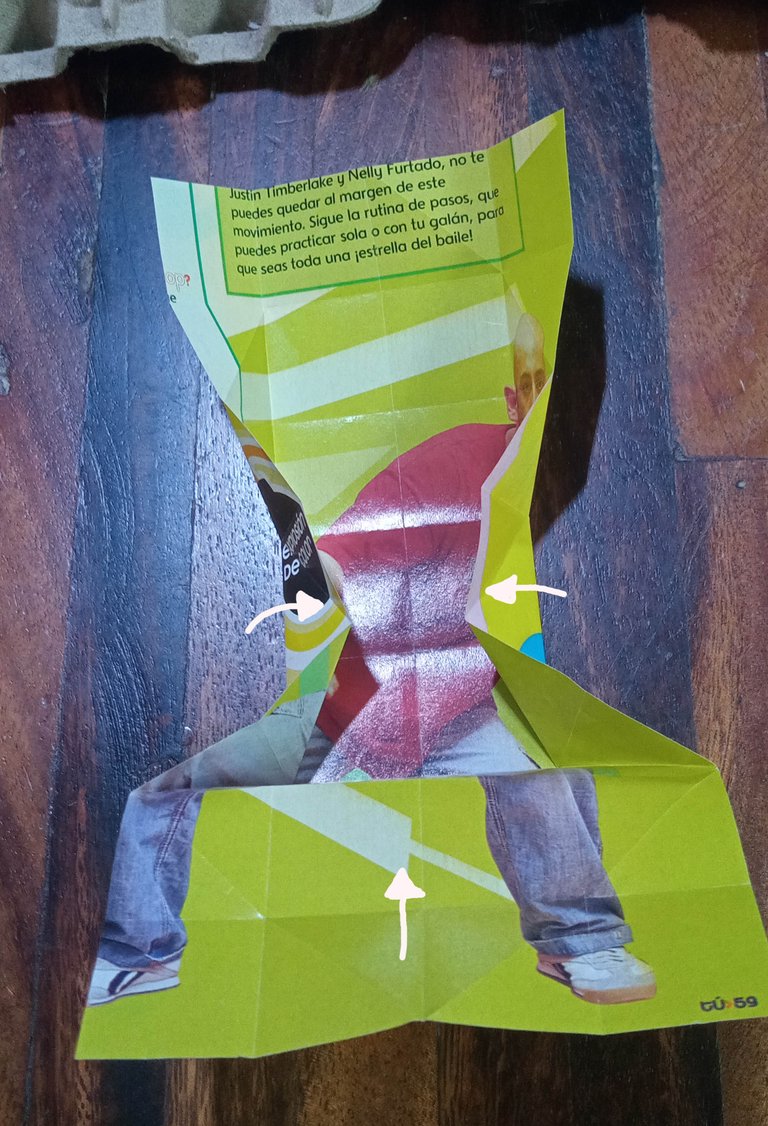
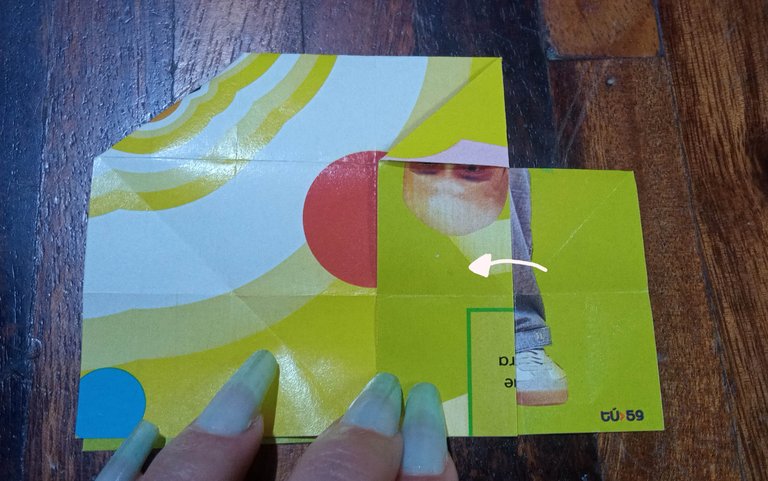
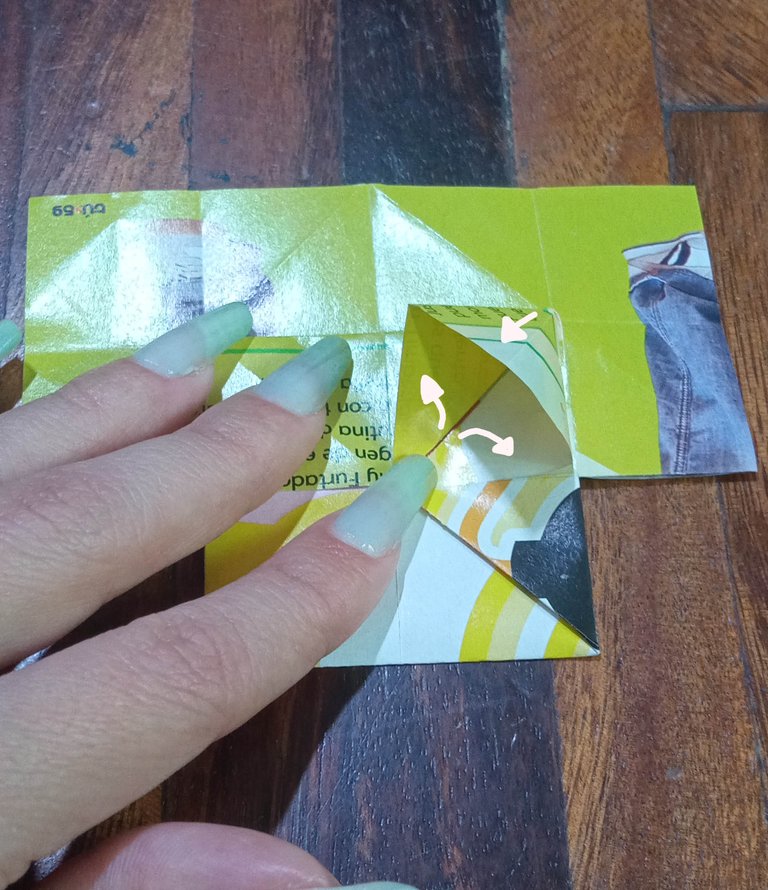
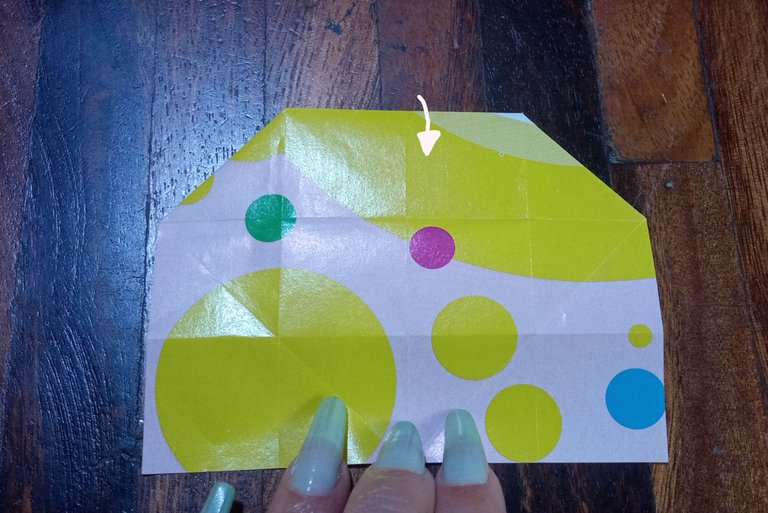
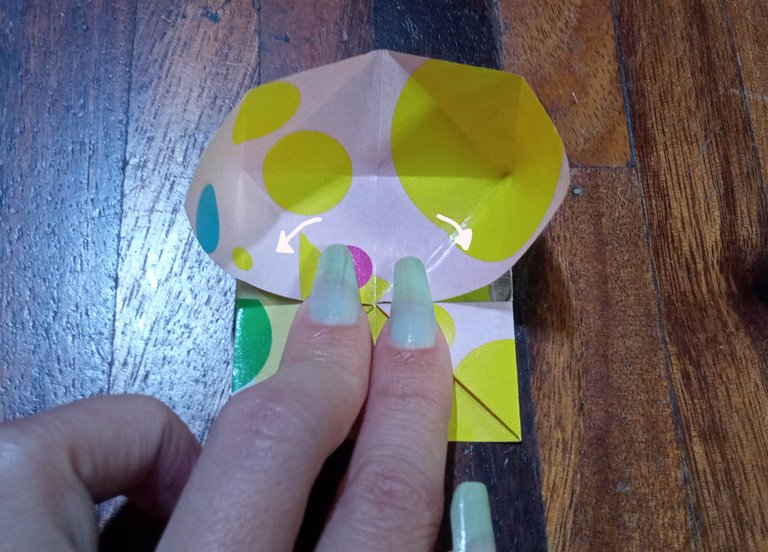
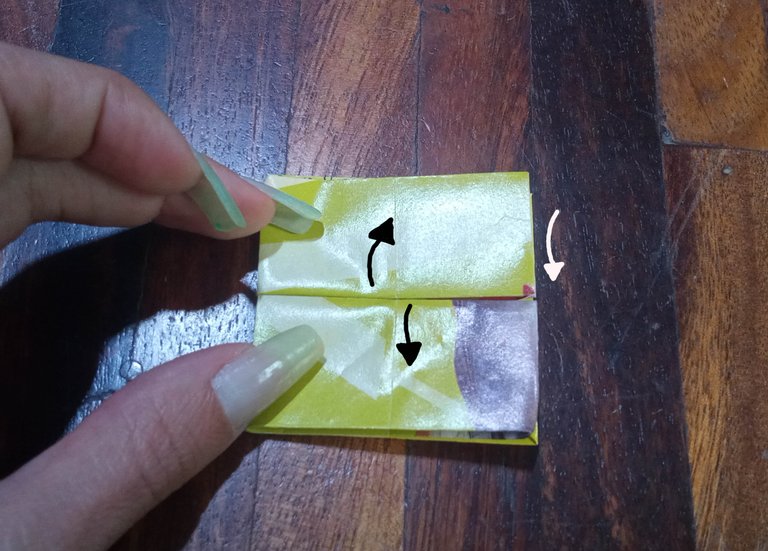
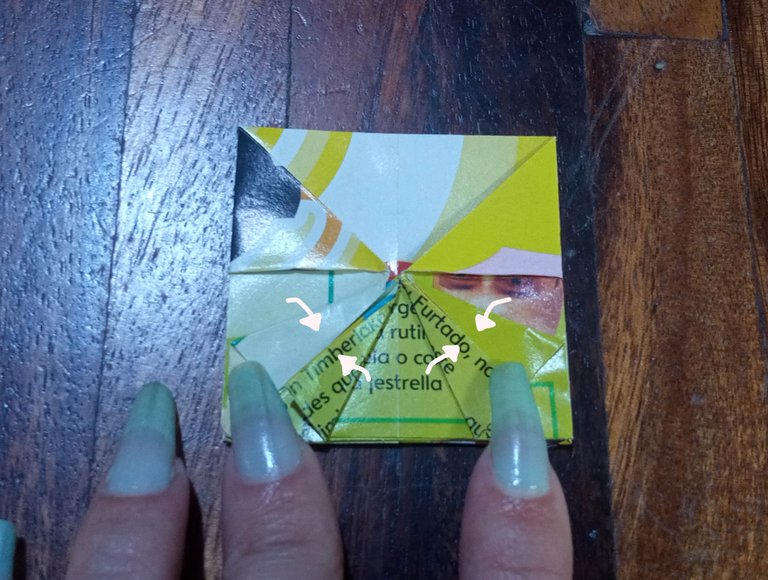
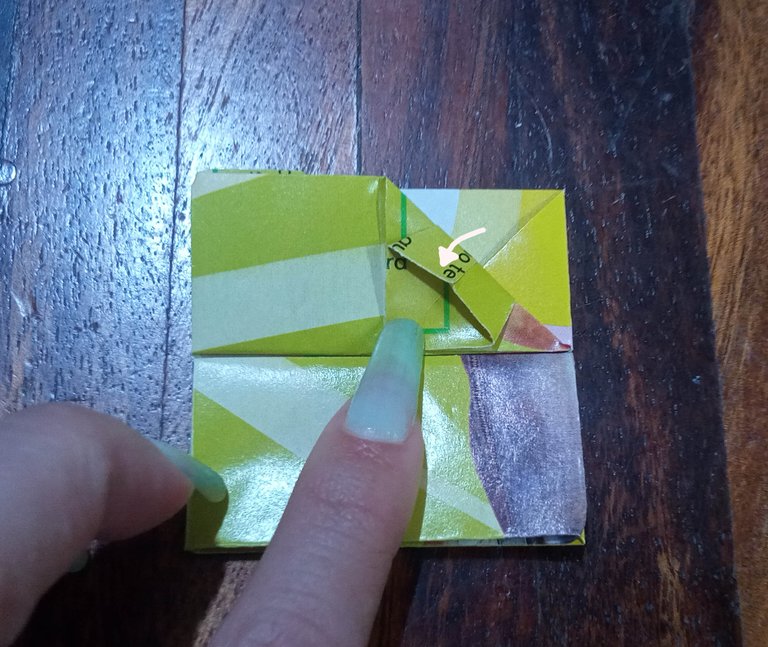
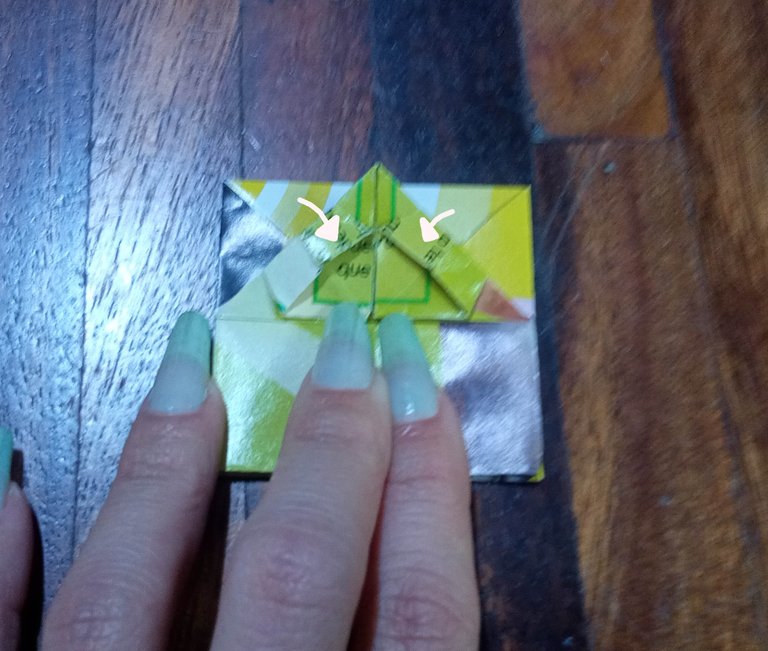
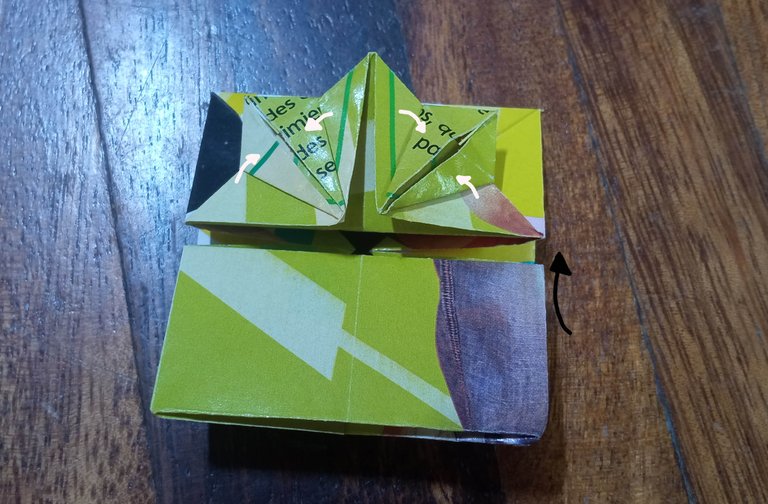
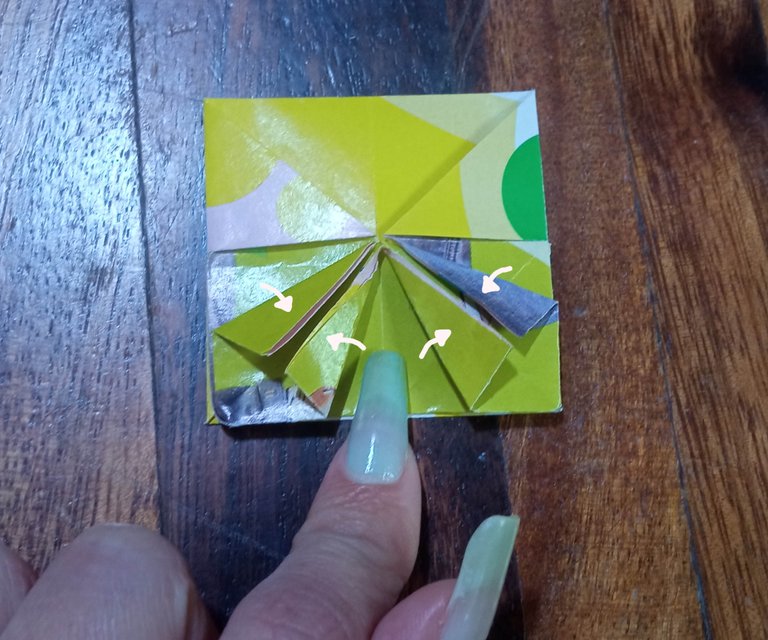
To make it easier for us to carry out the following steps, we fold as indicated by the black arrows in the first image and then we lower the tab again in the direction of the white arrow. Then, we fold the corners as seen in the second and third photographs:
 |  |  |
|---|
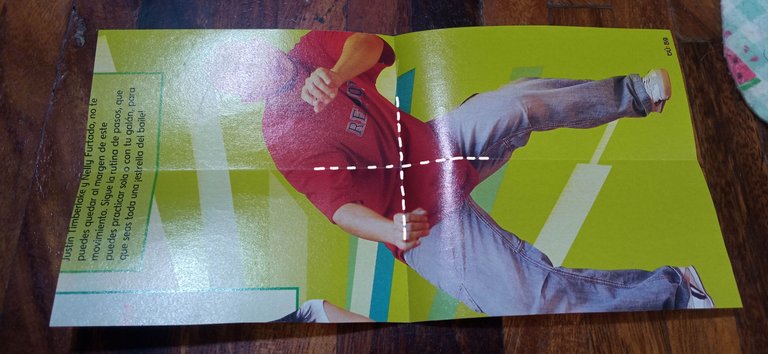
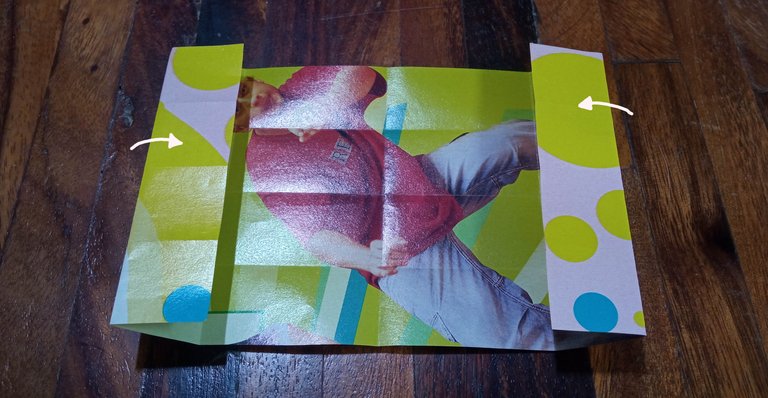
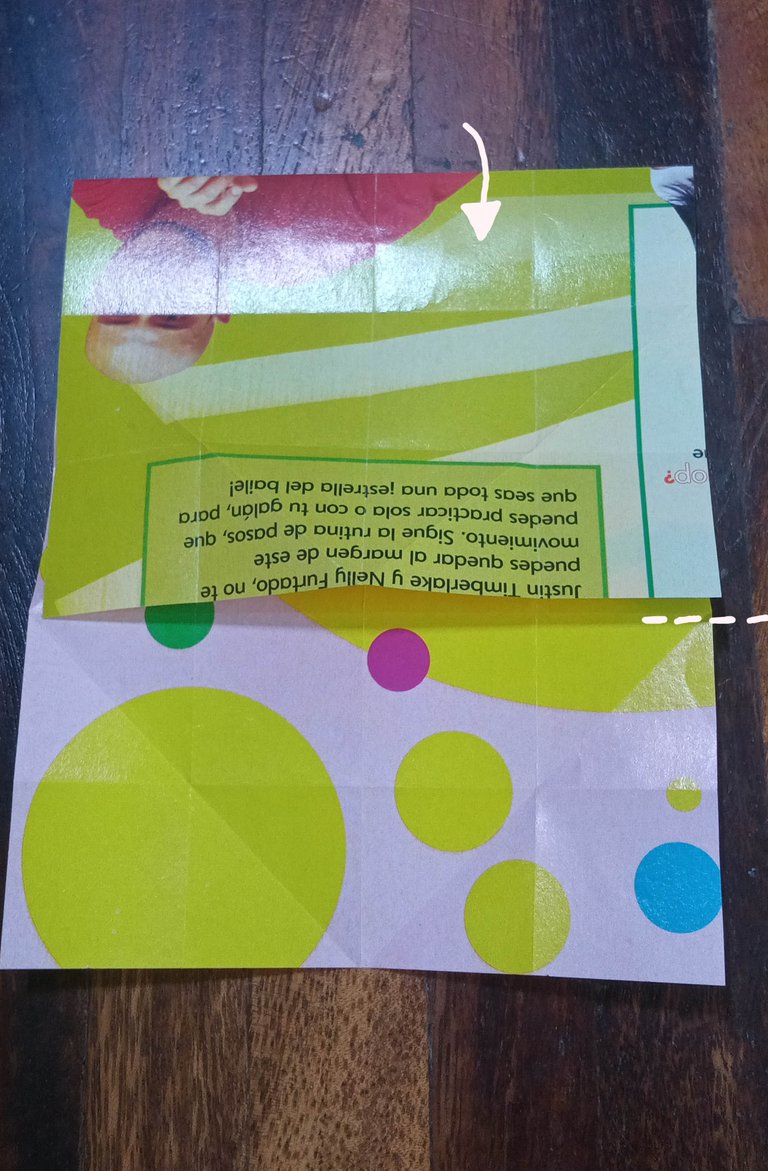
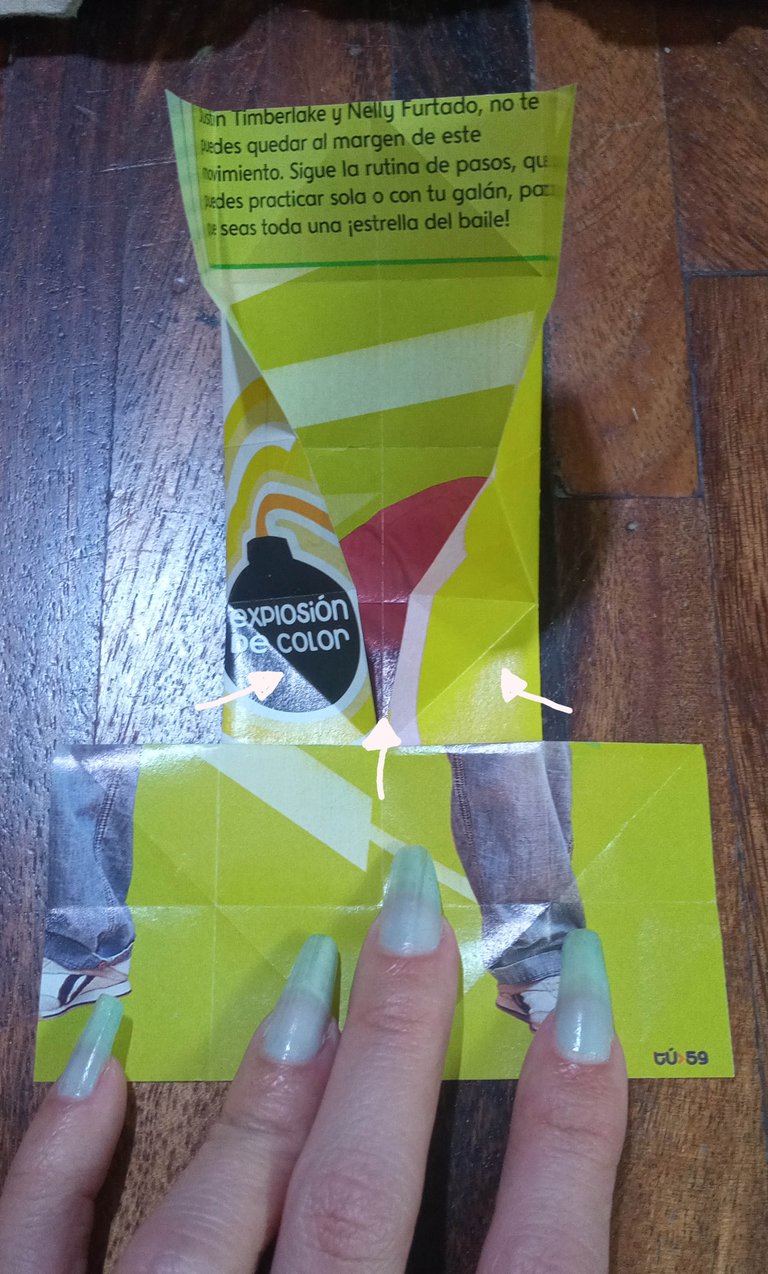
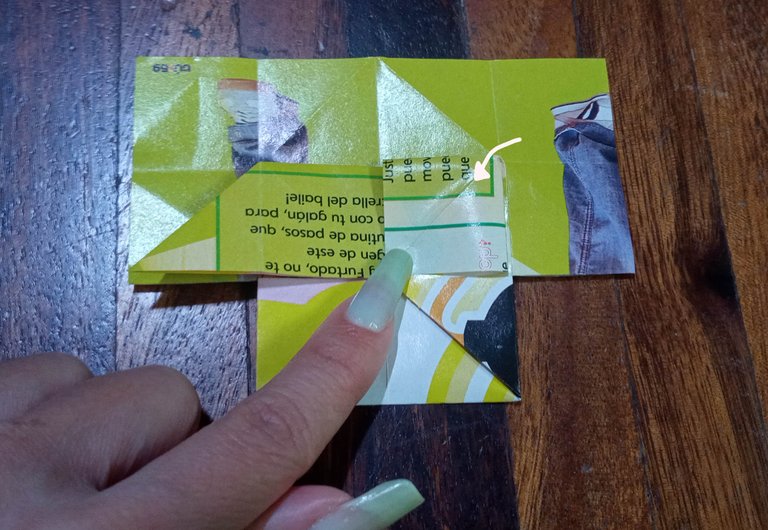
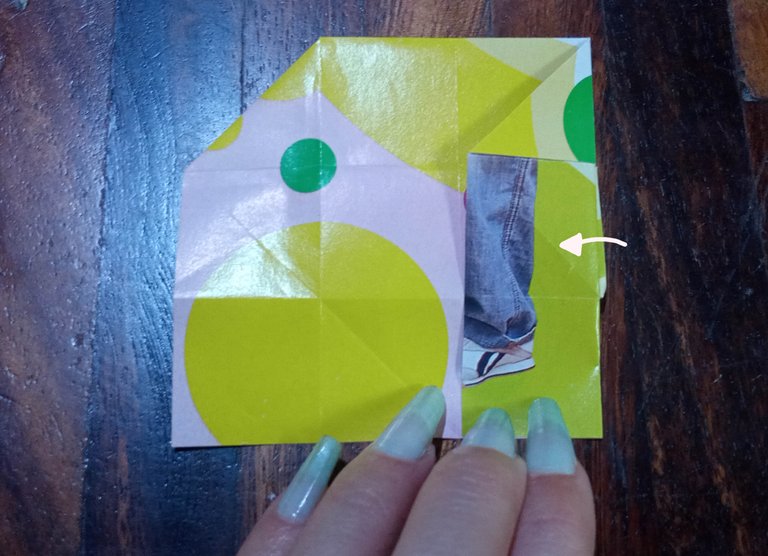
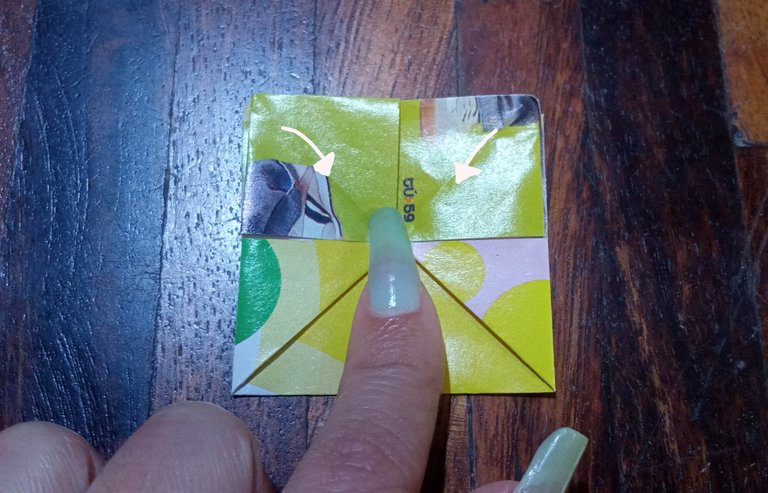
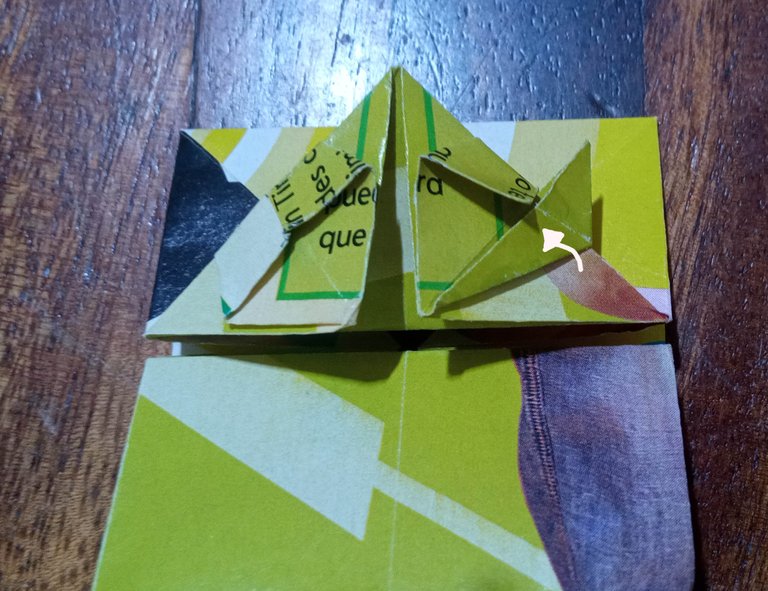
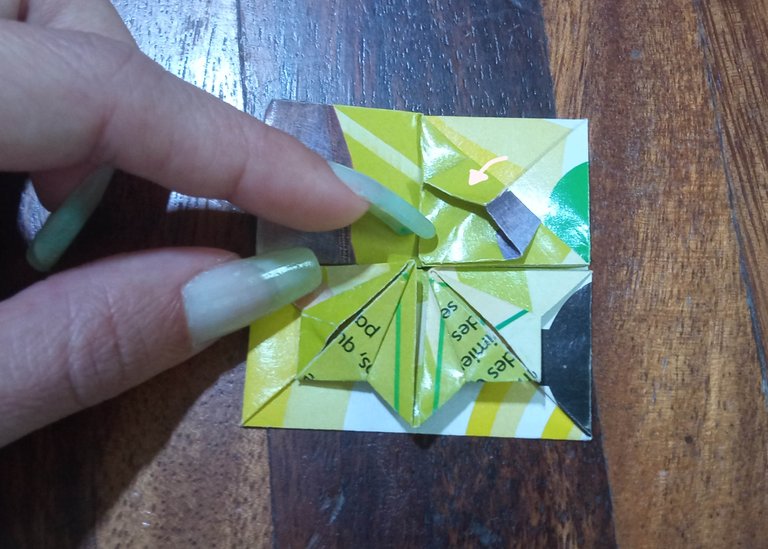
We fold as seen in the first image and then make a smaller fold like the one seen in the second image, on both sides.
 |  |  |
|---|
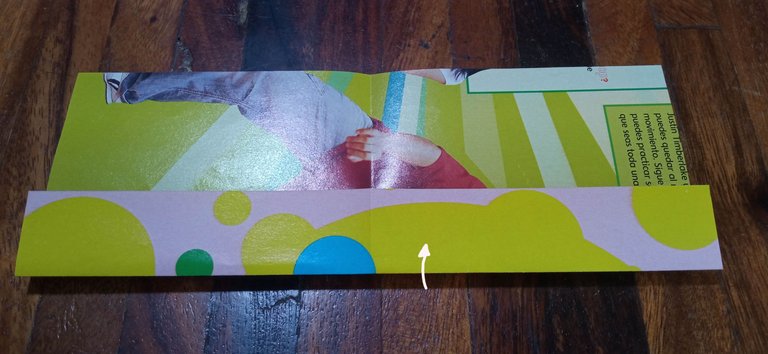
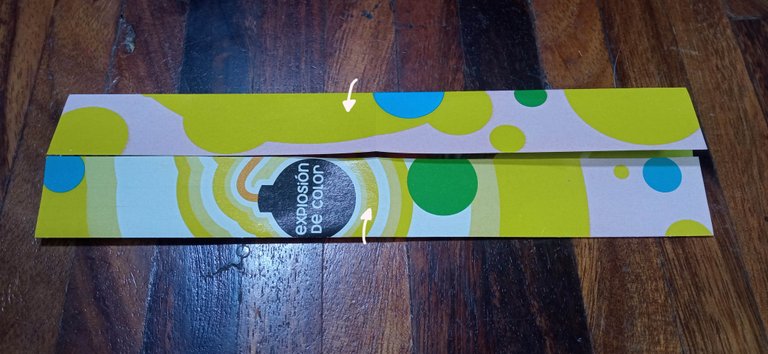
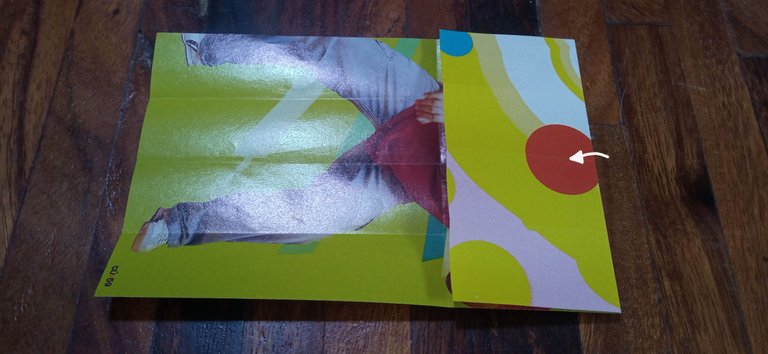
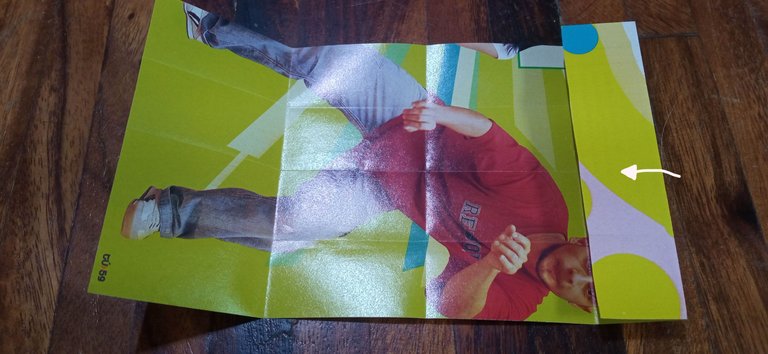
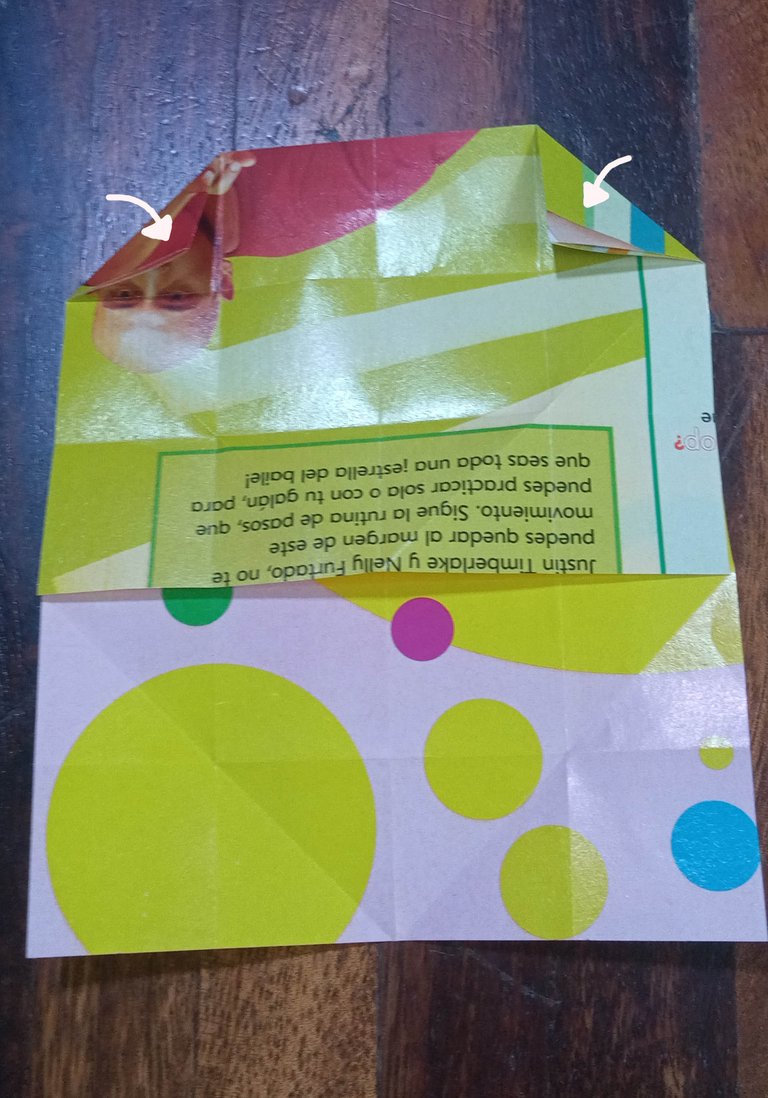
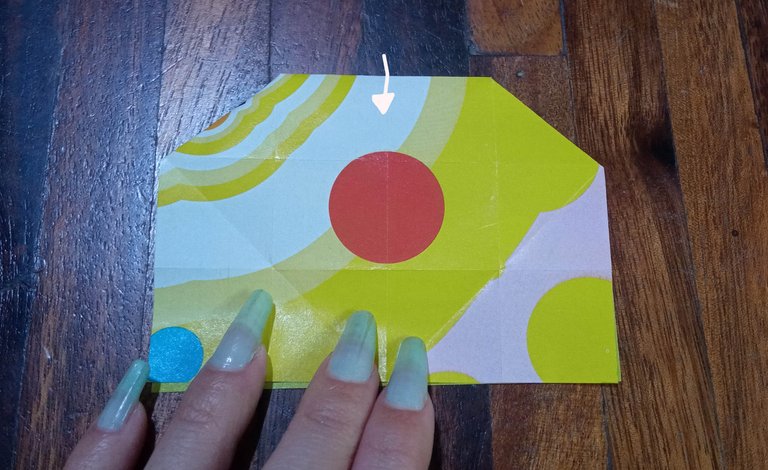
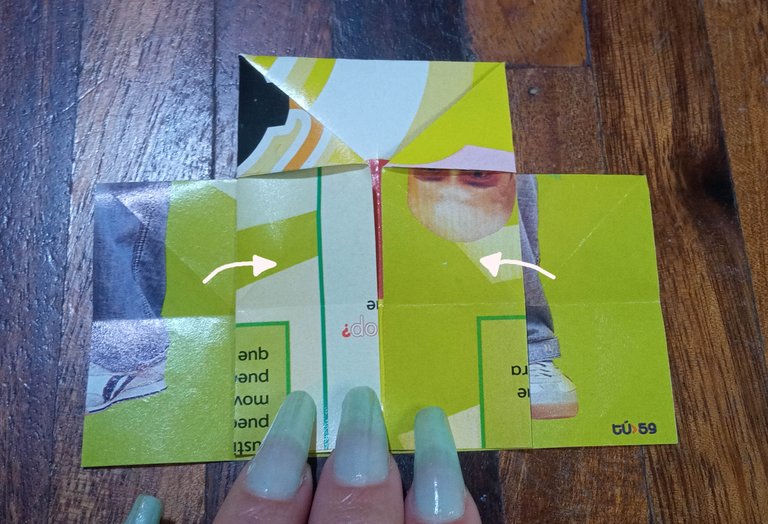
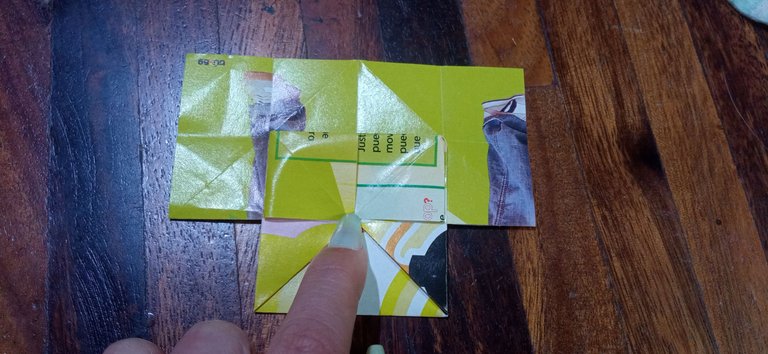
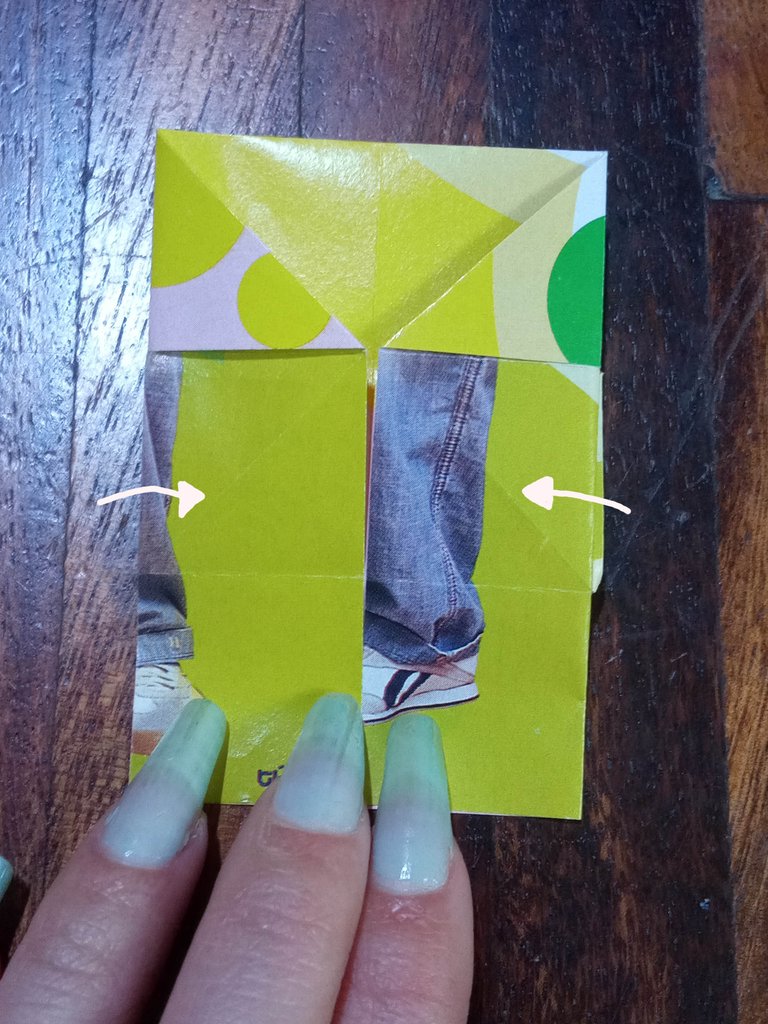
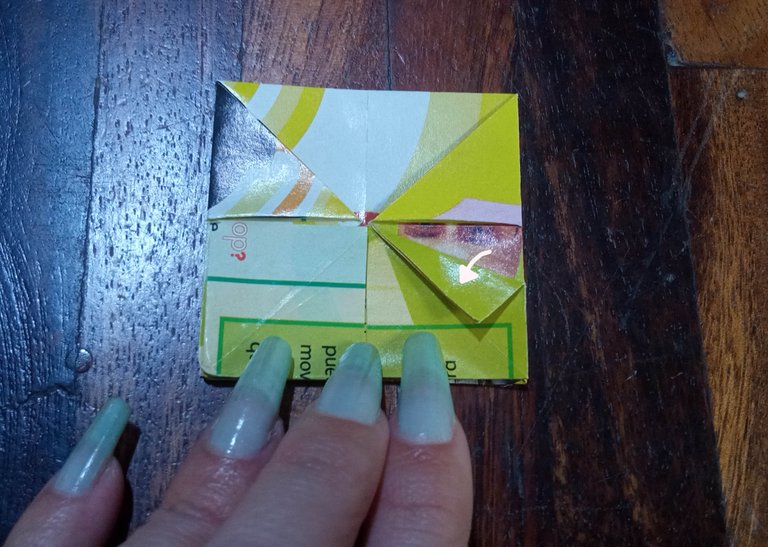
Then, proceed to fold the pieces as indicated by the white arrows. Once this is done, it is folded as indicated by the black arrow, in order to do the same procedure on the other side:
 |  |
|---|
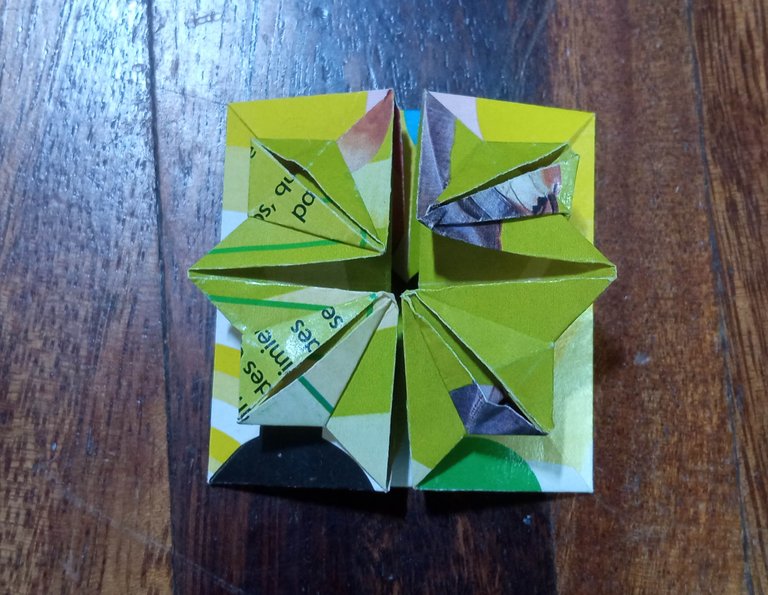
Afterwards, we can do the same steps mentioned above in the other tab and thus, finally have the piece that opens as if it were a small bag. It may seem complicated, but once you know how to do it, it is quite simple. The final finish seems quite beautiful to me, so it is worth learning how to do it.
 |  |  |
|---|
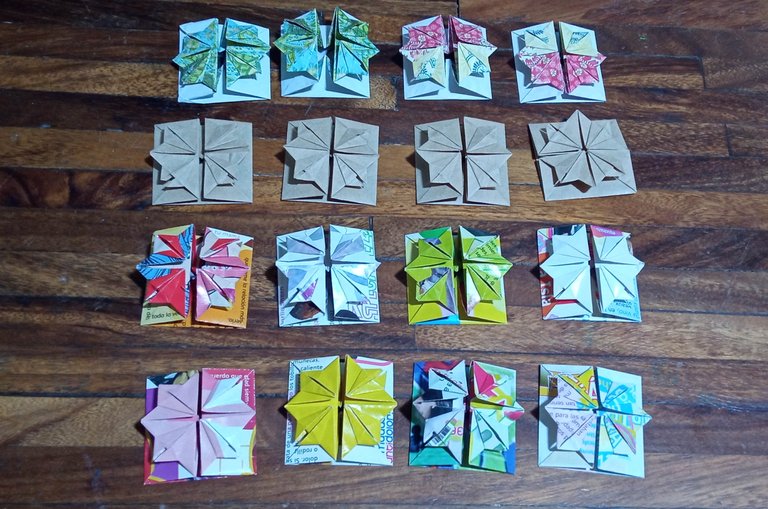
For the book, we need to make 16 pieces of this type. It seems like a lot, but once you've done a couple, you learn the procedure by heart and when you least expect it, you have them all ready. The best thing is that this is the most complicated piece and the rest are easier.
Thank you very much for visiting my publication. I hope you found it interesting.
Until next time!

CONTENIDO EN ESPAÑOL
¡Hola a todos los amantes de las manualidades! Para el aniversario con mi novio, quise elaborarle algo especial. Luego de que me mencionase que quería tener en físico fotografías de nosotros, busqué la forma de poder hacerlo, pero que fuese de forma compacta. Fue así como encontré El libro de hilos chinos, una manualidad originalmente creada para guardar implementos de costura, como agujas. Haciéndola con papel, se pueden agregar mensajes y en mi caso, fotografías en tamaño reducido.
Como el tutorial tiene varios pasos y se me hizo complicado grabarlo, les mostraré a lo largo de varias publicaciones, como hacerlo. En éste post, les mostraré como hacer la pieza que considero, es la más elaborada, pero que una vez que haces un par, básicamente te aprender el procedimiento de memoria y el resto de las piezas, te resulta sencillo. Para ello, utilicé recortes de revistas con figuras, papel de regalo y papel kraft, ya que utilicé los materiales que tenía a disposición.
Para realizar ésta primera pieza, se necesita una tira de papel de 10x20 cm. Doblamos la misma juntando las partes superior e inferior, así como los laterales, para obtener una marca en forma de cruz en el papel.
| | |
|---|
Luego, creamos unas nuevas marcas doblando una vez más la parte superior y la inferior, ésta vez juntando los bordes de las mismas, usando como guía la marca ubicada en el centro.
| |
|---|
Hacemos lo mismo con los bordes laterales, obteniendo lo que me parece que luce como una "ventana".
| |
|---|
Volvemos a tomar la atención en los laterales, doblando los mismos guiándonos por la marca obtenida en el paso anterior.
| |
|---|
Después, volteamos el papel, ya que vamos a proceder a realizar los siguientes dobleces en el lado contrario en el que hemos estado realizando las marcas. En las esquinas, vamos a doblar en forma triangular, guiándonos por la segunda marca, de modo que dichos triángulos, se junten.
| |
|---|
Seguidamente, abrimos la pieza y procedemos a doblar desde la parte superior, guiándonos por la marca obtenida por el doblez de los triángulos. De ésta forma, en las esquinas, volveremos a hacer unos dobleces triangulares más pequeños que los anteriores. Hacemos lo mismo, pero desde la parte inferior.
| | |
|---|
Ahora, abrimos y volteamos de nuevo la pieza (¿recuerdan que ya la habíamos volteado una vez?) y en esta cara, gracias a los dobleces que hicimos anteriormente, el papel va a poder ceder para adoptar la forma que se ve en las fotografías de abajo.
| |
|---|
Con esto, podremos doblar la pieza para obtener una figura como la que se aprecia en la primera fotografía de abajo. Luego, debemos levantar ambas pestañas de la forma en la que se ve en la segunda fotografía de abajo, simplemente para obtener un nuevo doblez, pero volvemos a colocarlo como estaba anteriormente.
| |
|---|
Si todo nos salió bien, debería verse de ambos lados de la siguiente forma:
| |
|---|
Ahora, doblamos las pestañas hacia el centro de la siguiente forma:
| |
|---|
Giramos la pieza para poder doblar ésta parte así:
| |
|---|
Gracias a los dobleces, podremos doblar las pequeñas esquinas hasta obtener un par de rombos, de ésta manera:
| | |
|---|
Ahora, podremos bajar la pestaña y doblar los laterales:
| | |
|---|
A éste paso, notaremos que los pasos se repiten:
| | |
|---|
Para que se nos sea más sencillo realizar los siguientes pasos, doblamos como indican las flechas negras en la primera imagen y luego, volvemos a bajar la pestaña en el sentido de la flecha blanca. Después, doblamos las esquinas como se aprecia en la segunda y tercera fotografía:
| | |
|---|
Doblamos como se ve en la primera imagen para después, hacer un doblez más pequeño como el que se ve en la segunda imagen, en ambos lados.
| | |
|---|
Luego, se procede a doblar las piezas como se indica en las flechas blancas. Una vez hecho esto, se dobla como lo indica la flecha negra, para poder hacer el mismo procedimiento en el otro lado:
| |
|---|
Después, podremos hacer los mismos pasos mencionados arriba en la otra pestaña y así, tener finalmente hecha la pieza que se abre como si fuera un saquito. Puede parecer complicado, pero una vez que ya sabes como se hace, resulta bastante sencillo. El acabado final me parece bastante bonito, así que vale la pena aprender a realizarlo.
| | |
|---|
Para el libro, necesitamos realizar 16 piezas de éste tipo. Parece mucho, pero una vez que ya has realizado un par, te aprendes el procedimiento de memoria y cuando menos te lo esperas, ya las tienes todas listas. Lo mejor es que esta se trata de la pieza más complicada y el resto, son más fáciles.
Muchas gracias por haber visitado mi publicación. Espero que les haya parecido interesante.
¡Hasta una próxima oportunidad!
a community encouraging first-hand content, and each individual living their best life.
Made a book with great skill and showed well the combination and beauty of different colors that gave the book a wonderful feel. Thank you very much for presenting all the steps in a smooth manner.
The first time I saw it, I didn't think I could do something so complicated. But as I mentioned, once you make each piece, you realize that it is not that difficult. You just have to have patience and desire to do something nice. I will upload the next part shortly. Because in this post, I only showed the smallest piece 😅 I hope you can take a look at the rest 😉 Thank you very much for coming to see it and for commenting 😌💚
Yes you are right I am waiting to see the rest. Thank you very much for the advice to make the job easier.We can be friends dear comment and be.
Origami is something new to me, so I was really afraid to try it. That's why I like to explain it as thoroughly as possible, because those types of explanations are what I like 😆 by the way, I just uploaded the second piece 👀 and of course! we can be friends 😁💚
Excelente!!! Lograste una manualidad de mucha originalidad y sobre todo con amor, que es lo más importante. Gracias por compartir 🤗
Si supieras que realmente me subió los ánimos cuando la terminé, porque a simple vista, se ve como algo imposible de realizar. Pero todo se trata de pequeñas piezas unidas. En éste post apenas mostré la primera y más elaborada de sus partes, porque quería explicar detalladamente cómo hacerlo. Espero que puedas ver cómo son las demás piezas y cómo se arma, porque es un excelente regalo para darle a alguien especial 😉 Muchísimas gracias a ti, por acercarte a verlo y por tu comentario 😘💚