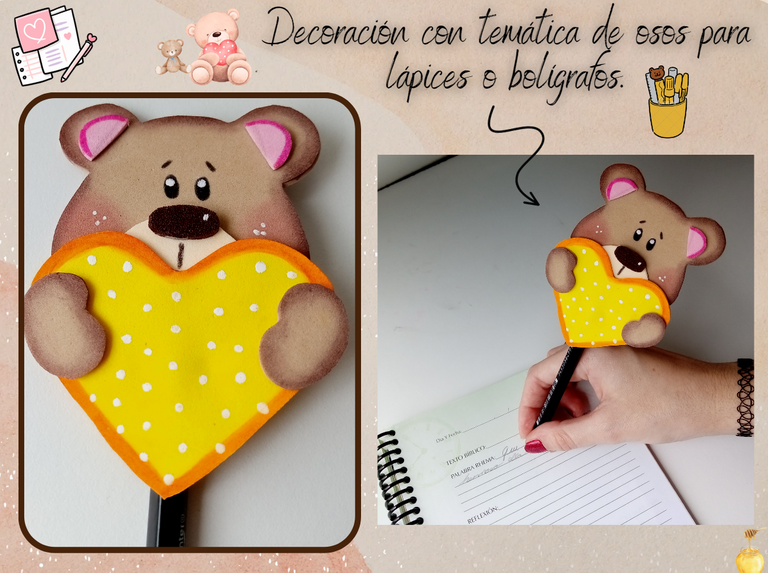
✨🐻💛¡Hola amigos amantes de la creatividad! Espero que hayan pasado un muy buen comienzo de semana.💛🐻✨
Espero que todos estén pasando un lindo día. Hoy les quiero compartir el paso a paso para elaborar una muy linda idea para decorar sus lápices o bolígrafos. Desde pequeña siempre tuve un amor enorme por los lápices decorados, bueno digamos que yo era la niña de los plumones, pero... no me gustaba mucho utilizarlos y desperdiciarlos, siento que siempre se perdían y me dolia mucho, jaja. Pero bueno, sin salirme del tema, siempre me ha encantado este tipo de decoración que le ponen a los lápices, siempre lo vi un poco difícil de elaborar porque debía dibujar en foami y hacer muchos detalles. Como mencione antes, poco a poco he ido practicando como trabajar con el foami y dibujar sobre él, pues mi pulso es terrible, poco a poco he visto una evolución, siento que ahora tengo más control y poco a poco he ido mejorando. No, soy pro, pero me gusta dibujar una carita y por lo menos que se vea linda.
Por eso, hoy me atrevo nuevamente a traerles esta hermosa creación con pequeños detalles, realmente fácil de hacer y es una excelente idea para darle un toque lindo a sus lápices o a los de sus hijos. Sé que parecerá que usé muchos materiales, pero la verdad es que solo necesitas retazos de foami para elaborarlo, puedes utilizar los retazos que te sobran y las has abandonado o simplemente inspirarte y crear la figura que desees, según los colores que tengas en casa.
🔸Sin más que añadir, a continuación los dejo con el paso a paso:
✨🐻💛¡Hello friends who love creativity! I hope you had a very good start to the week.💛🐻✨
I hope everyone is having a nice day. Today I want to share the step by step to make a very nice idea to decorate your pencils or pens. Since I was little I always had a huge love for decorated pencils, well let's say that I was the girl with the markers, but... I didn't really like using them and wasting them, I feel like they were always lost and it hurt a lot, haha. But hey, without going off topic, I have always loved this type of decoration that they put on pencils, but I always saw it as a bit difficult to elaborate, because I had to draw on foami and do many details. As I mentioned before, little by little I have been practicing how to work with the foam and draw on it, because my pulse is terrible, little by little I have seen an evolution, I feel that now I have more control and little by little I have been improving. No, I'm pro, but I like to draw a face and at least make it look cute.
For this reason, today I dare again to bring you this beautiful creation with small details, really easy to do and it is an excellent idea to give a cute touch to your pencils or those of your children. I know it will seem like I used a lot of materials, but the truth is that you only need foam pieces to make them, you can use the pieces that are left over and you have abandoned them or simply get inspired and create the figures you want, depending on the colors you have at home.
🔸Without more to add, then I leave you with the step by step:
♥️ESPERO QUE TE GUSTE,
¡Empecemos!
♥️I HOPE YOU LIKE IT,
Let's start!

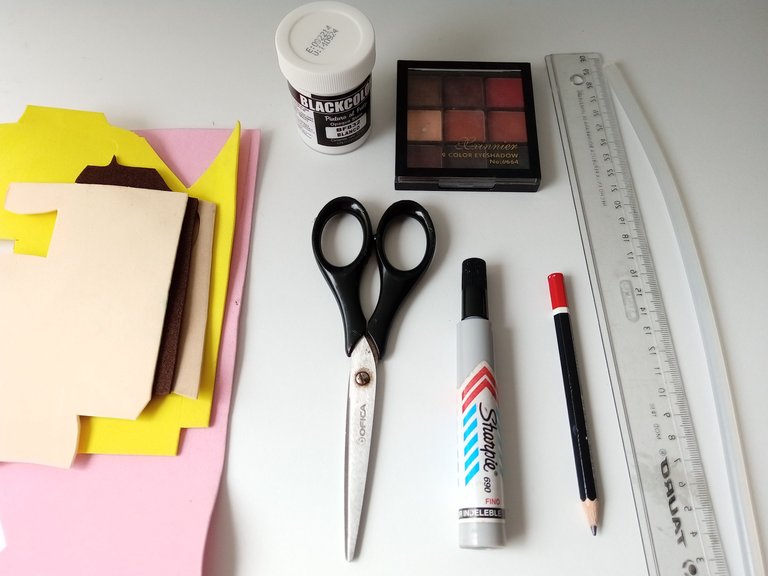
💛 MATERIALES | 💛 MATERIALS
- Foami marrón oscuro.
- Foami marrón claro.
- Foami rosa claro.
- Foami amarillo.
- Foami marfil.
- Tizas, sombras o marcadores.
- Marcador negro.
- Pintura blanca.
- Silicona caliente.
- Tijeras.
- Regla.
- Papel.
- Lápiz.
- Dark brown foam.
- Light brown foam.
- Light pink foam.
- Yellow foamy.
- Ivory foam.
- Chalks, shadows or markers.
- black markers.
- White paint.
- Hot silicone.
- Scissors.
- Ruler.
- Paper.
- Pencil.
🐻 PROCEDIMIENTO | 🐻 PROCESS
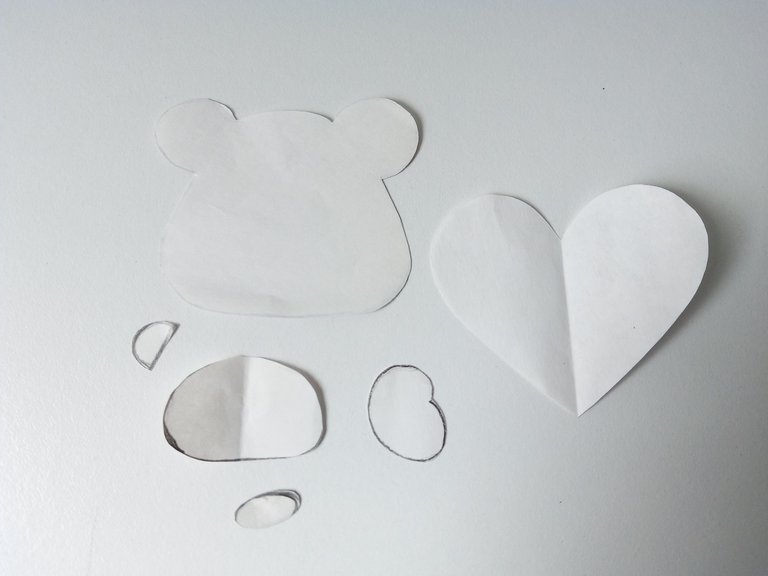
- PASO 1:
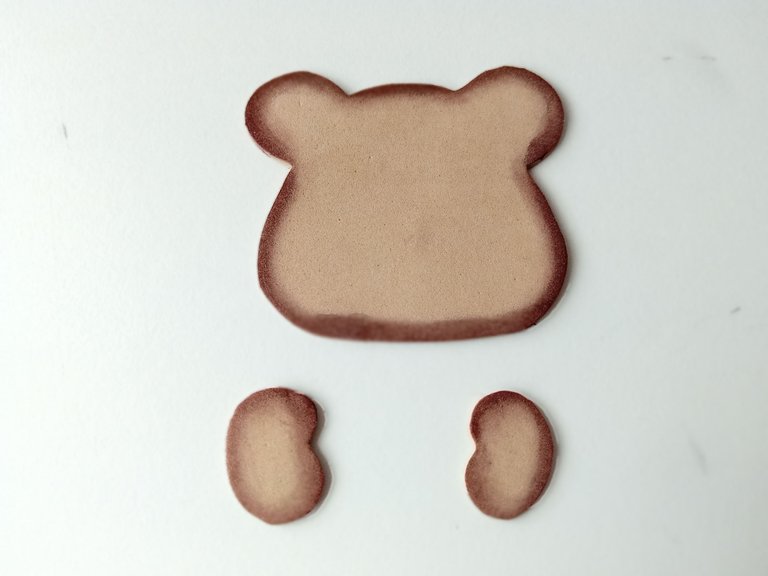
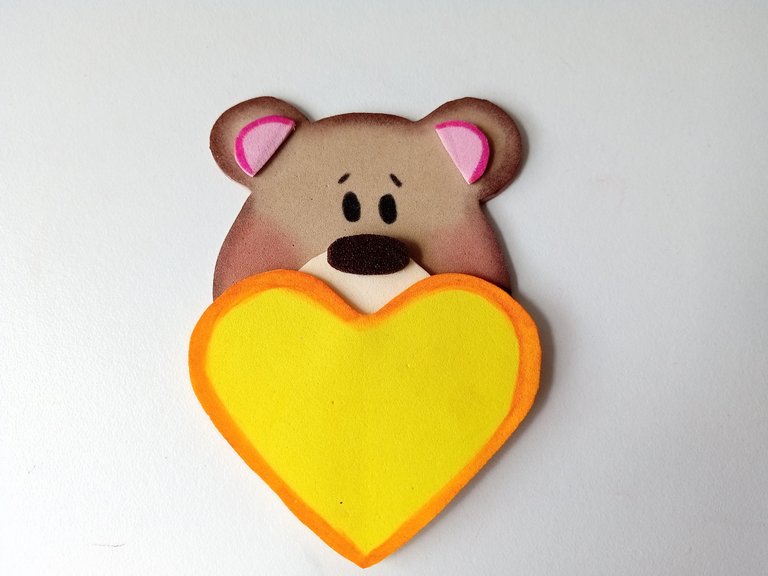
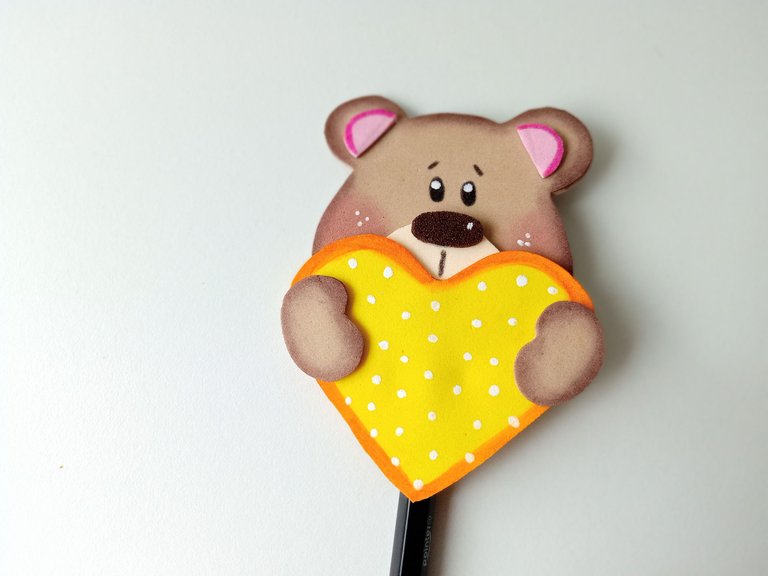
Lo primero que debemos hacer es dibujar la figura del oso individualmente, la recortamos y la calcamos en el color de foam correspondiente, es decir: la cabeza de 6 cm x 5 cm en foam marrón claro y 2 patas de 2 cm x 1,5 cm, también en foami marrón claro. La trompa de 3 cm x 2,5 cm en color marfil, la nariz en marrón oscuro, la parte interior de las orejas en rosa claro y por último, el corazón de 6,5 cm x 5,5 cm en amarillo.
- STEP 1:
The first thing I did was draw the figure of the bear individually, we cut it out and traced it in the corresponding foam color, that is to say: the head of 6 cm x 5 cm in light brown foam and 2 legs of 2 cm x 1.5 cm , also in light brown foami. The trunk of 3 cm x 2.5 cm in ivory, the nose in dark brown, the inside of the ears in light pink and finally, the heart of 6.5 cm x 5.5 cm in yellow.
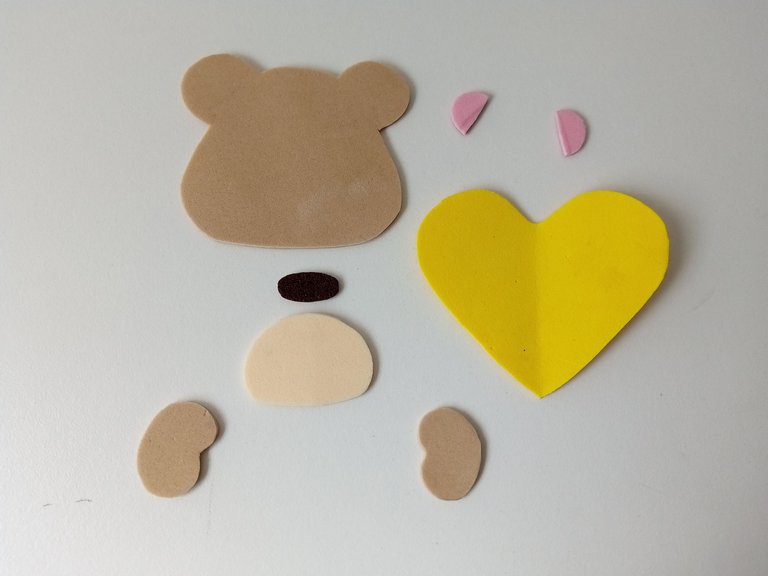
- PASO 2:
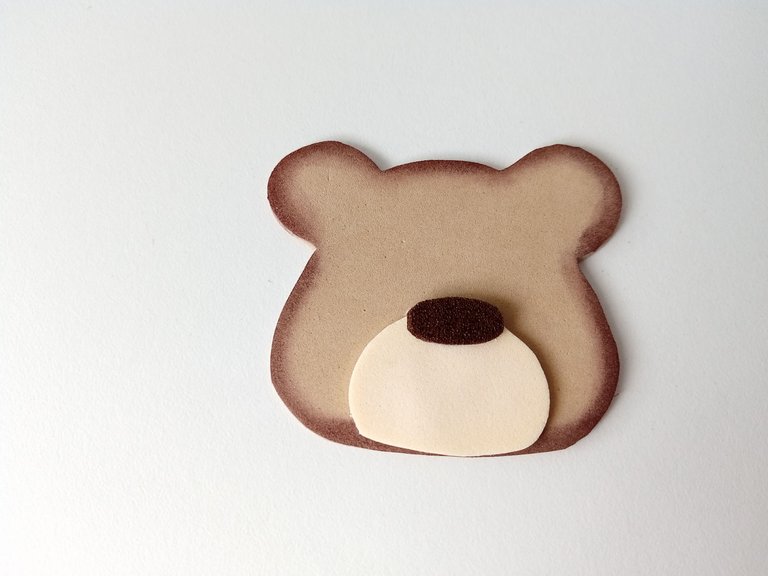
Una vez tengamos todas las piezas en su color correspondiente, vamos a tomar la cabeza y pasamos por todo el borde, con ayuda de un dedo o pañito, tiza o sombra un tono más oscuro que el foami y repetimos el mismo proceso con las patas. Luego pegamos a la cabeza la trompa y la nariz.
- STEP 2:
Once we have all the pieces in their corresponding color, we are going to take the head and go over the entire edge, with the help of a finger or a cloth, chalk or shadow a shade darker than the foami and we repeat the same process with the legs. Then we glue the trunk and the nose to the head.
- PASO 3:
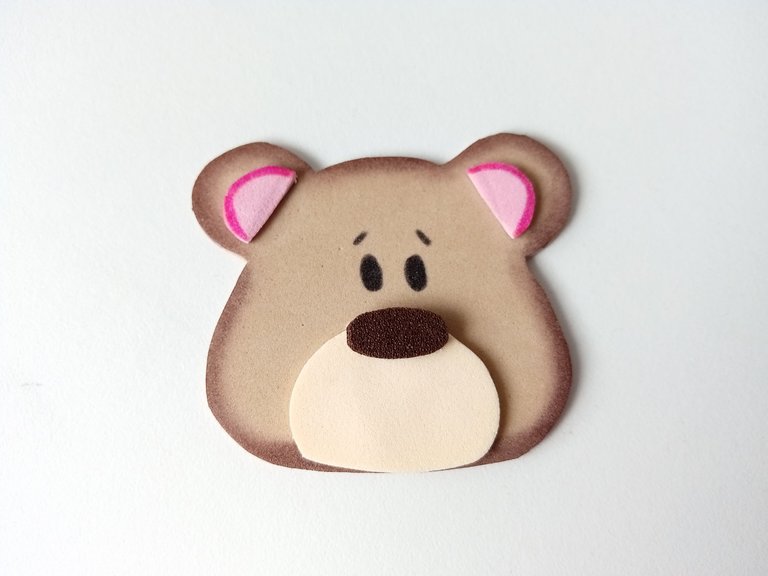
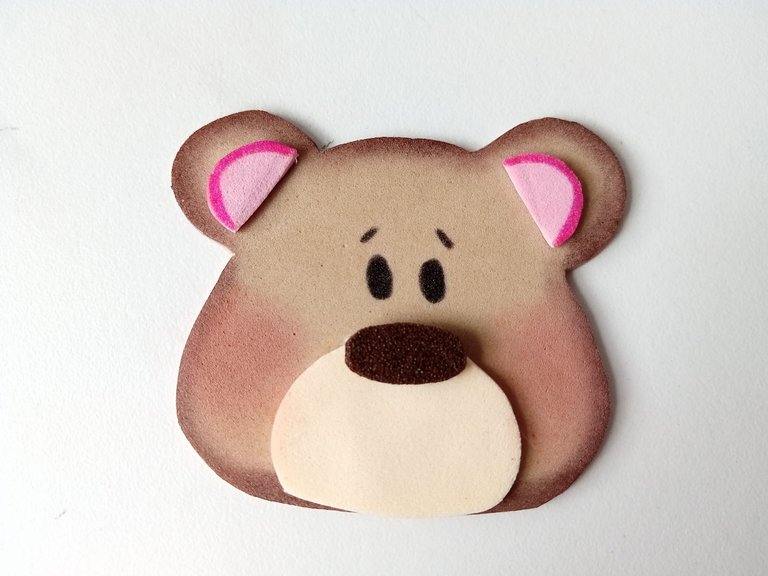
También pegamos el interior de las orejas y si deseas, puedes pasar un tono más oscuro de tiza o marcador por el borde. A continuación, dibuja los ojos, las cejas y con sombra roja o rosa pinta las mejillas del oso.
- STEP 3:
We also glue the inside of the ears and if you want, you can pass a darker shade of chalk or marker along the edge. Next, draw the eyes, the eyebrows and with red or pink shadow paint the cheeks of the bear.
- PASO 4:
Para darle un bonito toque al corazón, simplemente pasar por toda la borde tiza o marcador un tono más oscuro o que combine con el amarillo. Luego, pegar el corazón justo a la mitad de la trompa del oso y ambas patas pagarlas a los laterales, dando la idea de que el oso está sosteniendo el corazón.
- STEP 4:
For a nice touch to the heart, simply paint the entire edge with chalk or paint a darker or matching shade of yellow. Then glue the heart right in the middle of the bear's trunk and glue both paws to the sides, giving the idea that the bear is holding the heart.

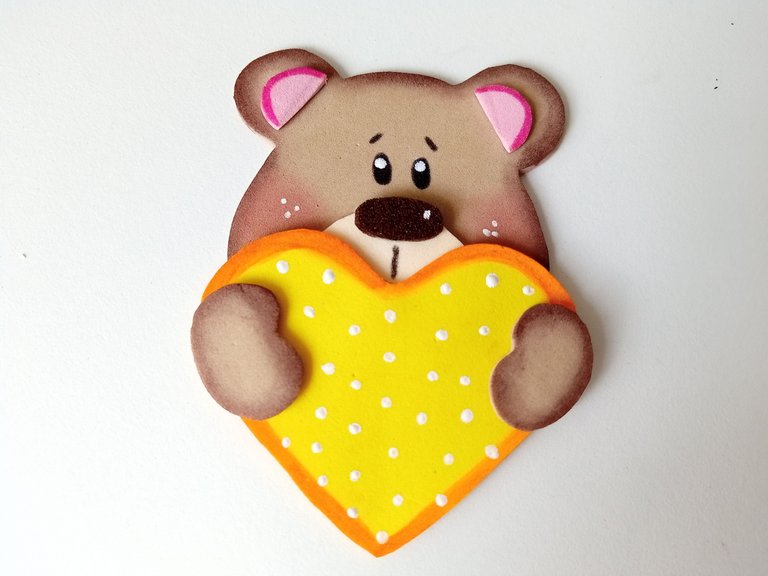
- PASO 5:
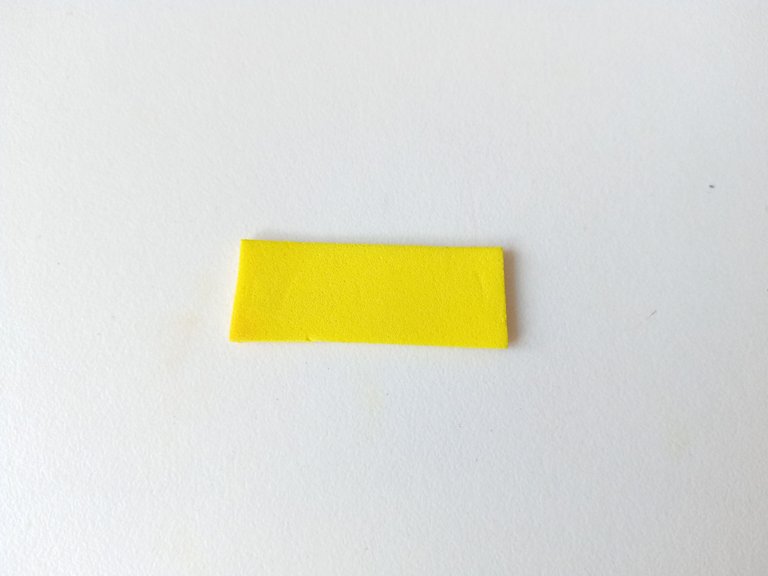
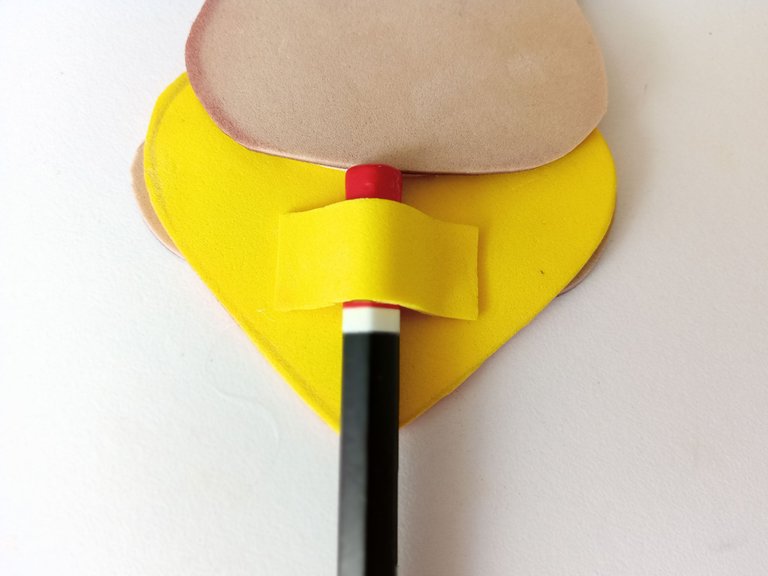
Con pintura blanca y la ayuda de la punta de un lápiz, realiza pequeños puntos blancos en los siguientes lugares: En los ojos, en la nariz, en las mejillas y por todo el corazón de forma desordenada. Para terminar, corta una tira de foami de 3 cm x 1,5 cm y pégala en la parte de atrás del corazón. Pegue solo los bordes de la tira, dejando un espacio en el medio donde irá el lápiz.
- STEP 5:
With white paint and the help of the tip of a pencil, make small white dots in the following places: In the eyes, on the nose, on the cheeks and all over the heart in a disorderly way. To finish, cut a 3 cm x 1.5 cm foami strip and glue to the back of the heart. Only glue the edges of the strip, leaving a space in the middle where the pencil will go.
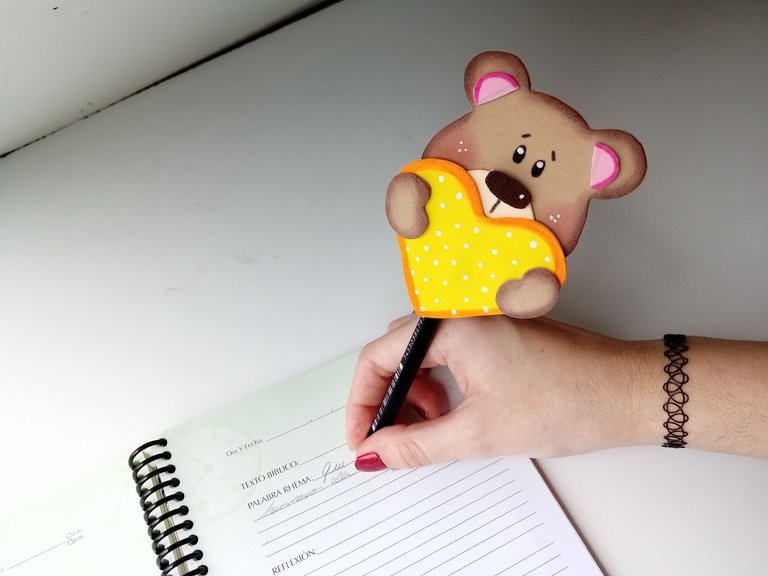
✨🐻💛¡Y listo!💛🐻✨ Es así como de una manera muy fácil puedes hacer una linda decoración para tus lápices o bolígrafos con la temática y colores de tu elección. Realmente me enamoré y quedé bastante orgullosa de mi proceso en cuanto al manejo de tizas, marcadores, puntos de luz y dibujar el rostro, me hace muy feliz y espero seguir mejorando. Espero que les haya gustado el paso a paso y se animen a elaborarlo.
❤️Hasta la próxima publicación.
✨🐻💛¡And ready!💛🐻✨ This is how in a very easy way you can make a nice decoration for your pencils or pens with the theme and colors of your choice. I really fell in love and was quite proud of my process regarding the handling of chalk, markers, points of light and drawing the face, it makes me very happy and I hope to continue improving. I hope you liked the step by step and are encouraged to elaborate it.
❤️Until the next post.
✨RESULTADO: | ✨RESULT:


Todas las fotografías son de mi propiedad.
Separador y Fotos editadas en Canva
All photographs are my property.
Photos edited in Canva
~~~ embed:1635677209259065346 twitter metadata:MTQ4NDI4MTAxMzQxMzAyMzc1Nnx8aHR0cHM6Ly90d2l0dGVyLmNvbS8xNDg0MjgxMDEzNDEzMDIzNzU2L3N0YXR1cy8xNjM1Njc3MjA5MjU5MDY1MzQ2fA== ~~~
The rewards earned on this comment will go directly to the people( @valenpba, @dayadam, @helloisalbani ) sharing the post on Twitter as long as they are registered with @poshtoken. Sign up at https://hiveposh.com.
Te quedó demasiado lindo y tierno amiga, me gustaron mucho los colores que usaste siento que se ven hermosos y vivos. Gracias por compartirnos el paso a paso ❤️
Valen💗
Que cosita más cuchi y tierna, un paso a paso bien explicado y lo mejor una forma útil de darle vida a esos retazos de foami que nos van sobrando de otras manualidades!
Me alegra que ahora estés teniendo más soltura para dibujar y que tu pulso esté mejorando tambien, bien es cierto que la práctica hace al maestro y a medida que sigas practicando verás mayores avances! 💗💗
Un abrazoooo! 🐻
OMg amiga, so cute.. Me encanta. Qué detallitos tan lindos!!! gracias por compartir. Quisiera yo poder saber todas esas cositas jaja pero creo que las manualidades no van conmigo
Que cosa mas bella🥰🥰 me encantaaaa!! El amarillo llama muchisimo la atencion😍😍
Congratulations, your post has been upvoted by @dsc-r2cornell, which is the curating account for @R2cornell's Discord Community.
Congratulations, your post has been upvoted by @dsc-r2cornell, which is the curating account for @R2cornell's Discord Community.
Muchas gracias por el apoyo amigos @dsc-r2cornell , agradecida.
Feliz día.❤️
Yay! 🤗
Your content has been boosted with Ecency Points, by @valenpba.
Use Ecency daily to boost your growth on platform!
Support Ecency
Vote for new Proposal
Delegate HP and earn more
Thank you very much.💗
Quedo súper tierno ideal para regalar a los alumnos en el colegio
A little bit of effort or interest motivates us greatly to create great things, you proved that very nicely.
Thank you very much, little by little I am improving and it is very easy to make.
Thanks for the support.❤️
Sounds great. Keep trying and don't forget that practice makes perfect.
Que belleza @valenpba un trabajo sencillo, pero hermoso, realizado con mucho detalle y dedicación. Éxitos querida. Gran trabajo... ✨
!PIZZA
Muchas gracias por tus hermosas palabras, amiga. 💗
Feliz de que te haya gustado y se note el trabajo que lleva hacer este detallito. Es fácil de elaborar pero hecho con amor 💗❤️
Saludos y gracias por el apoyo.🤭
PIZZA Holders sent $PIZZA tips in this post's comments:
@dayadam(3/5) tipped @valenpba (x1)
You can now send $PIZZA tips in Discord via tip.cc!
Thank you very much for the support @dayadam and @pizzabot.
Nice day.❤️
https://leofinance.io/threads/@dayadam/re-leothreads-21wrvocnl
The rewards earned on this comment will go directly to the people ( dayadam ) sharing the post on LeoThreads,LikeTu,dBuzz.
Pero que idea mas hermosa 🥺🥺, me parece demasiado creativa esta forma de decorar un lápiz, aparte que la compañía de ese osito sería maravillosa 💕.
Que bonita idea amiga, a mi que me encanta decorar todo me parece una gran idea, el motivo esta muy cuchi y colorido, ¡me encanta! 💕
Las manualidades con foami siempre han sido de mis favoritas y esta te quedó muy hermosa 🖤✨. Me gustó mucho tu post, me inspiró a volver a trabajar con ese material
Que cosa tan preciosa y tierna. Que manos tan mágicas tienes, amiga. Todo te queda precioso. Ya quisiera yo tener esa habilidad 😍💜
Que bellooooo😍 Me encanto, amiga, se ve muy tierno ese osito. Gracias por compartir, te quedo muy lindo.
Amiga qué hermoso esto! Me encantó! Enviame uno a Polonia por favor! jajaja
Este detalle está muy cuchi, para hacerle un regalo a alguien. Me encanto, está muy bien acabado! Gracias por compartir!💛
Awww una cosita deseado tierna y déjame decirte que el trabajo en foamy te quedó muy bien amiga. La aplicación de colores, los ojos, todo requiere de mucho cuidado y buen pulso como dices, pero lo lograste!
Quedó bellisimo. Gracias por compartir
Tan creativa como siempre mi valen. Siper hermoso ese osito 😍