✨🌹💐¡Hola amigos amantes de la creatividad! Espero que tengan un buen día..💐🌹✨
Estoy muy feliz porque se acerca la fecha del amor que se celebra el 14 de febrero en Venezuela y otros países. Si bien es cierto que cualquier día puedes darle un detalle a tu pareja, la intención de tener un día específico para darle un lindo detalle es hermosa, esto no quiere decir que deba ser lo más lujoso, puede ser una carta, bombones o en este caso; Como complemento a tu regalo, un pequeño ramo con una preciosa rosa. Así es, para estas fechas tengo muchas ganas de traerles algunas ideas fáciles y económicas para hacer en este día con nuestras propias manos y creatividad, es por eso que en esta ocasión quise hacer un hermoso ramo con una rosa muy fácil y con un resultado verdaderamente encantador.
Aunque llevo casi un año compartiendo contenido diy con ustedes, es cierto que tengo mis creaciones favoritas y de momento esta es una de ellas, para los que más o menos sigan mi blog, sabrán que me encantan las flores y bueno, que trato de ser la señora de las plantas aunque no tengo mucha idea de lo que estoy haciendo. Por otra parte, también estoy feliz, ya que el 15 de febrero celebro mi 1.er aniversario en la colmena y con esto es una forma de darles a ustedes mi pequeño obsequio de agradecimiento, como detalle de celebración por esas próximas fechas importantes para mí.
🔸Sin más que añadir, a continuación los dejo con el paso a paso:
✨🌹💐¡Hello friends who love creativity! I hope you have a great day.💐🌹✨
I am very happy because the date of love that is celebrated on February 14 in Venezuela and other countries is approaching. Although it is true that any day you can give a detail to your partner, the intention of having a specific day to give them a nice detail is beautiful, this does not mean that it should be the most luxurious, it can be a letter, chocolates or in this case; As a complement to your gift, a small bouquet with a beautiful rose. That's right, for these dates I really want to bring you some easy and cheap ideas to do on this day with our own hands and creativity, that's why on this occasion I wanted to make a beautiful bouquet with a very easy rose and with a result truly charming.
Although I have been sharing diy content with you for almost a year, it is true that I have my favorite creations and for now this is one of them, for those who more or less follow my blog, they will know that I love flowers and well, that I try to be the plant lady although I don't have much idea what I'm doing. On the other hand, I am also happy, since on February 15 I celebrate my 1st anniversary in the hive and with this it is a way of giving you my little thank you gift, as a detail of celebration for those upcoming important dates for me.
🔸Without more to add, then I leave you with the step by step:
♥️ESPERO QUE TE GUSTE,
¡Empecemos!
♥️I HOPE YOU LIKE IT,
Let's start!

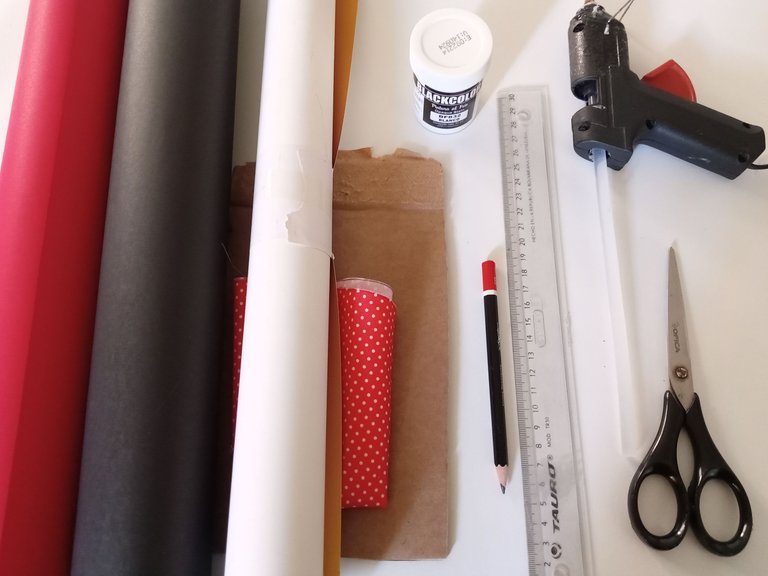
🌹 MATERIALES | 🌹 MATERIALS
- Cartulina roja.
- Cartulina negra.
- Cartulina dorada.
- Foami escarchado verde.
- Pintura blanca.
- Tela o cinta.
- Cartón.
- Papel.
- Tijeras.
- Silicona.
- Regla.
- Lápiz.
- Red cardboard.
- Black cardboard.
- Golden cardboard.
- Green frosty foami.
- White paint.
- Cloth or tape.
- Carton box.
- Paper.
- Scissors.
- Silicone.
- Rule.
- Pencil.
🌹 PROCEDIMIENTO | 🌹 PROCESS
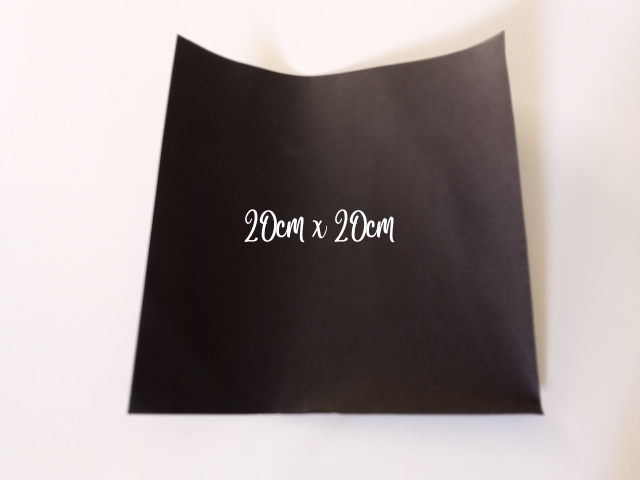
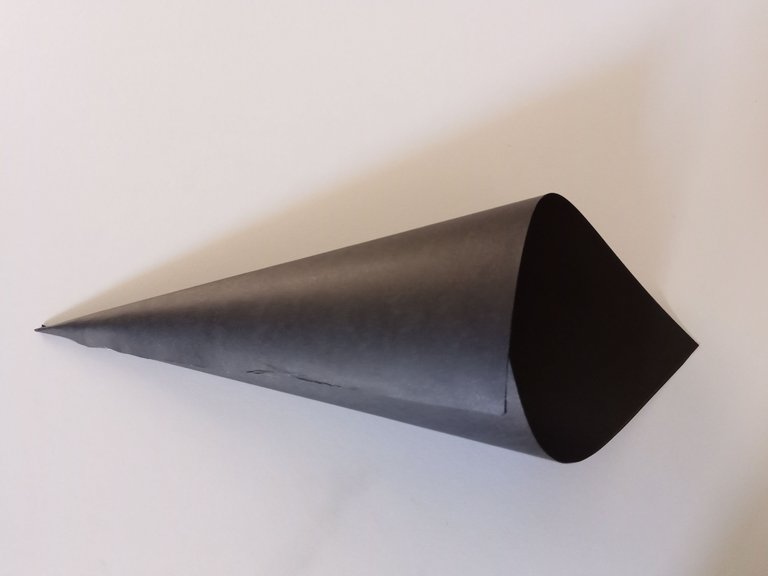
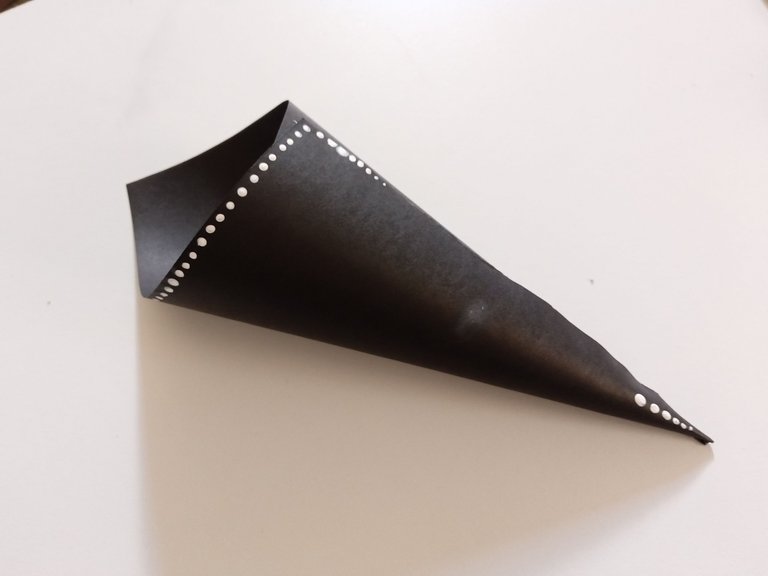
- PASO 1:
Lo primero que elaboré fue el ramo. Para ello, trazar y recortar un cuadrado de 20 cm x 20 cm sobre cartulina negra, luego lo vamos a enrollar hasta formar un cono y pegar. Como guía tienes que tener una de las puntas en la parte superior. Intenta que el orificio del cono no quede tan apretado, deben quedar unos 8 cm de espacio aproximadamente, de igual forma es la preferencia de cada uno.
- STEP 1:
The first thing I did was the bouquet, for this I traced and cut out a 20 cm x 20 cm square on black cardboard, then we are going to roll it up to form a cone and glue it. As a guide you have to have one of the tips at the top. Try not to make the hole of the cone so tight, there should be about 8 cm of space approximately, in the same way it is the preference of each one.
- PASO 2:
Con eso hecho, me volví un poco creativa y decidí darle algunos detalles al cono para que no se viera aburrido. Para ello, unta un poco de pintura blanca del otro lado de un pincel, y ve marcando círculos en el borde superior o por todo el cono, esto es realmente al gusto. Después de esto, déjalo secar y continúa con el siguiente paso.
- STEP 2:
With that done, I got a bit creative and decided to give the cone some detail so it wouldn't look boring. To do this, smear some white paint on the back of a brush, and go marking circles on the upper edge or all over the cone, this is really to taste. After this, let it dry and proceed to the next step.
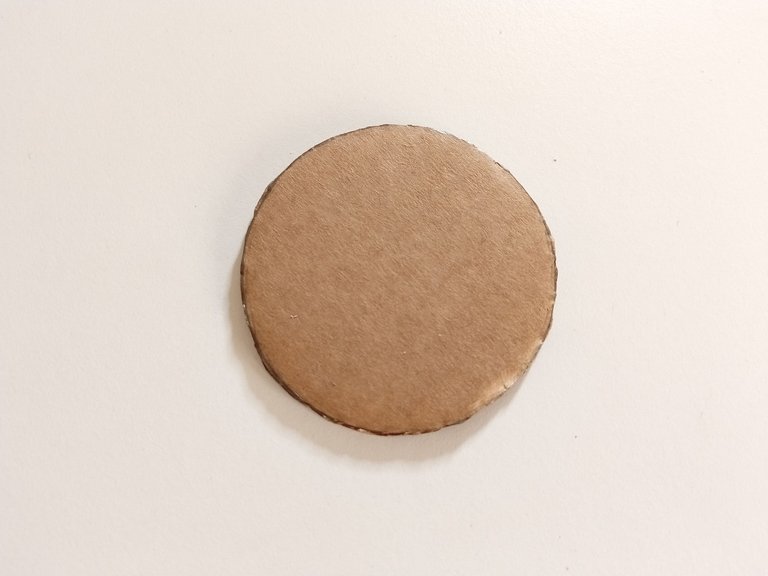
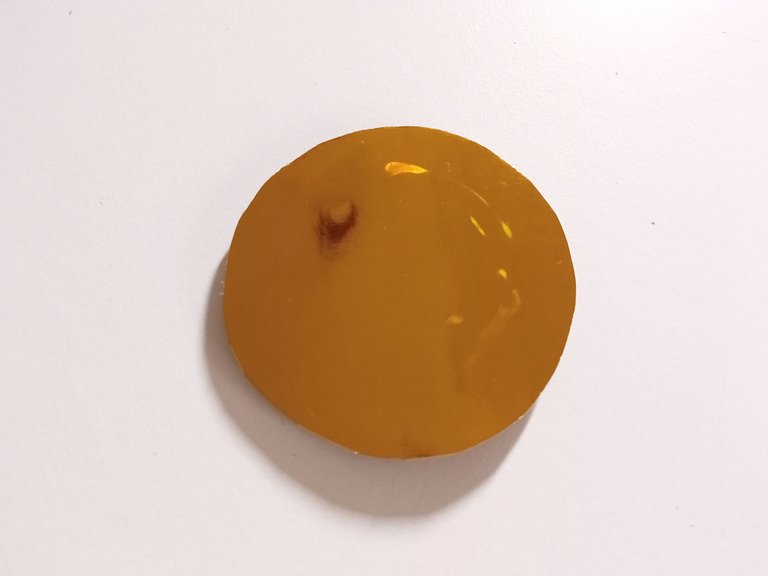
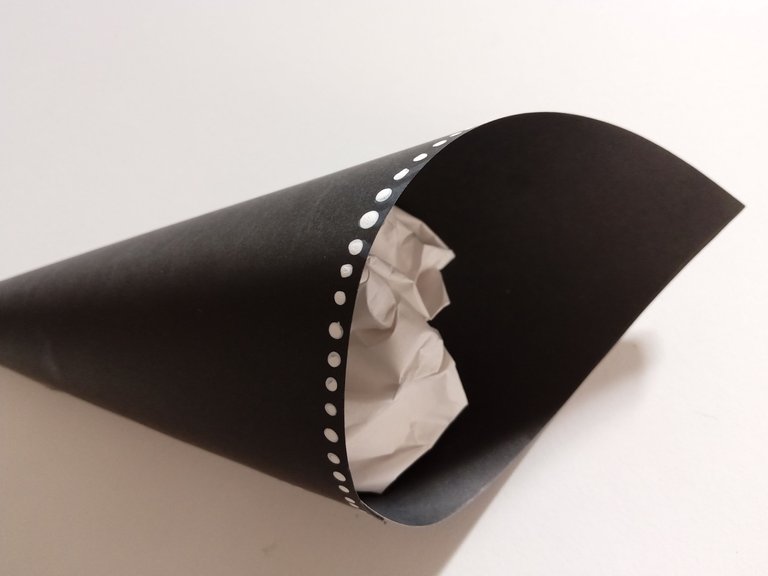
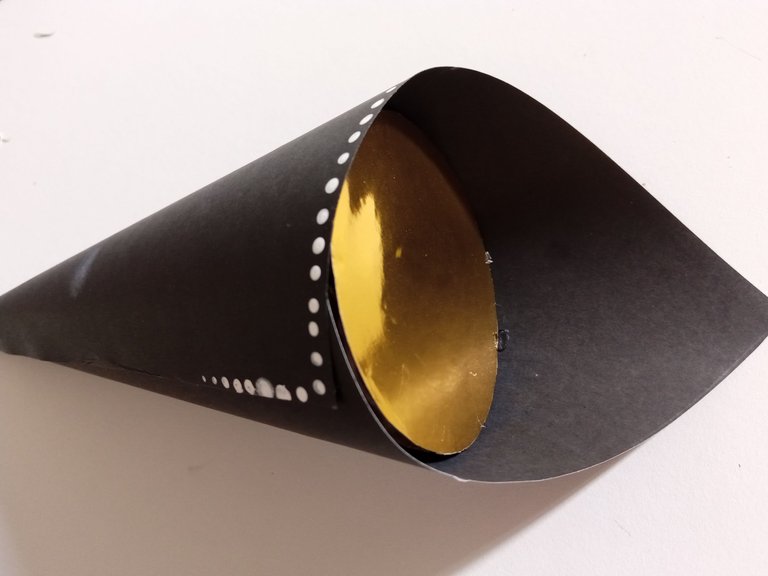
- PASO 3:
Toma las medidas del orificio de nuestro cono, dibuja un círculo con estas medidas en cartón, recorta y pega encima un círculo de cartulina dorada con las mismas medidas. Cuando la pintura de nuestro cono esté seca, inserte una hoja de papel arrugada y pegue el círculo de cartón encima.
- STEP 3:
Take the measurements of the hole of our cone, draw a circle with these measurements on cardboard, cut out and paste a circle of gold cardboard on top with the same measurements. When the paint on our cone is dry, insert a crumpled sheet of paper and glue the cardboard circle on top.
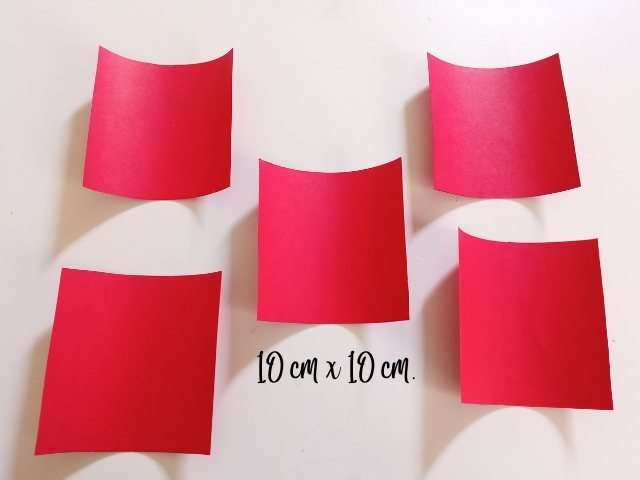
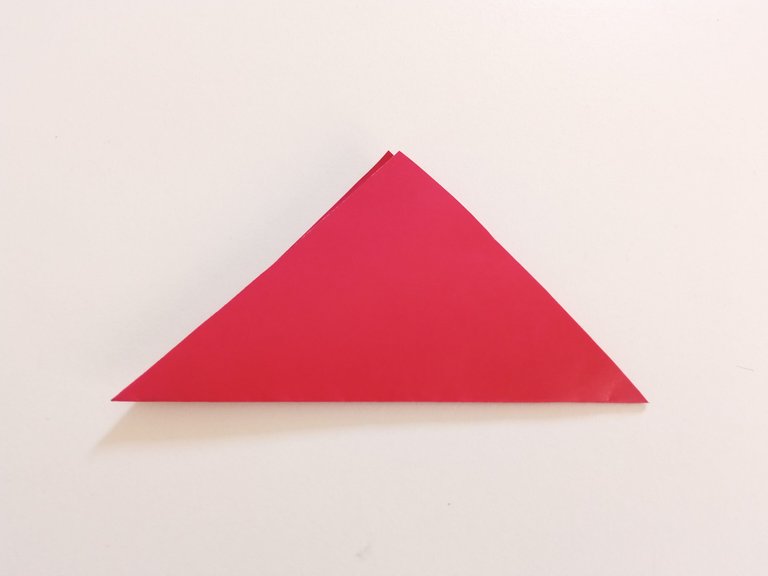
- PASO 4:
Ahora sí, es el momento de hacer nuestra rosa. En primer lugar comenzamos trazando y recortando 5 cuadrados de 10 cm x 10 cm. Luego vamos a tomar uno, lo vamos a doblar formando un triángulo y lo vamos a doblar por la mitad 2 veces más hasta tener un triángulo más chico.
- STEP 4:
Now yes, it's time to make our rose. Firstly we begin by tracing and cutting 5 squares of 10 cm x 10 cm. Then we are going to take one, we are going to fold it forming a triangle and we are going to fold it in half 2 more times until we have a smaller triangle.
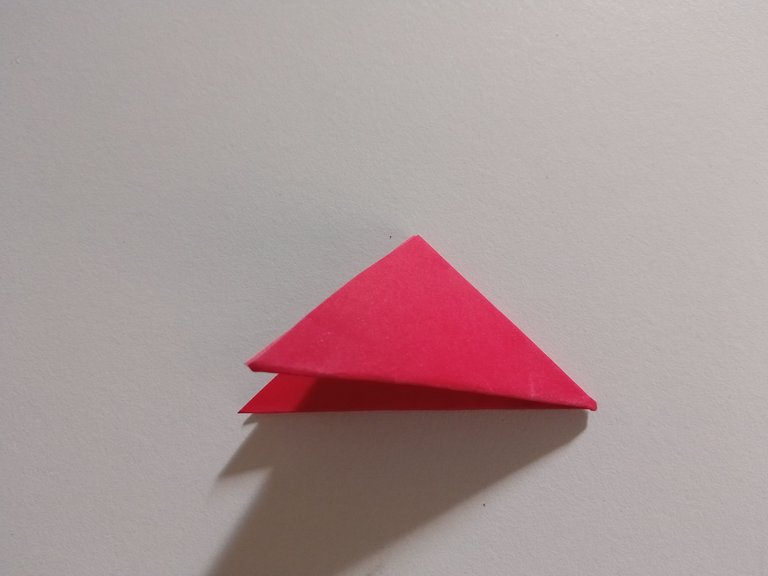
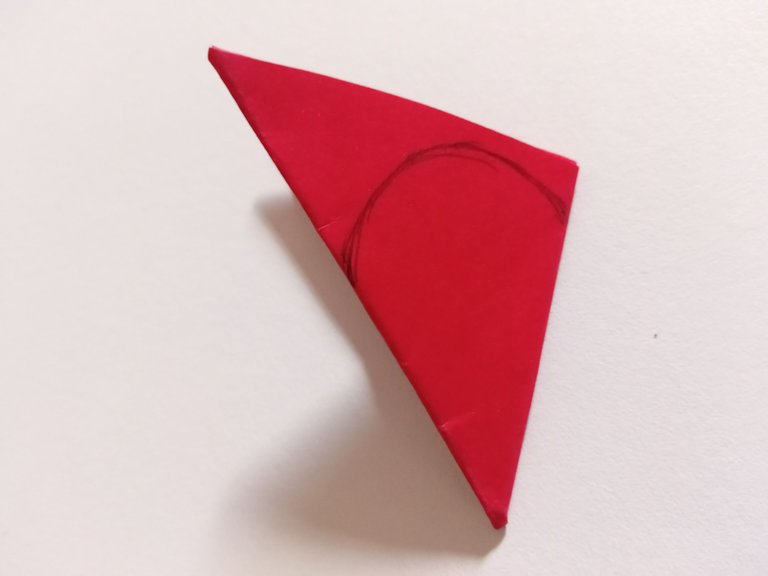
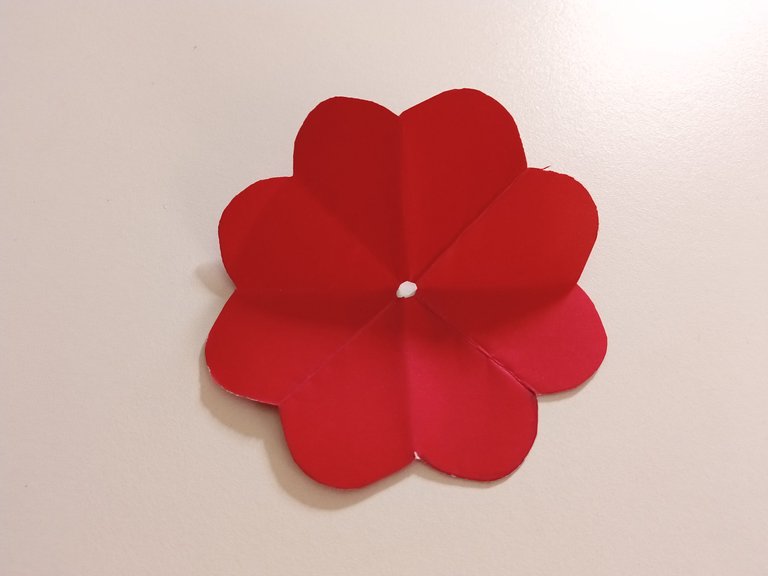
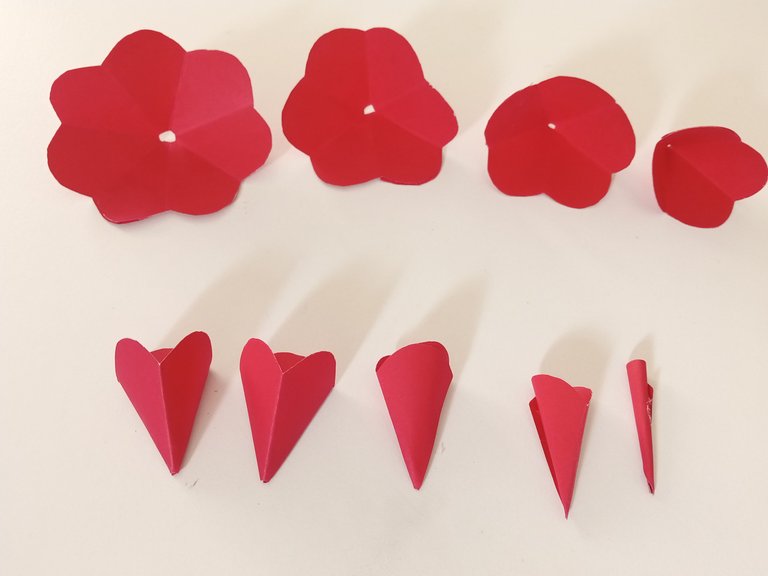
- PASO 5:
Una vez que tengamos un triángulo más pequeño, vamos a dibujar la forma ovalada de un pétalo, lo recortamos siguiendo la línea que dibujamos y también recortamos un poco el pico en la parte superior. Luego abrimos la cartulina y ya tendremos lista la forma de la flor. Repite el mismo proceso con el resto de las piezas cuadradas.
- STEP 5:
Once we have a smaller triangle, we are going to draw the oval shape of a petal, cut it out following the line we drew and also cut out the small peak at the top. Then we open the cardboard and we will have the shape of the flower ready. Repeat the same process with the rest of the square pieces.
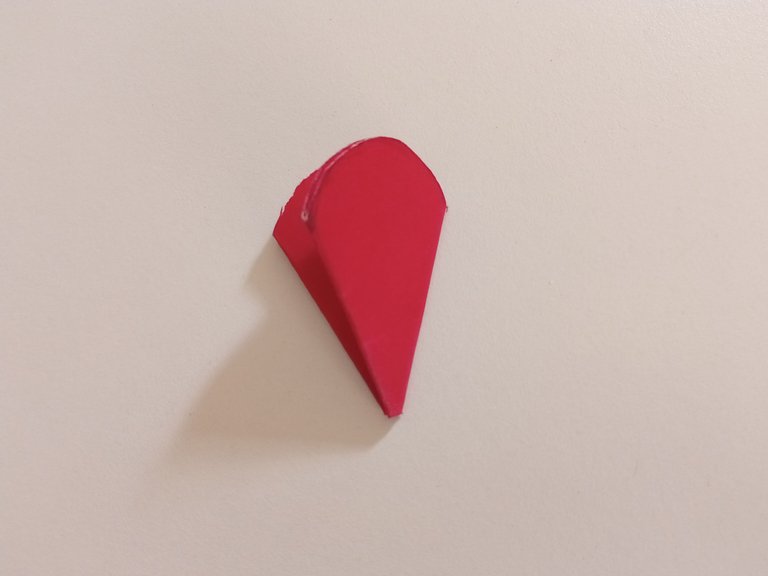
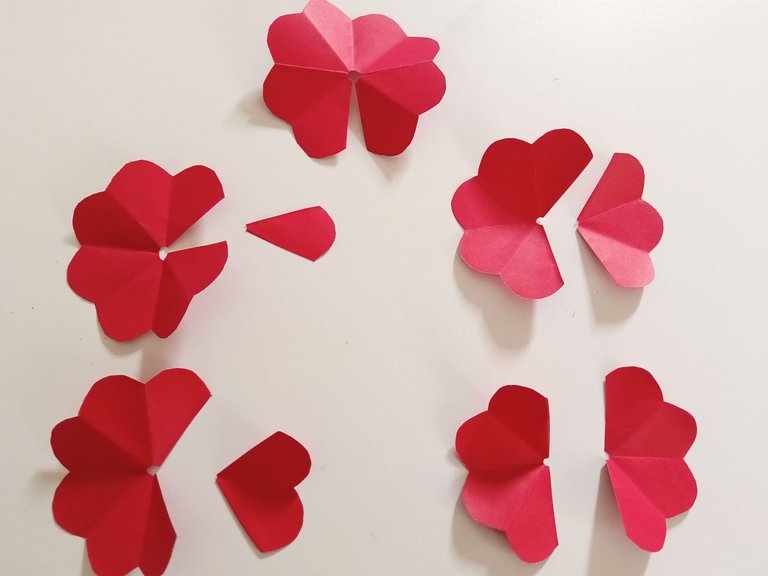
- PASO 6:
Una vez listas, haremos lo siguiente: toma una flor y corta solo en medio de 2 pétalos, en el siguiente separar 1 pétalo entero, en la otra 2 y así hasta separar 4 pétalos. Luego de esto, vamos a comenzar a unir las piezas individualmente pegando un pétalo sobre el otro, van a quedar como un embudo. La que solo es un pétalo, simplemente enrollar y pegar.
- STEP 6:
Once ready, we will do the following: take a flower and cut only 2 petals in the middle, in the next separate 1 whole petal, in the other 2 and so on until 4 petals are separated. After this, we are going to start joining the pieces individually by gluing one petal on top of the other, they will end up like a funnel. The one that is just a petal, just roll and stick.
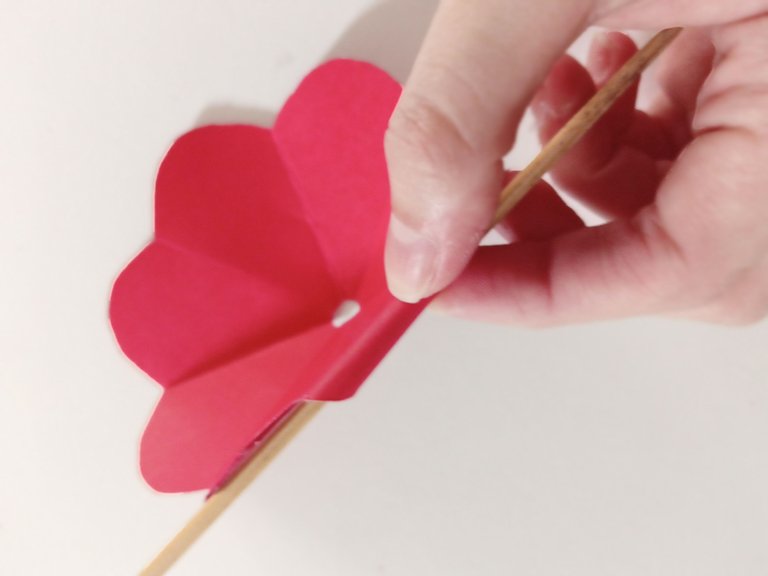
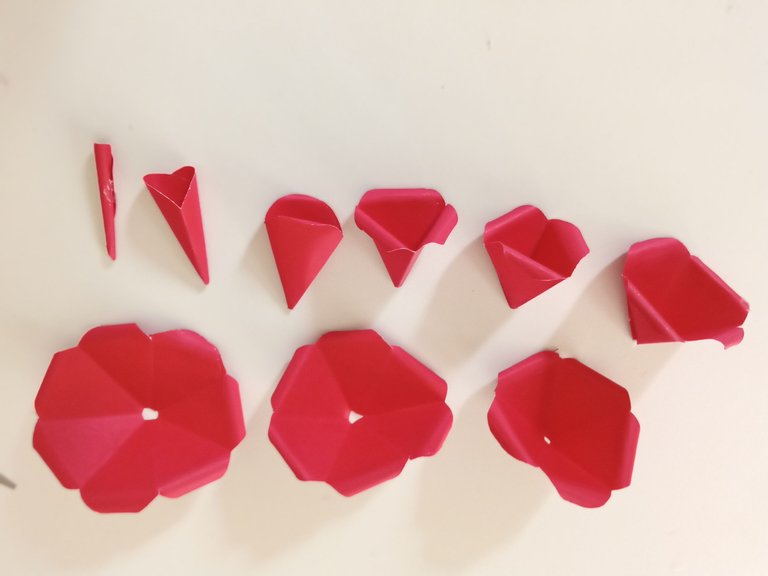
- PASO 7:
Para darle una forma más natural y que se parezca aún más a una rosa, toma un palito o un lápiz y vamos a empezar a enrollar los pétalos un poco hacia el lado opuesto. Repita este proceso con el resto de las piezas a excepción de las 2 piezas más pequeñas. Cuando estén todas listas, empieza a pegar las piezas una dentro de otra, de la más grande a la más pequeña.
- STEP 7:
To give it a more natural shape and look even more like a rose, take a stick or pencil and we're going to start rolling the petals a little to the opposite side. Repeat this process with the rest of the pieces except for the 2 smallest pieces. When they are all ready, start gluing the pieces one inside the other, from the largest to the smallest.
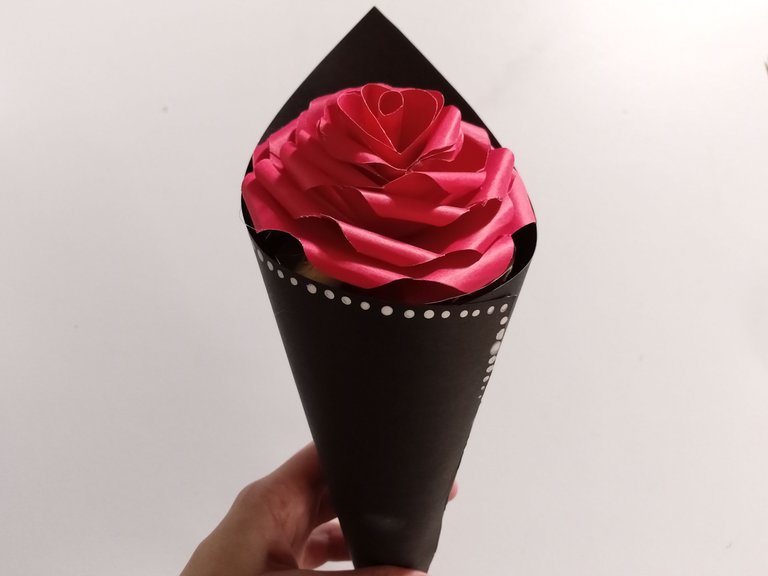
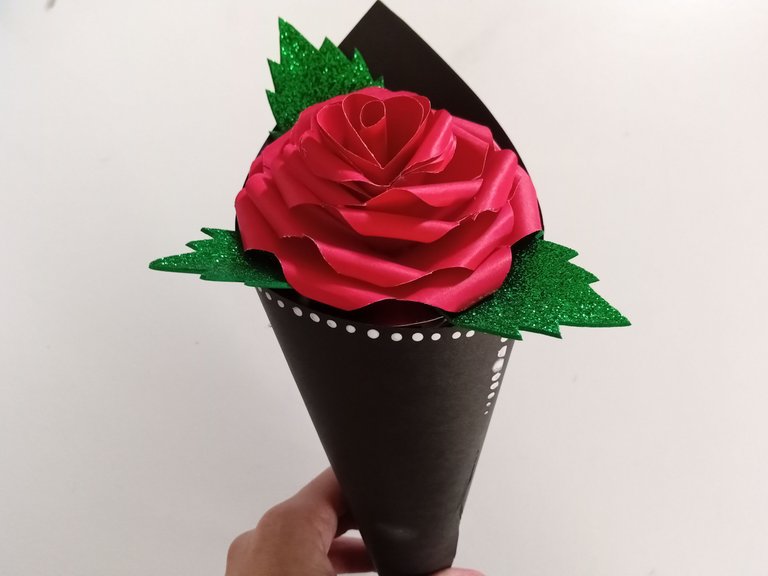
- PASO 8:
Finalmente, pega la rosa en el círculo de cartón dorado. Dibuja, recorta y pega unas hojas de foami verde escarchado. Como decoración extra; Pegué un corazón de cartulina dorada, corté una tira de tela, la pegué en el medio del cono e hice un pequeño lazo con la misma tela para pegar en el medio de la tira.
- STEP 8:
Finally, glue the rose on the gold cardboard circle, draw, cut and glue some green frosty foami leaves. As an extra decoration; I glued a heart on gold cardboard, cut a strip of fabric, glued it in the middle of the cone and made a small bow with the same fabric to glue in the middle of the strip.
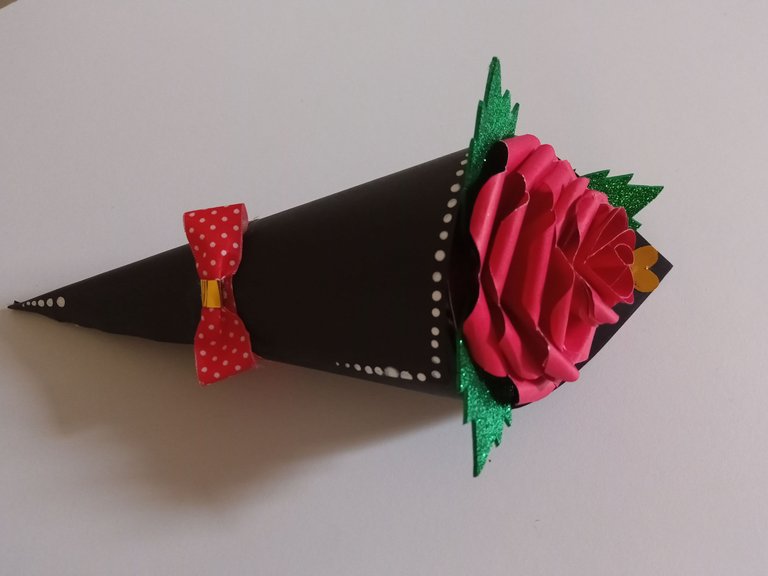
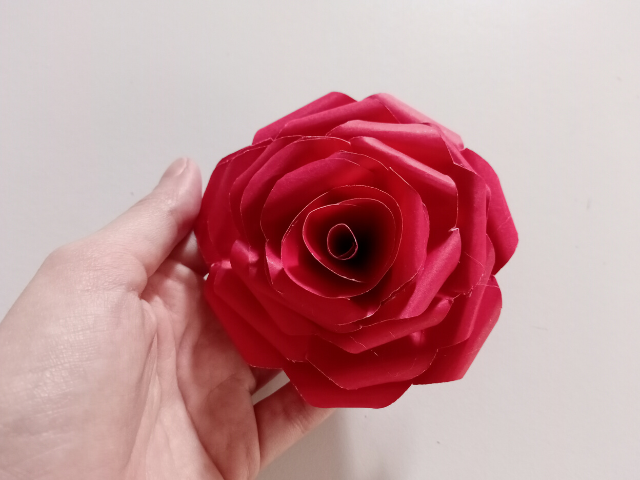
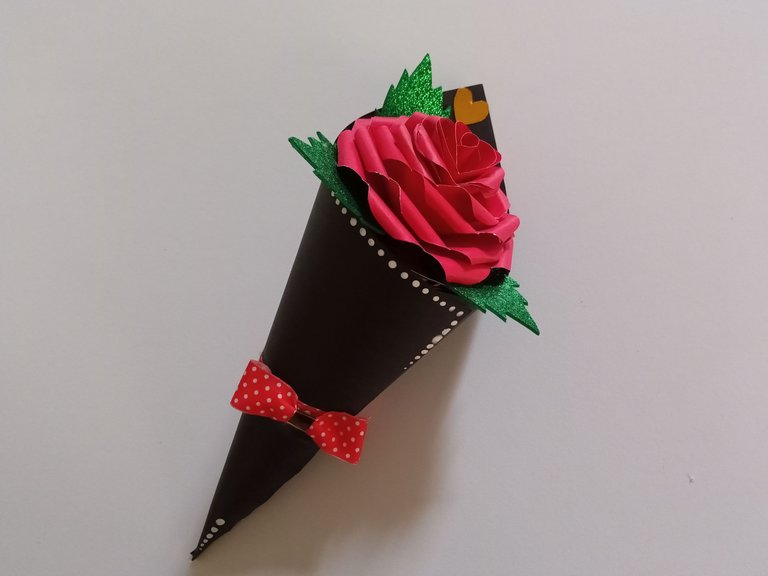
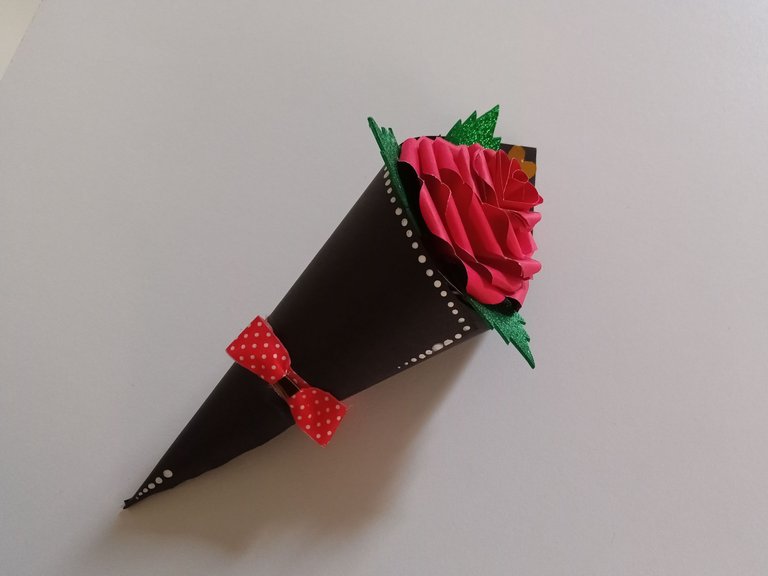
✨💐🌹¡Y listo!🌹💐✨ Así es como elaboré este pequeño ramo con una rosa de cartulina, súperfácil de hacer y elegante. Yo quede totalmente enamorada de esta creación, la rosa quedo perfecta. Por otra parte, si gustas puedes agregar una nota, una carta o los detalles que desees. Espero te haya gustado y te animes a hacerlo para el día del amor o cualquier ocasión, y regalárselo a un ser querido o pareja.
❤️Hasta la próxima publicación.
✨💐🌹¡And ready!🌹💐✨ This is how I made this small bouquet with a cardboard rose, supereasy to make and elegant. I fell totally in love with this creation, the rose was perfect. On the other hand, if you like you can add a note, a letter or the details you want. I hope you liked it and you are encouraged to do it for the day of love or any occasion, and give it to a loved one or partner.
❤️Until the next post.
✨RESULTADO: | ✨RESULT:


Todas las fotografías son de mi propiedad.
Separador y Fotos editadas en Canva
All photographs are my property.
Photos edited in Canva
!discovery 30
!diy
This post was shared and voted inside the discord by the curators team of discovery-it
Join our community! hive-193212
Discovery-it is also a Witness, vote for us here
Delegate to us for passive income. Check our 80% fee-back Program
Thank you very much for the support friends, grateful that you take me into account. @discovery-it ❤️
Thank you for sharing this post in the DIYHUB Community!
Your content got selected by our fellow curator stevenson7 & you just received a little thank you upvote from us for your great work! Your post will be featured in one of our recurring compilations which are aiming to offer you a stage to widen your audience within the DIY scene of Hive. Stay creative & HIVE ON!
Please vote for our hive witness <3
Thank you very much for the support friends, thank you for always keeping me in mind and appreciating what I do. ❤️ Nice day.
@stevenson7 @diyhub
You're welcome 🙂
Many thanks friends ! ❤️✨
~~~ embed:1623332302263578624 twitter metadata:MTQ5MDc5MjczNjE2OTExMTU2Mnx8aHR0cHM6Ly90d2l0dGVyLmNvbS8xNDkwNzkyNzM2MTY5MTExNTYyL3N0YXR1cy8xNjIzMzMyMzAyMjYzNTc4NjI0fA== ~~~
~~~ embed:1623478505131372544 twitter metadata:MTQyMjQxMzkxNTI3NTgxMjg2NHx8aHR0cHM6Ly90d2l0dGVyLmNvbS8xNDIyNDEzOTE1Mjc1ODEyODY0L3N0YXR1cy8xNjIzNDc4NTA1MTMxMzcyNTQ0fA== ~~~
The rewards earned on this comment will go directly to the people( @yagelybr, @valenpba, @mariamglow, @mariajcastro28 ) sharing the post on Twitter as long as they are registered with @poshtoken. Sign up at https://hiveposh.com.
Que hermosa te quedo mi Vale! Se nota lo mucho que te gustan las manualidades y lo bien que se te da. Que emoción que ya vayas a cumplir un año en la colmena 🥳❤️ Sin duda es un excelente regalo para este 14 de Febrero, muchas gracias por compartirnos el tutorial. Excelente post! ✨
Que bella mi Vane, gracias por tus lindas palabras, a mí me encanta hacer manualidades amiga 🤭. Asi es, ya casi un añito acá y siento que no viviría sin hive.
Me alegra que te haya gustado bella! ❤️✨
Amigaa, quedó hermoso el ramo, a mí me encantan las rosas y tu trabajo es espectacular. Te deseo muchos éxitos y que pases un excelente día!!🌹🌹
Holaaa bella! Muchas gracias por el apoyo y tu lindo comentario, de verdad que me anima mucho y lo agradezco. Yo también amo las flores en general, por eso quise aprovechar la oportunidad jaja. Muchas gracias por pasarte amiga, linda noche. ✨🌼
Hermoso
Muchas gracias amiga , me alegra que te hayan gustado.❤️
DIOSMIO QUE BELLEZA!! Ya los hombres no tienen excusa para regalar algo hermoso este 14 de febrero jajajaja, realmente lo explicas muy bien y se ve práctico, gracias amiga por traernos siempre hermosas creaciones!❤️
🤭 Muchas gracias amiga bella! Totalmente amiga, ninguna excusa de que están caras, ni nada, con poco dinero salen unas rosas eternas jaja.
Gracias a ti por siempre tener lindas palabras hacia mis creaciones bella. Un fuerte abrazo!❤️
Meee encantó😍
¡Cuanta ternura en este ramo de rosa! Ame la delicadeza que empleaste y su acabado tan sutil y hermoso..
Gracias por compartir mi Valen💗
Amiga ese detalle esta espectacular, lo que más me gusta es que es duradero, no como las rosas reales, que realmente a mi no me llaman la atención. Prefiero los regalos que se pueden conservar y este es uno de estos! Me encanta! Gracias por compartir! 💛
Muy lindo lo que dices amiga. Así es, aunque debo decir que a mí sí me gustan pero tienes toda la razón bella, lo bueno de esta rosa es que es duradera y podemos conservarla mucho más que unas rosas reales.
Muchas gracias a ti amiga, saludos.
Te quedó muy bonita. Me encanta lo sencillo que explicas. Eres muy buena en las manualidades 🥺❤️❤️❤️
🤭 Muchas gracias amiga! Eso es lo que intento, compartir cosas sencillas y que la explicación sea igual. Muchas gracias por tus palabras bella!❤️
Nonono amiga que hermosura, que lindo. Me encantan este tipo de cositas. Siento que son muy especiales. Gracias por compartir tu trabajo. Saludos
🤭 Que bella amiga!!! Muchas gracias por tus palabras, sinceramente, me alegra mucho que te hayan gustado tanto.
Gracias a ti por animarme. ❤️ Saludos.✨
Congratulations @valenpba! You have completed the following achievement on the Hive blockchain And have been rewarded with New badge(s)
Your next target is to reach 2000 comments.
You can view your badges on your board and compare yourself to others in the Ranking
If you no longer want to receive notifications, reply to this comment with the word
STOPTo support your work, I also upvoted your post!
Check out our last posts:
Support the HiveBuzz project. Vote for our proposal!
Amiga pero que bello te quedó, es un hermoso detalle para San Valentin ♥️ yo le colocaría unos dulcitos escondidos debajo de la rosa jaja igual te quedó bellisimo, no sabia esta forma de hacer una rosa, me gustó y tomaré tu idea para intentarlo, gracias por compartir este tutorial amiga linda ♥️
Muchas gracias amiga bella! Jaja también lo pensé amiga, pero no tenía dulces. También pensé en hacer la parte de la rosa como una tapa y dentro del cono meterle dulces.
Muchas gracias mi Mary, estoy segura de que te quedaría mucho más bello!
❤️
Me dejas loca por como quedó la flor porque si la vemos cómo inicia todo no te das una idea de cómo logras que tenga ese efecto tan bello en los pétalos que le dan movimiento a la flor.
Te quedó genial al igual que el paso a paso!
Así es amiga, pensé lo mismo. Es interesante cómo ese mínimo detalle le da la forma de rosa jaja.
Muchas gracias amiga, me alegra que te haya gustado. Saludos. ❤️
Que hermoso valen. Me encantó esta idea, además se ve muy real con el detalle que le hiciste a los pétalos, ese fue el mejor plus para este lindo ramo. Gracias por compartir bella 😊
Gracias amiga! Así es, ese pequeño efecto hizo una gran diferencia, haciendo ver más naturales los pétalos.
Gracias a ti mi Val!! ✨💗
Lindo detalle no solo para el 14F, sino en cualquier momento recibir una cosita tan linda, alegra el alma
Estoy de acuerdo amiga, no tiene que ser unicamente para el 14F, siempre es bien recibido un detallito así.
Gracias por pasarte amiga! 💗
Genial, y nada mejor que ese color rojo!
Muchas gracias amigo, me alegra que te haya gustado.✨
Hola.
La cuenta esta verificada.
https://hivewatchers.com/verifications?utf8=%E2%9C%93&verification%5Busername_search%5D=valenpba
Muchas Gracias
Thank you very much.