

Introducción:
Antes que nada cordiales saludos y mis mejores deseos para todos los lectores, el día de hoy les traigo un tutorial paso a paso en inglés y español, explicando como colocar y usar varias cuentas en una misma de cartera de Hive Keychain.
First of all cordial greetings and best wishes to all readers, today I bring you a step by step tutorial in English and Spanish, explaining how to place and use several accounts in the same Hive Keychain wallet.
Nuevamente, la razón para hacer este post es una solicitud que realizaron en el chat del Discrod de Mundo Virtual. Sin embargo, es importante tener la información, para poder anexar las cuentas bien y de manera segura, debido a que muchas veces, debemos cumplir diferentes roles en una comunidad, por lo menos ser miembro activo y publicar y a la vez tener el rol de Curador de la Comunidad en la cuenta oficial de la misma y ambas cuentas la podemos manejar desde una misma cartera.
Again, the reason for this post is a request made in the Virtual World Discrod chat. However, it is important to have the information, to be able to attach the accounts well and safely, because many times, we must fulfill different roles in a community, at least be an active member and publish and at the same time have the role of Curator of the Community in the official account of the same and both accounts can be managed from the same wallet.
También podemos tener varias cuentas por diferentes motivos, como lo son, el administrar las cuentas de familiares o amigos, cumplir diferentes roles en la red, tener una cuenta para juegos y otras publicar, tener una cuenta para publicar sobre un tema específico y otra sobre otro, en fin, existen diferentes razones. Lo importante es saber cómo hacerlo y para eso es este tutorial.
We can also have several accounts for different reasons, such as managing the accounts of family or friends, fulfill different roles in the network, have an account for games and others to publish, have an account to publish on a specific topic and another on another, in short, there are different reasons. The important thing is to know how to do it and that is what this tutorial is for.
Tutorial paso a paso / Step by step tutorial:
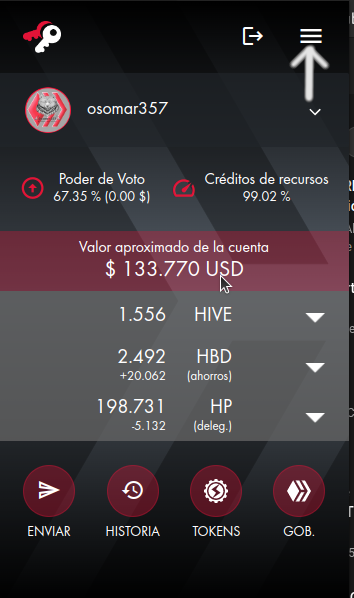
- Paso 1: Nos dirigimos a nuestra cartera de Hive Keychain y pisamos donde están las tres barras horizontales.
- Step 1: We go to our Hive Keychain wallet and click on the three horizontal bars.
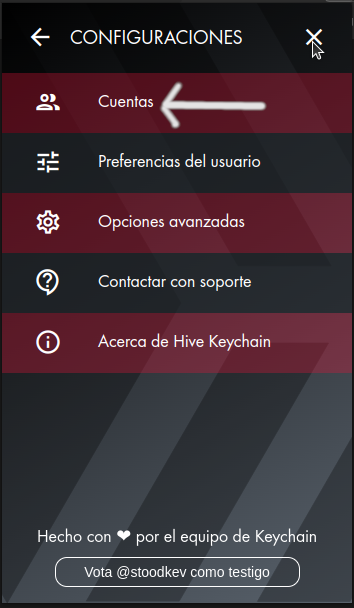
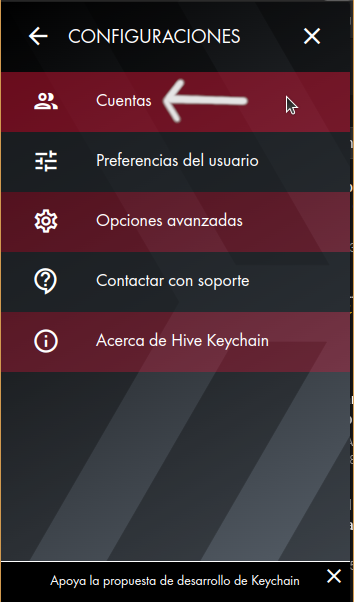
- Paso 2: Una vez que abra la nueva ventana, nos dirigimos a la pestaña que dice cuentas.
- Step 2: Once the new window opens, go to the tab that says accounts.
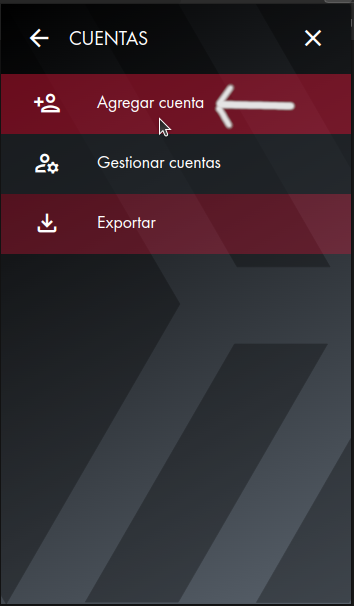
- Paso 3: Pisamos en la pestaña de cuentas, se nos abre una nueva ventana y luego vamos a la primera pestaña que dice "Agregar Cuenta".
- Step 3: Click on the accounts tab, a new window will open and then go to the first tab that says "Add Account".
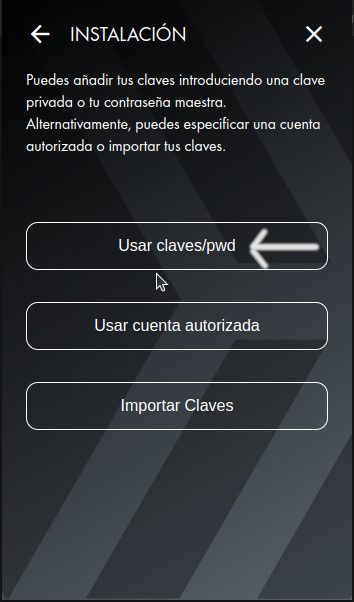
- Paso 4: Se nos abre una nueva ventana y vamos a la pestaña que dice "Usar Claves".
- Step 4: A new window opens and we go to the tab that says "Use Passwords".
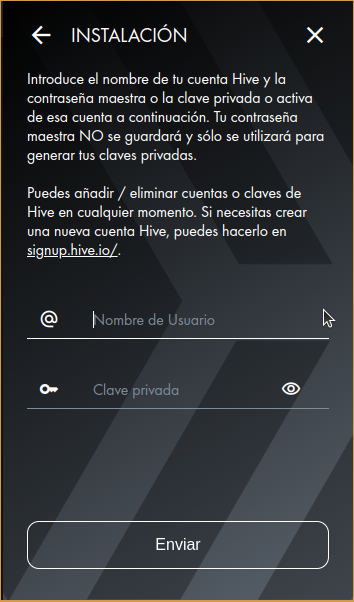
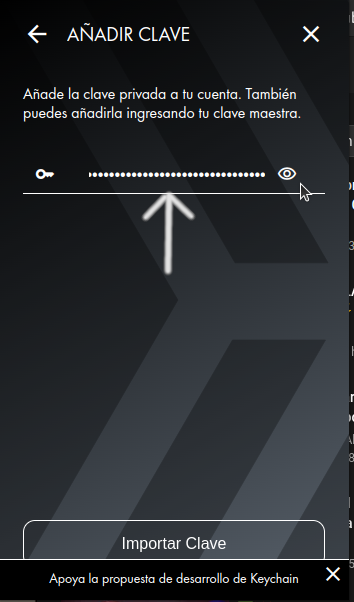
- Paso 5: Se abre una nueva ventana y nos va a pedir que coloquemos el nombre de la cuenta que vamos a agregar (Usuario Hive de la nueva cuenta) y la Clave Privada de la nueva cuenta. (1 imagen). Hacemos la operación que nos pide, para este ejemplo yo agregaré una cuenta llamada "mv-curación". Ver imagen 2.
- Step 5: A new window will open and it will ask us to enter the name of the account we are going to add (Hive User of the new account) and the Private Key of the new account (1 image). We do the operation that it asks us, for this example I will add an account called "mv-healing". See image 2.
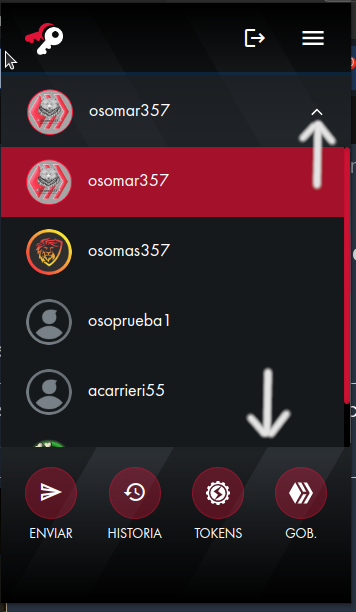
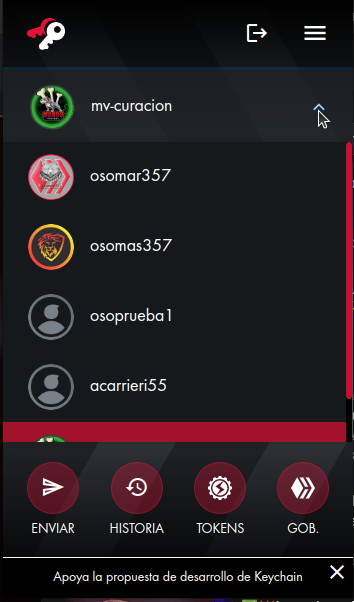
- Paso 6: Una vez que colocamos la clave privada, la cuenta nos saca y debemos entrar de nuevo a la cartera. Cuando eso pase, vamos a la parte superior derecha de la cartera y justo debajo de las tres líneas horizontales hay un símbolo que parece una "v" invertida, pisamos sobre él y parecerán todas las cuentas que tenemos en nuestra cartera, deslizando el ratón buscamos la cuenta que estamos agregando y pisamos sobre ella.
- Step 6: Once we put in the private key, the account takes us out and we must enter the wallet again. When that happens, go to the top right of the wallet and just below the three horizontal lines there is a symbol that looks like an inverted "v", click on it and it will appear all the accounts we have in our portfolio, sliding the mouse we look for the account we are adding and click on it.
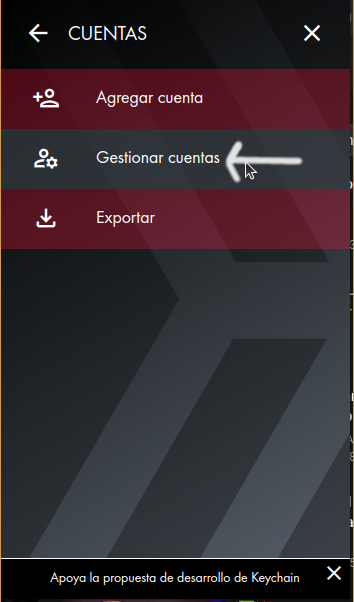
- Paso 8: Cuando pisamos sobre la cuenta que estamos agregando, nos lleva a la página principal de la cuenta. Hay vamos a la parte superior derecha y pisamos sobre las 3 barras horizontales. (Ver imagen 1).
- Step 8: When we click on the account we are adding, it takes us to the main page of the account. There we go to the top right and click on the 3 horizontal bars (See image 1).

- Paso 9: Nos abre una nueva ventana y vamos a la pestaña cuentas.
- Step 9: A new window opens and we go to the accounts tab.
- Paso 10: Una vez que abra la nueva ventana nos vamos a la pestaña que dice "Gestionar Cuentas".
- Step 10: Once the new window opens we go to the tab that says "Manage Accounts".
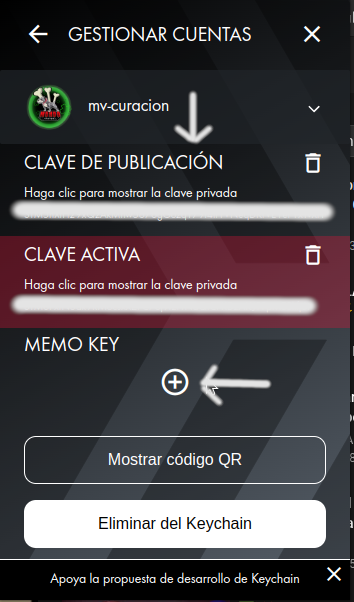
- Paso 11: Se nos va abrir una nueva ventana y nos va a pedir que anexemos la clave de publicación de la cuenta y en la parte de abajo veremos un signo de (+) donde posteriormente deberemos poner la clave de memo.
Debemos tener en cuenta que cada vez que colocamos una de las claves, la cuenta nos va a sacar y deberemos iniciar el proceso de nuevo, para colocar la última clave que es la de memo.
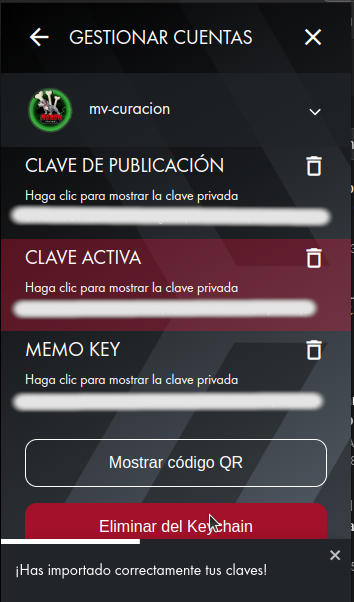
Entonces repetimos el proceso, colocamos la clave de Memo y ya tenemos la cuenta activa para actuar en todo el ecosistema de Hive.
- Step 11: A new window will open and we will be asked to add the account publication password and at the bottom we will see a (+) sign where we will have to add the memo password.
We must take into account that every time we put one of the keys, the account will be removed and we will have to start the process again, to put the last key which is the memo key.
Then we repeat the process, insert the Memo key and we have the account active to act in all the Hive ecosystem.
Una vez que terminemos este proceso, podemos ver en nuestra cartera de Hive Keychain, todas las cuentas que tenemos en la cartera.
Once we finish this process, we can see in our Hive Keychain wallet, all the accounts we have in the wallet.
Puntos a tener en cuenta: / Points to consider:
- Para ingresar a todas las cuentas, solamente tenemos que usar nuestra clave original para entrar a la Hive Keychaing.
- To log in to all accounts, we only have to use our original password to enter the Hive Keychaing.
- Una vez que abrimos nuestra sesión en la cartera, podemos entrar a cualquier página con cualquiera de las cuentas, que tenemos en la cartera. Esto es válido para Peadk, Escency y otras.
- Once we open our wallet session, we can log in to any page with any of the accounts, which we have in the wallet. This is valid for Peadk, Escency and others.
- En el caso de plataformas como Hive Engine, Tribaldex y LeoDex, debemos cerrar la sesión y colocar la cuenta con la que queremos entrar a realizar la transacción.
- In the case of platforms such as Hive Engine, Tribaldex and LeoDex, we must log out and enter the account with which we want to enter the transaction.
Espero que esta información sea de utilidad para todos, en dado caso de que tengan alguna duda, dejarla en los comentarios y con gusto se las responderé.
Muchas gracias por leerme.
I hope this information is useful for everyone, in case you have any questions, leave them in the comments and I will gladly answer them.
Thank you very much for reading me.


~~~ embed:1566154825968095232 twitter metadata:amFscDIxfHxodHRwczovL3R3aXR0ZXIuY29tL2phbHAyMS9zdGF0dXMvMTU2NjE1NDgyNTk2ODA5NTIzMnw= ~~~
The rewards earned on this comment will go directly to the people( @osomar357, @jlinaresp ) sharing the post on Twitter as long as they are registered with @poshtoken. Sign up at https://hiveposh.com.
Muy buen tutorial, súper bien hecho amigo !LOL
Excelente Información muy Útil Gracias compartirla
Yay! 🤗
Your content has been boosted with Ecency Points, by @osomar357.
Use Ecency daily to boost your growth on platform!
Support Ecency
Vote for new Proposal
Delegate HP and earn more
Otro gran tutorial, muy bien gestionado y fácil de entender... Excelente esto que vas haciendo al crear esta serie de publicaciones relativas a #Hive y sus aplicaciones de entorno... Mil gracias por compartir!.
!discovery 30
This post was shared and voted inside the discord by the curators team of discovery-it
Join our community! hive-193212
Discovery-it is also a Witness, vote for us here
Delegate to us for passive income. Check our 80% fee-back Program
!PGM
BUY AND STAKE THE PGM TO SEND A LOT OF TOKENS!
The tokens that the command sends are: 0.1 PGM-0.1 LVL-0.1 THGAMING-0.05 DEC-15 SBT-1 STARBITS-[0.00000001 BTC (SWAP.BTC) only if you have 2500 PGM in stake or more ]
5000 PGM IN STAKE = 2x rewards!
Discord
Support the curation account @ pgm-curator with a delegation 10 HP - 50 HP - 100 HP - 500 HP - 1000 HP
Get potential votes from @ pgm-curator by paying in PGM, here is a guide
I'm a bot, if you want a hand ask @ zottone444
Gracias por esta publicación, @osomar357 . Espero aplicar los conocimientos que compartes de inmediato