
If you follow my blog you couldn't help but notice my rant about my oil pastels: how I bought student grade oil pastels ("glorified crayons") and didn't like the medium, and how I came to love it by purchasing artist quality supplies and finding out the huge difference between the two.
Being a frugal kinda guy, I'm loath to chuck any good merchandise in the garbage just because I was too stupid to buy the best quality in the first place. Donating them to a school is not an option, as they are partly toxic and not suitable for kids. So I thought about it long and hard, and figured out a way to convert my cheap oil pastels into the kind you can actually use enjoyably.
This is a tutorial how I did it, and how you, too, can turn cheap crayons, or even raw pigments, or ground soft pastels, into pretty decent oil pastels.
Aus Schei**dreck Gehacktes machen:
Ölpastelle selbst herstellen (Anleitung)
Wenn Du meinen Blog verfolgst, hast du sicher die Schimpftirade über meine Ölpastellkreiden mitbekommen: Wie ich Ölpastellkreiden in Studienqualität ("glorifizierte Wachsmaler") kaufte und das Medium nicht mochte, und wie ich es lieben lernte, indem ich Pastelle in Künstlerqualität kaufte und den großen Unterschied zwischen beiden herausfand.
Da ich ein sparsamer Mensch bin, möchte ich keine gute Ware in den Müll werfen, nur weil ich zu dumm war, von vornherein die beste Qualität zu kaufen. Die Dinger an Schüler verschenken geht nicht, da sie nicht ganz ungiftig und daher für Kinder nicht geeignet sind. Also habe ich lange darüber nachgedacht und einen Weg gefunden, wie ich meine billigen Ölpastellkreiden in solche umwandeln kann, die man tatsächlich mit Freude benutzen kann.
Dies ist eine Anleitung, wie ich das gemacht habe, und wie auch Du billige Wachsmalstifte oder sogar rohe Pigmente oder zermahlene Softpastelle in ganz anständige Ölpastelle verwandeln kannst.
First a caveat: Although the student grade oil pastels used here are lightfast, that's not necessarily the case if you use kid's crayons as the pigment source. Also, this process involves baby oil, and how archival that renders your paintings is anybody's guess. The oil might yellow - who knows... So, for home use and practice, the resulting oil pastels are fine - just don't sell your artwork to an unsuspecting collector. Buy proper supplies for those artworks!
Zunächst eine Warnung: Die hier verwendeten Ölpastellkreiden in Studienqualität sind zwar lichtecht, aber das ist nicht unbedingt der Fall, wenn Du Wachsmaler für Kinder als Pigmentrohstoff verwendest. Außerdem wird bei diesem Verfahren Babyöl verwendet, und wie archivfest (langlebig) die Bilder dadurch werden, kann man nur vermuten. Wer weiß, das Öl könnte vergilben... Für den Hausgebrauch und zum Üben sind die so entstandenen Ölpastelle also in Ordnung, aber Du kannst deine Kunstwerke natürlich nicht an ahnungslose Sammler verkaufen. Verwende nur Material in Künstlerqualität für derartige Arbeiten!
What you need:
- A source of pigment (crayons, cheap oil pastels, soft pastels);
- Babyoil, or any other clear, non-drying oil;
- Household aluminum foil ("aluminium" for you Brits);
- A cylindrical object of suitable diameter, e.g. a marker pen;
- Masking tape, or any tape that doesn't melt easily;
- A fine scale or measuring spoons to measure the amount of oil consistently;
- A good heat source (perferably a kitchen torch, or a candle in a pinch);
- An old soup ladle, or a cheap ladle from the dollar store.
Optional when using soft pastels or raw pigment:
- A source of clear paraffin wax, e.g. cheap tea-lights;
- Mortar and pestle;
- Palette knife or a small putty knife;
- A small sheet of glass for mixing and mulling oil and pigment.
Was Du brauchst:
- Eine Pigmentquelle (Wachmaler, billige Ölpastellkreiden, Softpastellkreiden);
- Babyöl oder ein anderes klares, nicht austrocknendes Öl;
- Haushalts-Aluminiumfolie;
- Ein zylindrischer Gegenstand mit geeignetem Durchmesser, z. B. ein Markerstift;
- Malerkrepp oder ein anderes Klebeband, das bei Hitze nicht leicht schmilzt;
- Eine Feinwaage oder Messlöffel, um das Öl konsistent abzumessen;
- Eine gute Wärmequelle (am besten ein Flambierbrenner oder notfalls eine Kerze);
- Eine alte Suppenkelle oder eine billige Schöpfkelle vom TEDI.
Optional bei Verwendung von Softpastellkreiden oder Reinpigmenten:
- Klares Paraffinwachs, z. B. billige Teelichter;
- Mörser und Stößel;
- Palettenmesser oder kleiner Spachtel;
- Eine kleine Glasplatte zum Duchmischen von Öl und Pigment.

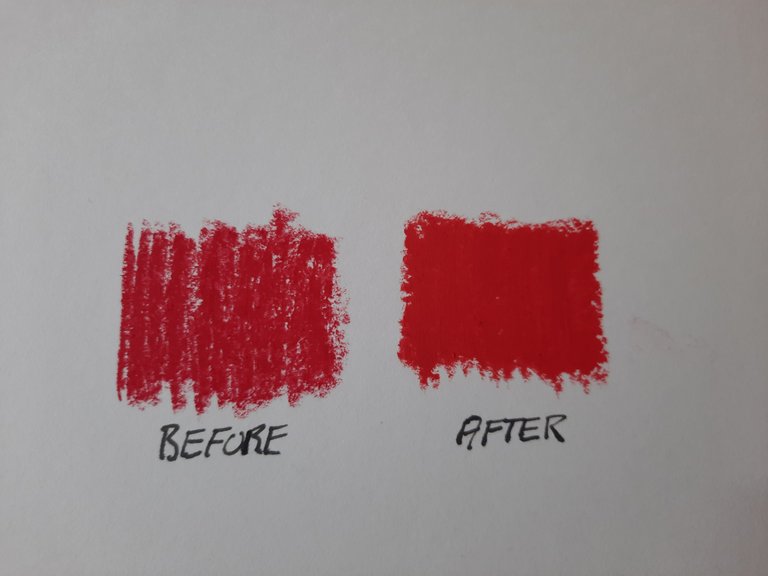
The difference between a wonderfully blendable oil pastel and a rock-hard wax crayon is really only the amount of oil in the product. The bad news is, I can't tell you exactly how much oil to use; you will have to experiment first, because it depends entirely on your source of pigment.
To make my student grade oil pastels softer, I added 25% oil by weight, about one tablespoon. To turn a kids' crayon into an oil pastel, this number might be as high as 35% by weight. To use paraffin wax from a tea-light as a medium for powdered pigment, you're looking at roughly 45% oil by weight, plus the oil used to mull the pigment powder into a dough.
The key to good results is, to measure the amount of oil added to the wax consistently, either by using a fine scale or measuring spoons! Make lots of molds (below) and experiment; you can always re-melt your test sticks and add oil incrementally until you arrive at the desired softness.
Der Unterschied zwischen einem wunderbar weichen Ölpastell und einer steinharten Wachsmalkreide besteht eigentlich nur in der Menge des Öls im Produkt. Die schlechte Nachricht ist, dass ich dir nicht genau sagen kann, wie viel Öl Du verwenden sollst; Du musst experimentieren, denn es hängt ganz entscheident von deiner Pigmentquelle ab.
Um meine "Boesner Ölpastellkreiden" in Studienqualität weicher zu machen, habe ich 25% Öl nach Gewicht hinzugefügt (ungefähr ein Esslöffel). Um einen Kinder-Wachsmaler in eine Ölpastellkreide zu verwandeln, wird diese Menge wohl eher 35% betragen. Wenn man Paraffinwachs aus einem Teelicht als Medium für pulverförmiges Pigment verwenden will, muss man mit etwa 45% Öl rechnen, zuzüglich des Öls, mit dem man das Pigmentpulver zu einer teigigen Masse anmischt.
Der Schlüssel zu guten Ergebnissen liegt darin, die der Wachsmasse hinzugefügte Ölmenge konsequent zu messen, entweder mit einer Feinwaage oder mit Messlöffelchen! Mach' dir einen Schwung Giessformen (siehe unten) und experimentiere; Du kannst deine Teststifte immer wieder einschmelzen und schrittweise Öl hinzufügen, bis Du die gewünschte Konsistenz erreicht hast.
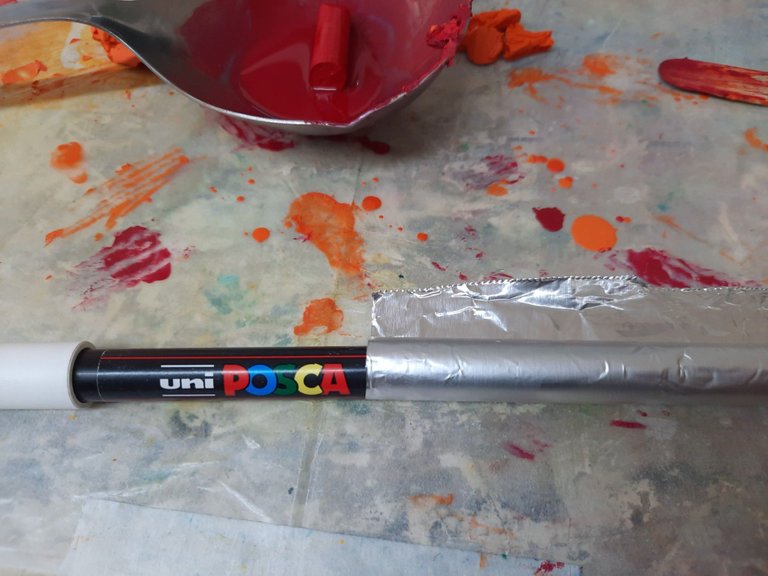
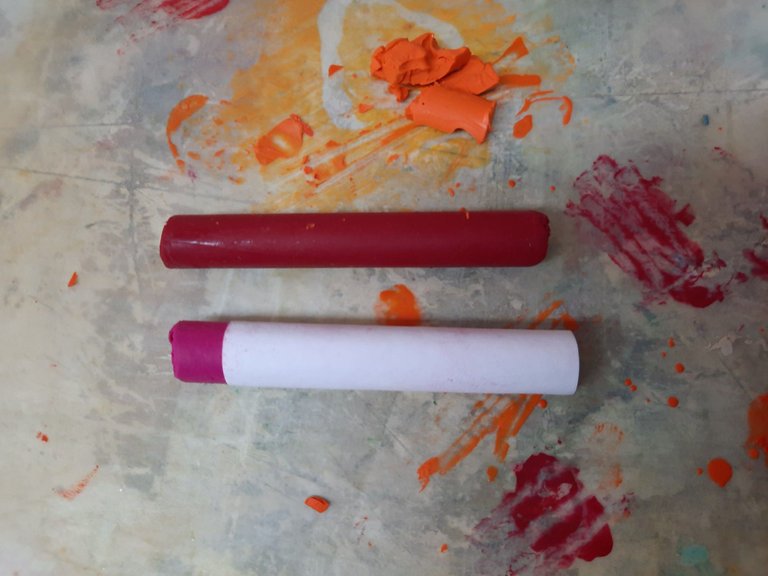
To make molds, use a cylindrical object - in my case it was a Posca marker - and wrap it with a piece of aluminum foil. The aluminum should be a little less than twice as long as the finished pastel stick and about 2" wide. The excess lenght is required to account for shrinkage as the wax hardens, and to allow for twisting the bottom of the mold shut. As you can see in the photo, the length of a Posca marker below the cap works out perfectly.
Für die Herstellung der Giessformen nimmst Du einen zylindrischen Gegenstand - in meinem Fall war es ein Posca Marker - und umwickelst ihn mit einem Stück Aluminiumfolie. Die Alufolie sollte etwas weniger als doppelt so lang wie der fertige Pastellstift und etwa 5 cm breit sein. Die überschüssige Länge wird benötigt, um die Schrumpfung beim Aushärten des Wachses zu berücksichtigen und um den Boden der Form zu verdrehen. Wie Du auf dem Foto sehen kannst, ist die Länge eines Posca Markers unterhalb der Kappe perfekt.

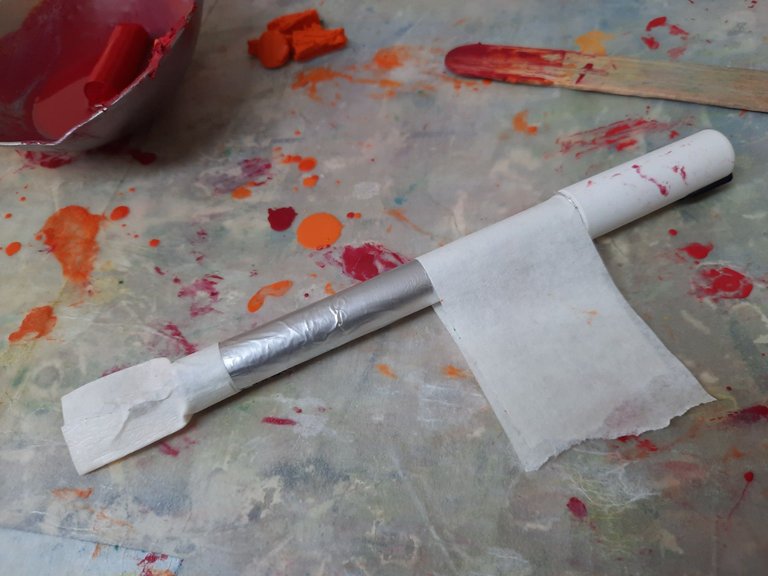
I cut the twisted portion to about ½" and used a piece of masking tape to add additional sealing to the bottom of the mold. While the hardening wax itself seals the sides of the mold quickly, the hot oil will find its way through the crimp, hence the extra tape. (Ask me how I know!)
Lastly, add a piece of tape like a "flag" to the top of the mold. This is your handle to hold the mold during pouring of the hot wax. Stick the tape only about three quarters around the mold as shown; this makes it easy to get scissors under the tape to remove it later. Remember, the finished pastel sticks will be soft and break or deform if you have to use brute force to tear the tape off.
Ich schnitt den verdrehten Teil auf etwa 15 mm ab und verwendete ein Stück Kreppband, um den Boden der Form zusätzlich abzudichten. Während das aushärtende Wachs die Seiten der Form selbst sehr schnell abdichtet, findet das heiße Öl seinen Weg durch den verdrehten Teil, daher das zusätzliche Klebeband. (Frag' mich, woher ich das weiß!)
Zum Schluss klebst Du ein Stück Klebeband wie ein Fähnchen an die Oberseite der Form. Dies ist der Griff, mit dem Du die Form während des Gießens des heißen Wachses halten kannst. Klebe das Band nur zu etwa dreiviertel um die Form herum, wie in der Abbildung gezeigt; so kannst Du später leicht eine Scherenklinge unter das Klebeband schieben, um es zu entfernen. Denk' dran, dass die fertigen Pastellstifte weich sein werden und brechen oder sich verformen, wenn Du das Klebeband mit roher Gewalt abreißen musst.
(Optional:) If you're using pigment from a soft pastel, break up the pastel and grind it to a fine powder using a mortar and pestle. On a glass plate make a mound of the powder with an indentation in the center and add half a teaspoon of oil. Use a palette knife or putty knife to mix the oil into the powder, mulling it over and slowly adding more oil until you have the consistency of tooth paste. Place the paste in the ladle, add the paraffin from half a tea-light, and at least one more tablespoon of oil. As mentioned before, you will have to experiment to find out exactly how much oil to add here.
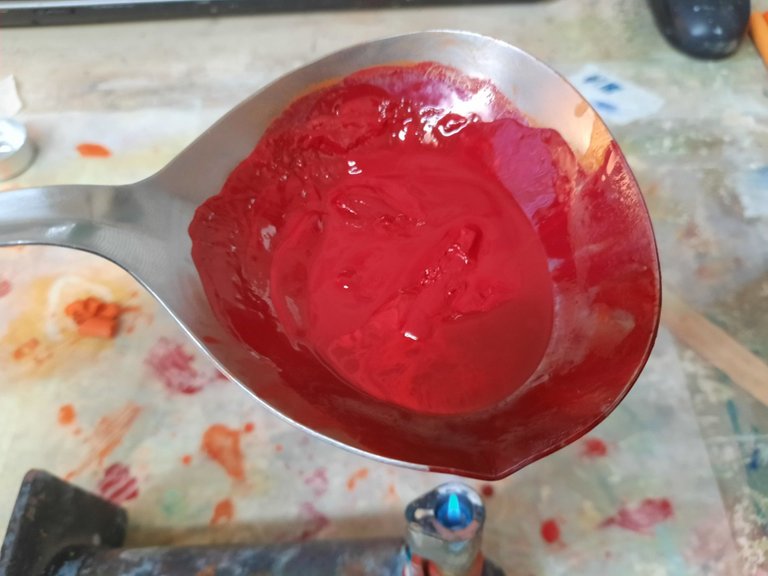
If you're simply converting hard oil pastels or kids' crayons, take the paper wrapper off a crayon and place it in the ladle. Add the oil and melt the mixture, stirring constantly. Once the wax/oil mixture is completely liquified, pour it in one of your molds to the brim.
Keep the mold upright as the wax hardens. The wax will shrink considerably, so you need to top it off a few times. This is important, as the wax hardens from the outside in and creates a funnel-shaped channel in the center of the mold. Without the top-offs, the upper third of the finished pastel stick will be hollow, which is not desirable.
(Optional:) Wenn Du Pigment von einem Softpastell verwendest, zerkleinere das Pastell mit einem Mörser und Stößel zu einem feinen Pulver. Mache auf einer Glasplatte ein Hügelchen aus dem Pulver, mit einer Vertiefung in der Mitte, und gib einen halben Teelöffel Öl dazu. Rühre das Öl mit einem Malmesser oder Spachtel in das Pulver ein, wobei Du Klümpchen im Gemisch mit dem Spachtel immer wieder auf der Glasplatte zerquetschst. Füge nach und nach mehr Öl hinzu, bis Du die Konsistenz von Zahnpasta hast. Gib die Paste in die Suppenkelle, füge das Paraffin eines halben Teelichts und mindestens einen weiteren Esslöffel Öl hinzu. Wie bereits erwähnt, Du musst experimentieren, um genau herauszufinden, wie viel Öl Du hier hinzufügen musst.
Wenn Du einfach harte Ölpastellkreiden oder Kinder-Wachsmaler verarbeitest, entferne die Papierhülle von einem Stift und lege ihn in die Kelle. Füge das Öl hinzu und schmelze die Mischung unter ständigem Rühren. Sobald die Wachs-Öl-Mischung vollständig verflüssigt ist, gieße sie bis zum Rand in eine deiner Giessformen.
Halte die Form aufrecht, während das Wachs aushärtet. Das Wachs wird beträchtlich schrumpfen, so dass Du einige Male nachgießen musst. Das ist wichtig, da das Wachs von außen nach innen aushärtet und in der Mitte der Form einen trichterförmigen Kanal bildet. Ohne das Auffüllen wird das obere Drittel des fertigen Ölpastellstifts hohl sein, was nicht wünschenswert ist.
You can dip the mold in a glass of water to speed up hardening, just be sure no water gets into the mold. Shrinkage will be more pronounced when cooling with water.
DANGER: If water gets into the wax (e.g. in the center channel caused by the shrinkage) and you re-melt the stick later, the water droplets will turn into steam and explode, violently spraying hot wax and oil all over the place!
After the oil pastel stick has hardened, it can be demolded. Cut the handle "flag" off the mold. The tape seal at the bottom you can leave untouched. Unwrap the aluminum foil; it will tear along the bottom tape seal just fine and you can then pull off the seal in one piece.
Cut the pastel stick to the desired length, cutting from the top only, which is where shrinkage may have left a portion of the stick hollow. If you like, wrap the stick in paper for cleaner handling.
Enjoy your new wonderfully soft oil pastels!
Du kannst die Form in ein Glas Wasser tauchen, um das Aushärten zu beschleunigen, achte aber unbedingt darauf, dass kein Wasser in die Form gelangt. Die Schrumpfung wird beim Abkühlen mit Wasser stärker ausgeprägt sein.
GEFAHR: Wenn Wasser in das Wachs eindringt (z. B. in den durch die Schrumpfung entstandenen Kanal im Zentrum) und Du den Stift später wieder einschmilzt, verdampfen die Wassertröpfchen und explodieren, wobei heißes Wachs und Öl überall verspritzt wird!
Nachdem der Ölpastellstift ausgehärtet ist, kann er aus der Form genommen werden. Schneide den "Fahnen-"-Griff der Form ab. Das Klebeband an der Unterseite kannst Du dranlassen. Wickele die Alufolie einfach ab; sie reißt entlang des unteren Klebebandes ein und Du kannst das Klebebandhütchen dann einfach in einem Stück abziehen.
Schneide die Pastellkreide auf die gewünschte Länge zu. Kürze dabei nur von der Oberseite, wo durch die Schrumpfung ein Teil der Kreide hohl geworden sein kann. Wenn Du magst, spendiere der neuen Ölpastellkreide noch eine Bauchbinde, um sie beim Malen sauberer handhaben zu können.
Viel Spaß mit deinen neuen, wunderbar weichen Ölpastellkreiden!
!discovery 30
Thank you very much. 😀
This post was shared and voted inside the discord by the curators team of discovery-it
Join our community! hive-193212
Discovery-it is also a Witness, vote for us here
Delegate to us for passive income. Check our 80% fee-back Program
This is a well detailed description on how to make an oil pastel, I never knew that baby oil is used in the making of pastel.
Thank you so much for sharing this beautiful tutorial with us. Thanks to @diyhub I found this article and I'm here as a dreemer from #dreemport 😊.
Have a beautiful week 💜
Thanks for stopping by and a great week for you as well. 😀
You're welcome! I will have a great week too 🥰
Unn wo is jetz es Gehackte, die Zwiwwele un die Flasch Maggi? Isch schiiewe Kooldamb wie kää Mensch, un der doo worschdeld in de Faarwe erum.
Das doo kannschde jemand verzeele, der die Bux hinne zumacht. An dem Kameraad haschde geraacht, bis da die Aue uff hab siwwe gestann sinn.
So, jetz geehn isch ma mol was se esse mache.
🤣🤣🤣 Das stimmd! Wann ma sich so e Tuut dräht unn die raacht, sinn die Faawe direkt vill bunder! Awwer wem verzääl ich das? Du kennsch dich aus, desweje hasche joo aach dauernd Kohldamp!
Doo leijt ääner mol knabb denääwe. Die Faawe sinn net bunder, awwer de siehschd Dinger, von deene de Mooler noch netamool a Aahnung hat.
Dann kannst du dir vorstellen, wie das Gespräch zwischen Kunstfreund und Erschaffer dieser Kunst am Rande einer Ausstellung abläuft. :-)
Hi, it's great to be able to give life to crayons that lost their quality or just aren't that good. I happen to have some that are super dry and now that I see this tutorial, I know they have salvation. Thank you very much for the explanation. Regards ♥
Glad you got some utility from my post. Cheers! 😀
Thank you for sharing this post in the DIYHUB Community!
Your content got selected by our fellow curator tibfox & you just received a little thank you upvote from us for your great work! Your post will be featured in one of our recurring compilations which are aiming to offer you a stage to widen your audience within the DIY scene of Hive. Stay creative & HIVE ON!
Please vote for our hive witness <3