Hello HIVEs!
A long time ago, I promised to reveal the secret of my ORBOMAT. Today I would like to introduce the robot. I originally developed it for the project "The Digital Man". Since then, I have been activating the ORBOMAT from time to time to test different light sources on it. Today I'm showing more fantasy planets and galaxies that were created with this tool.
Schon vor sehr langer Zeit hatte ich versprochen, das Geheimnis meines ORBOMAT zu lüften. Heute möchte ich den Roboter vorstellen. Ursprünglich hatte ich ihn für das Projekt "The Digital Man" entwickelt. Seitdem aktiviere ich den ORBOMAT hin und wieder, um verschiedene Lichtquellen an ihm zu testen. Heute zeige ich weitere Phantasie-Planeten und -Galaxien, die mit diesem Tool entstanden sind.
Canon EOS 6D Mark II
EF16-35mm ƒ4L IS USM
ISO100 / 16mm / ƒ16 / 820s
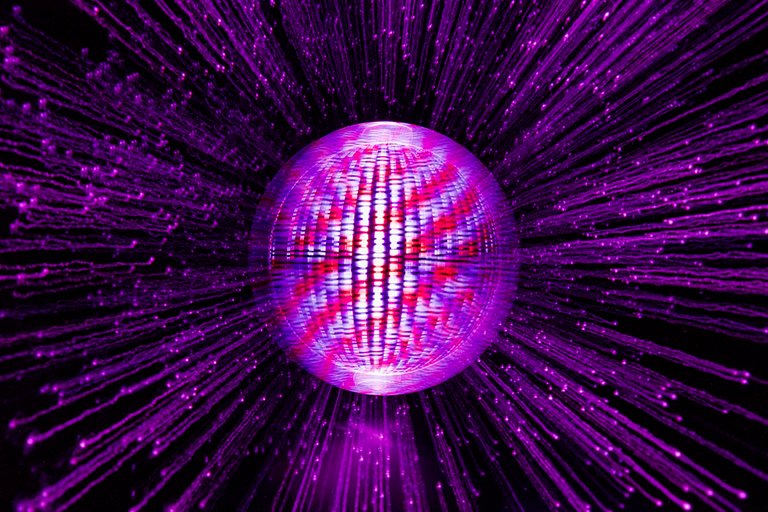
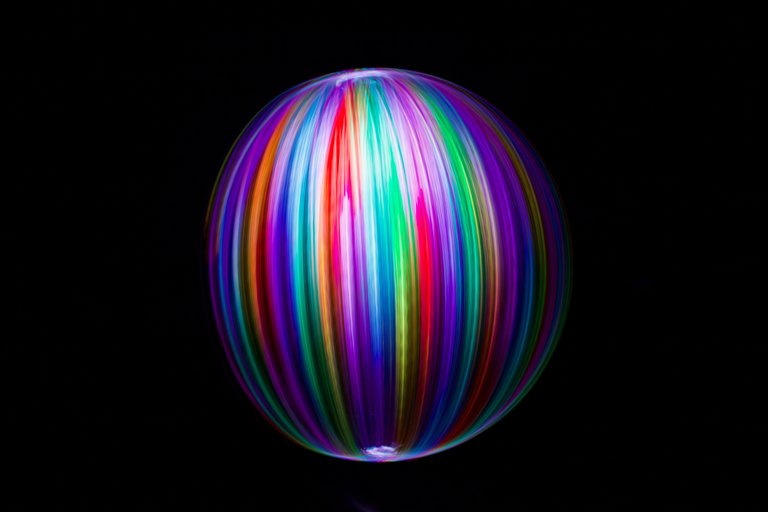
The Cover Picture
Two techniques can be seen on the cover picture. I mounted some glass fibre in front of the camera on a tripod and a colour filter on a torch. I first set the lens to 35mm. Then I slowly zoomed the lens down to 20mm. I then rotated the camera with the lens covered and repeated the process until I reached 360°. I then removed the tripod with the lamp from the set, changed the focal length to 16mm and started the ORBOMAT, which had previously been fitted with an oval Lightblade on an RGB CRITTER. The set is shown in the following photo.
Auf dem Titelbild sind gleich zwei Techniken zu sehen. Vor die Kamera montierte ich auf einem Stativ etwas Glasfaser und einen Farbfilter an einer Taschenlampe. Das Objektiv stellte ich zuerst auf 35mm ein. Dann zoomte ich das Objektiv langsam bis auf 20mm. Danach rotierte ich die Kamera bei verdecktem Objektiv und wiederholte den Vorgang so oft, bis ich die 360° erreichte. Danach stellte ich das Stativ mit der Lampe beiseite, änderte die Brennweite des Objektivs auf 16mm und startete den ORBOMAT, der zuvor mit einem ovalen Lightblade an einer RGB CRITTER bestückt wurde. Das Set zeige ich auf dem folgenden Foto.
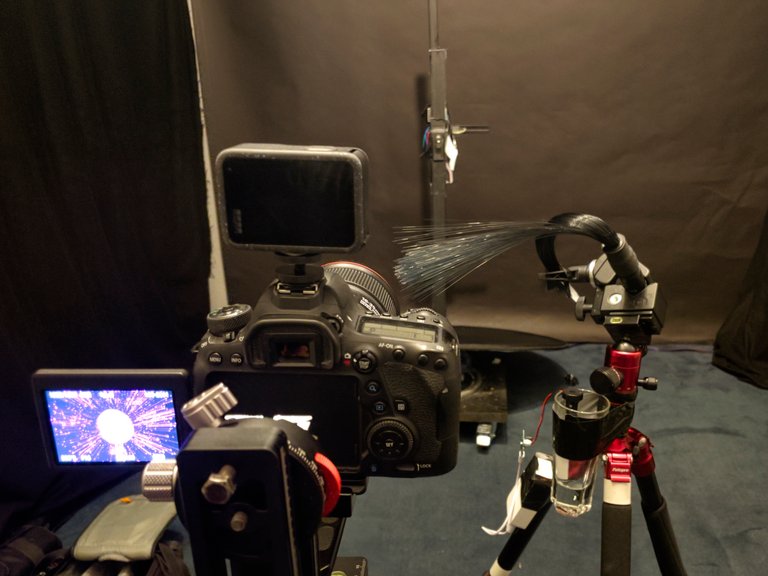
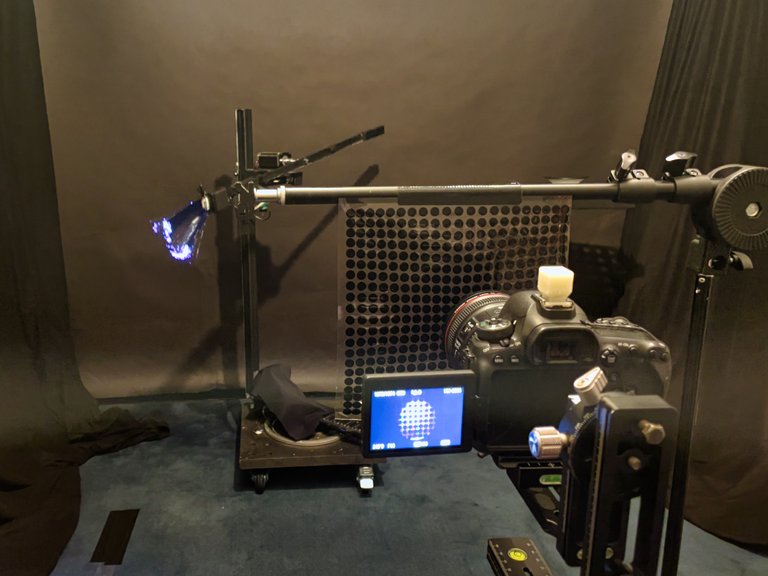
The Set
The Set
The picture above shows the set. It shows the tripod with torch and black glass fibre. The camera with docked GoPro and the ORBOMAT in the background. Yes, a GoPro to record light painting videos. But I'll report on that in a later post.
Auf dem Bild oben ist das Set abgebildet. Es zeigt das Stativ mit Taschenlampe und schwarzen Glasfaser. Die Kamera mit angedockter GoPro und dem ORBOMAT im Hintergrund. Ja, eine GoPro, um Light-Painting-Videos aufzunehmen. Aber dazu werde ich in einem späterem Post berichten.

Canon EOS 6D Mark II
EF16-35mm ƒ4L IS USM
ISO100 / 16mm / ƒ16 / 488s
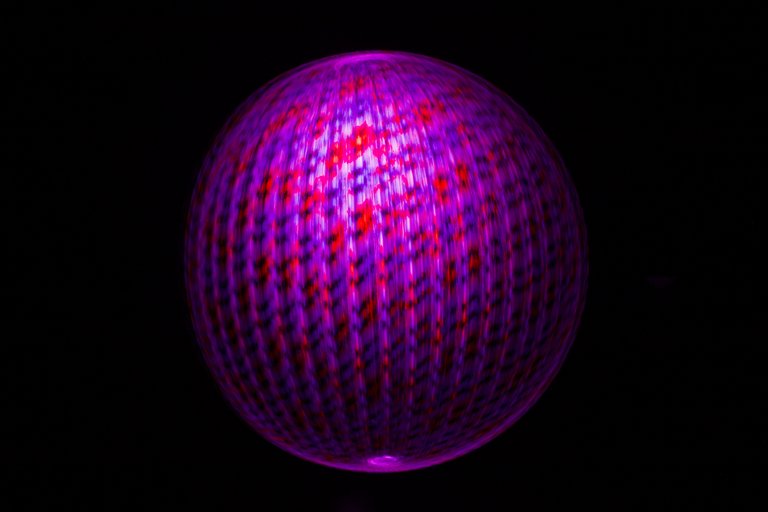
The image above was created in a similar way to the title image. The only difference is that the lens was not covered during the rotation and the zoom was not used during the exposure. The picture below shows the first test without zoom and rotation.
Das Bild oben wurde ähnlich dem Titelbild erstellt. Nur wurde das Objektiv während der Rotation nicht abgedeckt und auf den Zoom während der Belichtung verzichtet. Auf dem Bild unten zeige ich den ersten Test ohne Zoom und Rotation.

Canon EOS 6D Mark II
EF16-35mm ƒ4L IS USM
ISO100 / 16mm / ƒ16 / 664s
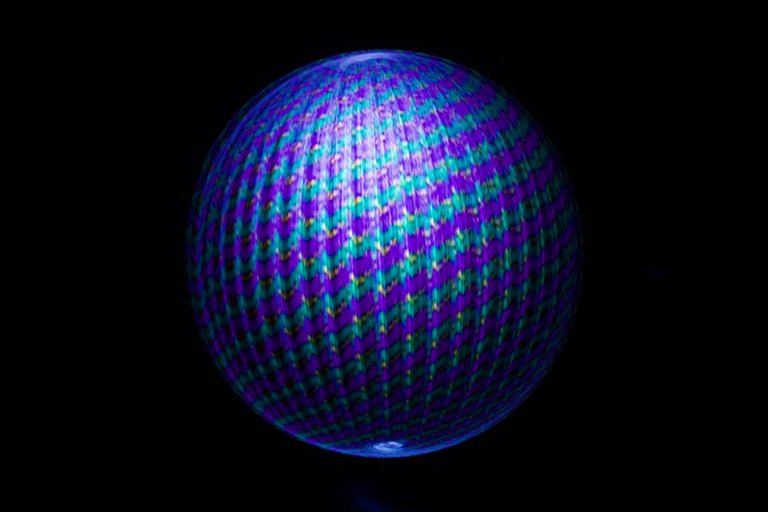
I had previously fitted the ORBOMAT with black glass fibre on the RGB CRITTER.
I show four test shots below.
Zuvor hatte ich den ORBOMAT mit schwarzem Glasfaser an der RGB CRITTER bestückt. Unten zeige ich vier Testaufmahmen.
Canon EOS 6D Mark II
EF24-70mm ƒ4L IS USM
ISO100 / 26mm / ƒ16 / 271s
Canon EOS 6D Mark II
EF24-70mm ƒ4L IS USM
ISO100 / 26mm / ƒ16 / 263s
Canon EOS 6D Mark II
EF24-70mm ƒ4L IS USM
ISO100 / 26mm / ƒ16 / 241s

Canon EOS 6D Mark II
EF24-70mm ƒ4L IS USM
ISO100 / 24mm / ƒ6.3 / 234s
Then I had the idea of photographing it all through a printed film. You can see the result and the set in the two photos below.
Dann kam mir noch die Idee, das alles mal durch eine bedruckte Folie zu fotografieren. Auf den beiden folgenden Fotos ist das Ergebnis und das Set zu sehen.

Canon EOS 6D Mark II
EF24-70mm ƒ4L IS USM
ISO100 / 26mm / ƒ16 / 246s
The Set
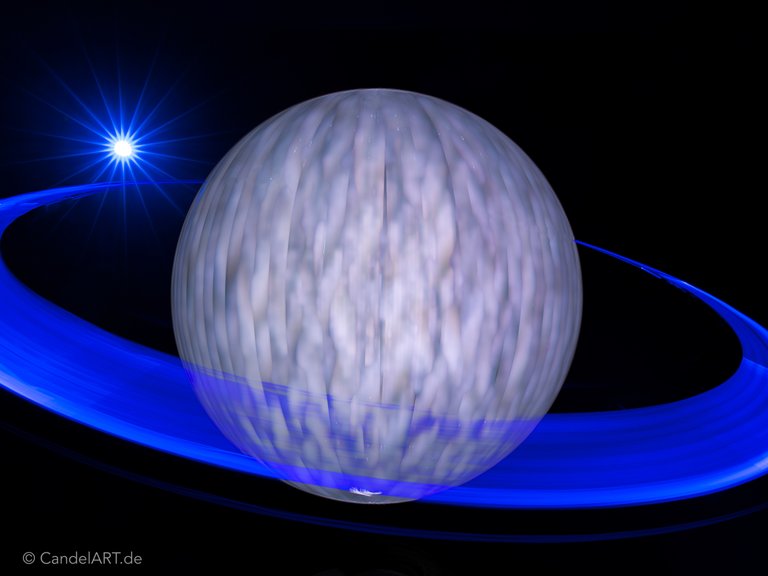
Three years ago, I created a ring planet with the help of the ORBOMAT. To do this, I fitted the ORBOMAT with an LED matrix.
The ring was pulled around the planet using a torch fitted with a light blade on a rotation tool.
Vor drei Jahren hatte ich mit Hilfe des ORBOMATEN einen Ringplanet kreiert. Dafür bestückte ich den ORBOMAT mit einer LED-Matrix. Der Ring wurde mit Hilfe einer Taschenlampe, bestückt mit einem Light-Blade, an einer Rotationshilfe um den Planeten gezogen.
E-M1MarkII
EF16-35mm ƒ4L IS USM (mit Adapter)
ISO64, 12mm, ƒ9, 2,5s (LiveComposit)
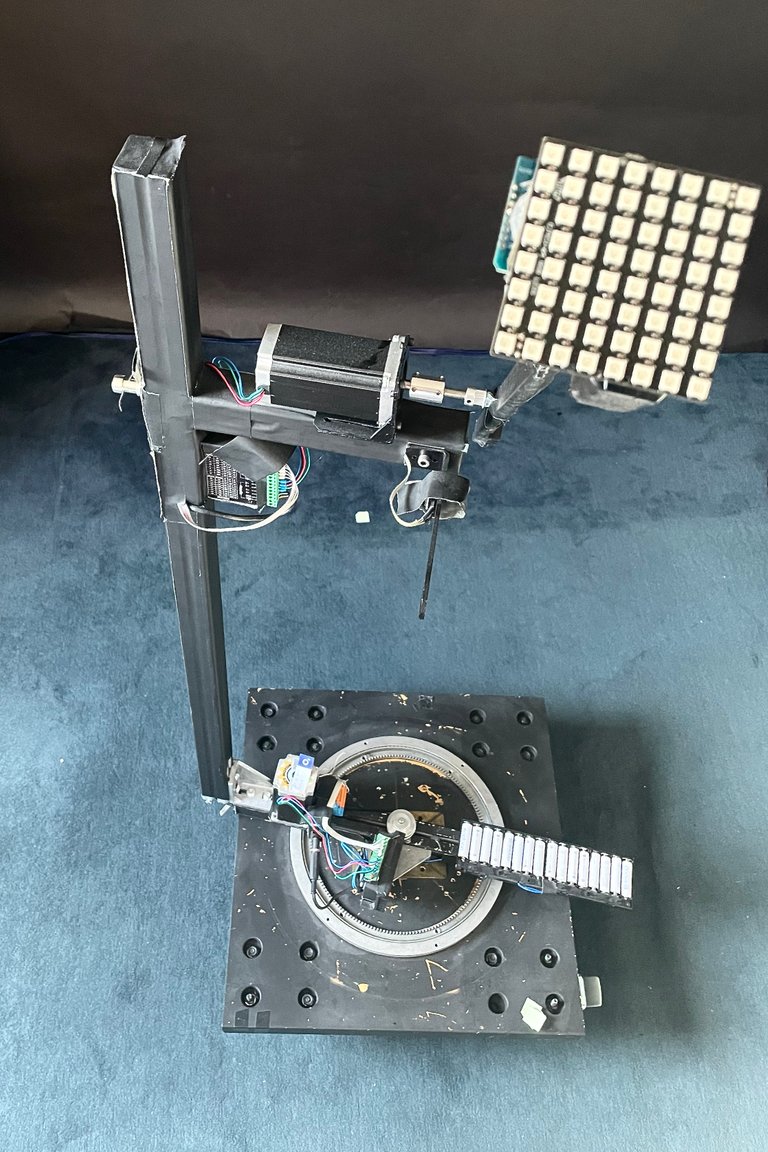
The ORBOMAT
In the following picture you can see the ORBOMAT equipped with an LED matrix. This in turn can be freely programmed. The robot is controlled by an ARDUINO. It is driven by two stepper motors. One for vertical and one for horizontal movement. The light sources are interchangeable. I have fitted the rotating battery arm with a Sub-D socket for this purpose. When I develop new light sources, these will be fitted with a Sub-D connector and can therefore be used on the ORBOMAT. The torches are attached to the rotating arm with tape.
Auf dem folgenden Bild seht ihr den ORBOMAT, bestückt mit einer LED-Matrix. Diese kann wiederum frei programmiert werden. Gesteuert wird der Roboter durch einen ARDUINO. Angetrieben wird er durch zwei Stepper-Motoren. Einen für die vertikale und einen für die horizontale Bewegung. Die Lichtquellen sind austauschbar. Dafür habe ich den rotierenden Batteriearm mit einer Sub-D-Buchse ausgestattet. Wenn ich neue Lichtquellen entwickele, werden diese mit einem Sub-D-Stecker ausgerüstet und können somit am ORBOMAT eingesetzt werden. Die Taschenlampen werden mit Tape am rotierenden Arm befestigt.
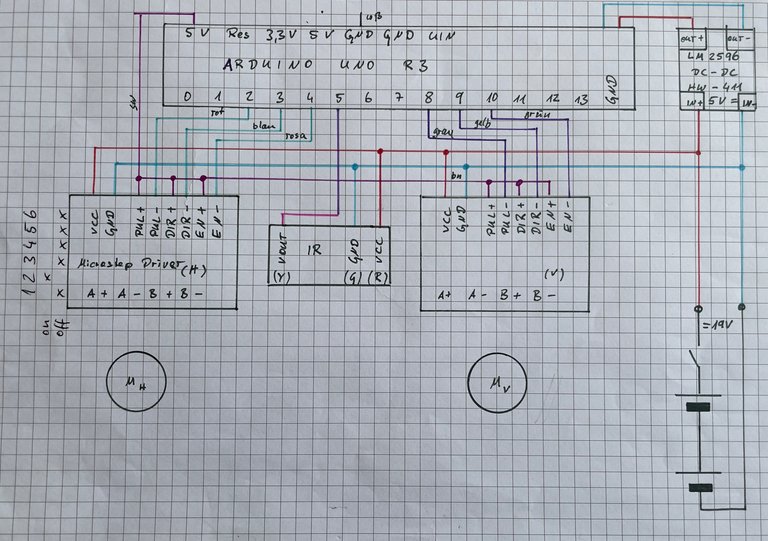
You can see the circuit diagram in the picture above. Old school: on paper! 😅 Please write me a comment if you need information for a replica. I would then compile a parts list.
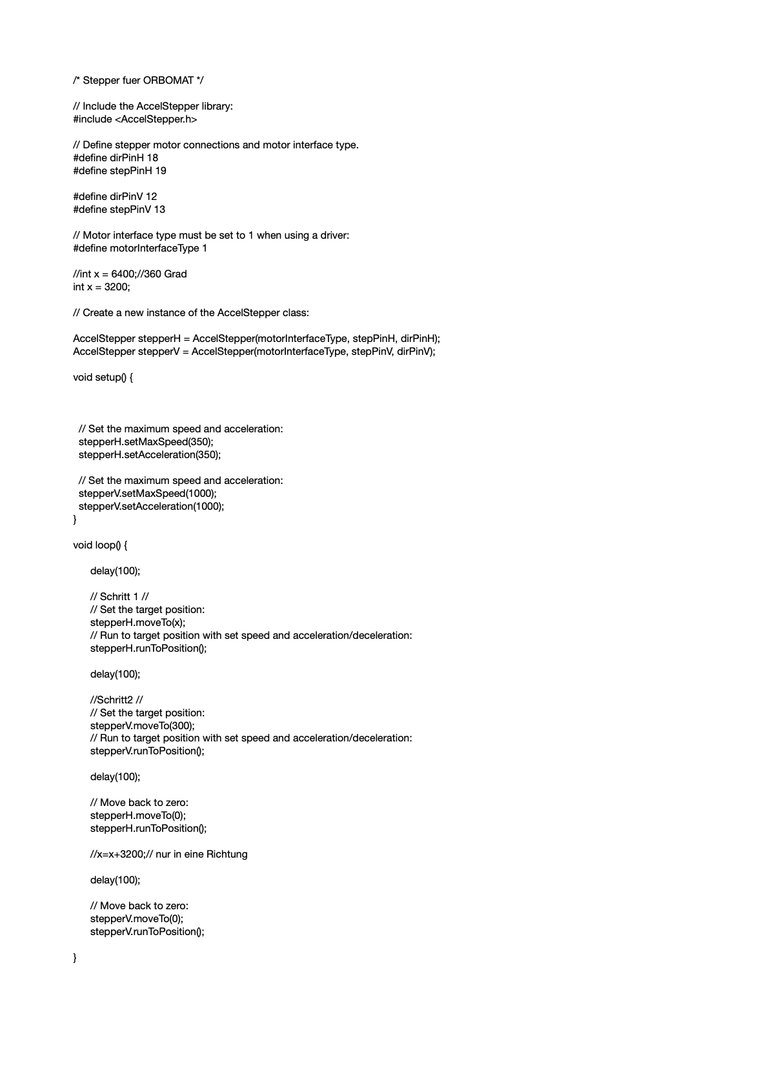
The picture below shows the programme. It is very simple. I have not provided any control options for the operator. If I want to change something in the process, I change it directly in the Arduino programme.
Auf dem Bild oben seht ihr den Schaltplan. Alte Schule: auf Papier! 😅 Bitte schreibt mir einen Kommentar, wenn ihr für einen Nachbau Informationen benötigt. Eine Teileliste würde ich dann zusammenstellen.
Auf dem Bild unten zeige ich das Programm. Es ist sehr einfach gehalten. Ich habe keine Steuerungsmöglichkeiten für den Bediener vorgesehen. Wenn ich etwas am Ablauf ändern möchte, ändere ich es direkt im Arduino Programm.
I will certainly be reporting on my ORBOMAT projects from time to time. I'll leave it at that for today. Let me know in the comments if it was interesting for you and if you liked the post.
I would be delighted if you would join me again next Sunday when I present a new story about light painting on my blog. So stay tuned!
Bestimmt werde ich immer mal wieder von meinen ORBOMAT-Projekten berichten. Für heute möchte ich es dabei belassen. Lasst mich in den Kommentaren wissen, ob es interessant für euch war und euch der Post gefallen hat. Ich würde mich freuen, wenn ihr am nächsten Sonntag wieder dabei seid, wenn ich auf meinem Blog eine neue Geschichte rund ums Lightpainting präsentiere. Also bleibt dran!

What Is Light Painting?
Light painting is a unique art form. As a rule, the darkness is illuminated by the artist with various light sources and traces of light are painted into the picture with various lighting tools. Various techniques are used, such as camera rotation or other movements of the camera during exposure. The creative possibilities are almost unlimited. When using ND filters, this technique can also be used in daylight. All images were taken during a single exposure. Apart from denoising, sharpening, cropping and possibly adjusting the white balance, the images are not processed on the computer.
Lichtmalerei ist eine einzigartige Kunstform. In der Regel wird die Dunkelheit mit diversen Lichtquellen vom Künstler ausgeleuchtet und Lichtspuren mit diversen Lichtwerkzeugen ins Bild gemalt. Dabei kommen verschiedene Techniken zum Einsatz, wie Kamerarotation oder andere Bewegungen der Kamera während der Belichtung. Die kreativen Möglichkeiten sind nahezu unbegrenzt. Bei Einsatz von ND-Filtern kann diese Technik auch bei Tageslicht angewand werden. Alle Bilder wurden während einer einzigen Belichtung aufgenommen. Abgesehen vom Entrauschen, Schärfen, Beschneiden und eventuellem Anpassen des Weißabgleichs werden die Bilder nicht am Computer bearbeitet.
CandelART
more about me and my art:

WE ARE LIGHT PAINTERS
To help and support the LightPainters community here on Hive I would appreciate your delegation of HivePower. Any amount is appreciated. It does not require much to get started, we are happy for any gesture. @lightpainters
How to delegate?
Delegate 50HivePower, [50HP]
Delegate 250HivePower, [250HP]
Delegate 500HivePower, [500HP]
Delegate 1000HivePower, [1000HP]
All the Hive Power will help to upvote the artist's contribution as part of the LightPainters community.
Mir gefällt das Saturnbild.
Damals wollte ich für mich herausfinden, wie das geht. Jetzt müßte ich das nur noch in ein richtiges Bild einbauen.
Coole Maschinen, aber irgendwie nichts für die frei Wildbahn.
Da hast wahrscheinlich recht. Da sind zwar große Rollen dran montiert, aber im PKW ist das Ding ganz schön sperrig. Somit hatte ich das Ding auch noch nicht im Ausseneinsatz.
Das erinnert mich an einen Kollegen, der eine Orbmaschine für 6 Meter große Orbs aus Stahl zusammen geschweißt hatte. Wenn ich mich recht entsinne, hatte der das Ding mit dem großen Anhänger zu den Locations gefahren. 😂
😂
🤣 Wozu braucht man einen 6m ORB? 😂
Keene Ahnung.😂
Now this is creativity at its peak!
Thanks! 😊
#hive #posh
The result of photographing is impressive.
Thanks!
!PGM
BUY AND STAKE THE PGM TO SEND A LOT OF TOKENS!
The tokens that the command sends are: 0.1 PGM-0.1 LVL-0.1 THGAMING-0.05 DEC-15 SBT-1 STARBITS-[0.00000001 BTC (SWAP.BTC) only if you have 2500 PGM in stake or more ]
5000 PGM IN STAKE = 2x rewards!
Discord
Support the curation account @ pgm-curator with a delegation 10 HP - 50 HP - 100 HP - 500 HP - 1000 HP
Get potential votes from @ pgm-curator by paying in PGM, here is a guide
I'm a bot, if you want a hand ask @ zottone444
Thank you! 😊
What a tremendous creative explosion!... A round of applause for you @candelart friend!!!... Thanks for sharing!...
!discovery 35
!VSC
!PIZZA
@jlinaresp has sent VSC to @candelart
This post was rewarded with 0.1 VSC to support your work.
Join our photography communityVisual Shots
Check here to view or trade VSC Tokens
Be part of our Curation Trail
@jlinaresp ha enviado VSC a @candelart
Éste post fue recompensado con 0.1 VSC para apoyar tu trabajo.
Únete a nuestra comunidad de fotografía Visual Shots
Consulte aquí para ver o intercambiar VSC Tokens
Se parte de nuestro Trail de Curación
Thank you my friend @jlinaresp ! 😊
This post was shared and voted inside the discord by the curators team of discovery-it
Join our Community and follow our Curation Trail
Discovery-it is also a Witness, vote for us here
Delegate to us for passive income. Check our 80% fee-back Program
https://reddit.com/r/blogs/comments/1b5sswy/light_painting_of_planets_and_galaxies_with_the/
The rewards earned on this comment will go directly to the people( @jlinaresp ) sharing the post on Reddit as long as they are registered with @poshtoken. Sign up at https://hiveposh.com.
That looks like alchemy to me! 😁 Great pictures! The second one would be my favorite. I like the richness of those red rings around the center...
Thank you! I'm glad you like it. 😊
$PIZZA slices delivered:
@jlinaresp(5/10) tipped @candelart