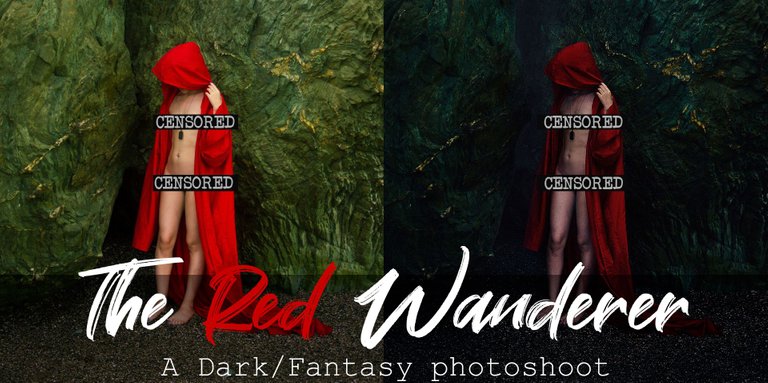
Helloo!
Today I'm here to show you a mini photo set titled "The Red Wanderer" and its editing process.
Hoy vengo a enseñarles un mini set de fotos titulado “The Red Wanderer” y su proceso de edición.


These photos came out in the middle of a photography trip that Niobe (the co-creator), the model and I took for a photoshoot for one of my projects, Figuras Anónimas.
Estas fotos salieron en medio de un viaje fotográfico que hicimos Niobe (la co-creadora), la modelo y yo para realizar una sesión de uno de mis proyectos, Figuras Anónimas.
Niobe thought it would be a good idea to take that red cape with us, because maybe we would come up with something with it during the trip (spoiler: we did it).
Niobe pensó que sería una buena idea llevarnos esa capa roja, porque quizás inventábamos algo con ella durante el viaje (spoiler: así fue).
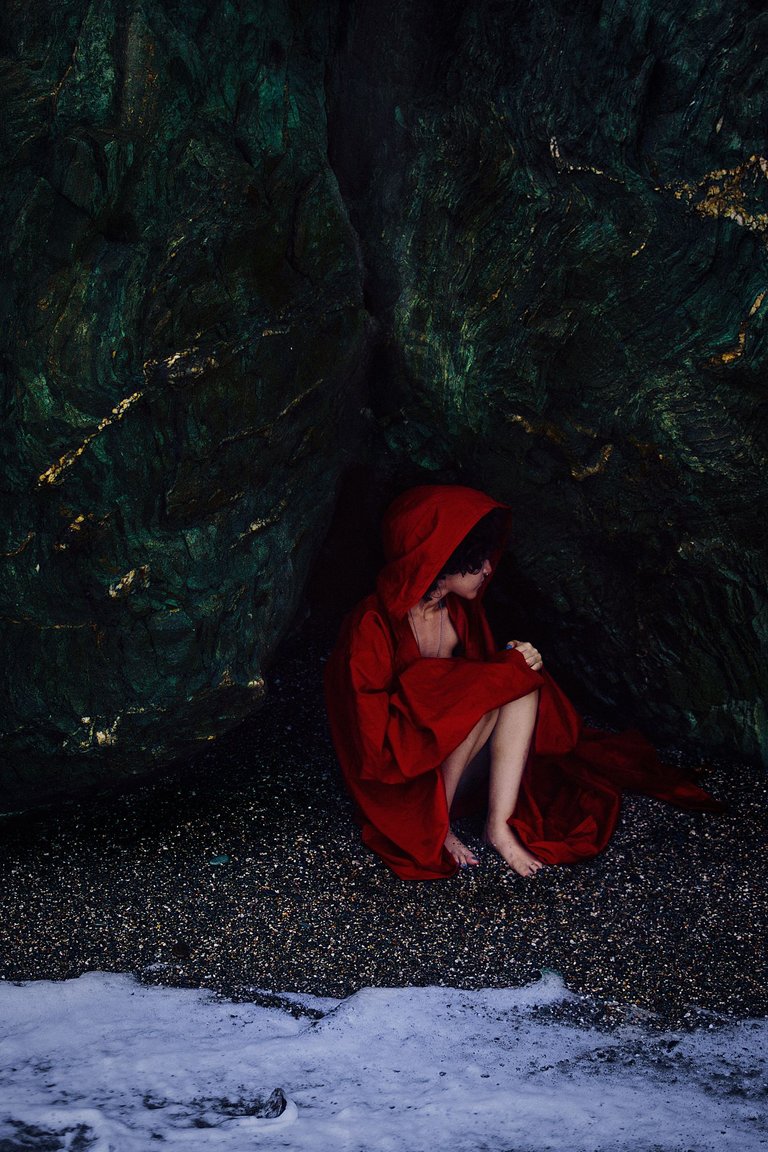
When we got to the beach ready to start taking pictures, she saw that rock formation and thought of the cape, so she didn't hesitate to pass the idea on to me.
Al llegar a la playa dispuestos a comenzar a hacer fotos, ella vio esa formación rocosa y pensó en la capa, así que no dudó en pasarme la idea.
The model is a great friend who has been an accomplice of our photographic adventures and does not hesitate to pose whenever we need her.
As the reason for the trip was a set for Figuras Anónimas, we decided to maintain anonymity in this one too, giving a little more mystery to the photographs.
La modelo es una gran amiga que ha sido cómplice de nuestras aventuras fotográficas y no duda en posar cada vez que la necesitamos.
Como el motivo del viaje era un set para Figuras Anónimas, decidimos mantener el anonimato en éste también, dotando de un poco más de misterio a las fotografías.
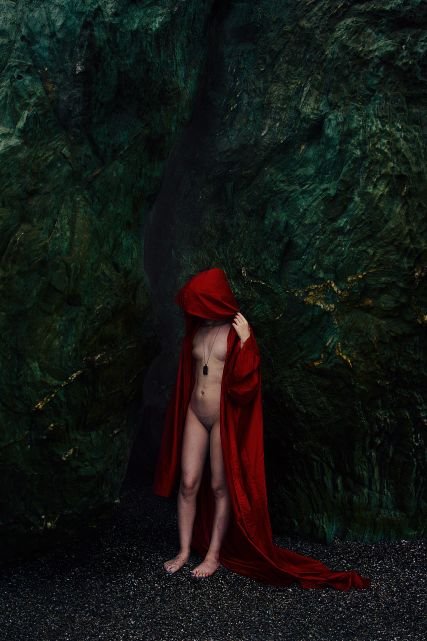
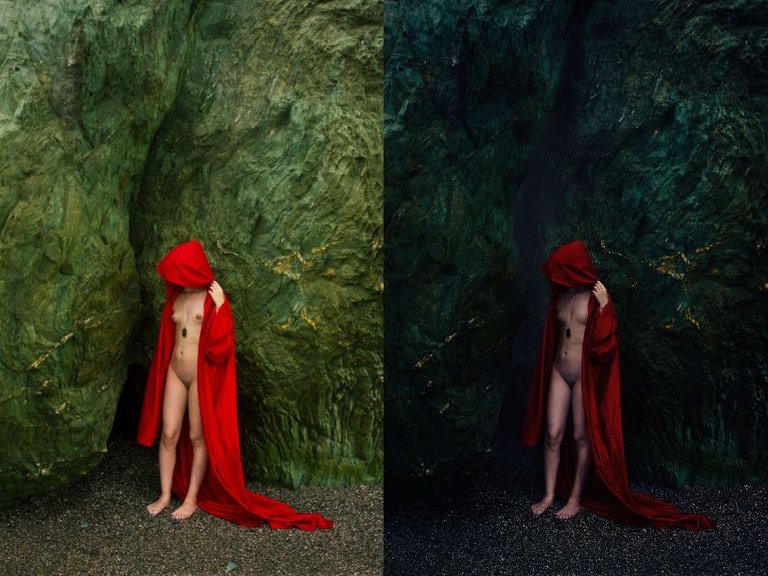
Now it's time for the before and after. Since this set was a bit improvised and we didn't think about props beyond the red cape, I decided that much of the weight of the final result would fall on the editing process.
For this set I wanted to adopt a dark/fantasy look, as I'm a fan of that style.
Ahora el momento del antes y después. Como este set fue un poco improvisado y no pensamos en utilería más allá de la capa roja, decidí que gran parte del peso del resultado final recaería en el proceso de edición.
Para este set quise adoptar un look oscuro/fantasía, ya que soy fan de ese estilo.
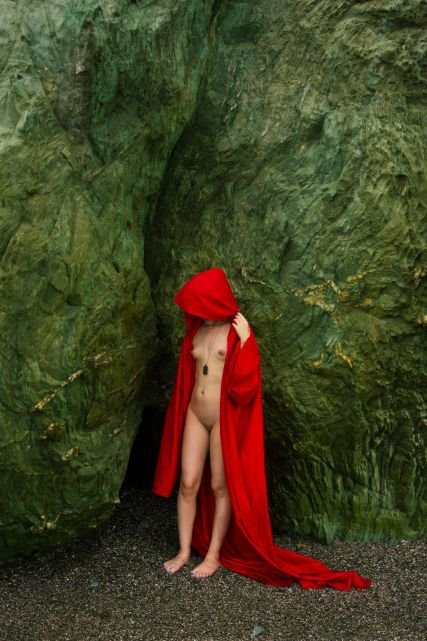
This is the raw file, the starting point of the editing process. For this photo I used only Adobe Photoshop.
Este es el raw original, el punto de partida del proceso de edición. Para esta foto utilicé únicamente Adobe Photoshop.
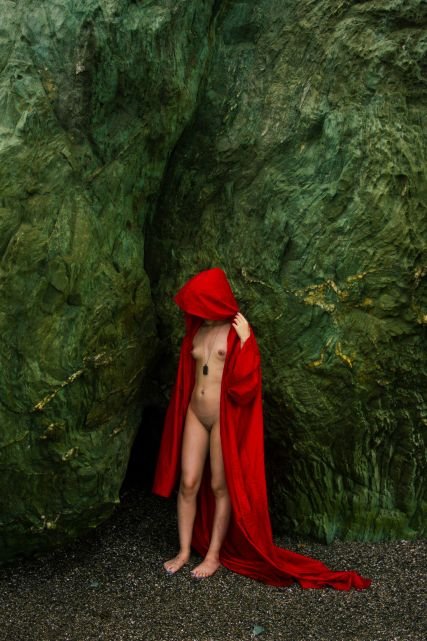
I threw the raw in Photoshop and processed the file in Camera Raw. I applied basic color and exposure adjustments, creating the foundation of what will be the final image.
Lancé el raw en Photoshop y procesé el archivo en Camera Raw. Apliqué ajustes básicos de color y exposición, creando los cimientos de lo que será la imagen final.

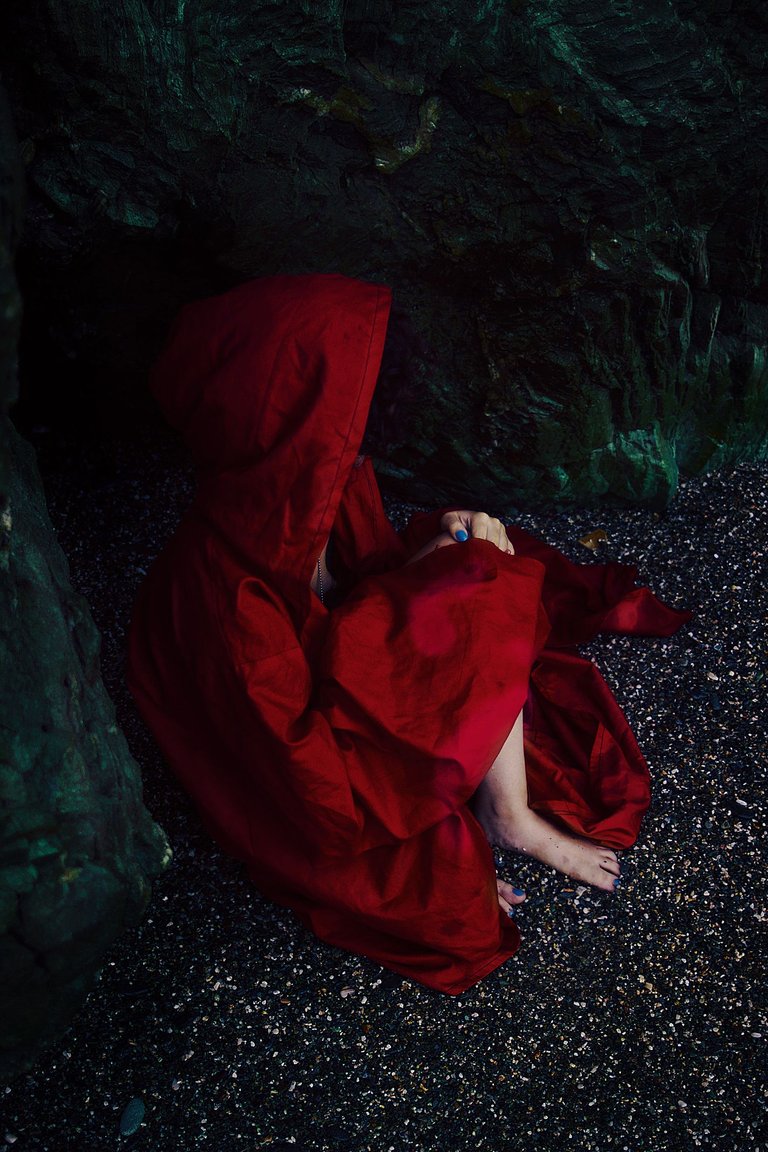
Using the Healing brush and the clone stamp I removed everything that seemed distracting in the environment. I also removed the nipples and genitalia to take away the humanity of the model and accentuate the theme of the set.
Utilizando el Healing brush y el clone stamp quité todo lo que me parecía que distraía en el entorno. Aproveché y eliminé también los pezones y los genitales para restarle humanidad a la modelo y acentuar la temática del set.
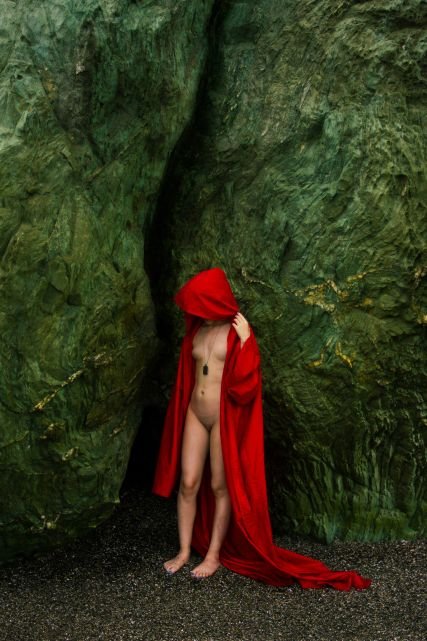
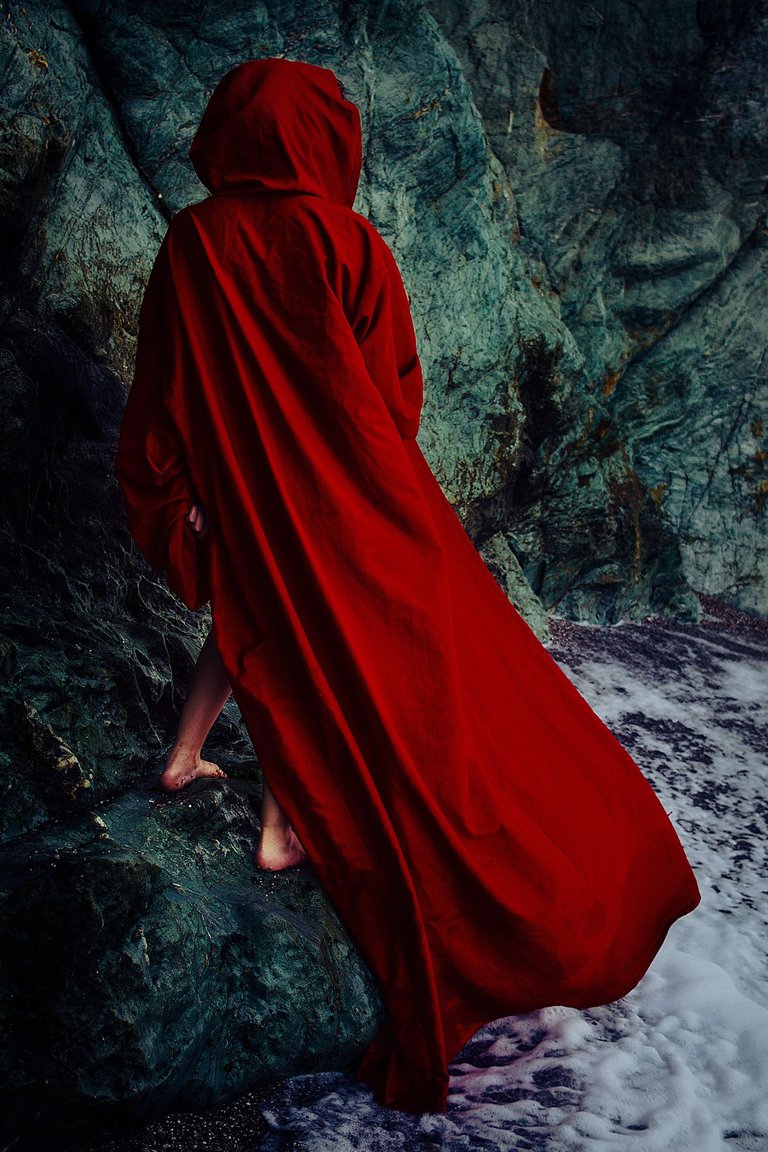
It's time for Dodge and Burn, my second favorite part of the process. You can create depth simply by manipulating the highlights and shadows.
In this photo I decided to create the feeling that the cavern in the back extended all the way across the rock, so I added shadows and highlights along it. I also added some shadows on the ground under the model.
Llegó la hora del Dodge and Burn, mi segunda parte favorita del proceso. Se puede crear profundidad simplemente manipulando las iluminaciones y las sombras.
En esta foto decidí crear la sensación de que la caverna de atrás se extendía por toda la roca, así que agregué sombras y luces a lo largo de ella. También añadí algunas sombras en el suelo bajo la modelo.

My favorite part: color management. I applied several layers of selective correction, hue/saturation and curves to get closer to the tone I wanted.
Mi parte favorita: el manejo del color. Apliqué varias capas de corrección selectiva, tono/saturación y curvas para acercarme al tono que quería.
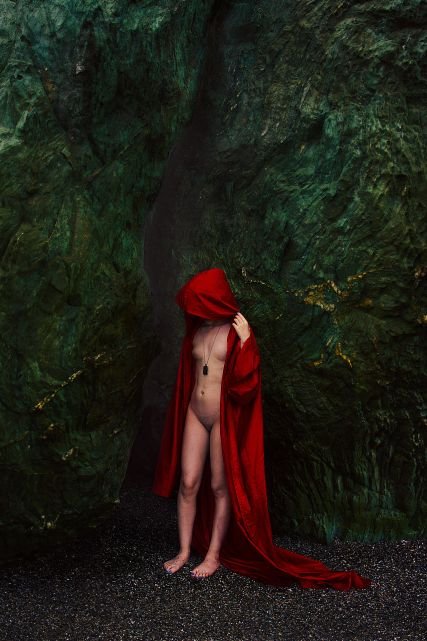
It came to my mind to add a little fog coming out of the cave. I achieved this by using a photo of a cloud in the Screen blending mode and adjusting it to suit. Then I applied a curves layer to better blend it with the image.
Se me ocurrió añadir una pequeña niebla saliendo de la cueva. Lo logré utilizando una foto de una nube en el modo de fusión Trama y ajustándolo a conveniencia. Luego apliqué una capa de curvas para fusionarla mejor con la imagen.
A second color correction. I wasn't satisfied with the first one, as I felt it didn't look as dark as I wanted. With that second adjustment I got it right.
Una segunda corrección de color. No estaba satisfecho con la primera, ya que sentía que no se veía tan oscuro como quería. Con ese segundo ajuste lo logré.
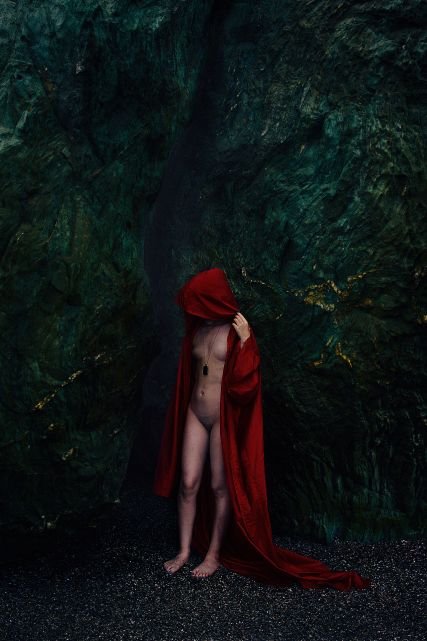
The final details! Here I applied a sharpening layer, darkened the model's skin a bit because I felt it was still too bright and added a vignette to the image. With that I finished the editing process.
The final result I achieved by editing this photo made it my favorite of the set. I think it creates the mood I wanted and creates that feeling of fantasy and darkness I was looking for.
Los detalles finales! Aquí apliqué una capa de enfoque, oscurecí un poco la piel de la modelo porque sentía que aún brillaba mucho y añadí una viñeta a la imagen. Con eso di por concluido el proceso de edición.
El resultado final que logré al editar esta foto la convirtió en mi favorita del set. Considero que crea el ambiente que deseaba y genera esa sensación de fantasía y oscuridad que buscaba.
I would like to know your opinion about the photos and the editing process, so don't hesitate to write down any doubt, question, advice or comment, I would really appreciate it.
I hope you liked my first contribution to Hive, I will be creating posts related to photography 1 or 2 times a week, as I said at the end of my introduction post.
Thank you very much for reading me!
Me gustaría conocer su opinión acerca de las fotos y el proceso de edición, así que no duden en escribir cualquier duda, pregunta, consejo o comentario, se los agradecería muchísimo.
Espero que les haya gustado mi primer aporte a Hive, estaré creando posts relacionados con la fotografía 1 o 2 veces por semanas, como lo dije al final de mi post de introducción.
Muchísimas gracias por leerme!

You can always choose to be kind!


All collages/headers were edited in Adobe Photoshop.
The rewards earned on this comment will go directly to the person sharing the post on Twitter as long as they are registered with @poshtoken. Sign up at https://hiveposh.com.
Amo con locura los resultados de estas fotografías.
Cuando las hicimos me imaginaba que el personaje iba saliendo de la cueva, pero ahora, con todos los efectos que le pusiste, en la primera foto más bien me da la sensación de que va entrando, que esa criatura misteriosa vive allí, sale para hacer de las suyas y vuelve a escabullirse por allí sin que nadie la descubra.
Buenísimos los resultados y todo el trabajo! Me gusta mucho cómo trabajaste los colores del fondo y cómo le diste dramatismo a la imagen con la oscuridad y la niebla.
Congratulations @enderlouis! You have completed the following achievement on the Hive blockchain and have been rewarded with new badge(s) :
Your next target is to reach 200 upvotes.
You can view your badges on your board and compare yourself to others in the Ranking
If you no longer want to receive notifications, reply to this comment with the word
STOP