Wir haben das Thema Blende, Belichtungszeit und ISO besprochen. Dabei habe ich euch erklärt, welchen Einfluss die drei Kernelemente der Fotografie haben. Nun kommen wir zum Schreckgespenst für jeden Anfänger, das Belichtungsdreieck. @ifullamri nannte es auch das goldene Dreieck. Keine Angst, es ist nicht so schwer zu verstehen.
We have the topic Aperture, Exposure time and ISO discussed. I explained the influence of the three core elements of photography. Now we come to the spectre for every beginner, the exposure triangle. @ifullamri also called it the golden triangle. Don't worry, it's not that hard to understand.
Quelle: https://pixabay.com/
Was ist das Belichtungsdreieck? - What is the exposure triangle?
Das Belichtungsdreieck ist der Zusammenhang von 3 Kernelemente, die das Ergebnis deiner Fotografie beeinflussen. Diese drei Kernelemente beeinflussen sich gegenseitig.
The exposure triangle is the relationship of 3 core elements that affect the outcome of your photography. These three core elements influence each other.
Wie funktioniert das Belichtungsdreieck? - How does the exposure triangle work?
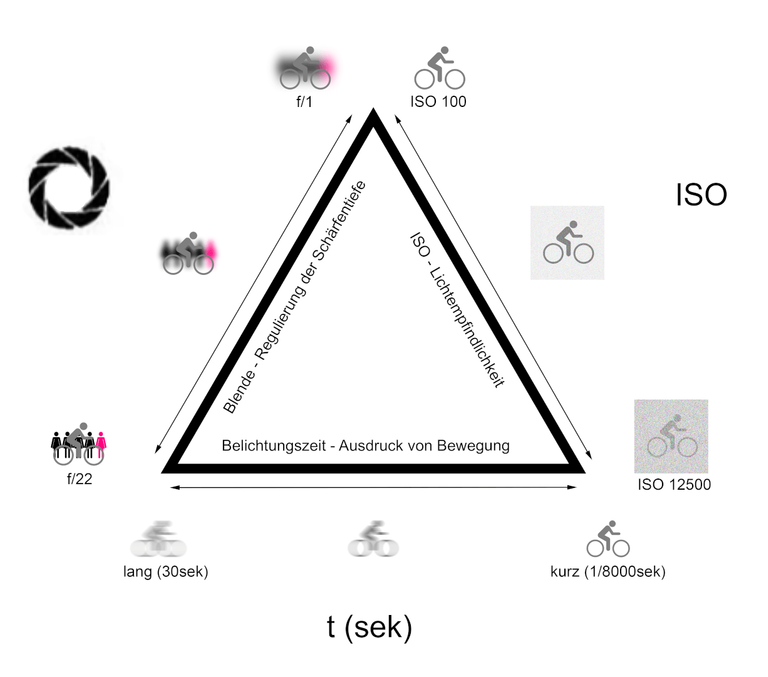
Das Belichtungsdreieck ist ausschlaggebend für die richtige Belichtung, verändere ich ein Wert so muss ich das mit den anderen beiden Wert ausgleicht, damit mein Bild korrekt belichte wird und ich das Ergebnis erziele, was ich beabsichtigt habe.
Mache ich meine Blende zu, also von f2,8 auf f22 verringere ich das Licht was hereinkommt und es wird dunkler. Um dagegen zu wirken, muss ich meine Belichtungszeit verkürzen (1/500 sek. zu 1/80 sek.), also das Licht mehr Zeit geben. Ist das nicht mehr möglich, weil ich dann mein Ziel nicht erreichen kann, erhöhe ich langsam den ISO Wert (ISO 50 bis ISO 1000). Als Grundlage gilt immer das Umgebungslicht, was sich aber auch verändert von Sonnenschein, bewölkt, Dämmerung oder auch im Gebäude.
The exposure triangle is crucial for the correct exposure, if I change one value I have to compensate with the other two values so that my image is correctly exposed and I achieve the result I intended.
If I close my aperture, i.e. from f2.8 to f22, I reduce the light coming in and it gets darker. To counteract this, I have to shorten my exposure time (1/500 sec. to 1/80 sec.), i.e. give the light more time. If this is no longer possible, because then I cannot reach my goal, I slowly increase the ISO value (ISO 50 to ISO 1000). The basis is always the ambient light, which also changes from sunshine, cloudy, twilight or even indoors.
Die Hilfsmittel meiner Kamera - The tools of my camera
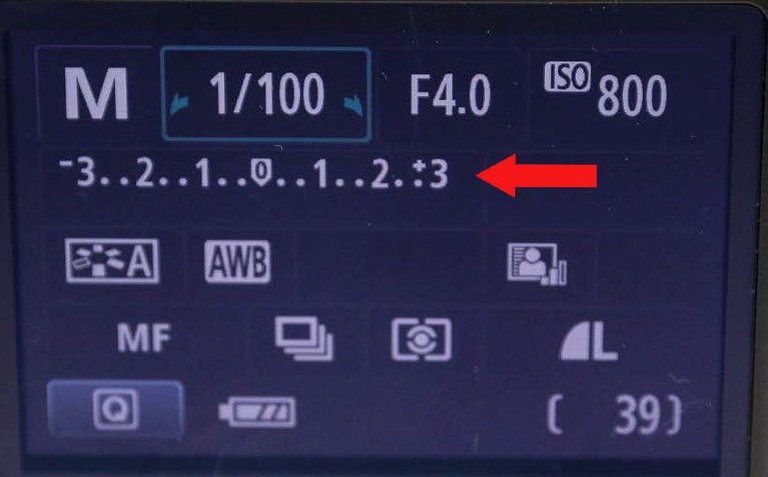
Früher braucht man ein Belichtungsmesser, um die Blende und Belichtungszeit zu berechnen. Dieses haben unsere digitalen Kameras (Smartphone) schon mit drin. Wenn man im manuellen Modus fotografiert, kann man in seiner Kamera eine Belichtungswaage einstellen (siehe Bild). Das kann auch im Sucher und auch im Live Viewer angezeigt werden. Unterhalb der Waage werden kleine Striche gezeigt, diese sich mit dem Verstellen von den 3 Kernelemente verändern. Hier sollte das ganz auf 0 gebracht werden. Das (-) steht für zu hell und das (+) für zu dunkel. So kann man auch ohne eine Tabelle, die richtige Belichtung einstellen.
In the past, you needed a light meter to calculate the aperture and exposure time. Our digital cameras (smartphone) already have this built in. If you shoot in manual mode, you can set an exposure scale in your camera (see picture). This can also be displayed in the viewfinder and also in the Live Viewer. Below the scale small lines are shown, which change with the adjustment of the 3 core elements. Here, the whole should be set to 0. The (-) stands for too light and the (+) for too dark. In this way, you can set the correct exposure even without a table.
Einige Beispiele - Some examples
Das sind nur Beispiele und keine echten Werte, diese sind von der Begebenheit und Umgebung immer unterschiedlich, es soll nur veranschaulichen wie sich Blende, Belichtungszeit und ISO zueinander verhalten.
These are only examples and not real values, they are always different depending on the situation and environment, it should only illustrate how aperture, exposure time and ISO relate to each other.
Landschaftsfotografie - Landscape photography
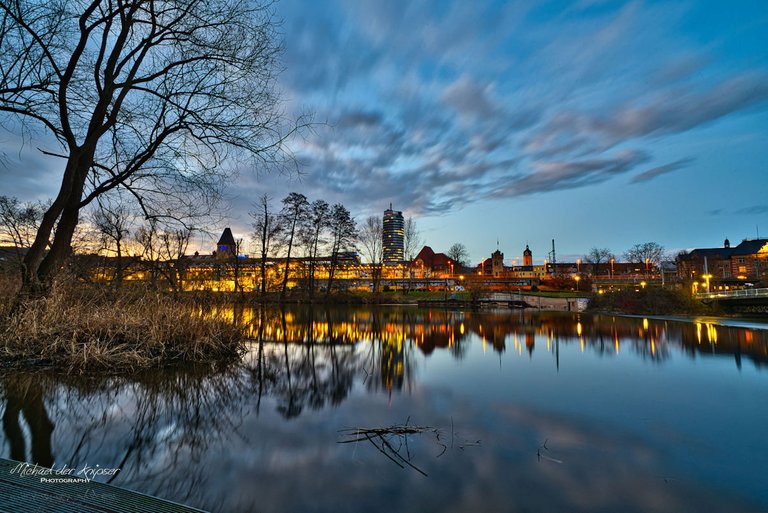
(17 mm; f/18; 8 sek.; ISO 125)
Kamera: Nikon D750, Objektive: Tamron 17-35 mm f2.8 - 4
Hier möchte ich eine größtmögliche Tiefenschärfe haben, somit muss ich die Blende schließen, sagen wir mal auf Blende f9. Daraus schießt sich, dass ich die Belichtungszeit verringere, sagen wir auf 1/80 sek. Meine Belichtungswaage zeigt mir aber des noch zu dunkel ist, dann habe ich zwei Möglichkeiten. Wenn ich aus der Hand fotografieren möchte, kann ich bis 1/50 die Belichtungszeit weiter verringern oder den ISO Wert erhöhen. Um die Belichtungswaage auf 0 zu bekommen. Habe ich das ganze auf ein Stativ, kann ich die Belichtungszeit weiter verringern und den ISO wert auf 50 oder 100 zu belassen (Bildrauschen)
Here I want to have the greatest possible depth of field, so I have to close the aperture, let's say to f9. This means that I reduce the exposure time, let's say to 1/80 sec. But my exposure scale shows me that it is still too dark, then I have two options. If I want to shoot handheld, I can further reduce the exposure time to 1/50 or increase the ISO value. To get the exposure scale to 0. If I have the whole thing on a tripod, I can reduce the exposure time further and leave the ISO value at 50 or 100 (image noise).
Porträtfotografie - Portrait photography
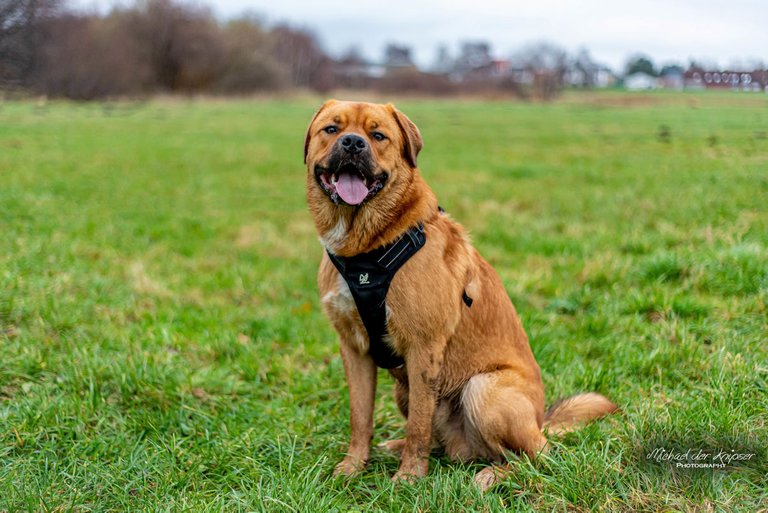
(50 mm; f/2,2; 1/800 sek.; ISO 1600)
Kamera: Nikon D750, Objektive: Yongnuo 50 mm (Festbrennweite)
Hier brauche ich keine große Tiefenschärfe und ich kann die Blende öffnen, sagen wir mal auf f3. Hier kommt es darauf an, wo ich das Porträt machen und wie das Umgebungslicht ist. Nehmen wir an es ist draußen und der Himmel ist wolkenlos und die Sonne steht hoch am Himmel. So muss ich die Belichtungszeit erhöhen, von 1/80 auf 1/500 sek. Dadurch gebe ich das Licht weniger Zeit, weil durch die offene Blende viel Licht reinkommt. Der ISO wert brauch nicht unbedingt verändert werden, es bleibt immer noch eine Option, wenn es die Umgebung nicht anders hergeben. So wie auf dem Bild mit Balu, hier war der Himmel sehr bedeckt und ich habe den ISO wert auf 1600 angehoben.
Here I don't need a great depth of field and I can open the aperture, say to f3. Here it depends on where I'm taking the portrait and what the ambient light is like. Let's say it's outside and the sky is cloudless and the sun is high in the sky. So I have to increase the exposure time, from 1/80 to 1/500 sec. This way I give the light less time, because a lot of light comes in through the open aperture. The ISO value doesn't necessarily need to be changed, it still remains an option if the environment doesn't allow it otherwise. As in the picture with Baloo, here the sky was very overcast and I raised the ISO value to 1600.
Makrofotografie - Macro photography
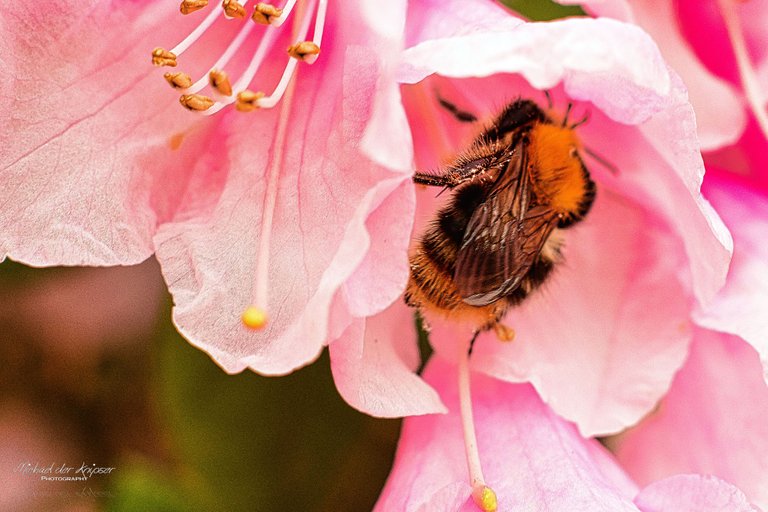
(50 mm; f/7,1; 1/125 sek; ISO 1250)
Kamera: Nikon D7100, Objektive: Yongnuo 50 mm (Festbrennweite)
Hier brauch ich etwas mehr Tiefenschärfe und ich kann die Blende etwas aufmachen, sagen wir mal f 6. Haben wir vor ein Insekt zu fotografieren, dann brauchen wir eine schnelle Belichtungszeit, sagen wir 1/500. Nun sind wir aber in der Situation wo wir die Blende und Belichtungszeit nicht mehr änder können. Weil das Insekt sehr schnell ist. Somit muss ich dann mit dem ISO wert nach oben gehen, sodass die Belichtungswaage wieder auf 0 steht.
Here I need a bit more depth of field and I can open the aperture a bit, let's say f6. If we want to photograph an insect, then we need a fast shutter speed, let's say 1/500. But now we are in the situation where we can't change the aperture and shutter speed. Because the insect is very fast. So I have to go up with the ISO value so that the exposure scale is back to 0.
Fazit
Wenn man versteht, welchen Einfluss die drei Kernelemente bei der Belichtung haben und wie sie zueinander stehen, hat man das Belichtungsdreieck verstanden. Die heutige Technik macht uns es leicht dieses Umzusetzen auch für Anfänger. Gerade im manuellen Modus, wo ich alles alleine bestimme, gibt es ungeahnte Möglichkeiten und ich kann die 3 Kernelemente, für meine Vorstellung vom Foto, einsetzten. Der beste Lehrmeister ist immer noch die Erfahrung, also geht raus und probiert es. Ihr werdet schnelle feststellen, dass ihr nicht mehr viel darüber nach denkt, sondern es instinktive umsetzt.
If you understand what influence the three core elements have on the exposure and how they relate to each other, you have understood the exposure triangle. Today's technology makes it easy for us to implement this, even for beginners. Especially in manual mode, where I determine everything alone, there are undreamt-of possibilities and I can use the 3 core elements for my idea of the photo. The best teacher is still the experience, so go out and try it. You will quickly find that you no longer think much about it, but implement it instinctively.
Schlußwort - Closing words
Nach 2 Tagen ist der Artikel fertig, ich hoffe dieses ist so einfach und verstandlich dagestellt worden. Mein Ziel ist es gerade Anfänger die Fotografie zu ermöglichen, ohne an dem großen Technischen Wissen zu scheitern. Die blanke Theorie ist das eine, aber ohne Übung und Praxis bringt es nicht viel. Teile dieses Wissen, probiert es aus und habt viel Spaß an der Fotografie. Somit wünsche ich euch einen schönen Tag und viel Spaß an der Fotografie.
After 2 days the article is ready, I hope this has been so simple and understandable dagestellt. My goal is just to enable beginners to photography without failing at the great technical knowledge. The bare theory is one thing, but without practice and practice it does not bring much. Share this knowledge, try it out and have fun with photography. So I wish you a nice day and have fun with photography.
Euer Hornet on Tour
DIG VALIDATOR: Hornet_on_Tour
Photo: Hornet on Tour (Michael der Knipser)
Instagram: https://www.instagram.com/hornet_on_tour/
Twitter: https://twitter.com/OnHornet
Translated with www.DeepL.com/Translator (free version)
This is a very informative post. Thanks for sharing the info here with us all. Hopefully, it can help out some people interested in better understanding the mechanisms of photography! Cheers
That's my hope too, because it's actually not that hard, just very trek theory. Thanks for your vote and comment @castleberry
You're welcome. It all gets easier once we learn the basics and mechanics of the equipment and techniques. I appreciate these kinds of informative posts to help speed that process up. Cheers.