BEGINNERS GUIDE TO LIGHT PAINTING
Okay. This is not going to be easy or short. So make yourself a cup of tea or get a beer from the fridge.
Basically, light painting is quite simple and you don't need any expensive special equipment. This article is intended to give you some useful advice and make it a little easier for you to get started in the special art form of light painting. I have not forgotten the difficulties that almost drove me mad in my early days ten years ago. You don't have to repeat the same mistakes I made ten years ago. Unfortunately, there were hardly any light painters back then who shared their knowledge. I had to work out almost everything on my own.
Okay. Das wird jetzt hier weder einfach noch kurz. Koch Dir also erstmal einen Tee oder hol Dir ein Bier aus dem Kühlschrank.
Im Grunde genommen ist Light Painting ganz einfach und teure Spezialausrüstung brauchst Du dafür auch erstmal nicht. Dieser Artikel soll Dir ein paar nützliche Ratschläge geben und Dir den Einstieg in die besondere Kunstform Light Painting etwas erleichtern. Ich habe nicht vergessen, welche Schwierigkeiten mich in meiner Anfangszeit vor mittlerweilen zehn Jahren oftmals fast in den Wahnsinn getrieben haben. Du musst nicht die gleichen Fehler, die ich vor zehn Jahren gemacht habe wiederholen. Leider gab es damals kaum Light Painter, die ihr Wissen geteilt haben. Ich musste mir fast Alles alleine erarbeiten.
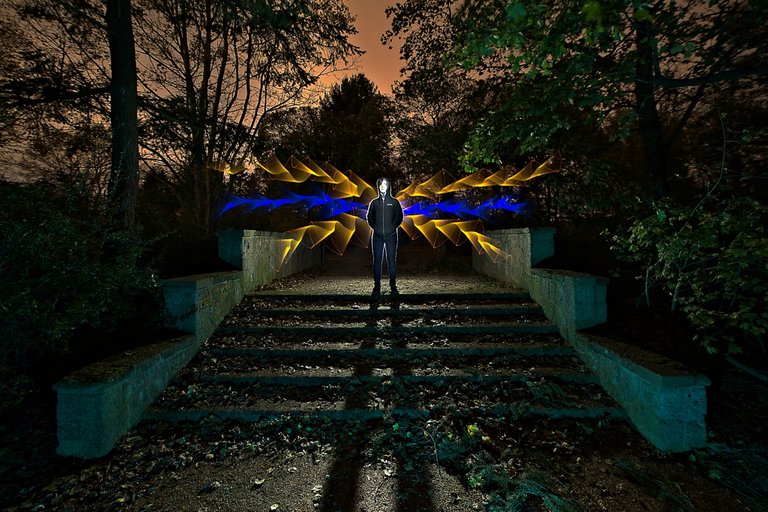
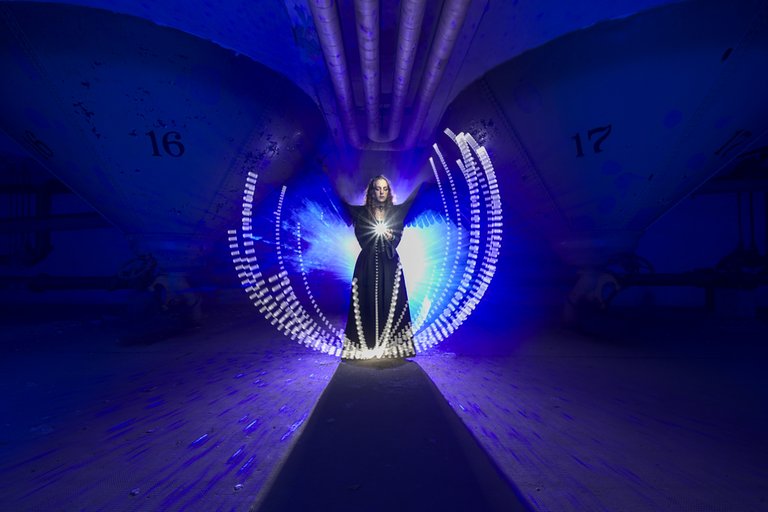
This picture is one of our first light paintings. Or is it? No, this is a remake from last year. Same location, same tools, same model (Erik - only older now) and same way of working. And this brings us to an important point: reproducibility. It may be fun at first just to wave the lights around in front of the camera, but if the result is only good by chance, the whole undertaking is usually quite frustrating very quickly. So you should plan your pictures carefully from the beginning and analyse them afterwards. In the next attempt, you only change the parts of the light painting that you don't like. Simply repeat the good parts. You will paint good pictures on the sensor of the camera in a very short time if you work like this. Another tip: Take like-minded friends along to the light painting. On the one hand, it's more fun. On the other hand, it is very helpful if you can work with one or more assistants who cover the lens, tell you if you are in the right place etc..
Bei diesem Bild handelt es sich um eines unserer ersten Light Paintings. Oder doch nicht? Nein, das ist ein Remake aus dem letzten Jahr. Gleiche Location, gleiche Tools, gleiches Model (Erik - nur mittlerweile älter) und gleiche Arbeitsweise. Und damit sind wir gleich bei einem wichtigen Punkt, der Reproduzierbarkeit. Es mag ja am Anfang ganz lustig sein einfach mit den Lampen vor der Kamera rumzufuchteln, wenn aber das Ergebnis nur zufällig gut wird ist das ganze Unterfangen meist recht schnell ziemlich frustrierend. Du solltest also von Anfang an Deine Bilder genau planen und im Anschluss analysieren. Im nächsten Versuch änderst Du nur die Teile des Light Paintings, die Dir nicht gefallen. Gute Teile wiederholst Du einfach. Du wirst in recht kurzer Zeit gute Bilder auf den Sensor der Kamera malen wenn Du so arbeitest. Ein weiterer Tipp: Nimm gleichgesinnte Freunde mit zum Light Painting. Einerseits macht das mehr Spaß. Andererseits ist es sehr hilfreich wenn man mit einem oder mehreren Assistenten arbeiten kann, die das Objektiv abdecken, sagen ob man an der richtigen Stelle steht usw..
GEAR
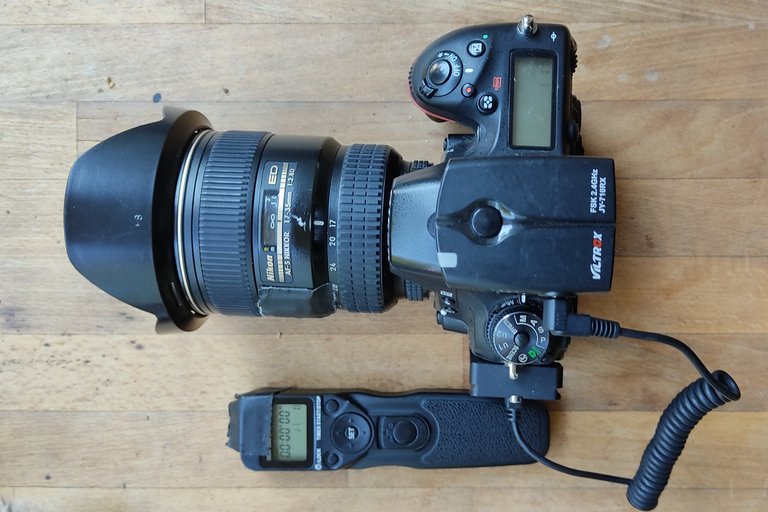
Camera: Any camera with "bulb" mode is fine for your first attempts. I use a Nikon D750 for most of my work.
Lens: You should use a wide angle lens. So you can keep the distance between the light source and camera short.
Tripod: No light painting will succeed without a very stable stand.
Remote Control: A simple cable release with a lock is usually quite sufficient. In bulb mode, you would otherwise have to hold the shutter release button down for the entire exposure time.
Lens Cap: To cover the lens during the exposure, you should take a black opaque cap or something similar.
Kamera: Jede Kamera mit "bulb"-Modus ist für Deine ersten Versuche geeignet. Ich verwende eine Nikon D750 für die meisten meiner Arbeiten.
Objektiv: Du solltest ein Weitwinkelobjektiv verwenden. So kannst Du den Abstand zwischen der Lichtquelle und der Kamera gering halten.
Stativ: Ohne ein sehr stabiles Stativ wird kein Lightpainting gelingen.
Fernauslöser: Ein einfacher Kabelauslöser mit Arretierung ist meist völlig ausreichend. Im Bulb-Modus müsstest Du sonst den Auslöser während der gesamten Belichtungszeit gedrückt halten.
Objektiv abdecken: Um während der Belichtung das Objektiv abzudecken solltest Du eine schwarze, blickdichte Mütze oder etwas Ähnliches mitnehmen.
Safety First
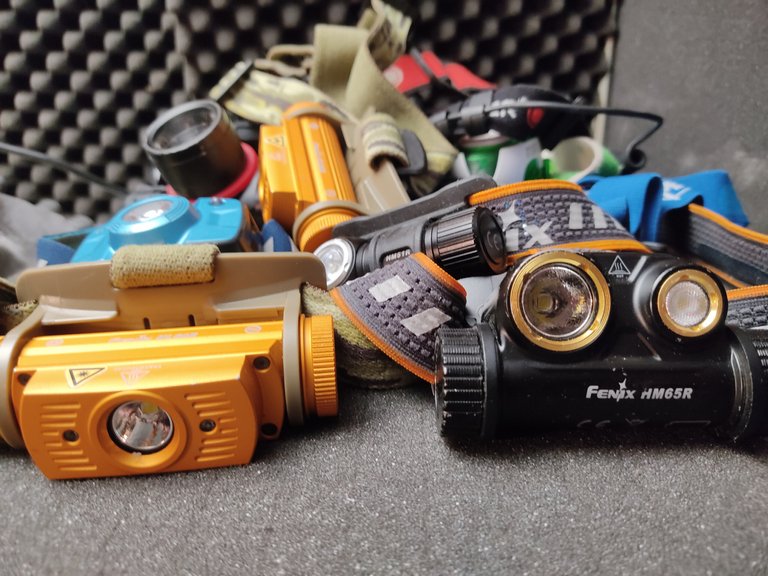
You should not walk around in the dark without a reliable headlamp. Especially not through any lost places with lots of danger spots. A good headlamp is robust, lightweight and has a long battery life.
Ohne eine zuverlässige Stirnlampe solltest Du nicht in der Dunkelheit rumlaufen. Schon gar nicht durch irgendwelche Lost Places mit vielen Gefahrenstellen. Eine gute Stirnlampe ist robust, leicht und hat eine lange Akkulaufzeit.
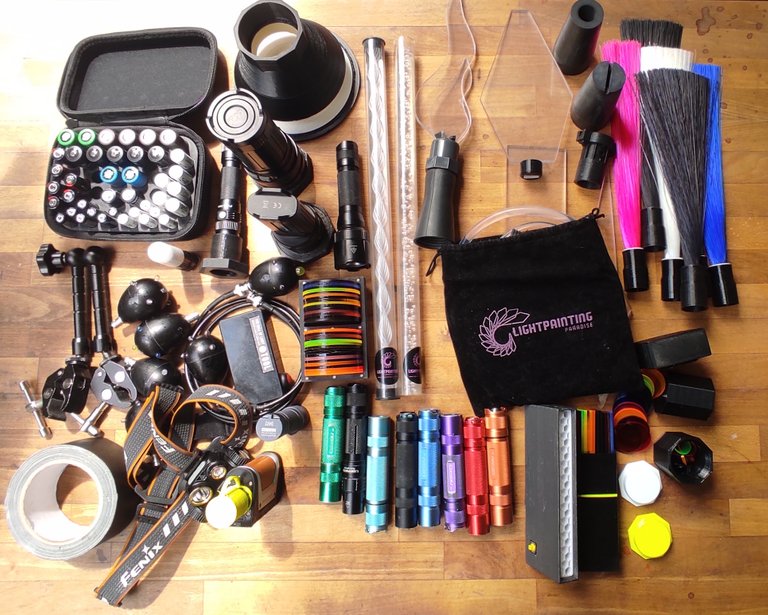
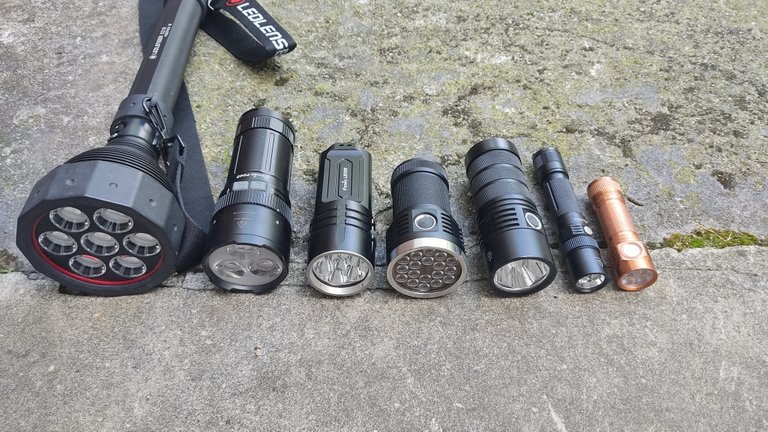
No, of course you don't have to buy all the stuff in the picture right away to do your first light paintings. If you're absolutely sure that light painting is going to be the new thing in your life, you can of course transfer a high three-digit amount to the online shop of Light Painting Paradise and get started like the pros. But if you're not quite sure, you should start small first. In any case, you should have the following things in your bag:
- Matte black gaffer tape to connect torch and light painting tool and many other tasks.
- Fully charged spare batteries for the torches and other light sources you use.
- one or more light sources - just look around your home and take everything with you that lights up and try to paint your first light traces with it. Besides torches, these can be bicycle lamps, luminous children's toys, sparklers, fireworks, the display of the smartphone, etc.
Nein, natürlich musst du nicht sofort das ganze Zeugs aus dem Bild kaufen um Deine ersten Light Paintings zu machen. Wenn Du absolut sicher bist, dass Light Painting das neue Ding in Deinem Leben sein wird kannst Du natürlich eine hohen dreistelligen Betrag zum Onlineshop von Light Painting Paradise transferieren und sofort loslegen wie die Profis. Wenn Du Dir aber nicht so ganz sicher bist solltest Du erstmal klein anfangen. Folgende Sachen solltest Du in jedem Fall in Deiner Tasche haben:
- mattschwarzes Gaffer Tape um Taschenlampe und Light Painting Tool zu verbinden und viele andere Aufgaben
- voll geladene Ersatzakkus für die von Dir verwendeten Taschenlampen und andere Lichtquellen
- eine oder mehrere Lichtquellen - schau Dich einfach zu Hause um und nimm alles mit was leuchtet und probiere damit Deine ersten Lichtspuren zu malen. Neben Taschenlampen können das Fahrradlampen, leuchtende Kinderspielzeuge, Wunderkerzen, Feuerwerk, das Display des Smartphones usw. sein.
What does Light Painting mean
The term light painting actually describes the painting with light of real objects, buildings or landscapes. I specifically illuminate certain things to make them visible to the camera sensor in the dark. For this purpose, powerful LED torches in combination with colour filters are usually the best choice. Depending on the size of the scene to be captured, the torch must have the appropriate brightness. Manufacturers usually only specify the luminous flux in lumens. However, this information is not very useful because the beam angle is completely ignored. A torch with 1000 lumens and a narrow beam angle of 10° still illuminates parts at a distance of 100 metres brightly enough to make them visible in the picture. A torch with a large beam angle of 120° only illuminates the near area brightly enough even if it has ten times the luminous flux. Most EDC lamps try to combine both. They shine with a fairly bright spot in the middle and with less brightness at a larger angle. For use as a normal torch, this certainly makes sense. In LIght Painting, I prefer to use torches with a homogeneous light cone. Otherwise the light painting quickly becomes "spotty".
Der Begriff Light Painting beschreibt eigentlich das Bemalen mit Licht von realen Gegenständen, Gebäuden oder Landschaften. Ich beleuchte also gezielt bestimmte Dinge um sie in der Dunkelheit für den Kamerasensor sichtbar zu machen. Für diesen Zweck sind leistungsstarke LED Taschenlampen in Kombiantion mit Farbfiltern meist die beste Wahl. Je nach Größe der Szene, die aufgenommen werden soll, muss die Taschenlampe die entsprechende Helligkeit haben. Die Hersteller geben meist nur den Lichtstrom in Lumen an. Mit dieser Angabe lässt sich allerdings nicht so viel anfangen weil der Abstrahlwinkel dabei völlig außer acht gelassen wird. Eine Taschenlampe mit 1000 Lumen und einem engen Abstrahlwinkel von 10° leuchtet Teile in 100 Meter Entfernung noch hell genug aus um sie im Blid sichtbar zu machen. Eine Taschenlampe mit großem Abstrahlwinkel von 120° leuchtet nur den nahen Bereich hell genug aus auch wenn sie einen zehnmal höheren Lichstrom hat. Die meisten EDC Lampen versuchen beides zu vereinen. In der Mitte leuchten sie mit einem recht hellen Spot und in einem größerem Winkel mit weniger Helligkeit. Für den Einsatz als normale Taschenlampe ist das sicher sinnvoll. Im LIght Painting benutze ich lieber Taschenlampen mit einem homogenen Lichtkegel. Anderfalls wird das Light Painting schnell "fleckig".
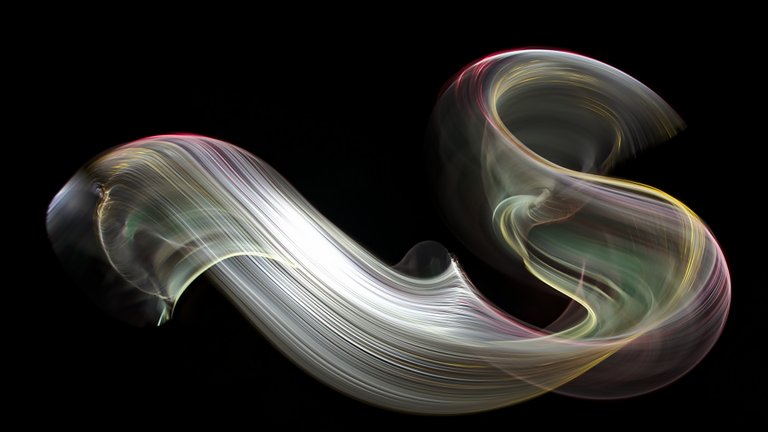
The other important technique in light painting is the painting of light traces, i.e. light writing, light graffiti or light drawing. In contrast to the working method in the paragraph above, here the light source is visible in the picture. By moving the light source, light traces are created during the long exposure of the camera. With torches without some kind of diffuser or "light brush", the light traces usually do not look good. In some places the light is over-radiated and in other places it is hardly visible because the head of the torch "tips out of the picture". In the example picture, I have attached a blade made of acrylic glass to a torch to draw the light trace. I had stuck small pieces of colour filter foil on the blade. For this technique, small torches with a maximum of 1000 lumens are completely sufficient. I usually use the Lightpainters torch developed by @ryuslightworks and distributed by Light Painting Paradise. This torch works in 10 brightness levels, several strobe modes with variable frequencies in the previously selected brightness and it can be operated in momentary mode. It doesn't get any better than this. However, this is not a Muggle torch. Even I, as an experienced light painter with dozens of torches in my suitcase, had to read the operating instructions several times.
Die andere wichtige Technik im Light Painting ist das Malen von Lichtspuren, also Light Writing, Light Graffiti oder Light Drawing. Im Gegensatz zur Arbeitsweise im Absatz oben ist hier die Lichtquelle im Bild sichtbar. Durch das Bewegen der Lichtquelle entstehen Lichtspuren während der Langzeitbelichtung der Kamera. Mit Taschenlampen ohne eine Art Diffusor oder "Lichtpinsel" sehen die Lichtspuren meist nicht gut aus. An einigen Stellen überstrahlt das Licht an anderen Stellen der Lichtspur ist es kaum zu sehen weil der Kopf der Taschenlampe "aus dem Bild kippt". Im Beispielbild habe ich ein Blade aus Acrylglas an einer Taschenlampe befestigt um die Lichtspur zu zeichnen. Das Blade hatte ich mit kleinen Stücken Farbfilterfolie beklebt. Für diese Technik genügen kleine Taschenlampen mit maximal 1000 Lumen völlig aus. Ich benutze dafür meist die Lightpainters Taschenlampe, welche @ryuslightworks entwickelt hat und die von Light Painting Paradise vertrieben wird. Diese Taschenlampe arbeitet in 10 Helligkeitsstufen, mehreren Strobe Modi mit variablen Frequenzen in der vorher gewählten Helligkeit und sie lässt sich im Momentary Mode betreiben. Besser geht es nicht. Allerdings ist das keine Muggel Taschenlampe. Da musste selbst ich als erfahrener Light Painter mit dutzenden Taschenlampen im Koffer mehrfach die Bedienungsanleitung lesen.
LET'S GET STARTED
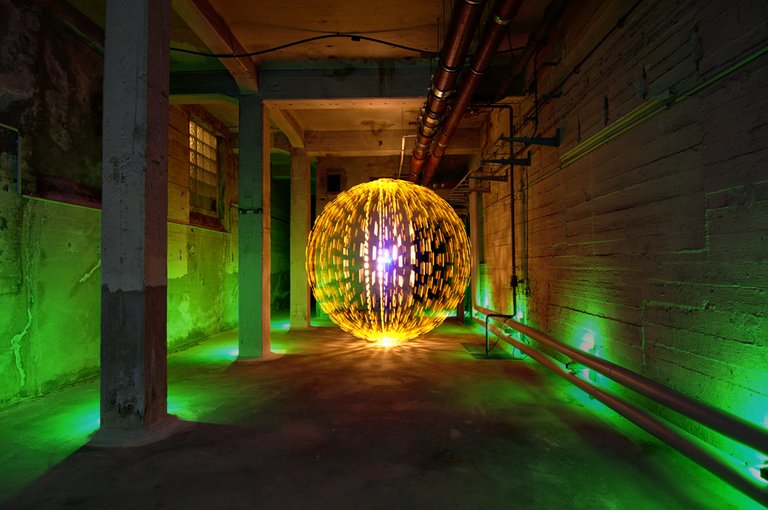
I will try to explain my working method using this picture as an example. Basically, the procedures are the same, but for some steps the order does not matter at all.
First I align the camera. To do this, I illuminate the room with a torch that is as bright as possible and switch on Live View on the camera. Then I usually focus straight away. The autofocus is always switched off, most of the lenses I use have no autofocus at all.
Then I set aperture and ISO. Aperture 8 and ISO 100 are usually a good starting point. I switch the camera to "bulb" or "time" mode. This mode is very comfortable. The first press of the shutter button starts the exposure, the second press ends the exposure. This saves the remote shutter release, but many cameras do not have this mode. In this case, only the remote shutter release with the locking mechanism can help.
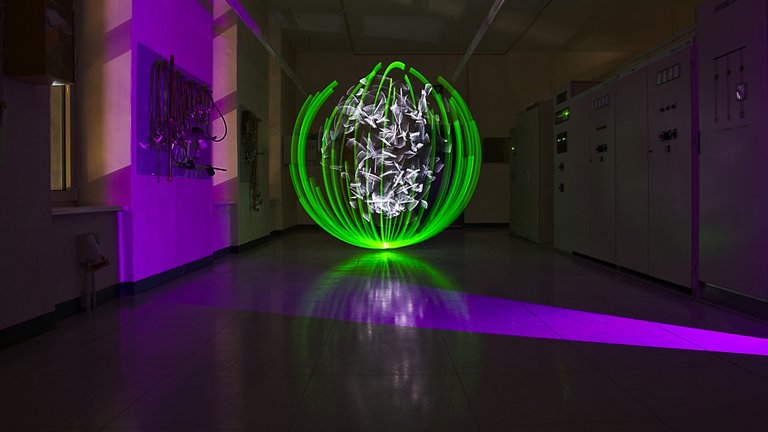
When everything is set, I start the exposure. For a picture like this, I first start with the light figure, the orb. When I turn it, I usually notice whether the thing is really round. If not, I stop the exposure immediately and start again without having to light the room.
I mark the position for the Orb as inconspicuously as possible on the floor beforehand and stand at this position with the Orb Tool switched on. I give the helper behind the camera the command to start the exposure and immediately begin turning the orb. When the orb is ready, the helper covers the lens. This is necessary because I cannot quickly switch off the torch on the Orb Tool, which is located at the end of the 2-metre-long rod. And I don't want an unwanted trace of light in the picture.
Ich werde versuchen meine Arbeitsweise am Beispiel dieses Bildes zu erklären. Grundsätzlich sind die Abläufe gleich, bei einigen Arbeitsschritten ist die Reihenfolge aber völlig egal.
Zuerst richte ich die Kamera aus. Dazu beleuchte ich den Raum mit einer möglichst hellen Taschenlampe und schalte an der Kamera das Live View ein. Meist fokussiere ich dann auch gleich. Der Autofokus ist immer ausgeschaltet, die meisten von mir verwendeten Objektive haben erst gar keinen Autofokus.
Danach stelle ich Blende und ISO ein. Blende 8 und ISO 100 sind meist ein guter Ausgangspunkt. Ich schalte die Kamera in den Modus "bulb" oder "time". Dieser Modus ist sehr komfortabel. Beim ersten Druck auf den Auslöser startet die Aufnahme beim zweiten Druck wird die Belichtung beendet. Das erspart den Fernauslöser, allerdings verfügen viele Kameras nicht über diesen Modus. Da hilft dann nur der Fernauslöser mir der Arretierung.
Wenn alles eingestellt ist starte ich die Belichtung. Bei einem Bild wie diesem beginne ich zuerst mit der Lichtfigur, dem Orb. Beim Drehen merke ich in den meisten Fällen schon ob das Ding auch wirklich rund wird. Falls nicht breche ich die Aufnahme sofort ab und beginne von vorn ohne noch umständlich den Raum zu beleuchten.
Ich markiere vorher die Position für den Orb möglichst unauffällig am Boden, stelle mich mit dem eingeschalteten Orb Tool an diese Position. Ich gebe dem Helfer hinter der Kamera das Kommando zum Start der Belichtung und beginne sofort mit dem Drehen des Orbs. Wenn der Orb fertig ist deckt der Helfer das Objektiv ab. Das ist nötig weil ich die Taschenlampe am Orb Tool nicht schnell ausschalten kann, diese befindet sich am Ende des 2 Meter langen Stabes. Und ich will ja keine ungewollte Lichtspur im Bild.

The next step was to illuminate the room. The light behind the window comes from a street lamp. So I could not influence this. The orange light in the room comes from the torch of the Orb Tool, so it was created while the Orb was being rotated and was already recorded by the camera's sensor. For the green light, I placed a green torch with a diffuser one after the other in several places in the picture and removed the cover from the lens for a few seconds in each position. In the last step, I indirectly lit the whole scene with a white torch by shining it against the wall behind the camera. I moved around so that the light was distributed more evenly and, above all, so that no shadows of the tripod and the camera were visible.
Im nächsten Schritt hab ich den Raum ausgeleuchtet. Das Licht hinter dem Fenster stammt von einer Straßenlaterne. Dieses konnte ich also nicht beeinflussen. Das orange Licht im Raum stammt von der Taschenlampe des Orb Tools, ist also bereits während des Drehens des Orbs entstanden und wurde bereits vom Sensor der Kamera aufgenommen. Für das Grüne Licht habe ich eine grüne Taschenlampe mit einem Diffusor nacheinander an mehreren Stellen im Bild platziert und in jeder Position für einige Sekunden die Abdeckung vom Objektiv entfernt. Im letzten Schritt habe ich dann die ganze Szene noch ein wenig mit einer weißen Taschenlampe indirekt beleuchtet in dem ich gegen die Wand hinter der Kamera geleuchtet habe. Dabei habe ich mich bewegt damit das Licht gleichmäßiger verteilt wird und vor Allem kein Schatten des Stativs und der Kamera sichtbar werden.
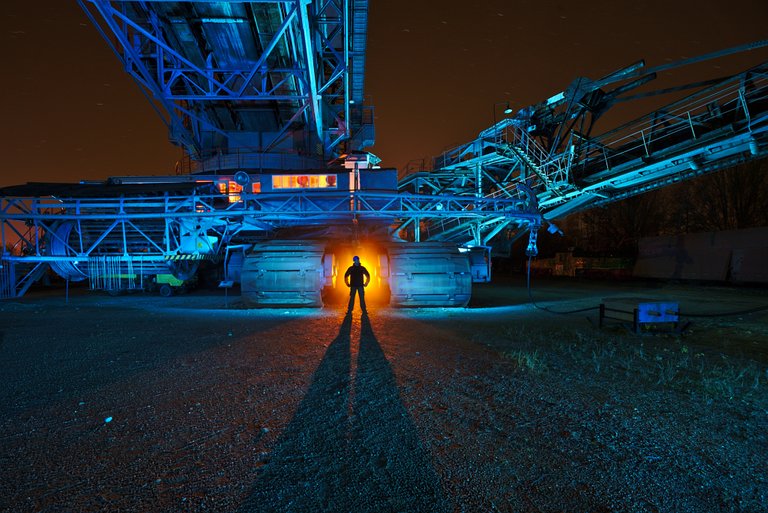
In most light paintings, however, I do not work with static light but move through the picture with the torch in my hand and paint the entire scene with light. Since light decreases quadratically with distance, it is advantageous to illuminate all parts of the picture from the same distance. The further I move away from the camera, the slower I move. Distant parts of the picture are illuminated longer than parts close to the camera. I make sure that the torch itself is not visible in the picture at any time. My body is always between the camera and the torch. In order not to be visible myself in the picture, I am constantly moving. If I stand still, my shadow is visible in the picture. I also make sure to illuminate all the places where I have moved. The camera sensor "adds" the light. So I can light up my own shadow.
In den meisten Light Paintings arbeite ich allerdings nicht mit statischem Licht sondern bewege mich mit der Taschenlampe in der Hand durch das Bild und male die gesamte Szene mit Licht an. Da Licht mir der Entfernung quadratisch abnimmt ist es von Vorteil alle Bildteile möglichst aus der gleichen Entfernung zu beleuchten. Umso weiter ich mich dabei von der Kamera entferne desto langsamer bewege ich mich. Entfernte Bildteile werden länger beleuchtet als Teile in der Nähe der Kamera. Dabei achte ich darauf, dass zu keinem Zeitpunkt die Taschenlampe selbst im Bild zu sehen ist. Mein Körper befindet sich also immer zwischen Kamera und Taschenlampe. Um nicht selbst im Bild sichtbar zu werden bewege ich mich permanent. Wenn ich stehen bleibe sieht man meinen Schatten im Bild. Darüber hinaus achte ich darauf alle Stellen an denen ich mich bewegt habe zu beleuchten. Der Kamerasensor "addiert" das Licht. Ich kann also meinen eigenen Schatten wegleuchten.
TIPS
- Don't use too many different lights and tools in the beginning.
- Use light sources and light shapers that can be found in your environment. Torches, bicycle lamps, luminous children's toys, plastic bottles and whatever else you come across.
- Always work according to a precise plan and analyse which parts of the plan work and which do not. Then change the parts that don't work.
- Only change one setting at a time if the light in the picture is too bright or too dark. Either aperture, ISO or the brightness of the light source if it can be changed.
- Light painting does not protect you from image design. Work result-oriented from the beginning. The most beautiful light painting only works if there is a recognisable image design and an image idea.
- Try to think in light, to think in layers of light.
- Don't be afraid to ask experienced light painters for help if you don't know what to do. Most colleagues are very friendly and helpful.
- Benutze am Anfang nicht zu viele verschiedene Lampen und Tools.
- Benutze Lichtquellen und Lichtformer die sich in Deiner Umgebung finden lassen. Taschenlampen, Fahrradlampen, leuchtende Kinderspielzeuge, Plastikflaschen und was Dir sonst noch über den Weg läuft.
- Arbeite immer nach einem genauen Plan und analysiere welche Teile des Plans funktionieren und welche nicht. Ändere dann die Teile die nicht funktionieren.
- Verändere immer nur eine Einstellung wenn das Licht im Bild zu hell oder zu dunkel ist. Entweder Blende, ISO oder die Helligkeit der Lichtquelle wenn diese sich ändern lässt.
- Light Painting schützt nicht vor Bildgestaltung. Arbeite von Anfang an ergebnisorientiert. Das schönste Light Painting funktioniert nur wenn es eine erkennbare Bildgestaltung und eine Bildidee gibt.
- Versuche in Licht zu denken, in Lichtebenen zu denken.
- Scheu Dich nicht davor die erfahren Light Painter um Hilfe zu bitten falls Du selbst nicht weiter kommst. Die allermeisten Kollegen sind sehr freundlich und hilfsbereit.
I hope this article was helpful for you. In the near future I will explain some tools and torches in more detail. Until then, have fun with your first light painting attempts.
Ich hoffe, dieser Artikel war hilfreich für Dich. In nächster Zeit werde ich einige Tools und Taschenlampen etwas eingehender erklären. Bis dahin wünsche ich Dir viel Spaß bei Deinen ersten Light Painting Versuchen.
WHAT IS LIGHT PAINTING?
Light painting is a unique form of art. The darkness is illuminate by the artist with diverse light sources and light traces are paint into the picture with various light tools. Various techniques are use, such as camera rotation or other movements of the camera during the exposure. The creative possibilities are almost unlimited. All the pictures were taken during one single exposure. Apart from denoising, sharpening, cutting and possibly adjusting the white balance, the pictures are not processed on the computer.
LICHTKUNSTFOTO
If you like my art visit www.lichtkunstfoto.de for more Light Art Photography and informations about Light Painting. Join me on Flickr Twitter
For more great Light Art Photography, Light Painting and inspiration check these light painters: @marlasinger666 @fadetoblack @fastchrisuk @dawnoner @oddballgraphics @martbarras @stepko @rod.evans.visual @yo-hoho @maxpateau @gunnarheilmann @neilru75 @maximepateau @ryuslightworks @lightstabeu

WE ARE LIGHT PAINTERS
To help and support the LightPainters community here on Hive I would appreciate your delegation of HivePower. Any amount is appreciated. It does not require much to get started, we are happy for any gesture. @lightpainters
How to delegate?
Delegate 50HivePower, [50HP]
Delegate 250HivePower, [250HP]
Delegate 500HivePower, [500HP]
Delegate 1000HivePower, [1000HP]
All the Hive Power will help to upvote the artist's contribution as part of the LightPainters community.
This is one of the most helpful posts I've read. Kudos for the amazing explanation and work you put in. I will immediately save this post in my favorites and will read it over and over again :)
I am glad that it is helpful for you.
Wow sehr umfangreich der Beitrag, perfekt für Interessierte, die mit Lightpainting starten wollen.
Ich hoffe, nicht zu umfangreich.
Nee überhaupt nicht. Kommt einem vielleicht so vor, weil der Beitrag zweisprachig ist. 😉
Great write up pal. Very in depth and informative. Bravo.
Cheers mate.
That's a very detailed tutorial dude. I am impressed by your engagement. As little support I have delegated 1000 HP to you. This way your reputation grows faster and I also get a share. ;-)
Sehr guter Beitrag 👍🙂
Vielen Dank.
You are known for sharing your knowledge, including tips and tricks. The entire community as well as everyone interested in joining is super grateful for this kind of post. Sharing your approach means a shortcut in one learning curve. We don't have to make the same mistakes and learn alone.
Lightpainting is most enjoyable in a group. So let's onboard more here. Cheers
Yes it’s right about time that @lightpainters start Onboarding as well like the @lightpaintershub (Lightpainters United) Family already do since a long time. You should finally invite the User from your webpage www.lightpainters.com as well, but I tell U this already since 2 Years. More PR. More Onboarding. So go for it! Make things real instead of just talking.
Yes, thank you for sharing your methods and techniques. It's a curious art and it would be very difficult for anyone to pick up on their own. Really cool shots!
I am glad if it is helpful.
Me too! Thanks again.
The rewards earned on this comment will go directly to the person sharing the post on Twitter as long as they are registered with @poshtoken. Sign up at https://hiveposh.com.
Congratulations @lichtkunstfoto! You have completed the following achievement on the Hive blockchain and have been rewarded with new badge(s):
Your next target is to reach 900 upvotes.
Your next target is to reach 25000 upvotes.
You can view your badges on your board and compare yourself to others in the Ranking
If you no longer want to receive notifications, reply to this comment with the word
STOPTo support your work, I also upvoted your post!
Check out the last post from @hivebuzz:
Support the HiveBuzz project. Vote for our proposal!
Sehr informativer Artikel.