THE PERFECT LIGHT PAINTING FLASHLIGHT?
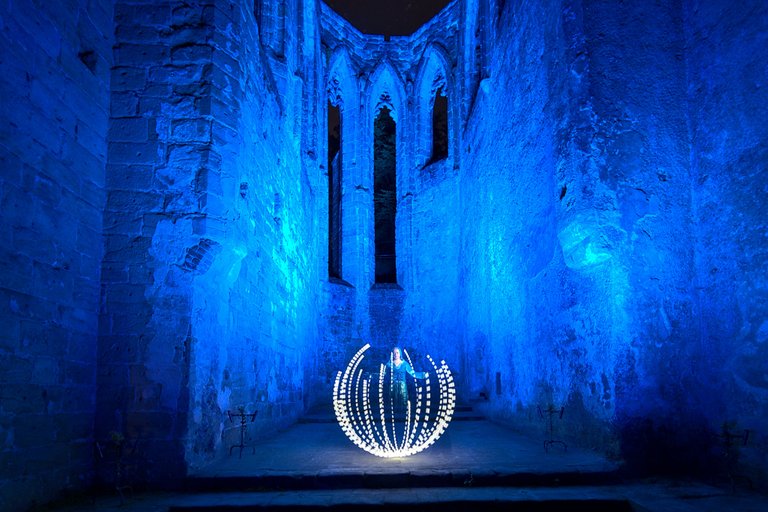
📷 Nikon D750 - Laowa 12/2,8 - f8 - ISO 50 - 507 seconds - Model: Marlene
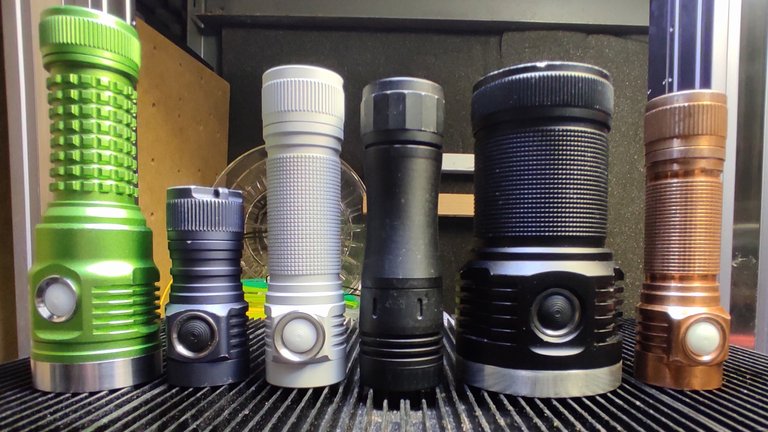
There is no such thing as the ultimate light painting torch and there certainly won't be one any time soon. On the one hand, there are physical limits, and on the other, the "light painter" target group is quite small. Hardly any manufacturer will therefore go to the trouble of building a torch that fulfils all the needs of the light painting artist. The physical limits are primarily of a thermal nature. Even if the development of LEDs continues to progress, the heat loss of the 10000 lumen torch must be dissipated somehow. This requires a certain amount of material that conducts heat as well as possible. This doesn't work if the housing is only as big as my little finger. So I will still be travelling with at least two torches. One with a high luminous flux to illuminate the scene, like the church ruins in the picture above, and a second, small torch for painting light trails like the Broken Orb.
Die eine, ultimative Light Painting Taschenlampe gibt es nicht und wird es sicher auch nicht so bald geben. Einerseits gibt es physikalische Grenzen, andererseits ist die Zielgruppe "Light Painter" recht klein. Kaum ein Hersteller wird sich also die Mühe machen, eine Taschenlampe zu bauen die möglichst alle Bedürfnisse des Light Painting Künstlers erfüllt. Die physikalischen Grenzen sind in erster Linie thermischer Natur. Auch wenn die Entwicklung im Bereich der LEDs immer weiter voran schreitet, muss die Verlustwärme der 10000 Lumen Taschenlampe irgendwie abgeleitet werden. Dazu ist eine bestimmte Menge an möglichst gut wärmeleitendem Material nötig. Das funktioniert also nicht, wenn das Gehäuse nur so groß ist wie mein kleiner Finger. Also werde ich weiterhin mit mindestens zwei Taschenlampen unterwegs sein. Eine mit hohem Lichstrom zur Ausleuchtung der Szene, wie der Kirchenruine oben im Bild und eine zweite, kleine Taschenlampe zum Malen von Lichtspuren wie den Broken Orb.

📷 Nikon D750 - Laowa 12/2,8 - f8 - ISO 50 - 281 seconds
In addition to the luminous flux, other aspects such as the colour temperature and the colour rendering index (CRI) are important. The higher this is, the more natural the colours of the scene are depicted. A value of 100 corresponds to sunlight. Some artificial light sources, such as candles, also achieve this value. In the LED torch sector, there are now models with high CRI values of 95 and higher. The runtime and the quality of workmanship are also important.
Neben dem Lichtstrom sind weitere Aspekte wichtig, wie die Farbtemperatur und der Farbwiedergabeindex (CRI). Umso höher dieser ist, desto natürlicher werden die Farben der Szene dargestellt. Ein Wert von 100 entspricht Sonnenlicht. Auch einige künstliche Lichtquellen, wie beispielsweise Kerzen, erreichen diesen Wert. Im Bereich der LED Taschenlampen gibt es mittlerweile Exemplare mit hohen CRI Werten von 95 und höher. Darüber hinaus sind die Laufzeit und die Verarbeitungsqualität von Bedeutung.

USER INTERFACE - UI
What requirements should a good light painting torch fulfil?
- Switch on and off with a simple, short press of the switch. This may sound mundane at first, but there are quite a few torches that can only be switched off by pressing the switch for a longer period of time or that switch through the various levels when the switch is pressed while switched on instead of going off immediately, as is the case with many Led Lenser torches.
- Saving the last mode. This is the only way to paint several light trails in the same type and brightness without going mad.
- Momentary Mode. In this mode, the torch only lights up for as long as the switch is pressed. This is very helpful for certain light figures, such as the Broken Orb.
- As many brightness levels as possible, preferably stepless, in order to be able to adjust the brightness precisely to the requirements of the planned image.
- Homogeneous strobe with the option of changing the frequency. Pretty much all conventional torches are ruled out here at the latest.
The Lightpainters torch from Light Painting Paradise is a torch that fulfils all these needs. Unfortunately, this torch is no longer available. Whether it will be produced and sold again at some point is currently uncertain. So it is worth looking for alternatives.
Welche Anforderungen sollte eine gute Light Painting Taschenlampe erfüllen?
- Ein- und ausschalten durch einfachen, kurzen Druck auf den Schalter. Das hört sich vielleicht im ersten Moment profan an, aber es gibt etliche Taschenlampen, die sich nur durch längeres Betätigen des Schalters ausschalten lassen oder beim Betätigen des Schalter im eingeschalteten Zustand durch die verschiedenen Stufen schalten anstatt sofort aus zu gehen, wie bei vielen Led Lenser Funzeln.
- Speicherung des letzten Modus. Nur so ist es möglich mehrere Lichtspuren in der gleichen Art und Helligkeit zu malen ohne wahnsinnig zu werden.
- Momentary Mode. Die Taschenlampe leuchtet in diesem nur solange, wie der Schalter gedrückt wird. Für bestimmte Lichtfiguren, wie den Broken Orb, ist das sehr hilfreich.
- Möglichst viele Helligkeitsstufen, am besten stufenlos, um die Helligkeit genau an die Erfordernisse des geplanten Bildes anpassen zu können.
- Homogener Strobe mit der Möglichkeit die Frequenz zu ändern. Spätestens hier scheiden so ziemlich alle konventionellen Taschenlampen aus.
Mit der Lightpainters Taschenlampe von Light Painting Paradise gibt es eine Taschenlampe, die all diese Bedürfnisse erfüllt. Leider ist diese Taschenlampe nicht mehr erhältlich. Ob sie irgendwann wieder produziert und verkauft wird ist aktuell ungewiss. Also lohnt die Suche nach Alternativen.
ANDURIL UI
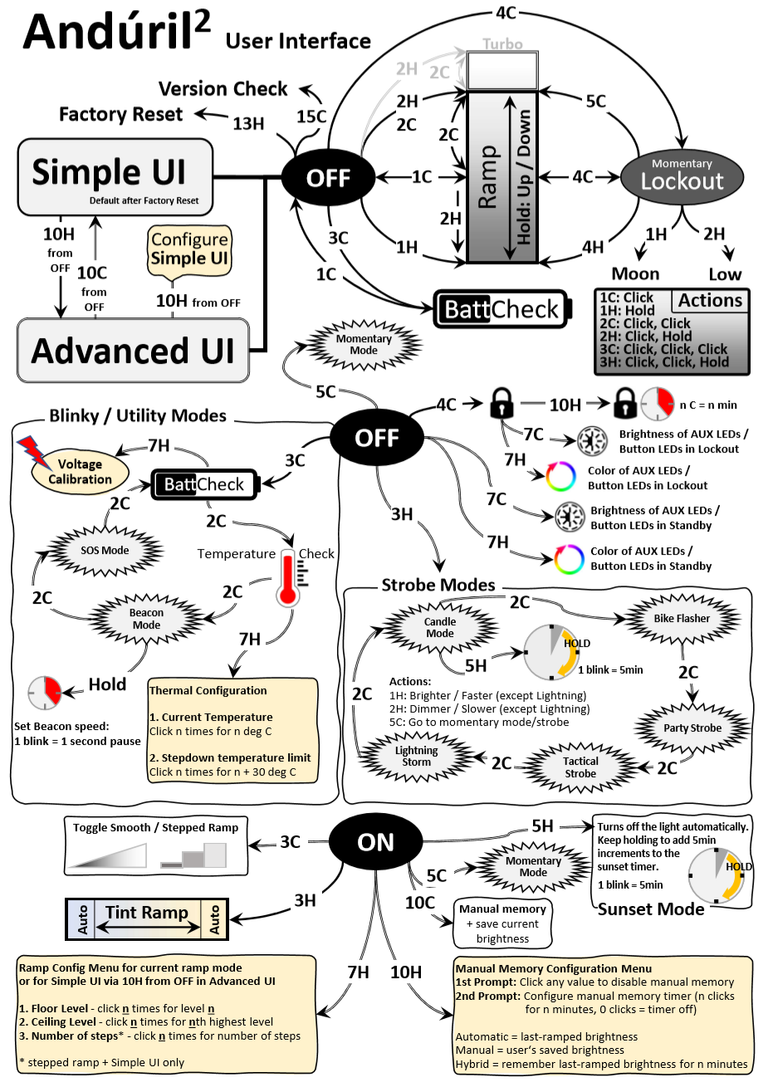
Looks simple, doesn't it? Joking aside. Torches with Anduril UI are not Muggle torches. Without a certain amount of familiarisation, you can't use such torches properly in Light Painting. All functions are controlled with a single switch. When I held an Andruil torch in my hands for the first time a few years ago, I was a bit overwhelmed. I loaded the image from above onto my smartphone. During light painting, I kept looking at the instructions. It took a few weeks before I was able to operate this torch "blind". The basic operation is very simple. You press the switch and the torch lights up. Press the switch again and the torch goes out. If you press and hold the switch while it is switched on, the brightness changes. The first press is up, the second press is down. Double-click to enter the turbo mode. The last selected brightness is saved automatically, except for turbo mode.
Sieht einfach aus, oder? Spaß beiseite. Taschenlampen mit Anduril UI sind keine Muggel Taschenlampen. Ohne eine gewisse Einarbeitungszeit kann man solche Taschenlampen nicht vernünftig im Light Painting verwenden. Alle Funktionen werden mit einem einzigen Schalter gesteuert. Als ich vor einigen Jahren das erste Mal eine Andruil Taschenlampe in den Fingern hatte war ich etwas überfordert. Ich lud das Bild von oben auf mein Smartphone. Während des Light Painting schaute ich immer wieder auf die Anleitung. Es dauerte einige Wochen, bis ich diese Taschenlampe "blind" bedienen konnte. Die Grundbedienung ist denkbar einfach. Man betätigt den Schalter, die Taschenlampe leuchtet. Man betätigt den Schalter ein weiteres Mal und die Lampe geht aus. Wenn man im eingeschalteten Zustand den Schalter gedrückt hält wird die Helligkeit verändert. Beim ersten Druck nach oben, beim zweiten Druck nach unten. Mit einem Doppelklick gelangt man in den Turbo. Die letzte gewählte Helligkeit wird automatisch gespeichert, außer für den Turbo Mode.
It is more difficult to access the various strobe modes. These are not saved. When switching on, you always reach the continuous light mode first. However, the selected strobe mode is available in momentary mode. To do this, select the strobe, set the frequency if necessary and then switch the torch off. When switched off, you can switch to momentary mode by briefly pressing the switch five times. The torch only lights up in the selected strobe mode as long as the switch is held down. To exit this mode, turn the torch on briefly to switch off the power. With a switch, there is no (sensible) way to switch off the momentary mode again with the switch.
This may sound very complicated at first, but after a while you get used to it. And light painting is complicated anyway. So the complex operation of the torch doesn't matter any more.
Schwieriger wird es in die verschiedenen Strobe Modi zu gelangen. Diese werden nicht gespeichert. Beim Einschalten gelangt man immer zuerst in den Dauerlichtmodus. Allerdings ist der gewählte Strobe Mode im Momentary Mode verfügbar. Man wählt dazu den Strobe, stellt unter Umständen die Frequenz ein und schaltet die Taschenlampe dann aus. Im ausgeschalteten Zustand gelangt man durch fünfmaliges, kurzes Drücken des Schalters in den Momentary Mode. Nur leuchtet die Taschenlampe im gewählten Strobe Mode solange man den Schalter gedrückt hält. Um den Modus zu verlassen dreht man die Lampe kurz auf um den Strom zu unterbrechen. Mit einem Schalter gibt es nunmal keine (vernünftige) Möglichkeit den Momentary Mode wieder mit dem Schalter auszuschalten.
Das klingt sicher erst einmal sehr kompliziert, aber nach einiger Zeit gewöhnt man sich daran. Und Light Painting ist ja ohnehin kompliziert. Da macht dann die komplexe Bedienung der Taschenlampe auch nichts mehr.
WHAT TORCHES WITH ANDURIL ARE AVAILABLE?
Emisar D18 with DIY Back Light Scanner
I usually use the Emisar D18 to illuminate larger areas. The 18 built-in SST 20 LEDs emit a maximum luminous flux of 10,000 lumens. I have never needed more light so far. In most cases, I use the D18 with 3000 to 5000 lumens. The only time I switched it to turbo mode with 10000 lumens was to illuminate the huge hangar. As it was quite chilly, I was able to warm my hands with the torch at the same time. In turbo mode, the thing gets really warm.
Zur Ausleuchtung größerer Bereiche verwende ich meist die Emisar D18. Die 18 verbauten SST 20 LEDs emittieren einen maximalen Lichtstrom von 10000 Lumen. Mehr Licht habe ich bisher noch nie gebraucht. In den meisten Fällen verwende ich die D18 mit 3000 bis 5000 Lumen. Einzig für die Ausleuchtung des riesengroßen Hangars hatte ich sie in den Turbo Mode mit 10000 Lumen geschaltet. Da es recht kühl war konnte ich mir gleichzeitig die Hände an der Taschenlampe wärmen. Im Turbo Mode wird das Ding schon ordentlich warm.

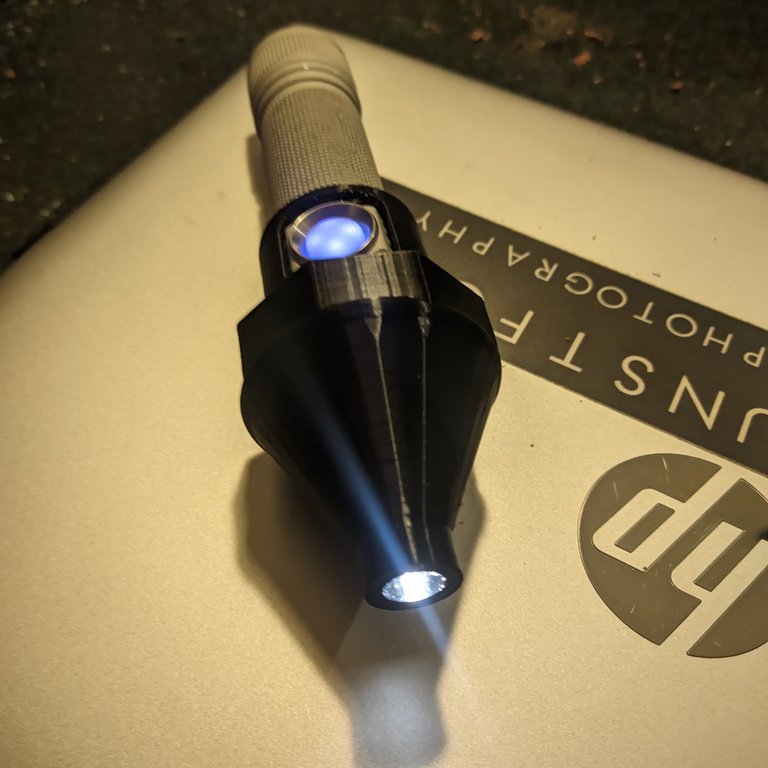
I use either the Emisar D4V2, D4K or the Lumintop FW3A to illuminate light painting tools or to light smaller areas. All these torches work well with the various tools. With the Emisar, however, you can no longer access the switch if it is plugged into one of the standard adapters. For this reason, I made a special adapter on the 3D printer.
Für die Beleuchtung von Light Painting Tools oder zur Beleuchtung kleinerer Bereiche verwende ich entweder Emisar D4V2, D4K oder die Lumintop FW3A. Alle diese Taschenlampen lassen sich gut mit den verschiedenen Tools verbinden. Bei den Emisar kommt man allerdings nicht mehr an den Schalter ran, wenn sie in einem der gängigen Adapter steckt. Aus diesem Grund habe ich einen speziellen Adapter auf dem 3D Drucker hergestellt.
There are also other torches available with the switch attached to the back, such as the Noctigon KR4. You can get to the switch when the torch is in the adapter, but I find it more comfortable to hold the torch in my hand and switch it on and off with my thumb.
Erhältlich sind auch weitere Taschenlampen, bei denen der Schalter am Hinterteil angebracht ist, wie die Noctigon KR4. Man kommt zwar an den Schalter ran, wenn die Taschenlampe im Adapter steckt, allerdings finde ich es komfortabler, wenn ich die Taschenlampe ohne Verrenkungen in der Hand halten und mit dem Daumen ein- und auschalten kann.
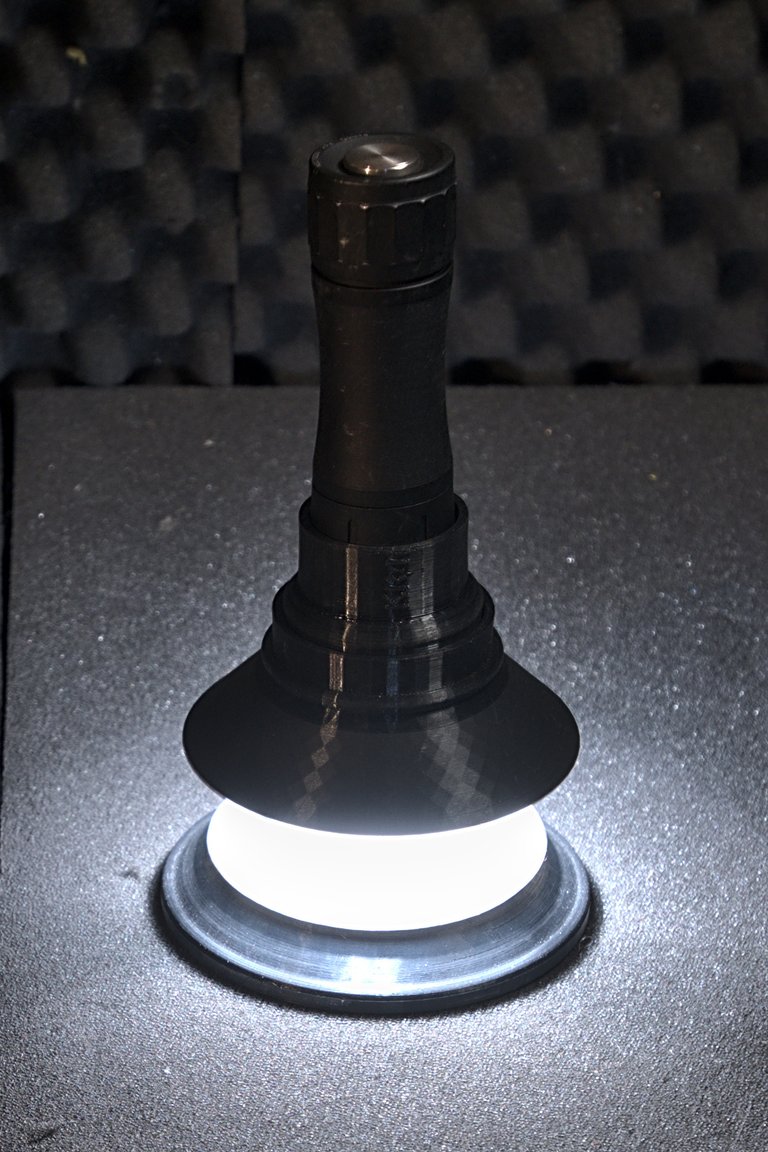
Noctigon KR4 with DIY Back Light Scanner

WHAT IS LIGHT PAINTING?
LICHTKUNSTFOTO
If you like my art visit www.lichtkunstfoto.de for more Light Art Photography and informations about Light Painting. Join me on Flickr Twitter

For more great Light Art Photography, Light Painting and inspiration check these light painters: @marlasinger666 @fadetoblack @fastchrisuk @dawnoner @oddballgraphics @martbarras @stepko @rod.evans.visual @yo-hoho @maxpateau @gunnarheilmann @neilru75 @maximepateau @ryuslightworks @lightstabeu @candelart @lacelight

WE ARE LIGHT PAINTERS
To help and support the LightPainters community here on Hive I would appreciate your delegation of HivePower. Any amount is appreciated. It does not require much to get started, we are happy for any gesture. @lightpainters
How to delegate?
Delegate 50HivePower, [50HP]
Delegate 250HivePower, [250HP]
Delegate 500HivePower, [500HP]
Delegate 1000HivePower, [1000HP]
All the Hive Power will help to upvote the artist's contribution as part of the LightPainters community.
Super Artikel! Und wieder reichlich Informationen über das wichtigste Werkzeug des Lightpainters, neben einer Kamera natürlich. 😁
Das ist ein großartiger Artikel! Habe gerade am Wochenende wieder das RGB-Lampen-Projekt in den Fingern gehabt und einen Freund auf die Suche nach einer geeigneten LED geschickt. Mal sehen, was er aus China an Material mitbringt.
Ich bin gespannt.
Super! The first photo is the birth of a man from a light pearl ;)
Thanks
Ich bin verwirrt.
Not every human being can do such things, every special talent is inside every human being and this painting looks very beautiful.
Awesome shot's here....
Thanks
Congratulations @lichtkunstfoto! You have completed the following achievement on the Hive blockchain And have been rewarded with New badge(s)
Your next target is to reach 19000 upvotes.
You can view your badges on your board and compare yourself to others in the Ranking
If you no longer want to receive notifications, reply to this comment with the word
STOPCheck out our last posts: