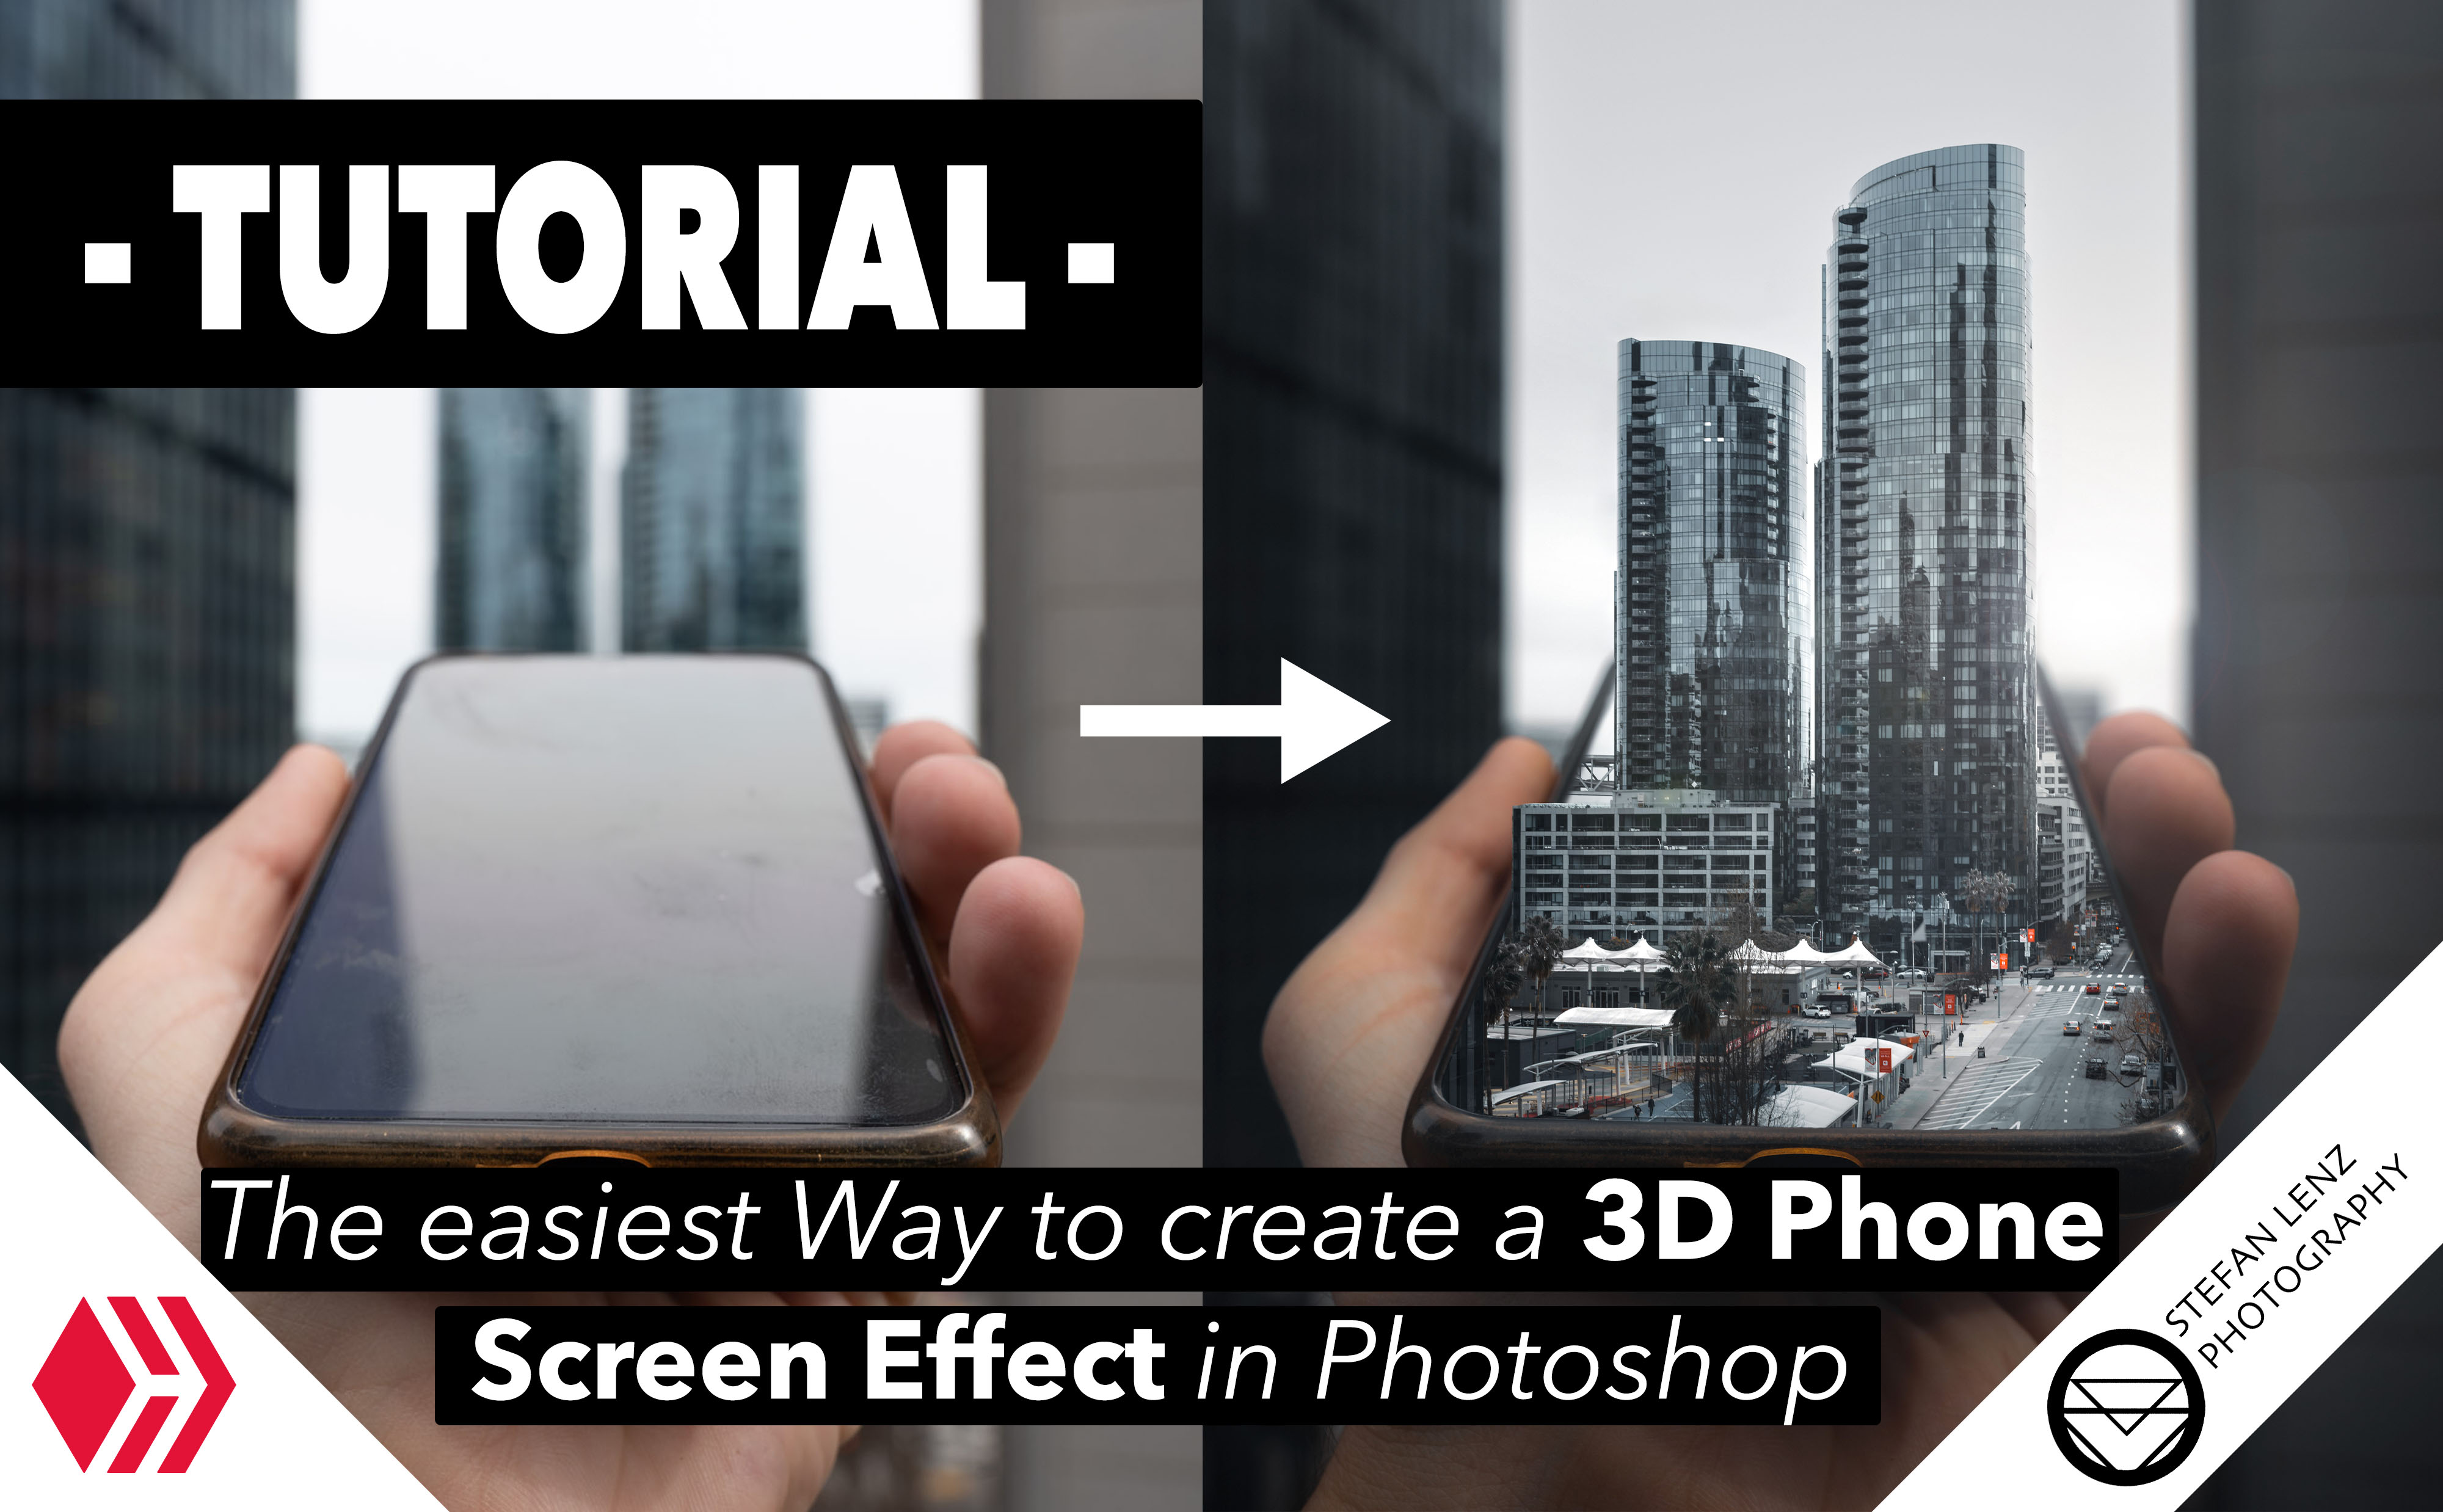
Hey guys! Today I'd like to show you a little photography trick that I like to use from time to time and that is relatively easy to implement. Don't worry, you only need a few basics in Photoshop - no advanced knowledge. On the photo spot, all you need is your camera and something you always have with you anyway - a smartphone. Just read on, if you want to know how to turn your phone screen into a 3D screen in just a few steps!
Hallo Leute! Heute möchte ich euch einen kleinen Fotografie-Trick vorstellen, den ich immer wieder gerne anwende und der relativ einfach umzusetzen ist. Keine Sorge, ihr braucht dafür nur ein paar Basics in Photoshop - keine fortgeschrittenen Kenntnisse. Vor Ort am jeweiligen Photospot braucht ihr lediglich eure Kamera und etwas, das ihr sowieso immer dabei habt - ein Smartphone. Lest einfach weiter, wenn ihr wissen wollt, wie ihr euren Handy-Bildschirm in wenigen Schritten in einen 3D-Screen verwandelt!
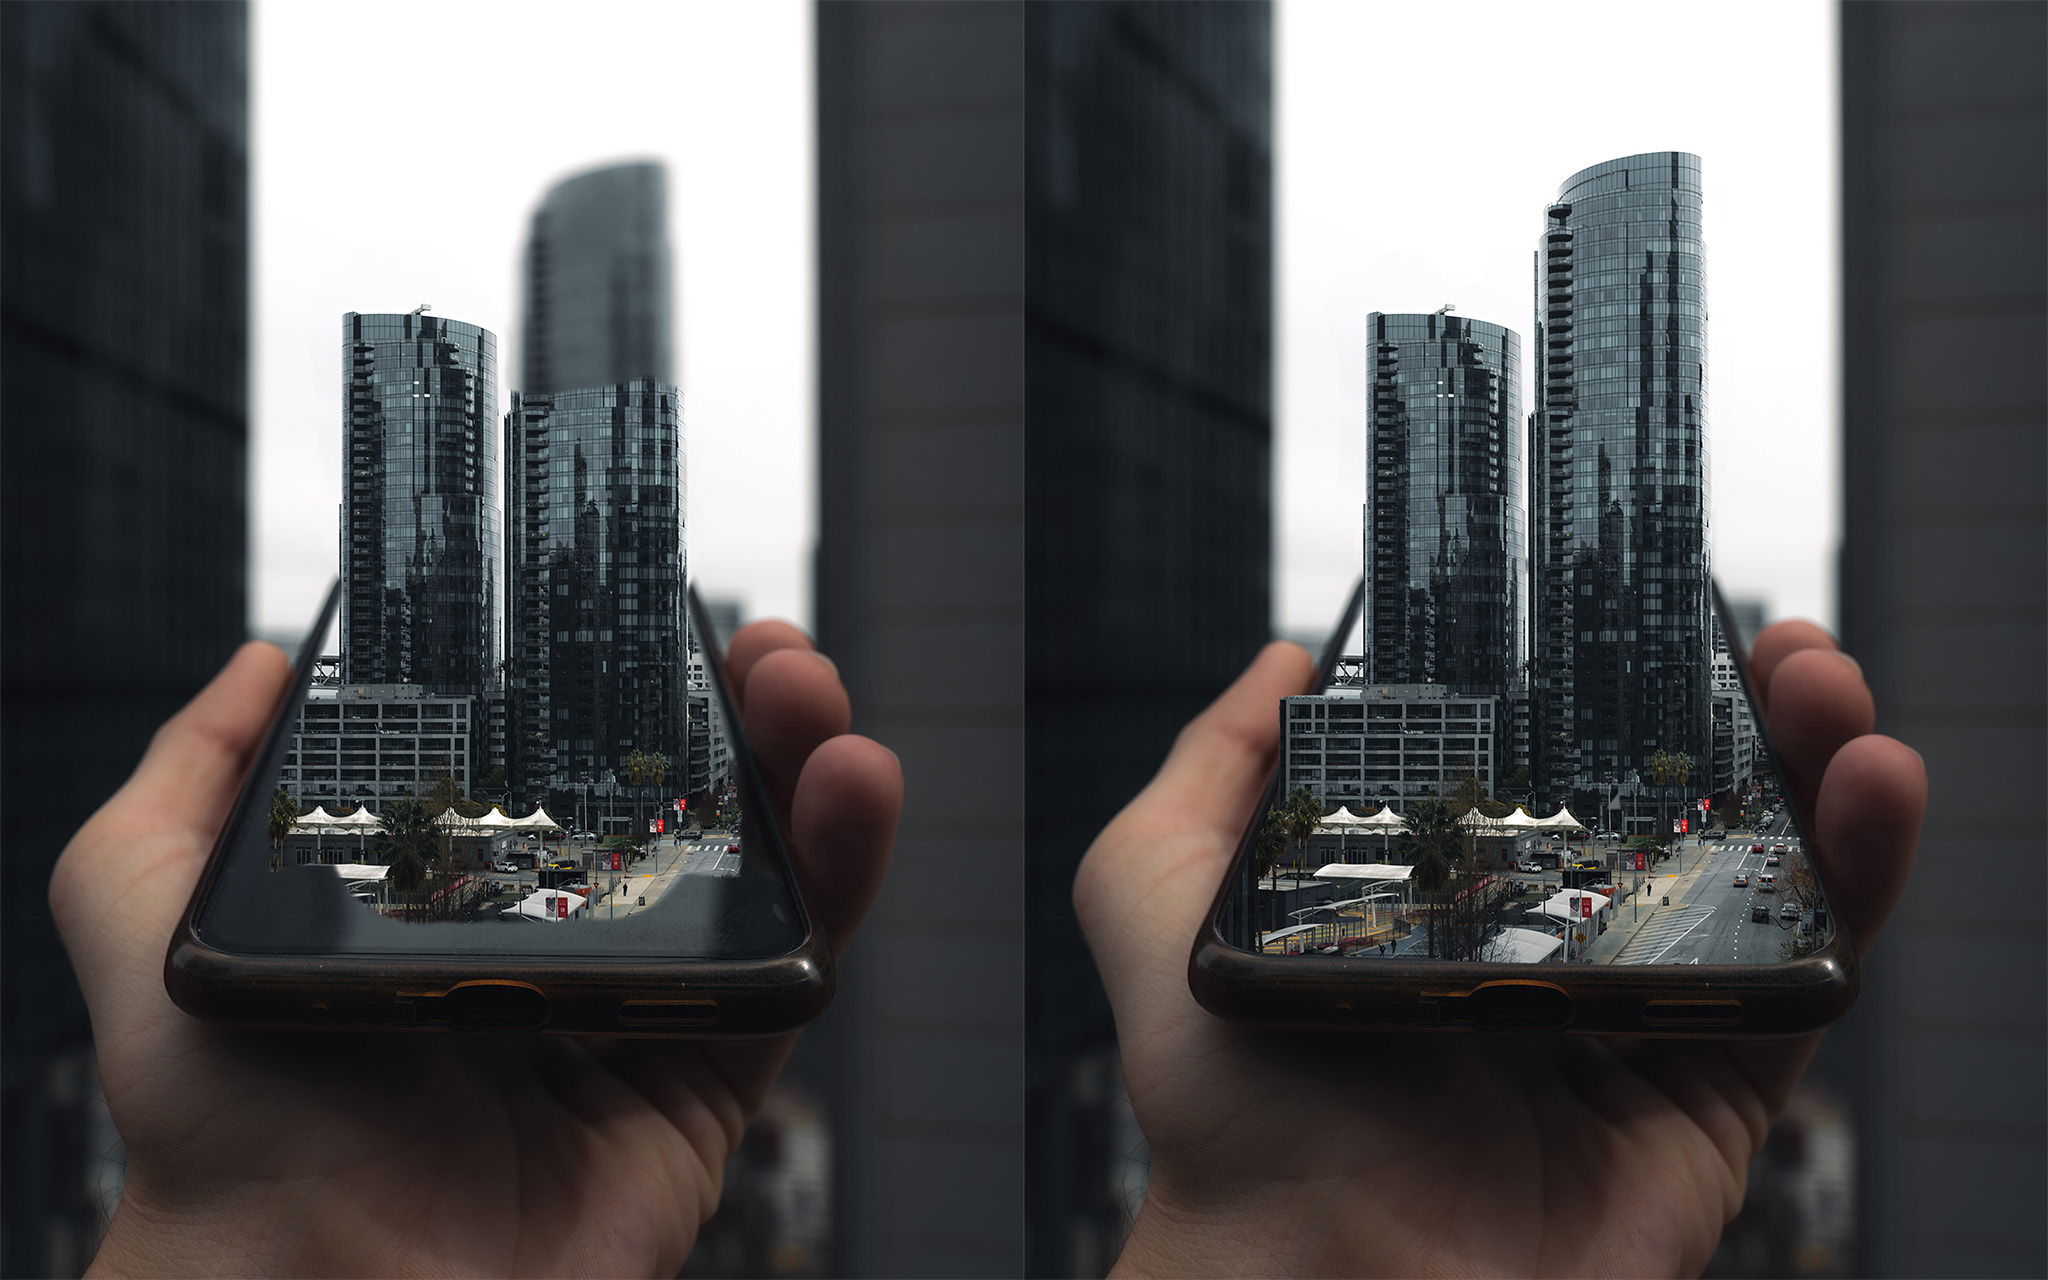
35mm - F11 - 1/60 sec. - ISO100 (both images)
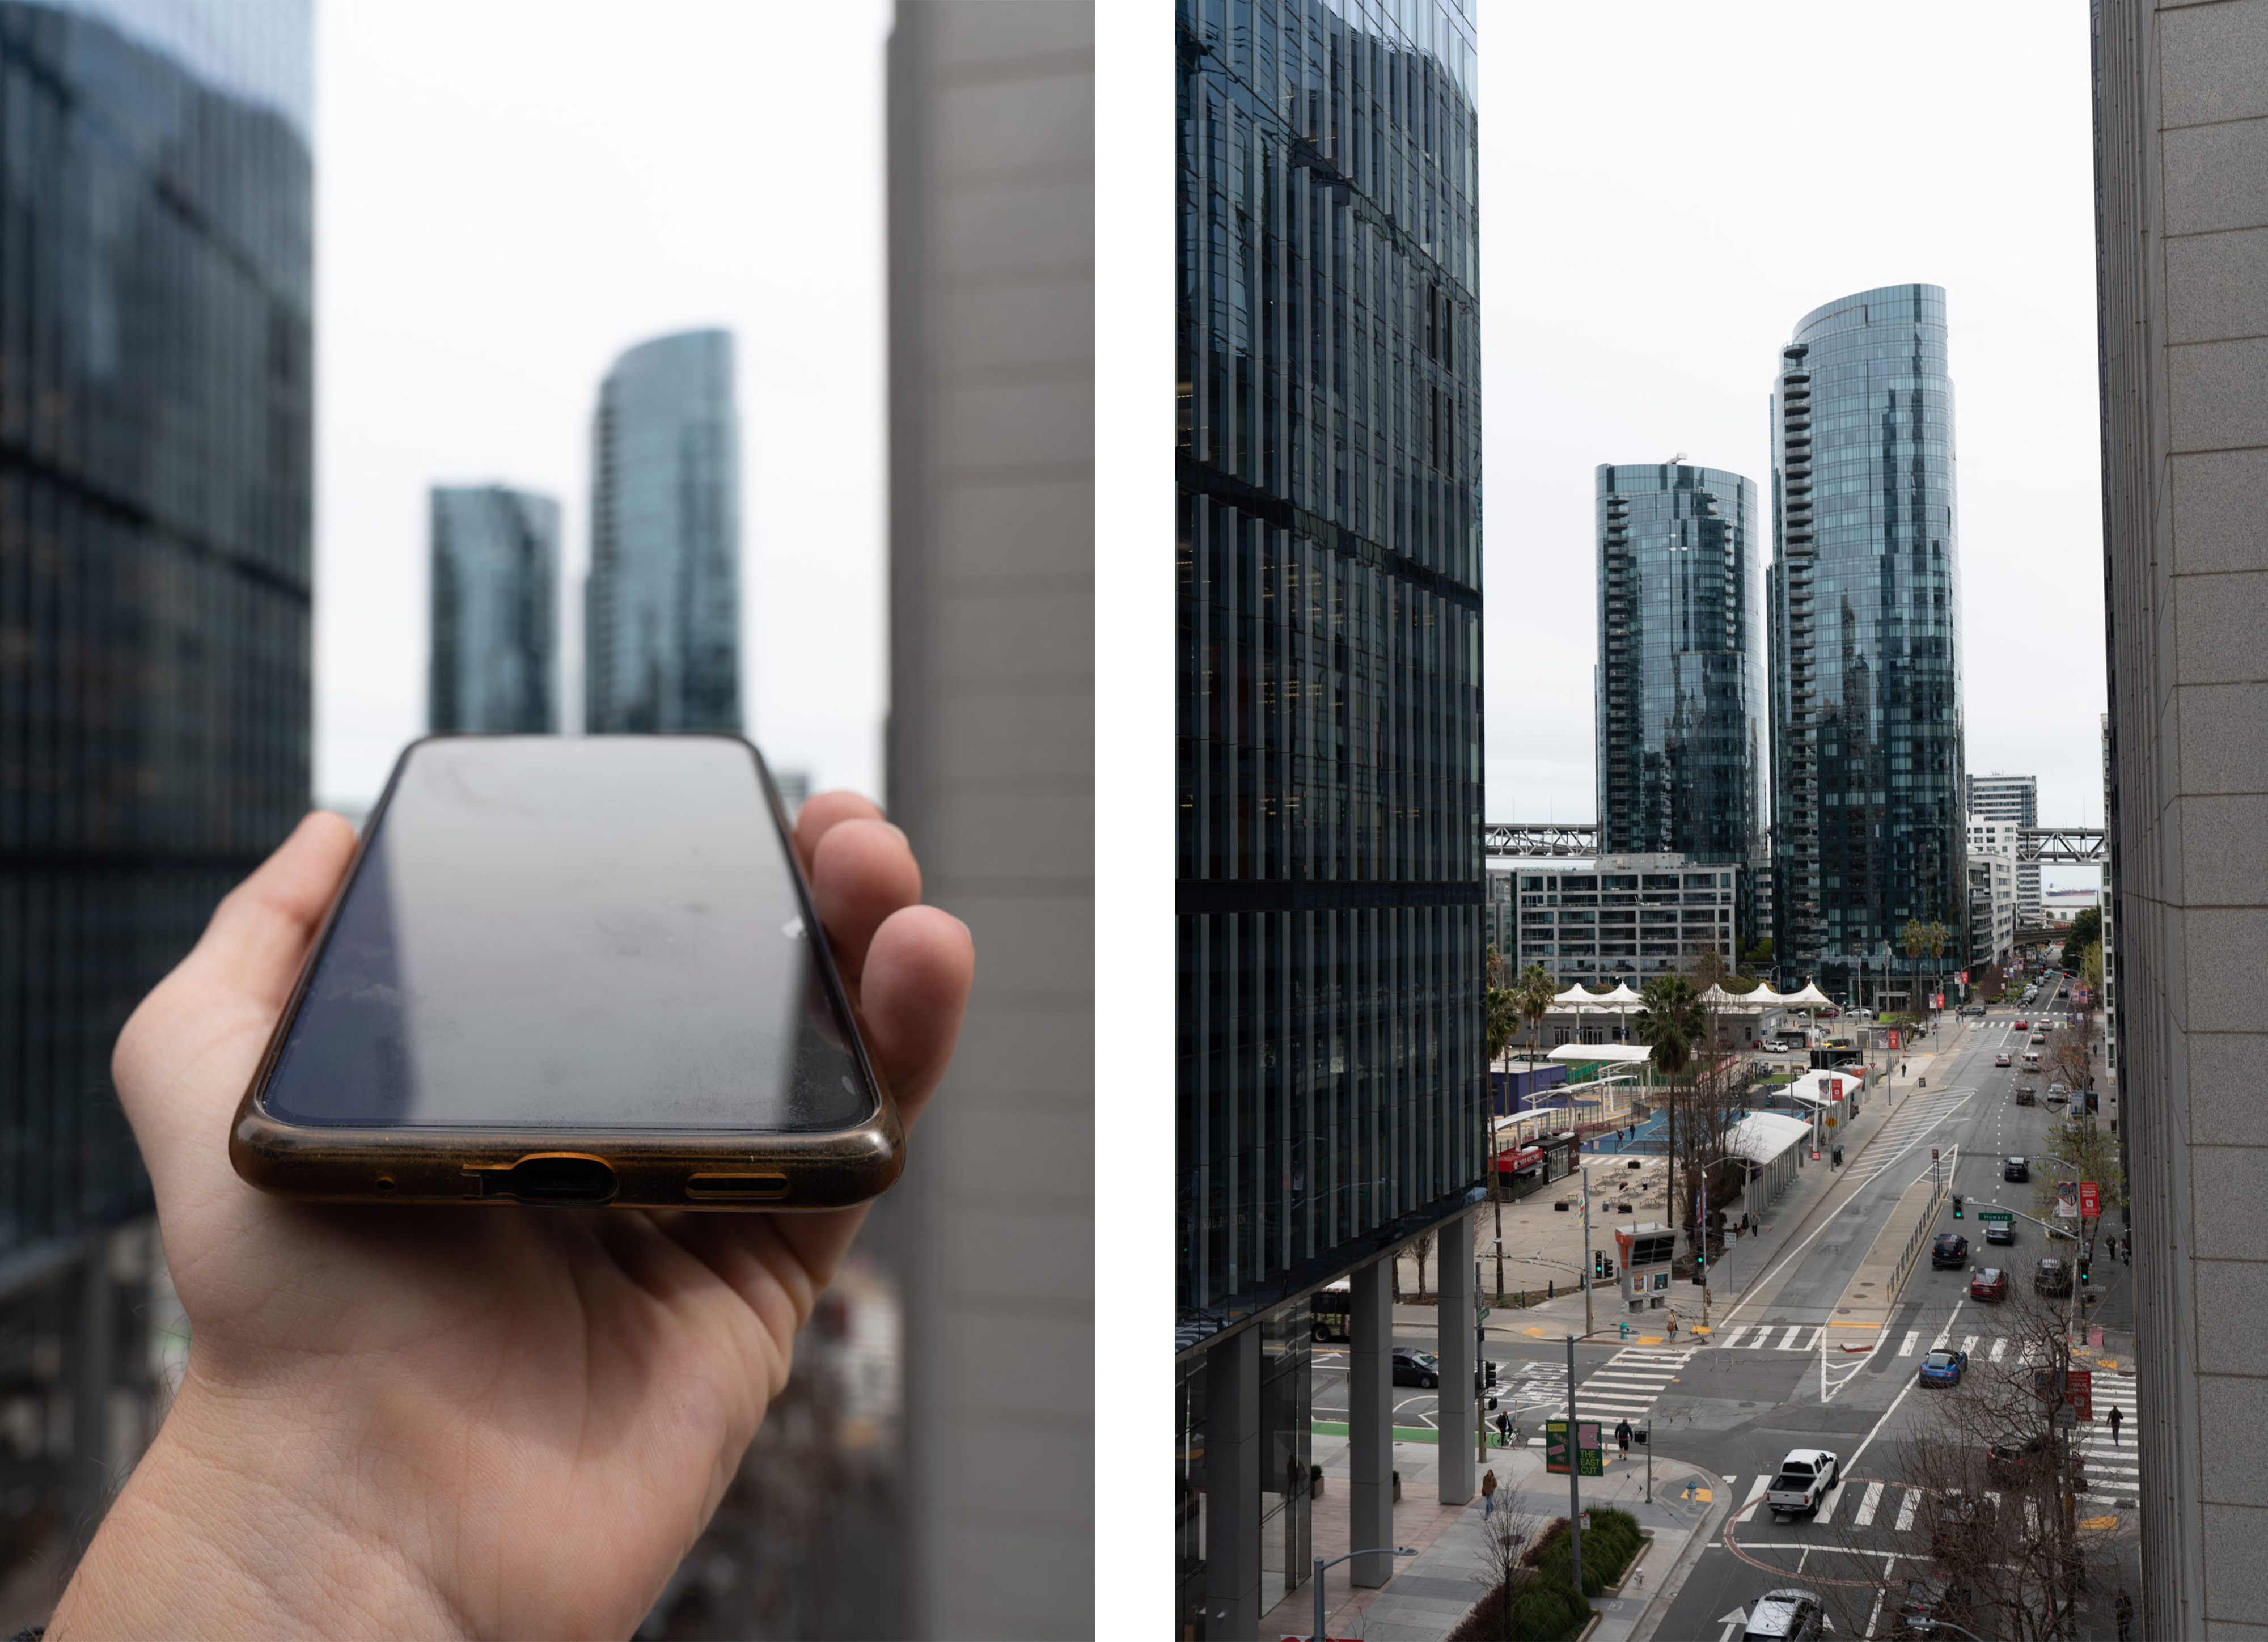
At the beginning, of course, it is important to look for a suitable subject. Free-standing buildings, statues or trees are best suited for this. Simply hold the phone in front of the subject and cover the lower part with it. It is very important that a part of the subject is covered by the phone, otherwise this effect will not work in post-processing. With the phone held in front of your camera, focus on it and press the shutter button. Then remove the phone from the picture without changing the framing, focus on the subject and press the shutter button again. Congratulations, you've already done the photography part!
Am Anfang ist es natürlich wichtig, euch ein geeignetes Motiv zu suchen. Am besten eignen sich dafür freistehende Gebäude, Statuen oder auch Bäume. Haltet das Handy einfach vor das Motiv und verdeckt damit den unteren Teil. Es ist sehr wichtig, dass ein Teil des Motivs vom Handy verdeckt wird, sonst funktioniert dieser Effekt in der Nachbearbeitung nicht. Mit dem handgehaltenen Handy vor eurer Kamera fokussiert ihr dieses und drückt den Auslöser. Danach nehmt ihr das Handy aus dem Bild, ohne den Bildausschnitt zu verändern, fokussiert auf das Motiv und drückt den Auslöser erneut. Gratulation, damit habt ihr den fotografischen Part auch schon erledigt!
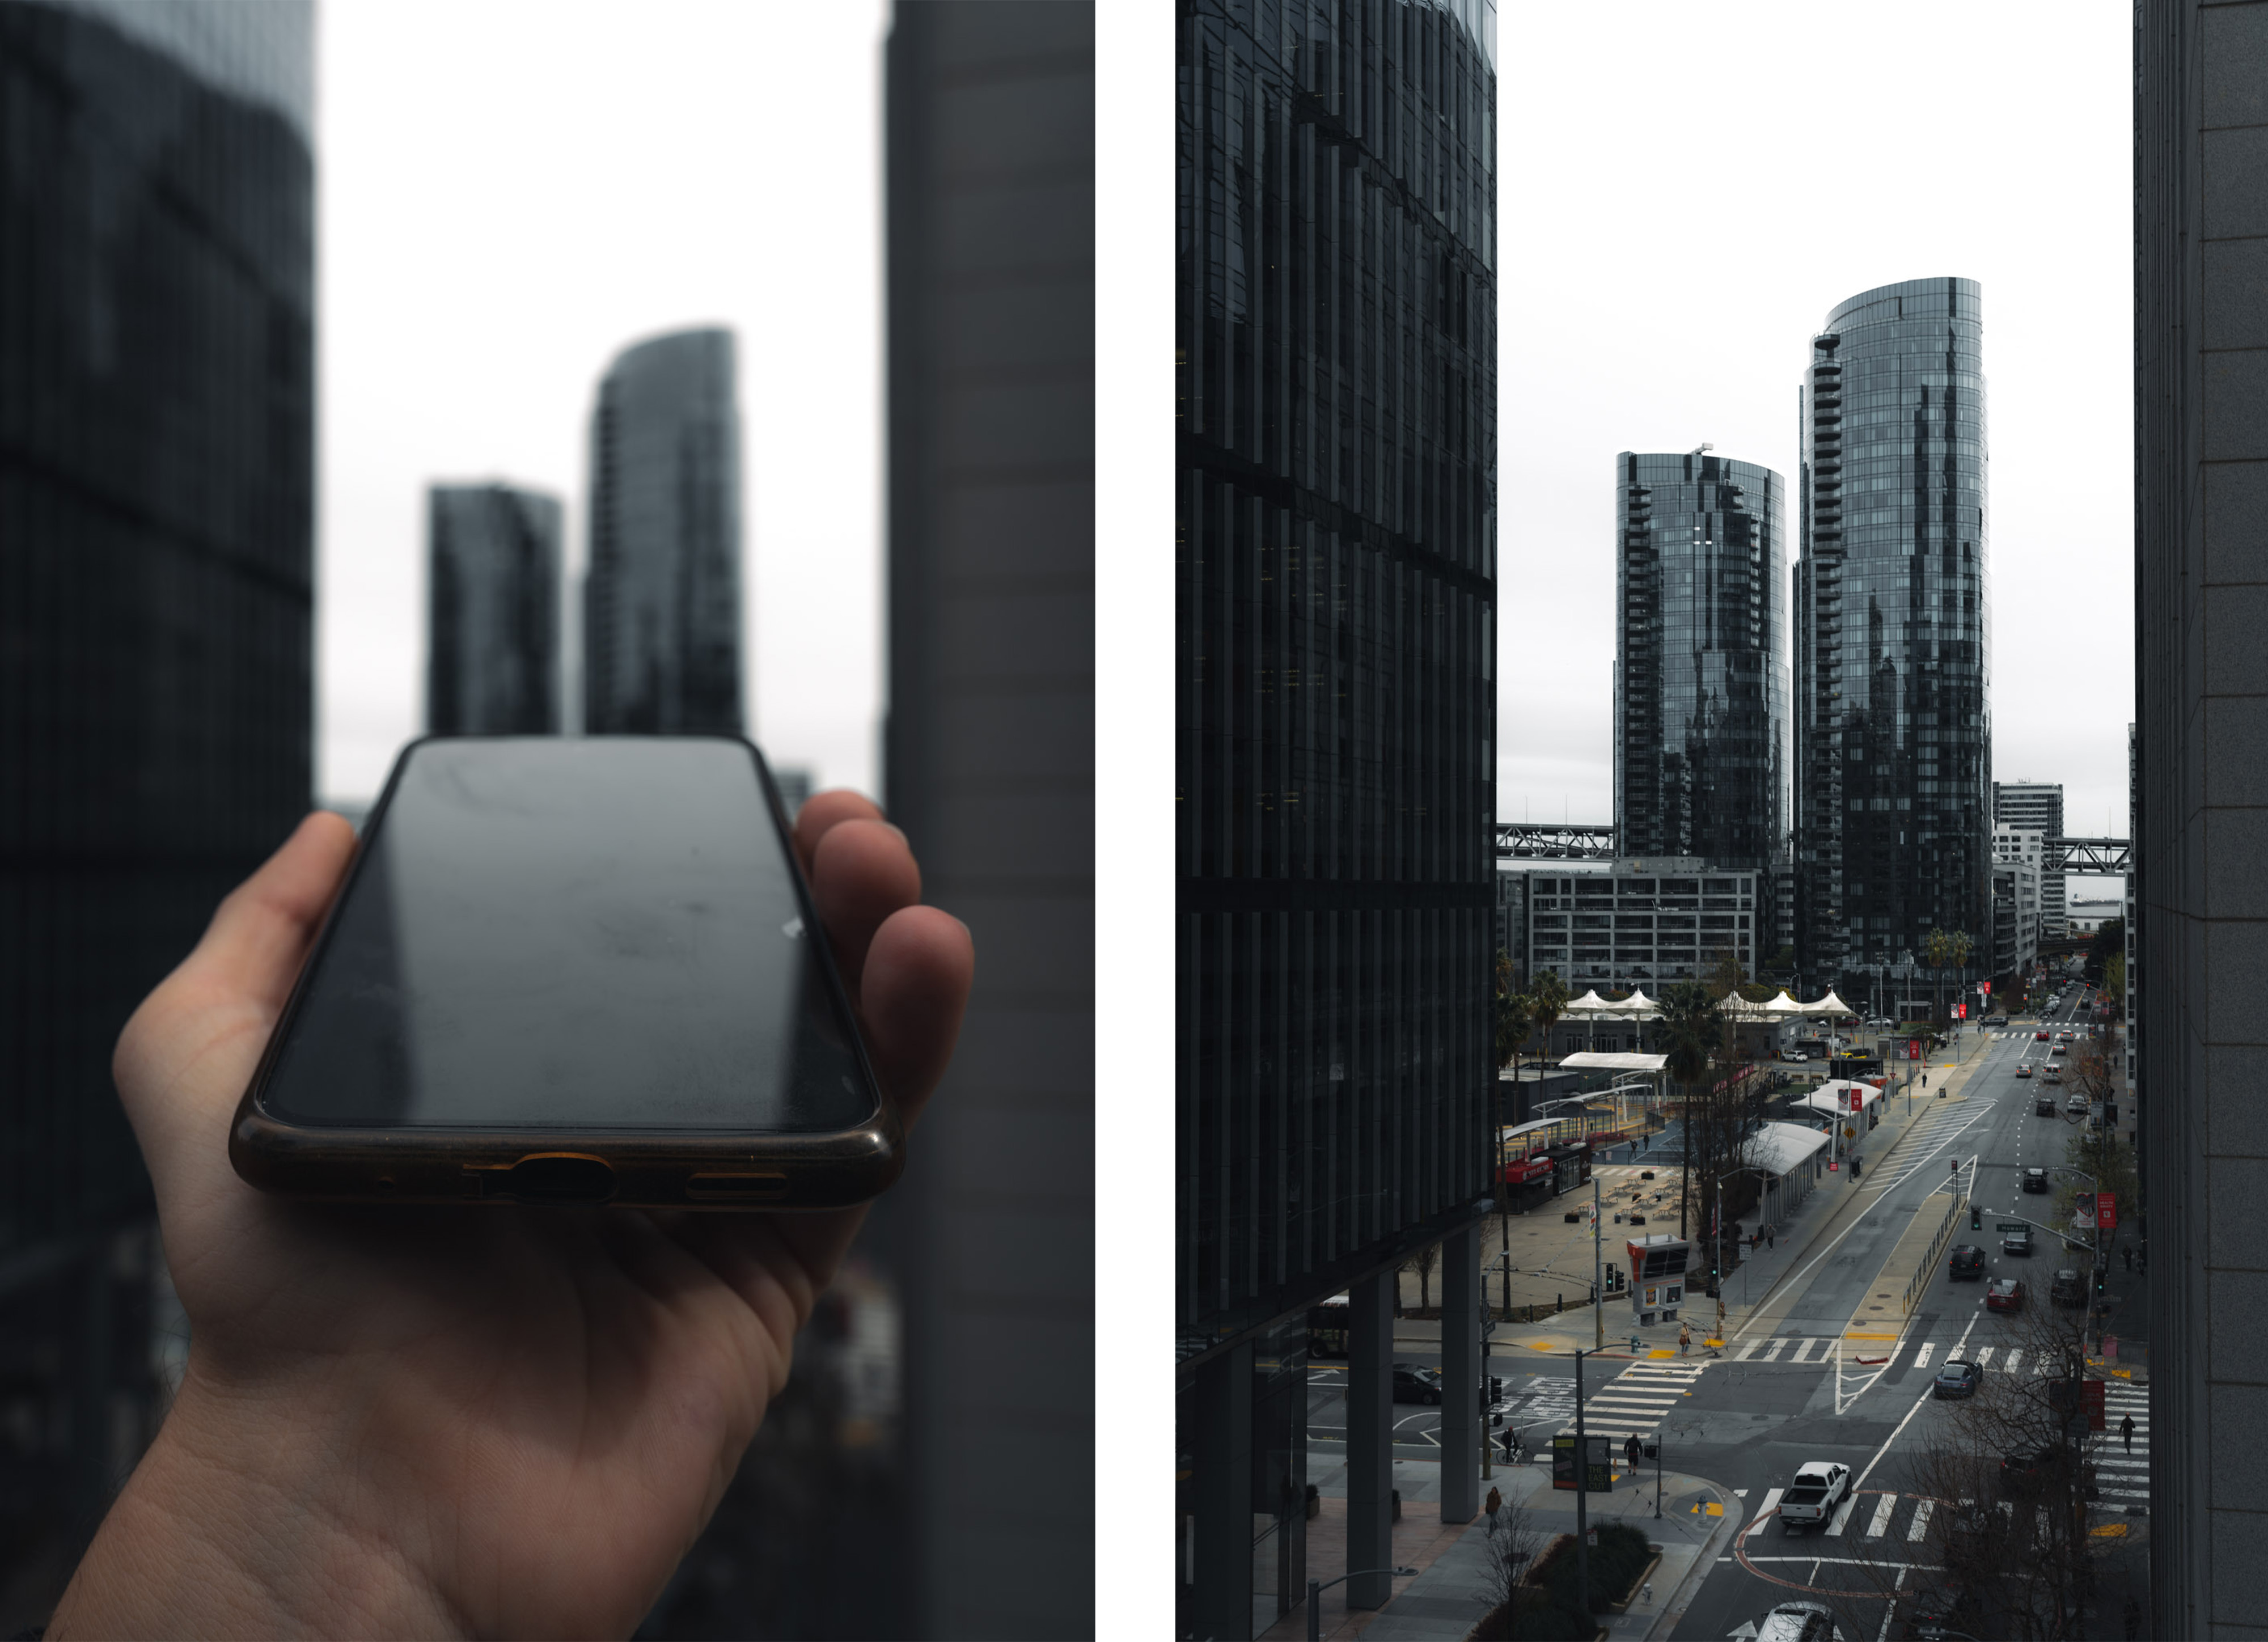
The next step in my example was to open the two shots in Lightroom (or Camera Raw) and post-process them to my personal taste. It doesn't matter which look you choose. Theoretically, you can also skip this step. The only thing that matters is that you use the same settings for both shots. You can simply edit one of the two photos and then copy and paste the settings. Afterwards I opened both images in Photoshop.
Der nächste Schritt in meinem Beispiel bestand darin, die beiden Aufnahmen in Lightroom (oder Camera Raw) zu öffnen und sie nach meinem persönlichen Geschmack nachzubearbeiten. Welchen Look ihr dabei wählt, spielt keine Rolle. Theoretisch könnt ihr diesen Schritt auch auslassen. Wichtig ist nur, dass ihr die gleichen Einstellungen für beide Aufnahmen wählt. Ihr könnt einfach eines der beiden Fotos bearbeiten und die Einstellungen dann kopieren und einfügen. Im Anschluss öffnete ich die beiden Bilder in Photoshop.
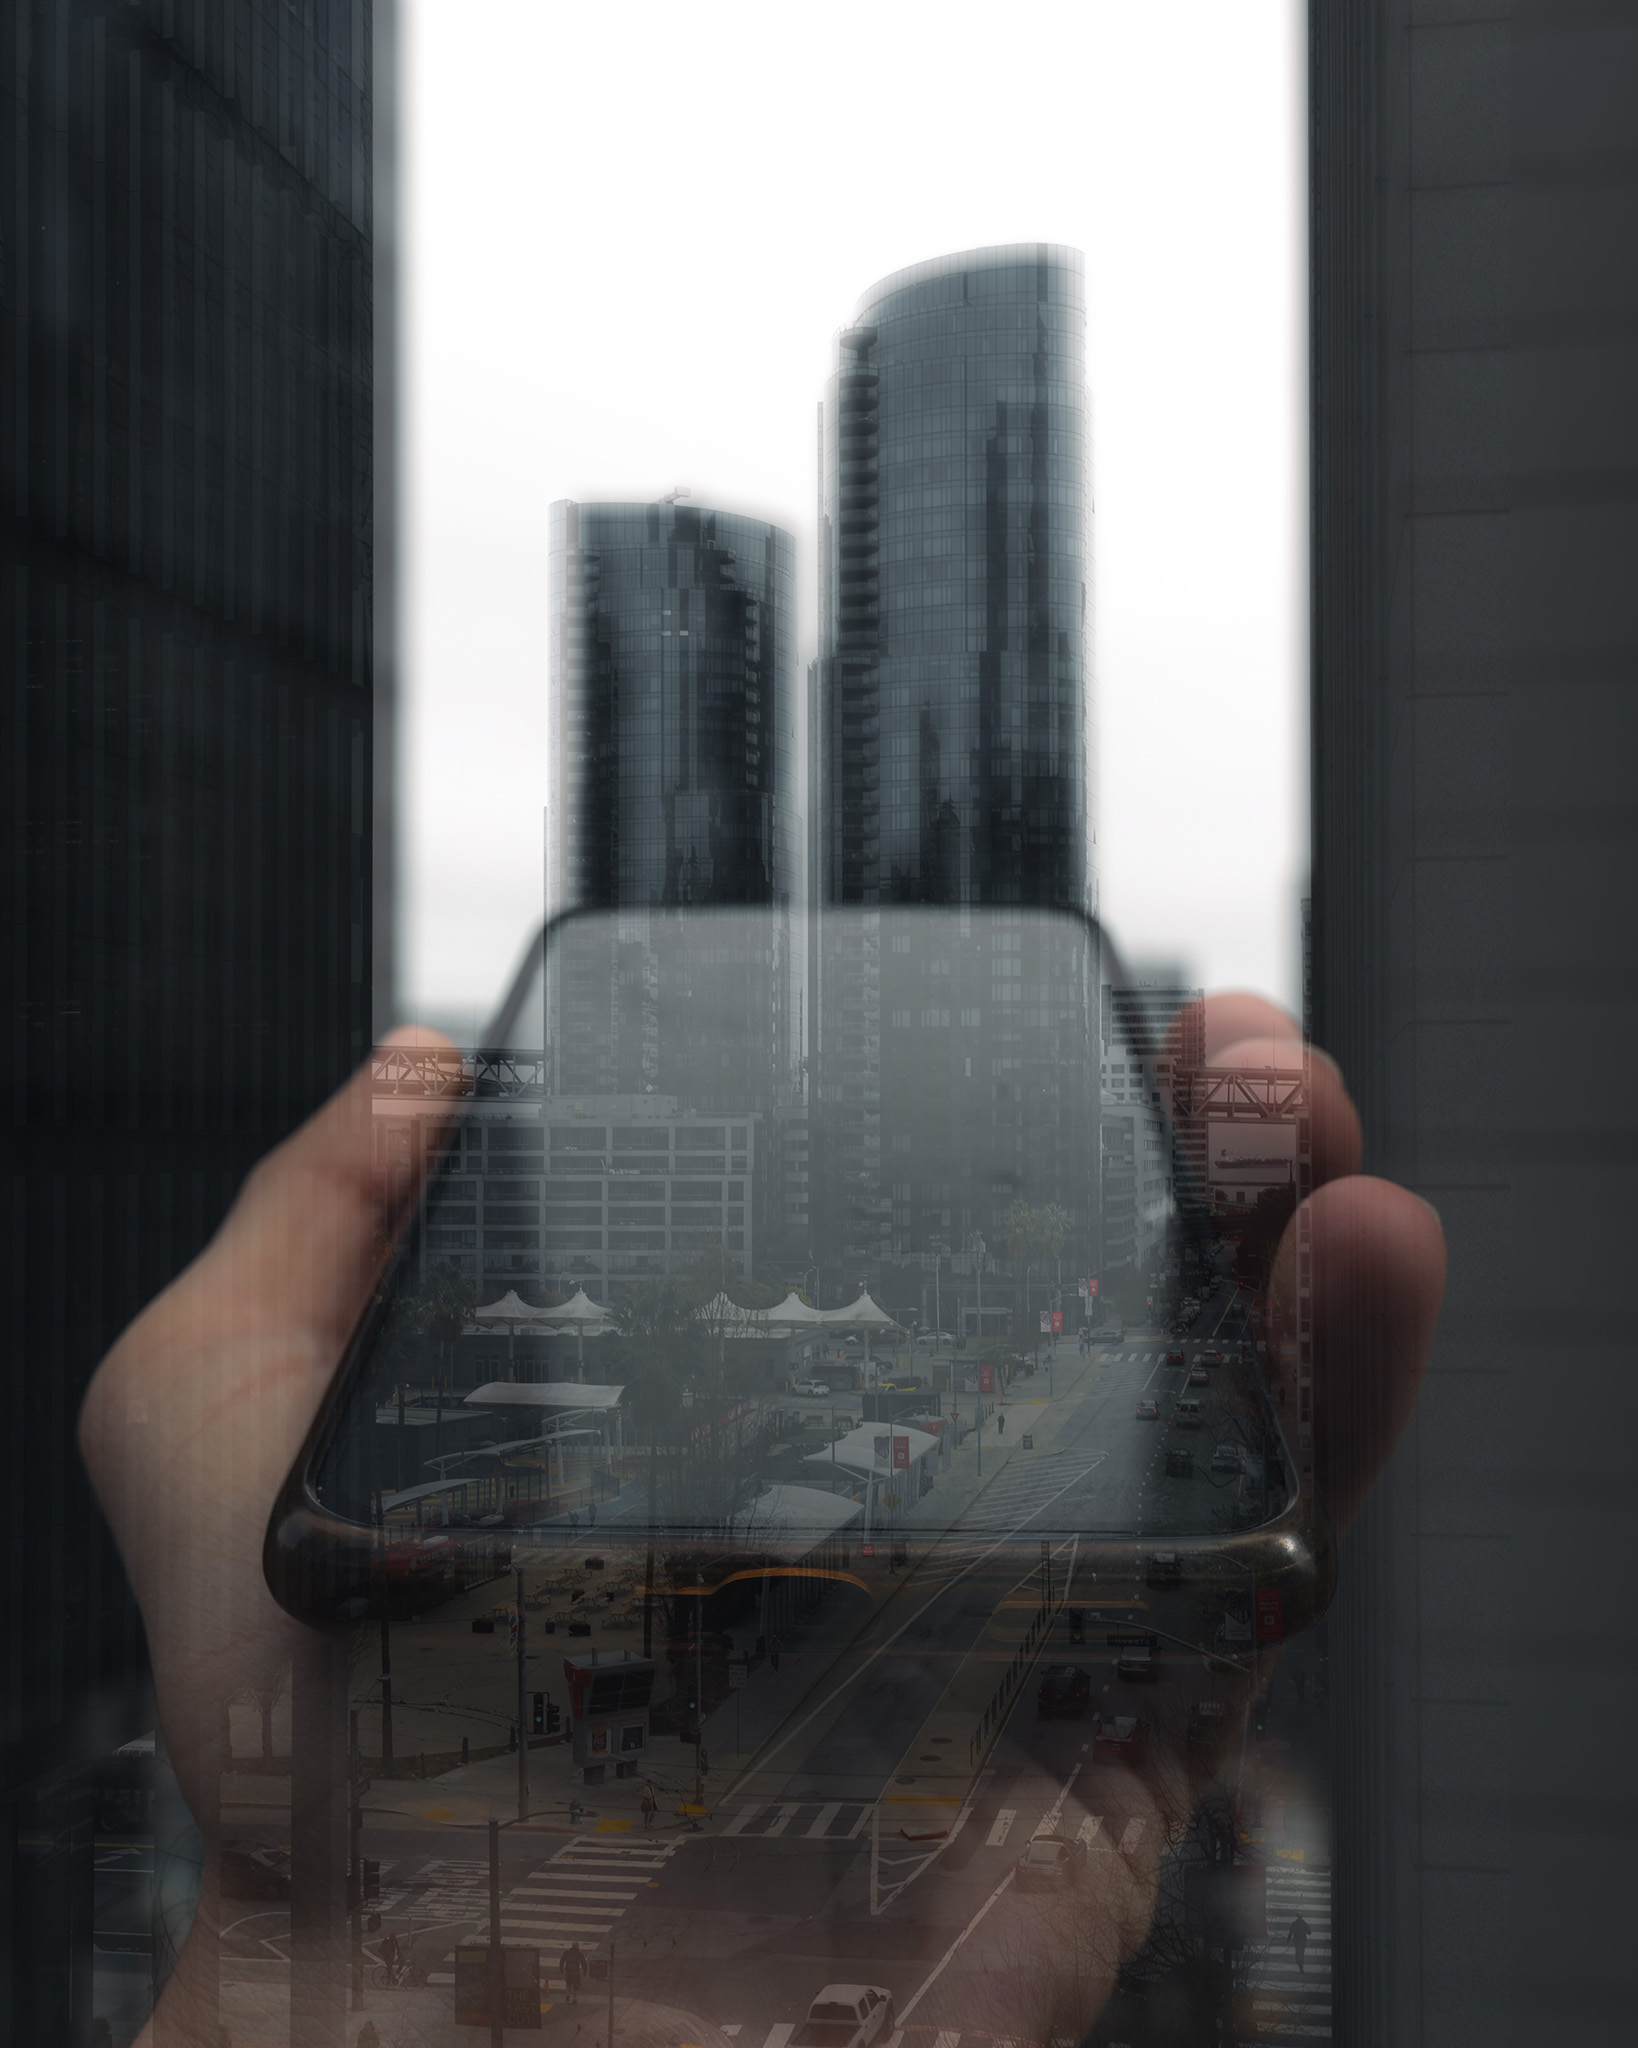
I placed the shot with the focus on the buildings as the top layer over the photo with the phone and set the layer opacity to about 25%. This allowed me to align the layer exactly so that the skyscrapers were in the center of the phone screen. After that, I set the layer opacity back to 100% and clicked on the layer mask icon while holding down the Option key (Alt key on Windows), which made the top layer invisible for the time being.
Ich legte die Aufnahme mit dem Fokus auf den Gebäuden als obere Ebene über das Foto mit dem Handy und stellte die Ebenen-Deckkraft auf ungefähr 25%. So konnte ich die Ebene exakt so ausrichten, dass sich die Wolkenkratzer in der Mitte des Handy-Bildschirms befanden. Danach stellte ich die Ebenen-Deckkraft wieder zurück auf 100% und klickte mit gedrückter Option-Taste (Alt-Taste bei Windows) auf das Symbol für die Erstellung einer Ebenen-Maske, wodurch die obere Ebene erstmal unsichtbar wurde.
Now I selected the layer mask and used the brush tool to paint the upper layer back into the image where I wanted it. Make sure you have selected white as the foreground and black and the background color before starting to paint. Now here it is important to work precisely on the edges to create an illusion that looks as realistic as possible. To do this, vary with the size and hardness of the brush. The nice thing is that you can correct mistakes quickly and easily right away. Simply use the X key to switch between white (to paint) and black (to erase). Once you have finished this step, you are almost done.
Nun wählte ich die Ebenenmaske aus und verwendete das Pinselwerkzeug, um die obere Ebene an den gewünschten Stellen zurück ins Bild zu malen. Wählt dazu Weiß als Vordergrund- und Schwarz als Hintergrundfarbe aus. Hier ist es nun wichtig, an den Kanten genau zu arbeiten, um eine möglichst realistisch wirkende Illusion zu kreieren. Variiert dazu mit der Größe und Härte des Pinsels. Das Schöne ist, dass ihr Fehler schnell und einfach sofort korrigieren könnt. Wechselt einfach mit der X-Taste zwischen weißer Farbe (um zu malen) und schwarzer Farbe (um zu radieren). Habt ihr diesen Schritt erledigt, seid ihr eigentlich fast fertig.
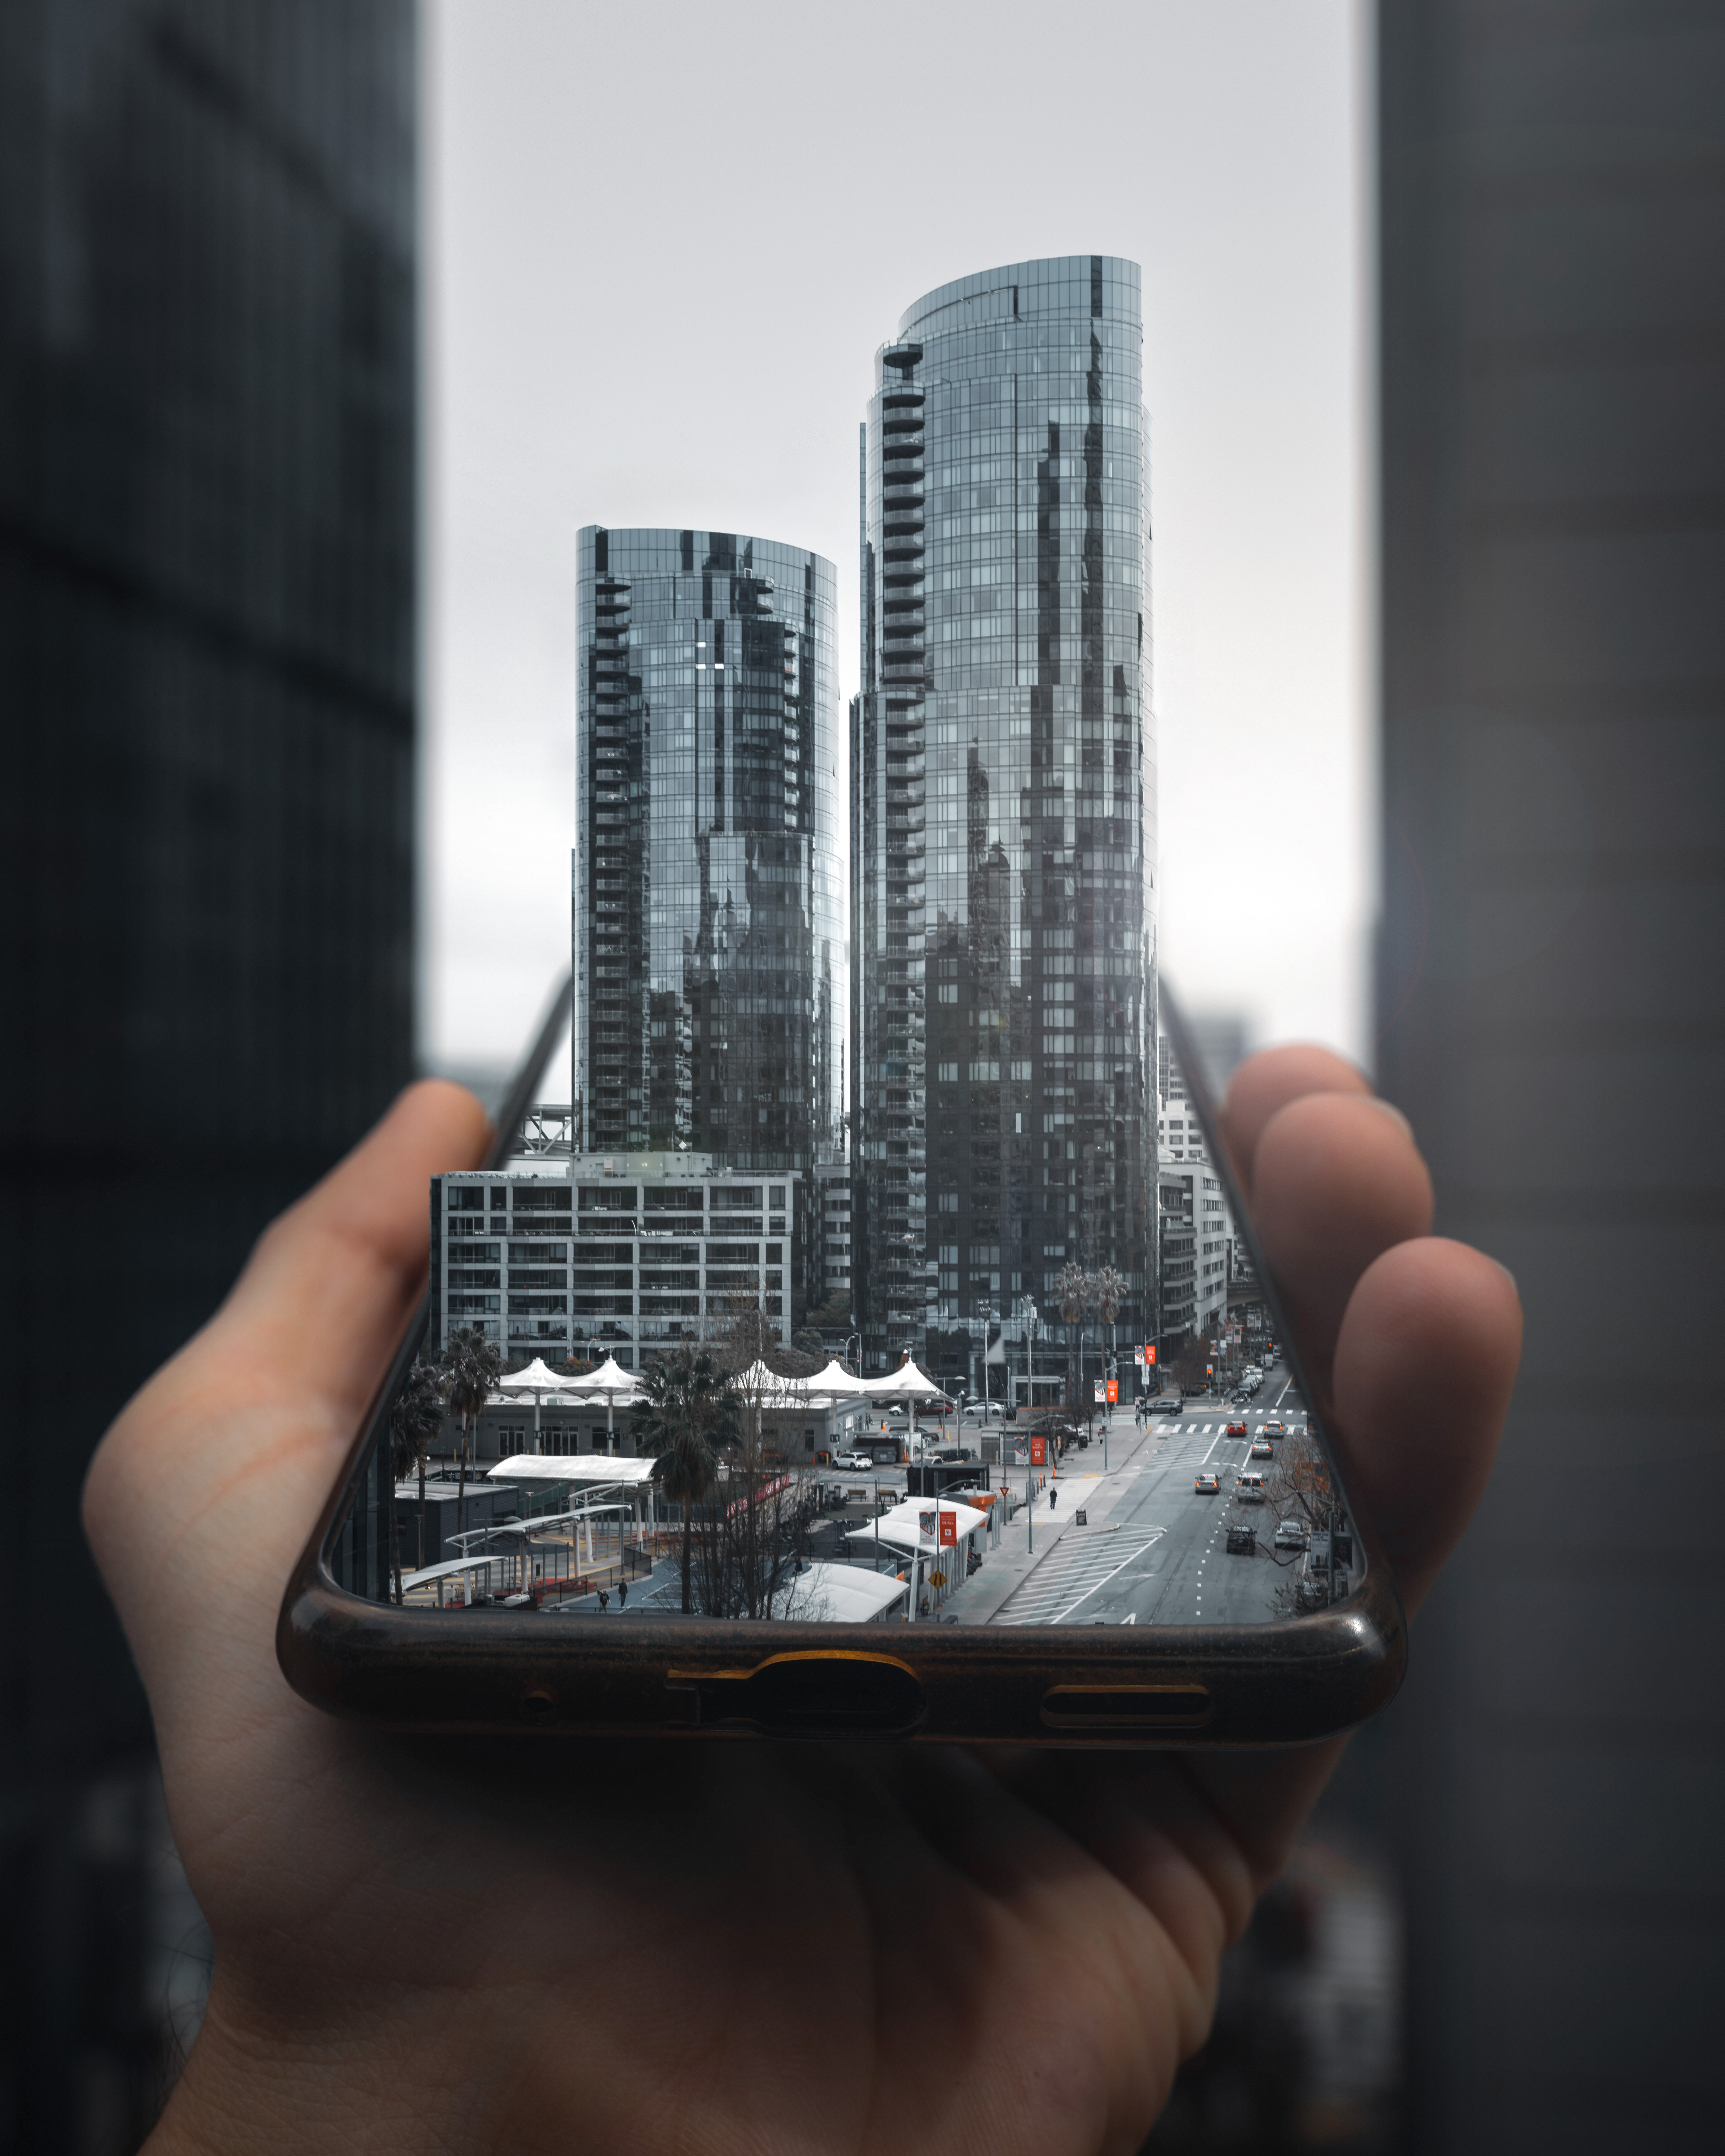
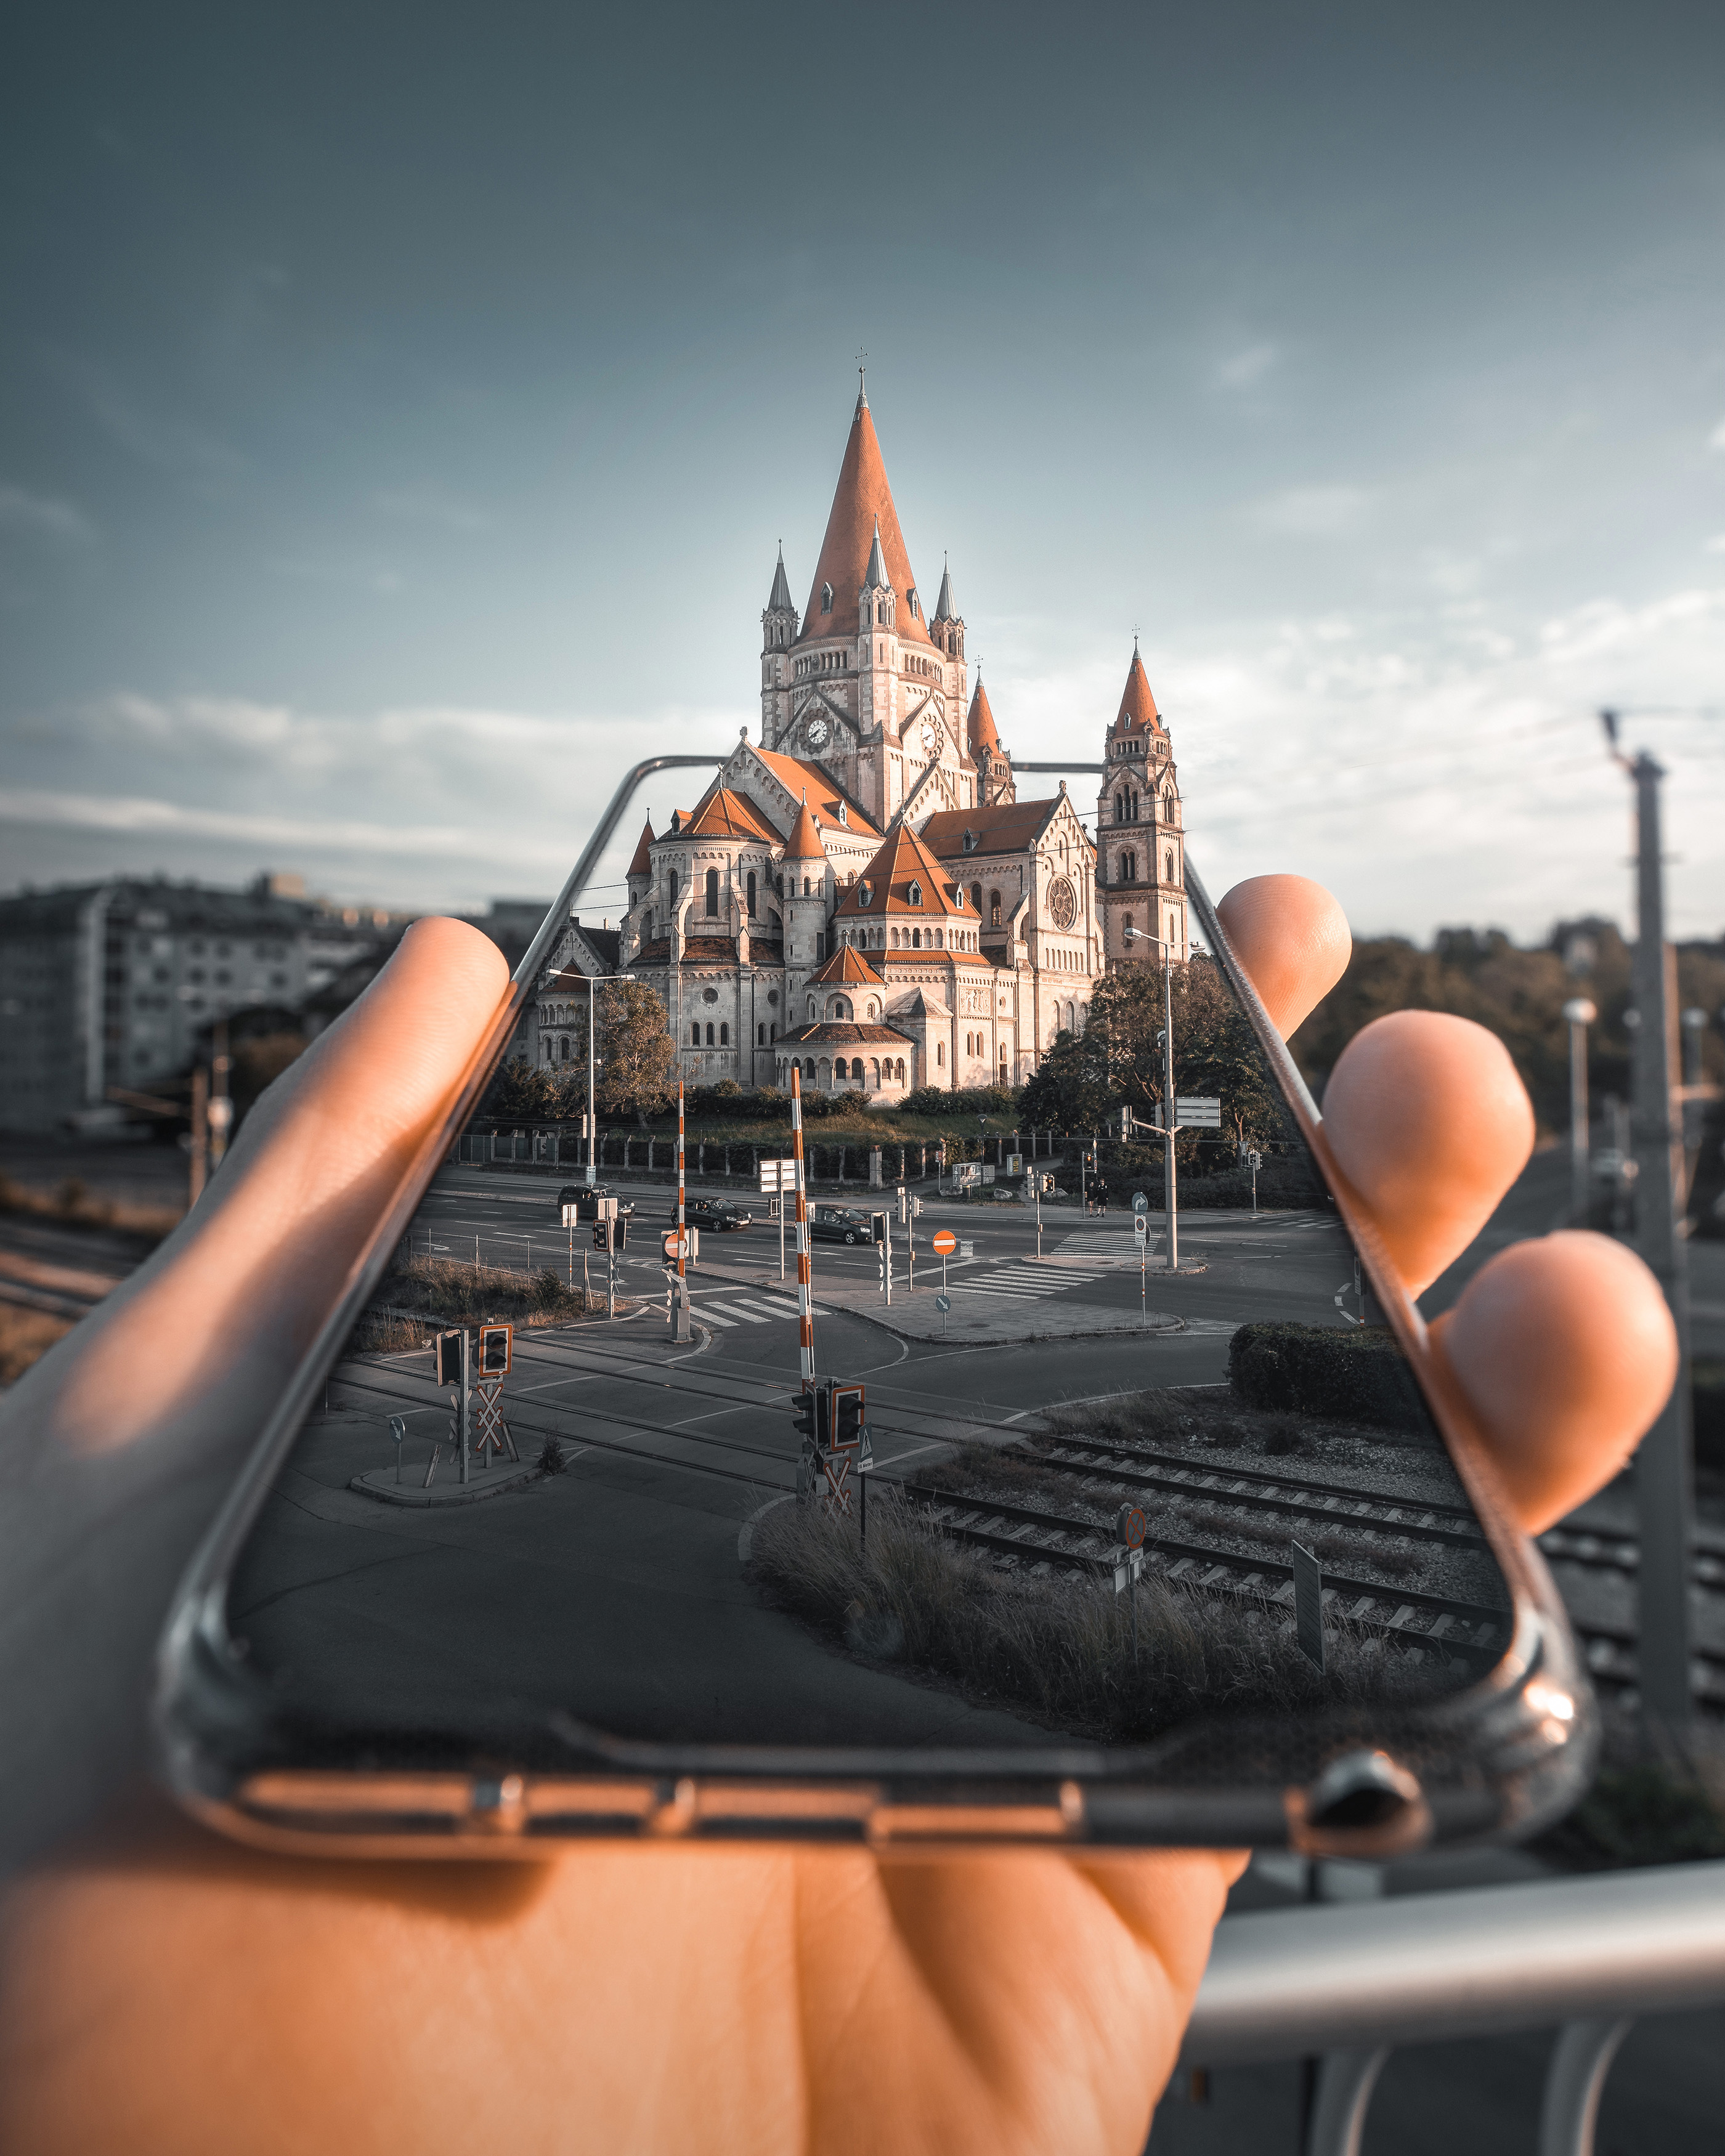
Now I pressed the key combination Shift + Option + Command + E (Windows: Shift + Alt + Ctrl + E) to combine all layers into a new layer. Then I added some light effects. For this I used radial graduated filters. At the end I applied the Camera RAW filter to make some final adjustments until I was satisfied with the result. You see, it's relatively easy to create this effect. Once you've done it yourself, you'll realize how much fun it is. I wish you a lot of success trying it out! Here you can see two more examples:
Nun drückte ich die Tastenkombination Shift + Option + Command + E (Windows: Shift + Alt + Strg + E), um alle Ebenen in einer neuen Ebene zu kombinieren. Dann fügte ich noch ein paar Lichteffekte hinzu. Dafür verwendete ich radiale Verlaufsfilter. Am Ende benutzte ich noch den Camera RAW Filter, um noch ein paar finale Einstellungen vorzunehmen, bis ich mit dem Ergebnis zufrieden war. Ihr seht, es ist relativ einfach, diesen Effekt zu erstellen. Wenn ihr es einmal selbst gemacht habt, werdet ihr merken, wie viel Spass es macht. Ich wünsche euch viel Erfolg beim ausprobieren! Hier noch zwei weitere Beispiele:

Camera: Sony A7RIII
Lens: Sony 16.35mm F2.8 GM
See you soon!/Bis bald!
Stefan

It is very creative and inspiring @travelshots. Thanks for sharing this idea!
You're welcome, thanks for your nice comment! 😊🙏
Cool tutorial!! i will try it out with the buildings where i live haha
Many thanks! Have fun trying it yourself 😃🙌
How impressive, and easy to do, of course, with some knowledge of the Photoshop tool.
Thanks for the explanation my friend, I will try to do it.
Cheers
Thanks a lot, mate! 🙏 Have fun trying it yourself 😊
That's the way it will be, mate.
cooler Trick, sieht wirklich so aus als würde das Handy die Gebäude 3D projizieren :)
Danke dir! 😊🙌