When we want to establish a control system we must evaluate some characteristics of the process, based on this evaluation we can choose the behavior that will have our control system that we can also call as control modes.
The most demanding applications may require a proportional integral proportional derivative PID control system, then you can combine two of these for less demanding systems, even a proportional only control may suffice for some cases.
Today we intend in this article to address the simplest of all that is the ON / OFF control for which we will rely on an illustrative example of a level control designed in LabView software.
Cuando queremos establecer un sistema de control debemos evaluar algunas características del proceso, en base a esta evaluación podemos escoger el comportamiento que tendrá nuestro sistema de control que también podemos denominar como modos de control.
Las aplicaciones más exigentes pueden requerir un sistema de control proporcional integral derivativo PID, luego se pueden combinar dos de estas para sistemas menos exigentes, incluso un control únicamente proporcional puede bastarnos para algunos casos.
Hoy se pretende en este artículo abordar el más simple de todos que es el control ON/OFF para lo cual nos apoyaremos en un ejemplo ilustrativo de un control de nivel diseñado en el software LabView.

The ON/OFF control is a method used to control variables that can oscillate between a controlled range of values, for the purposes of this article we will consider the level control in a tank for water storage.
The tank is emptied by gravity by opening a valve and is filled by a pump, the level at which we want to keep the tank we can call SetPoint.
Now let's consider an effect that occurs for an ON/OFF control in which we just try to keep the value in the SetPoint, for this we use a SetPoint of 50.
El control ON/OFF es un método que se usa para controlar variables que pueden oscilar entre un rango controlado de valores, para efectos de este artículo vamos a considerar el control de nivel en un tanque para almacenamiento de agua.
El tanque se vacía por gravedad al abrir una válvula y se llena mediante una bomba, el nivel en el que deseamos mantener el tanque podemos llamarlo SetPoint.
Ahora vamos a considerar un efecto que ocurre para un control ON/OFF en el que solo intentamos mantener el valor en el SetPoint, para ello usamos un SetPoint de 50.

What we observe here is that the system tries to bring the value of the level to the established SetPoint which it does very well, however a problem occurs when it tries to maintain the value at that level.
We observe that for a small difference between the desired value and the value obtained the system switches the outputs trying to maintain the setpoint, however, as it is logical to expect that the values keep changing constantly, the system makes switches at high speed, in fact many per second.
The problem is that some motors, contactors or machines that require energizing coils/capacitors for their operation cannot afford such fast commutations because they are elements capable of storing charge, and in a transient moment between the ON state and the OFF state there can be a "shock" of energy capable of destroying the equipment.
To solve this drawback we can include a variable that we will call Hysteresis, this word has many definitions and interpretations depending on the field of application, however here we will say that it is the difference between the maximum value and the minimum value that acquires a variable in an ON/OFF control system.
This means that we can allow the system to oscillate between a range of values above and below the SetPoint thus generating a delay between switches. Let us now try a hysteresis of 20 and see how the behavior changes.
Lo que observamos aquí es que el sistema intenta llevar el valor del nivel al SetPoint establecido lo cual hace muy bien, sin embargo ocurre un problema cuando intenta mantener el valor en ese nivel.
Observamos que para una pequeña diferencia entre el valor deseado y el valor obtenido el sistema conmuta las salidas intentando mantener el setpoint, sin embargo, como es lógico esperar que los valores se mantengan cambiando constantemente, el sistema hace conmutaciones a gran velocidad, de hecho muchas por segundo.
El problema es que algunos motores, contactores o máquinas que requieren energizar bobinas/capacitores para su funcionamiento no pueden permitirse conmutaciones tan rápidas debido a que son elementos capaces de almacenar carga, y en un momento transitorio entre el estado ON y el estado OFF puede haber un "choque" de energía capaz de destruir el equipo.
Para resolver este inconveniente podemos incluir una variable que llamaremos Histéresis, está palabra tiene muchas definiciones e interpretaciones según el campo de aplicación, sin embargo aquí diremos que es la diferencia entre el valor máximo y el valor mínimo que adquiere una variable en un sistema de control ON/OFF.
Esto quiere decir que podemos permitirle al sistema oscilar entre un rango de valores por encima y por debajo del SetPoint generando así un retardo entre las conmutaciones. Intentemos ahora una histéresis de 20 y veamos cómo cambia el comportamiento.
It is important to note that the range of values that our hysteresis takes is related to the SetPoint, for this case our setpoint was 50 and our hysteresis was 20 which originated oscillations between 40 and 60 being 50 (our setpoint) the central value of the oscillations.
Once the hysteresis value is set, its behavior will always be the same, if we change the setpoint value, the range in which the hysteresis oscillates will also change, but always taking the Setpoint value as the central point of the oscillations.
Es importante notar que el rango de valores que toma nuestra histéresis está relacionado con el SetPoint, para este caso nuestro setpoint fue de 50 y nuestra histéresis de 20 lo cual originó oscilaciones entre 40 y 60 siendo 50 (nuestro setpoint) el valor central de las oscilaciones.
Una vez establecido el valor de la histéresis su comportamiento siempre será igual, si cambiamos el valor del setpoint también cambiará el rango en el que oscila la histéresis pero siempre tomando el valor del Setpoint como punto central de las oscilaciones.

We can automatically detect the importance of knowing the allowed values before setting our Setpoint and Hysteresis to avoid reaching prohibited values, if we set a setpoint of 80 and a hysteresis of 50 we will get a maximum value of 105 which will cause the level to overflow spilling the liquid.
It is the same for a minimum allowable value, the hysteresis will also determine the rest time that will have each control element before actuating which is very important for the life of it.
To set the ON/OFF control from LabView I have arranged the following scheme:
Podemos detectar de forma automática la importancia de conocer los valores permitidos antes de fijar nuestro Setpoint e Histéresis para evitar llegar a valores prohibidos, si fijamos un setpoint de 80 y una histéresis de 50 vamos a obtener un valor máximo de 105 lo cual hará que el nivel desborde derramando el líquido.
Ocurre lo mismo para un valor mínimo permitido, la histéresis también determinará el tiempo de descanso que tendrá cada elemento de control antes de accionarse lo cual es de mucha importancia para la vida útil del mismo.
Para establecer el control ON/OFF desde LabView he dispuesto el siguiente esquema:
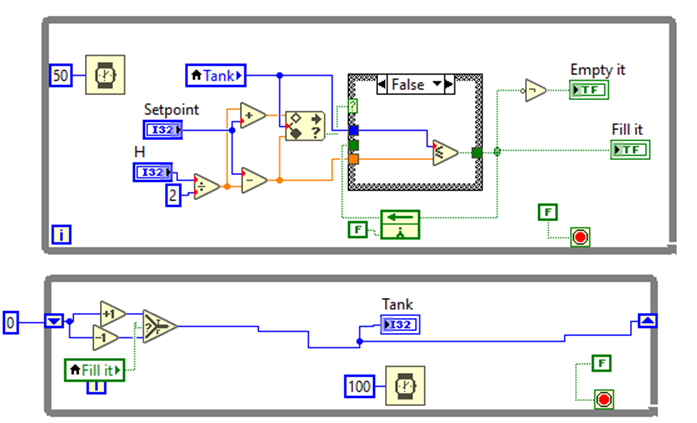
It is a simple comparison structure in which by means of a conditional block the switching values to the outputs are established.
The lower block has the function of simulating the behavior of the variable as the outputs are switched, however for a real application this block should be removed and create one that allows to receive and send data to and from the process.
In this way we have our ON/OFF control implemented, I hope the article is useful. I say goodbye until next time.
Es una estructura simple de comparación en la que mediante un bloque condicional se establecen los valores de conmutación a las salidas.
El bloque inferior tiene la función de simular el comportamiento de la variable según se conmutan las salidas, sin embargo para una aplicación real este bloque debe eliminarse y crear uno que permita recibir y enviar datos desde y hacia el proceso.
De esta forma tenemos nuestro control ON/OFF implementado, espero que el artículo te sea de utilidad. Me despido hasta la próxima.
Hi again, @electronico, cool to see your use of LabVIEW. I've used Labview for over 20 years for a lot of eleaborate industrial control systems. I'm doing more in python now with web user interfaces, but I still love labview and have built a LOT of operating control systems in the field with labview over the years. Thanks for the share, great stuff!
20 years, I am amazed my friend... you must have worked on most of the versions that have come out... surely you know a lot about the subject... I wish from time to time you could share something with us, the industrial automation area is my favorite.
Thanks for your contribution to the STEMsocial community. Feel free to join us on discord to get to know the rest of us!
Please consider delegating to the @stemsocial account (85% of the curation rewards are returned).
Thanks for including @stemsocial as a beneficiary, which gives you stronger support.
Congratulations @electronico! You have completed the following achievement on the Hive blockchain And have been rewarded with New badge(s)
Your next target is to reach 45000 upvotes.
You can view your badges on your board and compare yourself to others in the Ranking
If you no longer want to receive notifications, reply to this comment with the word
STOP