Disclaimer!
I am in no way an expert in any software I would mention in this series. Anything I mention in this post and the following posts would only be how I see/do things :> As much as I did this series to help fellow artists, I would also love to learn! So, if there's anything you would like to share to correct or improve anything in this post, I would greatly appreciate it ^^
Hi everyone!!! A little backstory about me HEHE I am currently a Game Arts and Design student and when I started getting into art, I mainly did 2D! Before I got into 3D, I didn't think I would get as invested as I am right now in 3D! Because, at the time, 3D intimidated me. I only really got into Game Arts because I wanted to do splash arts and stuff! Riot art was (and is) one of my biggest inspirations for all this (in 2D and 3D!). I really thought that I would only get into 3D to finish my requirements in school and once I graduate I would go back to my 2D arts. but. 3D. is. so. FUN! Whaaat? 3D is actually insanely fun. One time my friend saw me clapping in excitement at around 3am and assumed that I was playing Valorant. I wasn't. I was clapping because of how cute my bricks looked. At 3am.
While it's really tedious and could be difficult at times, 3D can be so much fun! And so, I've been wanting to share my experiences as well as the techniques I learned from my old friend, Youtube, for a while now. 3D wasn't as intimidating as I thought it was going to be ;w; I really wanted to help out fellow artists that find 3D too daunting to try. And so I thought, maybe if I made a guide (or something similar) from a fellow beginner's perspective, aspiring 3D artists wouldn't feel as intimidated as I was when I was just starting out :>
So, HELLO! Welcome to How to 3D! From a fellow beginner's perspective ♥ HEHE
Okokokok here I go.
Okokok. First and foremost, there are many ways to tackle 3D art. There's 3D for still images, 3D for animation, 3D for visual effects and many more I probably still don't know about. What I would mainly talk about in this series is 3D for games! Art, in general, for games is more technical than expressive. For your art to work in a game, there are extra steps you need to do to assure smooth gameplay for users.
So, the very basics of what you need to know about in 3D are modeling and texturing. For this post, let's go over everything first to have a general view on the process of making 3D :>
Modeling!
So in modeling, you are creating the actual 3D objects that you would use for your art. One of the important things to consider in modeling is Polygon Management.
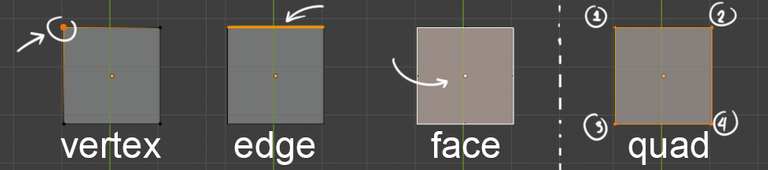
Your 3D objects would be made from shapes/polygons that consist of vertices and edges. So, in 3D game art, having quads (4 vertices per polygon) is a really good practice because most game engines work best with having quads.
There are different ways to model an object:
There's box modeling: using primitive premade shapes as a starting shape for your 3D object. From there you modify the vertices, edges, and polygon faces to achieve your desired shape;

sculpting: using the sculpting mode and actually carving the stuff yourself like how you do in physical clay sculpting. This would mean that your object would have a lot of polygons to allow very specific modifications in sculpting. If your object doesn't have enough polygons it would either (1) be hard to sculpt as the object would only be modified to an extent (2) add more polygons as you sculpt;
and a lot more other ways but what I think is the most basic way of modeling is edge modeling!
While all of the modeling techniques can be super helpful in many situations, edge modeling gives you most control for your 3D objects because it is quite literally moving every single edge and vertices manually. With edge modeling, you usually start with a single vertex then you extrude/extend that vertex to create an edge. You keep extruding your vertex and creating edges until you complete the outline of the model you want to create. This is extremely helpful specially when modeling organic objects that have very precise features like the face.

Once you are done and happy with your model, you can start with unwrapping! If you are planning to export your 3D art and upload it for other people to use, it is important that your objects are properly unwrapped for your image textures to work :>
So, what is unwrapping?
I think the best way it was described to me was to think of it as literally preparing to wrap a box using a single wrapper. You would be preparing to add cuts to the wrapper so it would fit perfectly to the object you are wrapping. Unwrapping in 3D is adding seams/cuts in your 3D object to lay the 3D objects flat. Unwrapping in 3D assures that your textures would, well, wrap around your 3D models perfectly :>
TL;DR
A 3D object consists of polygons. Polygons are the faces/sides that are made of vertices and edges which you can move around to modify the shape of your 3D object. It is important that your polygons are well managed and planned so you have absolute control of how the model is going to be shaped. After the modeling is unwrapping. Unwrapping is adding seams that would allow you to unwrap your 3D objects in the most optimal way for your textures.
TEXTURING HEHE!
Next is texturing! My, oh my, my favorite. This is where your unwrapping would be important! If you're planning to export your 3D object somewhere (in 3D game art's case, game engines), it would be easier to apply the textures if (1) the unwrapping is optimal, (2) the image textures are in 1 image or at least properly segregated.
What is texturing?
Texturing is really just adding colors and details to your object! There's a lot of ways to texture but I plan to make a separate post dedicated to texturing so I can explain more HEHE For now, think of it as simply assigning colors/materials to your 3D object :> These materials can hold a lot more information other than color such as reflectivity/specular, roughness, transparency/alpha, metallic properties, AND A LOT MORE!
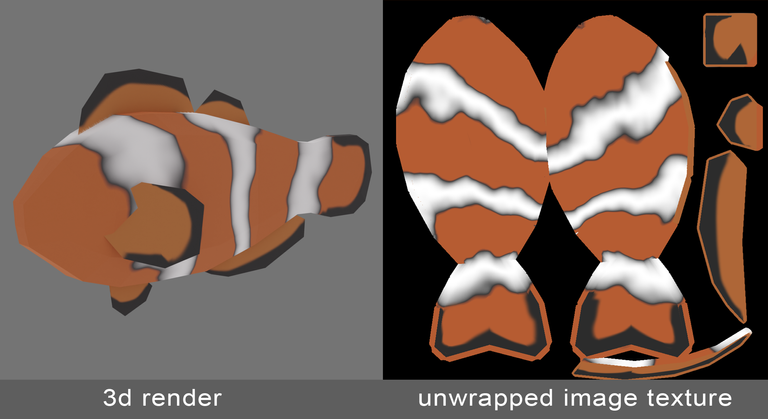
Here's an example of a cute 3D fish with unwrapped image texture HEHE But before your image texture ends up looking like the one on the right, there's this cool thing called baking. Before I knew what it meant, I tried to Google 'baking blender'. Yeah, you can guess how that turned out. Remember to add '3D' when you wanna Google stuff >u<
ANYWAY, What is baking?
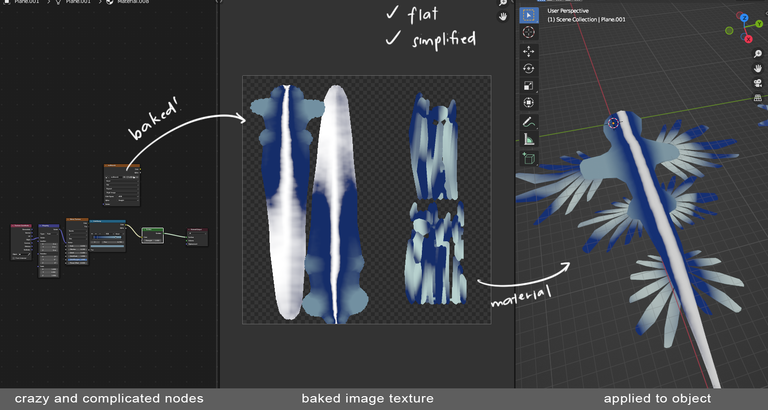
No cookies here, sorry folks. You know how I mentioned that materials can contain a lot more material information? Well, baking textures is essentially compiling all this complicated information and putting it all in this baked image. So instead of having all the complicated stuff, you have a single image texture :> It is used to create maps which are just image textures that can be used for other properties like roughness, alpha, etc.
Baking stuff not only applies for colors but also for other material properties. For example this alpha map for this cute crab:
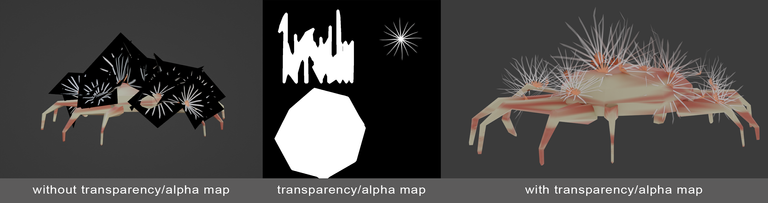
For this one, I wanted only the spikey stuff on the crab to be visible and the black parts to be transparent so it wouldn't be too obvious that the flowery spikey stuff on top of the crab is just planes rather than actual 3D objects. So I baked an alpha map that would allow me to control which parts I want to be visible and which parts I want to be transparent :>
TLDR;
After you have created your 3D object and unwrapped it, applying textures is done by adding materials that can contain different properties (other than color). If you want to export your object, you can bake the information into a single image which would help simplify all the information you did in 3D. Baking not only applies for textures but also other material properties such as roughness, alpha, etc. This is called baking maps.
I think that concludes this quick intro to 3D! YAY! Now that we have all that concepts and terminologies glossed over, let's talk about details next time :> I hope I was of any help and that I wasn't too scattered and hard to understand ;w; Until next time ♥
That's about it!
If you wish to have an amazing companion through your drawing journey, feel free to join our discord! It's full of amazing artists, both new and old, who are willing to share their experiences. I learned a lot from them, I hope you will too n_n
I also have artstation and twitter! You can check em out here:
https://www.artstation.com/kothy
https://twitter.com/kothyyyy
Thank You!
Feel free to comment any tips or suggestions. It will be greatly appreciated! If you liked the content, please leave an upvote. For more, please follow @kothy.
All images were made by @kothy
All rights reserved
!discovery 30
This post was shared and voted inside the discord by the curators team of discovery-it
Join our Community and follow our Curation Trail
Discovery-it is also a Witness, vote for us here
Delegate to us for passive income. Check our 80% fee-back Program
Next step going into detail about each bit? You could fill books 😆
Yes HEHE
Oh and are you going to be giggling the entire way through like you were here XD
Is it distracting? ;w;
I found it more amusing. There are probably people out there that would get annoyed but I wouldn't worry about it unless you want to sound more professional or something :)
Hmmm, maybe giggling less >u<