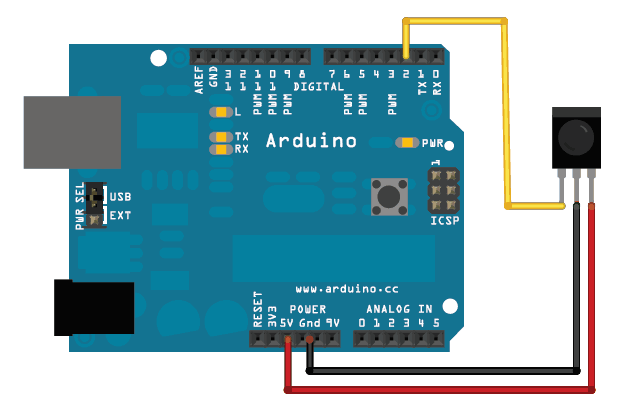
Everyone has an old remote control or a universal remote somewhere. With the infrared receiver TL1838 VS1838B you can capture the signals of an remote. Connect the reciever as shown in the picture.
For my project I have my Harmony One set to Sony codes. On the serial monitor you can see that it comes in as a 4 digit codes. Then you can program your arduino to do something only when this code comes in. I have created an example for code 1253.
// goto https://williewortel.eu for more howto tutorials.
#define ir_pin 2
int debug = 0; //Serial connection must be started to debug
int start_bit = 2000; //Start bit threshold (Microseconds)
int bin_1 = 1000; //Binary 1 threshold (Microseconds)
int bin_0 = 400; //Binary 0 threshold (Microseconds)
int longpulse=1; //If longpulse==0 it means pulseIn() timed out
volatile byte remoteOn = 0; // ==1, means remote has been pressed
void setup() {
pinMode(ir_pin, INPUT);
Serial.begin(9600);
Serial.println(“HUIS VAN DE TOEKOMST “);
}
void loop() {
while (remoteOn==1)
{
int key = getIRKey(); //Fetch the key
Serial.print(“Key Recieved: “);
Serial.println(key);
remoteOn=0; //reset flag
longpulse=1; //reset longpulse
switch (key)
{
case 1253:
Serial.println(“knop 1253 “);
return;
}
}
attachInterrupt (0, remoting, RISING);
}
int getIRKey() {
int data[12];
while((longpulse=pulseIn(ir_pin, LOW)) < 2200)
{
if(longpulse==0) // if timed out
{
break;
}
}
data[0] = pulseIn(ir_pin, LOW); //Start measuring bits, I only want low pulses
data[1] = pulseIn(ir_pin, LOW);
data[2] = pulseIn(ir_pin, LOW);
data[3] = pulseIn(ir_pin, LOW);
data[4] = pulseIn(ir_pin, LOW);
data[5] = pulseIn(ir_pin, LOW);
data[6] = pulseIn(ir_pin, LOW);
data[7] = pulseIn(ir_pin, LOW);
data[8] = pulseIn(ir_pin, LOW);
data[9] = pulseIn(ir_pin, LOW);
data[10] = pulseIn(ir_pin, LOW);
data[11] = pulseIn(ir_pin, LOW);
delay(50); // to slow down the loop if needed
if(debug == 1) {
Serial.println(“—–“);
}
for(int a=0;a<11;a++) { //Parse them if (debug == 1) { Serial.println(data[a]); } if(data[a] > bin_1) { //is it a 1?
data[a] = 1;
} else {
if(data[a] > bin_0) { //is it a 0?
data[a] = 0;
} else {
data[a] = 2; //Flag the data as invalid; I don’t know what it is!
}
}
}
for(int a=0;a<11;a++) { //Pre-check data for errors if(data[a] > 1) {
return -1; //Return -1 on invalid data
}
}
int result = 0;
int seed = 1;
for(int a=0;a<11;a++) { //Convert bits to integer
if(data[a] == 1) {
result += seed;
}
seed = seed * 2;
}
return result; //Return key number
}
void remoting() // The ISR
{
remoteOn=1;
}
Hi. I am a volunteer bot for @resteembot that upvoted you.
Your post was chosen at random, as part of the advertisment campaign for @resteembot.
@resteembot is meant to help minnows get noticed by re-steeming their posts
To use the bot, one must follow it for at least 3 hours, and then make a transaction where the memo is the url of the post.
If you want to learn more - read the introduction post of @resteembot.
If you want help spread the word - read the advertisment program post.
Steem ON!
Arduino projects are very interesting and can be used for lot of things. This is a good one, what you are suggesting is to get the signal and then use in the system to do whatever other work right?
yes thats right