안녕하세요 Hash 입니다. 오늘은 초보자들도 쉽게 따라할수 있는 스팀잇 배너 만드는 방법을 소개해보자 합니다.
넣고 싶은 그림이나 사진은 있는데 포토샾 쓸줄 모르시는분들, 배너를 스스로 만들어보고싶은분들에게 도움이 되길 바라며 포스팅을 올립니다.
필요한 기구: 포토샾 (CC 이후의 아무버젼), 컴퓨터와 마우스 (아무사양)
Hi Everyone, I would like to introduce that "How to create Settmit banner" -  I think it's perfect for someone who wants to create own banner but have no idea what todo.
This posting will guide how to make it  from A to Z, I hope i will helps!

What you need: Photoshop CC (any version), computer
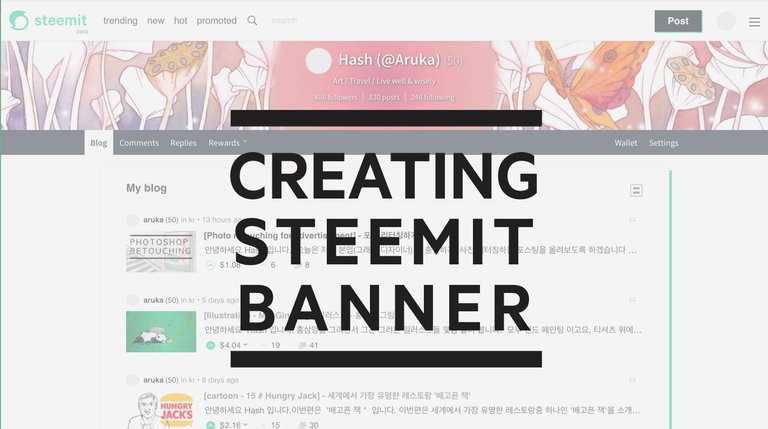
1. 내 스팀잇 사이트에 들어갑니다. 저기 배너 부분 보이시죠? (빨간색 테두리) 저 부분만 '부분 캡쳐' 해봅니다.
맥을 쓰시는 분들은 단축키 Shift + Command +4
일반 컴퓨터를 쓰시는 분들은 알약 캡쳐 등을 다운받아서 사용하시면 됩니다.
Go to Steemit site. See the red frame on the picture? Let's do the screen capture.
If you use Mac, the short cut is Shift + Command +4,
If you use a normal computer, you can use screen capture program.

2. 포토샾을 켭니다. File > open 으로 가셔서 아까 캡쳐한 배너 이미지를 엽니다.
Turn on Photoshop program. Go to File > Open, open the banner image that you captured.

3. 포토샾에서 View > Rulers 로 가셔서 줄자가 화면에 보이게 합니다.
Go to View > Rulers, click the rulers. Now you can see the rulers on your screen.

4. 이제 화면에 있는 눈금에서 드래그하여 중앙선을 잡아줍니다.
Drag from the ruler, put the line at the centre of your picture.

5. 배너에 있는 내 글씨가 잘보여야 하겠죠? 복잡한 이미지를 배너에 넣을계획이면 이 단계를 수행해주시고, 단순한 이미지라면 이단계는 건더뛰셔도 됩니다 ^^
오른쪽에 있는 Layer 창에 가셔서 메모지 모양 (오른쪽에서 두번째) 의 커서를 클릭하여 새 레이어를 만듭니다.
Go to Layer, click the note icon (second icon from the right side), create a new layer.
If your image is a simple image, you can skip this step. Otherwise, this step will make to easy to read your title and name :)

6. 왼쪽에 있는 툴바 (길쭉한 툴바)에 가셔서 Ellips Tool 커서를 지그시 누르고 있으면 도형들이 뜹니다. 그중 동그란 도형을 선택해주세요.
Go to Tool bar, and hold the Ellips Tool. then you will see a couple of options. Choose the round shape.

7. 원을 만듭니다. Shift 키를 누르면서 원을 만들면 정확한 원이 만들어 집니다.
Create a circle. You can make a exact circle if you press Shift key at the same time.

8. 다시 오른쪽에 있는 레이어 창으로 가셔서 방금만든 원이 있는 레이어를 "오른쪽 마우스 클릭 > Rasterize Layer " 클릭
Go back to the Layer window, and choose the layer that you just created circle. Click the layer with right mouse, and choose Rasterize Layer.

9. 이제 만든 원을 부드럽게 해줍니다. 상단에 있는 Filter > Blur > Gaussian Blur 클릭
Let's softer the circle - Go to Filter > Blur > Gaussian Blur and click.

10. 맘에 드는 만큼 부드럽게 해주세요~ 난 부드러운 여자 +_+
Make softer as much you want :))

11. 본인이 좋아하는 이미지를 오픈합니다. 혹은 바탕화면에서 좋아하는 이미지를 포토샾으로 드래그 합니다.
Now, open the image that you want to put in your banner. you can also drag the image from the screen to Photoshop directly.

12. 뙇! 이미지 레이어를 원 아래로 옮겨주세요
Boom!! Move the image layer to under the circle layer.

13. 그런다음, 이미지를 복사합니다. 아시죠? 복사 단축키... 만인의 공통 단축키... Control + C >> Control + V
After that, copy the image and paste. The short cut is Control + C >> Control + V

14. Move tool (V) 로 대충 이미지를 요리조리 움직여도 보고 , 놀아봅니다. 맘에 들면 오케이!
Move and play your image until you like with Move tool (V)

15. 그림이 중복되는 느낌이 나지 않도록 가장자리를 부드럽게 해줍니다. 지우개로 가장자리를 지우세요.
왼쪽에 툴바에 가셔서 지우개클릭하거나 E 단축키 사용
Tidy up the edge of the images, use the eraser tool E

16. 원 크기도 조절해주세요. Move tool (V) 을 클릭해주시고, Shift 키를 누르면서 드래그 하면 작아졌다 커졌다 합니다.
Resizing the circle size if you need. Click the Move tool (V) , if you hold Shift key, and drag. You can change the size now.

17. 완성
All done!

18. 이제 이미지를 업로드 합니다. 스팀잇에 직접 업로드 할수 없으니 구글 드라이브를 씁니다.
It's time to upload your image and publish. This is banner, you cannot upload your images directly.
I normally use Google drive / image, If you have no methods to upload, use your Google account.
Go to your Google (need to log in), go to image upload (it's top on the right, small grey box).

19. 구글 드라이브 이미지 복사를 해줍니다. "Copy image address" 를 클릭해주시면 됩니다.
Open your banner image after uploaded, and copy image address.

20. 내 스팀잇 으로 돌아와서, Settiing 으로 가서, COVER IMAGE URL 에 아까 복사한 이미지 주소 복사를 붙여넣기 합니다.
Comeback to Steemit. Go to Setting, paste the copied image address.

21. 짜잔~ 완성 ^^ 나만의 스팀잇 배너가 완성 되었네요. 휴~
Well done! Finally completed own your Steemit banner :)

이상으로 [Photoshop - How to create Steemit banner] - 스팀잇 배너를 만들어보자 포스팅을 마칩니다.
초보자분들도 쉽게 따라하시고, 모두들 자기 개인소장 배너 하나쯤은 폼나게 가지고 있으면 좋겠죠?
자그마한 제 포스팅과 제가 가지고 있는 스킬을 공유해보며, 모두에게 도움이 되었길 바래봅니다 ^^
This is the tip - [Photoshop - How to create Steemit banner].
I really hope my posting is really easy to follow and helps to everyone.
Please share and re-steemit if it helped you or good information to share :)
우와~!! 홍삼님 그림 너무 예뻐요~!! +,.+b
쪼야님 마음씀씀이가 더 이쁩니다 +_+b
저도 배너 만들어봐야겠어요~ 이건 리스팀 각! 감사합니다~ @aruka 님! 앞으로도 종종 찾아뵐게요ㅎ 팔로 하고 갑니당!
무간도님 리스팀 너무 감사합니다^^ 도움이 되었으면 좋겠네요! 맞팔 해드렸어요
제가 더 감사해요~~!! ㅎㅎㅎ
역시 ㅠㅠ 엄청나요...
너무 예뻐..ㅠ... 아루카님 이런 그림도.. 나중에 다 올려주세요..
그...그럴까요.... 씨마 부탁이라면 뭐든지 +_+
배경 이미지 참 이쁜데요? : )
역시 능력자였어.. -_-+
헛..... 감사합니다 ^^: 마스터트리님 능력도 멋지세요 +_+
헛.. 그림이 완전 예쁘네요 :) 튜토리얼 감사하빈다!
헛... 오래전에 그림그림이예요 ^^: 감사합니다 ㅎㅎㅎ 캐롯님 좋은 저녁 되세용!