
With the attack on Bree-land prevented, the heroes discover to their horror that some villagers have been kidnapped by the orcs. The orcs are tracked North into the Weather Hills. As the heroes enter the hills, the weather begins to turn unusually cold…
The Weather Hills is the second quest in the Lost Realm deluxe box. Whereas Intruders in Chetwood provided a showcase of the new side quest mechanic, Weather Hills attempts something different. Side quests are still important, but so are the traits on Treachery cards, which is a recurring theme in the cycle. The quest also has a rapid change of pace midway, as you go from hunting the orcs to being ambushed. As you make your way through the hills, it seems like the forces of nature are working against you…
The Weather Hills
- Found in: The Lost Realm Deluxe box, quest 2
- Official Difficulty: 5
- Community Difficulty: 6.4
- Encounter sets: Foul Weather, Ruins of Arnor, Angmar Orcs and the Weather Hills
- Quest cards: 2, but with various encounter side quests
- Play if: You enjoy fighting against the elements if you want a significant true solo challenge if you want a quest that forces you to quest AND fight. You like quests where healing is NOT optional.
- What is different about this quest?: Emphasis on Weather treacheries, a separate encounter deck for orc enemies, a change of pace midway
- Solo or multiplayer?: This author found the quest to be very punishing in true solo, as you will likely reveal multiple encounter cards pr. round, and clearing an active location yields a very high risk of pulling out an enemy. It is also easy to get location locked. The quest requires healing as well, and will therefore likely be easier in multiplayer.
- Can I run side-quests for this scenario?: As stage 1B requires no progress, you can indeed side quest. However, there are several side quests in the encounter deck so you might get busy clearing those. Some effects punish you based on the number of quest cards in play, so be careful before dropping a ton of side quests in play.
- What to look out for?: Weather Treacheries, location lock, cornered orcs making multiple attacks, beefy orcs entering play when the active location is cleared.
The Quest
Setup
For setup, you have a few things to do. First, you set aside orc ambush and Amon Forn, as these will come into play later. Exposed Ridge is made the active location, and 1 Weathered Hilltop is added to the staging area. This means that the initial staging area will be the same for every game you play – no choice or random card reveal. The objective hunting the orcs is added to the staging area, which will determine when you advance to 2A. Finally, you are instructed to create the Orc deck by shuffling all enemies from the Angmar orcs encounter plus all copies of Concealed orc-camp into a separate deck. This means that the encounter deck will be very light on enemies. Once this is done, the first round can begin
Quest card 1B: Scattered Among the Hills
The first thing you will notice when you flip the card is that it contains no instructions on how to advance to stage 2A. This information is on the hunting the orcs objective – you will need to find the orcs in order to advance.

For every orc you kill, you place a resource on the objective. Once you have X+3 (X is the number of players in the game) you advance. But didn’t we just remove most of the enemies from the encounter deck? Yes, but 1B contains instructions of when to reveal enemies from the orc deck. Every time the active location is explored, you will reveal the top card of the orc deck (or the top 2 cards if there are 3 or more players in the game). Keep in mind that this is ONLY for the active location. Anything removed from the staging area, through Northern Trackers or Asfaloth will not trigger this effect. This basically means that if you want to keep the staging area clear, by exploring a location each round, you will get an enemy or a location as well from the orc deck. And as we have removed most enemies from the deck, the chance of drawing into a location during staging is quite high. At this point, you almost hope for a treachery, right? Wrong! For quest card, 1B also has an extra little note to add: The first weather treachery revealed each turn gains surge. As there are 10 weather cards in the deck, it is likely that you will reveal an extra card during staging, plus an extra card from the orc deck if you clear the active location. It is easy to get location locked, due to the large number of cards revealed, and the punishing consequence of exploring the active location. Therefore, Location control is a good idea to bring.
During setup, we added an active location, plus a location to the staging area.
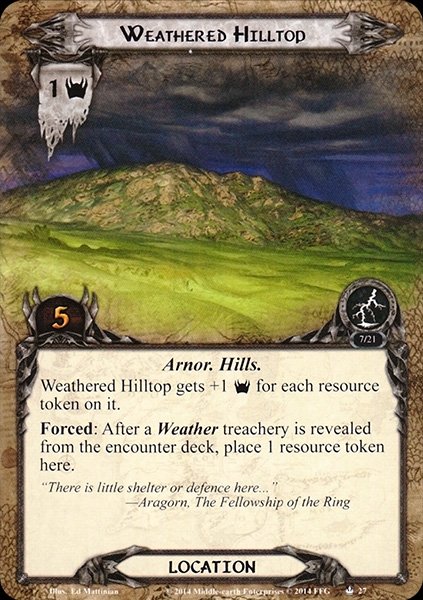
This increases the risk of location lock right out of the gate and means that you run a very high risk of seeing a powerful enemy in turn 1 if you clear the active location. The Weathered Hilltop is not so bad, as it only starts at 1 threat. With 5 quest points it is hard to remove through location control, so you will likely have to remove it by travelling through it. However, every time a Weather treachery is revealed you add a resource token to the Weathered Hilltop, and the location gets +1 threat pr. resource token. As we will see, there are quite a few Weather treacheries in the encounter deck, and if multiple copies of the location hit the table (there are 2 more in the deck), staging threat can easily grow out of control, as the first Weather treachery surges each turn. You might want to travel to it right away. But since we already has an Exposed Ridge in the active location slot, you have to clear this first (and deal with the enemy/location it brings out). Exposed ridge only has 3 quest points, so clearing it should be attainable in turn 1. If not, you will suffer the Forced effect of Exposed Ridge. When Exposed ridge is the active location, at the end of the refresh phase, each player deals 1 damage to a character he/she controls. So it is a minor form of archery that will target each player at the end of the round. This effect seems a bit arbitrary at first glance – surely, 1 damage to a character is not so bad. It may be preferable to take one damage rather than having an orc to deal with from clearing the active location. But to understand why this one damage can be problematic, it is necessary to take a closer look at the encounter deck.
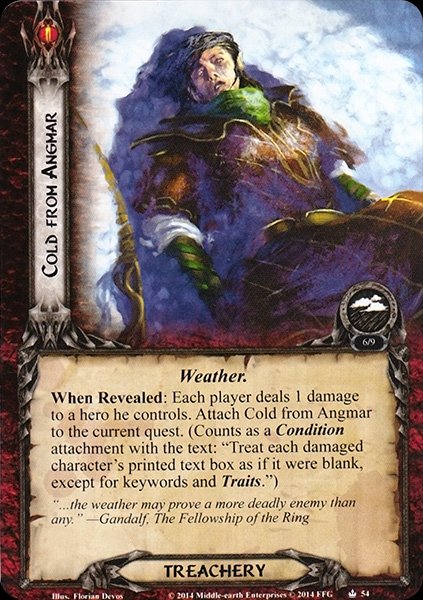
Several shadow effects punish you for having damaged defenders and damaged characters. If you let the Exposed ridge ping you for 1 damage each round, the chance of getting severely punished by shadow card effects is highly increased. Healing is therefore generally a good idea, to keep the number of damaged characters down. Warden of Healing is obviously your best option, but this author also found good use of Dunedain Remedy. Often, it is a good idea to assign these 1 damage points to one character, to keep the total number of damaged characters down. The exposed ridge shadow effect itself gives +1 attack pr. damaged character the defender controls, which can quickly escalate. The encounter set also contains a very annoying condition attachment, Cold from Angmar. This condition attachment deals one damage to a hero from each player, and attaches itself to the quest card. While it is in play, the text box of each damaged character is considered to be BLANK, minus traits and keywords. See now why you want to keep the number of damaged characters to a minimum? The good thing is that it can be dealt with through your favourite method of condition control. Athelas is good here, as it both can remove condition attachments and heal damage. Cold from Angmar also attaches to the current quest, meaning that it might go on a side quest, if you are doing one of those when you reveal it. If it shows up right as you are about to advance, it may also have negligible effects. But early in the game, it may wreck you. However, if you play with a damaged Beorn hero, he will lose the restriction that he cannot have attachments, allowing all sorts of shenanigans… Double blade of Gondolin, anyone? Jokes aside, you need to have a plan for how you will deal with the initial board state. Do you risk taking some damage and keep the Exposed ridge in play for a round? Or do you blast through it and deal with the enemies that it spawns? This ultimately depends on your deck and your strategy. To help you make this decision, it might be worthwhile to take a look at the Orc Deck, to see what you have in wait.
The Orc Deck
The Orc deck contains mostly enemies and is tricky to balance for the players – you want to quest enough to clear the active location and keep yourself from location lock, but also hold enough characters back so you can defeat whatever the Orc deck throws at you. Readying effects can help with this, as can ally swarms.
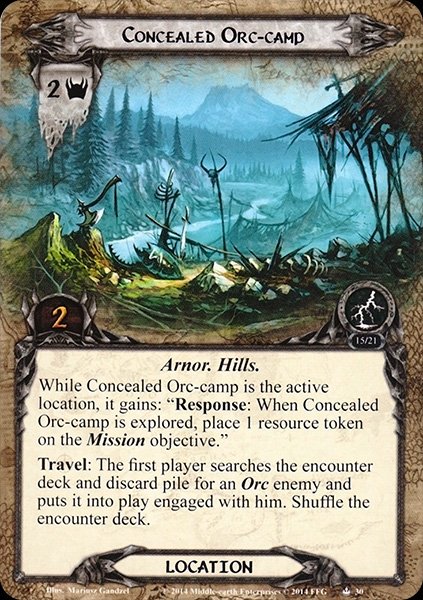
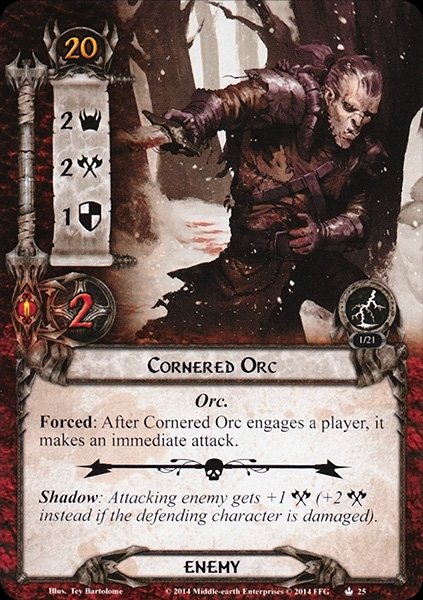
The only non-enemy card in the orc deck is Concealed orc-camp. This is a two-threat location with a travel cost requiring you to pull out an enemy from the encounter deck or discard pile. This will likely be a Cornered Orc (see description above) essentially meaning that you have to defend two attacks. This can of course be nullified with Thror’s Map. When you clear concealed orc camp, it will place a resource on the Hunting the orcs objective, bringing you closer to advancing the quest.
The Angmar Orc is not really a hard-hitter. He attacks for 2, so he can be blocked by modest defenders. With his 3 defense/3 HP he can be tough to kill, as you need quite a lot of attack power to put damage on him. However, his most annoying feature is his forced effect: When revealed you either have to discard an ally, or reveal an additional encounter card. Remember that if you have not drawn a weather treachery yet this turn, this can easily turn into two encounter cards, or contribute to the location lock. It can therefore be beneficial to keep cheap allies such as Snowbourn Scout (what, me again?) or Squire of the Citadel around as insurance. If you get one out and defeat it, it makes a good candidate to fulfil the travel cost of Concealed orc camp, as you bypass the When revealed effect of this card.
The Angmar Marauder is maybe the most ideal card you can draw from the orc deck. He only attacks for 3, making him easy to block for Beregond, Amarthiul or one of the other dedicated defender characters. He has 2 defence and 4 hit points meaning it is easier to damage him in combat, but he is still within Gandalf bomb range. The only problem is if you for some reason have to chump block him, as killing a character sends him back to the staging area. With the possibility of +2 attack being very likely, you have to be careful with who you select to block him. With 3 threat, he can easily prevent progress from being placed. Besides this, he should be easy to deal with.
The Angmar Captain is the one card you hope to avoid. With 35 engagement cost he can be avoided for some time, but he will contribute 3 threat while doing so. He attacks for 5, which can become 7 through shadow effects, so you need super defenders like Beregond with Gondorian Shield or a powered up Jubayr with Hauberk of Mail and a few of his buddies. Arwen is of course also quite good at building up a good defender. Chump blocking is unfortunately a very dangerous game here, due to the Captain’s Forced effect. If he kills a character, the defending player discards the top card of his/her deck, and if the discarded card is an ally, the Captain makes an additional attack, which usually means game over. Keep in mind that he is not unique and not immune to player card effects, so all combat control tricks can be applied, from Feinting to throwing Forest Snares. Otherwise, dispose of him quickly, and don’t allow him to kill your allies.
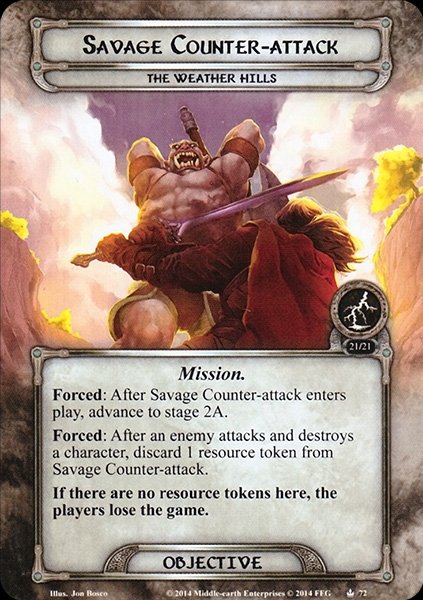
Throughout this stage, you have to carefully manage your staging area. If you don’t clear locations, you risk that they accumulate and location lock you. If you clear them every round, you might be overrun by enemies. It is important to keep notice of the board state. A good tech to quest with characters where you can control total willpower, such as Eowyn or a character with Protector of Lorien. That way, you can decide to clear the active location or not. Kill the enemies as they are revealed, heal as many damaged characters as you can, and prepare for the next stage. Once you have x+3 resources on Hunt the Orcs (x is the number of players), then the objective will flip to reveal Savage counter-attack! The orcs are striking back! Savage counter attack retains the resource tokens from Hunt the Orcs. First instruction here is to advance to 2A
Quest card 2: Cornered Animals – 20 quest points
Stage 2A first instructs you to end the current phase (which will likely be combat, meaning that you can’t deal with more enemies this round). The discard pile and the orc deck are shuffled into the encounter deck, meaning that the tougher orc enemies now can be revealed, and their nasty shadow effects should be taken into consideration.
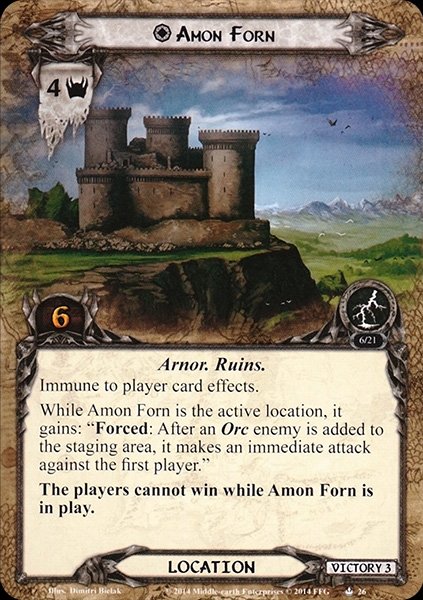
The side quest Orc Ambush is revealed, requiring each player to fetch an orc enemy from the encounter set or discard pile, while also providing a +1 buff to threat, attack and defence of each orc enemy. This side quest requires 4 quest points to clear, so it should be possible to clear it fast (unless you have taken too much damage… You will see why in a moment). The quest card also adds Amon Forn to the staging area, a 4 threat/6 quest points location that is immune to player card effects, and causes orcs to make an immediate attack when added to the staging area, as long as Amon Forn is the active location. The quest cannot be defeated while Amon Forn is in play, meaning that you have to clear it. The interaction betweeen the Orc Ambush and Amon Forn is obvious, and makes every orc enemy revealed more dangerous.
Stage 2B furthermore adds that each damaged character gets -1 willpower, showing once again why healing is so essential. This, combined with the high threat of Amon Forn and the boosted threat to orcs from Orc ambush means that clearing orc ambush might not be so trivial. Stage 2B requires 20 quest points to clear, so questing is not trivial. Obviously, keeping your questers free of damage through healing effects and stacking damage on other characters (preferably attackers) is a good strategy here. At this point it might seem like a good idea to take your time, stabilize your board and deal with the side quest and Amon Forn. However, there is a clock at work. Remember the resources on Savage counter attack? If the number of resources reaches 0, you have lost. Every time a character is killed, you remove a resource, making chump blocking a bad idea. Likewise, stage 2B instructs you that at the beginning of the quest phase, either reveal an additional encounter card this phase or remove a resource token. There is no increased reward from completing with all tokens in play, so feel free to discard a few of them, to give yourself some breathing space. In multiplayer you will likely need to determine who can survive blocking an attack and who will need to chump block. This will give you an overview of how many tokens you have left on Savage Counter attack until you have stabilized the board once again. A cannot stress how handy a super-defender is to prevent a loss from Savage Counter attack. Likewise, shadow cancellation can be very effective to prevent enemies from getting huge attack bonuses. Having a Beregond or Jubayr can really make a difference here.
After the first round of questing, see if it is possible to take out Orc Ambush. You will want to kill the enemies you are engaged with (you likely picked cornered orcs, unless you feel confident and can deal out a lot of damage to an Angmar orc), and having cleared that side quest will make your life easier. Travel to Amon Forn once you feel confident you can clear it the next round. Healing is once again a super good idea, as it increases your questing power. If the location and side quest can be cleared, you stand a good chance of winning. You will likely reveal an extra encounter card most rounds, depending on how many characters died during the inital attack, and during the clearing of Amon Forn. The super defenders with Sentinel mentioned above are again highly effective, to ensure that no character dies, allowing you to save the tokens for revealing fewer encounter cards. High willpower is required, as 20 quest points is no small feat when you reveal one extra encounter card each turn. If you can keep the staging area fairly clear, this should be attainable in a few rounds. Once you have cleared Amon Forn, you have won the game!
The Encounter Deck
Global
- The Normal encounter deck holds 33 cards, which is slimmed down to 26 in Easy mode.
- Shadow effects are not as common as in other quests, only 61% of cards in Normal mode and 53% of cards in Easy mode sport a shadow effect.

- Average threat on cards revealed is really low, about 1.1 threat/card in both modes. This is due to the high concentration of treacheries that do not have a printed threat. Be on the lookout for those Weathered Hilltops though, they can get nasty real quick.
- Surge is only present on three of the side-quests. However, on stage 1 of the quest, each first revealed Weather treachery also gains surge, making you go through the deck much faster.
- Doomed 2 is the only instance of the Doomed keyword in this quest. There are 2 copies of Freezing Blast that have this keyword. Further threat raising effects are still in the game though, so threat reduction can be a lifesaver in these hills. Search the Ruins can really cause a rapid gain in threat if left unchecked.
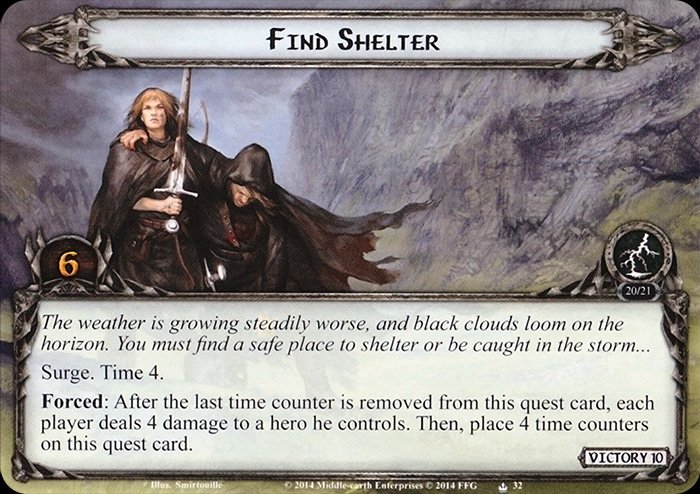
- The Time keyword is back again, this time appearing on the Find Shelter side-quest. As there are no other cards effecting the keyword, you can be pretty confident that the timer will run out in exactly 4 turns.
- Immunity
- Amon Forn is immune to player card effects
At first glance, the encounter deck seems pretty location/treachery balanced, but remember that most enemies are in the Orc deck during the first few rounds of the game. This isn’t a second Emyn Muil, there are actually some heavy hitting enemies in this quest. The Orc Deck consists out of 11 cards, with 3 being locations. This number varies a little for Easy mode, but this gives you a bit of a feel for your chances of revealing an enemy from that deck. The statistics above also don’t count the Weatered Hilltop that starts off in the staging area.
Enemies
With most enemies in the Orcdeck, this section will be brief, for more info on what enemies are in the Orc deck, see The Orc Deck. After the transition to stage 2B, the orc deck will be shuffled into the encounter deck. See above for discussions on the enemies of the orc deck.
- The Cornered Orc is the only enemy you can draw from the encounter deck in stage 1B. With his wimpy 2 attack, he is not too much of a challenge to block, and with 1 defense/2 HP he is not much of a challenge to kill. His main threat comes from his Forced effect – after engaging, he makes an immediate attack, meaning you will essentially have to block him twice, or take some undefended attacks. Many allies can take an attack form him, but it still means that you will have less allies for blocking the more dangerous orcs, or pile up damage on your heroes, making them vulnerabel to Cold from Angmar. The Cornered Orc might be a prime target for getting a swift strike or a stone thrown in his stupid face. He also has a nasty shadow effect – +1 attack, or +2 if the defender is damaged (which is quite likely in this scenario). A good tech against him is as mentioned above, to control total willpower with Eowyn or Protector of Lorien, If you reveal a corned orc, it might be worth waiting a round to clear the active location until you have dealt with him.
Treacheries
A major part of stage 1B is the weather treacheries, which surge. They synergize with Cold from Angmar (blanking text boxes of damaged characters as discussed above), by damaging characters, or punishing you for having damaged characters. In Stage 2B, they punish you by damaging characters, which reduces your willpower, making it more difficult to produce the 20 progress tokens required.
- Ice storm forces each player to assign X damage amongst characters they control where X is the number of quest cards in play. Generally, this punishes you for not clearing side quests, and for laying out too many player side quests. You might therefore think twice about throwing down a side quest, unless you are sure you can clear it.
- Biting wind assigns X damage to players committed to the quest, where X is the number of characters currently committed. This is very punishing for swarm decks and can make short work of your Ethir Swordsmen gang. Healing and assigning characters with many hit points, such as Aragorn can help tackle this treachery.
- Freezing blast has Doomed 2 and removes each damaged character from the quest. This can often lead to further quest increase, as you might suddenly fail to quest. Making sure you keep the number of damaged characters to a minimum is your best tech against this one.
- Finally, there are 3 copies of Cold from Angmar, which punishes you for having damaged characters. If you build a deck around a hero/ally ability, you are very vulnerable to this treachery. It is discussed in detail in the section on quest 1B.
- The only non-weather treachery is Tragic Discovery, which raises each player’s threat by the threat of the active location, which will most likely be 2 to 3. This is most dangerous if you have a Weathered Hilltop with many resources, and therefore high threat. A Gandalf or Galadhrim’s Greeting may be worth to include.
Locations
We have already discussed the dangers of Weathered Hilltop and Exposed Ridge in section 1B. However, there are quite a few locations in the encounter deck, and it is very likely that you will see one or more through the quest phase.
- Sheltered valley is a fairly benign location, which offers you a little time to stall. With 2 threat/4 quest points it is not dangerous or hard to clear, and its travel cost removes 1 token from the mission objective, giving you more time to build up your board state. When it is explored as the ACTIVE location, all damaged is healed from one character. Now is the time to heal your super defender or your Eowyn quester.
- Ruins of Arnor is Test of Will hate, causing a threat increase of 2 for each player every time a “when revealed” effect of a treachery is cancelled. They really want you to suffer those Weather effects! Luckily, threat is not high (2) and the 3 quest points make it a prime target for Northern Tracker or Asfaloth.
- Another prime Asfaloth target is Ancient Causeway, which raises each players threat by 2 when it is explored. It requires only 2 quest points to clear and contributes 3 threat, so it is not too difficult to clear, but can contribute to location lock.
- The final location is the concealed orc camp, which is described in detail in the section on the Orc Deck.

Side Quests
The side quests in this quest can be very punishing, as you are often challenged on willpower due to the high number of locations that are often in play. All of the side quests are highly thematic, and gives a certain RPG-feel to the quest.
- When you track the orcs and are punished by cruel weather effects, it makes sense that you have to Find Shelter. This side quest requires 6 progress, has surge and Time 4. When the last time counter is removed, each player deals 4 damage to a hero he/she controls, which will almost certainly cause a hero loss. Then 4 more time counters are added, in case you didn’t table flip after the first effect triggered.
- Make Camp is another thematic side quest, which also surges. It has the unfortunate effect that characters can’t be healed. This is really unfortunate, as we have discussed extensively above why healing is so crucial to success in this quest. However, if you can clear it (6 progress), each player can heal 3 damage from one character he/she controls. It might be worth to pack a few copies of Secret Paths to nullify locations, allowing you to clear through these side quests in one round.
- Finally we have Search the ruins, a brutal surging 8 quest point side quest, which raises each players threat by 2 at the end of the refresh phase. When it is cleared, each players threat is reduced by 3, which will almost certainly lead to a net increase in threat, as it is unlikely that you can clear it in one round. If your threat starts to become too high due to all these Legacies of Numenor you played for an early advantage, this side quest can really ruin your day. All of them can cause scoop moments and should be prioritized. The good thing is that you are not required to place progress on stage 1, so there you can side quest intensively.
Tips and Tricks
- Lost Realm highlighted the side quest mechanic, and you will likely see at least one side quest in the victory display (Orc ambush). The side quest cards may be worth including, in particular the Riders of Rohan.
- It might be advantageous to split out roles in multiplayer, with one deck handling enemies and another deck questing hard, due to the large number of progress required in 2B. Tactics Aragorn is a good choice to pull enemies away from your more fragile players. You need to do a lot in this quest – defend without dying, killing strong enemies, manage threat and heal. Specializing is one way to solve this.
- Have a strong character who can soak off the damage being handed out by the treacheries. A 5 HP character can sponge up a lot of damage, and keeps damage-dependent penalties to a minimum.
- Cold from Angmar can be devastating, but you can also use it to your advantage! Blank Erestor in the first round, and you are allowed a starting hand of 11 cards. Blank Spirit Glorfindel and you can quest penalty-free until you get Light of Valinor. And as mentioned above, Blank Beorn to let him dual-wield Dagger of Westernesse or A burning brand… (I don’t think this last one has been errata’ed, but I might be wrong).
- With so many direct damage effects to both heroes and allies, it is not wise to pick wimpy allies like Silvans for this quest. It would be better to get some Dwarves or Ents on the table who can soak some damage from the Weather effects.
- Healing is not only an obvious inclusion for this quest but absolutely necessary if you want to survive this quest beyond turn 3-4. If Make Camp is in play, try to explore it first, as it prevents healing. If you have a good healing engine online, you will find that this quest becomes a lot easier as you don’t have to worry as much about having damaged characters.
- Location control can be a good inclusion for this quest to get rid of any location in the staging area that you don’t want active. You can also do some swapping of locations to make them active, but bypassing their Travel cost. Especially in higher player counts, this quest will throw a lot of locations at you that can become real pains if they stay in play for long.
Playthroughs
- 2 player, updated decks: https://www.youtube.com/watch?v=vhnLKSjuJmY
- 2 player, progression style: https://www.youtube.com/watch?v=XFMy9oDw4_w
- True solo, updated decks: https://www.youtube.com/watch?v=ySeM0guF1AA
- True solo, updated decks: https://www.youtube.com/watch?v=JJSCxwfDPXQ
And this marks the end of the Weather Hills! The villagers have been saved. Though, some seem to have been sacrificed in a necromantic ritual. What is that all about? Oh, well, that is out of our hands for now. Back to the village with these guys. End of the story, the heroes saved the day again. Right? … Right? Join us next time, for Deadman’s Dike and the horrors that might bring with it!
Powered by WPeMatico
Posted from my blog with SteemPress : https://lotr.cards/2018/09/20/the-weather-hills/
Source
Plagiarism is the copying & pasting of others work without giving credit to the original author or artist. Plagiarized posts are considered spam.
Spam is discouraged by the community, and may result in action from the cheetah bot.
More information and tips on sharing content.
If you believe this comment is in error, please contact us in #disputes on Discord
Hi! I am a robot. I just upvoted you! I found similar content that readers might be interested in:
https://visionofthepalantir.com/2018/09/20/the-weather-hills/
This user is on the @buildawhale blacklist for one or more of the following reasons: