Have you wondered why? Kim Kardashian, and many women have wanted to learn and put it into practice, but what is the way I should contour my face? Is it only to apply correctors here and there, or does the result depend on other factors? In two entries, I try to orientations so that you can do this technique in your homes, do you feel encouraged? at CONTOURING.

The technique of dark clear, contoured or light and shadow, has always been used and is one of the bases of all professional makeup. It consists of applying clear correctors to highlight and pronounce parts of the face and dark correctors to define, deepen and hide others. It is usually done in a useful way, but currently the pronounced contour appears to be fashionable. If you have not already done so by name or description, surely with these images it will be clear what I'm talking about: according to face types
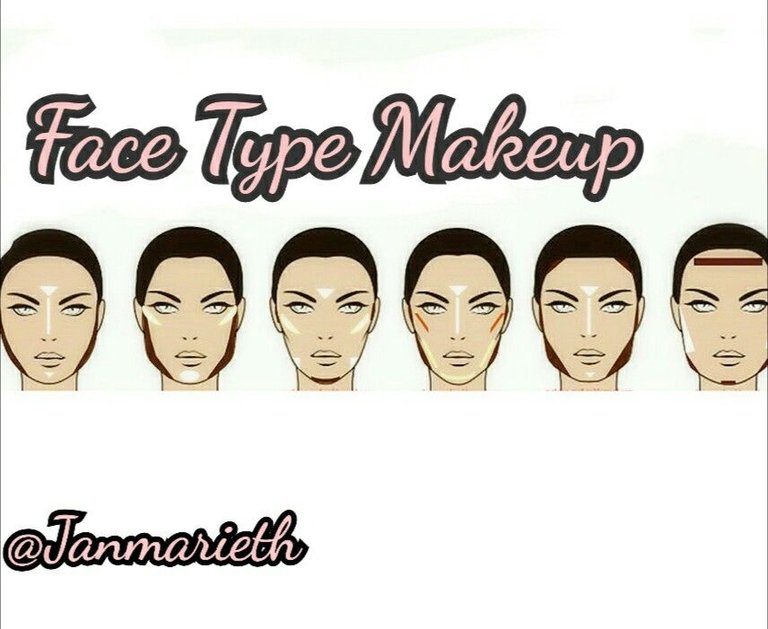
Oval face: As it is supposed to be the "perfect face" does not need corrections. Anyway, if after making the basic corrections of nose-forehead-chin there is a pronounced angle can be hidden with dark concealer.
Square face: In this type of face it is sought to lengthen, since it tends to be "compressed" due to its square terminations. To achieve this, the maxillary angles are darkened to hide the square features. The sides of the forehead should also be darkened. To give light and the lengthening effect, the central area of the face is illuminated with the clear concealer: illuminate the nose bone in a straight line, in addition to points of light in the eyebrows and chin.
Round face: Like the previous one, what should be done in this type of face is to lengthen and reduce in width. For that, dark concealer is applied around the edge of the face, leaving the chin area free (remember that it is not very pronounced, so if you darken it you will notice less). In case you have a double chin, it also gets dark. To give light and the effect of lengthening, the central area of the face is illuminated with the clear concealer: illuminate the nose bone in a straight line, as well as points of light between the eyebrows and chin
Triangular face: To achieve the proportion between the different parts of the face, we will darken the laterals of the jaw, and will illuminate the temples, edge of the forehead, chin and on the bone of the cheekbone with an ascending diagonal line
Inverted triangular face: The dark corrections in this type of face have the objective of diminishing the space in the first third of the face. Dark concealer application on the temples and edges of the forehead, along the line that separates it from the hair. If the chin is very pointed, it is recommended to darken the final part of the chin. The clear concealer is used to illuminate the center of the forehead, the cheekbones ascending without reaching the temples and the corners of the jaw in the form of small triangles.
Diamond or hexagonal face: This face tends to be wider, so it can occupy the correctors to balance. If the face has more diamond shape then the cheekbones should be slightly darkened to remove volume; if it has a hexagonal shape in addition to darkening the cheekbones, the angles of the jaw also darken. For both lights: the center of the face and the inside of the jaw, to give volume. Now if in my case that is the elongated face is the techniques that they use to define the features
Elongated face: Here what must be done, a difference of all the previous faces, is to enlarge the face. For that, a clear concealer is applied around the edge of the face (if it has a square jaw, the angles should be darkened as in the case of the square face). To shorten the face a little, apply the dark concealer on the forehead and chin, horizontally. How to pass the corrections to the contour Once we have our face as a map (the first times they looked in the mirror and think it is impossible for the spots to look good) comes the hard work. They have 2 options: leave a contour or an outline. The choice depends on the occasion, mood, personal tastes, etc. This technique is complicated and requires practice, do not expect it to go well either the first, second, or third application. If you want to use it for a special occasion, practice in advance so that you know your face.
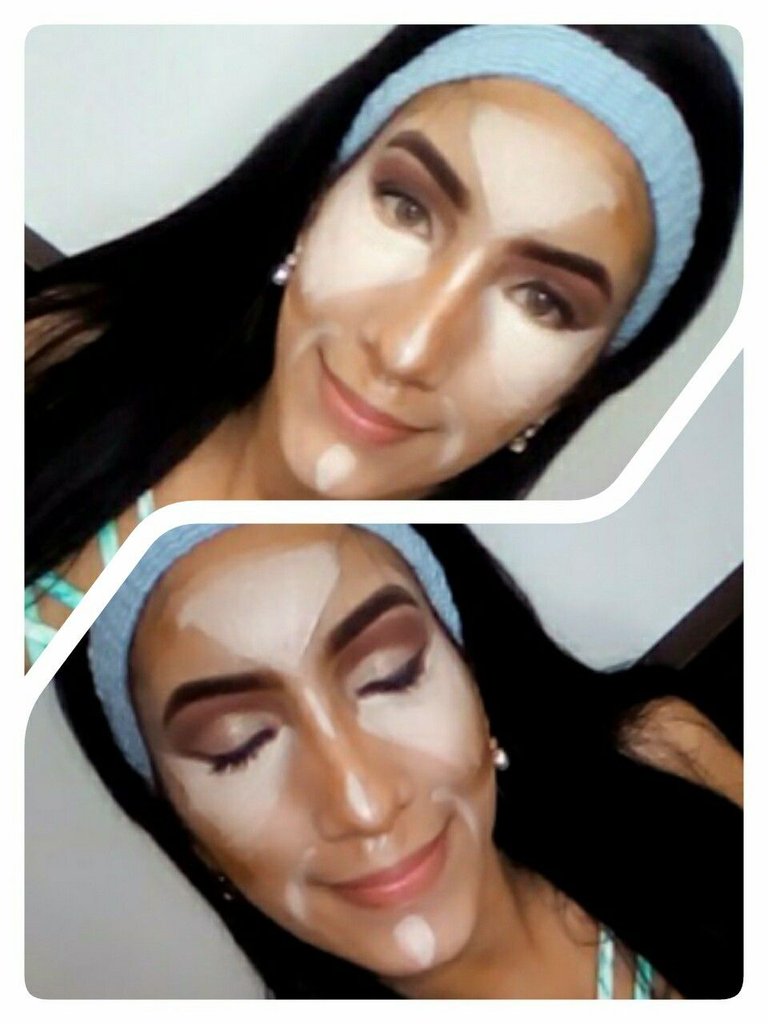
Subtle contour
for a subtle contour the brush for clean base (I recommend the round brush, not the flat one), to blur in a circle the concealer spots always going from the center of the face towards the outside. Try to always keep the tones of the correctors in place, and do not take the dark to the sector where the clearing goes, nor vice versa. When you notice that the correctors are already faded enough, apply the foundation with the same brush. I recommend applying less base than they usually use and not directly on the face, if they have a mixer deposit a little base and take the product with the brush (if they do not have mixer put the base on the back of your hand). If you wish, you can highlight the outline with bronzing powder then apply the base, and then continue with your normal makeup
Pronounced contour
with a double fiber brush such as MAC 187 or ls with a Beauty Blender type sponge, slightly blur the correctors, giving more emphasis on the union of the tones on the edges so that the transition is not so marked. With this technique the correctors will not lose their intensity. Put base on the mixer or back of the hand, with the double fiber brush take little product and apply on the correctors in the form of small touches (this brush will make the base light on the skin so it does not cover the correctors). Then, highlight the outline with bronzing powder and matte illuminators.

Eye makeup is recommended before contouring, to avoid soiling the face with the shadow. Anyway, you can do it sooner or later, always taking care not to ruin the work done in any of the parties.
Encantada de tu trabajo rosa estas bellisima
You are looking hot beautiful and sexy..
Excelente, me encanta que desarrolles una comunidad de #makeup y que expliques con tantos detallitos el proceso para auto-maquillarte. Buenisimo! ¡Exitos!
Gracias amiga que alegria que te gusten, espero que te ayuden de mucho saludos y abrazos ya me paso por tu blog
buen trabajo amiga
I like is work