I don't know how many of you guys are producers and for that matter, what percentage of producers use FL Studio so this post might not be for everyone but if you are using FL Studio, you'll wanna read this.
What is HARMOR?
Harmor is a very powerful VST instrument within FL Studio. It is an additive / subtractive synthesizer, image synthesizer as well as audio resynthesizer. Whew! Don't be alarmed! We will not get into technical details or start going through everything Harmor has to offer... I will only help you use Harmor as a DRUM MACHINE with 32 samples.
Why?
Because the audio resynthesizer is amazingly powerful. I use it as my main sampler right now because I love how easy it is to manipulate the sound and see where it takes me. The problem is that running Harmor for all of your samples is quite inefficient. The solution is having 32 samples, in the same instance of Harmor, triggering them on separate notes.
By changing a few parameters, you'll be able to put together your own 32 sounds and unleash the full power of this amazing VST.
Before we begin:
Choose your 32 sounds and add them to your playlist 1 by 1, making sure you space them equally. In this example, I have used some standard FL Studio samples (8 kicks, 18 percussion and 6 hi-hats).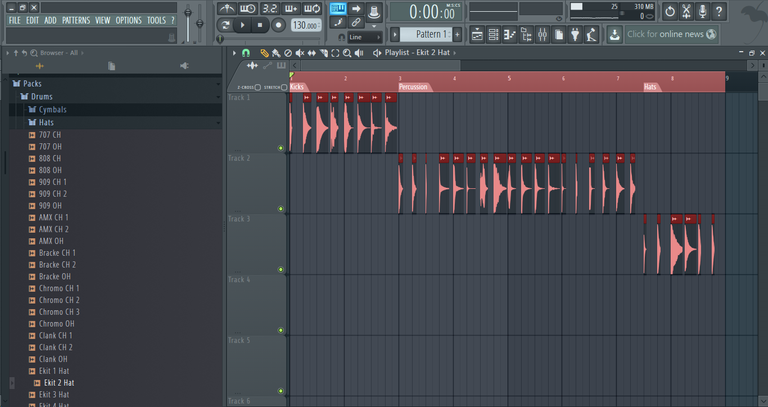
Export the sounds 1 Wave file! As I spaced them, I need to export 8 FULL BARS. If I had used longer samples, I might have needed to space them out farther apart and use 32 bars maybe, in which case I would have selected the FULL 32 bars. If you don't do this, FL Studio might cut the audio short, if the last sample ends too soon.
Step 1:
Add an instance of Harmor to your project (F8 to open up the plugin picker, type "harmor") and select the RESYNTHESIS preset.
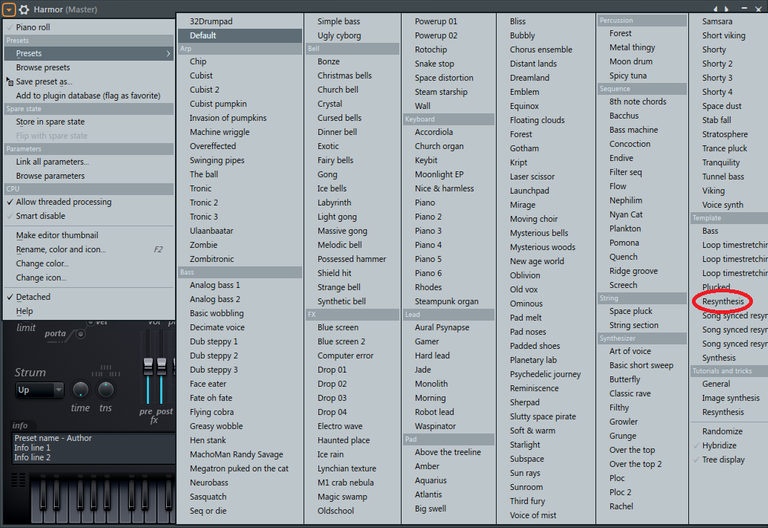
Step 2: Making it STEREO!
Right now, if you drag and drop a sample onto it it will read ONLY the sample's MID channel, in part A.
To add the SIDE channel, you will need to select part B and drag the sample here again. Make sure you TURN ON part B and LINK part A to part B.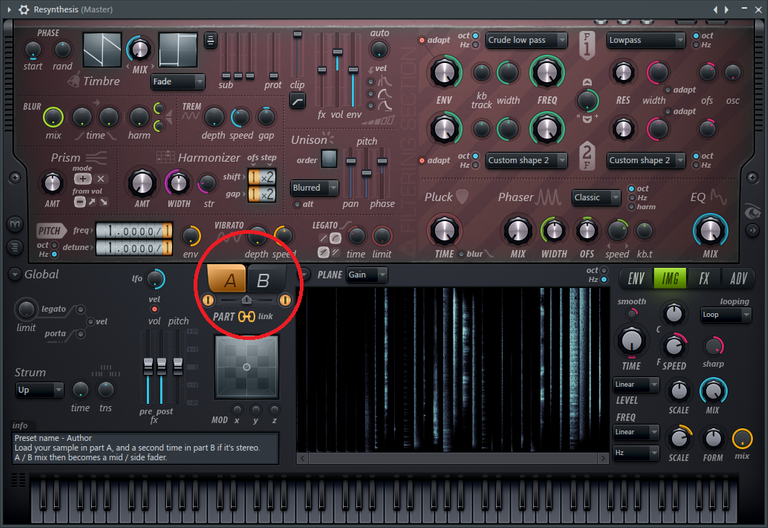
I loaded up the .wav with the 32 sounds I made earlier on both A and B channels.
Step 3: The mapping SETUP!
We will manipulate the TIME and PITCH envelopes within Harmor. This will allow us to scroll through the 32 samples by changing the MIDI notes while preserving the pitch of the sample.
In the ENV tab, choose "Image time offset" and "keyboard mapping" from the drop down menus. The first note will be our first sample. In this case C5 is the starting point and since we have 32 samples, we will need to divide the whole sample into 32 parts. This is SIMPLY done by setting the 33rd note (G#7 in this case C5+33 = G#7) as the end of the "time" parameter as shown below. You can add points by right-clicking and drag around to move them. Make sure you also copy this to part B! (the small arrow underneath the graph, options - copy to part B)
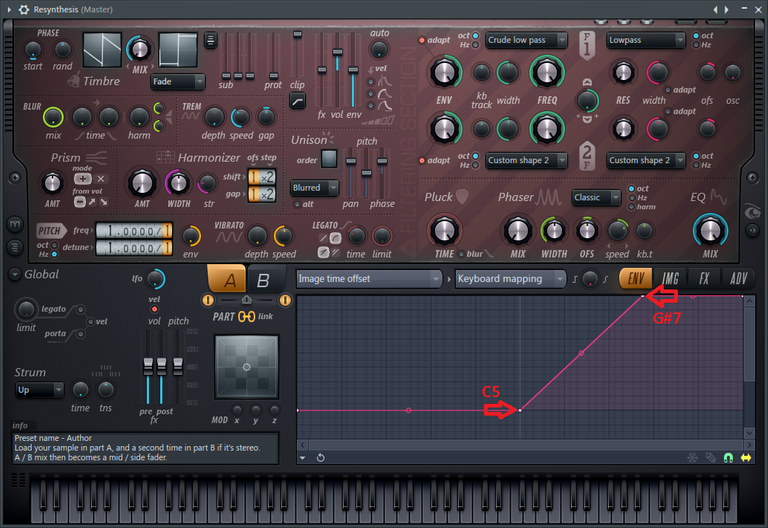
We will essentially do the same thing for the PITCH parameter. Select it from the dropdown menu, select "keyboard mapping", find C5 (or your preferred base note) and add an anchor point, then add another anchor point at G#7 (base note +33) and drag it down to -3300 cents. 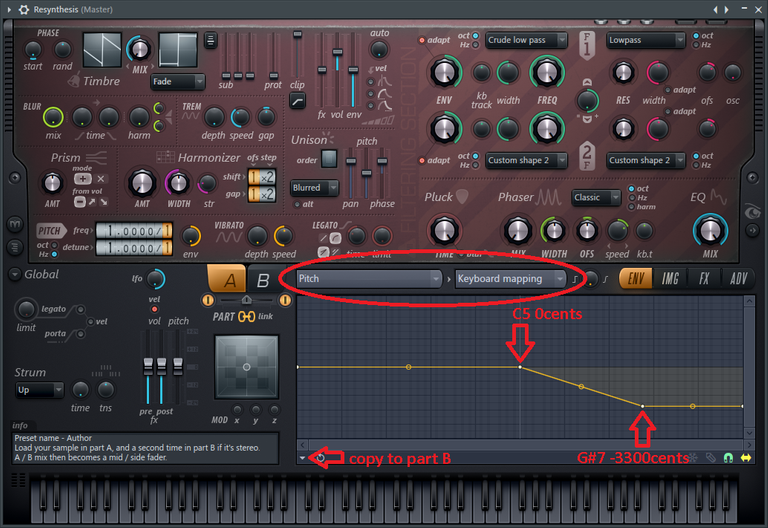
Step 4: DONE! (save your preset if you plan on using it later)
Now you can use the piano roll to play through all those samples! Remember that your samples start from C5 and end with G7. They are one after the other in the wave file so don't forget to end the MIDI note before the next sample starts playing! (i.e. if you leave the note playing, the next samples in the wave file will start playing)
ADVANCED CONTROL:
You can right click the "speed" knob and quickmap it to the X parameter, in part A as well as part B. This will allow you to play your samples at different speeds by changing the X parameter of the MIDI notes. Remember that the default X value for new notes is 0 so you will have to make sure it's the value you want if you just hear noise or nothing at all!
I like to do the same with the pitch. You can right click the PITCH - Freq slider on the left and quickmap it to Y parameter for quick and individual pitch shift for the samples.
What is it good for?
I personally like using the built-in Harmor effects, especially the distortion. It is also amazing for experimenting with any sound. Load up a vocal sample and you basically have it chopped into 32 parts within Harmor.
I simply LOVE how powerful this instrument is and how much freedom it gives you. I hope you find this useful!
If anything is unclear, don't hesitate to ask for more info!
Wow dude ! Really awesome seeing a fellow music producer here on steemit, especially someone who knows what they are talking about ! I actually learned something from this so I'm happy , though I don't use HARMOR that often, this is defiantly going to be helpful when it comes to using samples as a main sound, really useful info ! followed !
Congratulations @ilv1! You have completed some achievement on Steemit and have been rewarded with new badge(s) :
Click on any badge to view your own Board of Honnor on SteemitBoard.
For more information about SteemitBoard, click here
If you no longer want to receive notifications, reply to this comment with the word
STOPBy upvoting this notification, you can help all Steemit users. Learn how here!
this is a great post and great information and learning about FL studio , I use it too , I do mix and mastering and producing songs in it , I didn't used harmor as a drum machine and it's great to learn it from you. good job. wish you luck.
Like others said: nice to see more producers out here, you've included some things in you're blog I didn't yet knew. :) Must say I don't use Harmor much, but definately going to check it out more after reading this.