
zawgi;
မဂၤလာပါ ခင္ဗ်။
အပိုင္း ၁ မွာ ''Paypal Account'' တစ္ခု ျပုလုပ္ပံုအေျကာင္း ေဖာ္ျပခဲ့ျပီးပါျပီ။အခု အပိုင္း ၂ မွာေတာ့ ''Paypal Account'' Setting ပိုင္း အခ်ို့နဲ့ ''Paypal Account'' ကို ''Visa Or Master Card'' တစ္ခုျဖင့္ အခမဲ့ ခ်ိတ္ဆက္ျခင္း အေျကာင္း ဆက္လက္ေဖာ္ျပပါမယ္ ခင္ဗ်။
ပထမဦးဆံုး ''Paypal Account'' နဲ့ ခ်ိတ္ဆက္ဖို့ Visa Or Master Card'' တစ္ခု အခမဲ့ ရယူဖို့အတြက္ ''Browser'' နဲ့ ''https://cc.namsopro.com'' ကို သြားပါမယ္။အဲဒီေနာက္ ''Inserte su Bin'' စာရဲ့ေအာက္က ေလးေထာင့္ကြက္ထဲမွာ ''5310104''လို့ ရိုက္ထည့္ပါမယ္။အဲဒီေနာက္ ''Agregar'' ရဲ့ ေအာက္က ေလးေထာင့္ကြက္ ၃ခုစလံုးမွာ အမွန္ျခစ္ေပးပါ။
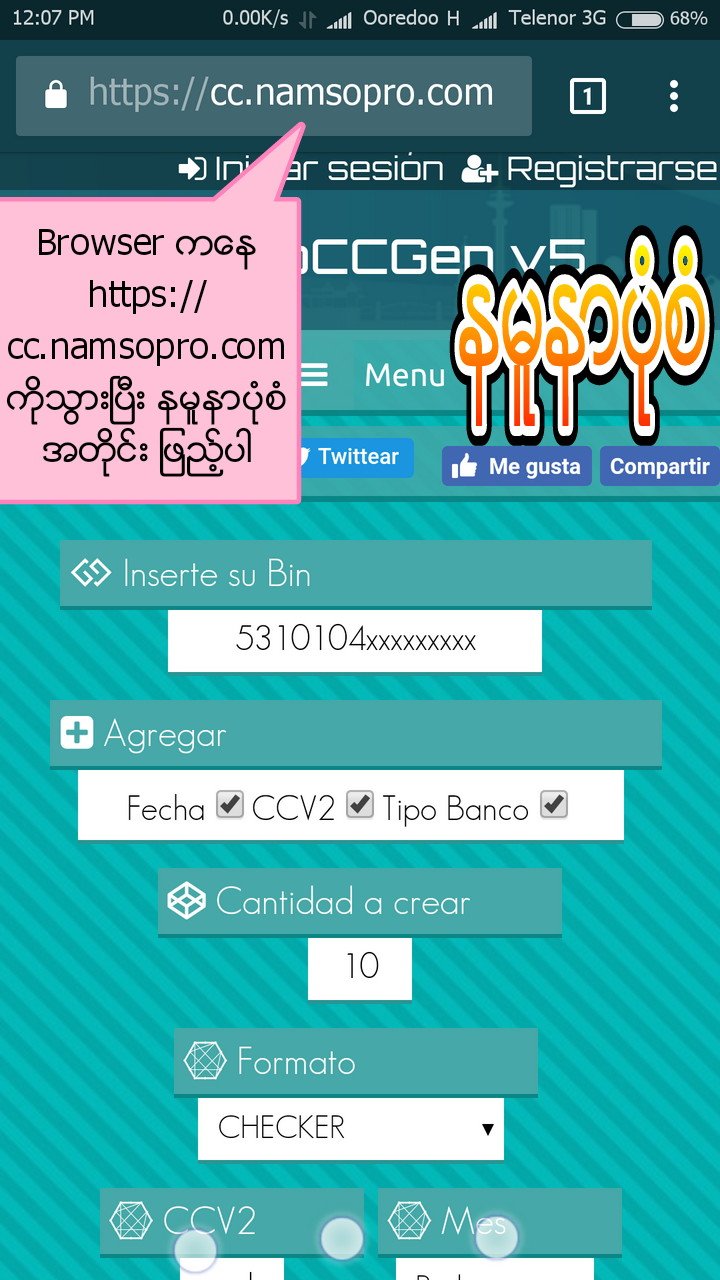
အဲဒီေနာက္ ''Page'' ေအာက္မွာရွိတဲ့ ''Generar Tarjetas'' ကို ႏွိပ္ပါမယ္။

''Paypal Account'' နဲ့ ခ်ိတ္ဆက္ႏိုင္မယ့္ ''Card No.'', "Expiry Date'' နဲ့ ''CVV No.'' ေတြပါဝင္တဲ့ Master Card ၁၀ခု က်လာပါလိမ့္မယ္။
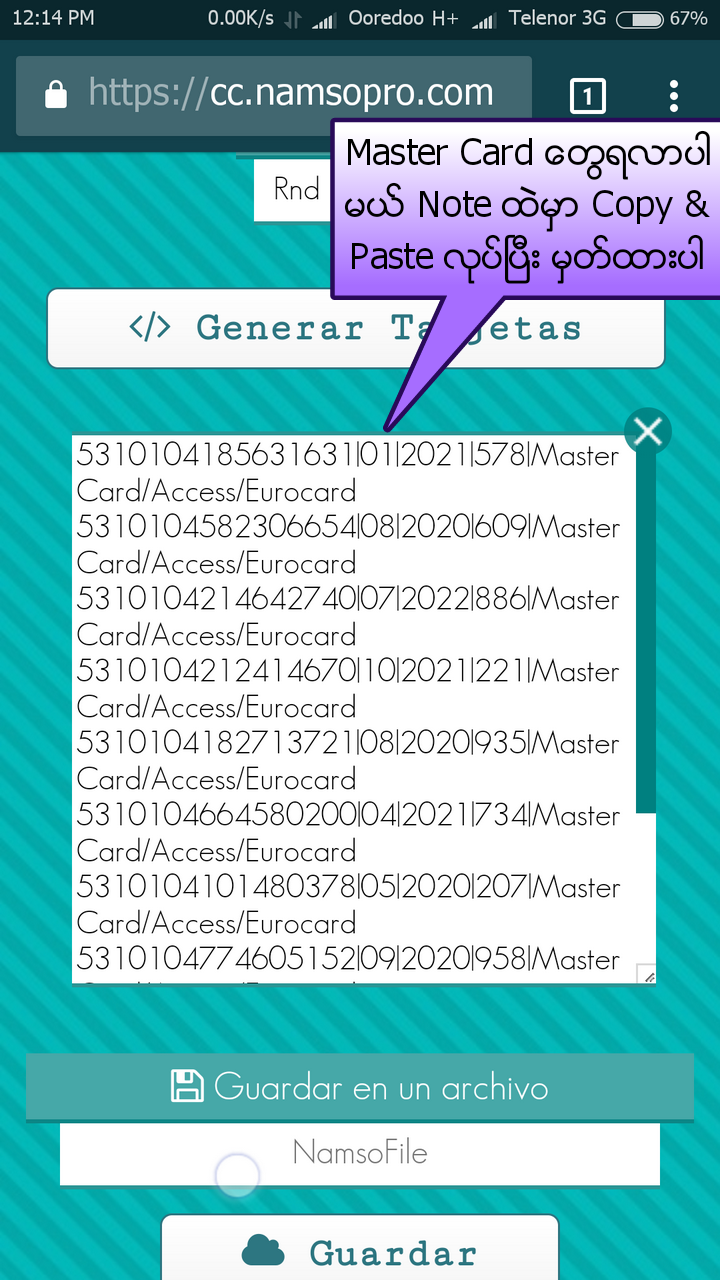
အားလံုးကို ''Note App'' ထဲမွာ ''Copy & Paste'' လုပ္ျပီး မွတ္ထားလိုက္ပါ။
''https://cc.namsopro.com''မွာ ''Card'' အေရအတြက္ မိမိစိတ္ျကိုက္ ရယူႏိုင္ပါတယ္။
ဟုတ္ကဲ့။အခု ''Master Card'' ေတြ ရျပီဆိုေတာ့ ''Paypal Account'' နဲ့ ခ်ိတ္ဆက္ရေအာင္ဗ်ား။
''Paypal App'' ကို ဖြင့္ပါမယ္။
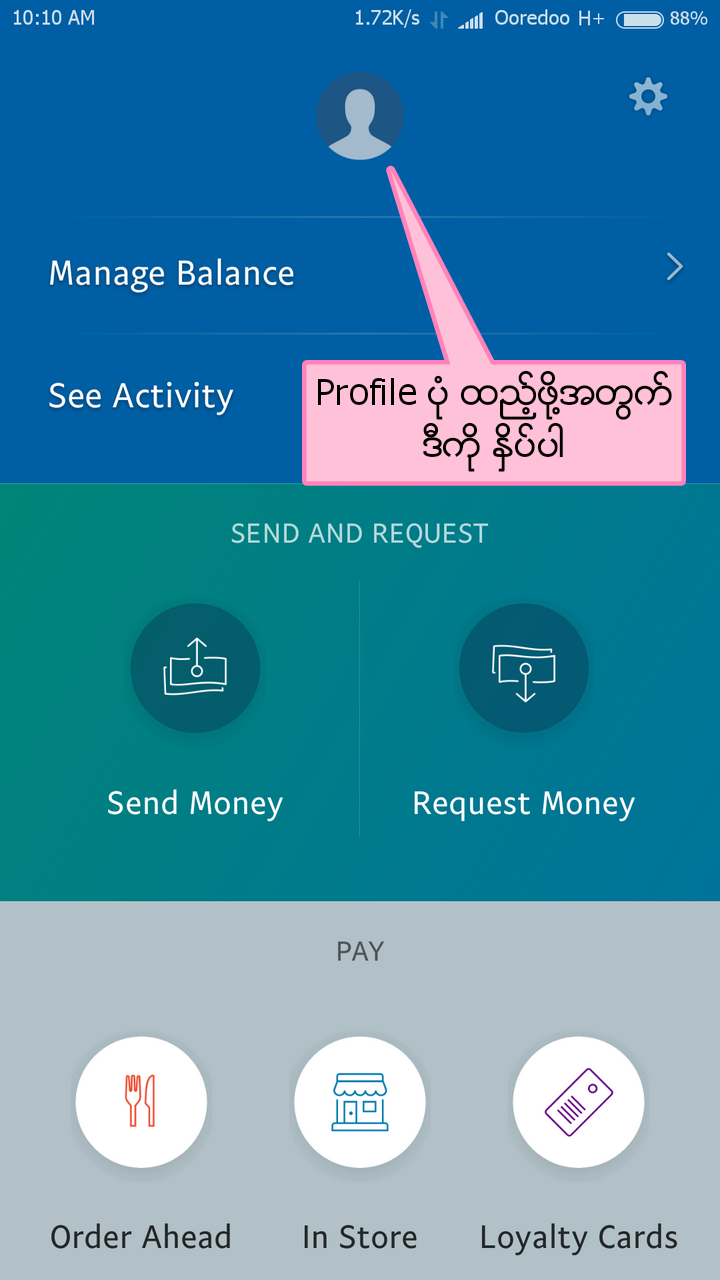
က်ြန္ေတာ့ ''Paypal Account'' ထဲမွာေတာ့ ''Profile'' ပံု မထည့္ရေသးတဲ့အတြက္ ဘာပံုမွ မေပၚေသးပါဘူး။''Profile'' ပံု ထည့္ဖို့အတြက္
အေပၚဆံုးက ''Profile'' ပံုေနရာကို ႏွိပ္ပါ။
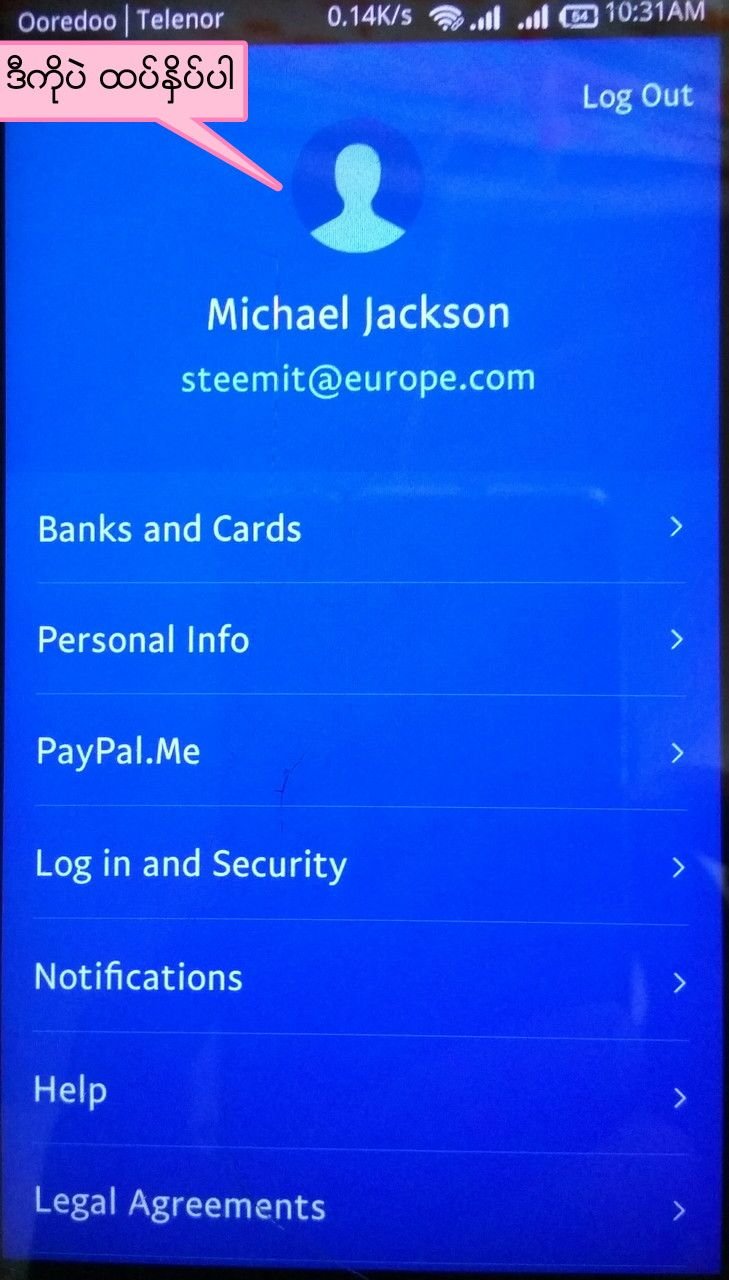
ေနာက္စာမ်က္ႏွာမွာ အေပၚဆံုးက ''Profile'' ပံု ေနရာကိုပဲ ထပ္ႏွိပ္ပါ။
အဲဒီေနာက္
''Change Photo'' ===>''Choose Existing Photo'' ===>Gallery ===>Photo အဲဒီအတိုင္းသြားျပီး ''Gallery'' ထဲက ကိုယ္ျကိုက္တဲ့ ပံုေရြးျပီး ''Profile'' ပံု ထည့္ႏိုင္ပါတယ္။
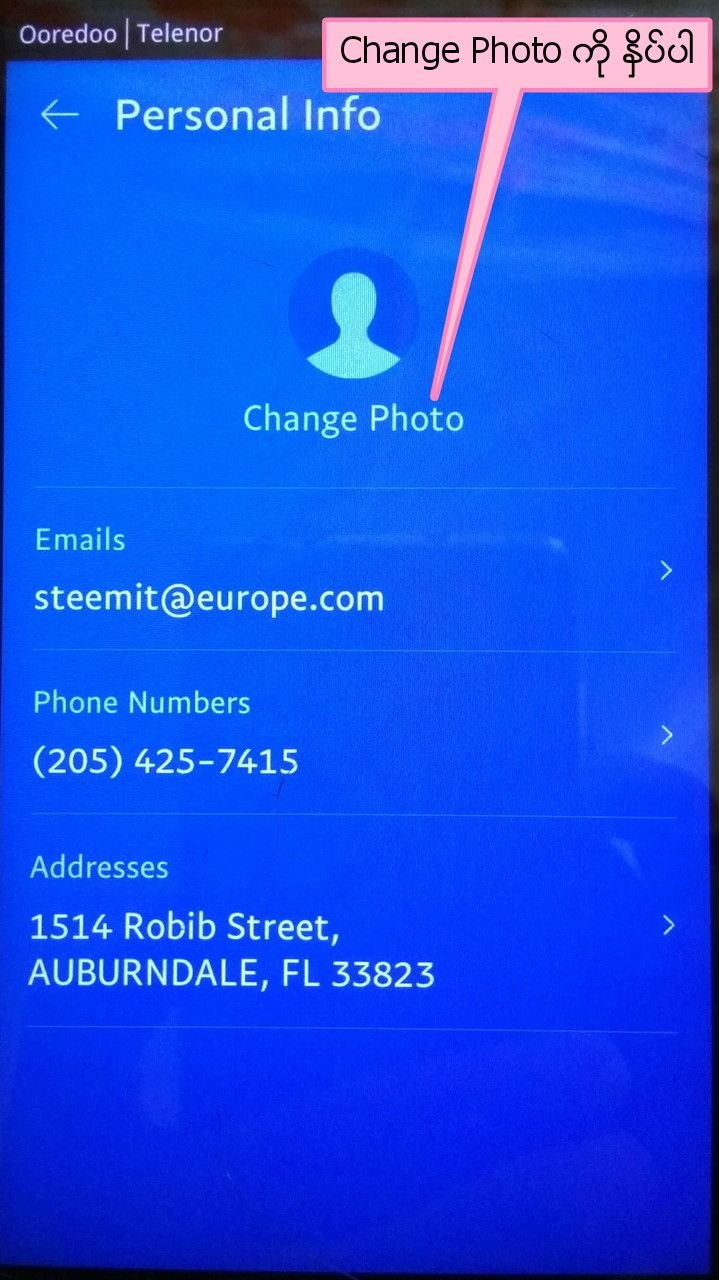
က်ြန္ေတာ္ကေတာ့ ႏွင္းဆီပန္းပံုေလး ထည့္လိုက္ပါတယ္။
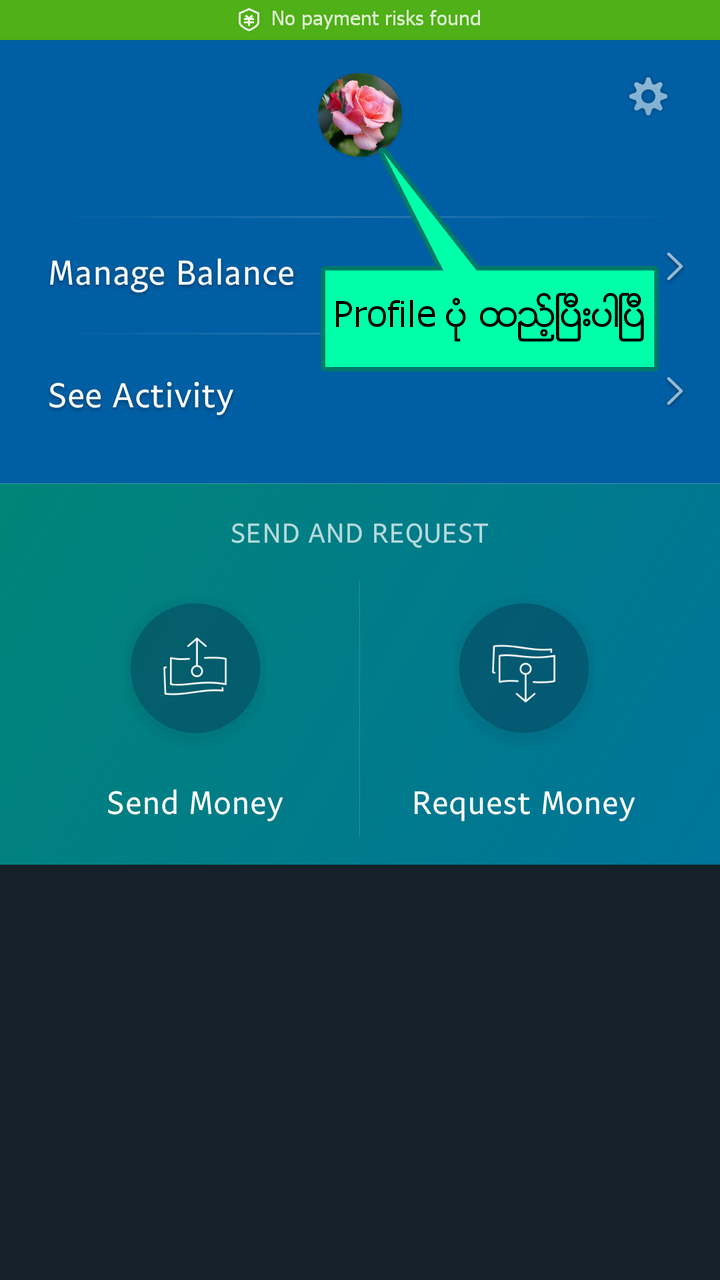
OK။ဒါဆိုရင္ေတာ့ ''Profile'' ပံု ထည့္ျပီးပါျပီ။
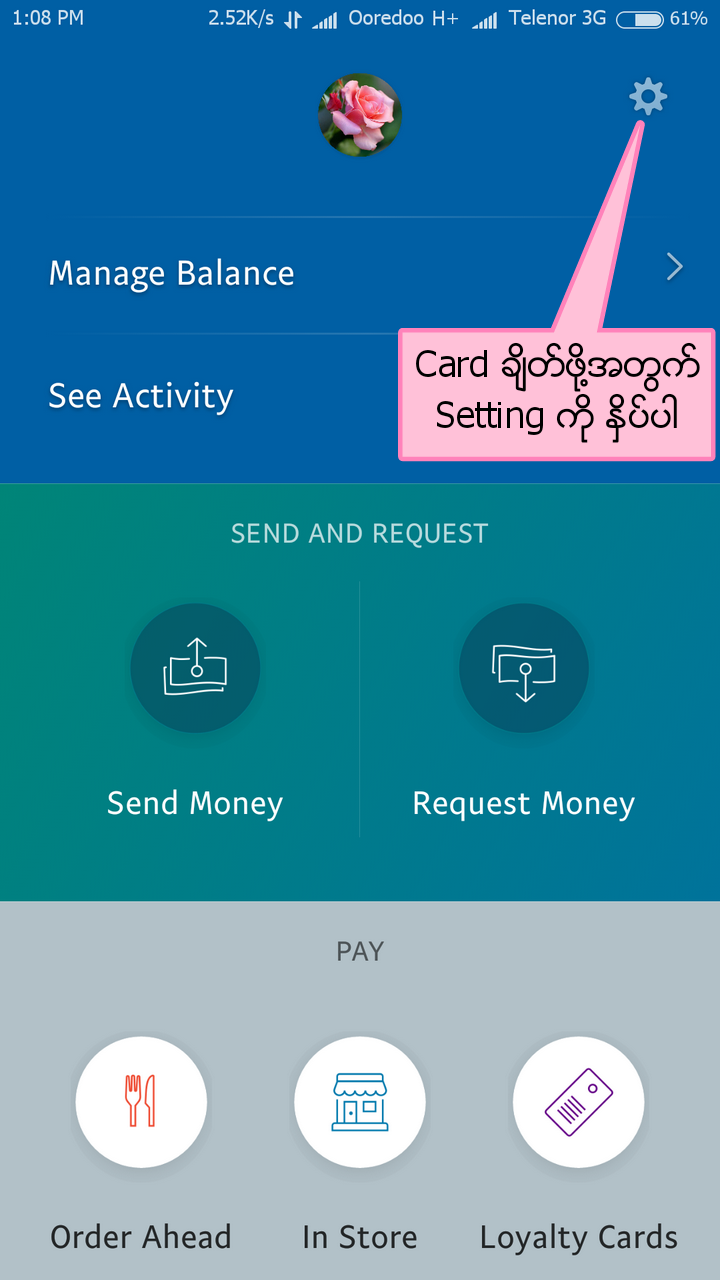
ဟုတ္ကဲ့။အခု ဆက္လက္ျပီးေတာ့ ''Paypal Account'' မွာ ''Visa Or Master Card'' တစ္ခုနဲ့ ခ်ိတ္ဆက္ျကရေအာင္ဗ်ား။
''Visa Or Master Card'' နဲ့ ခ်ိတ္ဆက္ဖို့အတြက္ အေပၚဆံုးညာဘက္ေထာင့္မွာ ရွိတဲ့ ''Setting'' အမွတ္အသားေလးကို ႏွိပ္ပါ။
အဲဒီေနာက္ ''Banks and Cards'' ===>''Link a Card or Bank'' ===>''Debit or Credit Card''===>''Link a Card'' အဲဒီ အတိုင္းသြားပါမယ္။
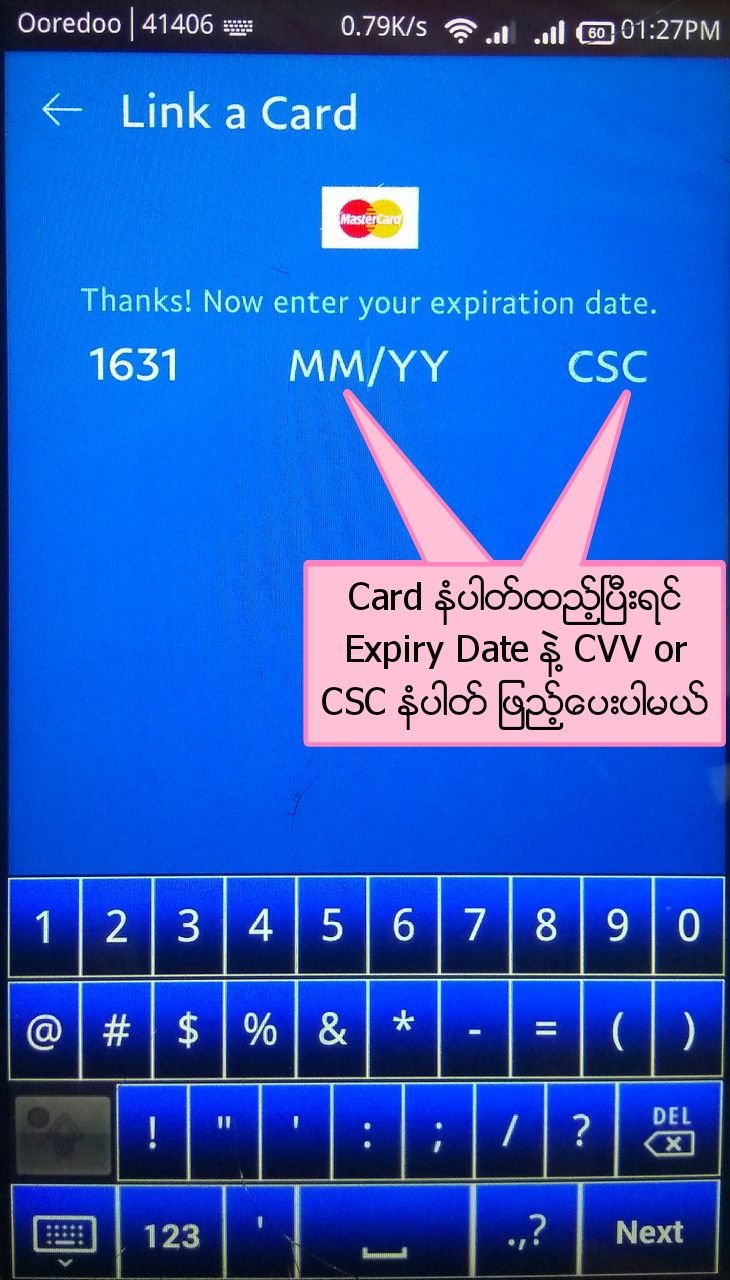
အဲဒီေနာက္ ''Card number'' ဆိုတဲ့ ကြက္လပ္ထဲမွာ က်ြန္ေတာ္တို့ ''Note App'' ထဲမွာ မွတ္ထားတဲ့ ''Master Card'' တစ္ခုရဲ့ Card No.'' ထည့္ပါမယ္။
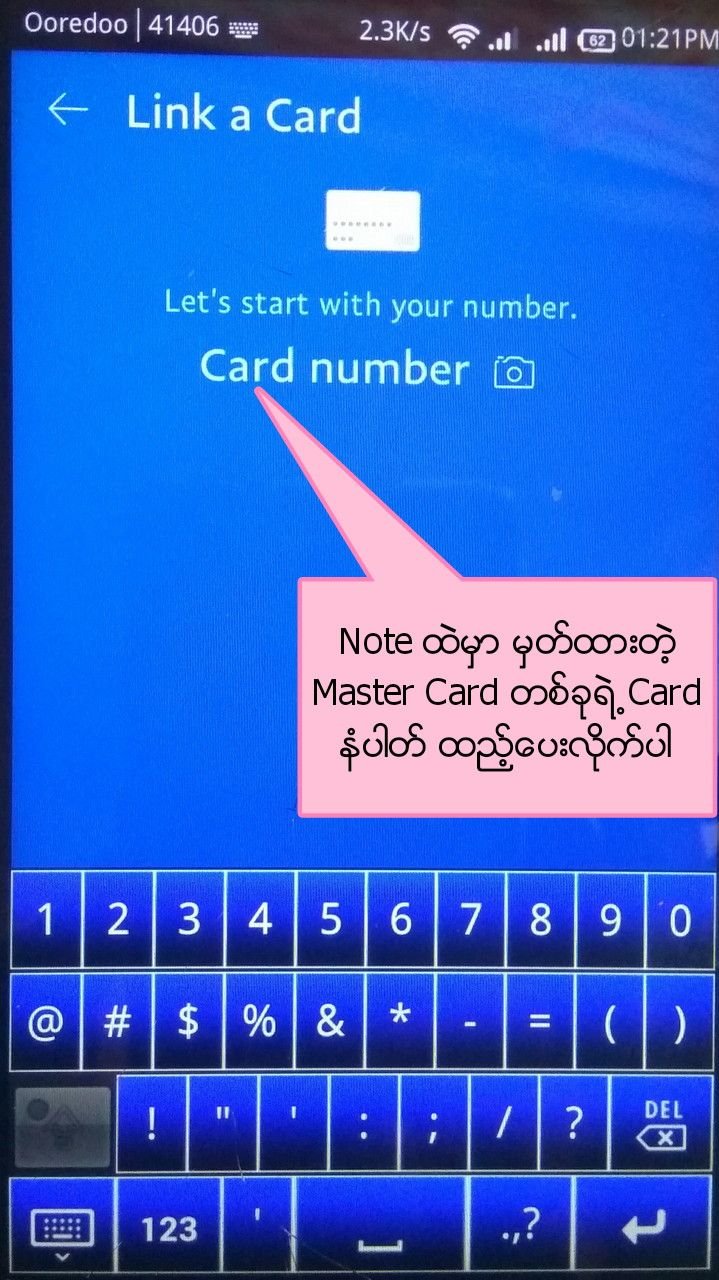
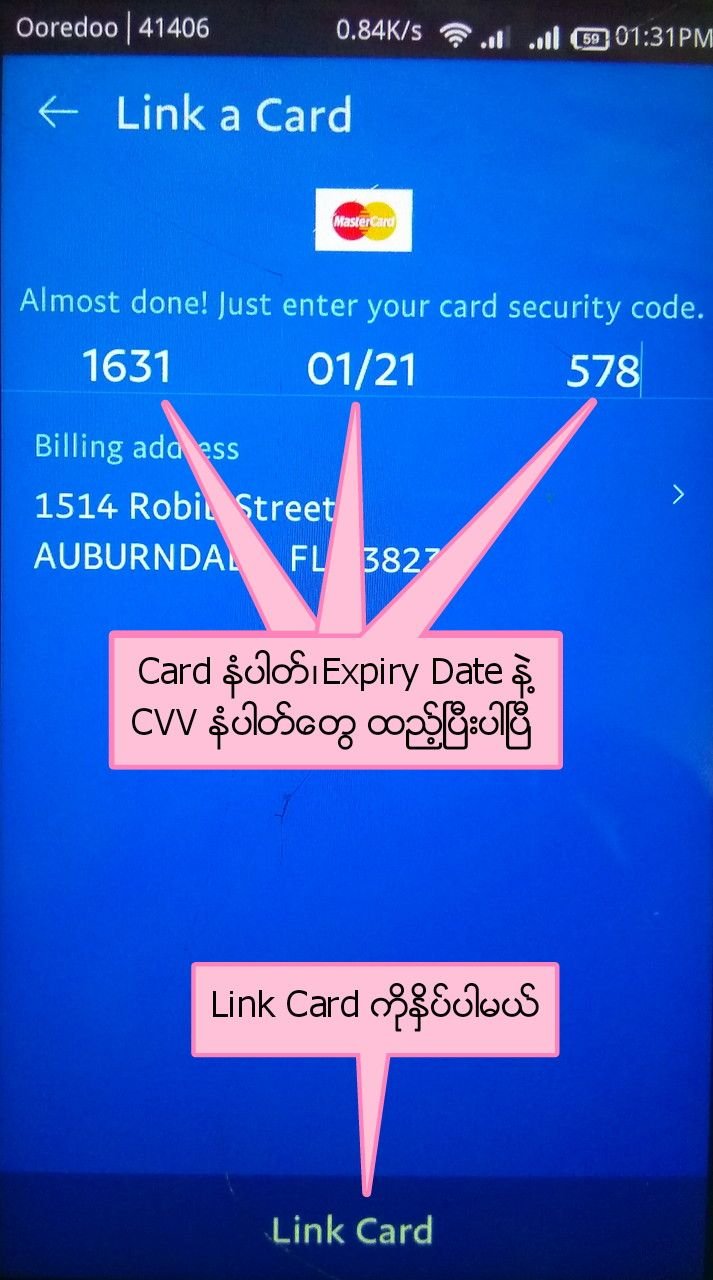
အဲဒီေနာက္ ''Expiry Date'' နဲ့ ''CVV'' နံပါတ္ေတြ ထည့္ပါမယ္။
အားလံုးထည့္ျပီးသြားရင္ေတာ့ ''Link Card'' ကို ႏွိပ္ပါမယ္။
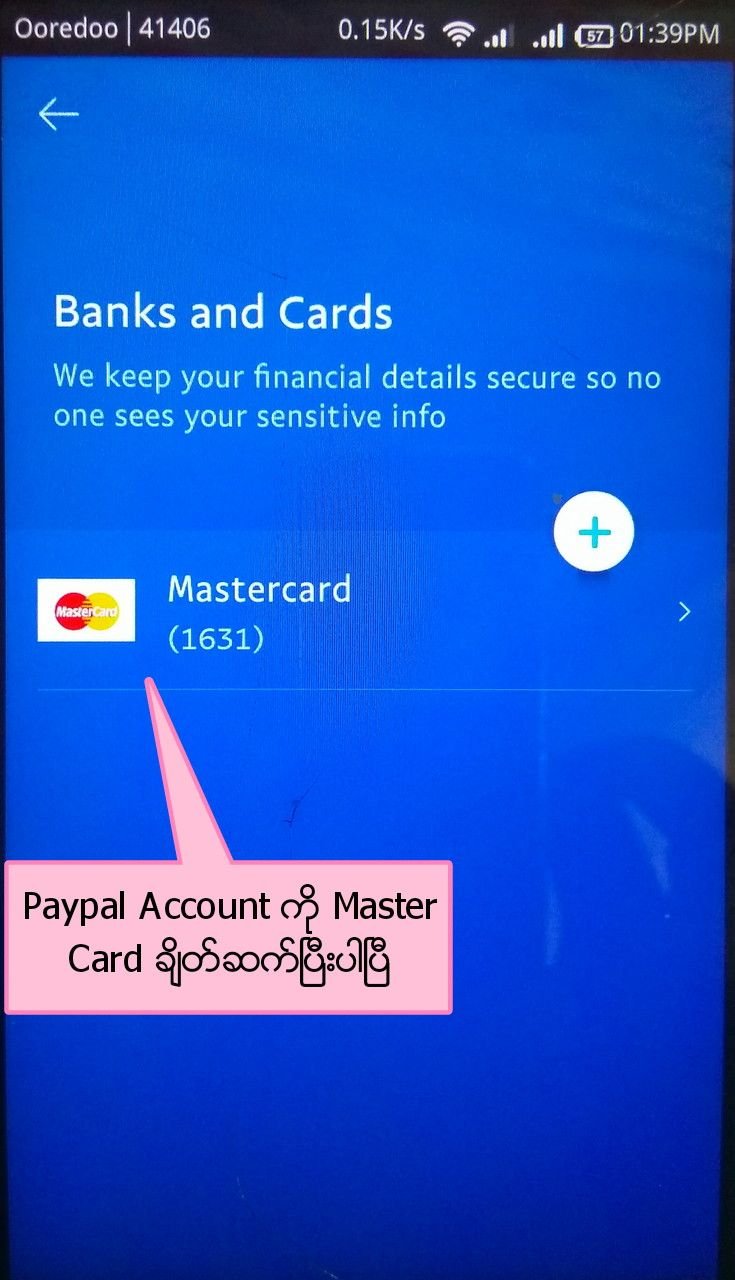
အဲဒီေနာက္ ခဏျကာရင္ ''Paypal Account'' ကို ''Master Card'' ခ်ိတ္ျပီးသြားတာ ေတြ့ရပါမယ္။
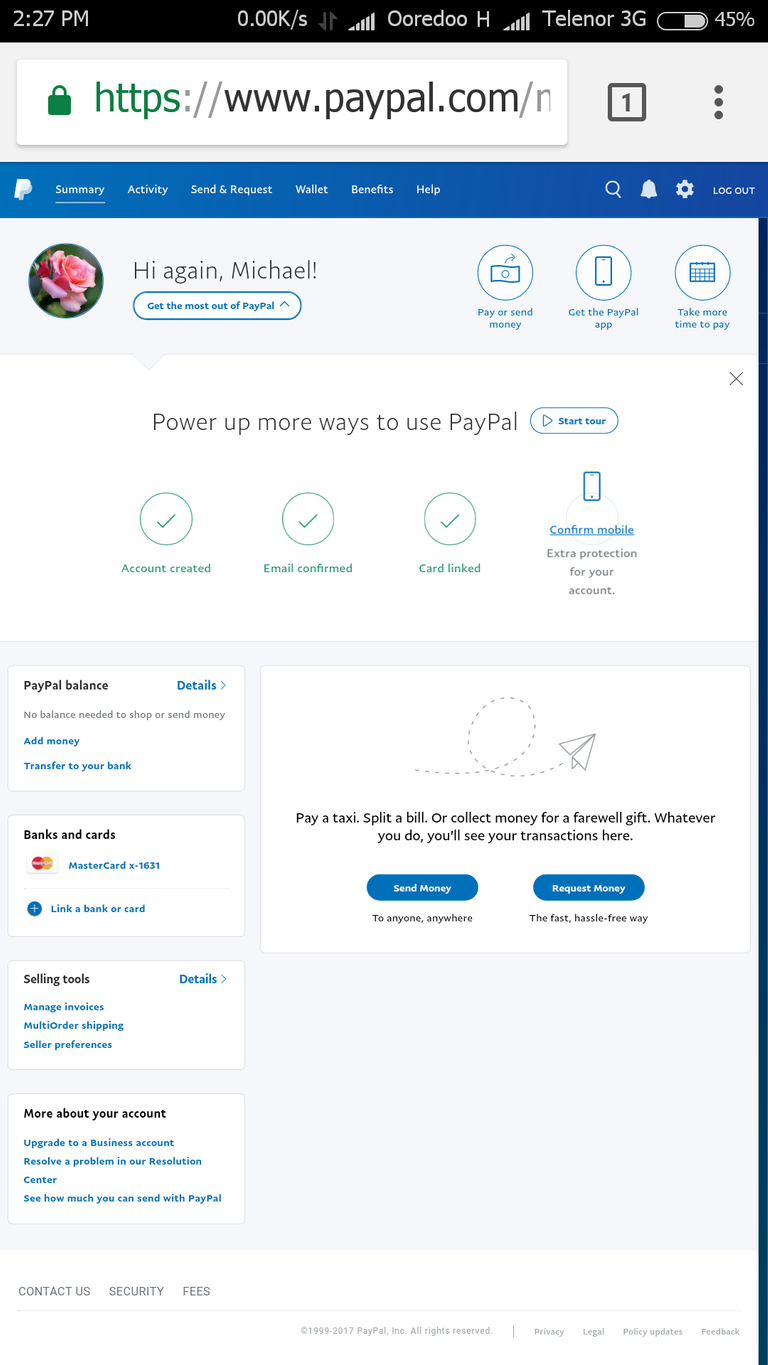
''Paypal Account'' ဖြင့္တုန္းက ''Email'' ထဲကို ''Comfirmation Link'' ပို့ေပးထားပါတယ္။အဲဒီ ''Comfirmation Link'' ကို ႏွိပ္ျပီး ''Email Verify'' လုပ္ေပးဖို့လည္း လိုအပ္ပါတယ္။ဒါဆိုရင္ေတာ့ က်ြန္ေတာ္တို့ ''Paypal Account'' ကို ''Browser'' ကေန ဝင္မယ္ဆိုရင္ ပံုထဲကအတိုင္း ေတြ့ရပါလိမ့္မယ္။
အခုဆိုရင္ေတာ့ က်ြန္ေတာ္တို့ရဲ့ ''Paypal Account'' ကို ''Card'' တစ္ခုနဲ့ ခ်ိတ္ဆက္ထားလိုက္တဲ့အတြက္ က်ြန္ေတာ္တို့ဟာ ''Basic Paypal Member'' ျဖစ္သြားပါျပီ(ဒါေပမယ့္ totally verify မျဖစ္ေသးပါဘူး)။
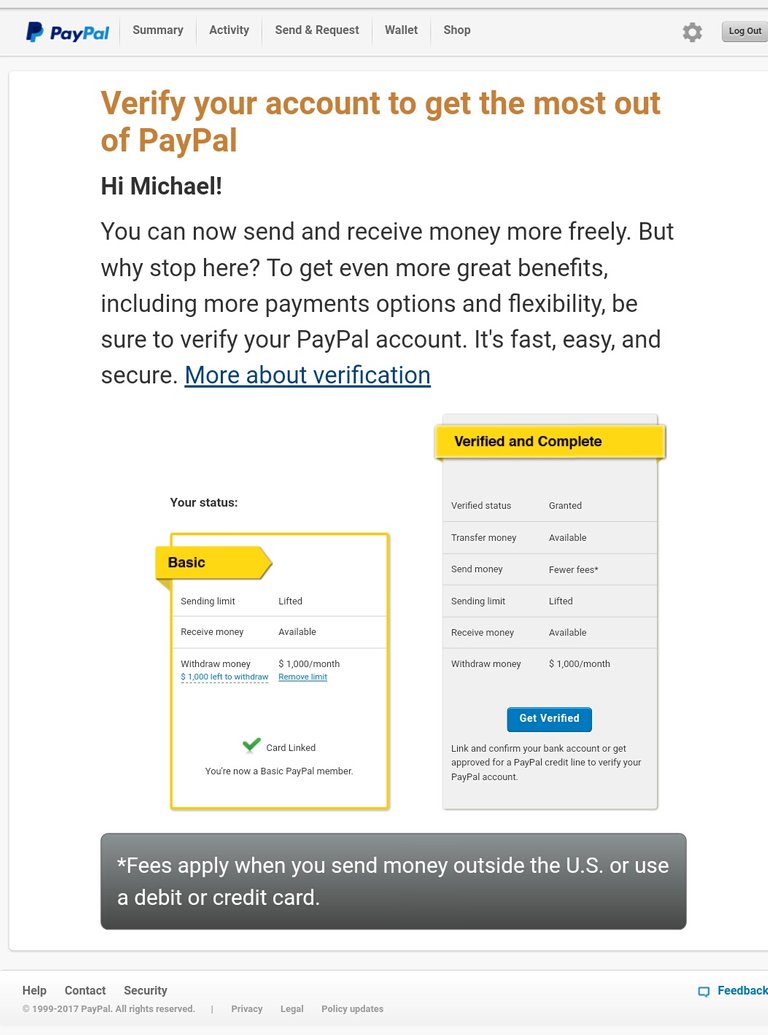
ေကာင္းက်ိုးအေနနဲ့ ''Paypal Account'' ထဲကို ေငြလက္ခံျခင္းနဲ့ ''Paypal Account''ထဲကေငြကို အျခားသူမ်ားထံသို့ ေပးပို့ျခင္းတို့ကို အကန့္အသတ္မဲ့ လုပ္ေဆာင္ႏိုင္သြားပါျပီ။
ဒါေပမယ့္ ''Totally Verify'' မျဖစ္ေသးတဲ့အတြက္ "Paypal Account'' ထဲက ေငြထုတ္ယူဖို့(Withdrawl လုပ္ဖို့) ၁လကို US$ 1000 အထိပဲ ထုတ္ယူႏိုင္တယ္ဆိုတဲ့ ကန့္သတ္ခ်က္(Limitation)ကေတာ့ ရွိေနပါေသးတယ္။
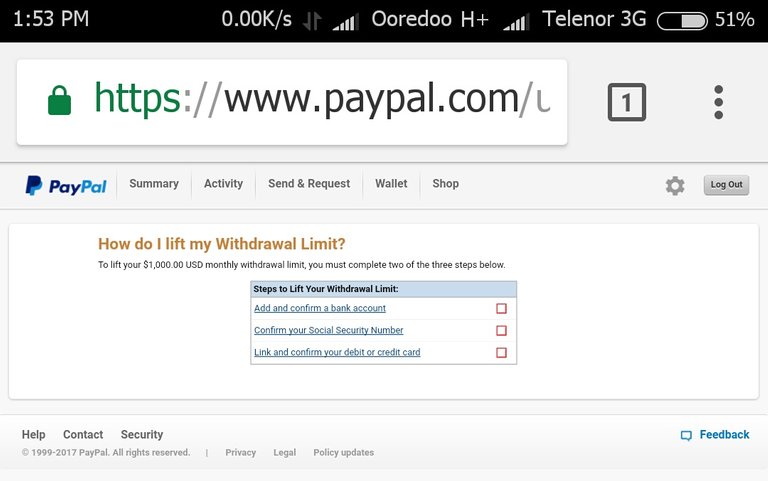
၁လကို US$ 1000 ေငြထုတ္ကန့္သတ္ခ်က္ကို ဖယ္ရွားဖို့အတြက္ဆိုရင္ ''Paypal Account Totally Verify'' ျဖစ္ေအာင္ျပုလုပ္ရပါမယ္။''Verify'' ျပုလုပ္ဖို့အတြက္ (1)Bank Account Comfirmation (2)Social Security Number(SSN)Comfirmation နဲ့ (3)က်ြန္ေတာ္တို့ ခ်ိတ္ဆက္ထားတဲ့ Credit or Debit Card Comfirmation ဆိုတဲ့ အခ်က္(၃)ခ်က္ထဲက အခ်က္(၂)ခ်က္ကို Comfirm လုပ္ေပးမွ ရမွာပါ။
ဒီအခ်က္ေတြကို ''Confirm'' လုပ္ေပးဖို့ဆိုတာကလည္း သိပ္ေတာ့ မလြယ္လွပါဘူး။ဘာလို့လည္းဆိုေတာ့ က်ြန္ေတာ္တို့ ''Paypal Account'' စလုပ္ကတည္းက Name, Address, Phone Number,Credit or Debit Card စတာေတြအားလံုးကို အတု(fake)ေတြခ်ည္း သံုးခဲ့တာျဖစ္တဲ့အတြက္ က်ြန္ေတာ္တို့အေနနဲ့ ''Paypal Totally Verified Account''ဆိုတာကို ရယူဖို့ မျဖစ္ႏိုင္ပါဘူး။
''Card'' တစ္ခုနဲ့ ခ်ိတ္ဆက္ထားတဲ့ ''Basic Paypal Member'' အဆင့္နဲ့ပဲ ေက်နပ္ရမွာ ျဖစ္ပါတယ္။
ဟုတ္ကဲ့။စာလည္း ေတာ္ေတာ္ရွည္သြားျပီ ခင္ဗ်။က်ြန္ေတာ္ရဲ့ Post ကို ဖတ္ရႈေပးတဲ့အတြက္ ေက်းဇူးတင္ပါတယ္ ခင္ဗ်။
မိတ္ေဆြမ်ားအားလံုး က်မ္းမာ ခ်မ္းသာျပီး မဂၤလာရွိတဲ့ ေန့ရက္ေလးေတြကို ပိုင္ဆိုင္ႏိုင္ပါေစ ခင္ဗ်။
ခ်စ္ခင္ေလးစားစြာျဖင့္-----
@thantzin(moehlaing)

*****-----*****-----*****-----*****-----*****
unicode;
မင်္ဂလာပါ ခင်ဗျ။
အပိုင်း ၁ မှာ ''Paypal Account'' တစ်ခု ပြုလုပ်ပုံအကြောင်း ဖော်ပြခဲ့ပြီးပါပြီ။အခု အပိုင်း ၂ မှာတော့ ''Paypal Account'' Setting ပိုင်း အချို့နဲ့ ''Paypal Account'' ကို ''Visa Or Master Card'' တစ်ခုဖြင့် အခမဲ့ ချိတ်ဆက်ခြင်း အကြောင်း ဆက်လက်ဖော်ပြပါမယ် ခင်ဗျ။
ပထမဦးဆုံး ''Paypal Account'' နဲ့ ချိတ်ဆက်ဖို့ Visa Or Master Card'' တစ်ခု အခမဲ့ ရယူဖို့အတွက် ''Browser'' နဲ့ ''https://cc.namsopro.com'' ကို သွားပါမယ်။အဲဒီနောက် ''Inserte su Bin'' စာရဲ့အောက်က လေးထောင့်ကွက်ထဲမှာ ''5310104''လို့ ရိုက်ထည့်ပါမယ်။အဲဒီနောက် ''Agregar'' ရဲ့ အောက်က လေးထောင့်ကွက် ၃ခုစလုံးမှာ အမှန်ခြစ်ပေးပါ။
အဲဒီနောက် ''Page'' အောက်မှာရှိတဲ့ ''Generar Tarjetas'' ကို နှိပ်ပါမယ်။
''Paypal Account'' နဲ့ ချိတ်ဆက်နိုင်မယ့် ''Card No.'', "Expiry Date'' နဲ့ ''CVV No.'' တွေပါဝင်တဲ့ Master Card ၁၀ခု ကျလာပါလိမ့်မယ်။
အားလုံးကို ''Note App'' ထဲမှာ ''Copy & Paste'' လုပ်ပြီး မှတ်ထားလိုက်ပါ။
''https://cc.namsopro.com''မှာ ''Card'' အရေအတွက် မိမိစိတ်ကြိုက် ရယူနိုင်ပါတယ်။
ဟုတ်ကဲ့။အခု ''Master Card'' တွေ ရပြီဆိုတော့ ''Paypal Account'' နဲ့ ချိတ်ဆက်ရအောင်ဗျား။
''Paypal App'' ကို ဖွင့်ပါမယ်။
ကျွန်တော့ ''Paypal Account'' ထဲမှာတော့ ''Profile'' ပုံ မထည့်ရသေးတဲ့အတွက် ဘာပုံမှ မပေါ်သေးပါဘူး။''Profile'' ပုံ ထည့်ဖို့အတွက်
အပေါ်ဆုံးက ''Profile'' ပုံနေရာကို နှိပ်ပါ။
နောက်စာမျက်နှာမှာ အပေါ်ဆုံးက ''Profile'' ပုံ နေရာကိုပဲ ထပ်နှိပ်ပါ။
အဲဒီနောက်
''Change Photo'' ===>''Choose Existing Photo'' ===>Gallery ===>Photo အဲဒီအတိုင်းသွားပြီး ''Gallery'' ထဲက ကိုယ်ကြိုက်တဲ့ ပုံရွေးပြီး ''Profile'' ပုံ ထည့်နိုင်ပါတယ်။
ကျွန်တော်ကတော့ နှင်းဆီပန်းပုံလေး ထည့်လိုက်ပါတယ်။
OK။ဒါဆိုရင်တော့ ''Profile'' ပုံ ထည့်ပြီးပါပြီ။
ဟုတ်ကဲ့။အခု ဆက်လက်ပြီးတော့ ''Paypal Account'' မှာ ''Visa Or Master Card'' တစ်ခုနဲ့ ချိတ်ဆက်ကြရအောင်ဗျား။
''Visa Or Master Card'' နဲ့ ချိတ်ဆက်ဖို့အတွက် အပေါ်ဆုံးညာဘက်ထောင့်မှာ ရှိတဲ့ ''Setting'' အမှတ်အသားလေးကို နှိပ်ပါ။
အဲဒီနောက် ''Banks and Cards'' ===>''Link a Card or Bank'' ===>''Debit or Credit Card''===>''Link a Card'' အဲဒီ အတိုင်းသွားပါမယ်။
အဲဒီနောက် ''Card number'' ဆိုတဲ့ ကွက်လပ်ထဲမှာ ကျွန်တော်တို့ ''Note App'' ထဲမှာ မှတ်ထားတဲ့ ''Master Card'' တစ်ခုရဲ့ Card No.'' ထည့်ပါမယ်။
အဲဒီနောက် ''Expiry Date'' နဲ့ ''CVV'' နံပါတ်တွေ ထည့်ပါမယ်။
အားလုံးထည့်ပြီးသွားရင်တော့ ''Link Card'' ကို နှိပ်ပါမယ်။
အဲဒီနောက် ခဏကြာရင် ''Paypal Account'' ကို ''Master Card'' ချိတ်ပြီးသွားတာ တွေ့ရပါမယ်။
''Paypal Account'' ဖွင့်တုန်းက ''Email'' ထဲကို ''Comfirmation Link'' ပို့ပေးထားပါတယ်။အဲဒီ ''Comfirmation Link'' ကို နှိပ်ပြီး ''Email Verify'' လုပ်ပေးဖို့လည်း လိုအပ်ပါတယ်။ဒါဆိုရင်တော့ ကျွန်တော်တို့ ''Paypal Account'' ကို ''Browser'' ကနေ ဝင်မယ်ဆိုရင် ပုံထဲကအတိုင်း တွေ့ရပါလိမ့်မယ်။
အခုဆိုရင်တော့ ကျွန်တော်တို့ရဲ့ ''Paypal Account'' ကို ''Card'' တစ်ခုနဲ့ ချိတ်ဆက်ထားလိုက်တဲ့အတွက် ကျွန်တော်တို့ဟာ ''Basic Paypal Member'' ဖြစ်သွားပါပြီ(ဒါပေမယ့် totally verify မဖြစ်သေးပါဘူး)။
ကောင်းကျိုးအနေနဲ့ ''Paypal Account'' ထဲကို ငွေလက်ခံခြင်းနဲ့ ''Paypal Account''ထဲကငွေကို အခြားသူများထံသို့ ပေးပို့ခြင်းတို့ကို အကန့်အသတ်မဲ့ လုပ်ဆောင်နိုင်သွားပါပြီ။
ဒါပေမယ့် ''Totally Verify'' မဖြစ်သေးတဲ့အတွက် "Paypal Account'' ထဲက ငွေထုတ်ယူဖို့(Withdrawl လုပ်ဖို့) ၁လကို US$ 1000 အထိပဲ ထုတ်ယူနိုင်တယ်ဆိုတဲ့ ကန့်သတ်ချက်(Limitation)ကတော့ ရှိနေပါသေးတယ်။
၁လကို US$ 1000 ငွေထုတ်ကန့်သတ်ချက်ကို ဖယ်ရှားဖို့အတွက်ဆိုရင် ''Paypal Account Totally Verify'' ဖြစ်အောင်ပြုလုပ်ရပါမယ်။''Verify'' ပြုလုပ်ဖို့အတွက် (1)Bank Account Comfirmation (2)Social Security Number(SSN)Comfirmation နဲ့ (3)ကျွန်တော်တို့ ချိတ်ဆက်ထားတဲ့ Credit or Debit Card Comfirmation ဆိုတဲ့ အချက်(၃)ချက်ထဲက အချက်(၂)ချက်ကို Comfirm လုပ်ပေးမှ ရမှာပါ။
ဒီအချက်တွေကို ''Confirm'' လုပ်ပေးဖို့ဆိုတာကလည်း သိပ်တော့ မလွယ်လှပါဘူး။ဘာလို့လည်းဆိုတော့ ကျွန်တော်တို့ ''Paypal Account'' စလုပ်ကတည်းက Name, Address, Phone Number,Credit or Debit Card စတာတွေအားလုံးကို အတု(fake)တွေချည်း သုံးခဲ့တာဖြစ်တဲ့အတွက် ကျွန်တော်တို့အနေနဲ့ ''Paypal Totally Verified Account''ဆိုတာကို ရယူဖို့ မဖြစ်နိုင်ပါဘူး။
''Card'' တစ်ခုနဲ့ ချိတ်ဆက်ထားတဲ့ ''Basic Paypal Member'' အဆင့်နဲ့ပဲ ကျေနပ်ရမှာ ဖြစ်ပါတယ်။
ဟုတ်ကဲ့။စာလည်း တော်တော်ရှည်သွားပြီ ခင်ဗျ။ကျွန်တော်ရဲ့ Post ကို ဖတ်ရှုပေးတဲ့အတွက် ကျေးဇူးတင်ပါတယ် ခင်ဗျ။
မိတ်ဆွေများအားလုံး ကျမ်းမာ ချမ်းသာပြီး မင်္ဂလာရှိတဲ့ နေ့ရက်လေးတွေကို ပိုင်ဆိုင်နိုင်ပါစေ ခင်ဗျ။
ချစ်ခင်လေးစားစွာဖြင့်-----
@thantzin(moehlaing)
*****-----*****-----*****-----*****-----*****
You have a good solution for Paypal. In which we can apply your master card.
thanks for your support,friend!
ေက်းဇူးပါ
u r welcome,brother!
nice post sar
thank you for your support,brother!
good bro
နည္းပညာေလးေတြသိခြင့္ရလို႔ ေက်းဇူးတင္ပါတယ္
အားေပးတဲ့အတြက္ေက်းဇူးပါ brother ေရ!
နည္းပညာပုိင္းကုိေတာ့မကၽြမ္းက်င္ပါဗ်ာ ေက်းဇူးတင္ပါတယ္။ save ထားမယ္။
ေက်းဇူးပါ ဆရာ။
အစဥ္ေလးစားလ်က္ပါ ခင္ဗ်။
တန္ဖိုးရွိတဲ႔ Post ပါ
အားေပးတဲ့အတြက္ေက်းဇူးပါ brother ေရ!
thanks for your sharing
thanks for your support!
ေက်းဇူးပါ
u r welcome!
thanks for your support!
Congratulations @thantzin! You have completed some achievement on Steemit and have been rewarded with new badge(s) :
Click on any badge to view your own Board of Honor on SteemitBoard.
For more information about SteemitBoard, click here
If you no longer want to receive notifications, reply to this comment with the word
STOPCongratulations @thantzin! You have completed some achievement on Steemit and have been rewarded with new badge(s) :
Click on any badge to view your own Board of Honor on SteemitBoard.
For more information about SteemitBoard, click here
If you no longer want to receive notifications, reply to this comment with the word
STOPGreat effort job post bro
Thanks..
thanks for your support,brother!
good for sharing
thanks for your support,sis!
ေက်းဇူးတင္ပါတယ္ဗ်
u r welcome!
thanks for your support,brother!
Verified လည္း limit က် တတ္သလားလို႔
Paypalက ျမန္မာႏိုင္ငံကို support မေပးတဲ့အတြက္ က်ြန္ေတာ္တို့ ျမန္မာႏိုင္ငံ အေနနဲ့ ''Verified Paypal Account'' ျပုလုပ္လို့ မရပါဘူး ဆရာ။အခု က်ြန္ေတာ္တို့ verified ဆိုျပီးေျပာေနတဲ့ Paypal Account ေတြက credit or debit card တစ္ခုနဲ့ Link ခ်ိတ္ထားရံုမ်ွသာရွိေသးတဲ့ အမွန္တကယ္ Verified မျဖစ္ေသးတဲ့ unverified account ေတြပါ ဆရာ။လံုးဝ Verified ျဖစ္သြားျပီဆိုရင္ limit က်စရာအေျကာင္း မရွိပါဘူးဆရာ။sending,receiving နဲ့ withdrawl(တစ္ျကိမ္ထုတ္ Us$ 10000) အားလံုး unlimited ပါ ဆရာ။
thank you for your support,friend!
let's grow together with steemit!