Small handmade anti-stress stuffed animal/ Pequeño peluche antiestrés hecho a mano [ESP/ENG]

in #needlework3 years ago

Español

¡Bienvenidos a un nuevo tutorial!

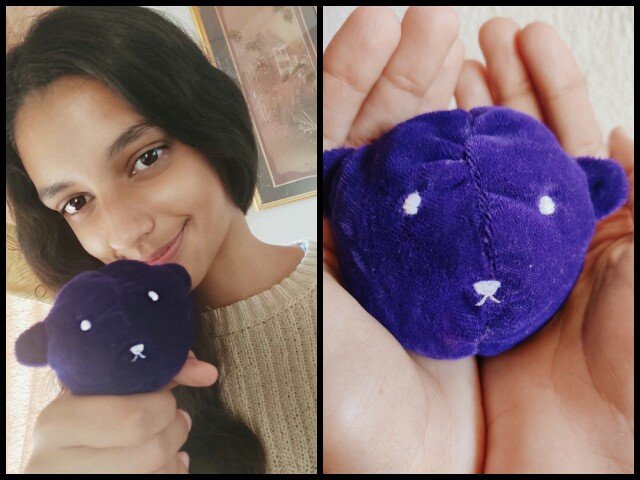
El día de hoy traigo una propuesta para combatir el estrés o el aburrimiento que puede producirse a través del día, un pequeño peluche osito en forma de bolita, fácil de agarrar y fácil de hacer. Se requieren muy pocos materiales para realizarlo, y si te animas, tendrás un pequeño compañero que te ayudará a liberar tensión.

English

Welcome to a new tutorial!

Today I bring a proposal to combat stress or boredom that can occur throughout the day, a small teddy bear in the form of a little ball, easy to grab and easy to make. Very few materials are required to make it, and if you dare, you will have a little companion that will help you release tension.

PicsArt_04-25-11.43.46.jpg


~Los materiales~

Como se trata de un peluche tan pequeño, no necesitaremos mucho material, pero en caso de que quieras hacerlo más grande, sólo debes duplicar o triplicar la cantidad.

-Tela: Solo necesitas un pequeño pedazo de 20 cm x 20 cm. En mi caso estoy reciclando tela de un viejo vestido de mi madre, de tela de terciopelo, pero puedes usar tela polar o simplemente una tela que sea suave y no estire mucho.

-Hilos: necesitaras dos hilos de coser, uno para coser el peluche, y otro para bordarle la cara, debe ser un color que le resalte la cara. En mi caso usé un hilo negro y uno blanco, pero si la tela que usas es de color claro, puedes usar un hilo negro para las dos cosas.

-Agujas: con una simple agua de costura basta.

-Alfileres: Para sostener la tela, en mi caso usé otras agujas porque no tengo alfileres por el momento.

-Un color claro
-Un bolígrafo
-Papel para el patrón
-Tijeras de costura
-Una regla

~The materials~

Since this is such a small stuffed animal, we won't need a lot of material, but in case you want to make it bigger, just double or triple the amount.

-Fabric: You only need a small piece of 20 cm x 20 cm. In my case I'm recycling fabric from an old dress of my mother, velvet fabric, but you can use fleece or just a fabric that is soft and doesn't stretch too much.

Threads: you will need two sewing threads, one to sew the stuffed animal, and another one to embroider the face, it must be a color that highlights the face. In my case I used a black and a white thread, but if the fabric you use is light colored, you can use a black thread for both.

-Needles: with a simple sewing water is enough.

-Pins:To hold the fabric, in my case I used other needles because I don't have pins at the moment.
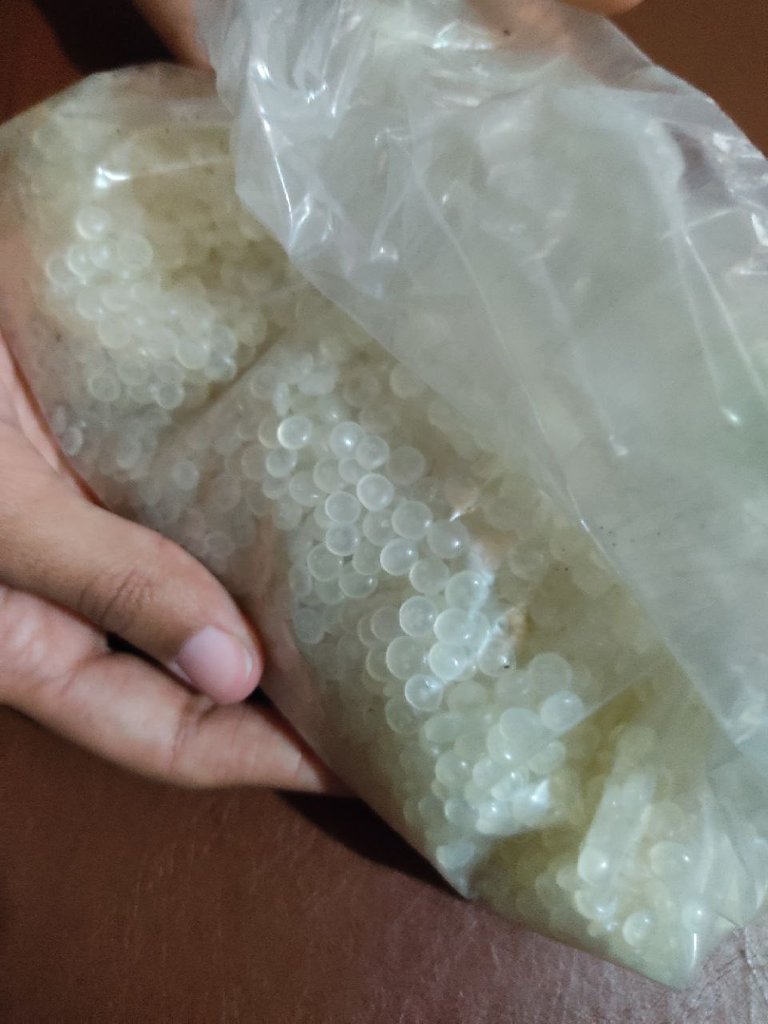
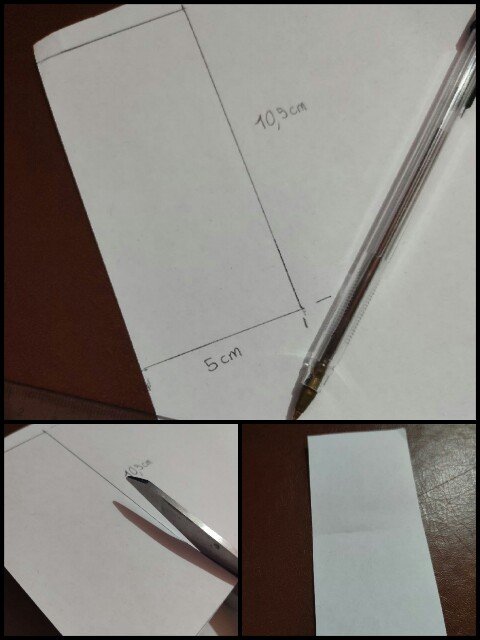
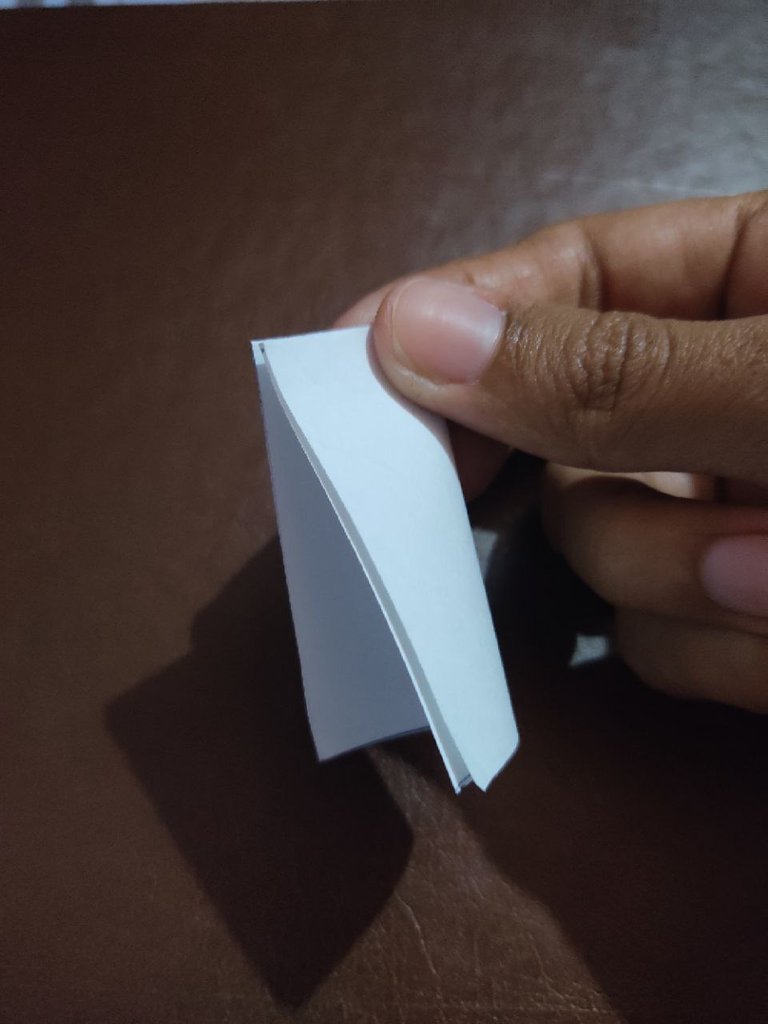
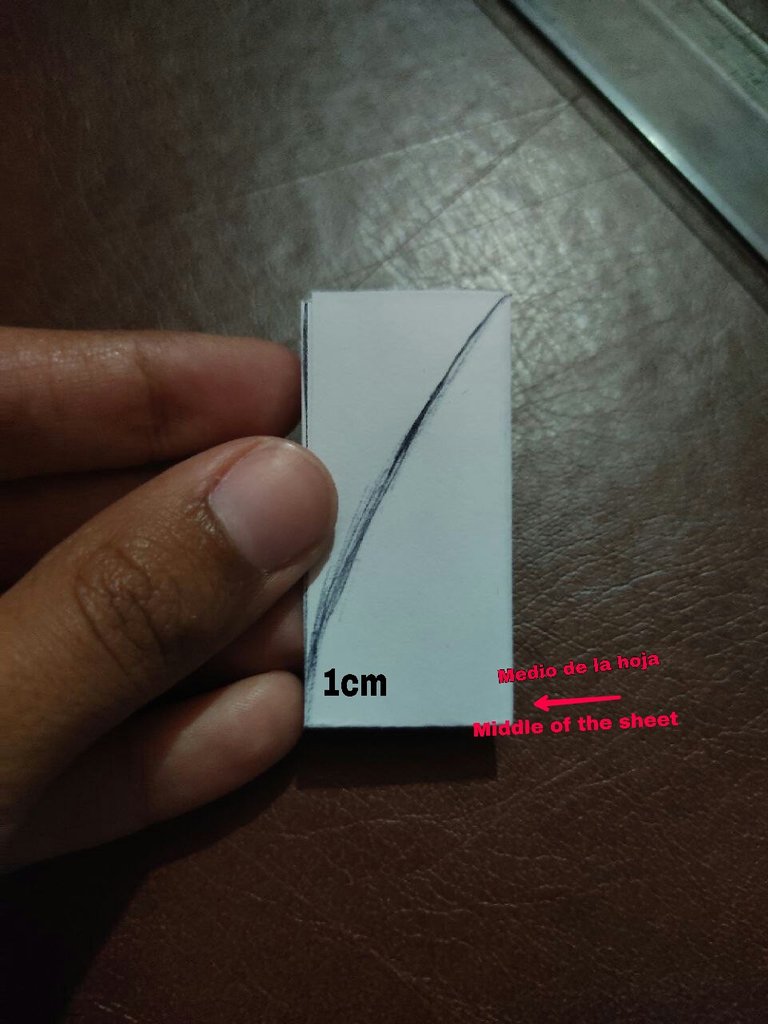
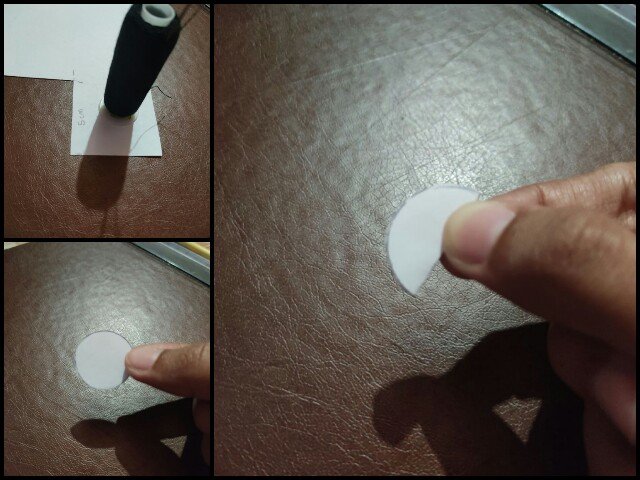
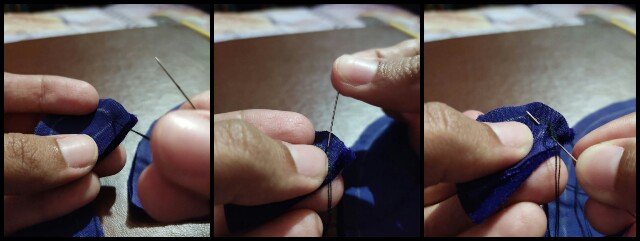
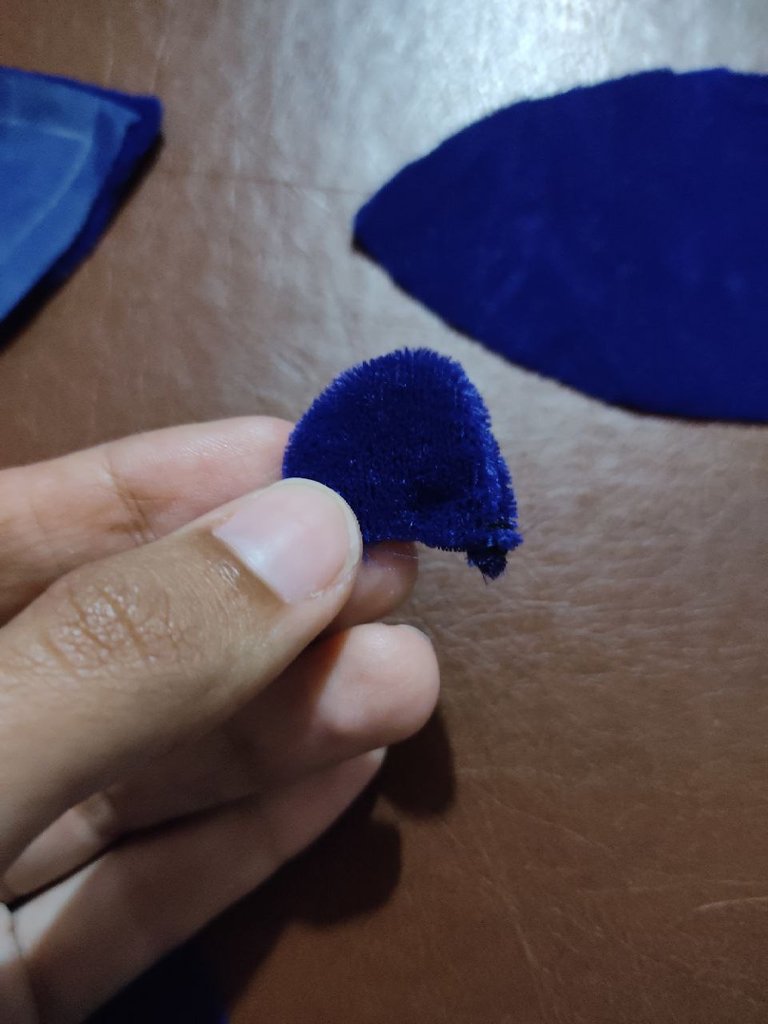
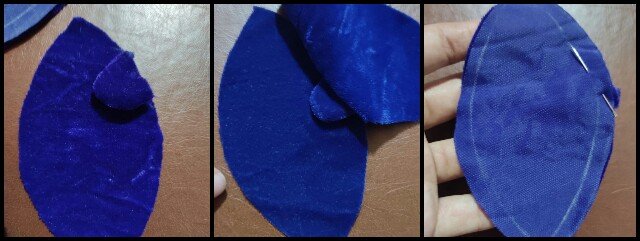
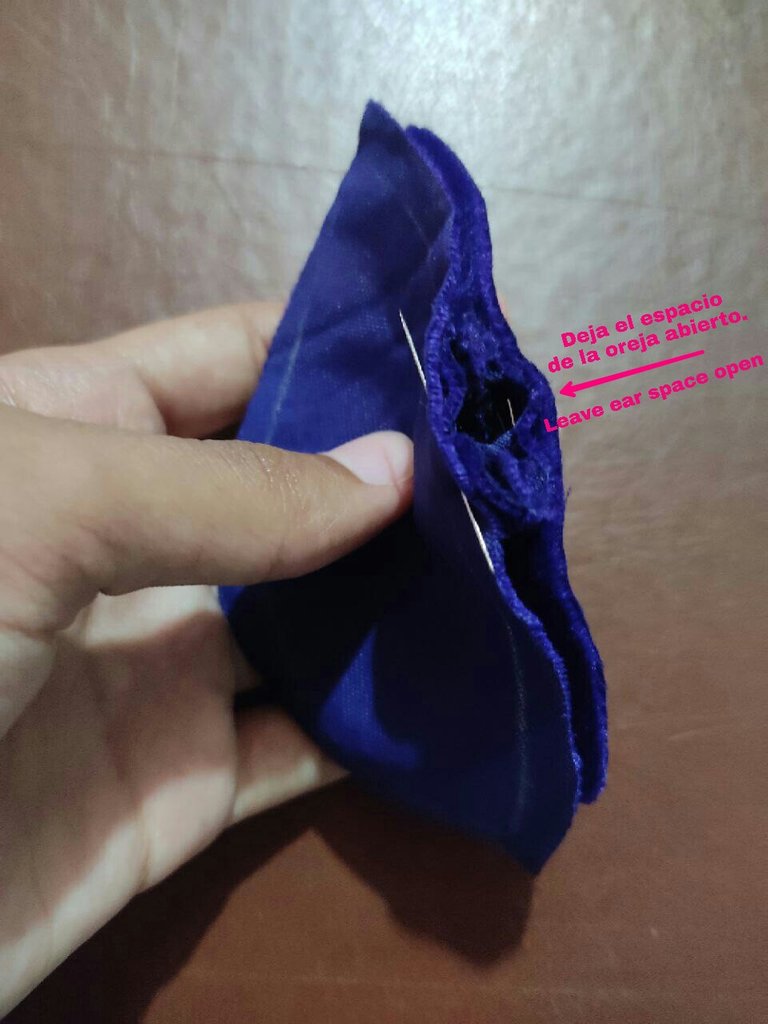
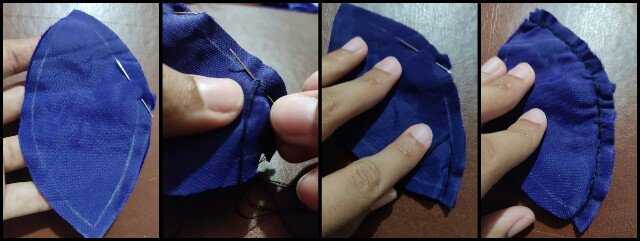
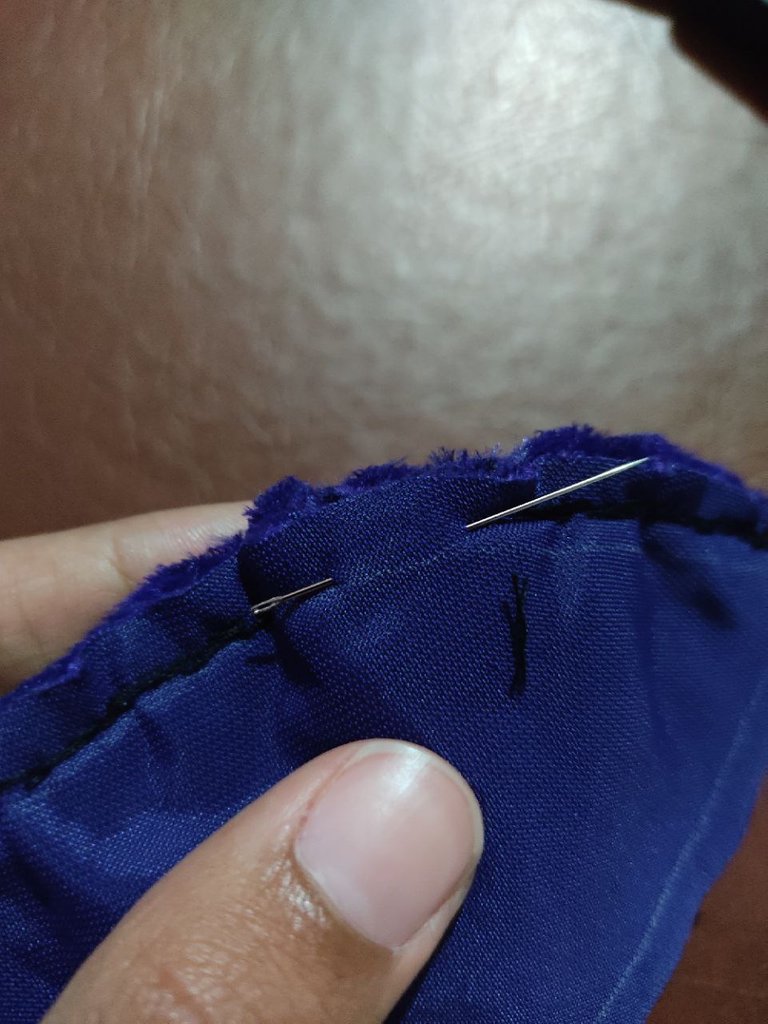
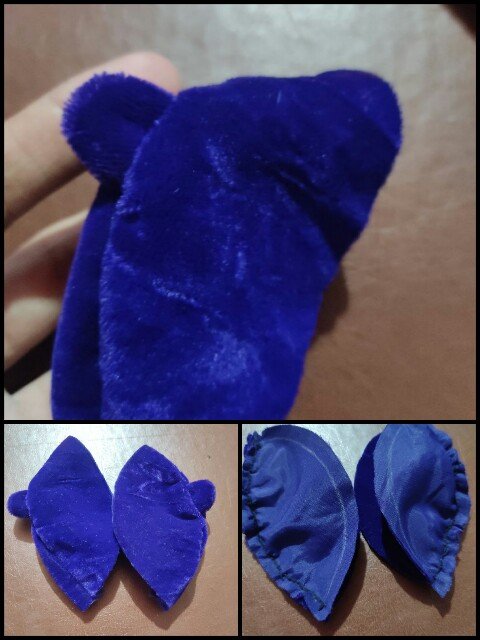
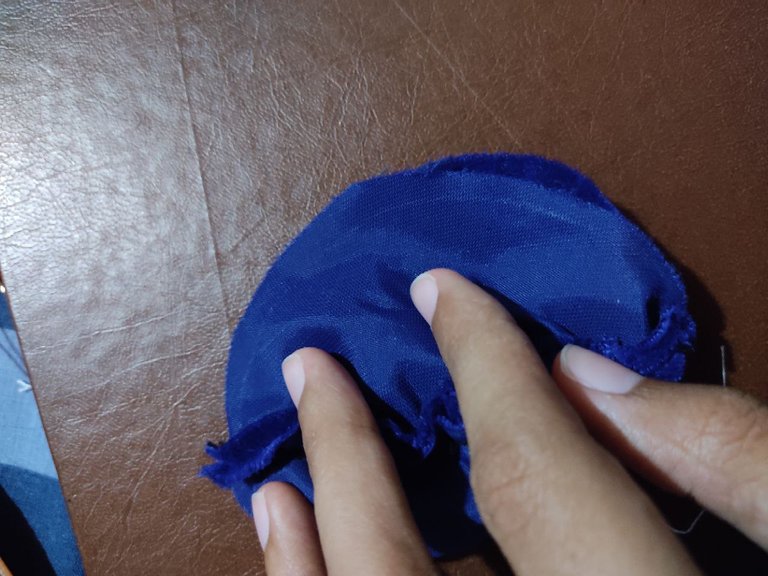
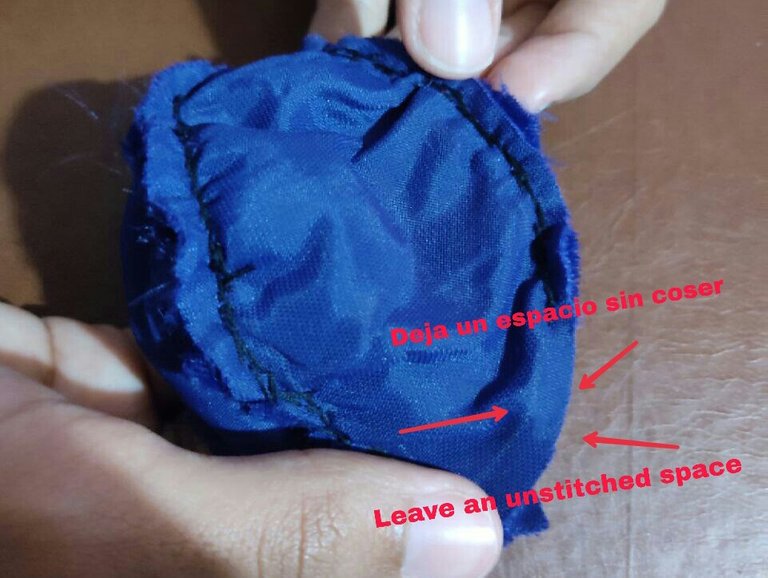
-A light color
-A pen
Pattern paper.
-Sewing scissors
-A ruler
.


Para rellenar el peluche, usé estás pequeñas bolitas de plástico que me regaló mi novio, pero en sí se debe rellenar con micro perlas de poliestireno. en caso de no tener ninguno de estos materiales,puedes usar arroz o lentejas, así tendrá el mismo efecto antiestrés, pero deberás mantenerlo siempre lejos del agua o la humedad.

To fill the stuffed animal, I used these little plastic balls that my boyfriend gave me, but it should be filled with polystyrene micro beads. If you don't have any of these materials, you can use rice or lentils, so it will have the same anti-stress effect, but you should always keep it away from water or humidity.

IMG_20210424_194743_788.jpg


~The pattern~

Instead of leaving you the image with the pattern to download, I will show you how to draw it.

Step 1: Using the paper and pen, with the help of a ruler you are going to draw a 10,5cm x 5cm rectangle.

Step 2: Cut the rectangle.

~El patrón~

En vez de dejarles la imagen con el patrón para descargar, les enseñaré como dibujarlo.

Paso 1: Usando el papel y el bolígrafo, con la ayuda de una regla vas a dibujar un rectángulo de 10,5 cm x 5cm.

-Paso 2: Corta el rectángulo.

PicsArt_04-25-11.47.33.jpg

Paso 3: dobla la hoja de papel en cuatro parte,siempre por la mitad.
Step 3: fold the sheet of paper in four parts, always in half.

IMG_20210425_152136_116.jpg

Paso 4: Una vez doblada la hoja, vamos a dibujar una linea que conecte el extremo izquierdo de abajo con el extremo derecho de arriba, haciendo casi una linea recta, pero dejando un pequeño espacio de 1 cm o menos (esa parte va dibujada de forma derecha). Importante: Asegurate de dibujar desde la parte donde se encuentra el medio de la hoja doblada hasta el extremo final).
Step 4: Once the sheet is folded, we are going to draw a line connecting the bottom left end with the top right end, making almost a straight line, but leaving a small space of 1 cm or less (that part is drawn straight). Important: Make sure to draw from the part where the middle of the folded sheet is located to the end).

PicsArt_04-25-11.56.58.jpg

Paso 5: Corta la hoja guiandote por la línea y al desdoblarlo debería quedarte como se muestra en la foto. Este será el patrón para la cabeza.
Step 5: Cut the sheet following the line and unfold it as shown in the picture. This will be the pattern for the head.

IMG_20210425_152209_685.jpg

Paso 6: Ahora para las orejas debes dibujar un círculo, recortarlo y doblarlo por la mitad, en este caso uséla forma redonda de el hilo de coser para guiarme, pero puedes hacerlo más grande, es tu decisión.
Step 6: Now for the ears you must draw a circle, cut it out and fold it in half, in this case I used the round shape of the sewing thread to guide me, but you can make it bigger, it's up to you.

PicsArt_04-25-11.59.56.jpg


~El proceso~

Comencemos dibujando el la tela las piezas necesarias de nuestro patrón, se requieren 4 piezas de cada patrón, cómo se muestra en la foto En caso tal de que uses tela polar o terciopelo, te recomiendo dibujar el patrón por el lado reverso de la tela.

~The process~

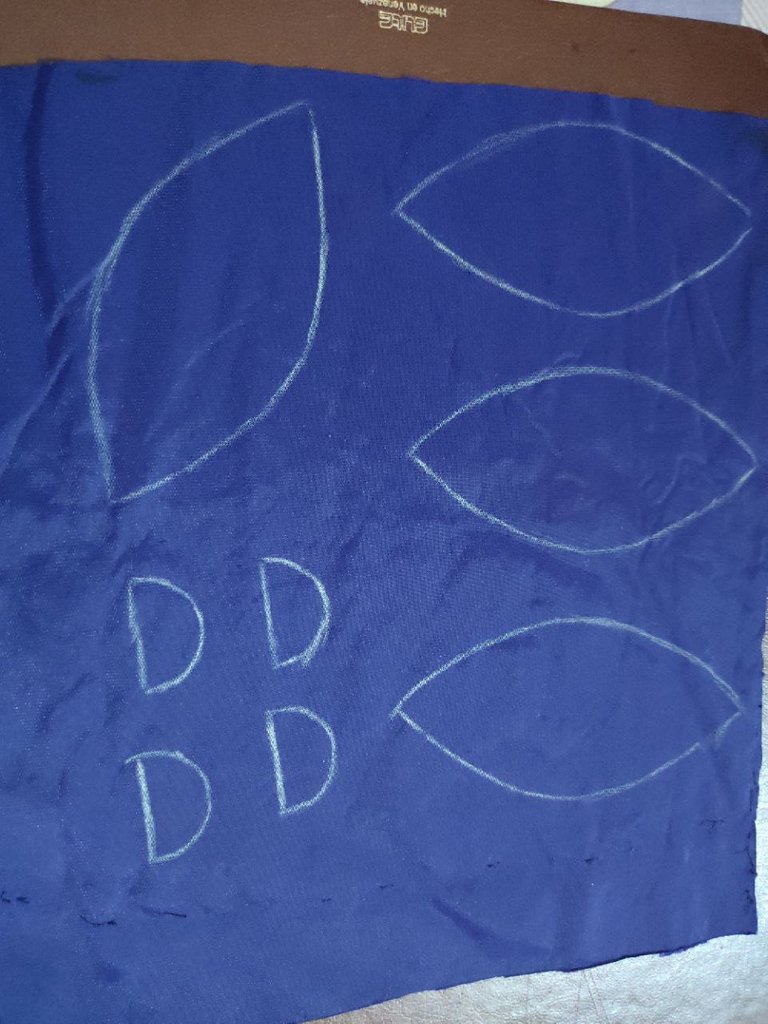
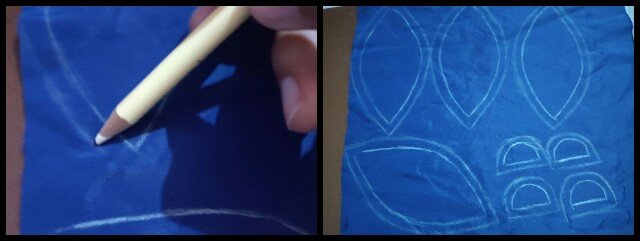
Let's start by drawing on the fabric the necessary pieces of our pattern, 4 pieces of each pattern are required, as shown in the picture. In case you use fleece or velvet fabric, I recommend you to draw the pattern on the back side of the fabric.

IMG_20210425_002242_932.jpg

Como hay que dejar espacio para la costura, a mi me gusta dibujar dos veces en el patrón, la primera guiandome con el patrón, y la segunda, dejando un margen de 0,5 cm a 1cm. La primera linea dibujada es por donde pasaremos el hilo y la aguja, y la segunda linea dibujada es por donde cortaremos con la tijera.
As you have to leave space for the seam, I like to draw twice on the pattern, the first time using the pattern as a guide, and the second time, leaving a margin of 0.5 cm to 1 cm. The first line drawn is where we will pass the thread and needle, and the second line drawn is where we will cut with the scissors.
PicsArt_04-25-12.02.34.jpg
Ya cortadas todas las piezas, comenzaremos cosiendo las orejas. Toma dos de las cuatro piezas y coselas juntas, dejando la parte donde se ve las lineas dibujadas afuera.

Once all the pieces are cut, we will start sewing the ears. Take two of the four pieces and sew them together, leaving the part where the lines are drawn outside.

PicsArt_04-25-12.10.32.jpg

Al terminar, debemos voltear y nos quedará algo como se muestra en la foto, ¿No es tierno? Una pequeña orejita de oso. Ahora debemos repetir el proceso con las otras dos piezas de tela.

When finished, we should flip it over and we will be left with something like the one shown in the photo, isn't it cute? A little bear's ear. Now we must repeat the process with the other two pieces of fabric.

IMG_20210425_002324_984.jpg


Ahora, esta probablemente sea la parte más complicada. Debes tomar tu orejita y ponerla entre dos pedazos de la tela para la cabeza, debe quedar como un sandwich en donde las partes donde están las lineas dibujadas queden hacía afuera.

Asegurate de marcar en donde vas a poner la oreja, ya que es allí donde se verá al finalizar el osito. Debe ser más arriba de la mitad, siemore pegado a la orilla de la tela.

Es aquí donde debes usar tus alfileres o agujas para asegurar que se mantenga unidas las piezas mientras coses.

Now, this is probably the most complicated part. You have to take your ear and put it between two pieces of the fabric for the head, it should be like a sandwich where the parts where the lines are drawn are facing outwards.

Make sure to mark where you are going to put the ear, since that is where it will be seen at the end of the teddy bear. It should be more than halfway up, always sticking to the edge of the fabric.

This is where you should use your pins or needles to make sure you keep the pieces together as you sew.

PicsArt_04-25-12.13.08.jpg

Asegurate de usar alfileres para asegurar la tela de ambos lados, sobre todo en la parte de la oreja, ya que debe dejarse abierta para que entre el relleno una vez terminado nuestro osito.
Be sure to use pins to secure the fabric on both sides, especially on the ear part, as it must be left open for the stuffing to enter once our teddy bear is finished.

PicsArt_04-25-12.27.13.jpg

Ahora debes coser a través de toda la linea dibujada, pero cuando sea turno de coser la parte de la oreja, debes sólo coser por un lado, para asegurar que quede abierto, como explique antes.
Now you should sew along the entire drawn line, but when it is time to sew the ear part, you should only sew on one side, to make sure it is open, as I explained before.

PicsArt_04-25-12.30.45.jpg

Una vez cosido, del otro lado debería verse así, la oreja sin costura. Ahora debemos coserla sin que se una con la parte de al lado.
Once sewn, the other side should look like this, the seamless ear. Now we must sew it without joining it to the side.

IMG_20210425_002641_918.jpg


Lo siguiente es repetir el proceso con la otra oreja, y una vez terminado, al voltearlo nos debe quedar como se muestra en la foto.
The next step is to repeat the process with the other ear, and once finished, when we turn it over, it should look as shown in the photo.

PicsArt_04-25-12.33.00.jpg

Ahora tenemos dos mitades del oso que debemos unir, así que volteamos otra vez las piezas y lo unimos tal como se hice al principio, siguiendo la linea dibujada
Now we have two halves of the bear to join, so we flip the pieces again and join it as it was done at the beginning, following the drawn line.

PicsArt_04-25-12.34.46.jpg

Ahora notaremos que tenemos una cara vacía, ¡así que es hora de ponerse creativos!Para darle vida a este osito, con hilo blanco hice algunas puntadas rectas, de esta forma le agregué una cara sencilla pero bonita. Tú puedes agregarle la cara de la forma que desees. Para ayudarte te recomiendo usar el color claro para marcar en la tela, así los ojos se ven simétricos.
Now we will notice that we have an empty face, so it's time to get creative! To give life to this bear, with white yarn I made some straight stitches, this way I added a simple but cute face. You can add the face any way you want. To help you, I recommend using the light color to mark on the fabric, so the eyes look symmetrical.

PicsArt_04-25-12.41.02.png

¡Ya casi está listo! Ya se han cosido 3 de los 4 ldos, sólo falta uno. Una vez más, hay que voltear nuestro trabajo, coser por toda la linea marcada, la única diferencia es que esta vez vamos a dejar un espacio sin coser, es muy importante esto, ya que por ahí es que podremos voltear el osito para rellenarlo.
Almost done! Three of the four sides have already been sewn, only one is missing. Once again, we have to turn our work, and sew all along the marked line, the only difference is that this time we are going to leave a space without sewing, this is very important, because there is where we will turn our teddy bear to fill it.
IMG_20210425_002959_369.jpg
_20210425_191602.JPG

Ahora vamos a voltearlo por ultima vez

Now let's turn it over one last time.

PicsArt_04-25-01.19.39.jpg

¡Es hora de rellenar! Esta es mi parte favorita. Para ayudarme a realizar el trabajo y que no se saliera,hice un cono de papel, el cual metería un extremo en el osito y el otro extremo lo usaría para undirlo en la bolsa de el relleno, las bolitas pasara a través del cono y quedarán en el osito. Asegurate de que las orejas se rellene bien.
It's time to fill in! This is my favorite part. To help me get the job done and to keep it from coming out, I made a paper cone, which I would stuff one end into the bear and the other end I would use to stuff it into the stuffing bag, the little balls would go through the cone and stay in the bear. Make sure the ears are stuffed well.

PicsArt_04-25-01.21.40.jpg

En lo último,ayudate con la mano para terminar y cuando sientas que ya está bien gordito, cose ese último lado y podrás dar por listo tu peluche.

In the last part, help yourself with your hand to finish and when you feel that it is already well plumped, sew that last side and you can consider your stuffed animal ready to go.

IMG_20210425_114030_080.jpg


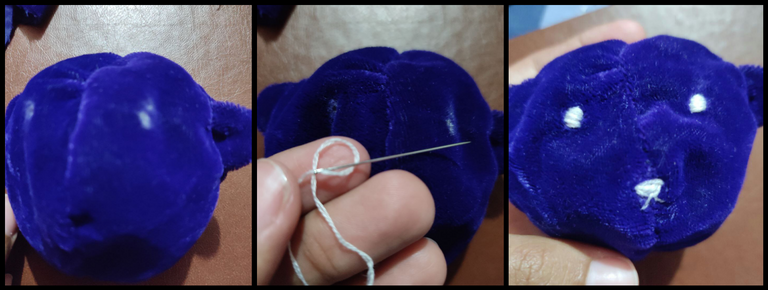
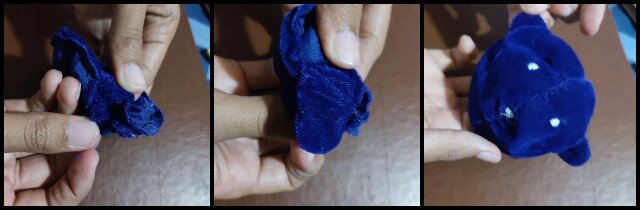
Ahora tienes un amigo para llevar contigo a donde vayas. Recuerda ponerle nombre. El mio se llama Poppy ♥


Now you have a friend to take with you wherever you go. Remember to name it. Mine is named Poppy ♥

Espero que les haya gustado este tutorial, me disculpo si es muy largo. Espero que les sea de provecho y nos vemos en el siguiente tutorial.

¡Hasta la próxima!

I hope you liked this tutorial, I apologize if it is too long. I hope you find it useful and I'll see you in the next tutorial.

See you next time!


Todas las fotos fueron tomadas por mí, el texto fue traducido del español al inglés usando Deepl.
All the pictures were taken by me, the text was translated from Spanish to English using Deepl.

Sort:  

Me encanto esta idea, necesito un osito anti estrés. Te etiquetare si lo realizo.

Me alegra muchísimo ♥ sería un honor

Congratulations @bunnysneedle! You have completed the following achievement on the Hive blockchain and have been rewarded with new badge(s) :

You received more than 400 upvotes.
Your next target is to reach 500 upvotes.

You can view your badges on your board and compare yourself to others in the Ranking
If you no longer want to receive notifications, reply to this comment with the word STOP

Support the HiveBuzz project. Vote for our proposal!