Happy #NeedleworkMonday everyone!
Another exciting Monday of amazing Needlework projects by all you talented Steemians!

I drew this iron for my earlier post: #needleworkmonday :: Wipe Cloth "Embroidery" and decided to re-use the picture and colored it a bit for this post as it seemed fitting 😁
This week, I would like to share with you a washable ironing board cover tutorial because my ironing board is pretty worn out but still functions well. Instead of buying a new one, I thought why not make a new cover? 🤔🤓
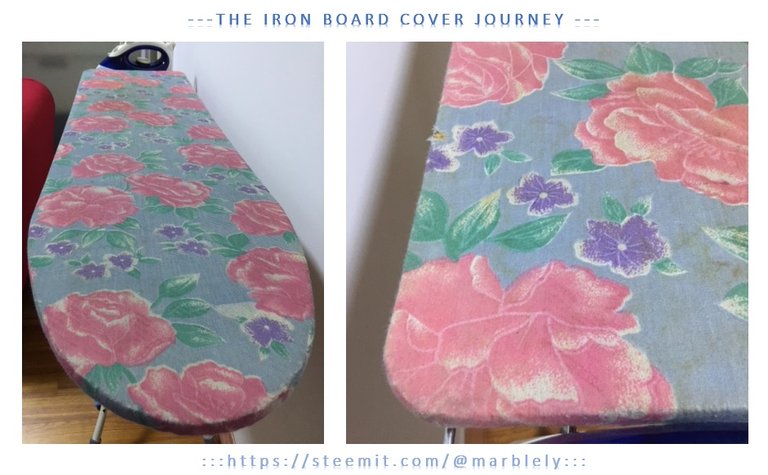
The ironing board's original cover is stapled onto the board and is worn out, torn at some places and water stained from the spraying of mist and iron.

Here goes....
(1) Place your cloth of choice on the ironing board (one that is drapy and is able to withstand heat). Mine, I reused an old piece of wrap cloth that has holes at some places 😳.
(2) Cut the cloth to the shape of the ironing board with about 2-3 inches of seam allowance.
I learnt that the more cloth at the sides will enable the cover to wrap nicely underneath the board after inserting the elastic.
(3) You will get something like this - a cut piece that has been cut according to the shape of the ironing board.

(4) Hem the sides all around the cut cloth using whichever method that you like.
(5) Then, fold the hem and sew about 1 cm from the edge, (6) leaving insertion holes at the beginning and end.
Don't worry if the hem is not neat (especially the curved parts). I learnt from this project that once we insert the elastic, it will all be nicely hidden and tucked at the bottom of the board - like magic! 😎

(7) Take an elastic string and (8) insert it into a darning needle (or any tool you have) to bring the elastic string through the insertion hole, (9) all the way to the other end.

(10) Then do a fitting test - start dressing the ironing board, beginning from the curved end. Pull the elastic and adjust the cover to ensure it fits the board.
(11) Nicely tuck the bottom.
(12) Make sure it is wrapped snugly around the ironing board and tie a knot at the open end of the cover.
And we are done!
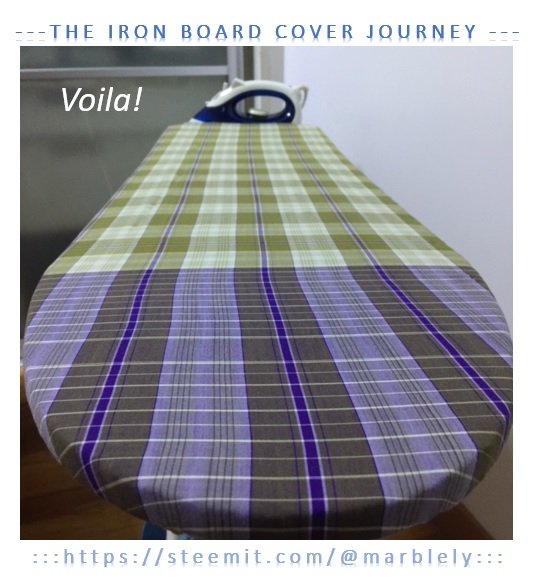
This cover is removable, and washable to your heart's desire 💗

#NeedleworkMonday is hosted by the lovely ladies, @crosheille and @crystalize 😍

Its so nice how you made the old ironing board turned into a new one..thanks for sharing this one..ive got an idea
Thank you @dizzyapple. It is nice to be able to refurnish old and worn out things and use it like new.
Well thought out and nicely done!
I'm not the queen of sewing but If you make the seam with twice folding the fabric to the backside you should be able to omit the hem.
Thank you @muscara! Ooo you are right. That would have saved some time. Hemming can be quite a task sometimes. Thank you!
That's a brilliant idea @marblely. I made a cover for my ironing board many years ago and it's great to be able to choose the fabric - my version did definitely not look as well made as yours though. Well done !
Thank you @cryptocariad! it is nice to be able to do double re-use. Re-using an old wrap cloth and re-furbishing an old board. 😊 I hid the not-so-well-made parts at the bottom of the board.
They do not show ... no worries @marblely...
This is very practical and pretty.
Thank you @gmatthe2 😊
Congratulations! This post has been upvoted from the communal account, @minnowsupport, by marblely from the Minnow Support Project. It's a witness project run by aggroed, ausbitbank, teamsteem, theprophet0, someguy123, neoxian, followbtcnews, and netuoso. The goal is to help Steemit grow by supporting Minnows. Please find us at the Peace, Abundance, and Liberty Network (PALnet) Discord Channel. It's a completely public and open space to all members of the Steemit community who voluntarily choose to be there.
If you would like to delegate to the Minnow Support Project you can do so by clicking on the following links: 50SP, 100SP, 250SP, 500SP, 1000SP, 5000SP.
Be sure to leave at least 50SP undelegated on your account.
You just planted 0.12 tree(s)!
Thanks to @marblely
We have planted already 3673.33 trees
out of 1,000,000
Let's save and restore Abongphen Highland Forest
in Cameroonian village Kedjom-Keku!
Plant trees with @treeplanter and get paid for it!
My Steem Power = 19231.17
Thanks a lot!
@martin.mikes coordinator of @kedjom-keku
This is such a nice post, so nicely done! I like all the photographs along the way. But I must confess ... only a month ago, I bought a new ironing board cover! I have a very old ironing board. I bought it from a secondhand shop (those were the days) opposite my parents' house in about 1978, I think. It still works and I like it because it has a wide bed. At one stage, I had a sleeve board attachment, but that has got lost in the mists of time. I've replaced the cover so many times, and the felt that sits underneath and creates a nice, plump finish - I guess you could use an old woollen blanket ... if anyone has such a thing nowadays :)
Thank you @shanibeer! 😘 Oh wow.. yours was really old. 40 years!! Good excuse to get a new one 😁 Though, wide bed ironing boards are not easy to find these days. My grandma used to iron on a square table (1 meter each side) because she likes wide surface area which a standard ironing board does not provide. And she covered the table with a few layers of cloth ranging from old woolen blanket and cotton wrap cloths 😅.
I know, forty years and it was old when I got it! It works so well, though, I can't imagine replacing it. My mum had an old rickety wooden one that creaked and groaned when she was ironing. I think it may have collapsed eventually 😊
Oh ya.. it is more than 40 years old! May have been 50 or 60? That is one very good and sturdy ironing board 😄 Oh ya, mine currently squeaks quite a bit when I iron at the curved end 😅
Brilliant @marblely! This was such a nicely written up post with lovely process pictures along the way. I love the idea which will save you money and give you some sewing practice (which I need badly lol).
I do like to have nice padding on my ironing board. I’m wondering how some padding could be added to this when changing out the cover? This could possibly be a future project for me! Thank you so much for sharing! 😃
Thank you @crosheille! 😘 I will always remember your kind comment in my first post of the green crochet frog "Feel free to share the process of your work too! We love seeing a project come to life!!! 😃" and I try to share the process pictures (when I remember to take pictures) as presentable as possible, though sometimes not successful.
Hehe.😅Oh yes, I agree, these little things does save us money and give us sewing practice 🙃 and give us a sense of achievement and satisfaction.
Ah I have seen those padded overs sold in shops. They add a batting /sponge like material of some sort to the back of the cover (without needing a backing fabric like how people usually do with quilting but I think you can add that) and sew the foldover elastics on both the pieces. Something to try next time 😉
Awwwww that’s so cool. Yes I will never forget your first #NeedleWorkMonday post of the cute little frog! You have been doing such a great job sharing the process pictures of your work! Thanks for listening and taking my advice! 😃
A sense of achievement is so important! That’s what keeps us doing what we do!! Motivation at it’s best!
Yes batting!! That’s what I was thinking about but couldn’t recall the name. Yes maybe something to add for the next round! 😉
😍😘
Excelent @marblely! I think that at some point I can do something like that. Thank you so much for sharing.
Thank you @jicrochet! 😊 Yes yes, it was fun to sew and am sure it will be fun for you too 🙃. Thanks for reading and commenting on my post 😘
Brilliant. I also have an iron board which needs some cosmetic surgery, because of some burn marks ... (I feel sorry for my board) I am not sure if I should try out to make a new layer or if we need a new board (the wood has some hills and valleys :-DDD)
But if I try: should I use a special fabric for the cover?
Thank you @neumannsalva! 😘 Hehe yah, I feel sorry for mine too. Maybe just put some stuffings in the valleys and cover it with a new cover :D That way, you got the valleys covered :) but the hills hmmm.... hehe
I just use an old smooth cotton fabric. Cotton should be ok or linen (but linen may not be smooth and when you iron, you may not get the smooth effect that you want) because those are the labels for the highest 2 temperatures at the dial :D. Good luck!! :)
uhhh @marblely I forgot to mention: I love the little iron <3 <3 I myself have not tattoes, but I love tattoes which look like pencil drawings and this would be cute and kind of ironic (I hate ironing... really) The colored sketch is soooo lovely
Thank you @neumannsalva! 😘 I am remembering how much I love coloring with color pencils when I was in school. Thank you for liking the colored sketch. It means a lot to me 😘. Steemit activities really reignites my old passions :) I am not keen on ironing too and usually postpone it till I have no choice (e.g. no more work clothes haha)
I have always bought ironing board covers - and never thought of making one at all. Thanks for showing us the steps to do it. That makes it easier when we want to make one ourselves. This is amazing work!
Thank you @mrscwin! 😘 It is a quick and fun project to try.
this is great! i like having my ironing board cover washable as well. I also replaced our cover and left the original cover on the ironing board but I actually did not sew that, I just put big safety pins to cover it out hihihi
Thank you @lhyn! 😘 Hehe.. that works well too.
This post was shared in the Curation Collective Discord community for curators, and upvoted and resteemed by the @c-squared community account after manual review.
Thank you @c-squared! 😘