
Introduction
To keep the long story short, I'll just highlight a little about this Qt framework and then jump straight into all the errors I faced when trying out the OneSignal's Android SDK Setup on Qt framework.
Qt by far for me, has the simplest programming in term of customization on the UI. The QML is as intuitive yet straight forward. I have been following since Qt 5.0 and saw a lot of progress made by the Qt for android. Trust me. Is worth it.
Another reason, as technology decision maker for my company, I choose to adopt Qt due to it's ability to cross compile on many platform. Technology nowadays move fast. Features are added or change frequently. The ability to workaround by going native when feature is not supported is also important. In this post, is about going back native java on android to enable the much needed push notification that is not supported here.
Getting Started
As a starter, I have been developing with QML for quite sometime now. So starting a QtQuick project is a breeze. The next thing we need is to run the application on Android devices, which is also relatively easy following this setup link.
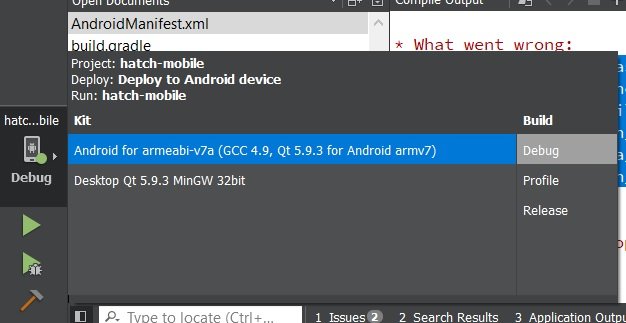
Once you have setup the link, you can emulate or run on android device by setting below. And then click the play button. As simple as that.
Upon building finish, in the build folder is exactly the same of what you see developing using android studio layout.

Customizing for Android App
Start by creating a folder where all the android overwrite you want to happen to be place here. For my example, I am putting it in {ProjectDirectory}/android.
Go back to the build folder and copy the following 2 files into this android folder. AndroidManifest.xml and build.gradle.
NOTE: this was the part I was actually confuse how to obtain Qt sample or default file, thus, copying from the generated to modify on it.
Then setup the *.pro file with android path accordingly as follow
android {
    QT += androidextras
    ANDROID_PACKAGE_SOURCE_DIR = $$PWD/android
    ANDROID_JAVA_SOURCES.path = /src/com/hatchsoft
    ANDROID_JAVA_SOURCES.files = $$files($$PWD/android/src/com/hatchsoft/*.java)
    INSTALLS += ANDROID_JAVA_SOURCES

    OTHER_FILES += \
        android/AndroidManifest.xml \
        android/build.gradle
}
Next, we'll be creating this folder $$PWD/android/src/com/hatchsoft/*.java, where we will be putting our native code in. I have a created a NativeApplication.java as implementation as follow:
package com.hatchsoft;
import com.onesignal.OneSignal;

public class NativeApplication extends org.qtproject.qt5.android.bindings.QtApplication {
   @Override
   public void onCreate() {
      super.onCreate();
      OneSignal.startInit(this)
        .inFocusDisplaying(OneSignal.OSInFocusDisplayOption.Notification)
        .unsubscribeWhenNotificationsAreDisabled(true)
        .init();

      // Call syncHashedEmail anywhere in your app if you have the user's email.
      // This improves the effectiveness of OneSignal's "best-time" notification scheduling feature.
      // OneSignal.syncHashedEmail(userEmail);
   }
}
Then, on the AndroidManifest.xml, change the Application entry class to our NativeApplication as follow
<application android:hardwareAccelerated="true" android:name="com.hatchsoft.NativeApplication" android:label="-- %%INSERT_APP_NAME%% --" android:icon="@drawable/icon">
Customizing accodingly to OneSignal
Following the OneSignal Documentation here. I am assuming you guys have set this up following this link here Generate a Google Server API Key.
I basically ignore this, I am facing error when inserting this. After that, somehow gradle did download the plugin needed later. Anyhow, it works. Which later i'll explain on the take away.
plugins {
    id 'com.onesignal.androidsdk.onesignal-gradle-plugin' version '0.8.0'
}
apply plugin: 'com.onesignal.androidsdk.onesignal-gradle-plugin'

repositories {
    maven { url 'https://maven.google.com' }
}
</pre>
Continue on, this is how my `build.gradle` look like
<pre>buildscript {
    repositories {
        jcenter()
    }

    dependencies {
        classpath 'com.android.tools.build:gradle:2.2.3'
    }
}

allprojects {
    repositories {
        jcenter()
        maven {
            url "https://maven.google.com"
        }
    }
}

apply plugin: 'com.android.application'

dependencies {
    compile fileTree(dir: 'libs', include: ['*.jar'])

    // OneSignalSDK
    compile 'com.onesignal:OneSignal:[3.6.5, 3.99.99]'
}

android {
    /*******************************************************
     * The following variables:
     * - androidBuildToolsVersion,
     * - androidCompileSdkVersion
     * - qt5AndroidDir - holds the path to qt android files
     *                   needed to build any Qt application
     *                   on Android.
     *
     * are defined in gradle.properties file. This file is
     * updated by QtCreator and androiddeployqt tools.
     * Changing them manually might break the compilation!
     *******************************************************/

    compileSdkVersion androidCompileSdkVersion.toInteger()

    buildToolsVersion androidBuildToolsVersion

    sourceSets {
        main {
            manifest.srcFile 'AndroidManifest.xml'
            java.srcDirs = [qt5AndroidDir + '/src', 'src', 'java']
            aidl.srcDirs = [qt5AndroidDir + '/src', 'src', 'aidl']
            res.srcDirs = [qt5AndroidDir + '/res', 'res']
            resources.srcDirs = ['src']
            renderscript.srcDirs = ['src']
            assets.srcDirs = ['assets']
            jniLibs.srcDirs = ['libs']
       }
    }

    lintOptions {
        abortOnError false
    }

    defaultConfig {
        applicationId "com.hatchsoft"

        // TODO: Update OneSignal ID below
        manifestPlaceholders = [onesignal_app_id: "PUT YOUR ONESIGNAL APP ID HERE",
                              // Project number pulled from dashboard, local value is ignored.
                              onesignal_google_project_number: "REMOTE"]
    }
}
Building and running the App
Hit the play button, and let it load to your apps. And on your OneSignal dashboard you can see your user listed there.
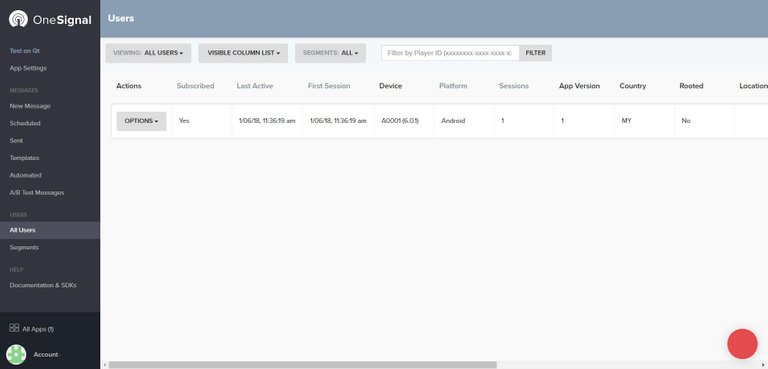
By now, I am pretty pump up, as I know the setup is successful, and ready for testing. Trust me, it works now.
My take away and learning
Along the way, I did struggle for sometime, figuring out those error and start googling around. Eventually, everything works.
For one, I do think QtCreator can be improve to help us code Java with intelli-sense and auto import. That will help tremendously, when trying to code on QtCreator.
Next, though v-play does have ready made OneSignal QML Component ready to use (exactly what I am looking for). However, the pricing is consider super pricey for a developer in Malaysia to afford. Basically, RM200(USD50) per month is too much for me. However, learning and seeing how parameter is expose there, is possible to re-create QML component for this, than solely on java.
Error and solution
Yup, for the sake of documentation to prevent more waste of time, I'll just share those major errors, and solution I found here.
OneSignal ask to add plugin that doesn't work for here
plugins {
id 'com.onesignal.androidsdk.onesignal-gradle-plugin' version '0.8.0'
}
apply plugin: 'com.onesignal.androidsdk.onesignal-gradle-plugin'

repositories {
maven { url 'https://maven.google.com' }
}
You'll get other error such as
all buildscript {} blocks must appear before any plugins {} blocks in the script
Thus, basically just ignoring this, as you can see from my build.gradle above works.
Execution failed for task ':mergeDebugResources'.
Execution failed for task ':mergeDebugResources'.
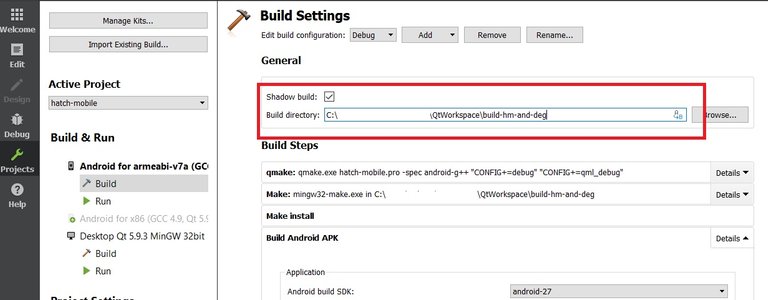
> Error: Failed to crunch file C:\xxxxxxxxxxxxxxxx\QtWorkspace\build-hatch-mobile-Android_for_armeabi_v7a_GCC_4_9_Qt_5_9_3_for_Android_armv7-Debug\android-build\build\intermediates\exploded-aar\com.google.android.gms\play-services-base\11.6.2\res\drawable-xxhdpi-v4\common_google_signin_btn_icon_light_normal_background.9.png into C:\xxxxxxxxxxxxxxxx\QtWorkspace\build-hatch-mobile-Android_for_armeabi_v7a_GCC_4_9_Qt_5_9_3_for_Android_armv7-Debug\android-build\build\intermediates\res\merged\debug\drawable-xxhdpi-v4\common_google_signin_btn_icon_light_normal_background.9.png
This error basically spell that the path use is too long for the OS to handle, simple fix is basically to shorten the Qt created build folder name build-hatch-mobile-Android_for_armeabi_v7a_GCC_4_9_Qt_5_9_3_for_Android_armv7-Debug through the QtCreator interface.
Execution failed for task ':processArmv7DebugResources'
ERROR: In  FontFamilyFont, unable to find attribute android:font
ERROR: In  FontFamilyFont, unable to find attribute android:fontStyle
ERROR: In  FontFamilyFont, unable to find attribute android:fontWeight


FAILURE: Build failed with an exception.

* What went wrong:
Execution failed for task ':processArmv7DebugResources'.
This error was the most tricky of all. What causing this was because of the android-support-v4.jar version doesn't match with android api version and build-tools version. In my case, the build-tools I am using is at 27.0.1 and was compiling on android-25.
By updating to latest, android-27. Go to project -> Build APK -> change to android-27. It solve the error above magically.
Downloading SDK Platform Android 8.1.0, API 27, revision 1 Download finished with wrong size. Expected 65606517 bytes, got 65738431 bytes.
Somebody on the android team forgot to update the checksum when was using the SDK manager to update the android-27. Thus, simple solution is go back to the temporary folder and manually unzip it.
When download fails, you can notice a temp folder for this path:"C:\Program Files (x86)\Android\android-sdk\temp". There should be a file called "platform-27_r01.zip". Copy it out and extract the "android-8.1.0" folder. The next step, rename it to "android-27". Then, copy it to the path "C:\Program Files (x86)\Android\android-sdk\platforms".
That it, have fun :)
I hope this long post does help somebody from going through another long night of fixing errors.
I have created a github template using from this link QtOneSignal. Take it, use it and start making your project fly too!