Hello everybody !
:)
Welcome for a new photography lesson.
 - You can find my previous lessons of Master photography in 7 minutes, here :
- Lesson 1 - Fundamental Triangle
- [Lesson 2 - Composition] (Current one)
The previous lesson was a bit complex for a first one, so we will tacle a softer subject today, less technical, more artistic.
Today we are talking about the basics of composition.
If you like taking pictures, it can be usefull for you : from people using phone and instagram, to people using reflex and selling their work.
[Master photography in 7 minutes] - Lesson #2 : Main composition techniques
Before starting this subject, I would like to remind you one important thing. If photography is a real passion for you, never be influenced by somebody telling you that your picture is horrible because "it doesn't respect the standards of composition".
Don't get me wrong, I don't tell you to not listen to critics, I just remind you that the more important in life is to do what you love. If you like to take pictures with half of your subject in the frame, if you like to underexpose or overexpose the colors of your picture, or pump the contrast as hell, be my guest, and enjoy.
I tell you that because all you are going to see after those first sentences, are technique mainly used in photography, to attract, and highlight the subject(s) of your composition. However, it's like everything, the tastes are different from one individual to another one.
Composition is a subjective way of thinking. Just learn them and then, compose as you feel, keeping in mind that the best way to improve is to try new things and get away of your comfort zone.
As you understood, there is a part of feeling and subjectivity in your composition, but there are also scientific facts, and technical things that are well kown. For example we know where your eyes look at the picture during the first seconds, how they sweep the frame, how to give an impression of movement, how to make your brain work and imagine the scene... etc
And that's what we are dealing with right now. Facts.
Fact number one : The rule of thirds.
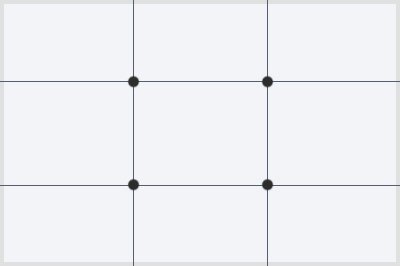
Main representation of the rule of thirds
Many people will tell you that art is not lead by rules and technique, and they are right. The rule of thirds is no exception, it's just a tool to know where the eyes will be attracted the more, so don't respect this rule for every pictures that you make, just apply it when it's convenient.
So what is the rule of third ?
Cut the frame in thirds, horizontaly and verticaly, then you'll have intersections between line. Those intersections are the zones where there is the more impact. If you put an important element of your subject on those points, it will have a better effect than if you put your subject in the midlle of the frame.
Why ? Because those points are where the eyes are focused the most on a picture.
- Stop shooting your subject in the middle of the frame ! Try to innovate and test new composition.
Sometimes, you can't put your subject on those "third" points, but you still can use the lines, where are also attracted your eyes.
Do you remember your father telling you to have everything in the frame, and be carefull to not cut the head or the arm of your subject in the picture ?
That's totally bullshit in many cases !
That's why, when you go to the cinema, you'll see scenes like the following one. Eyes are perfectly in the first third line, and that's pretty effective ! Your brain doesn't care if you can't see the top of the head, that's not important. The look of the subject is.
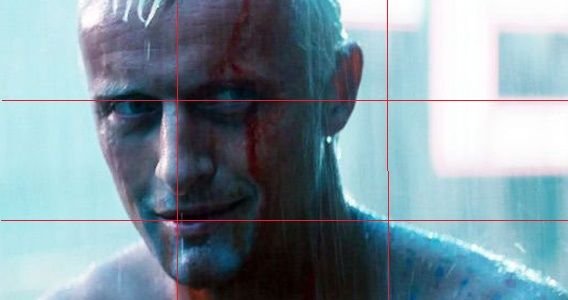
Example of eyes perfectly matching the horizontal third line, and face perfectly aligned on vertical third line
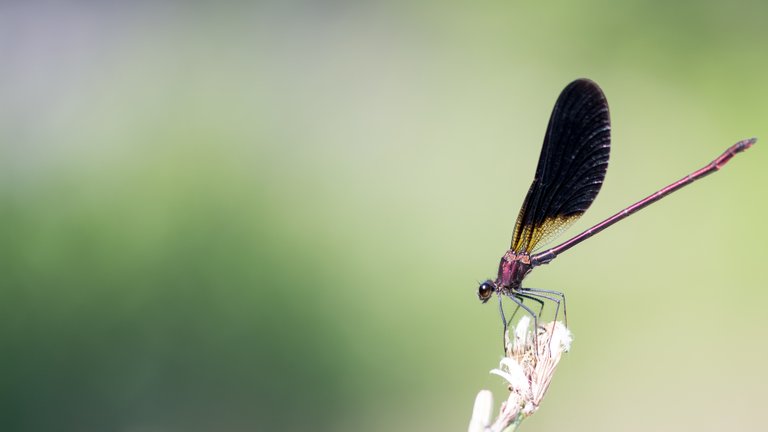
Rule of thirds was the first and basic example of what you can improve on your pictures. But it's really the elementary one. There are also other techniques that are mandatory to draw the attention of people. You have to make your picture live, and for that, you need to give an impression of movement, or to make people imagine the scene.
An easy way to do that is to notice where is heading your subject. If your subject is watching on the left, let a bit of space in the left part of your picture, don't center everything.
Rule of space
I'm a wildlife photographer, so my subjects are animals in this example , but it works the same.
Here is a Banded Demoiselle that I shot recently. Letting some space where is face is heading to, give more impact and life than just puting the subject in the center.
Another example with an eagle shot at Beauval in France. It is watching to the right, so we should let the picture with some space at the right :
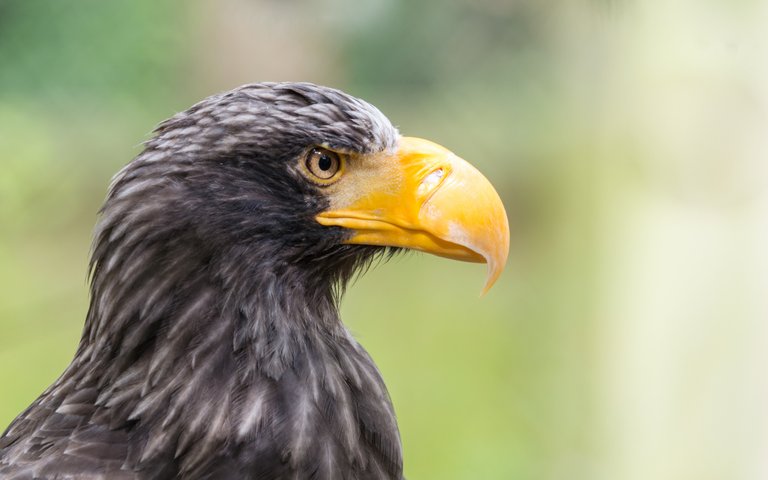
- Always try to let some space and show the way where your subject is heading.
Isn't it more lively ? Yes it is.
Geometrical lines
I told you many times to not center your subject in the frame. However, it might be effective for some cases. Generally, with architecture that have a lot of straight lines, playing with symetry and geometrical lines on your frame might be effective.
For this first picture you can see that none of the previous rules have been followed, the buildings are completely on the horizontal centered line, but it is effective anyway.
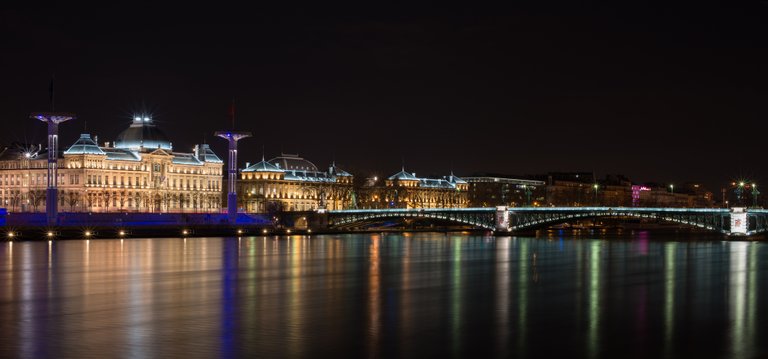
University in my city : Lyon
Here, for this shot under a bridge in Lyon, the frame is a square (which is very rare), and I played with symetry. Buildings and geometrical lines work well together as you can see.
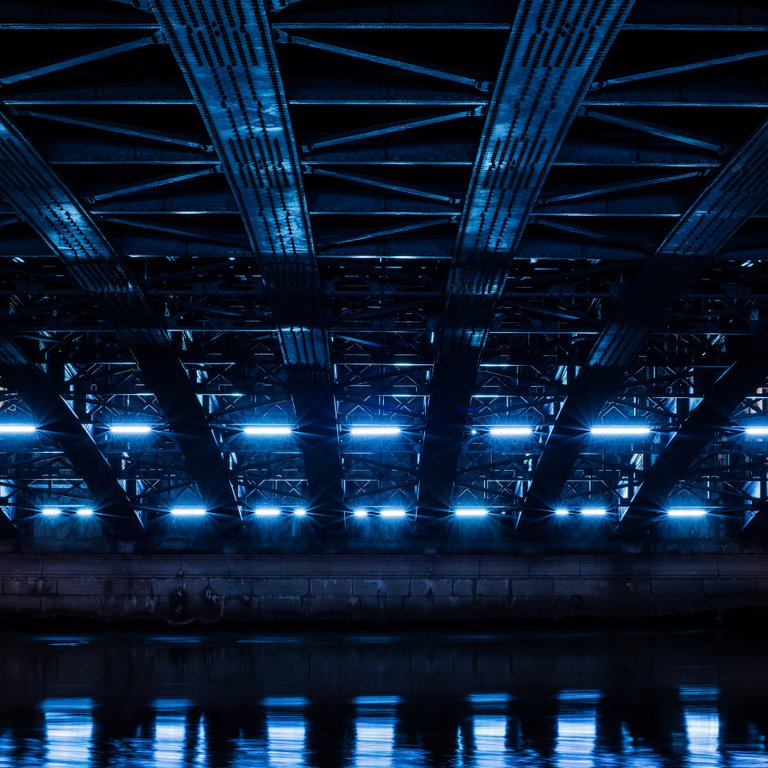
Under the bridge, Lyon
Infinity of rules...
We could find an infinity of rules that work amazingly well, and you will find a counter example for everyone of them. That's why I was telling you at the begining to shoot as the way you want. Those rules are just to show you where the eyes are attracted and how you can bait the look of the watcher.
What I advice you is to train with all the rules that you can read on the internet, and try your own ones, just use your imagination to avoid doing the main boring things, like centering everything to have things perfectly in the frame. Try to cut your subject in half, try to let some space in your pictures, try new frame ratio, instead of 4:3, 1:1 ... etc
You can even mix the rules that you like.
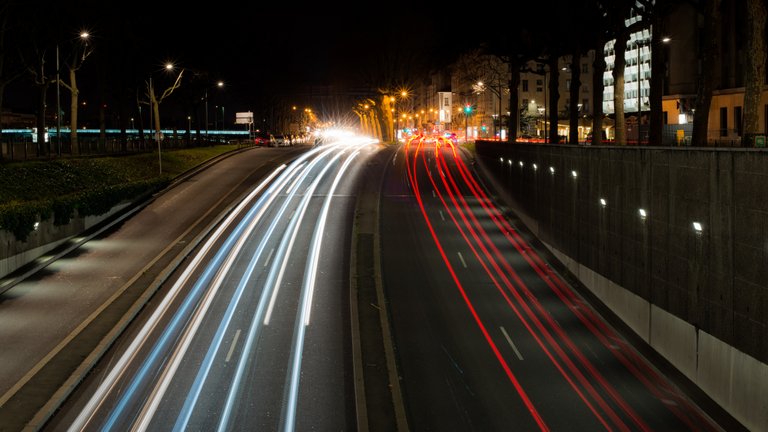
Here an example of night photography in my city where I mix the centering, the symetry and the third line. Would you be able to find them ? :D
Anyway, keep the passion of photography, and remember that every eyes see the art differently.
Some people will love what you do, some will find it useless, some will hate, and it's their right. Just keep shooting, and experimenting things with your phone, your camera, or any tool that you might use :)

Source of this image : https://static.pexels.com
I hope you learned some things, and it wasn't too long.
Feel free to comment and suggest any subjects for next course, or any asking. I answer all of your questions.