
It's been a week since Part 1 and there's been a lot of feedback on the content of my tutorial. I'd like to start by addressing some of the criticism, before continuing the series of tips.
- @najoh55: "Hi, i really hate the flash and i don't use it at all, even for night pictures. I prefer to use a fast lens and steady grip."
- I tried to make it clear that using fill flash is my personal preference. I tend to use it for all of my portrait photos, but not necessarily at a high setting. Just enough to make sure there's no shadow over the faces, but not enough to wash out the details. While I encourage you to experiment with it, keep in mind that some people don't like the apparent flatness of features which it can result in.
- @djm34: "Shooting raw doesn't really increase the resolution, the reason one wants to shoot raw is to be able to do post-processing. If you're always satisfied by the photo which comes out of your camera and the in-camera post-processing there is no reason to shoot raw actually, jpeg is good enough. Actually most people will probably have better photos in jpeg as the raw file always require post processing."
- This is very good advice. If you don't intend to post-process your photos, the extra bit-depth provided by RAW won't help you, but the decreased on camera post-processing may hurt!
- The extra bit-depth is useful for salvaging under- or over-exposed photos, but you won't need to if you follow today's guide.
- @tibidk: "The SD card you use is also very important, remember that. It's pointless to shoot a RAW or high res on a slow card, because you will lose a ton of quality because of the slow write speed."
- Sort of true; if you're shooting with a low end compact flash or SD card (less than Class 10) you probably don't want to shoot RAW, especially not RAW+JPEG. This is because it will take a while to write out the images to your card, and you'll have to wait for it to finish once the buffer is full before you can shoot more. The photo quality isn't affected by the write speed of the card, unless something weird happens during a very drawn-out write process.
Now, on to the next set of tips
Warning: while fewer than last week's, today's tips are much more technical
The focus this time will be on multiple exposures (sexy, I know! And sorry about the pun)
To appreciate today's advice, an understanding of the meaning of exposure value (EV) helps. Basically, it's a measure of how much light will hit your camera's sensor, and is affected by 1) the shutter speed, and 2) the aperture (the focal length of your lens divided by the diameter of the "entrance pupil", i.e., how wide open your lens' diaphragm is). Now, the correct exposure value for your scene depends on a bunch of factors, including how well lit it is and what ISO you're shooting at. To get a perfect exposure, you'll want to meter properly, and set the exposure value based on that. Then you can "bracket" around that, for reasons I'll go into shortly. I'll probably write an article about types of metering sometime in the near future, since it's an under-appreciated feature on higher-end cameras.
As an aside, cameras have gotten so good at metering these days that you really don't have to understand what options you have, and when to use them, to be able to take even the most classiest looking photos. Nevertheless I'd like for you to get the fullest understanding of the myriad of aspects of taking decent photos, so I plan to write that article despite your protestations!
Now, if you were following along before I got sidetracked, good. If not, don't worry, cameras take care of 99% of the work for us, you don't need a discrete light meter these days to get perfect exposures. The basic idea is that you want to get your picture exposed properly, and then bracket from there.
1) Burst Mode

- Storage is cheap! Don't be afraid to turn on "burst mode" and hold the shutter down
- This is especially useful for kinetic scenes
- If you're shooting a sporting event, it could be hard to time your shutter click with the punt or whatever, now you don't have to!
- If you're taking photos of a person, let your subject play around, and take a burst of photos
- This will result in more natural looking and occasionally surprisingly awesome portraits
- This is especially useful for kinetic scenes
- The main downside is you'll now have to parse through a lot more photos than before to find the really good shots
- If you have a slow SD card, this could result in a bottleneck when writing from cache, preventing you from taking the perfect photo exactly when you wanted to, so be cognizant of that
2) High Dynamic Range (HDR)

- HDR scenes are often mesmerizing. They consist of a lot of detail in bright regions, without enforcing a loss of detail in the shadows
- A theme in my guide is that storage is cheap! We aren't shooting film here, so don't be afraid to take as many pictures as it takes!
- Unfortunately, due to the recent gain in popularity of this term, it's often misused.
- Phone camera phones probably don't actually do HDR images (though there are apps you can download with this specific functionality)
- How will you know if your phone is legitimately shooting HDR photos? Once you understand the concept, it will be easy to tell!
- Process:
- Find the correct "neutral" exposure for your scene
- Either set your camera to exposure bracket around that, (+/- 1.5 EV, or +/- 2EV's are good bets, in my opinion)
- I recommend setting the shutter speed, and bracketing around the aperture, unless you have very good lighting conditions
- Otherwise your overexposed portion of photos will be too blurry
- I recommend setting the shutter speed, and bracketing around the aperture, unless you have very good lighting conditions
- Either let your camera do the HDR for you, or if it doesn't have that option, use software
- There are plenty of drag-and-drop options, just drop in your 3-5 photos of the same scene with different EVs, and watch the magic happen
- Alternatively, if you have a decent flash, you can use flash bracketing for a set aperture and shutter speed
To illustrate the usefulness of the technique, I'll highlight certain sections of the above photo

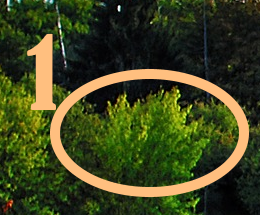
1) The midtones, for the most part only needing the standard exposure. This scene has what I believe to be a curious aliasing pattern present on the tips of the leaves, however, somewhat dampening the sense of wonder instilled by the photo.

2) The shadows, probably the hardest to expose consistently without HDR. Notice how the ripples of water can be seen even in the shadow of the trees?
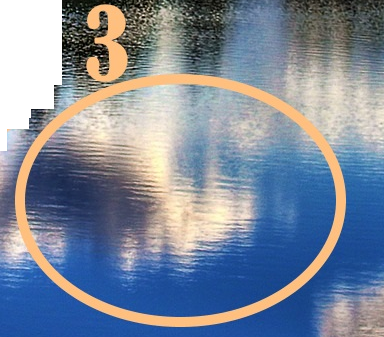
3) The highlights. The sky is probably a better representation of this, but I like how close to the darkest shadows this reflection of bright clouds is. Notice how even the shiniest regions have intricately reflected detail?
I hope I've explained these methods adequately, feel free to ask questions about them in the comments. And go forth and shoot in bursts!
This is an original SteemIt post. Photo 1 was sourced from Wikipedia, and photo 2 from Pixabay. Click on the tip photos for larger versions

Thanks, these are some really useful tips for making better photograps.
You're welcome!
great post :)