To say I’m a bit contrary, is a bit of an understatement. I have a off-center worldview that tends to make me want to do things differently. I don’t know if that is because I want a challenge, or because I just don't want to follow the trend, or because somewhere in my subconscious I believe nothing worthwhile is easy. But somewhere over the past couple of years, on the back of tripping over a thread on a forum, I started fiddling about with projection lenses.

A Schneider-Kreuznach Cinelux AV MC PC 105mm f2.9 slide projector lens shows more or less the pinnacle of slide projector lens results. An Astrantia is always a flower that can flatter a good macro lens, and if you are happy enough to live with a f2.9 minimum aperture, then a lens that cost less than £30 at an on-line auction can compete with those in the premier macro league, giving you both resolution and Bokeh.
As we all know dedicated objective photographic lenses come in many shapes and sizes, from the crisp and ultra-sharp primes, to ultra-range zooms that aim to cover all the generalists’ dreams. But here we are talking about using lenses dedicated to shining a bright picture on a screen as an objective lens.

This shot using an ISCO PC 45mm 2.8 AV lens shows the crisp sharpness that can be achieved from a slide projector lens, accompanied with a melting Bokeh that just smooths away the rest of the image, leaving the eye to concentrate on just the architectural structure of the leaves behind. During this period, there is practically nothing to choose between the ISCO and Schneider as brands.
To be fair this is not that big a leap in the dark. Odds are that if you haven’t, you will know someone, that will have re-purposed enlarger lenses as macro lenses; and as a combination with photo-stacking this is a method that is hard to best for clinically pin-sharp sub 1:1 imagery. And, at the end of the day, re-purposing projection lenses is not such a big leap after that.
But, why on earth would you want to pursue using a lens off an old projector? Well essentially performance at an extremely tight depth of field, and as a bonus two different types of Bokeh to die for. When you consider that, the design brief sounds quite good.

My first dabble with projector lenses was with this Chiyoko P-Rokkor 75mm f2.5 lens from a Minolta Mini projector. Its triplet construction gives a gentle bubbly Bokeh that compliments the slightly soft rendering of the lens. If I was ever in the bridal market I would consider using as it has a good blend of being just sharp enough, and possesses a natural subtle contrast (which may be a side-effect from only being single coated).
But let’s just say from the start projection lenses are a very mixed bag, from the downright meritless to the ridiculously sublime, and from the original cost of a few quid to those well in excess of a thousand.
That is not to say those at the bottom end of the scale are completely without use. One of my favorite lenses is an unbranded medium format slide projector lens, that has featured on Steemit before. It is loosely a four element Petzval design, uncoated, with an exposed aluminium internal barrel, so in consequence it is low of contrast and of little resolving power - but is a gem in producing a soft look that can, dependent on the subject, have a Bokeh that is bubbly or plasticized to the point of Van Gogh.

My wonderfully awful no-name "Two and a Quarter" 6 in focus F 3.8 Petzval projection lens is capable of many weird and sometimes wonderful results, and this shot is included more as an example of what it can do with Bokeh than its actual worth as an image. The semi-distant out of focus foliage from horizontal branches have melted themselves into a tribute to Van Gogh – and next year a pot of blue iris may be placed in the very same place.
Bubbly Bokeh is one reason for locating a good quality low price projection lens. Bubbly Bokeh is a side effect of a badly managed light path in camera objectives. Where this occurs in any lens it is a side effect that could be lived with at that price point, and back in the day all lenses were usually designed to start working well from 2 stops down (as no-body would really want to shoot with a lens wide open, would they). In the world of projection lenses this was something that nobody would ever have considered correcting, as the side effect would never be produced from an illuminated slide or film. Therefore, practically all of the bottom and mid-point projection lenses will give you that Meyer like bubbly Bokeh.
This is because the vast majority of these are based on the relatively simple Cooke Triplet design (either as a standard three element lens or with one element expanded i.e. compounded as two glued elements, or split and air separated), which will yield a brighter edge to out of focus highlights, if something like an iris doesn’t cut it out. Oops, now you know that Meyer Bubbly Bokeh secret, that dependent on the lens; the iris opening is wider than the light path and/or the edge of the lenses are not masked out.
This simple management of the light path also gives you a simple organisation of the light at the focal point, the result of this is a smooth rendering of the out-of-focus areas, or Bokeh. But I’m sure that this aim was not even thought about by the various lenses designers, their aim was to achieve flat field performance on the screen from either a flat or curved field on the film.

Again, the no-name "Two and a Quarter" 6 in focus F 3.8 Petzval projection lens gives another demonstration of Bokeh capabilities smearing an exaggerated pallet of back-light reds and greens behind the subject of a fruiting elder berry twig. The availability of simple lens designs at an accessible price allows great scope for experimentation, and furthering your own knowledge at little cost.
The cream of the slide projector lenses are those which were designed for use with professional audio visual kit. In this realm you encounter lenses like the Leitz Colorplan, ISCO PC lenses, and Schneider Cinelux AVs, and in these the sharpness becomes astounding as the management of the light path eases all the brightness it can. Gone however is the bubbly Bokeh, but in most cases the smoothness is still sublime.
Never forget however Bokeh is never a given, the key to any Bokeh effect is a balance between lens, distance to background, the background’s illumination, and that background itself.
But so far we have just considered slide projection lenses, there is another field of projection lenses where there properties can be harnessed for altogether different ends; that of the cinema projection lens. But there are caveats: These lenses were made to sit in bolt-on carriages at the end of projectors that could weigh the better part of a ton, so their own weight was of little consideration in the design. The filter threads, where present, are obscure. The back focal distance, that bit from the last element to the focal plane is not standardized, so it can be 20 to 200mm (I jest not), so mounting on your DSLR or Mirrorless can be an issue. Overheated film can de-gas in a similar was as superglue, so the rear multi coating can be less than perfect as the discharged gas can dissolve multi-coating – even the high-end old fashioned fused metallic ones. And 35mm projection lenses are effectively half-frame, so they are usually fine up to APS-c, but if you are on full-frame it is best to source 70mm film projection lenses. Always, until you know what you are dealing with, avoid anamorphic or other dedicated wide-screen options – unless you want to stretch-out your digital images. There are better ways to make panoramic images, even for a contrarian like me.

The tight narrow zone of focus in a projection lens need not limit the inclusion of the geographical hard landscape, Here Beinn Dearg, that lies above the Lake of Menteith, provides a warm out of focus counterpoint as it catches the last warmth of the day’s light while twilight has set in on the un-melted frost of the umbrelliferous crown of the Cow’s parsley.
In this case any tighter aperture than that provided by the Isco Optic Ultra MC f2.3 150mm would have let you the viewer have a hint of the visual clutter that lay between the two subjects.
The plus point is that these can make superb low light macro and portrait lenses, with a quality of rendering quite unlike anything else. The design and quality of these lenses peaked within the last 20 years, with the main objective being to make a rather poor duping film stock look spectacular on a fluorescent screen. Bokeh is to me softer than any Mayer lens, as is the flat field sharpness, but the real gain is in the quantity and quality of the light transmitted for the given aperture. My favorite design in this sector are the Schneider/Isco Ultra’s that have balance of contrast to them that can be effectively harnessed in the digital age, and indeed as they should for a lens that originally would originally have cost thousands.
So regardless of the original purpose what do you look out for; well if you want quality look for quality, Schneider/Isco, Nissin Sankor and Leitz will always deliver dependent on the lens design, and if the lens has a metal rather than a plastic barrel then that is usually a good indicator (though there are always exceptions). Kodak and Rollei lenses can be variable, some are superb, some are average, some particularly Kodak are very poor. Of the rest, if you get it for peanuts on eBay, then you can always have some fun for very little outlay – at worst you will have an excellent soft focus option for a fraction of the cost of a Lens-baby.
Of note is the Schneider - Isco relationship as it is a strange one. At times Isco could be Schneider’s second level brand, offering reduced quality at a reduced price, at another it could be producing Schneider quality for other brands, and at others it could be producing different designs at the same quality point. And at others it could be making lenses branded for Kodak and Rollei. If in doubt look at how well built the lens is, if that is cheep the rest will be too.

Here a Leitz Colorplan f2.5 90mm gives a comparative rendering of a similar back-lit foliage scene to the other Petzval and Triplet lenses, this lens is far sharper than either, but in consequence the tighter specification has resulted in a better managed light path that loses the effect of Bubbly Bokeh, however it replaces this with a smoothness that is comparable with the ISCO and Schneider above, if not the incredible sharpness, which would make it an ideal portrait lens.
One thing to always consider is back-focus. In most lenses this is workable, but some like Leitz Colorplan’s are a bit short for straight forward use (on most DSLRs they will require some delicate tube cutting), and Cine lenses less than 70mm focal length can be a risk. And in this regard, there are some projection lenses with little or no back focus, where the lens is designed to sit on, or close to, a digital source. So, don't be tempted by lenses from a projection TV, or most digital projectors.
As a rule it is always best to avoid the Curved Field lenses (usually marked CF) as these are intended to work with glass-less mounted slides (once they have popped with the heat of the projector), and as the name implies give you not only a curved zone of objective focus, but a consequential less smooth rendering of Bokeh.
So how do you make a projection lens practical?
Well essentially, I now use two main methods, glue and ream.
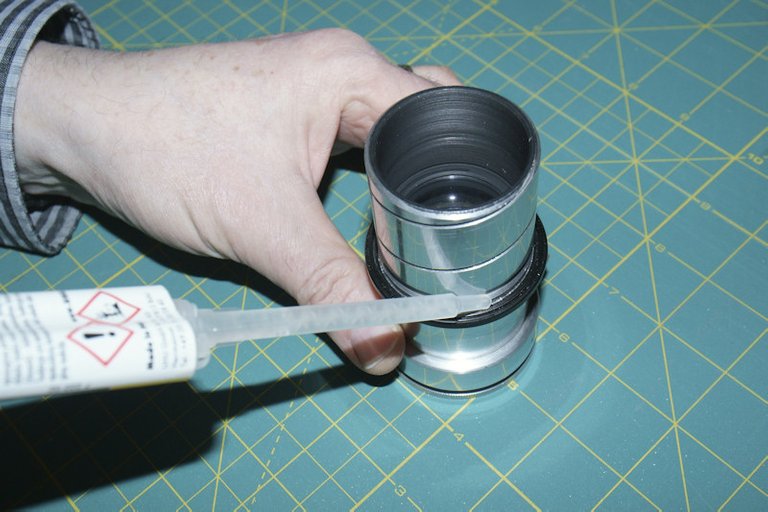
The gluing method works best with cine lenses, and I tend to use a 52mm or 42mm step up/down filter ring glued to the rear of the lens. From bitter experience, I would strongly advise never to use superglue, this de-gasses in the same way as overheated cine film, as described above, and can effectively dissolve any multi coating. So now I carefully center the filter ring, holding it in place with blue tac, and fill the join with epoxy resin, making sure that the lens is well ventilated while the glue cures. Once set the lens can then be mounted on a helical focusing mount, either from China via eBay, or a Leica Zooan adapter (originally to convert a LTM M39 Hektor lens to Visoflex).
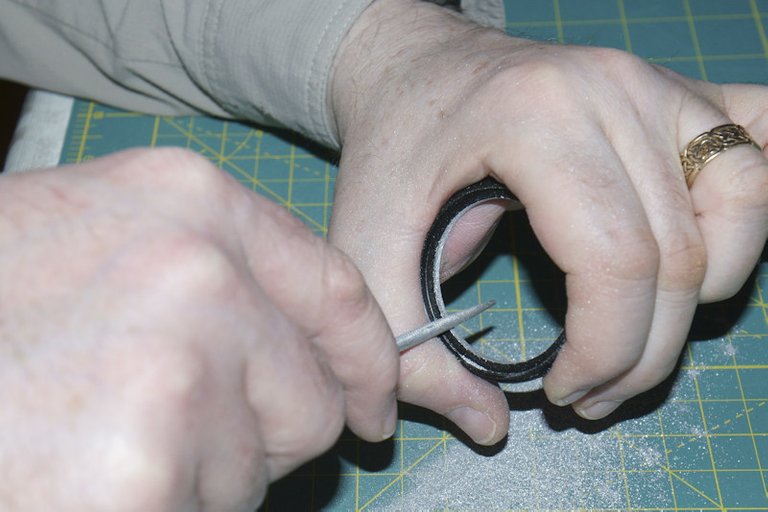
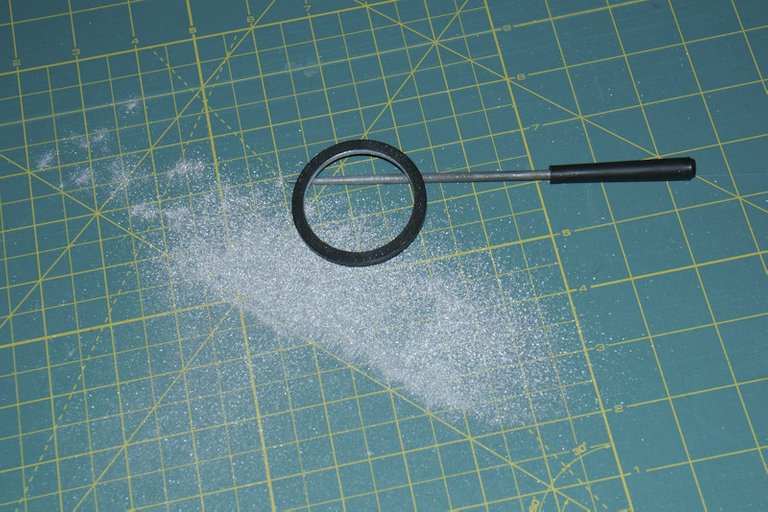
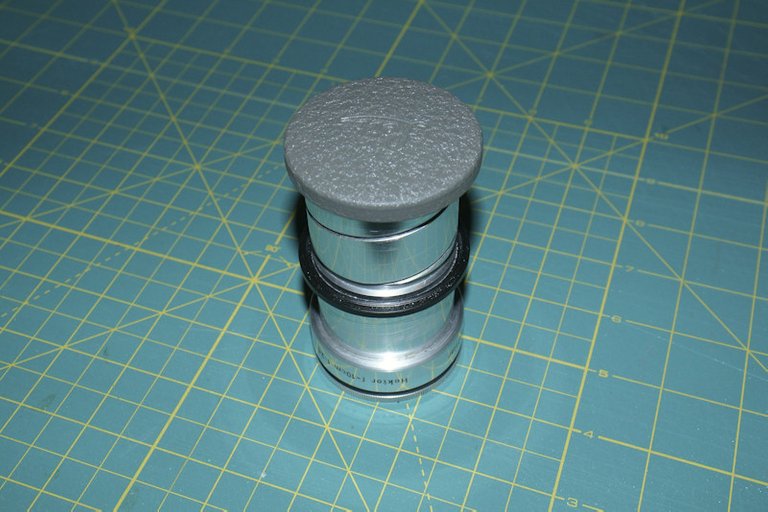
The reaming method works best with slide projection lenses. Most of these have an external barrel diameter of about 42.5mm so I use a 52mm to 42mm step up filter ring (i.e. with the 52mm male thread). I then use a circular metal file to ream out the female 42mm thread until it exactly fits the barrel – this can take an hour or two. For this you need to have the patience of that guy in Leica who buffs the cameras, as you need the reaming to be exact and square to preserve the lens’s centering in your new mount. Once the filter ring is in place I attach it to a 52mm to 42mm focusing helicoid from China, and generally insert it to the maximum it can go in when the helicoid is at its minimum extension, and check that the lens is running true through the helicoid (ensuring that I have not created a tilt lens). I then check that I can still achieve infinity focus on the camera (I never worry that I go beyond infinity). If this is all okay, I then carefully unscrew the lens and secure the filter ring to the lens barrel with epoxy as above.
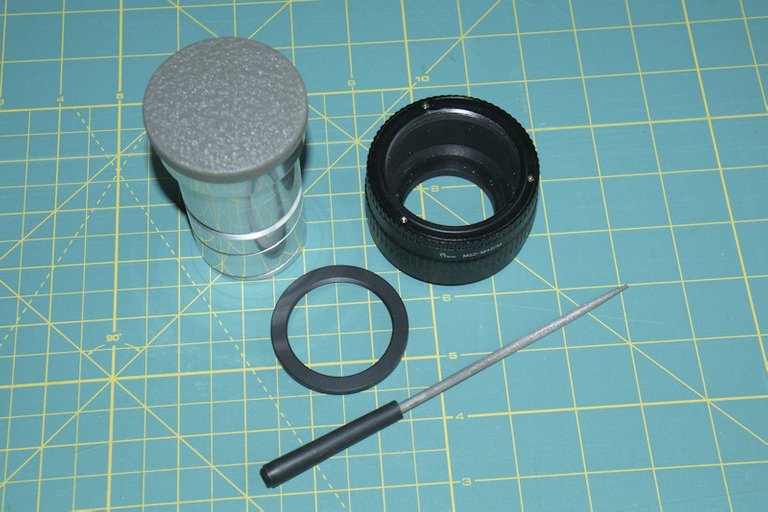
To start out on my preferred method for slide projector lenses we need five basic items; the lens (this time a Leitz Hektor 10cm f2.5), a m52 x 0.75mm to m42 x 1mm helical focussing tube, a 52mm to 42mm filter step up ring, a fine circular metal file, and an easy to clean work non-skid surface.
Accurate reaming takes time and patience, and as this lens is unhappily wider than normal, a couple of days work. The key is to work with moderate pressure with the file flat to the filed surface and every couple of minutes rotate the ring about a quarter turn, and every quarter of an hour swap the face of the ring over so you are working from the other face – this will aid you in keeping the circle true. In the early stages when you are filing down the thread, observing the evenness of the wear will help you refine your technique.
Two hours of this and even ex-rock climbing and guitarist me can feel the strain – so when you feel you need to take a break take it, and pick it up the next day. Fatigue just makes errors, and make you start thinking about how a Dremel will make this quicker – it won’t, and unless you have a metal lathe then there is no mechanical solution that will give you the quality you need.
From earlier measurements of this lens I knew that it did its tube was too long by 20mm to give me infinity focus when mounted in the helical, and as the last element is around 30mm deep in the tube, I knew I could comfort shorten the tube by 25mm (having an accurate infinity stop is not in my requirement list). This, allowing for the sighting or the tube cutter, conveniently gave me a setting position of the reamed out ring just beyond the machined-out notch on the lens’s tube, allowing easy visual reference for squareness.
You can use other safe glues, hot glue guns give satisfactory results for example, buy I trust epoxy. So quick drying epoxy with a mixing nozzle provides an excellent solution for me. Just to be sure there is no degassing risk to the lens coatings and any balsam, always let the glue cure in a well-ventilated place that is a reasonable temperature.
As I do my own pluming I have an excellent metal pipe cutter that makes a true cut. Outside of this the only real solution is to use a metal lathe. Even so using the pipe cutter has one problem in this instance; the cut thread of the projector lens’s simple focusing system, and getting a true square cut over this is one sacrifice that I will have to admit a little bit of defeat over. The trick is essentially to work from just at the edge of the thread till you come to the other edge of it, an keep going backwards and forwards until you reach the depth of the cut. …And the most important point of all: Metal filings are the last thing you want kicking about your lens or camera system, so, make sure all metal cuts are de-burred, and any shed metal filings are blown away and removed from any camera, or lens part, they may have come in contact with. That also goes for you too, you don’t want to have a flashback to that kid in metalwork who got iron filings in his eye.

And to check that all is in order a reference shot at infinity is required. And a wee touch on contrast and sharpening and the result is respectable – even if this subject is almost half a mile away from the intended use of the lens.

An as tough as old boots Mahonia scrumming to the effects of winter, but with the subject matter that makes this type of compound triplet lens shine.

Amazing. Very nice post, now I know to look for one more thing at yard sales and vintage stores :) Great pictures, and the tutorial in the end is super useful. As always, your posts are a gold mine of information and interesting notions.
Thank you very much, I'm just happy to pass on some knowledge.
Bit of an edit mistake - don't know why this ended up as a separate entry