Anyone with a 3D printer knows about the struggles. You are full of expectations, insert the filament and want to finally transfer your first stl. file for printing. SURPRISE, first your 3D printer needs you to level the 3D printing platform with the extruder nozzle.
Why is it necessary to level the 3D printing plate
A 3D printer creates layers of plastic upon each other on the Z axis which creates the 3-dimensional object. Each layer is printed on the printing plate (x- and y-axes). At least that’s currently the case, students at the Zurich University of Applied Sciences already work on movable printing plates - but that is another topic.
Enough of the future and sci-fi, it’s important to have a perfectly horizontal plate and calculated distance between both components. If you do not level the 3D printing plate, it will cause irregularities to the 3D printed object. The calibration counteracts changes of the plate alignment caused by human errors, transportation or object removal after each print.
The print head requires an optimal distance to the platform. If it is too far away, then the leaking plastic does not stick to the plate creating misprint. If the extruder is too close to the print bed, it will start scratching on the surface and the first layers will not be printed. This is neither good for the extruder nozzle nor your printing platform 😉
How to set-up/level the 3D printing platform?
The more modern devices from 2015/2016 (not DIY-kits) have support functions and solutions for starters. Devices such as the Flashforge Finder have a built-in auxiliary function for calibration. This makes it easy for beginners, as well as advanced users, as the extruder nozzle is guided between the measuring points while you only have to follow instructions.
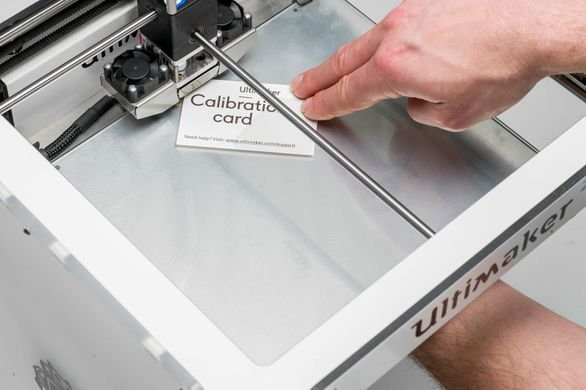
Other devices have to be aligned manually for which makers typically use paper or other small calibration plates from metal. This helps you level the print head with the correct distance to the printing platform. The perfect distance between both components is when the paper is neither clamped nor loose so you can still move it around a bit.
During the calibration you have to level the 3D printing plate at least on 3 places. This secures a perfect calibration for all 4 corners creating the uniform distance between the print head at three different endpoints. Please understand that we cannot go into too much detail about the mathematical theory behind this here. However, we wanted to make sure you are aware that 2 points aren’t enough and a fourth distance point won’t improve anything.
Conclusion to the whole calibration
Leveling up your 3D printing plate is one of those moments where you wonder why it has not been solved yet. 3D printing manufacturers are already working on solutions to increase the customer experience. With regards to simplicity for calibration, companies currently have and probably will have significant differences for their devices.
Until that is solved, the leveling of 3D printers remains a necessary “evil” that teaches you at least a little about your own device. But no worries, soon the day will come when we nostalgically tell others about the times when we had to manually level the 3D printing plate 🙂
Feel free to comment if you have any questions with which we can help.
Join our Discord Channel to connect with us and nominate your own or somebody else's posts in our review channel.
Help us to reward you for making it ! Join our voting trail or delegate steem power to the community account.
Your post is also presented on the community website www.steemmakers.com where you can find other selected content.
If you like our work, please consider upvoting this comment to support the growth of our community. Thank you.